stop start BMW X6 XDRIVE 35I 2014 Owners Manual
[x] Cancel search | Manufacturer: BMW, Model Year: 2014, Model line: X6 XDRIVE 35I, Model: BMW X6 XDRIVE 35I 2014Pages: 323, PDF Size: 8.36 MB
Page 13 of 323
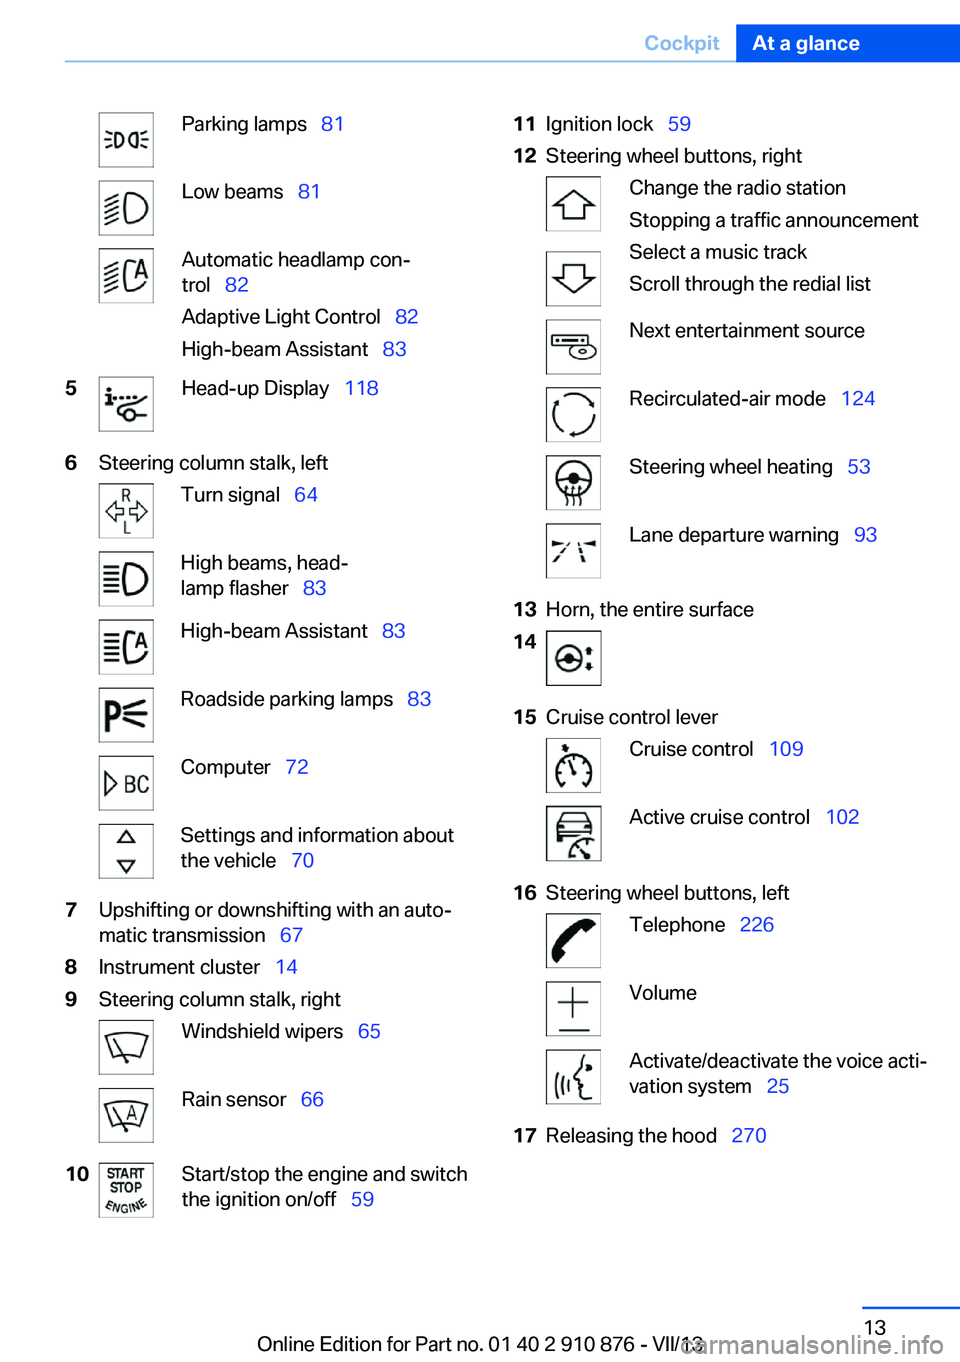
Parking lamps 81Low beams 81Automatic headlamp con‐
trol 82
Adaptive Light Control 82
High-beam Assistant 835Head-up Display 1186Steering column stalk, leftTurn signal 64High beams, head‐
lamp flasher 83High-beam Assistant 83Roadside parking lamps 83Computer 72Settings and information about
the vehicle 707Upshifting or downshifting with an auto‐
matic transmission 678Instrument cluster 149Steering column stalk, rightWindshield wipers 65Rain sensor 6610Start/stop the engine and switch
the ignition on/off 5911Ignition lock 5912Steering wheel buttons, rightChange the radio station
Stopping a traffic announcement
Select a music track
Scroll through the redial listNext entertainment sourceRecirculated-air mode 124Steering wheel heating 53Lane departure warning 9313Horn, the entire surface1415Cruise control leverCruise control 109Active cruise control 10216Steering wheel buttons, leftTelephone 226VolumeActivate/deactivate the voice acti‐
vation system 2517Releasing the hood 270Seite 13CockpitAt a glance13
Online Edition for Part no. 01 40 2 910 876 - VII/13
Page 37 of 323
The tailgate closes automatically when the
button on the inside of the tailgate is pressed.
To stop the closing procedure:▷Press the button on the inside of the tail‐
gate.▷Press the button on the exterior of the tail‐
gate.
The closing procedure is also stopped:
▷When the engine starts.▷If the vehicle jerks while driving away.
Closing is not canceled when you put the vehi‐
cle into motion.
Automatic closing
The tailgate closes automatically without
button operation if it is weighed down by an
additional weight of approx. 11 lbs/5 kg, such
as snow or ice.◀
Manually opening or closing
In case of an electrical malfunction:
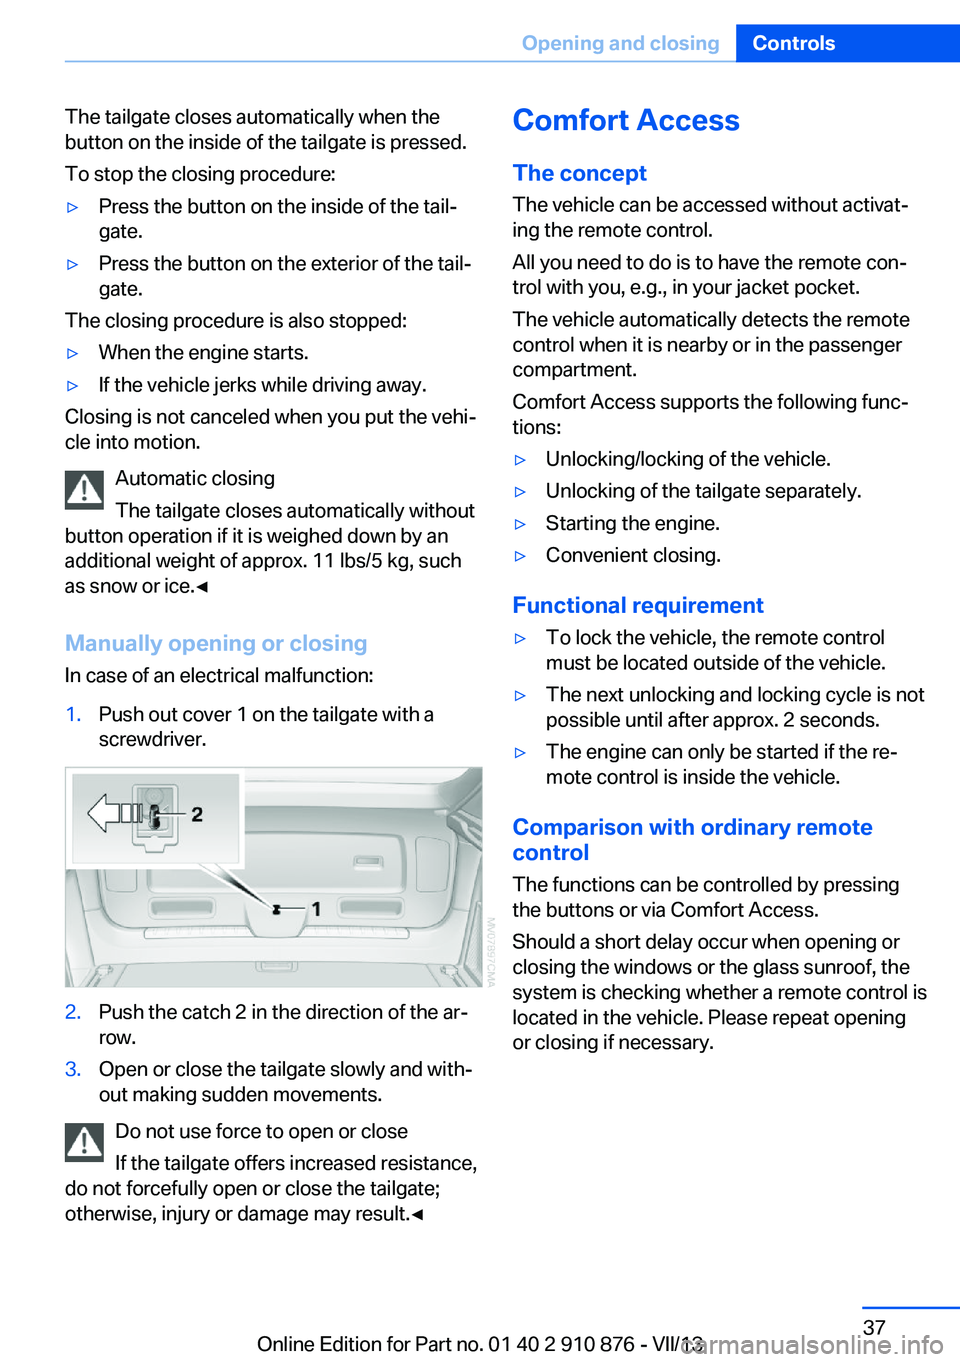
1.Push out cover 1 on the tailgate with a
screwdriver.2.Push the catch 2 in the direction of the ar‐
row.3.Open or close the tailgate slowly and with‐
out making sudden movements.
Do not use force to open or close
If the tailgate offers increased resistance,
do not forcefully open or close the tailgate;
otherwise, injury or damage may result.◀
Comfort Access
The concept
The vehicle can be accessed without activat‐
ing the remote control.
All you need to do is to have the remote con‐
trol with you, e.g., in your jacket pocket.
The vehicle automatically detects the remote
control when it is nearby or in the passenger
compartment.
Comfort Access supports the following func‐
tions:▷Unlocking/locking of the vehicle.▷Unlocking of the tailgate separately.▷Starting the engine.▷Convenient closing.
Functional requirement
▷To lock the vehicle, the remote control
must be located outside of the vehicle.▷The next unlocking and locking cycle is not
possible until after approx. 2 seconds.▷The engine can only be started if the re‐
mote control is inside the vehicle.
Comparison with ordinary remote
control
The functions can be controlled by pressing the buttons or via Comfort Access.
Should a short delay occur when opening or
closing the windows or the glass sunroof, the
system is checking whether a remote control is
located in the vehicle. Please repeat opening
or closing if necessary.
Seite 37Opening and closingControls37
Online Edition for Part no. 01 40 2 910 876 - VII/13
Page 38 of 323
Unlocking
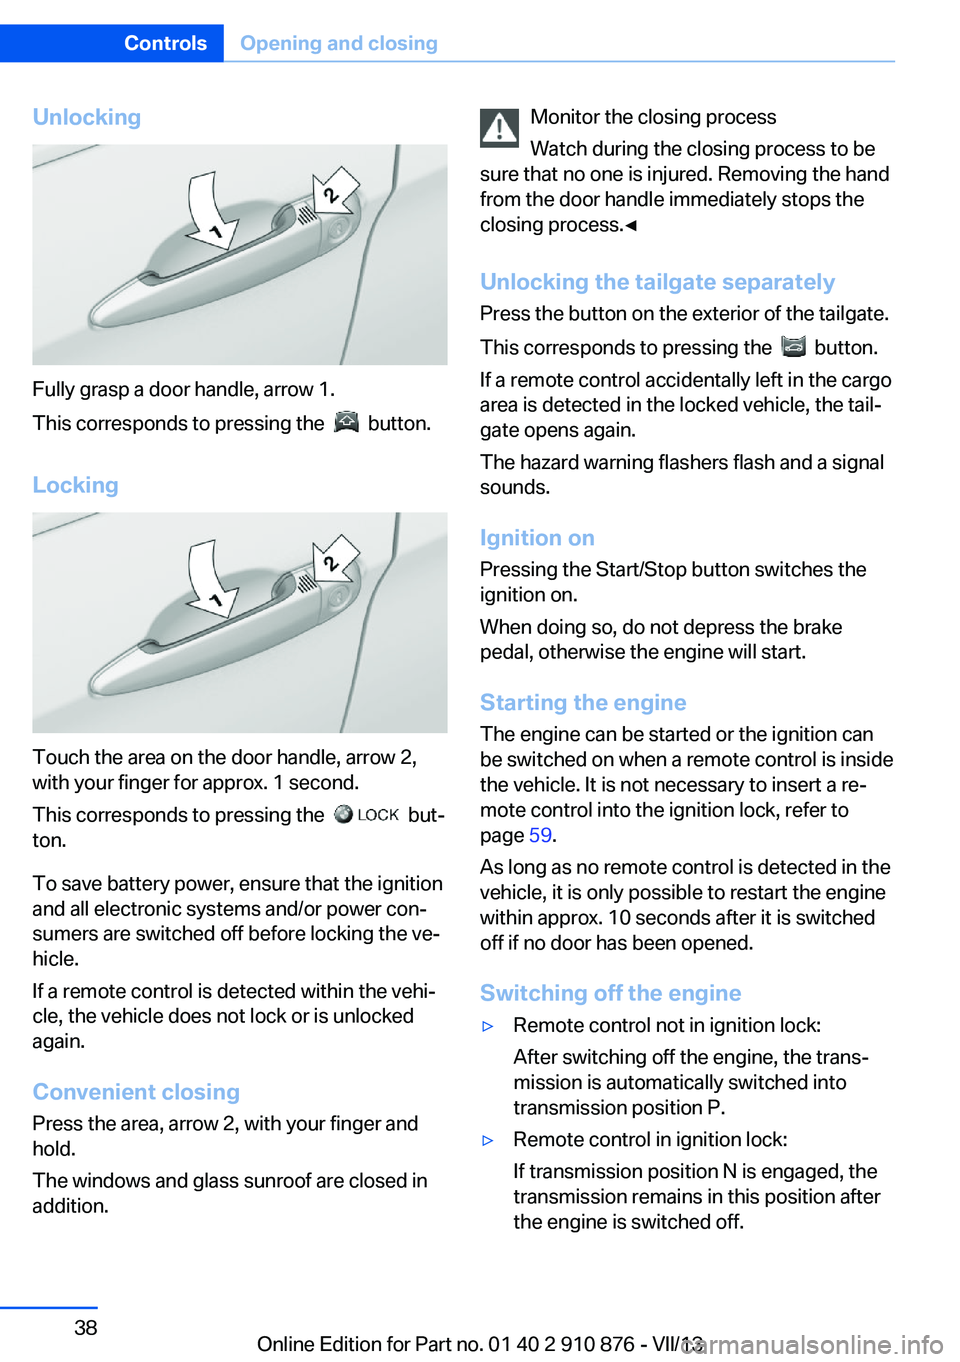
Fully grasp a door handle, arrow 1.
This corresponds to pressing the
button.
Locking
Touch the area on the door handle, arrow 2,
with your finger for approx. 1 second.
This corresponds to pressing the
but‐
ton.
To save battery power, ensure that the ignition
and all electronic systems and/or power con‐
sumers are switched off before locking the ve‐
hicle.
If a remote control is detected within the vehi‐
cle, the vehicle does not lock or is unlocked
again.
Convenient closing Press the area, arrow 2, with your finger and
hold.
The windows and glass sunroof are closed in
addition.
Monitor the closing process
Watch during the closing process to be
sure that no one is injured. Removing the hand
from the door handle immediately stops the closing process.◀
Unlocking the tailgate separately
Press the button on the exterior of the tailgate.
This corresponds to pressing the
button.
If a remote control accidentally left in the cargo
area is detected in the locked vehicle, the tail‐
gate opens again.
The hazard warning flashers flash and a signal
sounds.
Ignition on Pressing the Start/Stop button switches the
ignition on.
When doing so, do not depress the brake
pedal, otherwise the engine will start.
Starting the engine
The engine can be started or the ignition can
be switched on when a remote control is inside
the vehicle. It is not necessary to insert a re‐
mote control into the ignition lock, refer to
page 59.
As long as no remote control is detected in the
vehicle, it is only possible to restart the engine
within approx. 10 seconds after it is switched
off if no door has been opened.
Switching off the engine
▷Remote control not in ignition lock:
After switching off the engine, the trans‐
mission is automatically switched into
transmission position P.▷Remote control in ignition lock:
If transmission position N is engaged, the
transmission remains in this position after
the engine is switched off.Seite 38ControlsOpening and closing38
Online Edition for Part no. 01 40 2 910 876 - VII/13
Page 59 of 323
DrivingVehicle equipment
This chapter describes all series equipment as
well as country-specific and special equipment
offered for this model series.Therefore, it also
describes equipment that may not be found in
your vehicle, for instance due to the selected
special equipment or the country version. This
also applies to safety-related functions and
systems.
Ignition lock
Insert the remote control into the
ignition lock
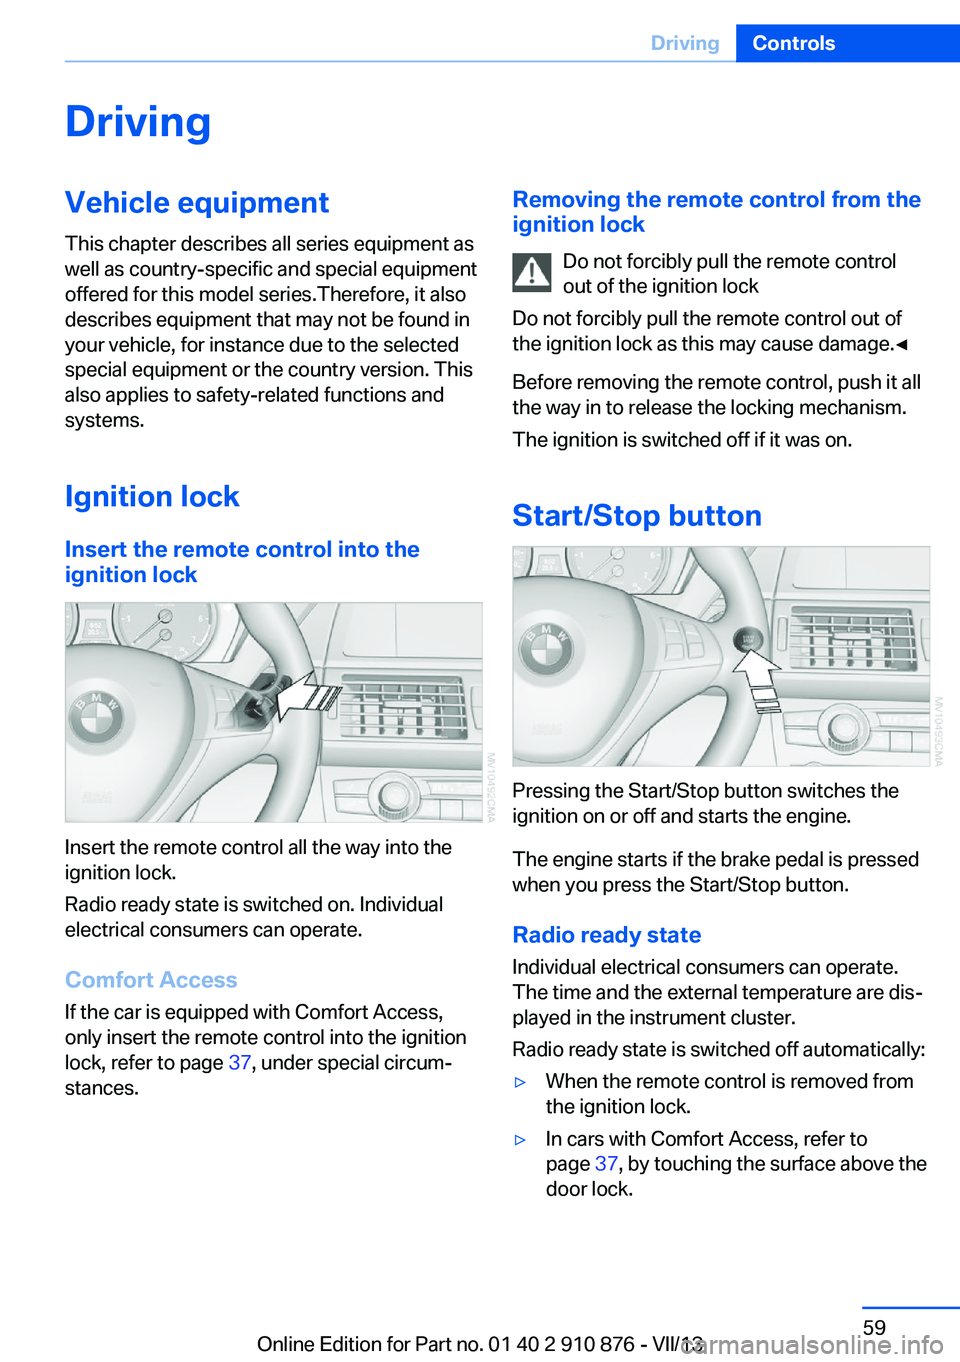
Insert the remote control all the way into the
ignition lock.
Radio ready state is switched on. Individual
electrical consumers can operate.
Comfort Access
If the car is equipped with Comfort Access,
only insert the remote control into the ignition
lock, refer to page 37, under special circum‐
stances.
Removing the remote control from the
ignition lock
Do not forcibly pull the remote control
out of the ignition lock
Do not forcibly pull the remote control out of
the ignition lock as this may cause damage.◀
Before removing the remote control, push it all
the way in to release the locking mechanism.
The ignition is switched off if it was on.
Start/Stop button
Pressing the Start/Stop button switches the
ignition on or off and starts the engine.
The engine starts if the brake pedal is pressed
when you press the Start/Stop button.
Radio ready state Individual electrical consumers can operate.
The time and the external temperature are dis‐
played in the instrument cluster.
Radio ready state is switched off automatically:
▷When the remote control is removed from
the ignition lock.▷In cars with Comfort Access, refer to
page 37, by touching the surface above the
door lock.Seite 59DrivingControls59
Online Edition for Part no. 01 40 2 910 876 - VII/13
Page 60 of 323
Ignition onAll electrical consumers can operate. The od‐
ometer and trip odometer are displayed in the
instrument cluster.
To save battery power when the engine is off,
switch off the ignition and any unnecessary
electronic systems/power consumers.
Radio ready state and ignition off
All indicator and warning lamps as well as dis‐
plays in the instrument cluster go out.
Transmission position P with the ignition
off
When the ignition is switched off, position P is
engaged automatically. When in an automatic
car wash, for example, ensure that the ignition
is not switched off accidentally.◀
For example, the ignition is not switched off in
the following situations:▷The brake is applied.▷The low beams are switched on
Starting the engine
General information Enclosed areas
Do not let the engine run in enclosed
areas; otherwise, breathing of exhaust fumes
may lead to loss of consciousness and death.
The exhaust gases contain carbon monoxide,
an odorless and colorless but highly toxic
gas.◀
Unattended vehicle
Do not leave the car unattended with the
engine running; otherwise, it presents a poten‐
tial source of danger.
Before leaving the vehicle with the engine run‐
ning, set the parking brake and engage trans‐
mission position P; otherwise, the vehicle may
begin to roll.◀
Frequent starting in quick succession
Avoid repeated futile attempts at starting
the car and avoid starting the car frequently in
quick succession. Otherwise, the fuel is not
burned or is inadequately burned, and there is
the danger of overheating and damaging the
catalytic converter.◀
Do not wait for the engine to warm-up while
the vehicle remains stationary. Start driving
right away, but at moderate engine speeds.
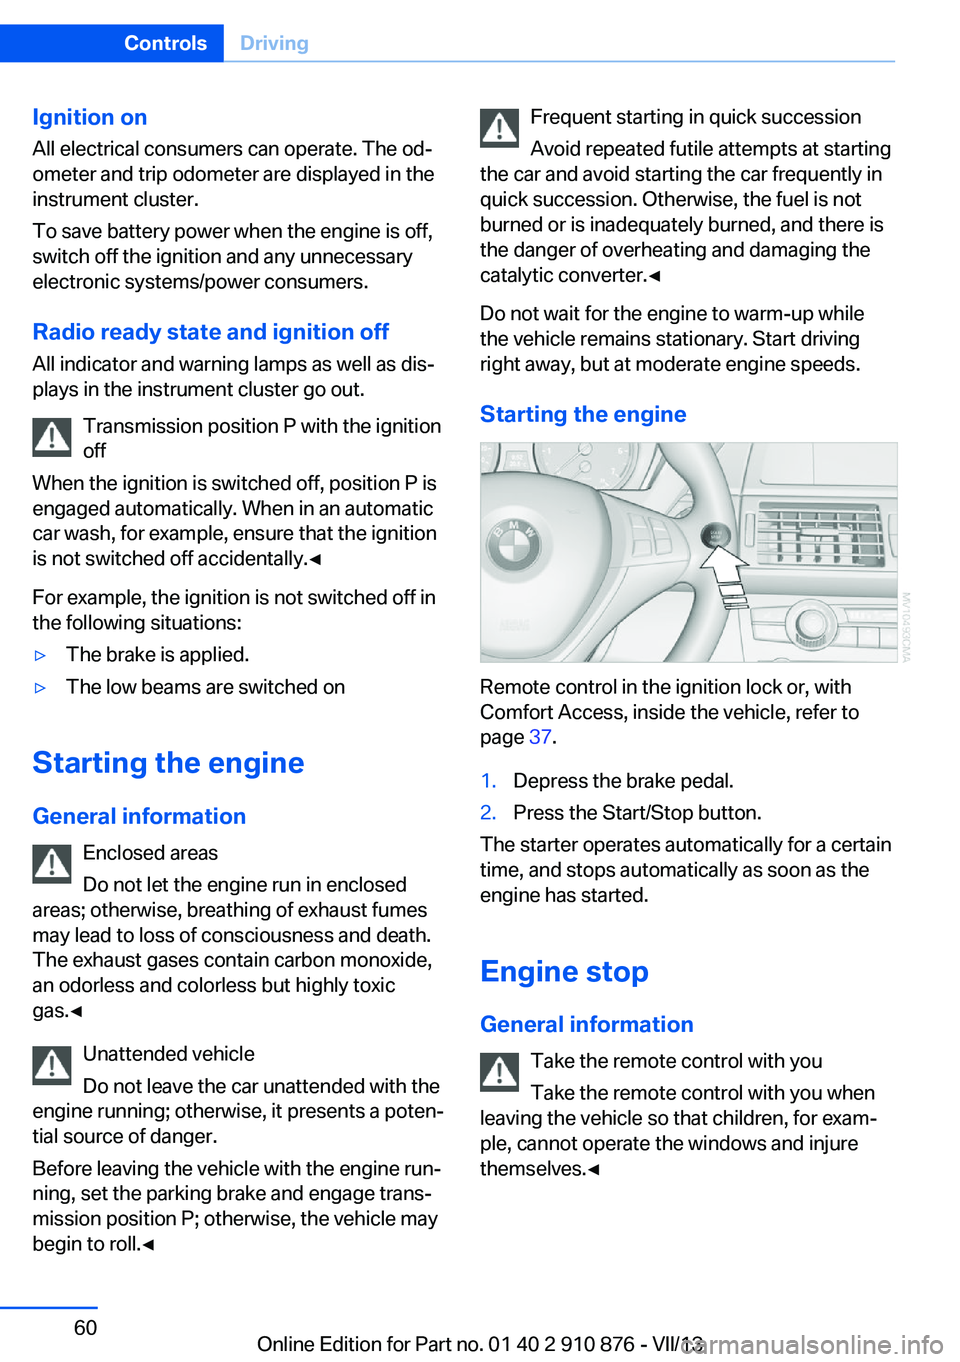
Starting the engine
Remote control in the ignition lock or, with
Comfort Access, inside the vehicle, refer to
page 37.
1.Depress the brake pedal.2.Press the Start/Stop button.
The starter operates automatically for a certain
time, and stops automatically as soon as the
engine has started.
Engine stop General information Take the remote control with youTake the remote control with you when
leaving the vehicle so that children, for exam‐
ple, cannot operate the windows and injure
themselves.◀
Seite 60ControlsDriving60
Online Edition for Part no. 01 40 2 910 876 - VII/13
Page 61 of 323
Set the parking brake and further secure
the vehicle as required
Set the parking brake firmly when parking; oth‐
erwise, the vehicle could roll. On steep upward
and downward inclines, further secure the ve‐
hicle, for example, by turning the steering
wheel in the direction of the curb.◀
Before driving into a car wash To make it possible for the vehicle to roll in an
automatic car wash, follow the information on
Washing in automatic car washes, refer to
page 291.
Switching off the engine
Procedure1.Engage transmission position P with the
vehicle stopped.2.Press the Start/Stop button.3.Set the parking brake.4.Remove the remote control from the igni‐
tion lock, refer to page 59.
Parking brake
The concept The parking brake is primarily intended to pre‐
vent the vehicle from rolling while parked; it
brakes the rear wheels.
The parking brake can be set manually or auto‐
matically:
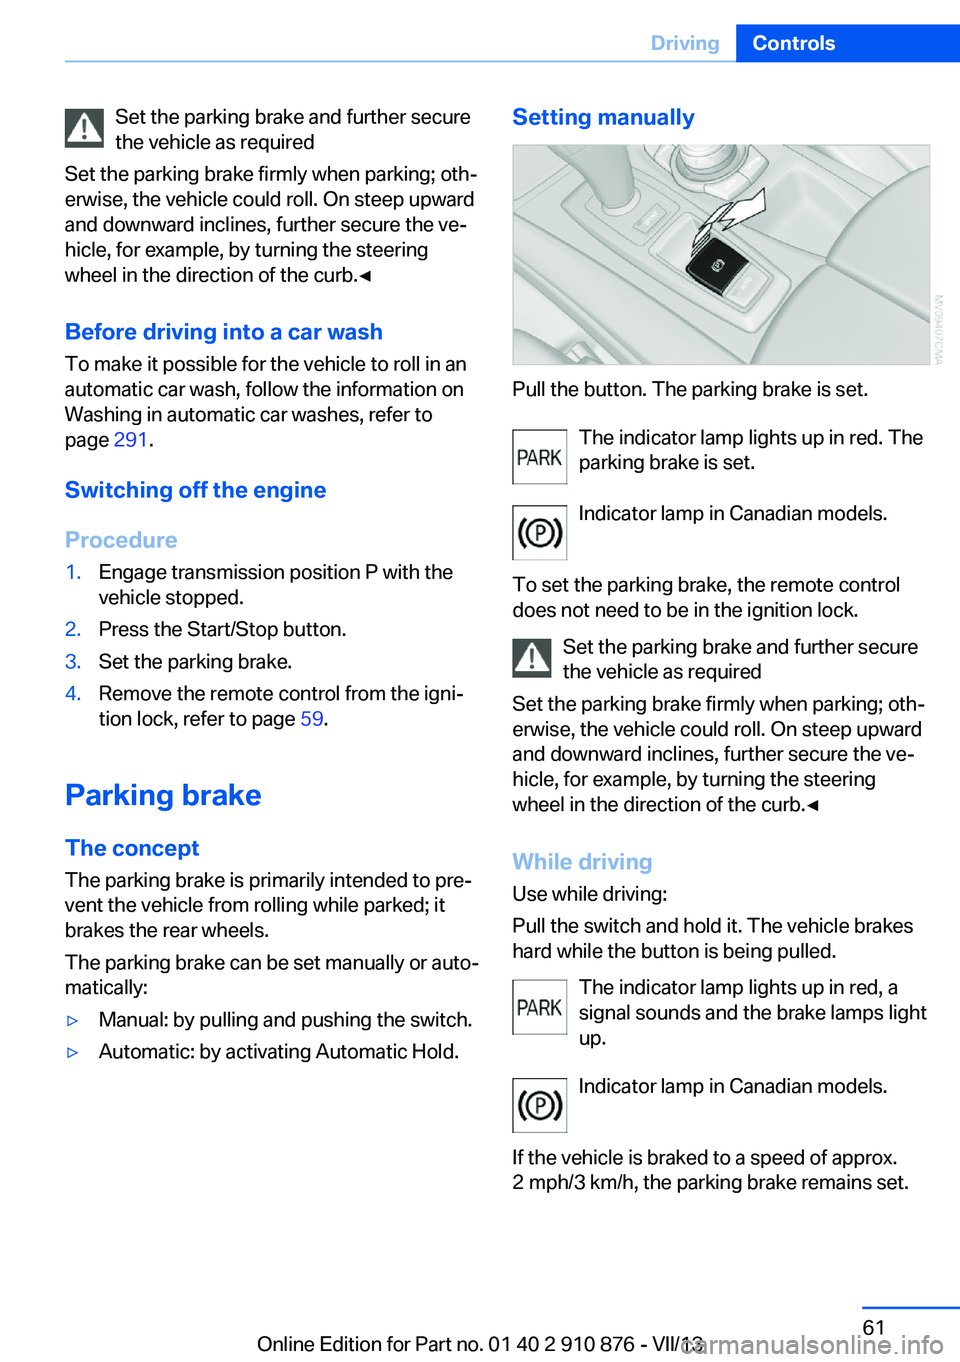
▷Manual: by pulling and pushing the switch.▷Automatic: by activating Automatic Hold.Setting manually
Pull the button. The parking brake is set.
The indicator lamp lights up in red. The
parking brake is set.
Indicator lamp in Canadian models.
To set the parking brake, the remote control
does not need to be in the ignition lock.
Set the parking brake and further secure
the vehicle as required
Set the parking brake firmly when parking; oth‐
erwise, the vehicle could roll. On steep upward
and downward inclines, further secure the ve‐
hicle, for example, by turning the steering
wheel in the direction of the curb.◀
While driving
Use while driving:
Pull the switch and hold it. The vehicle brakes
hard while the button is being pulled.
The indicator lamp lights up in red, a
signal sounds and the brake lamps light
up.
Indicator lamp in Canadian models.
If the vehicle is braked to a speed of approx.
2 mph/3 km/h, the parking brake remains set.
Seite 61DrivingControls61
Online Edition for Part no. 01 40 2 910 876 - VII/13
Page 63 of 323
Automatic Hold is deactivated.
If the vehicle is being held by Automatic Hold,
then press on the brake pedal to deactivate it.
When the parking brake is set manually, refer
to page 61, Automatic Hold is deactivated au‐
tomatically.
Driving Automatic Hold is activated: the vehicle is au‐
tomatically secured against rolling when it
stops.
The indicator lamp lights up in green.
Indicator lamp in Canadian models.
Step on the accelerator pedal to drive off.
The brake is released automatically.
The indicator lamp goes out.
Before driving into a car wash
Deactivate Automatic Hold; otherwise,
the parking brake will be set when the vehicle
is stationary and the vehicle will no longer be
able to roll.◀
Parking
The parking brake is automatically set if the
engine is switched off while the vehicle is be‐
ing held by Automatic Hold.
The indicator lamp changes from green
to red.
Indicator lamp in Canadian models.
The parking brake is not set if the engine is
switched off while the vehicle is coasting to a
halt. Automatic Hold is deactivated.Take the remote control with you
Take the remote control with you when
leaving the vehicle so that children, for exam‐
ple, cannot release the parking brake.◀
Malfunction
In the event of a failure or malfunction of the
parking brake, secure the vehicle against roll‐
ing using a wheel chock, for example, when
leaving it.
Releasing the parking brake manually In the event of an electrical power loss or elec‐
trical malfunction, you can release the parking
brake manually.
Secure the vehicle against rolling
Before releasing the parking brake man‐
ually, and whenever you park the vehicle with
the parking brake released, ensure that posi‐
tion P of the automatic transmission is en‐
gaged. Note the display in the instrument clus‐
ter.
In addition, secure the vehicle against rolling,
e.g. with a wheel chock. Otherwise there is a
danger that the vehicle could roll if parked on a
steep slope.◀
Jump-starting and towing, refer to page 289.
Unlocking1.Open the left-hand side panel in the cargo
area.2.Remove the first aid kit and the warning tri‐
angle. Close the bracket of the warning tri‐
angle.3.Insert the screwdriver, which is contained
in the onboard vehicle tool kit under theSeite 63DrivingControls63
Online Edition for Part no. 01 40 2 910 876 - VII/13
Page 85 of 323
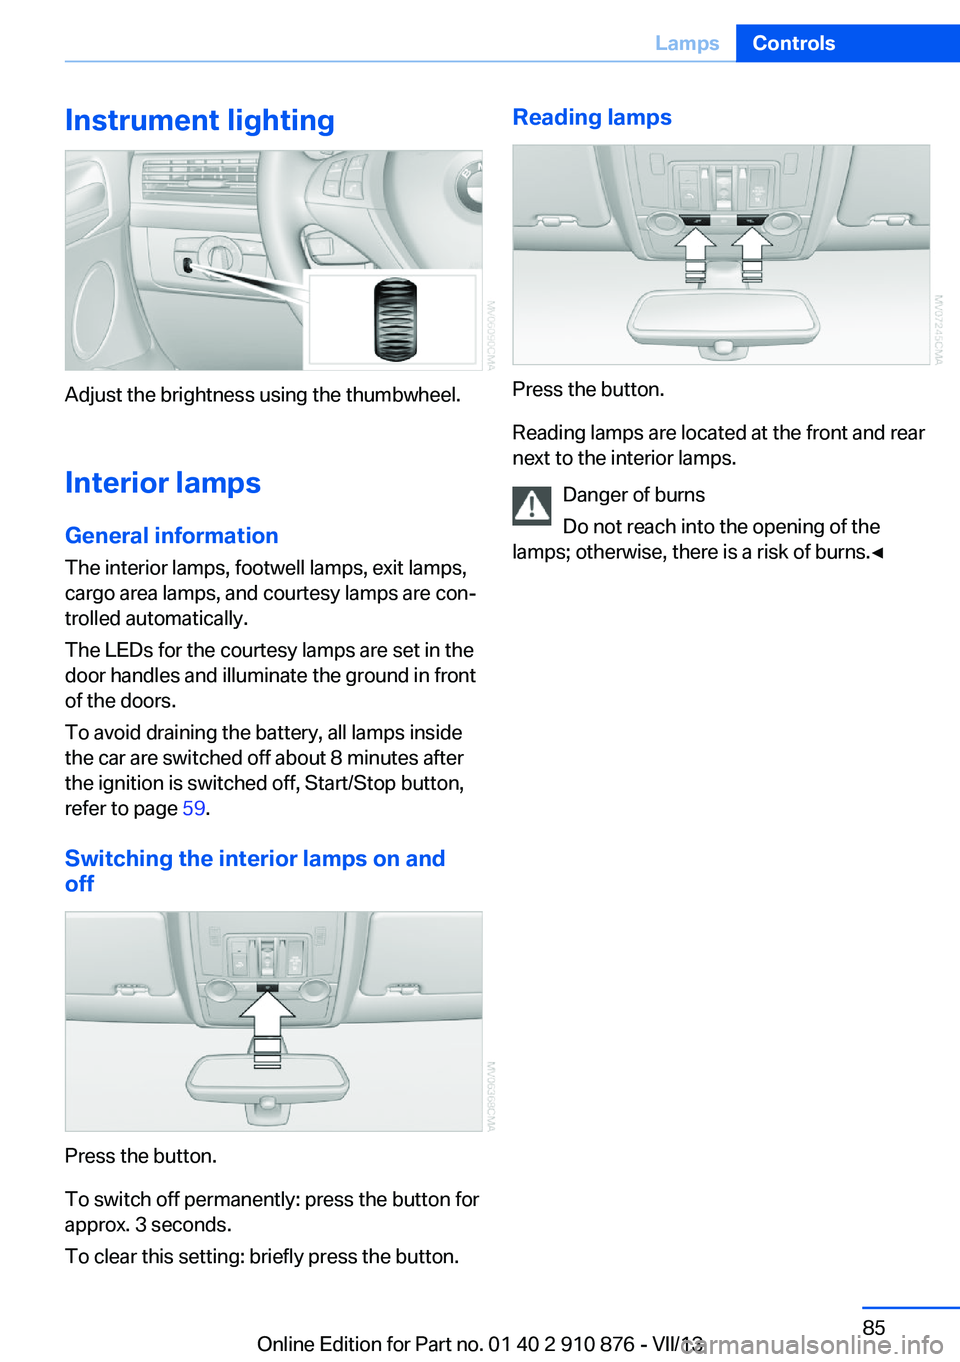
Instrument lighting
Adjust the brightness using the thumbwheel.Interior lamps
General information
The interior lamps, footwell lamps, exit lamps,
cargo area lamps, and courtesy lamps are con‐
trolled automatically.
The LEDs for the courtesy lamps are set in the
door handles and illuminate the ground in front
of the doors.
To avoid draining the battery, all lamps inside
the car are switched off about 8 minutes after
the ignition is switched off, Start/Stop button,
refer to page 59.
Switching the interior lamps on and
off
Press the button.
To switch off permanently: press the button for
approx. 3 seconds.
To clear this setting: briefly press the button.
Reading lamps
Press the button.
Reading lamps are located at the front and rear
next to the interior lamps.
Danger of burns
Do not reach into the opening of the
lamps; otherwise, there is a risk of burns.◀
Seite 85LampsControls85
Online Edition for Part no. 01 40 2 910 876 - VII/13
Page 89 of 323
It detects a pressure loss in a tire by comparing
the rotational speeds of the individual wheels
while moving.
In the event of a pressure loss, the diameter
and therefore the rotational speed of the corre‐
sponding wheel change. This is detected and
reported as a flat tire.
Functional requirements
The system must have been initialized when
the tire inflation pressure was correct; other‐
wise, reliable signaling of a flat tire is not en‐
sured. Initialize the system after each correc‐ tion of the tire inflation pressure and afterevery tire or wheel change.
System limits Sudden tire damage
Sudden serious tire damage caused by
external influences cannot be indicated in ad‐
vance.◀
A natural, even pressure loss in all four tires
cannot be detected. Therefore, check the tire
inflation pressure regularly.
The system could be delayed or malfunction in
the following situations:▷When the system has not been initialized.▷When driving on a snowy or slippery road
surface.▷Sporty driving style: slip in the drive
wheels, high lateral acceleration.▷When driving with snow chains.
When driving with a compact wheel, the Flat
Tire Monitor is unable to function.
Status display The current status of the Flat Tire Monitor can
be displayed on the Control Display, e.g.,
whether or not the FTM is active.
1."Vehicle Info"2."Vehicle status"3. "Flat Tire Monitor"The status is displayed.
Initialization
The initialization process adopts the set infla‐
tion tire pressures as reference values for the
detection of a flat tire. Initialization is started by
confirming the inflation pressures.
Do not initialize the system when driving with
snow chains or with a compact wheel.1."Vehicle Info"2."Vehicle status"3. "Reset"4.Start the engine - do not drive away.5.Start the initialization with "Reset".6.Drive away.
The initialization is completed while driving,
which can be interrupted at any time.
The initialization automatically continues when
driving resumes.
Indication of a flat tire The warning lamp lights up red. A
message appears on the Control Dis‐
play. In addition, a signal sounds.
There is a flat tire or a major loss in tire inflation
pressure.
Reduce your speed and stop cautiously. Avoid
sudden braking and steering maneuvers.
Do not continue driving without run-flat
tires
If the vehicle is not equipped with run-flat tires
as provided at the factory, do not continue
driving. Continuing to drive could cause severe
accidents.◀
When a flat tire is indicated, DSC Dynamic Sta‐
bility Control is switched on if necessary.
Seite 89SafetyControls89
Online Edition for Part no. 01 40 2 910 876 - VII/13
Page 93 of 323
Check the tire inflation pressure and reset the
system.
Malfunction The small warning lamp flashes inyellow and then lights up continu‐
ously; the larger warning lamp comes
on in yellow. On the Control Display,
the tires are shown in gray and a message ap‐
pears. No flat tire can be detected.
Display in the following situations:▷If a wheel without TPM electronics is fitted,
for instance a compact wheel: have the
service center check it if necessary.▷Malfunction: have the system checked by
your service center.▷TPM could not be fully reset. Reset the
system again.▷Disturbance by systems or devices with
the same radio frequency: after leaving the
area of the disturbance, the system auto‐
matically becomes active again.
Declaration according to NHTSA/
FMVSS 138 Tire Pressure Monitoring
Systems
Each tire, including the spare (if provided)
should be checked monthly when cold and in‐
flated to the inflation pressure recommended
by the vehicle manufacturer on the vehicle
placard or tire inflation pressure label (If your
vehicle has tires of a different size than the size
indicated on the vehicle placard or tire inflation
pressure label, you should determine the
proper tire inflation pressure for those tires.).
As an added safety feature, your vehicle has
been equipped with a tire pressure monitoring
system (TPMS) that illuminates a low tire pres‐
sure telltale when one or more of your tires is
significantly under-inflated. Accordingly, when
the low tire pressure telltale illuminates, you
should stop and check your tires as soon as
possible, and inflate them to the proper pres‐
sure. Driving on a significantly under-inflated
tire causes the tire to overheat and can lead to
tire failure. Under-inflation also reduces fuel ef‐
ficiency and tire tread life, and may affect the
vehicle's handling and stopping ability.
Please note that the TPMS is not a substitute
for proper tire maintenance, and it is the driv‐
er's responsibility to maintain correct tire pres‐
sure, even if under-inflation has not reached
the level to trigger illumination of the TPMS
low tire pressure telltale.
Your vehicle has also been equipped with a
TPMS malfunction indicator to indicate when
the system is not operating properly. The
TPMS malfunction indicator is combined with
the low tire pressure telltale. When the system
detects a malfunction, the telltale will flash for
approximately one minute and then remain
continuously illuminated. This sequence will
continue upon subsequent vehicle startups as
long as the malfunction exists. When the mal‐
function indicator is illuminated, the system
may not be able to detect or signal low tire
pressure as intended. TPMS malfunctions may
occur for a variety of reasons, including the in‐
stallation of replacement or alternate tires or
wheels on the vehicle that prevent the TPMS
from functioning properly. Always check the
TPMS malfunction telltale after replacing one
or more tires or wheels on your vehicle to en‐
sure that the replacement or alternate tires and
wheels allow the TPMS to continue to function
properly.
Lane departure warning
The concept This system issues a warning at speeds above
approx. 40 mph/65 km/h if the vehicle is about
to leave the lane on roads with lane markings.
The steering wheel begins vibrating lightly.
The time when the warning is issued may vary
with the current driving situation.
The system does not issue a warning if the
turn signal is set before leaving the lane.Seite 93SafetyControls93
Online Edition for Part no. 01 40 2 910 876 - VII/13