change time BMW X6 XDRIVE 50I 2011 Owner's Manual
[x] Cancel search | Manufacturer: BMW, Model Year: 2011, Model line: X6 XDRIVE 50I, Model: BMW X6 XDRIVE 50I 2011Pages: 312, PDF Size: 8.91 MB
Page 157 of 312
Navigation
Driving tips
155Reference
At a glance
Controls
Communications
Entertainment
Mobility
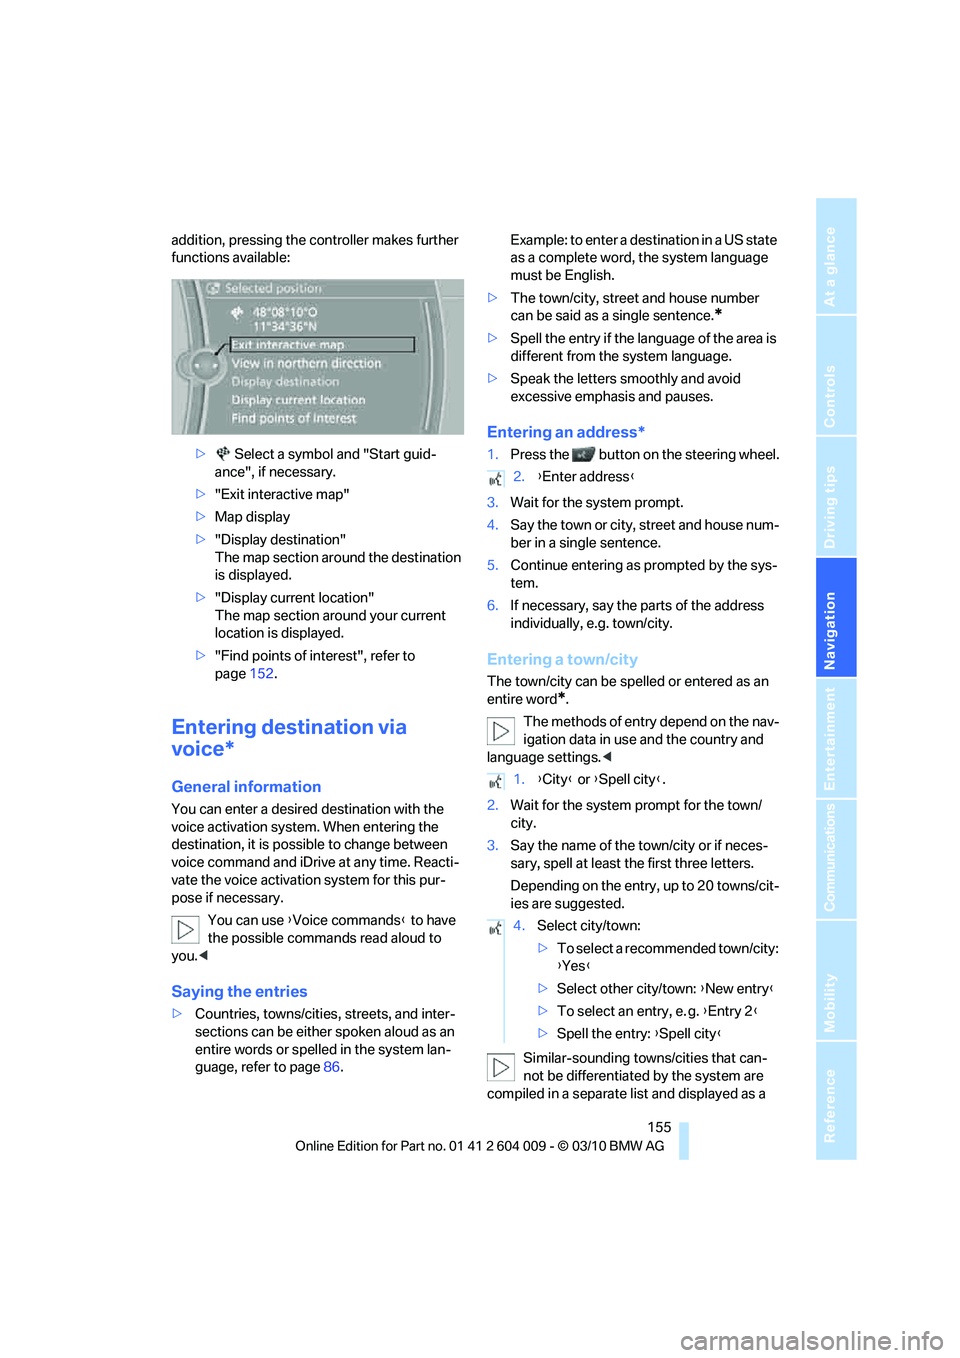
addition, pressing the controller makes further
functions available:
> Select a symbol and "Start guid-
ance", if necessary.
>"Exit interactive map"
>Map display
>"Display destination"
The map section around the destination
is displayed.
>"Display current location"
The map section around your current
location is displayed.
>"Find points of interest", refer to
page152.
Entering destination via
voice*
General information
You can enter a desired destination with the
voice activation system. When entering the
destination, it is possible to change between
voice command and iDrive at any time. Reacti-
vate the voice activation system for this pur-
pose if necessary.
You can use {Voice commands} to have
the possible commands read aloud to
you.<
Saying the entries
>Countries, towns/cities, streets, and inter-
sections can be either spoken aloud as an
entire words or spelled in the system lan-
guage, refer to page86.Example: to enter a destination in a US state
as a complete word, the system language
must be English.
>The town/city, street and house number
can be said as a single sentence.
*
>Spell the entry if the language of the area is
different from the system language.
>Speak the letters smoothly and avoid
excessive emphasis and pauses.
Entering an address*
1.Press the button on the steering wheel.
3.Wait for the system prompt.
4.Say the town or city, street and house num-
ber in a single sentence.
5.Continue entering as prompted by the sys-
tem.
6.If necessary, say the parts of the address
individually, e.g. town/city.
Entering a town/city
The town/city can be spelled or entered as an
entire word
*.
The methods of entry depend on the nav-
igation data in use and the country and
language settings.<
2.Wait for the system prompt for the town/
city.
3.Say the name of the town/city or if neces-
sary, spell at least the first three letters.
Depending on the entry, up to 20 towns/cit-
ies are suggested.
Similar-sounding towns/cities that can-
not be differentiated by the system are
compiled in a separate list and displayed as a
2.{Enter address}
1.{City} or {Spell city}.
4.Select city/town:
>To select a recommended town/city:
{Yes}
>Select other city/town: {New entry}
>To select an entry, e. g. {Entry 2}
>Spell the entry: {Spell city}
Page 160 of 312
Destination guidance
158
Destination guidance
Starting destination
guidance
1."Navigation"
2."Enter address"
3.Select the destination.
4."Accept destination"
5."Start guidance"
The route is displayed on the Control Display
after it is calculated.
The distance to the destination/intermediate
destination and the estimated time of arrival are
displayed in the map view.
Terminating destination
guidance
1."Navigation"
2."Map"
3.Select the symbol.
4."Stop guidance"
Continuing destination
guidance
If the destination was not reached during the
last trip, destination guidance can be resumed.
"Resume guidance"
Route criteria
General information
You can influence the calculated route by
choosing certain route criteria. You can change
the route criteria as often as you like while
entering the destination and whenever the des-
tination guidance is active.
The route is planned according to fixed rules.
The road type is taken into account, e.g. whether it is a highway or a winding road. As a
result, the routes recommended by the naviga-
tion system may not always be the same ones
that you would choose based on personal expe-
rience.
The settings are stored for the remote control
currently in use.
Changing route criteria
1."Navigation"
2."Map"
3."Route preference"
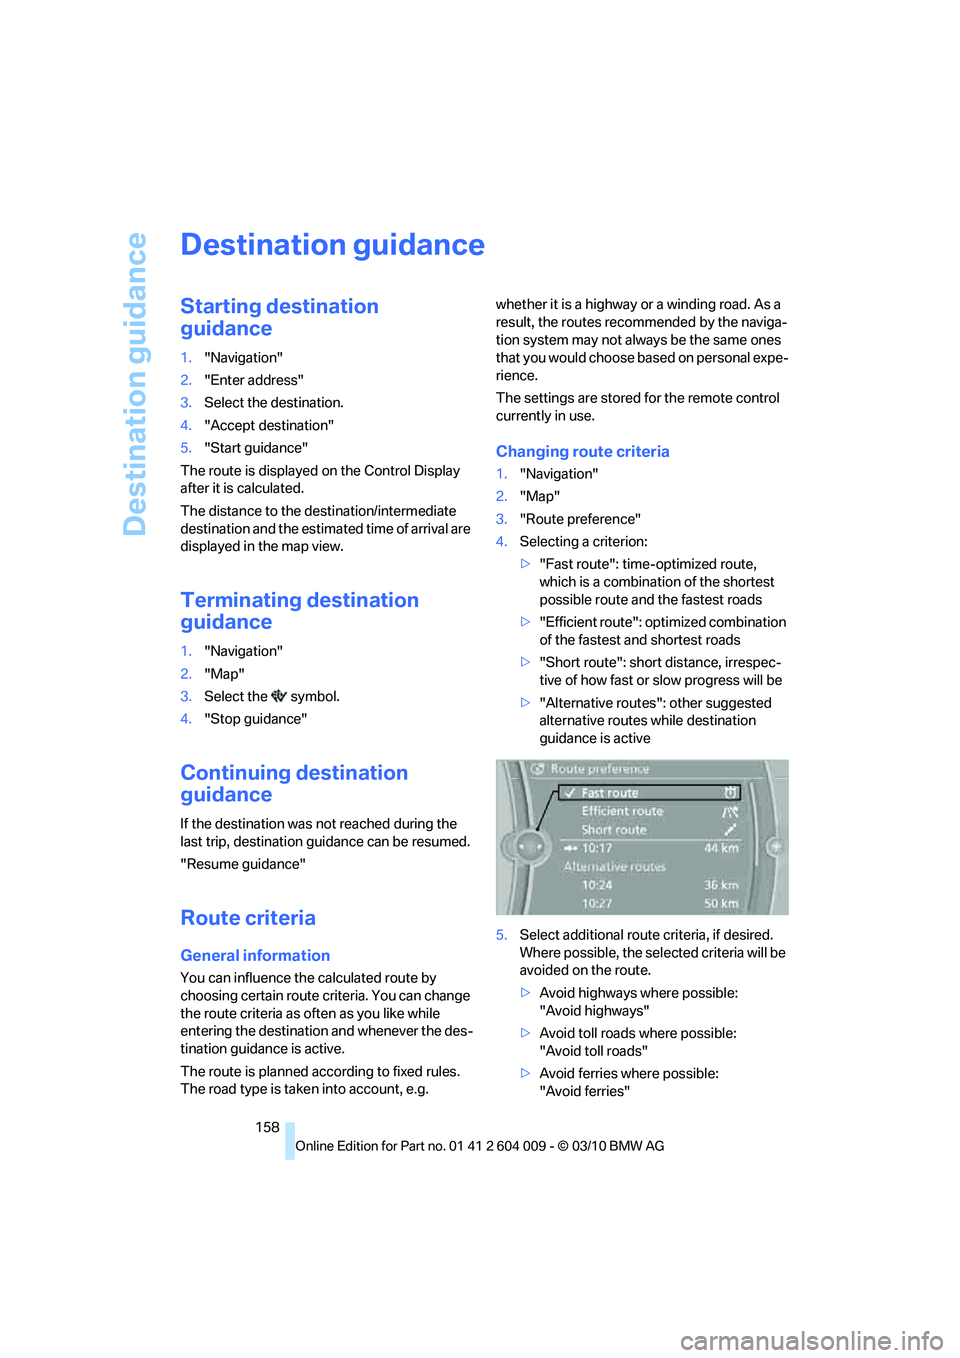
4.Selecting a criterion:
>"Fast route": time-optimized route,
which is a combination of the shortest
possible route and the fastest roads
>"Efficient route": optimized combination
of the fastest and shortest roads
>"Short route": short distance, irrespec-
tive of how fast or slow progress will be
>"Alternative routes": other suggested
alternative routes while destination
guidance is active
5.Select additional route criteria, if desired.
Where possible, the selected criteria will be
avoided on the route.
>Avoid highways where possible:
"Avoid highways"
>Avoid toll roads where possible:
"Avoid toll roads"
>Avoid ferries where possible:
"Avoid ferries"
Page 170 of 312
On/off and tone
168
On/off and tone
The following audio and video sources share
the same control elements and adjustments:
>Radio
>CD/DVD player
>CD/DVD changer
*
>Video*
>External devices, e.g. MP3 player
Controls
The audio and video sources can be controlled
using:
>Buttons near the CD/DVD player
>iDrive
>Buttons on the steering wheel, refer to
page10
>Programmable memory buttons, refer to
page20
>Voice activation system
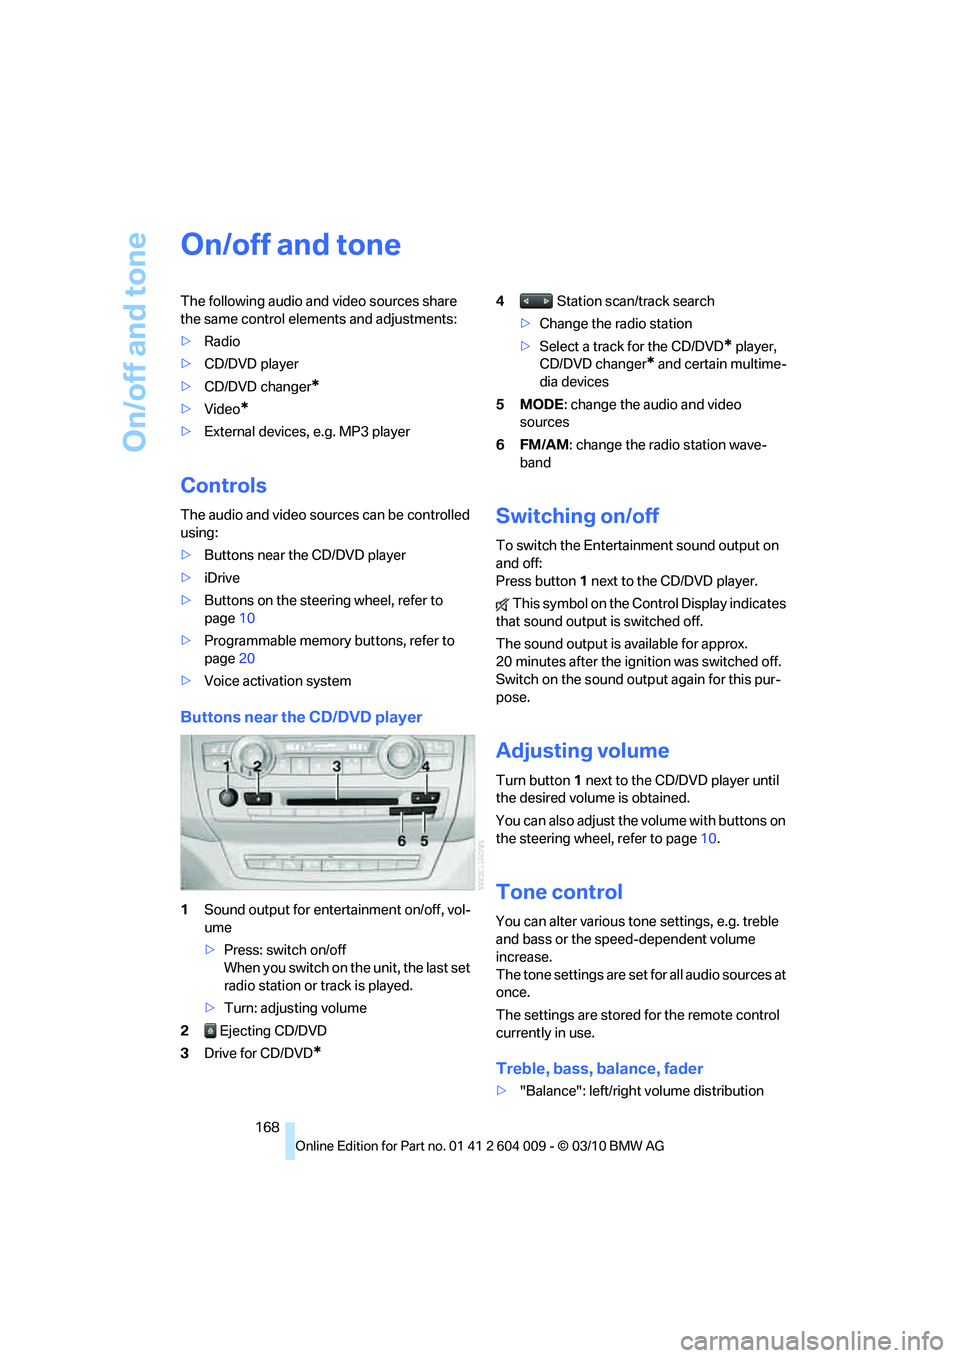
Buttons near the CD/DVD player
1Sound output for entertainment on/off, vol-
ume
>Press: switch on/off
When you switch on the unit, the last set
radio station or track is played.
>Turn: adjusting volume
2 Ejecting CD/DVD
3Drive for CD/DVD
*
4 Station scan/track search
>Change the radio station
>Select a track for the CD/DVD
* player,
CD/DVD changer
* and certain multime-
dia devices
5MODE: change the audio and video
sources
6FM/AM: change the radio station wave-
band
Switching on/off
To switch the Entertainment sound output on
and off:
Press button1 next to the CD/DVD player.
This symbol on the Control Display indicates
that sound output is switched off.
The sound output is available for approx.
20 minutes after the ignition was switched off.
Switch on the sound output again for this pur-
pose.
Adjusting volume
Turn button1 next to the CD/DVD player until
the desired volume is obtained.
You can also adjust the volume with buttons on
the steering wheel, refer to page10.
Tone control
You can alter various tone settings, e.g. treble
and bass or the speed-dependent volume
increase.
The tone settings are set for all audio sources at
once.
The settings are stored for the remote control
currently in use.
Treble, bass, balance, fader
>"Balance": left/right volume distribution
Page 177 of 312
Navigation
Entertainment
Driving tips
175Reference
At a glance
Controls
Communications
Mobility
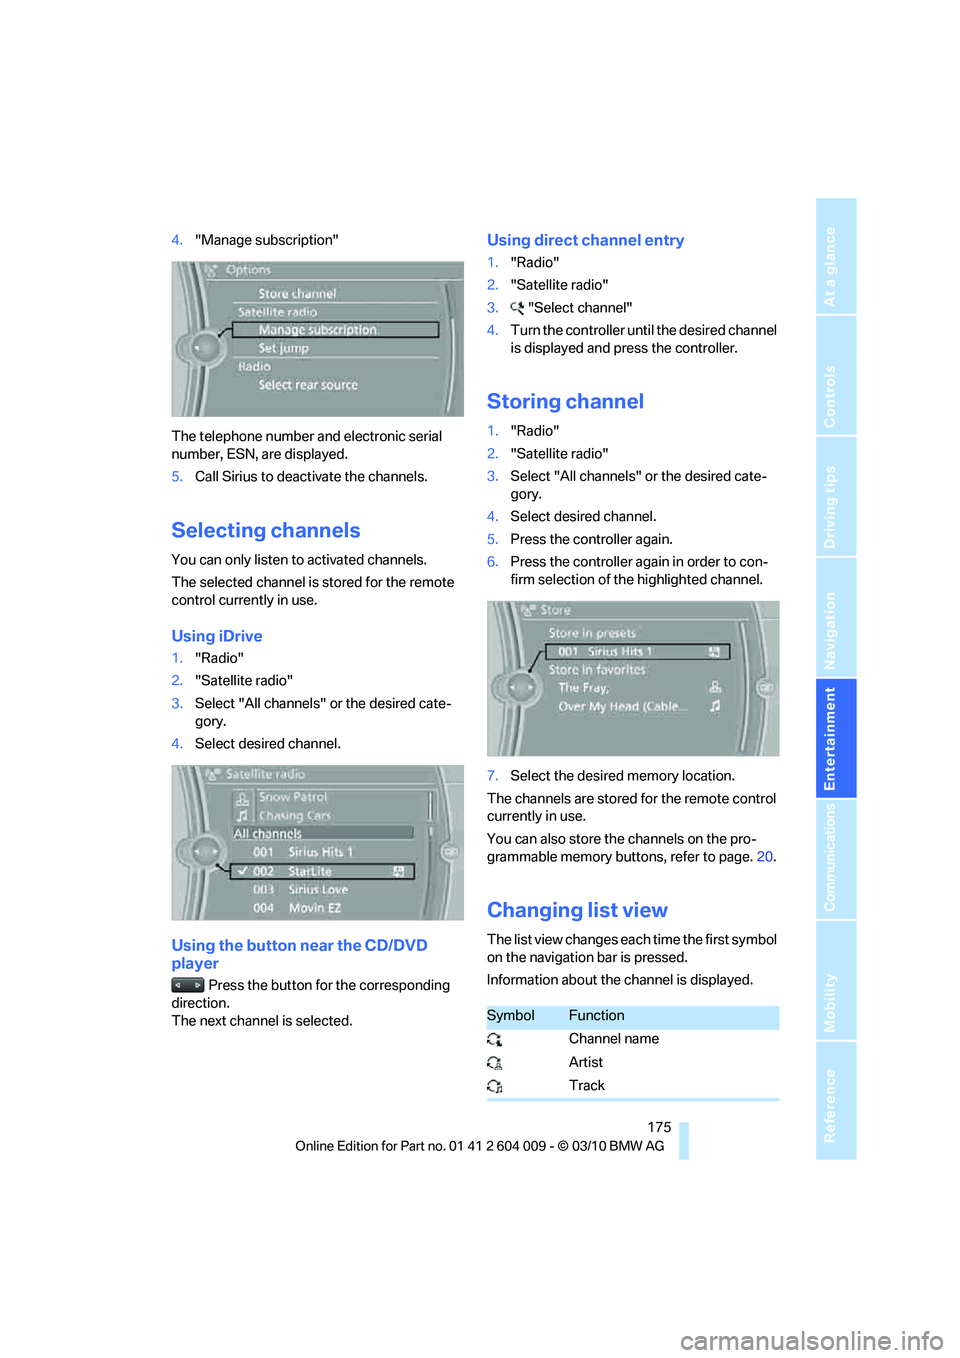
4."Manage subscription"
The telephone number and electronic serial
number, ESN, are displayed.
5.Call Sirius to deactivate the channels.
Selecting channels
You can only listen to activated channels.
The selected channel is stored for the remote
control currently in use.
Using iDrive
1."Radio"
2."Satellite radio"
3.Select "All channels" or the desired cate-
gory.
4.Select desired channel.
Using the button near the CD/DVD
player
Press the button for the corresponding
direction.
The next channel is selected.
Using direct channel entry
1."Radio"
2."Satellite radio"
3."Select channel"
4.Turn the controller until the desired channel
is displayed and press the controller.
Storing channel
1."Radio"
2."Satellite radio"
3.Select "All channels" or the desired cate-
gory.
4.Select desired channel.
5.Press the controller again.
6.Press the controller again in order to con-
firm selection of the highlighted channel.
7.Select the desired memory location.
The channels are stored for the remote control
currently in use.
You can also store the channels on the pro-
grammable memory buttons, refer to page.20.
Changing list view
The list view changes each time the first symbol
on the navigation bar is pressed.
Information about the channel is displayed.
SymbolFunction
Channel name
Artist
Track
Page 181 of 312
Navigation
Entertainment
Driving tips
179Reference
At a glance
Controls
Communications
Mobility
CD/DVD player and CD/DVD changer
CD/DVD playback
Inserting CD/DVD
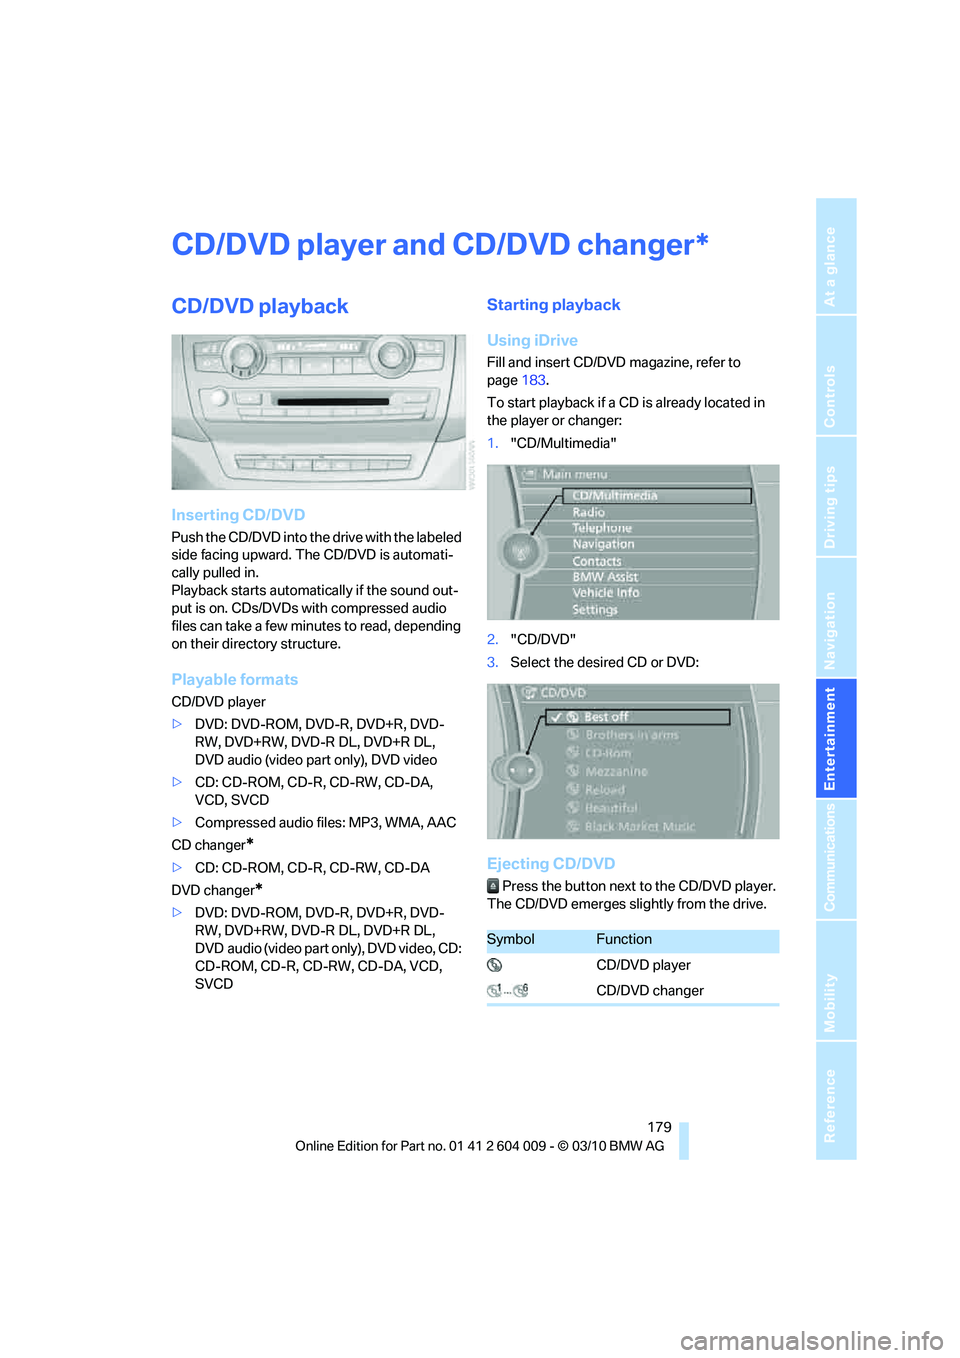
Push the CD/DVD into the drive with the labeled
side facing upward. The CD/DVD is automati-
cally pulled in.
Playback starts automatically if the sound out-
put is on. CDs/DVDs with compressed audio
files can take a few minutes to read, depending
on their directory structure.
Playable formats
CD/DVD player
>DVD: DVD-ROM, DVD-R, DVD+R, DVD-
RW, DVD+RW, DVD-R DL, DVD+R DL,
DVD audio (video part only), DVD video
>CD: CD-ROM, CD-R, CD-RW, CD-DA,
VCD, SVCD
>Compressed audio files: MP3, WMA, AAC
CD changer
*
>CD: CD-ROM, CD-R, CD-RW, CD-DA
DVD changer
*
>DVD: DVD-ROM, DVD-R, DVD+R, DVD-
RW, DVD+RW, DVD-R DL, DVD+R DL,
DVD audio (video part only), DVD video, CD:
CD-ROM, CD-R, CD-RW, CD-DA, VCD,
SVCD
Starting playback
Using iDrive
Fill and insert CD/DVD magazine, refer to
page183.
To start playback if a CD is already located in
the player or changer:
1."CD/Multimedia"
2."CD/DVD"
3.Select the desired CD or DVD:
Ejecting CD/DVD
Press the button next to the CD/DVD player.
The CD/DVD emerges slightly from the drive.
*
SymbolFunction
CD/DVD player
CD/DVD changer
Page 182 of 312
CD/DVD player and CD/DVD changer
180
Audio playback
Selecting the track using the button
Press the button for the corresponding
direction repeatedly until you reach the desired
track.
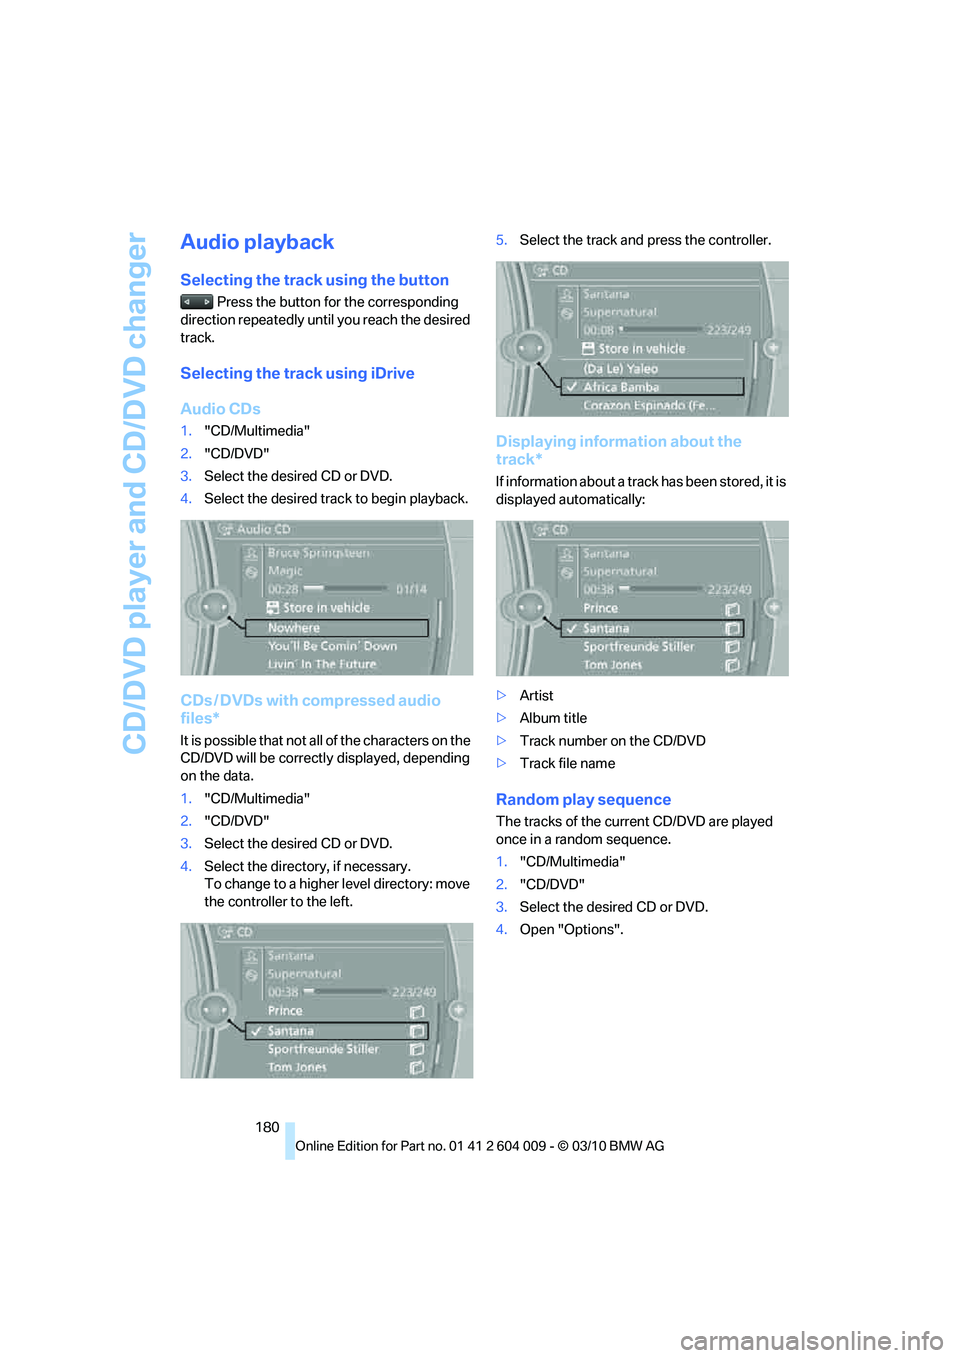
Selecting the track using iDrive
Audio CDs
1."CD/Multimedia"
2."CD/DVD"
3.Select the desired CD or DVD.
4.Select the desired track to begin playback.
CDs / DVDs with compressed audio
files*
It is possible that not all of the characters on the
CD/DVD will be correctly displayed, depending
on the data.
1."CD/Multimedia"
2."CD/DVD"
3.Select the desired CD or DVD.
4.Select the directory, if necessary.
To change to a higher level directory: move
the controller to the left.5.Select the track and press the controller.
Displaying information about the
track*
If information about a track has been stored, it is
displayed automatically:
>Artist
>Album title
>Track number on the CD/DVD
>Track file name
Random play sequence
The tracks of the current CD/DVD are played
once in a random sequence.
1."CD/Multimedia"
2."CD/DVD"
3.Select the desired CD or DVD.
4.Open "Options".
Page 183 of 312
Navigation
Entertainment
Driving tips
181Reference
At a glance
Controls
Communications
Mobility
5."Random"
CDs/DVDs with compressed audio files: the
directories and the tracks contained therein are
played back in random sequence.
Random mode is switched off when the audio
source is changed or the ignition is switched off.
Fast forward/reverse
Press and hold the button for the corre-
sponding direction.
Automatic replay*
Selected tracks, directories, or CDs/DVDs are
automatically replayed.
Video playback*
Country codes
Only DVDs with the code of the home region
can be played back; also refer to the information
on your DVD.
Starting playback
For your own safety, the video image is only dis-
played up to approx. 2 mph/3 km/h, and in some
countries only with the parking brake applied or
in transmission position P.
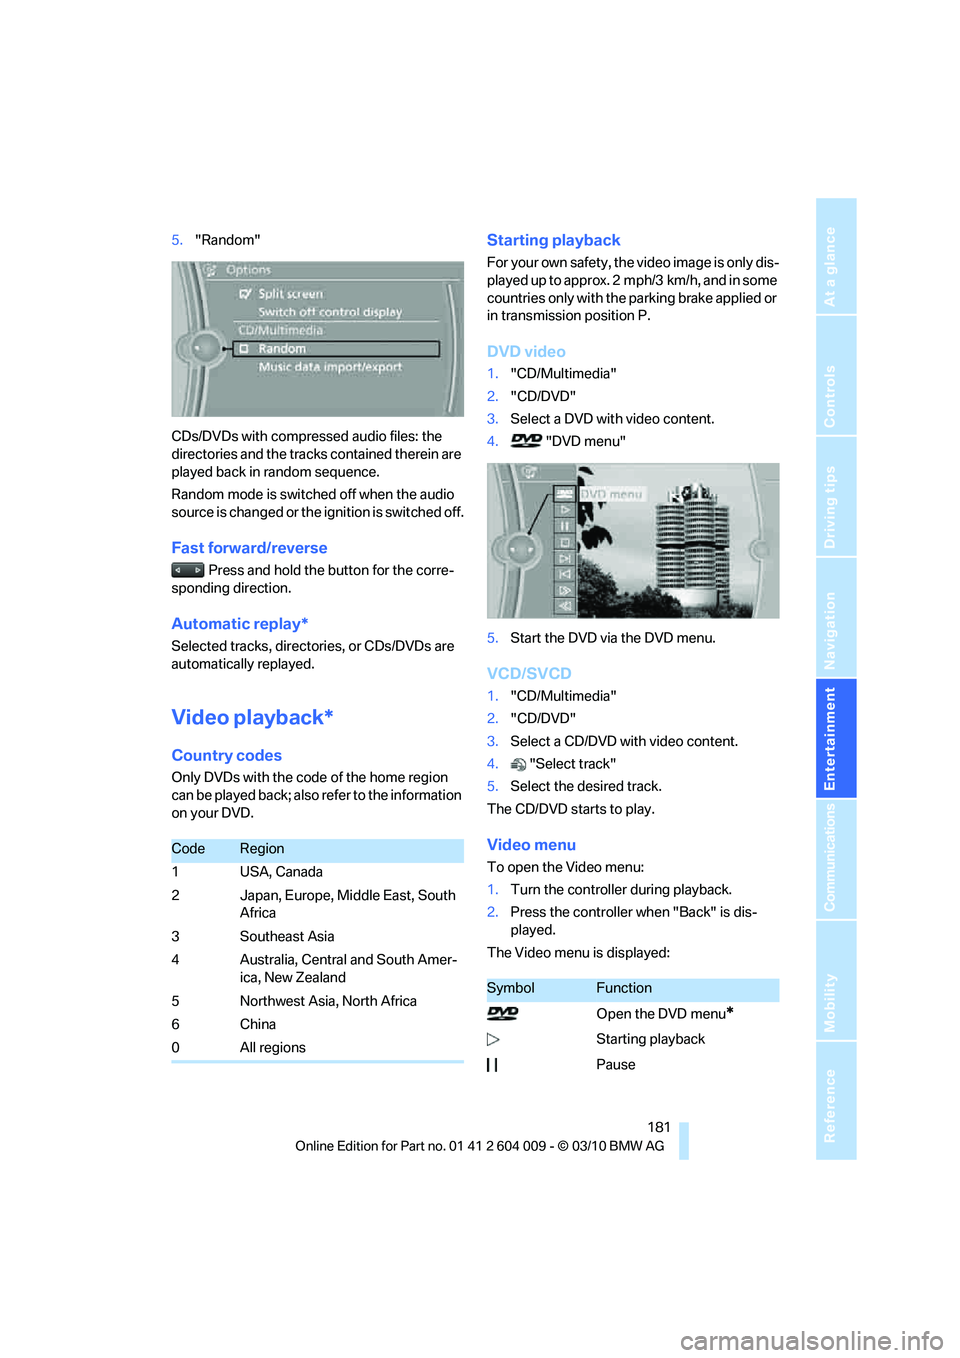
DVD video
1."CD/Multimedia"
2."CD/DVD"
3.Select a DVD with video content.
4. "DVD menu"
5.Start the DVD via the DVD menu.
VCD/SVCD
1."CD/Multimedia"
2."CD/DVD"
3.Select a CD/DVD with video content.
4."Select track"
5.Select the desired track.
The CD/DVD starts to play.
Video menu
To open the Video menu:
1.Turn the controller during playback.
2.Press the controller when "Back" is dis-
played.
The Video menu is displayed:
CodeRegion
1USA, Canada
2 Japan, Europe, Middle East, South
Africa
3 Southeast Asia
4 Australia, Central and South Amer-
ica, New Zealand
5 Northwest Asia, North Africa
6China
0 All regions
SymbolFunction
Open the DVD menu
*
Starting playback
Pause
Page 184 of 312
CD/DVD player and CD/DVD changer
182 In fast forward/reverse: the speed increases
every time the controller is pressed. To stop,
start playback.
DVD menu
1.If necessary, turn the controller to open the
video menu.
2. "DVD menu"
The DVD menu is displayed. The display
depends on the contents of the DVD.
>To select menu items: move and press the
controller.
>To change to the Video menu: turn the con-
troller and select "Back".
Settings for DVD/VCD
For some DVDs, settings can only be made via
the DVD menu; refer also to the information on
your DVD.
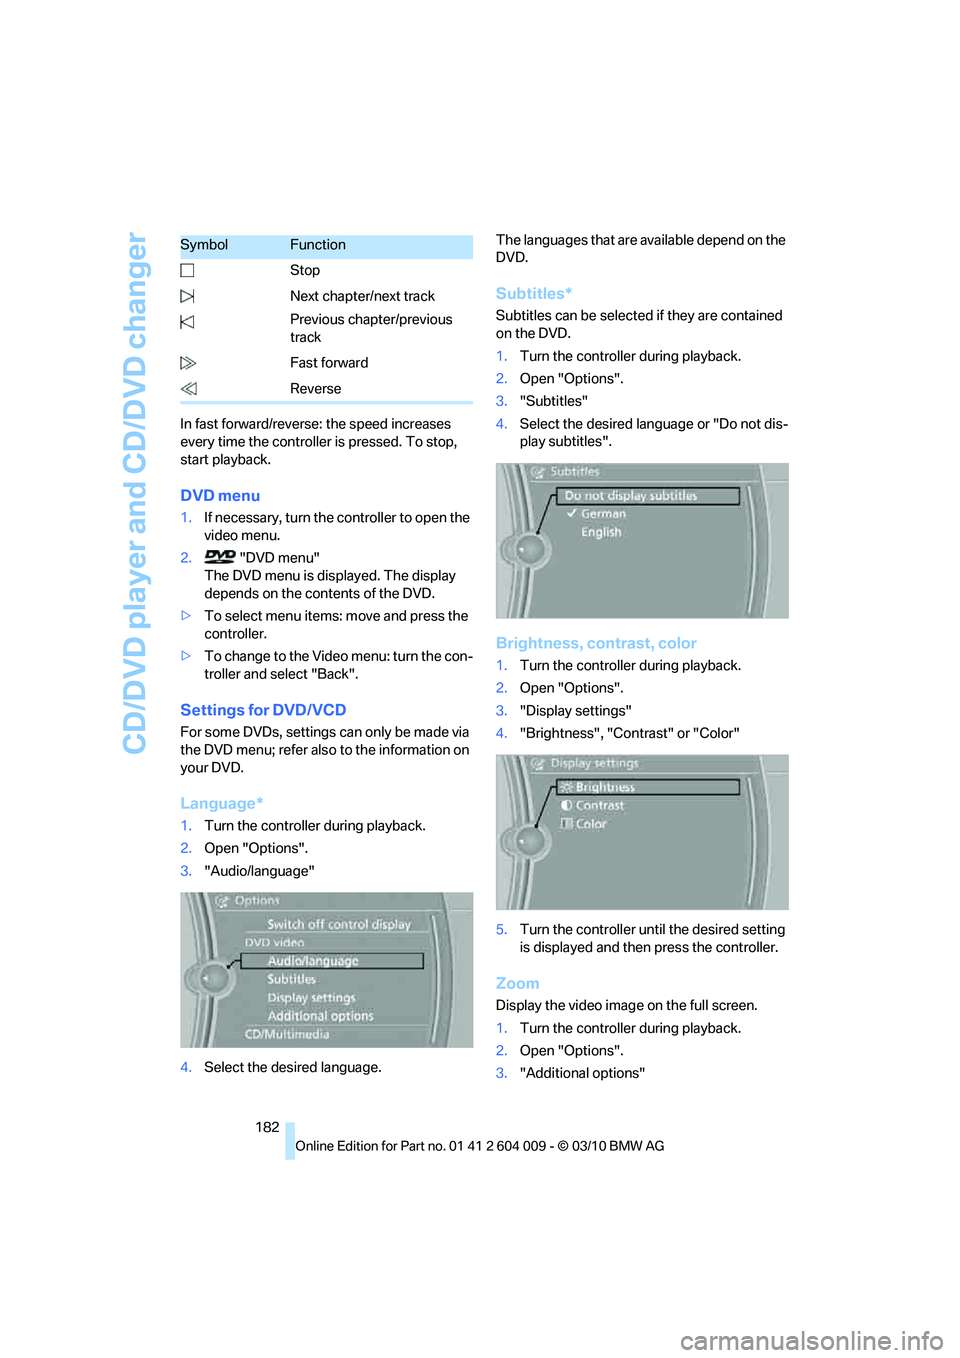
Language*
1.Turn the controller during playback.
2.Open "Options".
3."Audio/language"
4.Select the desired language.The languages that are available depend on the
DVD.
Subtitles*
Subtitles can be selected if they are contained
on the DVD.
1.Turn the controller during playback.
2.Open "Options".
3."Subtitles"
4.Select the desired language or "Do not dis-
play subtitles".
Brightness, contrast, color
1.Turn the controller during playback.
2.Open "Options".
3."Display settings"
4."Brightness", "Contrast" or "Color"
5.Turn the controller until the desired setting
is displayed and then press the controller.
Zoom
Display the video image on the full screen.
1.Turn the controller during playback.
2.Open "Options".
3."Additional options" Stop
Next chapter/next track
Previous chapter/previous
track
Fast forward
Reverse
SymbolFunction
Page 186 of 312
CD/DVD player and CD/DVD changer
184 placed into the selected CD/DVD compart-
ment.
Only insert the CD/DVD if the LEDs2
under the CD/DVD slot4 are flashing;
otherwise, you may damage the CD/DVD or
the CD/DVD changer.
Do not continue to push on the CD/DVD;
this may cause it to jam and prevent it from
being able to eject again.<
4.To load additional CD/DVD compartments:
Repeat steps 1 to 3.
Filling all vacant CD/DVD
compartments
1.Hold down the button.
The LEDs on the empty CD/DVD compart-
ments flash.
2.When the LEDs 2 under the CD/DVD slot4
flash, insert a single CD/DVD into the mid-
dle.
The CD/DVD is automatically pulled in and
placed into the first empty CD/DVD com-
partment.
Only insert the CD/DVD if the LEDs2
under the CD/DVD slot4 are flashing;
otherwise, you may damage the CD/DVD or
the CD/DVD changer.
Do not continue to push on the CD/DVD;
this may cause it to jam and prevent it from
being able to eject again.<
3.Wait until the CD/DVD has been pulled in.
4.To load additional CD/DVD compartments:
Repeat steps 2 and 3.
After filling, it can take a few minutes to read the
CDs/DVDs.
Removing a single CD/DVD
1. Press button.
2. ... Press the button to select the
CD/DVD compartment.
The CD/DVD is slid a short distance out
from the CD/DVD changer.
3.Remove the CD/DVD.
If the CD is not removed, it will be pulled
back in after approx. 10 seconds.<
Removing all CDs/DVDs
1.Hold down the button.
The CDs/DVDs will be slid out a short dis-
tance out from the CD/DVD changer, in
sequence.
2.Remove the CDs/DVDs.
Malfunctions
If all LEDs on the CD/DVD changer flash rapidly,
the system is malfunctioning.
To eliminate the malfunction:
1.Press or .
The CD/DVD last inserted is ejected.
2.Remove the CD/DVD.
If the LEDs stop flashing rapidly, the CD/DVD
changer is functional again.
Audio playback*
The audio track of a DVD can be played back
even if video playback is not possible in the
vehicle.
Only the main film without the previews or
extras can be played back.
Starting playback
A DVD is located in the DVD changer.
1."CD/Multimedia"
2."CD/DVD"
3.Select the desired DVD.
Selecting a chapter using the button
Press the button repeatedly until the
desired chapter is played.
Selecting a chapter using iDrive
1."CD/Multimedia"
2."CD/DVD"
3.Select the desired DVD.
4.Select the desired chapter.
Fast forward/reverse
Press and hold the button.
Page 187 of 312
Navigation
Entertainment
Driving tips
185Reference
At a glance
Controls
Communications
Mobility
Selecting the language*
The languages that are available depend on the
DVD.
1."CD/Multimedia"
2."CD/DVD"
3.Select the desired DVD.
4.Open "Options".
5."Audio/language"
6.Select the desired language.
Notes
BMW CD/DVD players and changers are
officially designated Class 1 laser prod-
ucts. Do not operate if the cover is damaged,
otherwise severe eye damage can result.
Do not use self-recorded CDs/DVDs with labels
applied as these can become detached during
playback due to heat buildup and can cause
irreparable damage to the device.
Only use round CDs/DVDs with a standard
diameter of 4.7 inch/12 cm and do not play
CDs/DVDs with an adapter, e.g. CD singles, as
otherwise the CDs or the adapter may jam and
no longer eject properly.
Do not use a combined CD/DVD, e.g. DVD
Plus,
otherwise the CD/DVD may jam and no longer
eject properly.<
General malfunctions
BMW CD/DVD changers and players have been
optimized for performance in vehicles. In some
instances they may be more sensitive to faulty
CDs/DVDs than stationary devices would be.
If a CD/DVD cannot be played, first check
whether it has been inserted correctly.
Humidity
High levels of humidity can lead to condensa-
tion on the CD/DVD or the laser's scan lens and
temporarily prevent playback.
Malfunctions with individual CDs/DVDs
If malfunctions occur only with particular CDs/
DVDs, this can be due to one of the following
causes:
Self-recorded CDs/DVDs
Possible reasons for malfunctions with self-
recorded CDs/DVDs are, e.g., inconsistent
data-creation or recording processes, or poor
quality or old age of the CD/DVD blank.
Only label CDs/DVDs on the upper side with a
pen intended for this purpose.
Damage
Avoid fingerprints, dust, scratches and mois-
ture.
Store CDs/DVDs in a sleeve.
Do not subject CDs/DVDs to temperatures
above 1227/506, nor to high humidity levels
or direct sunlight.
CDs/DVDs with copy protection
CDs/DVDs are often provided with a copy pro-
tection feature by the manufacturer. This can
m e a n t h a t s o m e C D s / D V D s c a n n o t b e p l a y e d o r
can only be played to a limited extent.
MACROVISION
This product contains copyrighted technology
that is based on multiple registered U.S. pat-
ents and the intellectual property of the Macro-
vision Corporation and other manufacturers.
Use of this copyrighted material must be
approved by Macrovision. Unless otherwise
agreed with Macrovision, media with this pro-
tection may only be used for private purposes.
The copying of this technology is strictly forbid-
den.
DTS Digital Surround™
Manufactured under license under U.S.
Patent Numbers: 5,451,942;
5,956,674; 5,974,380; 5,978,762; 6,487,535 &
and other patents granted and registered in the
USA and worldwide. DTS and the logo are reg-
istered trademarks & DTS Digital Surround and