warning light BMW X6 XDRIVE 50I 2012 Owners Manual
[x] Cancel search | Manufacturer: BMW, Model Year: 2012, Model line: X6 XDRIVE 50I, Model: BMW X6 XDRIVE 50I 2012Pages: 317, PDF Size: 8.83 MB
Page 15 of 317
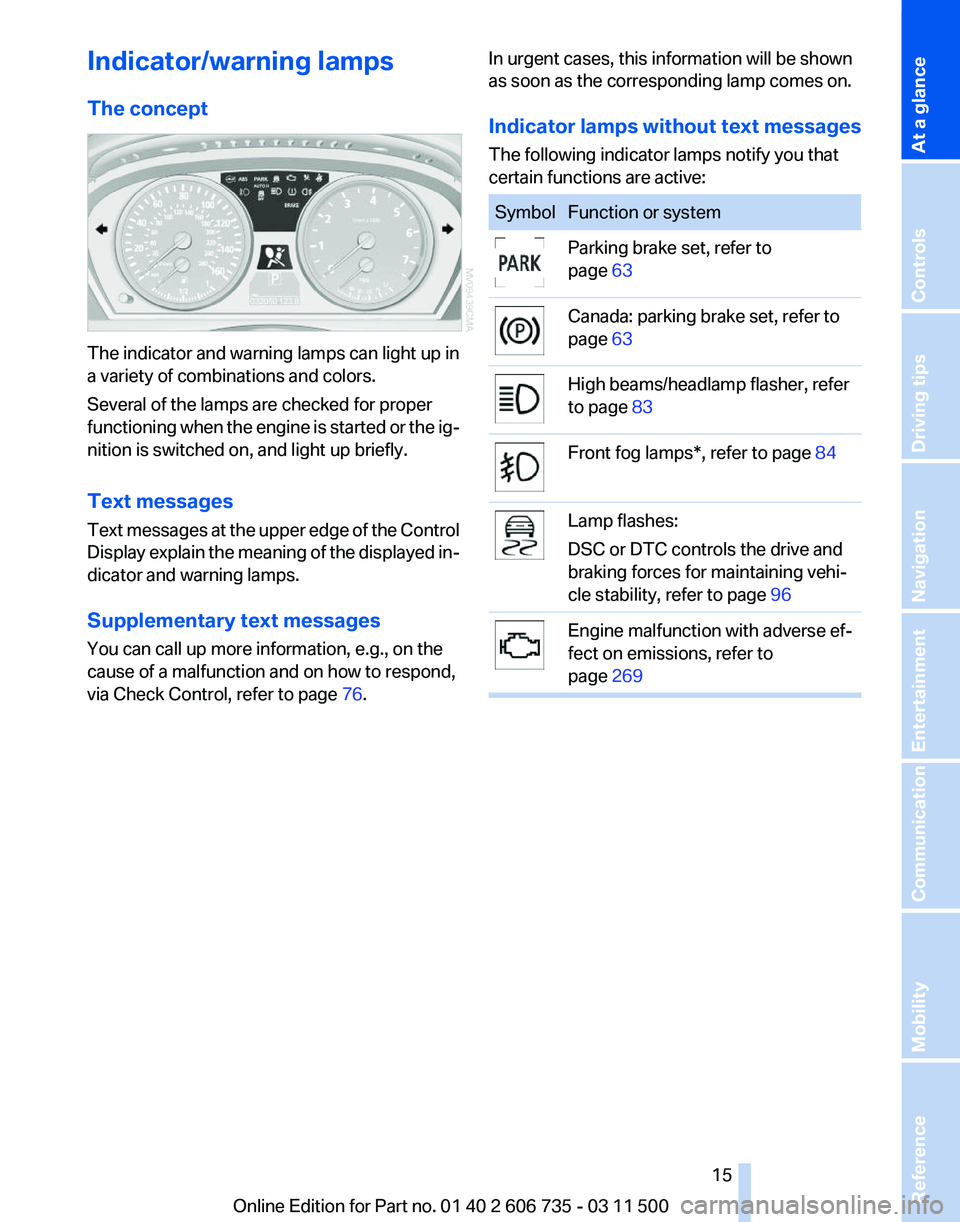
Indicator/warning lamps
The concept
The indicator and warning lamps can light up in
a variety of combinations and colors.
Several of the lamps are checked for proper
functioning
when the engine is started or the ig‐
nition is switched on, and light up briefly.
Text messages
Text messages at the upper edge of the Control
Display explain the meaning of the displayed in‐
dicator and warning lamps.
Supplementary text messages
You can call up more information, e.g., on the
cause of a malfunction and on how to respond,
via Check Control, refer to page 76.In urgent cases, this information will be shown
as soon as the corresponding lamp comes on.
Indicator lamps without text messages
The following indicator lamps notify you that
certain functions are active: Symbol Function or system
Parking brake set, refer to
page
63 Canada: parking brake set, refer to
page
63 High beams/headlamp flasher, refer
to page
83 Front fog lamps*, refer to page
84 Lamp flashes:
DSC or DTC controls the drive and
braking forces for maintaining vehi‐
cle stability, refer to page
96 Engine malfunction with adverse ef‐
fect on emissions, refer to
page
269 Seite 15
15Online Edition for Part no. 01 40 2 606 735 - 03 11 500
Reference Mobility Communication Entertainment Navigation Driving tips Controls
At a glance
Page 29 of 317
The individual settings are stored for a maximum
of
four remote controls. They are stored for two
remote controls if Comfort Access* is in use.
Personal Profile settings
The following functions and settings can be
stored in a profile.
More information on the settings can be found
under:
▷ Assigning the programmable memory but‐
tons, refer to page 22.
▷ Response of the central locking system
when the car is being unlocked, refer to
page 30.
▷ Automatic locking of the vehicle, refer to
page 33.
▷ Driver's seat, exterior mirror and steering
wheel positions*, refer to page 53.
▷ Settings for the display on the Control Dis‐
play and in the instrument cluster:
▷12h/24h clock format, refer to
page 79.
▷ Date format, refer to page 79.
▷ Brightness of the Control Display, refer
to page 80.
▷ Language on the Control Display, refer
to page 80.
▷ Units of measure for fuel consumption,
distance covered/remaining distances,
and temperature, refer to page 80.
▷ Show visual warning for the Park Distance
Control PDC*, refer to page 111.
▷ Show visual warning for Top View*, refer to
page 114.
▷ Show Side View*, refer to page 116.
▷ Backup camera*:
▷Function selection, refer to page 113.
▷ Type of display, refer to page 114.
▷ Lane departure warning*: last setting, on/
off, refer to page 93.
▷ Head-up Display*: selection, brightness and
position of the display, refer to page 117.▷
Adaptive Drive*: selected chassis and sus‐
pension tuning, refer to page 99.
▷ Light settings:
▷Triple turn signal activation, refer to
page 66.
▷ Welcome lamps, refer to page 81.
▷ Headlamp courtesy delay feature, refer
to page 81.
▷ Daytime running lights, refer to
page 82.
▷ High-beam Assistant*, refer to
page 83.
▷ Automatic climate control with 2-zone con‐
trol: settings, refer to page 120.
▷ Navigation:
▷Voice activation, refer to page 163.
▷ Route criteria, refer to page 161.
▷ Map view settings, refer to page 164.
▷ Entertainment:
▷Tone control, refer to page 172.
▷ Radio, stored stations, refer to
page 180.
▷ CD/multimedia, audio source listened to
last, refer to page 181.
▷ Telephone: volume, refer to page 220.
Central locking system
The concept
The central locking system becomes active
when the driver's door is closed.
The system simultaneously engages and re‐
leases the locks on the following:
▷ Doors.
▷ Tailgate.
▷ Fuel filler flap.
Operating from the outside
▷ Via the remote control.
▷ Via the door lock*.
Seite 29
29Online Edition for Part no. 01 40 2 606 735 - 03 11 500
Reference Mobility Communication Entertainment Navigation Driving tips
Controls At a glance
Page 39 of 317
Warning lamps
The warning lamp in the instrument
cluster lights up when you attempt to
start
the engine: the engine cannot be
started.
The remote control is not in the vehicle or has a
malfunction. Take the remote control with you
inside the vehicle or have it checked. If neces‐
sary, insert another remote control into the ig‐
nition switch.
The warning lamp in the instrument
cluster lights up while the engine is
running: the remote control is no lon‐
ger inside the vehicle.
After switching off the engine, the engine can
only be started again within approx. 10 seconds
if no door has been opened.
The indicator lamp in the instrument
cluster comes on and a message ap‐
pears on the Control Display: replace
the remote control battery.
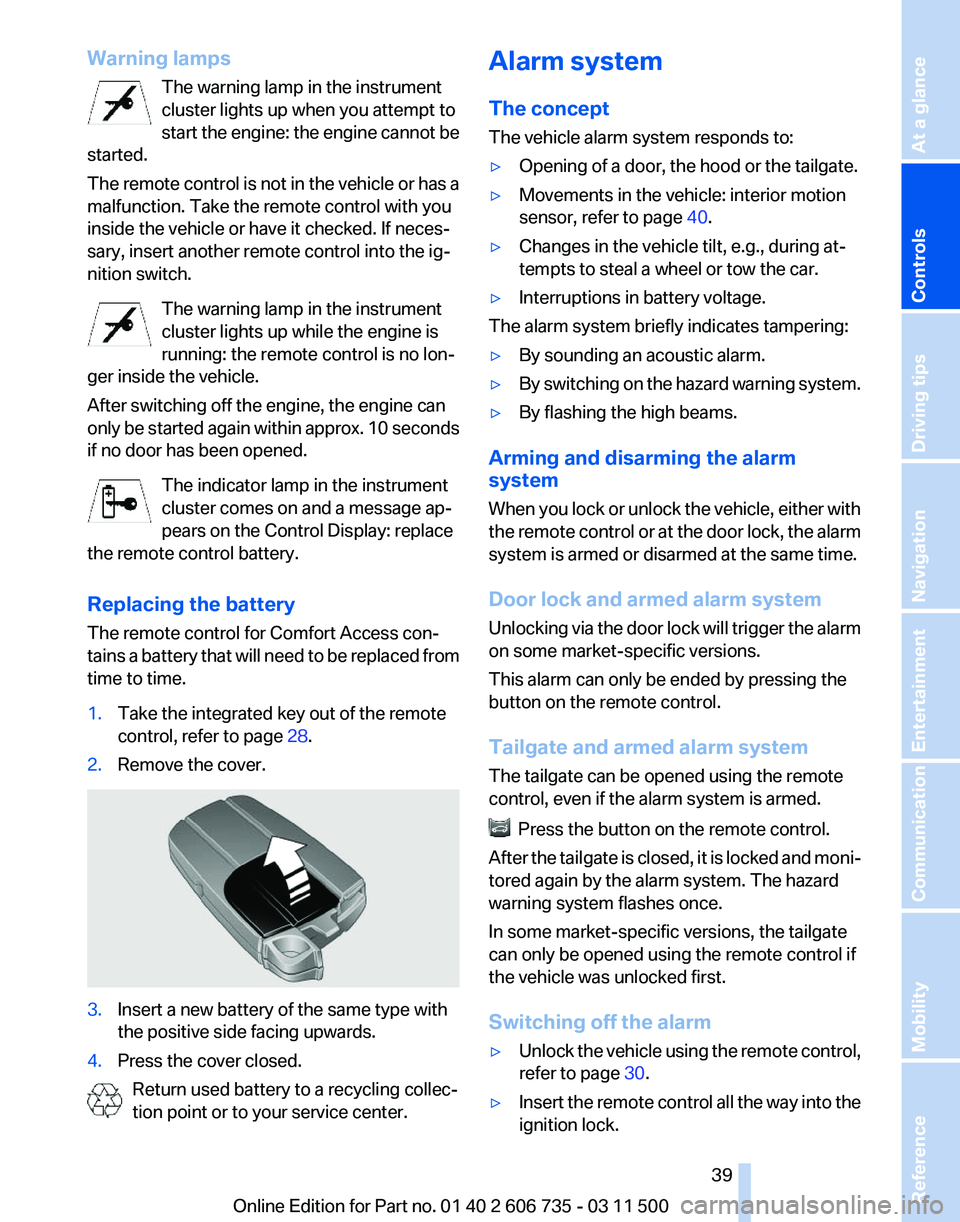
Replacing the battery
The remote control for Comfort Access con‐
tains a battery that will need to be replaced from
time to time.
1. Take the integrated key out of the remote
control, refer to page 28.
2. Remove the cover. 3.
Insert a new battery of the same type with
the positive side facing upwards.
4. Press the cover closed.
Return used battery to a recycling collec‐
tion point or to your service center. Alarm system
The concept
The vehicle alarm system responds to:
▷
Opening of a door, the hood or the tailgate.
▷ Movements in the vehicle: interior motion
sensor, refer to page 40.
▷ Changes in the vehicle tilt, e.g., during at‐
tempts to steal a wheel or tow the car.
▷ Interruptions in battery voltage.
The alarm system briefly indicates tampering:
▷ By sounding an acoustic alarm.
▷ By switching on the hazard warning system.
▷ By flashing the high beams.
Arming and disarming the alarm
system
When
you lock or unlock the vehicle, either with
the remote control or at the door lock, the alarm
system is armed or disarmed at the same time.
Door lock and armed alarm system
Unlocking via the door lock will trigger the alarm
on some market-specific versions.
This alarm can only be ended by pressing the
button on the remote control.
Tailgate and armed alarm system
The tailgate can be opened using the remote
control, even if the alarm system is armed. Press the button on the remote control.
After
the tailgate is closed, it is locked and moni‐
tored again by the alarm system. The hazard
warning system flashes once.
In some market-specific versions, the tailgate
can only be opened using the remote control if
the vehicle was unlocked first.
Switching off the alarm
▷ Unlock the vehicle using the remote control,
refer to page 30.
▷ Insert the remote control all the way into the
ignition lock.
Seite 39
39Online Edition for Part no. 01 40 2 606 735 - 03 11 500
Reference Mobility Communication Entertainment Navigation Driving tips
Controls At a glance
Page 47 of 317
Press upper or lower section of switch.
BMW X5: rear seats
2nd row seats
If the row of seats is divided
*, each side can be
adjusted separately.
Do not adjust the seat while driving
Never adjust the 2nd row seats while the
vehicle is moving, as otherwise the passengers
on the 3rd row seats could be injured.
Make sure that the locking devices of the 2nd
row seats engage properly. Otherwise the re‐
straining effect of the safety belts during an ac‐
cident could be reduced.◀
Longitudinal direction* 1.
Pull the lever and slide the seat into the de‐
sired position.
2. Release the lever and move the seat slightly
forward or back so that it engages properly.
Backrest*
The backrests can be adjusted in four steps. Pull the lever and apply weight to or remove
weight from the backrest as needed.
Access to 3rd row seats*
Pull the lever and fold the seat forward.
The
handle recess on the interior trim of the door
pillar makes climbing in easier.
Keep the footwell under the 2nd row seats
clear
When folding back the 2nd row seats, make sure
that the footwell under the 2nd row seats is
clear. Otherwise persons in the 3rd row seats
could be injured or objects damaged.◀
Warning lamp for the 2nd row seats:
lights up if the 2nd row seats are not
locked. A message also appears on
the Control Display.
3rd row seats*
The 3rd row seats are divided and offer space
for two persons.
Folding up backrest
Before folding up the backrest, remove the lug‐
gage compartment roller cover, refer to Seite 47
47Online Edition for Part no. 01 40 2 606 735 - 03 11 500
Reference Mobility Communication Entertainment Navigation Driving tips
Controls At a glance
Page 51 of 317
Checking and replacing safety belts
Have the work performed only by your
service center; otherwise, it cannot be ensured
that this safety feature will function properly.◀
Belt-force limiter
The
effect of the belt-force limiter on the driver's
seat is dependent on the position of the driver's
seat.
To maintain the long-term accuracy of this func‐
tion, the driver's seat must be calibrated if a cor‐
responding message is displayed on the Control
Display.
Calibrating driver's seat
The warning lamp lights up. A mes‐
sage also appears on the Control Dis‐
play. Please calibrate the driver's seat.
1. Move the driver's seat forward until it stops.
2. Move the driver's seat forward again. It
briefly moves toward the front in the proc‐
ess.
3. Set the desired seating position again.
The calibration is completed when the message
on the Control Display disappears. Should this
message continue to be displayed, repeat the
calibration. If the message does not disappear
even
after repeated calibration, have the system
checked as soon as possible.
Do not carry out calibration while the ve‐
hicle is moving
Never carry out calibration while the vehicle is
moving, as this can cause accidents.
Make sure that no persons or objects become
wedged during the calibration process, as this
can cause injuries or damage.◀
Head restraints
Correctly adjusted head restraints
A correctly adjusted head restraint reduces the
risk of spinal injury in the event of an accident. Adjusting the head restraint
Correctly adjust the head restraints of all
occupied
seats; otherwise, there is an increased
risk of injury in an accident.◀
BMW X5: push the head restraints of the 3rd row
seats* into the top position.
Height
Adjust the head restraint so that its center is ap‐
prox. at ear level.
Distance
Adjust the distance so that the head restraint is
as close as possible to the back of the head.
Active front head restraints
In the event of a rear-end collision of sufficient
severity, the active head restraint reduces the
distance to the head.
Reduced protective function
▷Do not use seat or head restraint cov‐
ers.
▷ Do not hang objects, e.g., clothes hangers,
directly on the head restraints.
▷ Only attach accessories approved by BMW
to the seat or head restraint.
Otherwise, the protective function of the active
head
restraint will be impaired and the personal
safety of the occupants will be endangered.
Have the active head restraints reset after they
are triggered in a rear-end collision. Have this
work performed by the service center only; oth‐
erwise, this safety feature with not be opera‐
tional.◀
Please contact the service center if the front
head restraints need to be removed or installed.
Front seats: adjusting the height
Adjust the head restraint so that its center is ap‐
prox. at ear level. Seite 51
51Online Edition for Part no. 01 40 2 606 735 - 03 11 500
Reference Mobility Communication Entertainment Navigation Driving tips
Controls At a glance
Page 65 of 317
Driving
Automatic
Hold is activated: the vehicle is auto‐
matically secured against rolling when it stops.
The indicator lamp lights up in green.
Indicator lamp in Canadian models.
Step on the accelerator pedal to drive off.
The brake is released automatically.
The indicator lamp goes out. Before driving into a car wash
Deactivate Automatic Hold; otherwise, the
parking brake will be set when the vehicle is sta‐
tionary and the vehicle will no longer be able to
roll.◀
Parking
The parking brake is automatically set if the en‐
gine is switched off while the vehicle is being
held by Automatic Hold.
The indicator lamp changes from green
to red.
Indicator lamp in Canadian models.
The parking brake is not set if the engine is
switched off while the vehicle is coasting to a
halt. Automatic Hold is deactivated. Take the remote control with you
Take the remote control with you when
leaving the vehicle so that children, for example,
cannot release the parking brake.◀
Malfunction
In the event of a failure or malfunction of the
parking brake, secure the vehicle against rolling
using a wheel chock, for example, when leaving
it. Releasing the parking brake manually
In the event of an electrical power loss or elec‐
trical malfunction, you can release the parking
brake manually.
Secure the vehicle against rolling
Before releasing the parking brake man‐
ually,
and whenever you park the vehicle with the
parking brake released, ensure that position P of
the automatic transmission is engaged. Note
the display in the instrument cluster.
In addition, secure the vehicle against rolling,
e.g. with a wheel chock. Otherwise there is a
danger that the vehicle could roll if parked on a
steep slope.◀
Jump-starting and towing, refer to page 282.
Unlocking
1. Open the left-hand side panel in the cargo
area.
2. Remove the first aid kit* and the warning tri‐
angle*.
Close the bracket of the warning tri‐
angle.
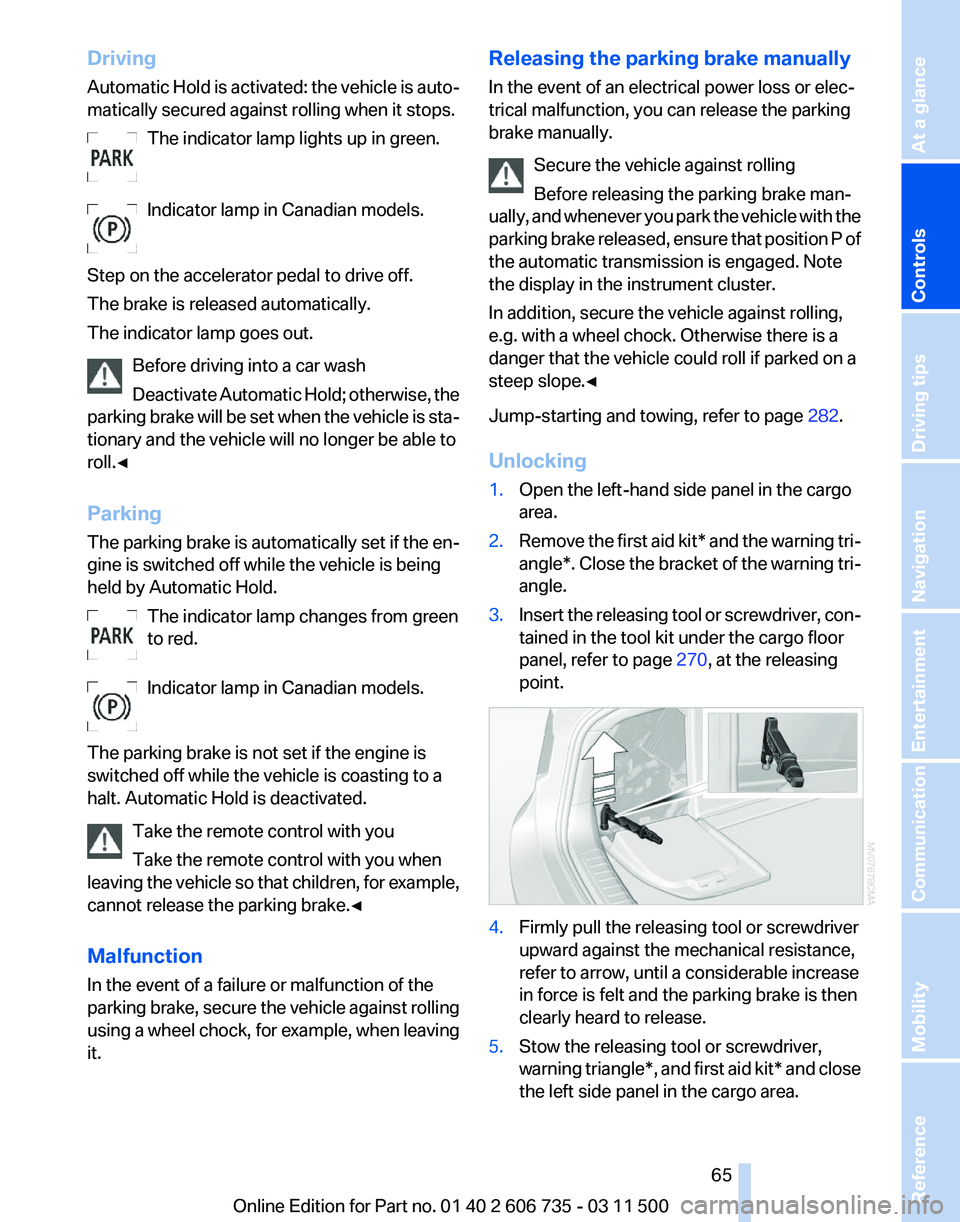
3. Insert the releasing tool or screwdriver, con‐
tained in the tool kit under the cargo floor
panel, refer to page 270, at the releasing
point. 4.
Firmly pull the releasing tool or screwdriver
upward against the mechanical resistance,
refer to arrow, until a considerable increase
in force is felt and the parking brake is then
clearly heard to release.
5. Stow the releasing tool or screwdriver,
warning
triangle*, and first aid kit* and close
the left side panel in the cargo area. Seite 65
65Online Edition for Part no. 01 40 2 606 735 - 03 11 500
Reference Mobility Communication Entertainment Navigation Driving tips
Controls At a glance
Page 71 of 317
Displays
Odometer, external
temperature display, clock
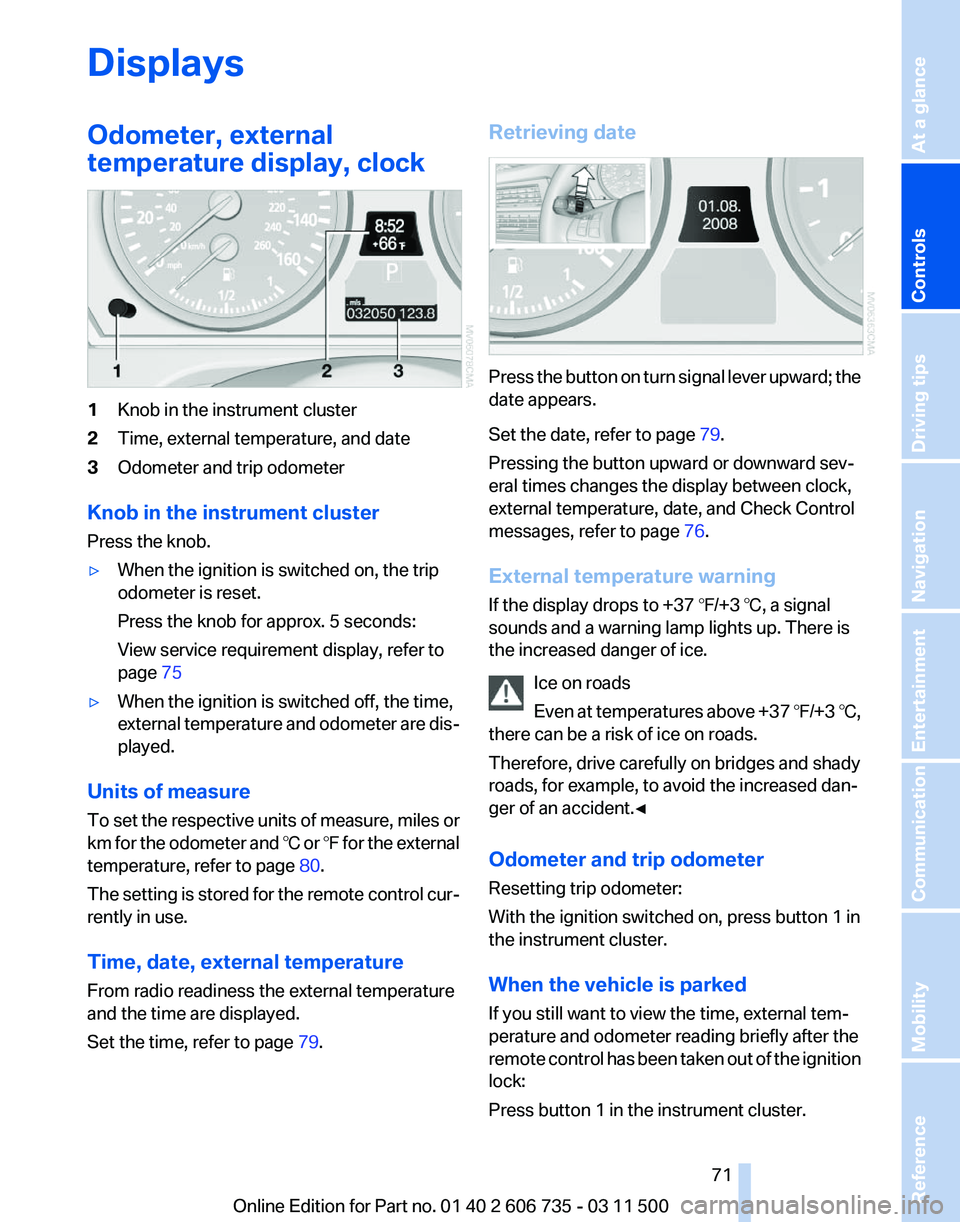
1
Knob in the instrument cluster
2 Time, external temperature, and date
3 Odometer and trip odometer
Knob in the instrument cluster
Press the knob.
▷ When the ignition is switched on, the trip
odometer is reset.
Press the knob for approx. 5 seconds:
View service requirement display, refer to
page 75
▷ When the ignition is switched off, the time,
external
temperature and odometer are dis‐
played.
Units of measure
To
set the respective units of measure, miles or
km for the odometer and ℃ or ℉ for the external
temperature, refer to page 80.
The setting is stored for the remote control cur‐
rently in use.
Time, date, external temperature
From radio readiness the external temperature
and the time are displayed.
Set the time, refer to page 79.Retrieving date
Press the button on turn signal lever upward; the
date appears.
Set the date, refer to page
79.
Pressing the button upward or downward sev‐
eral times changes the display between clock,
external temperature, date, and Check Control
messages, refer to page 76.
External temperature warning
If the display drops to +37 ℉/+3 ℃, a signal
sounds and a warning lamp lights up. There is
the increased danger of ice. Ice on roads
Even
at temperatures above +37 ℉/+3 ℃,
there can be a risk of ice on roads.
Therefore, drive carefully on bridges and shady
roads, for example, to avoid the increased dan‐
ger of an accident.◀
Odometer and trip odometer
Resetting trip odometer:
With the ignition switched on, press button 1 in
the instrument cluster.
When the vehicle is parked
If you still want to view the time, external tem‐
perature and odometer reading briefly after the
remote control has been taken out of the ignition
lock:
Press button 1 in the instrument cluster. Seite 71
71Online Edition for Part no. 01 40 2 606 735 - 03 11 500
Reference Mobility Communication Entertainment Navigation Driving tips
Controls At a glance
Page 76 of 317
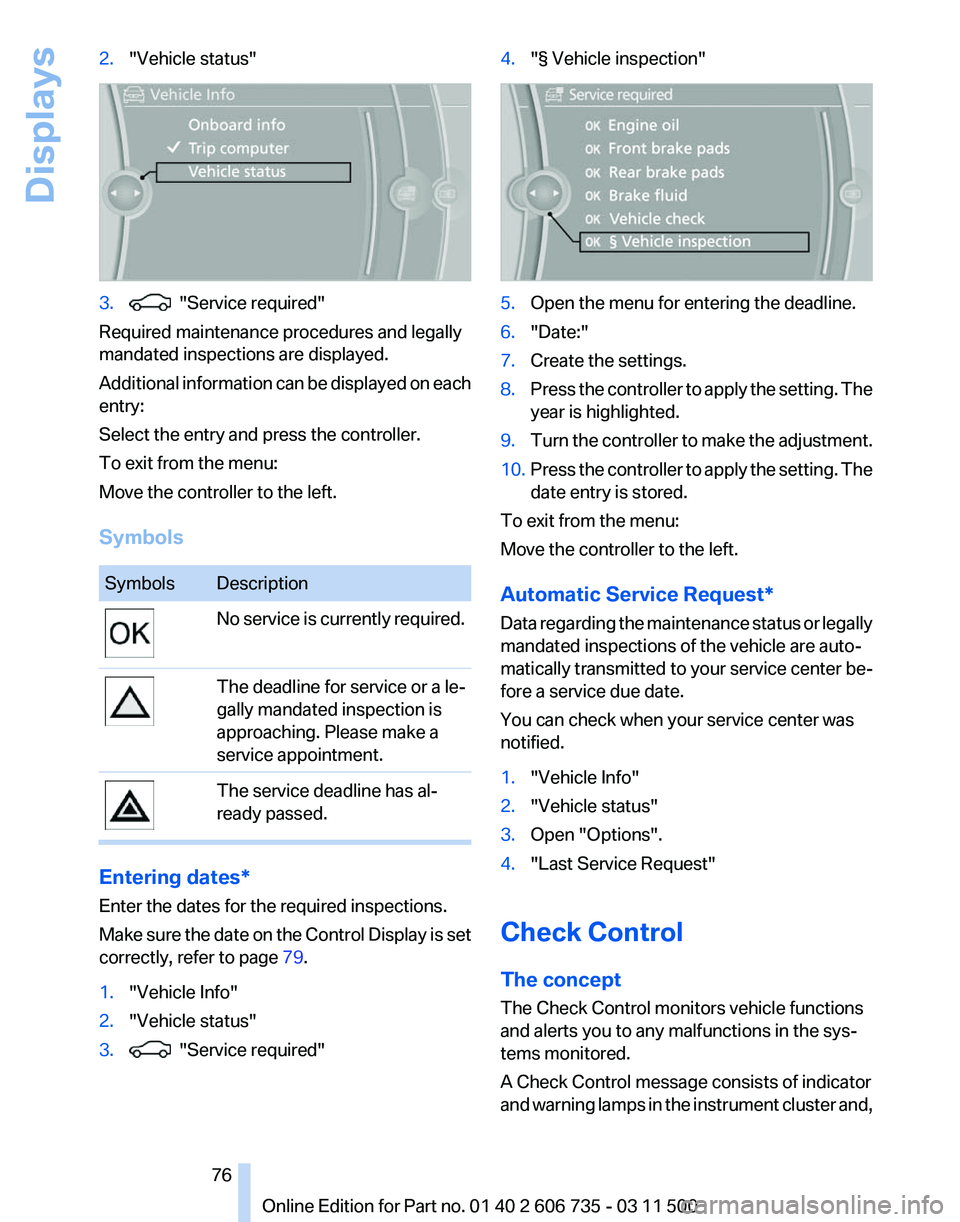
2.
"Vehicle status" 3. "Service required"
Required maintenance procedures and legally
mandated inspections are displayed.
Additional
information can be displayed on each
entry:
Select the entry and press the controller.
To exit from the menu:
Move the controller to the left.
Symbols Symbols Description
No service is currently required.
The deadline for service or a le‐
gally mandated inspection is
approaching. Please make a
service appointment.
The service deadline has al‐
ready passed.
Entering dates*
Enter the dates for the required inspections.
Make
sure the date on the Control Display is set
correctly, refer to page 79.
1. "Vehicle Info"
2. "Vehicle status"
3. "Service required" 4.
"§ Vehicle inspection" 5.
Open the menu for entering the deadline.
6. "Date:"
7. Create the settings.
8. Press the controller to apply the setting. The
year is highlighted.
9. Turn the controller to make the adjustment.
10. Press the controller to apply the setting. The
date entry is stored.
To exit from the menu:
Move the controller to the left.
Automatic Service Request
*
Data regarding the maintenance status or legally
mandated inspections of the vehicle are auto‐
matically transmitted to your service center be‐
fore a service due date.
You can check when your service center was
notified.
1. "Vehicle Info"
2. "Vehicle status"
3. Open "Options".
4. "Last Service Request"
Check Control
The concept
The Check Control monitors vehicle functions
and alerts you to any malfunctions in the sys‐
tems monitored.
A Check Control message consists of indicator
and
warning lamps in the instrument cluster and,
Seite 76
76 Online Edition for Part no. 01 40 2 606 735 - 03 11 500
Displays
Page 77 of 317
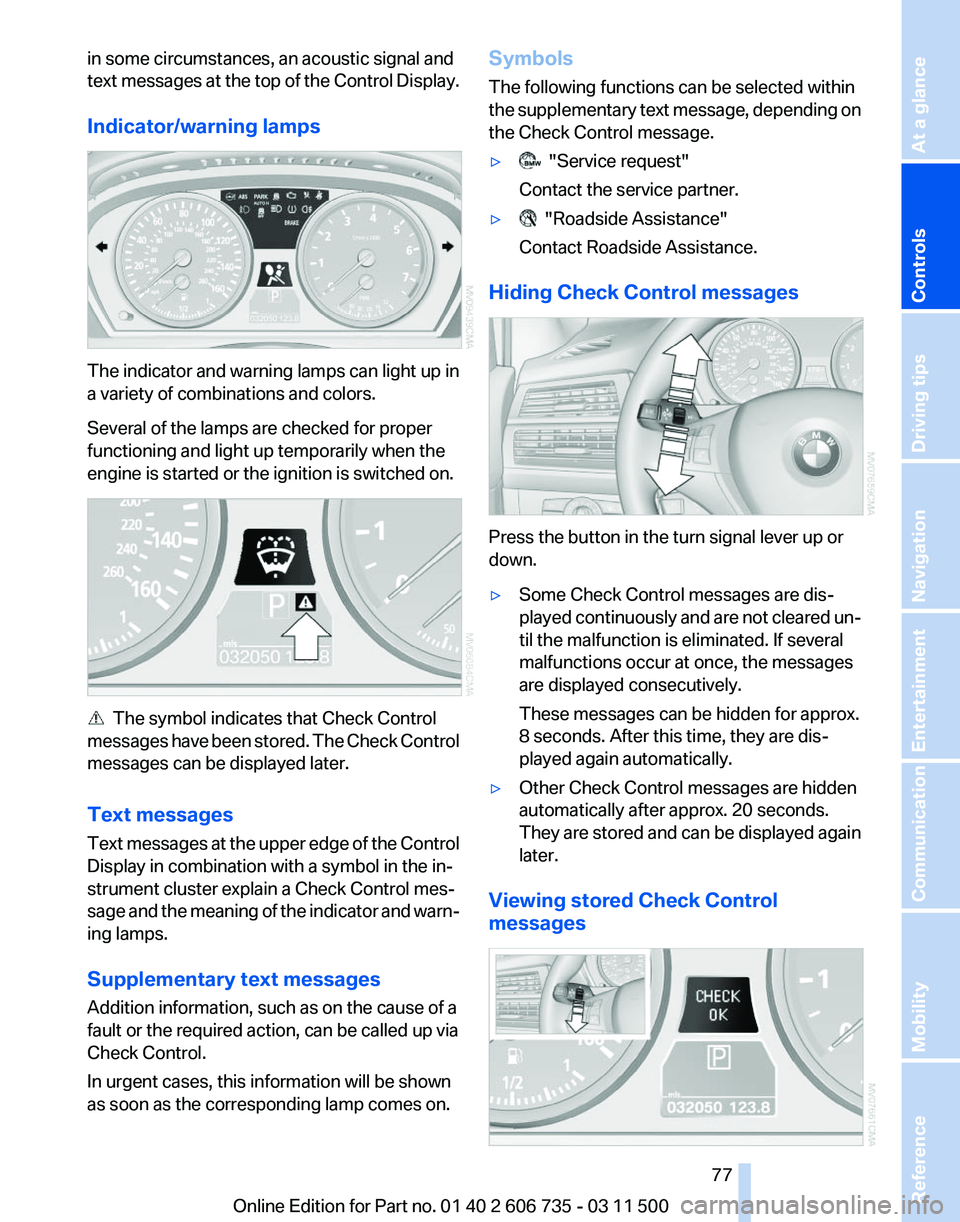
in some circumstances, an acoustic signal and
text
messages at the top of the Control Display.
Indicator/warning lamps The indicator and warning lamps can light up in
a variety of combinations and colors.
Several of the lamps are checked for proper
functioning and light up temporarily when the
engine is started or the ignition is switched on.
The symbol indicates that Check Control
messages
have been stored. The Check Control
messages can be displayed later.
Text messages
Text messages at the upper edge of the Control
Display in combination with a symbol in the in‐
strument cluster explain a Check Control mes‐
sage and the meaning of the indicator and warn‐
ing lamps.
Supplementary text messages
Addition information, such as on the cause of a
fault or the required action, can be called up via
Check Control.
In urgent cases, this information will be shown
as soon as the corresponding lamp comes on. Symbols
The following functions can be selected within
the
supplementary text message, depending on
the Check Control message.
▷ "Service request"
Contact the service partner.
▷ "Roadside Assistance"
Contact Roadside Assistance.
Hiding Check Control messages Press the button in the turn signal lever up or
down.
▷
Some Check Control messages are dis‐
played
continuously and are not cleared un‐
til the malfunction is eliminated. If several
malfunctions occur at once, the messages
are displayed consecutively.
These messages can be hidden for approx.
8 seconds. After this time, they are dis‐
played again automatically.
▷ Other Check Control messages are hidden
automatically after approx. 20 seconds.
They
are stored and can be displayed again
later.
Viewing stored Check Control
messages Seite 77
77Online Edition for Part no. 01 40 2 606 735 - 03 11 500
Reference Mobility Communication Entertainment Navigation Driving tips
Controls At a glance
Page 87 of 317
▷
Do not apply adhesive materials to the air‐
bag cover panels, cover them or modify
them in any way.
▷ Never modify either the individual compo‐
nents
or the wiring in the airbag system. This
also applies to steering wheel covers, the
dashboard, the seats, the roof pillars and the
sides of the headliner.◀
Even when all instructions are followed closely,
injury from contact with the airbags cannot be
ruled out in certain situations.
The ignition and inflation noise may lead to
short-term
and, in most cases, temporary hear‐
ing impairment in sensitive individuals.
In the case of a malfunction, deactivation
and after triggering of the airbags
Do not touch the individual components imme‐
diately after the system has been triggered; oth‐
erwise, there is the danger of burns.
Only have the airbags checked, repaired or dis‐
mantled and the airbag generator scrapped by
your service center or a workshop that has the
necessary authorization for handling explosives.
Non-professional attempts to service the sys‐
tem could lead to failure in an emergency or un‐
desired triggering of the airbag, either of which
could result in injury.◀
Warnings and information on the airbags are
also found on the sun visors.
Automatic deactivation of the front
passenger airbags
The occupation of the seat is detected by eval‐
uating the impression on the occupied seat sur‐
face of the front passenger seat.
The front and side airbags on the front passen‐
ger side are activated or deactivated accordingly
by the system.
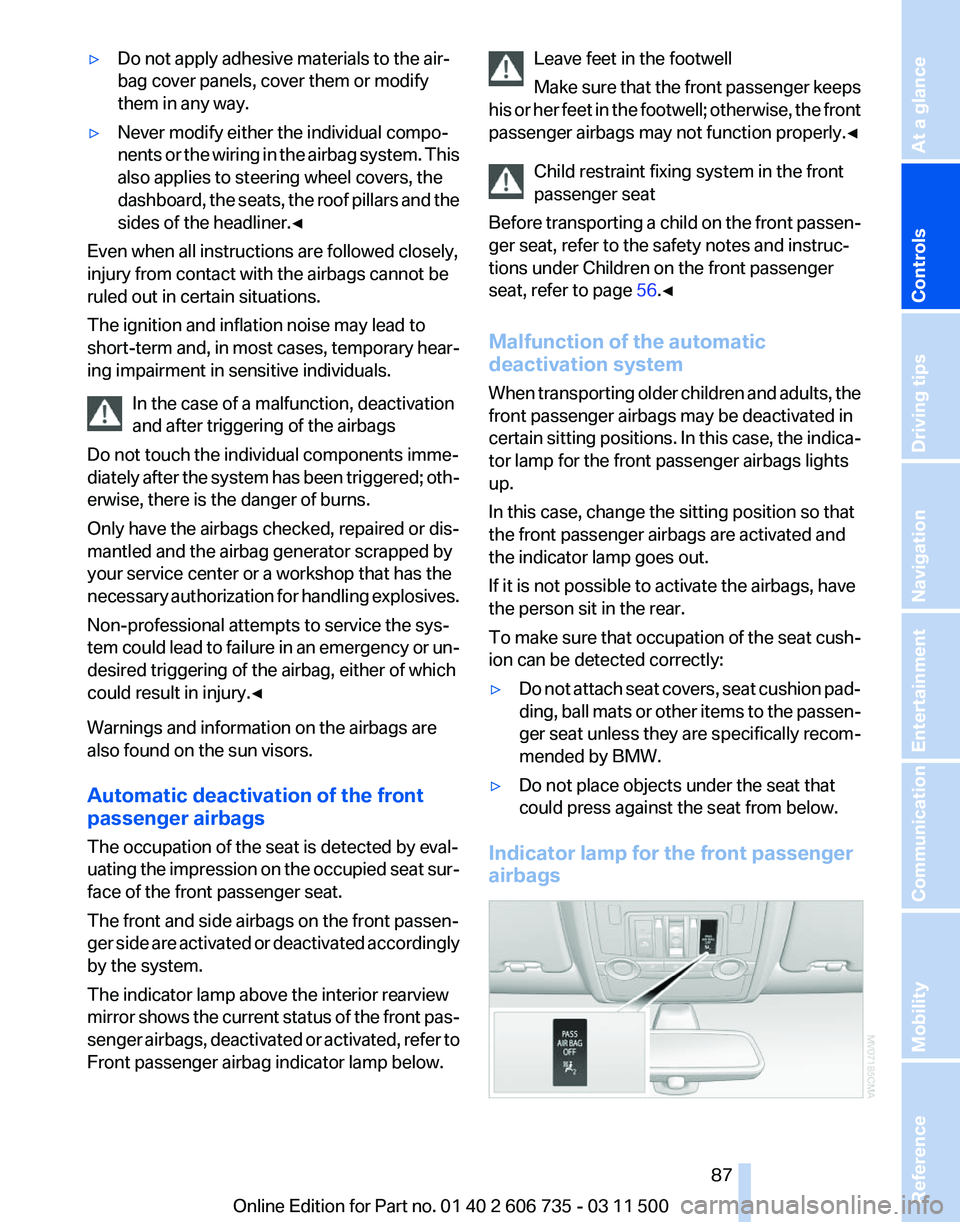
The indicator lamp above the interior rearview
mirror shows the current status of the front pas‐
senger airbags, deactivated or activated, refer to
Front passenger airbag indicator lamp below. Leave feet in the footwell
Make
sure that the front passenger keeps
his or her feet in the footwell; otherwise, the front
passenger airbags may not function properly.◀
Child restraint fixing system in the front
passenger seat
Before transporting a child on the front passen‐
ger seat, refer to the safety notes and instruc‐
tions under Children on the front passenger
seat, refer to page 56.◀
Malfunction of the automatic
deactivation system
When transporting older children and adults, the
front passenger airbags may be deactivated in
certain sitting positions. In this case, the indica‐
tor lamp for the front passenger airbags lights
up.
In this case, change the sitting position so that
the front passenger airbags are activated and
the indicator lamp goes out.
If it is not possible to activate the airbags, have
the person sit in the rear.
To make sure that occupation of the seat cush‐
ion can be detected correctly:
▷ Do not attach seat covers, seat cushion pad‐
ding,
ball mats or other items to the passen‐
ger seat unless they are specifically recom‐
mended by BMW.
▷ Do not place objects under the seat that
could press against the seat from below.
Indicator lamp for the front passenger
airbags Seite 87
87Online Edition for Part no. 01 40 2 606 735 - 03 11 500
Reference Mobility Communication Entertainment Navigation Driving tips
Controls At a glance