cruise control BMW X6 XDRIVE35I 2008 Owners Manual
[x] Cancel search | Manufacturer: BMW, Model Year: 2008, Model line: X6 XDRIVE35I, Model: BMW X6 XDRIVE35I 2008Pages: 288, PDF Size: 9.28 MB
Page 13 of 288
At a glance
11Reference
Controls
Driving tips
Communications
Navigation
Entertainment
Mobility
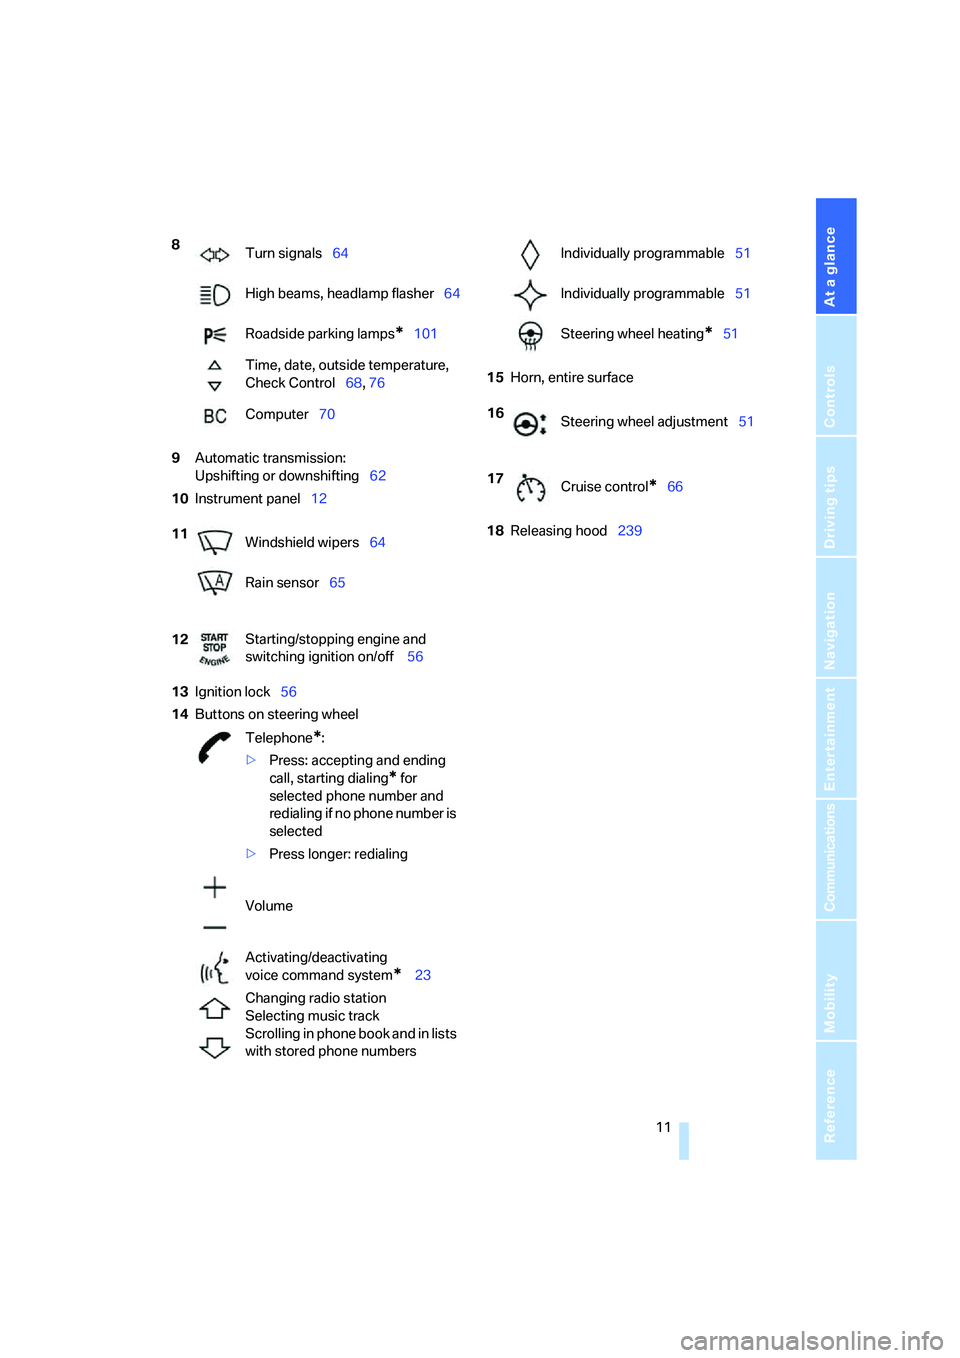
9Automatic transmission:
Upshifting or downshifting62
10Instrument panel12
13Ignition lock56
14Buttons on steering wheel15Horn, entire surface
18Releasing hood239 8
Turn signals64
High beams, headlamp flasher64
Roadside parking lamps
*101
Time, date, outside temperature,
Check Control68, 76
Computer70
11
Windshield wipers64
Rain sensor65
12Starting/stopping engine and
switching ignition on/off 56
Telephone
*:
>Press: accepting and ending
call, starting dialing
* for
selected phone number and
redialing if no phone number is
selected
>Press longer: redialing
Volume
Activating/deactivating
voice command system
* 23
Changing radio station
Selecting music track
Scrolling in phone book and in lists
with stored phone numbers
Individually programmable51
Individually programmable51
Steering wheel heating
*51
16
Steering wheel adjustment51
17
Cruise control
*66
Page 14 of 288
Cockpit
12
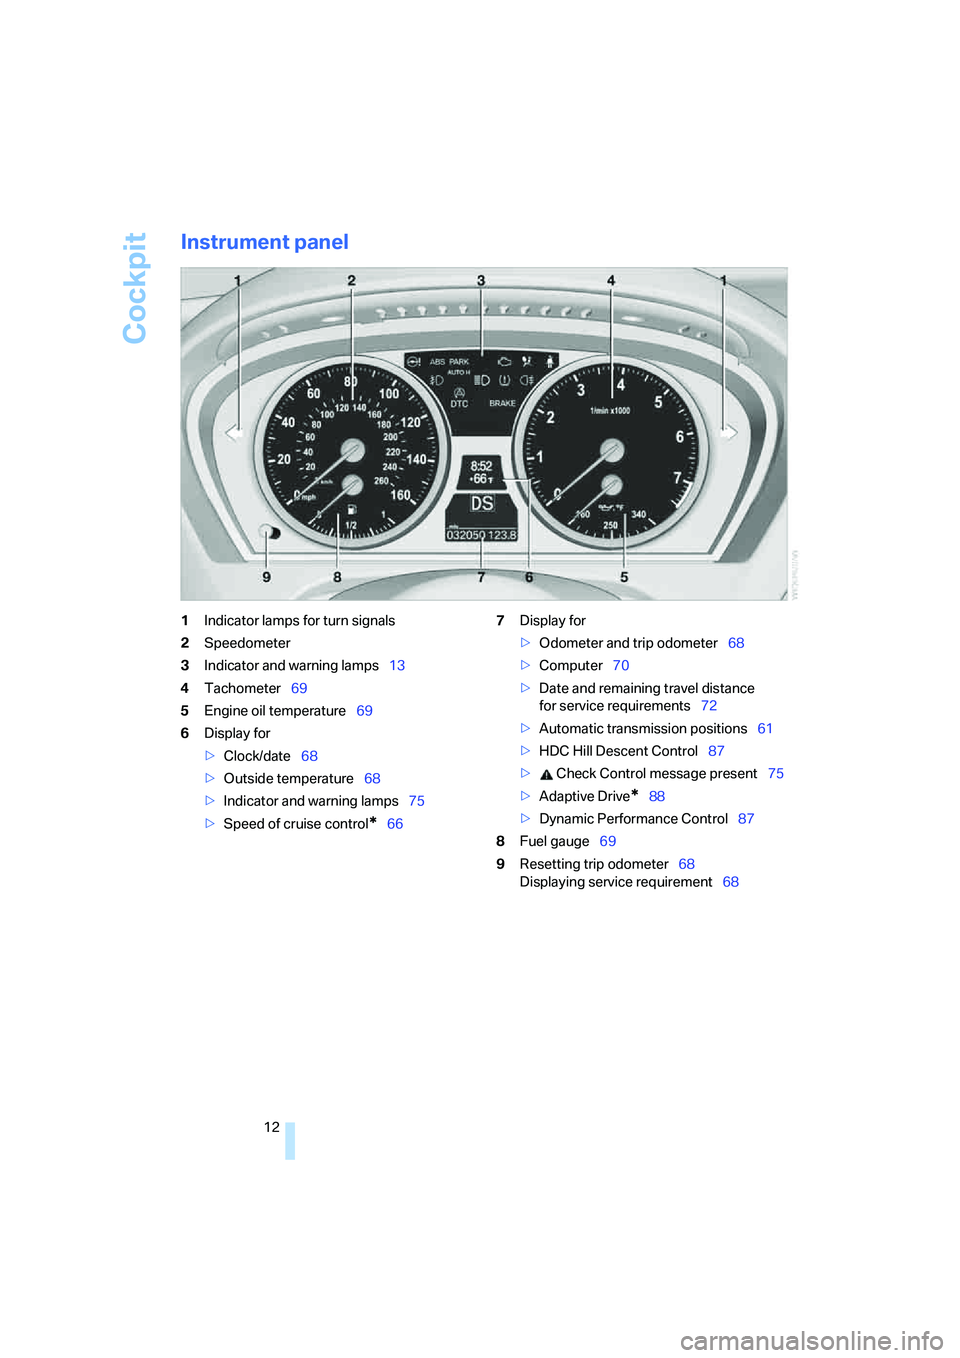
Instrument panel
1Indicator lamps for turn signals
2Speedometer
3Indicator and warning lamps13
4Tachometer69
5Engine oil temperature69
6Display for
>Clock/date68
>Outside temperature68
>Indicator and warning lamps75
>Speed of cruise control
*667Display for
>Odometer and trip odometer68
>Computer70
>Date and remaining travel distance
for service requirements72
>Automatic transmission positions61
>HDC Hill Descent Control87
> Check Control message present75
>Adaptive Drive
*88
>Dynamic Performance Control87
8Fuel gauge69
9Resetting trip odometer68
Displaying service requirement68
Page 68 of 288
Driving
66
Capacity
approx. 6.3USquarts/6liters.
Cruise control*
The concept
The cruise control with a braking function is
available for use at speeds of approx. 20 mph/
30 km/h and higher. The vehicle stores and
maintains the speed that you set using the lever
mounted on the steering column. To keep the
specified speed constant, the system brakes if
the engine braking effect is not sufficient on a
downhill grade.
Do not use the cruise control under driv-
ing conditions that do not permit a con-
stant speed, e.g. when driving on winding
roads , in heavy traffic o r in poor roa d co nditions
such as snow, rain, ice, and loose road surface.
Otherwise you could lose control of the vehicle
and cause an accident.<
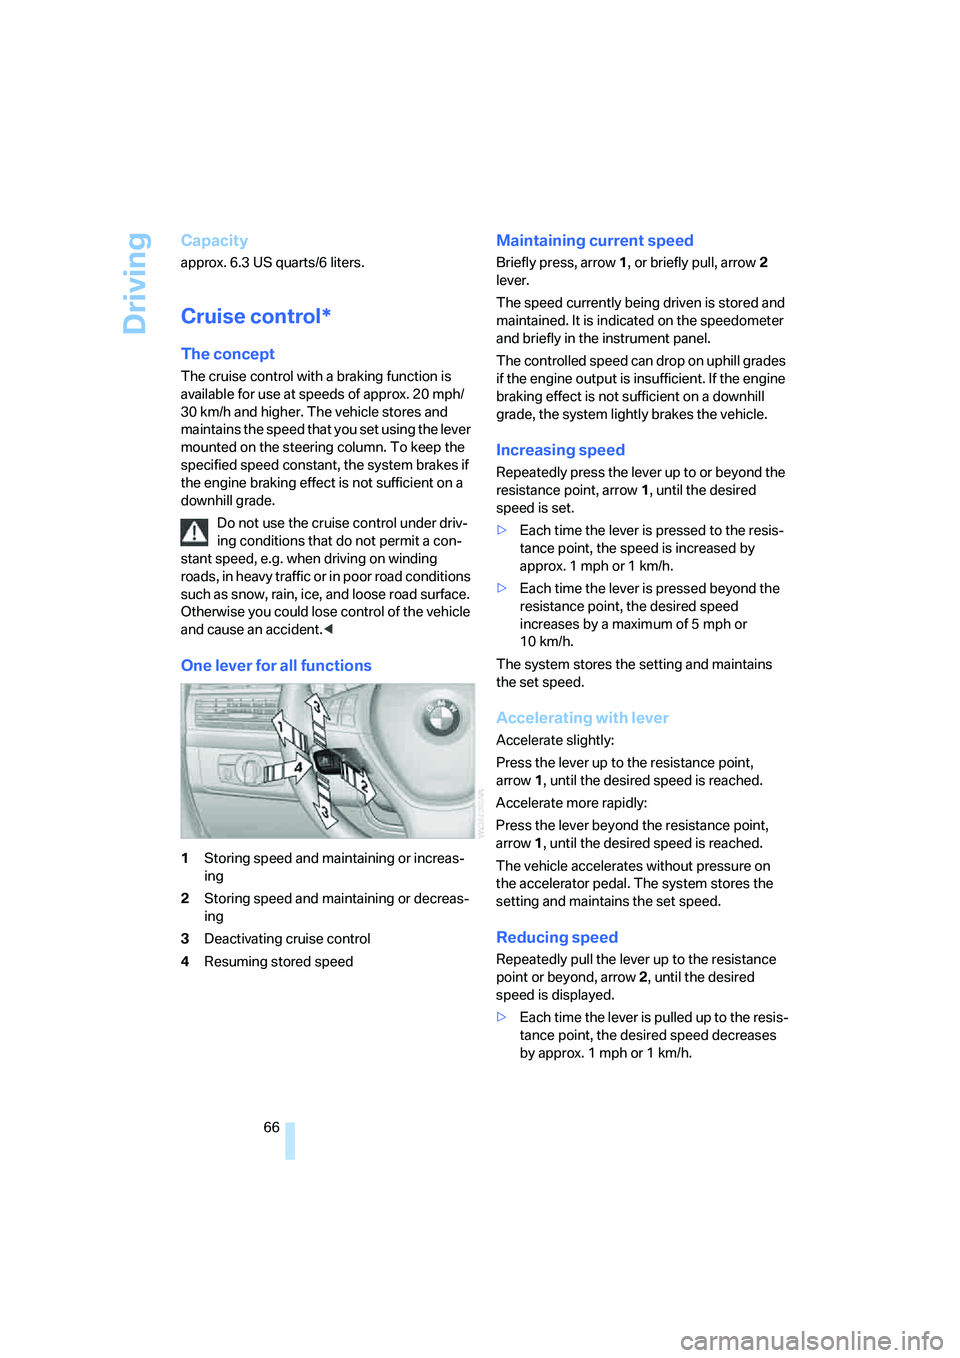
One lever for all functions
1Storing speed and maintaining or increas-
ing
2Storing speed and maintaining or decreas-
ing
3Deactivating cruise control
4Resuming stored speed
Maintaining current speed
Briefly press, arrow1, or briefly pull, arrow2
lever.
The speed currently being driven is stored and
maintained. It is indicated on the speedometer
and briefly in the instrument panel.
The controlled speed can drop on uphill grades
if the engine output is insufficient. If the engine
braking effect is not sufficient on a downhill
grade, the system lightly brakes the vehicle.
Increasing speed
Repeatedly press the lever up to or beyond the
resistance point, arrow1, until the desired
speed is set.
>Each time the lever is pressed to the resis-
tance point, the speed is increased by
approx. 1 mph or 1 km/h.
>Each time the lever is pressed beyond the
resistance point, the desired speed
increases by a maximum of 5 mph or
10 km/h.
The system stores the setting and maintains
the set speed.
Accelerating with lever
Accelerate slightly:
Press the lever up to the resistance point,
arrow1, until the desired speed is reached.
Accelerate more rapidly:
Press the lever beyond the resistance point,
arrow1, until the desired speed is reached.
The vehicle accelerates without pressure on
the accelerator pedal. The system stores the
setting and maintains the set speed.
Reducing speed
Repeatedly pull the lever up to the resistance
point or beyond, arrow2, until the desired
speed is displayed.
>Each time the lever is pulled up to the resis-
tance point, the desired speed decreases
by approx. 1 mph or 1 km/h.
Page 69 of 288
Controls
67Reference
At a glance
Driving tips
Communications
Navigation
Entertainment
Mobility
>Each time the lever is pulled beyond the
resistance point, the desired speed is
decreased by a maximum of 5 mph or
10 km/h until the minimum speed of
20 mph or 30 km/h is reached.
The system stores the setting and maintains
the set speed.
Deactivating cruise control
Briefly press the lever up or down, arrow3.
The displays in the speedometer go out.
In addition, the system is automatically deacti-
vated:
>when braking
>when transmission position N is engaged
>when DTC is activated or DSC is deacti-
vated
>when HDC is activated
>when the parking brake is set
>when driving stability control systems inter-
vene
Accelerating does not deactivate the cruise
control. After releasing the accelerator pedal,
the stored speed is reached and maintained
again.
Warning lamp
The warning lamp lights up if the
cruise control has been deactivated
automatically, e.g. by a control inter-
vention of the DSC. A message appears on the
Control Display.
Resuming stored speed
Briefly press the button, arrow4. The stored
speed is resumed and maintained.
With the ignition switched off, the stored speed
value is deleted and cannot be resumed again.
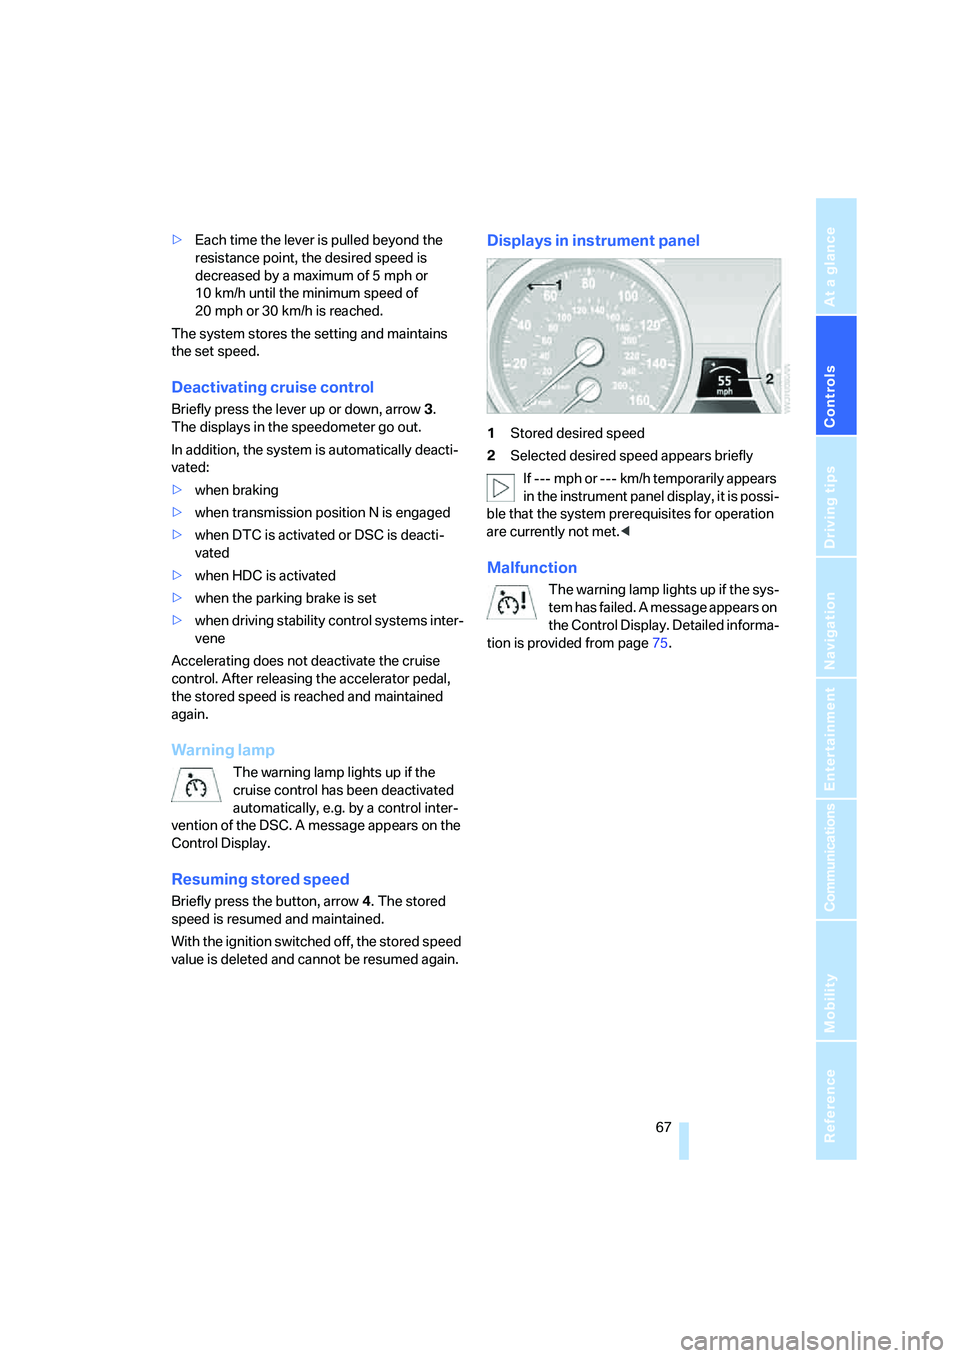
Displays in instrument panel
1Stored desired speed
2Selected desired speed appears briefly
If --- mph or --- km/h temporarily appears
in the instrument panel display, it is possi-
ble that the system prerequisites for operation
are currently not met.<
Malfunction
The warning lamp lights up if the sys-
tem has failed. A message appears on
the Control Display. Detailed informa-
tion is provided from page75.
Page 90 of 288
Technology for comfort, convenience and safety
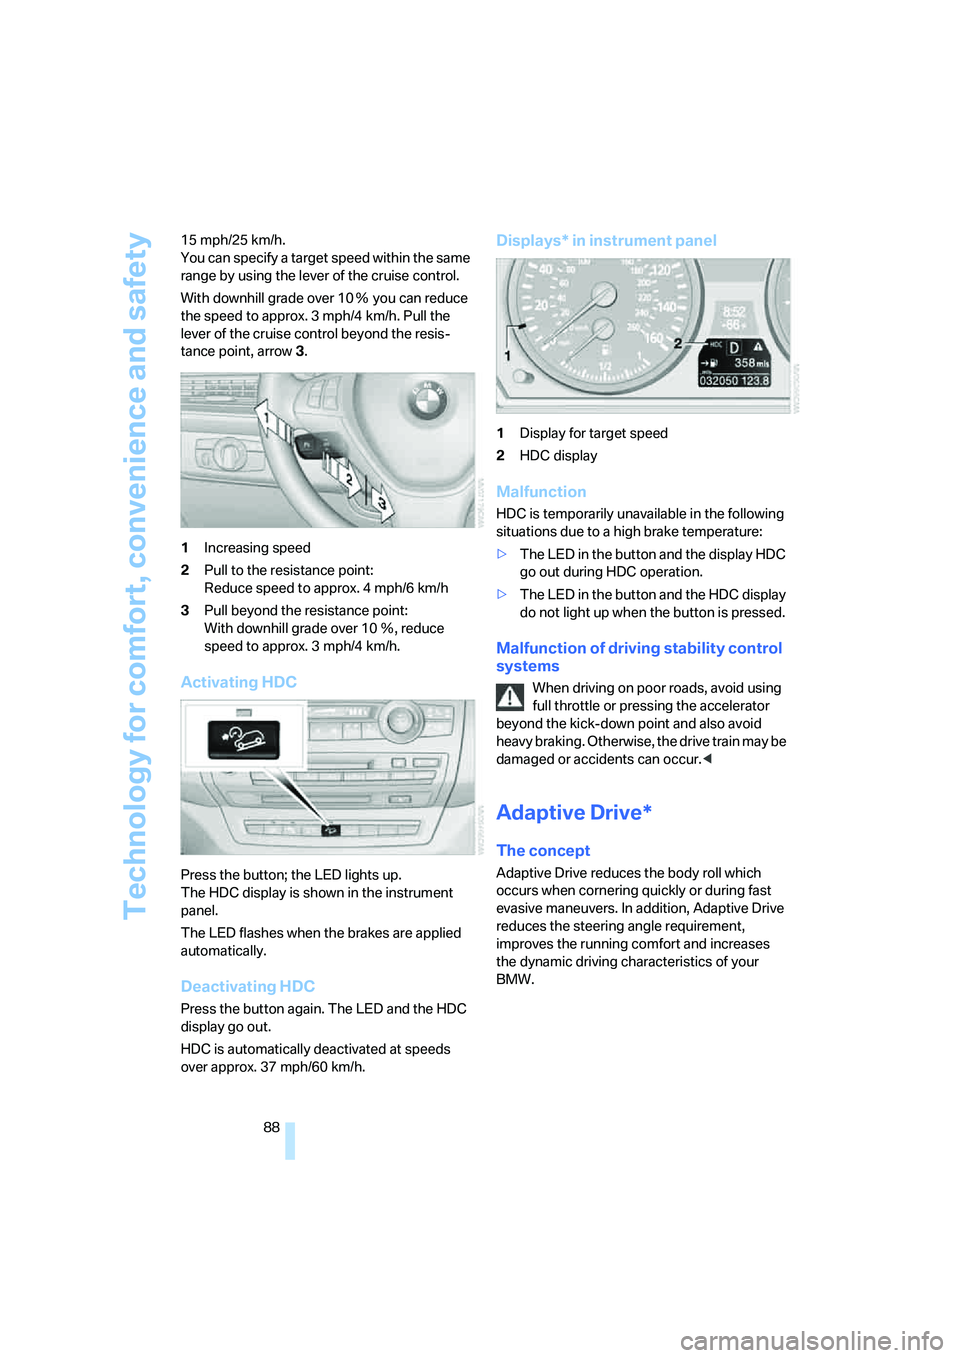
88 15 mph/25 km/h.
You can specify a target speed within the same
range by using the lever of the cruise control.
With downhill grade over 10Ξ you can reduce
the speed to approx. 3 mph/4 km/h. Pull the
lever of the cruise control beyond the resis-
tance point, arrow3.
1Increasing speed
2Pull to the resistance point:
Reduce speed to approx. 4 mph/6 km/h
3Pull beyond the resistance point:
With downhill grade over 10Ξ, reduce
speed to approx. 3 mph/4 km/h.
Activating HDC
Press the button; the LED lights up.
The HDC display is shown in the instrument
panel.
The LED flashes when the brakes are applied
automatically.
Deactivating HDC
Press the button again. The LED and the HDC
display go out.
HDC is automatically deactivated at speeds
over approx. 37 mph/60 km/h.
Displays* in instrument panel
1Display for target speed
2HDC display
Malfunction
HDC is temporarily unavailable in the following
situations due to a high brake temperature:
>The LED in the button and the display HDC
go out during HDC operation.
>The LED in the button and the HDC display
do not light up when the button is pressed.
Malfunction of driving stability control
systems
When driving on poor roads, avoid using
full throttle or pressing the accelerator
beyond the kick-down point and also avoid
heavy braking. Otherwise, the drive train may be
damaged or accidents can occur.<
Adaptive Drive*
The concept
Adaptive Drive reduces the body roll which
occurs when cornering quickly or during fast
evasive maneuvers. In addition, Adaptive Drive
reduces the steering angle requirement,
improves the running comfort and increases
the dynamic driving characteristics of your
BMW.
Page 99 of 288
Controls
97Reference
At a glance
Driving tips
Communications
Navigation
Entertainment
Mobility
Head-Up Display*
The concept
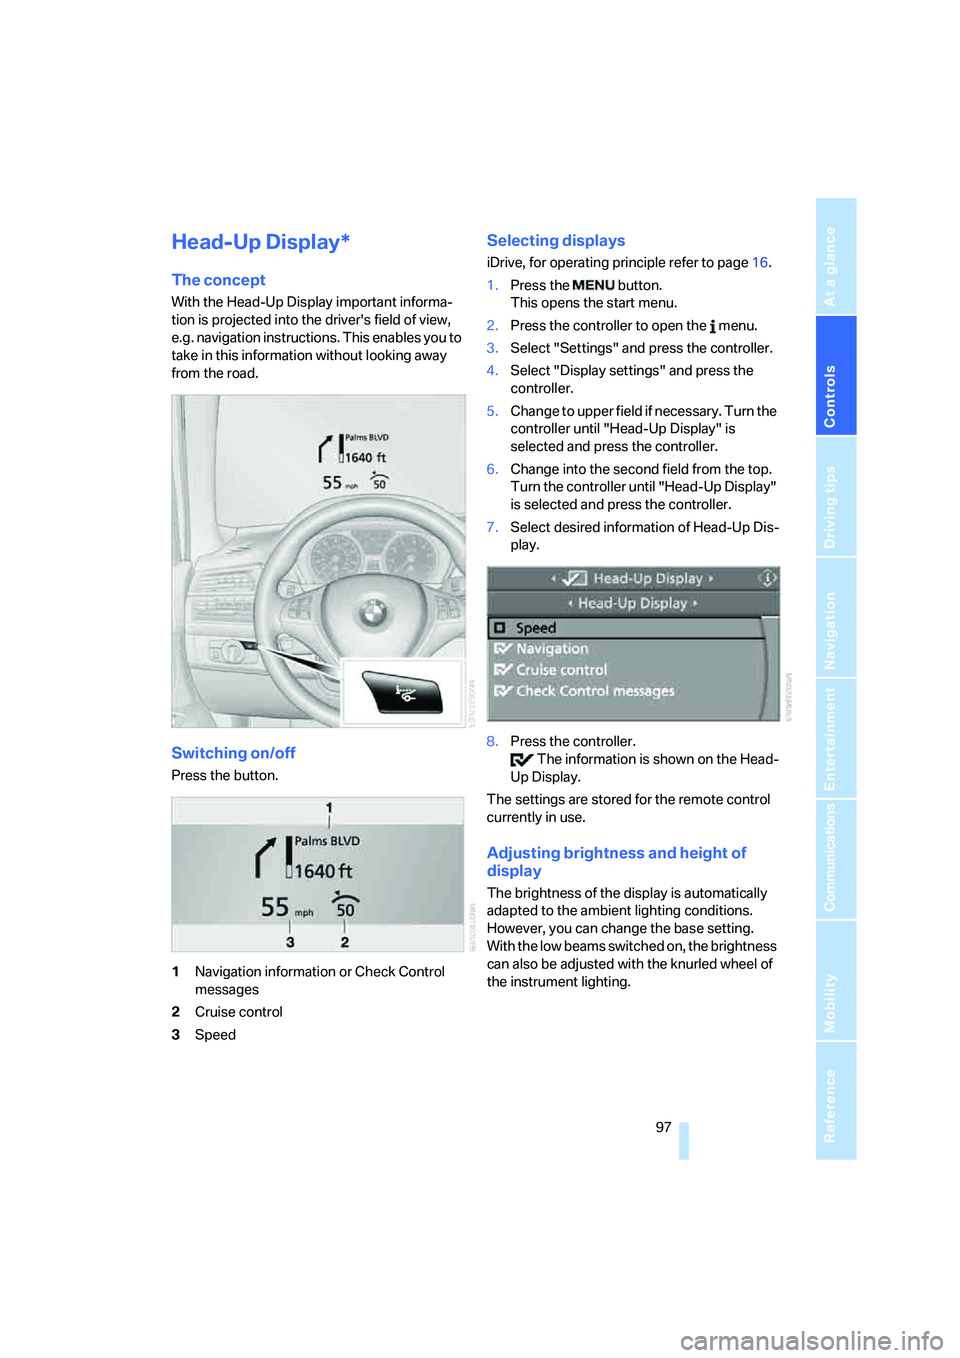
With the Head-Up Display important informa-
tion is projected into the driver's field of view,
e.g. navigation instructions. This enables you to
take in this information without looking away
from the road.
Switching on/off
Press the button.
1Navigation information or Check Control
messages
2Cruise control
3Speed
Selecting displays
iDrive, for operating principle refer to page16.
1.Press the button.
This opens the start menu.
2.Press the controller to open the menu.
3.Select "Settings" and press the controller.
4.Select "Display settings" and press the
controller.
5.Change to upper field if necessary. Turn the
controller until "Head-Up Display" is
selected and press the controller.
6.Change into the second field from the top.
Turn the controller until "Head-Up Display"
is selected and press the controller.
7.Select desired information of Head-Up Dis-
play.
8.Press the controller.
The information is shown on the Head-
Up Display.
The settings are stored for the remote control
currently in use.
Adjusting brightness and height of
display
The brightness of the display is automatically
adapted to the ambient lighting conditions.
However, you can change the base setting.
With the low beams switched on, the brightness
can also be adjusted with the knurled wheel of
the instrument lighting.
Page 272 of 288
Everything from A to Z
270 Convenience operation
– glass sunroof30,32
– glass sunroof with comfort
access37
– windows30,32
– windows with comfort
access37
– with comfort access37
Coolant242
– checking level242
– temperature69
Cooling, maximum106
Cornering Brake Control
CBC85
Courtesy lamps, refer to
Interior lamps102
Cradle for telephone or mobile
phone116
Cruise control66
Cruising range70
Cup holders117
Curb weight, refer to
Weights260
"Current position"155
Current position
– displaying155
– entering144
– storing144
"Customer
Relations"216,224
Cylinders, refer to Engine
data258
D
Dashboard, refer to
Cockpit10
Data258
– capacities261
– dimensions259
– engine258
– technical data258
– weights260
"Date"79
Date68
– display format79
– retrieving68
– setting79"Date format"79
"Daytime running lamps"100
Daytime running lamps100
"Deactivated"45
Decommissioning the vehicle,
refer to Caring for your
vehicle brochure
Defrosting windows105
Defrosting windows and
removing condensation105
Defrost position, refer to
Defrosting windows105
"Delete address book" for
navigation145
"Delete all numbers" on the
mobile phone215
"Delete data" for
navigation145
"Delete" for mobile
phone215
Destination address
– deleting145
– entering137,139
Destination for navigation
– destination list143
– entering136
– selecting from address
book144
– selecting using
information142
– selecting using voice139
– storing144
Destination guidance148
– canceling voice
instructions52
– changing specified
route146
– displaying route149
– distance and arrival148
– ending/continuing148
– starting148
– voice instructions151
– volume of voice
instructions152
Destination list for navigation
system
143Destinations recently driven
to143
"Details"
– DVD system in the rear198
– in audio mode188
"Dial" for mobile phone213
"Dial number"213
"Diamond button"52
Digital clock68
Digital compass114
Digital radio, refer to High
Definition Radio167
Digital Versatile Disc, refer to
– DVD changer179
– Player for navigation
DVD160
Dimensions259
Directional indicators, refer to
Turn signals64
Direction announcements,
refer to Voice
instructions151
Direction instructions, refer to
Voice instructions151
Directory for navigation, refer
to Address book144
Direct selection buttons21
Displacement, refer to Engine
data258
"Display"79
Display, refer to iDrive16
Displaying images198
Display lighting, refer to
Instrument lighting102
"Display off"21
Displays, refer to Instrument
panel12
"Display settings"79,97
Displays on the windshield,
refer to Head-Up Display97
Disposal
– battery of remote control
with comfort access38
– remote control battery192
– vehicle battery251
Distance, refer to
Computer70
Page 283 of 288
Reference 281
At a glance
Controls
Driving tips
Communications
Navigation
Entertainment
Mobility
Storing current position144
Storing radio stations166
Storing sitting position, refer
to Seat, mirror and steering
wheel memory44
Storing tires238
"Street" for destination
entry138
"Subtitles" for DVD system in
rear195
Summer tires, refer to Wheels
and tires232
Switches, refer to Cockpit10
Switching cooling function on
and off106
Switching off engine57
Switching on
– audio160
– CD changer160
– CD player160
– radio160
Switching on hour signal79
Swiveling headlamps, refer to
Adaptive Head Light101
Symbols4
– indicator/warning lamps13
– navigation system154
– traffic information with
navigation system152
T
Tachometer69
"Tailgate"34
Tail lamps246
– replacing bulbs246
Tank contents, refer to
Capacities261
Target cursor for
navigation141
Technical alterations, refer to
For your own safety5
Technical data258
Telematic, refer to
TeleService,
BMW Assist221Telephone
– refer to Mobile phone206
– refer to separate operating
instructions
"Telephone list"52
TeleService223
Temperature
– adjusting in upper body
region105
– adjusting with automatic
climate control105,109
– changing units of
measure79
– refer to Coolant
temperature69
Temperature display
– outside temperature68
– setting units79
– temperature warning68
Temperature warning68
Tempomat, refer to Cruise
control66
"Terminate services"226
"Text language"80
The individual vehicle5
Third brake lamp, refer to
Center brake lamp248
Tightening torque of the lug
bolts, refer to After
mounting250
Tilt alarm sensor, switching
off36
Tilting down passenger-side
exterior mirror50
"Time"78
"Time / Date"78
"Time format"79
Timer, refer to Preselecting
activation times110
"Timer 1" for parked car
ventilation110
"Timer 2" for parked car
ventilation110
Tire inflation pressures232
– checking232
– monitoring, refer to Flat Tire
Monitor89
Tire Pressure Monitor
TPM
91Tire Quality Grading235
Tires
– age235
– air loss90,92
– breaking-in126
– changing237
– condition236
– damage236
– flat tire, refer to Changing
wheels248
– inflation pressure232
– inflation pressure
monitoring, refer to FTM
Flat Tire Monitor89
– new wheels and tires237
– pressure loss90,92
– pressure monitoring, refer to
TPM Tire Pressure
Monitor91
– replacing248
– retreaded tires237
– run-flat tires237
– size235
– tread236
– wear indicators236
– wheel/tire combination237
– winter tires238
"Title" for DVD system in
rear195
TMC station, refer to Traffic
information152
"Tone"161
– for DVD system in rear195
Tone in audio mode
– adjusting161
– middle setting163
Tools, refer to Onboard
toolkit245
"Top 8" for mobile phone214
Torque
– engine258
– lug bolts, refer to After
mounting250
Touch tone dialing216
Tow fitting254
Towing254
– tow fitting254
"Town / City" for destination
entry137