jacking BMW X6 XDRIVE35I 2008 Owners Manual
[x] Cancel search | Manufacturer: BMW, Model Year: 2008, Model line: X6 XDRIVE35I, Model: BMW X6 XDRIVE35I 2008Pages: 288, PDF Size: 9.28 MB
Page 250 of 288
Replacing components
248 2.Rotate the bulb socket to the left and
remove.
3.Apply gentle pressure to the bulb while
turning it to the left for removal and replace-
ment.
4.Insert the bulb socket in the liftgate and
engage it.
5.Replace the cover.
License plate lamp
5-Watt bulb, C5W
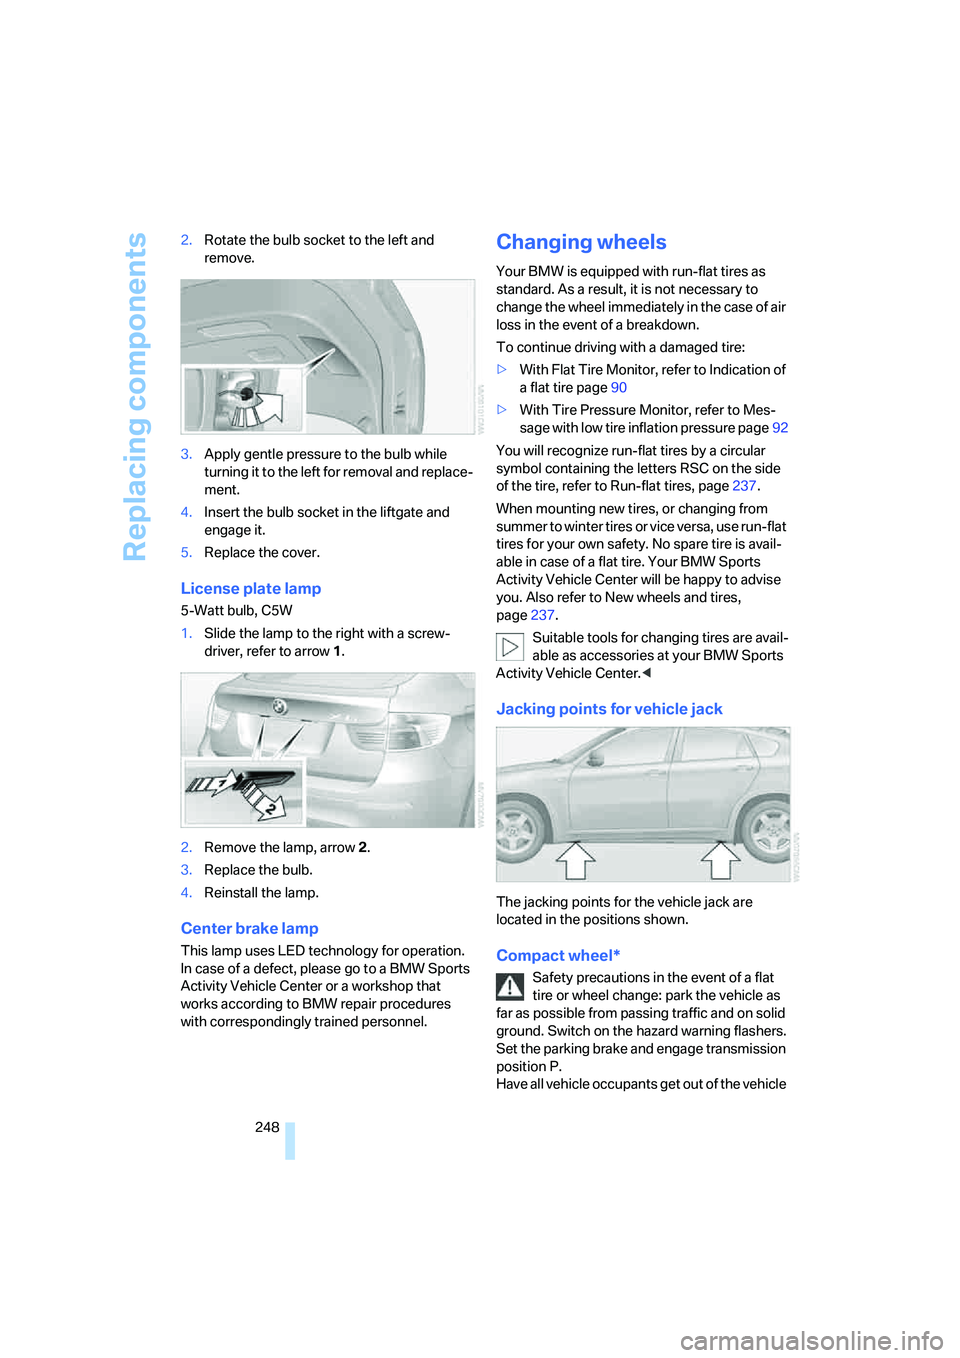
1.Slide the lamp to the right with a screw-
driver, refer to arrow1.
2.Remove the lamp, arrow2.
3.Replace the bulb.
4.Reinstall the lamp.
Center brake lamp
This lamp uses LED technology for operation.
In case of a defect, please go to a BMW Sports
Activity Vehicle Center or a workshop that
works according to BMW repair procedures
with correspondingly trained personnel.
Changing wheels
Your BMW is equipped with run-flat tires as
standard. As a result, it is not necessary to
change the wheel immediately in the case of air
loss in the event of a breakdown.
To continue driving with a damaged tire:
>With Flat Tire Monitor, refer to Indication of
a flat tire page90
>With Tire Pressure Monitor, refer to Mes-
sage with low tire inflation pressure page92
You will recognize run-flat tires by a circular
symbol containing the letters RSC on the side
of the tire, refer to Run-flat tires, page237.
When mounting new tires, or changing from
summer to winter tires or vice versa, use run-flat
tires for your own safety. No spare tire is avail-
able in case of a flat tire. Your BMW Sports
Activity Vehicle Center will be happy to advise
you. Also refer to New wheels and tires,
page237.
Suitable tools for changing tires are avail-
able as accessories at your BMW Sports
Activity Vehicle Center.<
Jacking points for vehicle jack
The jacking points for the vehicle jack are
located in the positions shown.
Compact wheel*
Safety precautions in the event of a flat
tire or wheel change: park the vehicle as
far as possible from passing traffic and on solid
ground. Switch on the hazard warning flashers.
Set the parking brake and engage transmission
position P.
Have all vehicle occupants get out of the vehicle
Page 251 of 288
Mobility
249Reference
At a glance
Controls
Driving tips
Communications
Navigation
Entertainment
and ensure that they remain outside the imme-
diate area in a safe place, such as behind a
guardrail.
If a warning triangle
* or portable hazard warning
lamp
* is r e q u ir e d , s e t i t up o n t h e ro a d s id e a t a n
appropriate distance from the rear of the vehi-
cle. Comply with all safety guidelines and regu-
lations.
Change the wheel only on a level, firm surface
which is not slippery. The vehicle or the jack
could slip to the side if you attempt to raise the
vehicle on a soft or slippery surface such as
snow, ice, tiles, etc.
Position the jack on a firm support surface.
Do not use a wooden block or similar object as a
support base for the jack, as this would prevent
it from extending to its full support height and
reduce its load-carrying capacity.
To avoid serious or fatal injury: never lie under
the vehicle, and never start the engine while it is
supported by the jack.<
What you will need
To avoid rattling noises later on, note the posi-
tions of the tools before removing them, then
return them to their initial positions after com-
pleting work.
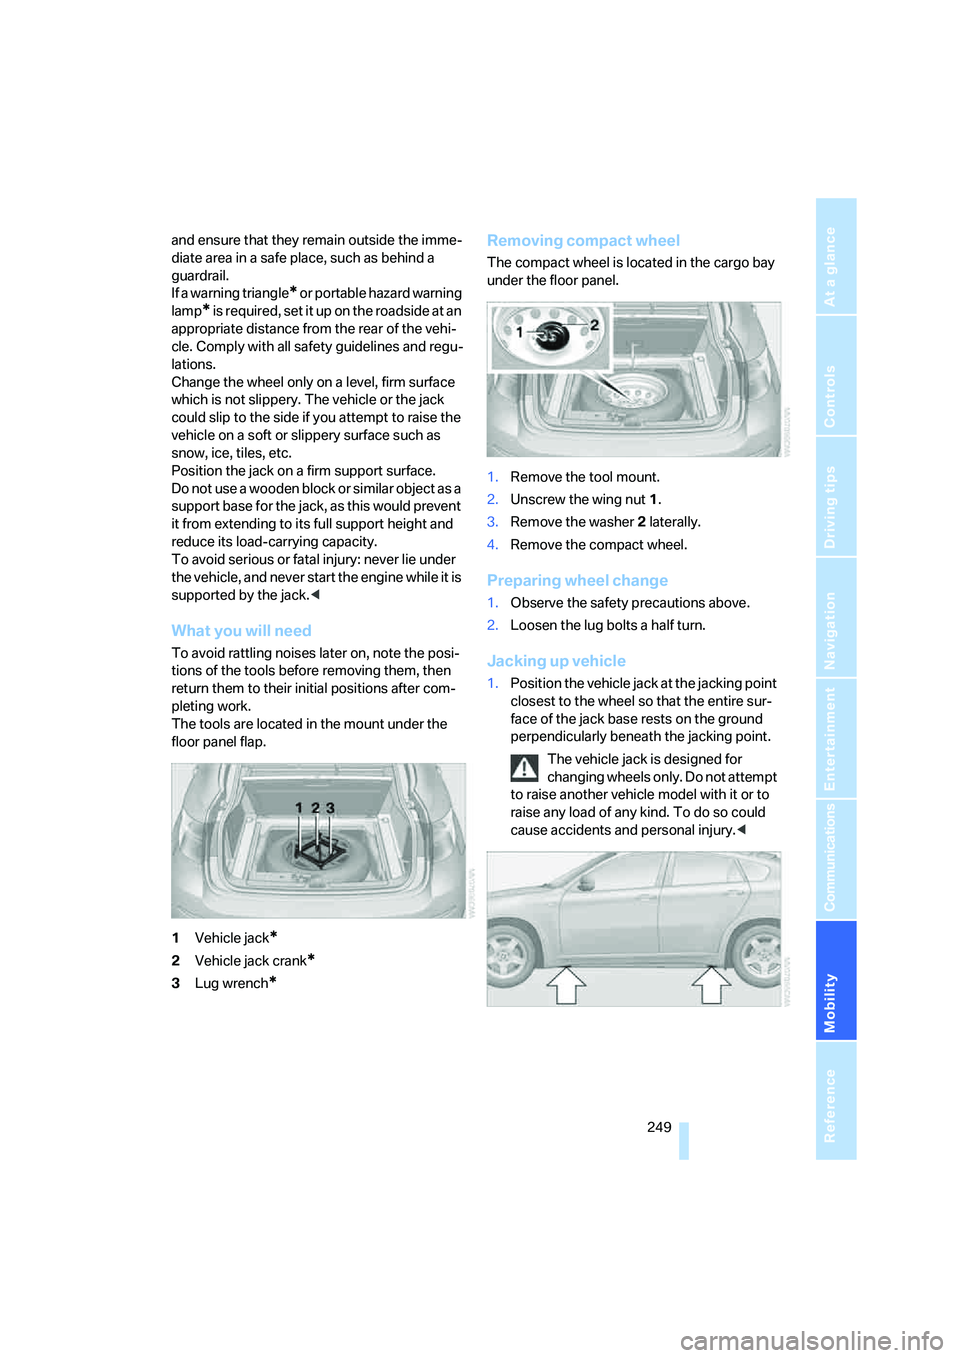
The tools are located in the mount under the
floor panel flap.
1Vehicle jack
*
2Vehicle jack crank*
3Lug wrench*
Removing compact wheel
The compact wheel is located in the cargo bay
under the floor panel.
1.Remove the tool mount.
2.Unscrew the wing nut 1.
3.Remove the washer 2 laterally.
4.Remove the compact wheel.
Preparing wheel change
1.Observe the safety precautions above.
2.Loosen the lug bolts a half turn.
Jacking up vehicle
1.Position the vehicle jack at the jacking point
closest to the wheel so that the entire sur-
face of the jack base rests on the ground
perpendicularly beneath the jacking point.
The vehicle jack is designed for
changing wheels only. Do not attempt
to raise another vehicle model with it or to
raise any load of any kind. To do so could
cause accidents and personal injury.<
Page 252 of 288
Replacing components
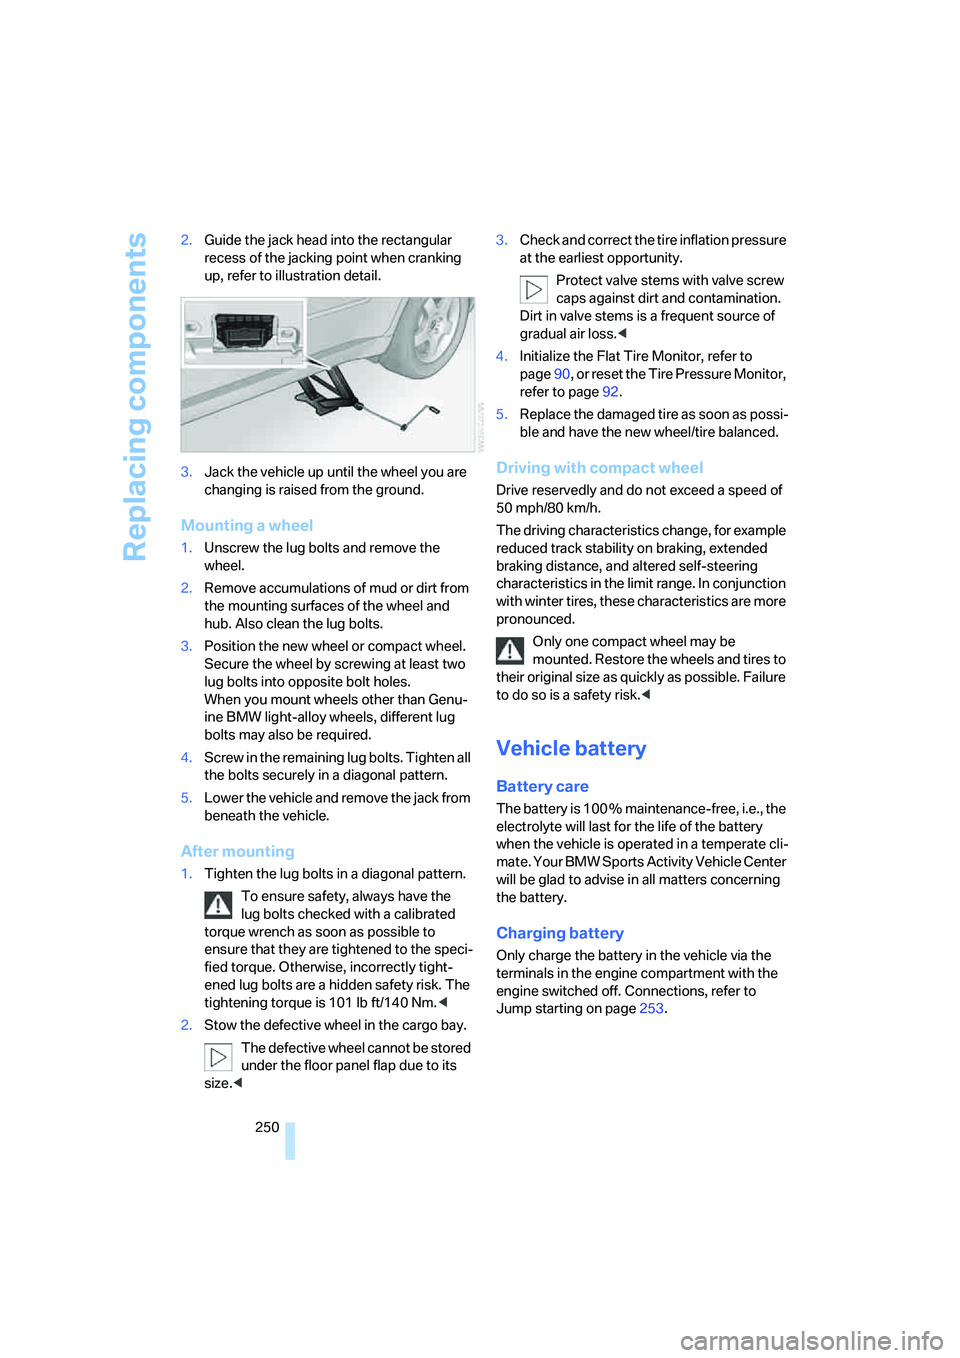
250 2.Guide the jack head into the rectangular
recess of the jacking point when cranking
up, refer to illustration detail.
3.Jack the vehicle up until the wheel you are
changing is raised from the ground.
Mounting a wheel
1.Unscrew the lug bolts and remove the
wheel.
2.Remove accumulations of mud or dirt from
the mounting surfaces of the wheel and
hub. Also clean the lug bolts.
3.Position the new wheel or compact wheel.
Secure the wheel by screwing at least two
lug bolts into opposite bolt holes.
When you mount wheels other than Genu-
ine BMW light-alloy wheels, different lug
bolts may also be required.
4.Screw in the remaining lug bolts. Tighten all
the bolts securely in a diagonal pattern.
5.Lower the vehicle and remove the jack from
beneath the vehicle.
After mounting
1.Tighten the lug bolts in a diagonal pattern.
To ensure safety, always have the
lug bolts checked with a calibrated
torque wrench as soon as possible to
ensure that they are tightened to the speci-
fied torque. Otherwise, incorrectly tight-
ened lug bolts are a hidden safety risk. The
tightening torque is 101 lb ft/140 Nm.<
2.Stow the defective wheel in the cargo bay.
The defective wheel cannot be stored
under the floor panel flap due to its
size.<3.Check and correct the tire inflation pressure
at the earliest opportunity.
Protect valve stems with valve screw
caps against dirt and contamination.
Dirt in valve stems is a frequent source of
gradual air loss.<
4.Initialize the Flat Tire Monitor, refer to
page90, or reset the Tire Pressure Monitor,
refer to page92.
5.Replace the damaged tire as soon as possi-
ble and have the new wheel/tire balanced.
Driving with compact wheel
Drive reservedly and do not exceed a speed of
50 mph/80 km/h.
The driving characteristics change, for example
reduced track stability on braking, extended
braking distance, and altered self-steering
characteristics in the limit range. In conjunction
with winter tires, these characteristics are more
pronounced.
Only one compact wheel may be
mounted. Restore the wheels and tires to
their original size as quickly as possible. Failure
to do so is a safety risk.<
Vehicle battery
Battery care
The battery is 100 % maintenance-free, i.e., the
electrolyte will last for the life of the battery
when the vehicle is operated in a temperate cli-
mate. Your BMW Sports Activity Vehicle Center
will be glad to advise in all matters concerning
the battery.
Charging battery
Only charge the battery in the vehicle via the
terminals in the engine compartment with the
engine switched off. Connections, refer to
Jump starting on page253.
Page 276 of 288
Everything from A to Z
274
I
IBOC, refer to High Definition
Radio167
Ice, refer to Outside
temperature warning68
Ice warning, refer to Outside
temperature warning68
ID3 tag, refer to Information on
track174
Identification, tire238
Identification mark, run-flat
tires237
iDrive16
– assistance window20
– changing language80
– changing menu page19
– changing settings78
– changing units of measure
and display type79
– confirming selection or
entry19
– controller16
– controls16
– displays, menus17
– selecting menu item19
– setting brightness79
– setting date79
– setting time78
– start menu17
– status information20
– symbols18
Ignition56
– switched off56
– switched on56
Ignition key, refer to Keys/
remote control28
Ignition key position 1, refer to
Radio readiness56
Ignition key position 2, refer to
Ignition on56
Ignition lock56
– starting engine with comfort
access37
Independent ventilation, refer
to Parked car ventilation109Indicator/warning lamps13
– active steering94
– airbags96
– DSC13,86
– DTC87
– fasten safety belt47
– Flat Tire Monitor90
– TPM Tire Pressure
Monitor92
Individual air distribution106
Individually programmable
buttons on steering
wheel51
Individual settings, refer to
Personal Profile28
Inflation pressure, refer to Tire
inflation pressure232
Inflation pressure monitoring
– refer to FTM Flat Tire
Monitor89
– refer to TPM Tire Pressure
Monitor91
Information
– on another location142
– on country142
– on current position142
– on destination location142
"Information on
destination"143
"Info sources"73
Initializing
– Flat Tire Monitor90
– refer to Power failure251
– refer to Setting date79
– refer to Setting time78
– seat, mirror and steering
wheel memory44
"Input map"141
Installation position
– DVD changer179
– mobile phone116
Instructions for navigation
system, refer to Voice
instructions151
Instrument cluster, refer to
Instrument panel12
Instrument illumination, refer
to Instrument lighting102
Instrument lighting102Instrument panel12
– refer to Cockpit10
Integrated key28
Integrated universal remote
control112
Interesting destination for
navigation142
"Interim time"77
Interior lamps102
– switching on with remote
control30
Interior motion sensor36
– switching off36
Interior rearview mirror50
– automatic dimming
feature51
– compass114
Intermittent mode of the
wipers64
J
Jacking points249
Joystick
– refer to iDrive16
– refer to Selector lever,
selecting transmission
positions61
Jumpering, refer to Jump
starting253
Jump starting253
K
Keyless-Go, refer to Comfort
access36
Keyless opening and closing,
refer to Comfort access36
Key Memory, refer to Personal
Profile28
"Keypad"216
Keys28
– key-related settings, refer to
Personal Profile28
Kick-down, automatic
transmission with
Steptronic62
Knock control231
Page 284 of 288
Everything from A to Z
282 Town/city for destination
entry137
Tow-starting254,255
"TPM"92
TPM Tire Pressure
Monitor91
– resetting system92
– system limits91
– warning lamp92
Tracks
– finding175
– random sequence176
– sampling, scan175
Track width, refer to
Dimensions259
Traction-assist feature, refer
to DSC Dynamic Stability
Control86
Traction control, refer to
DSC Dynamic Stability
Control86
Traffic congestion
– bypassing155
– displaying traffic
information152
Traffic information for
navigation
– depiction in route map153
– displaying153
– during destination
guidance155
– switching on/off152
– symbols154
"Traffic Info settings"152
Transmission
– automatic transmission with
Steptronic61
– manually releasing
transmission lock on
automatic transmission with
Steptronic63
Transmission positions, refer
to Automatic transmission
with Steptronic61
Transporting children
safely53
Transport securing device,
refer to Securing cargo130Tread depth, refer to Minimum
tread depth236
Treble, refer to Tone
control161
"Treble / Bass" for DVD
system in rear195
"Trip computer"71
Trip computer71
Trip-distance counter, refer to
Trip odometer68
"Triple turn signal"64
Trip odometer68
Turning circle, refer to
Dimensions259
Turn signals64
– indicator lamp12
– replacing bulbs246
U
Underbody protection, refer to
Caring for your vehicle
brochure
Uniform Tire Quality Grading/
UTQR235
"Units"80
Units
– average fuel
consumption79
– temperature79
Universal garage-door
opener, refer to Integrated
universal remote
control112
Universal remote control112
"Unlock button"30
Unlocking
– from inside32
– liftgate30
– using remote control30
– without key, refer to Comfort
access36
Unlocking and locking doors,
using remote control30
Unlocking without key, refer to
Comfort access36
"Unlock rear menu" for DVD
system in rear190
"Update services"225USB audio interface187
"USB" in audio
mode186,188
Used batteries
– refer to Disposal251
– refer to Replacing battery38
V
Valve screw caps, refer to
After mounting250
Vehicle
– battery250
– breaking-in126
– care244
– care, refer to Caring for your
vehicle brochure
– decommissioning, refer to
Caring for your vehicle
brochure
– loading128
– measurements, refer to
Dimensions259
– parking57
– washing, refer to Caring for
your vehicle brochure
– weights260
"Vehicle / Tires" for
unlocking30
Vehicle jack249
– jacking points249
Vehicle position, refer to
Displaying current
position155
Ventilation107
– draft-free107
– in the rear108
– rear automatic climate
control109
– while stationary109
Vent outlets of automatic
climate control103
Vents, refer to Ventilation107
"Vent settings"106
"Video settings" for DVD
system in rear194
Voice, refer to Voice
instructions for navigation
system151