LIM button BMW X6M 2013 E71 User Guide
[x] Cancel search | Manufacturer: BMW, Model Year: 2013, Model line: X6M, Model: BMW X6M 2013 E71Pages: 327, PDF Size: 7.71 MB
Page 126 of 327
Automatic climate control with 4-zone con‐
trol 126
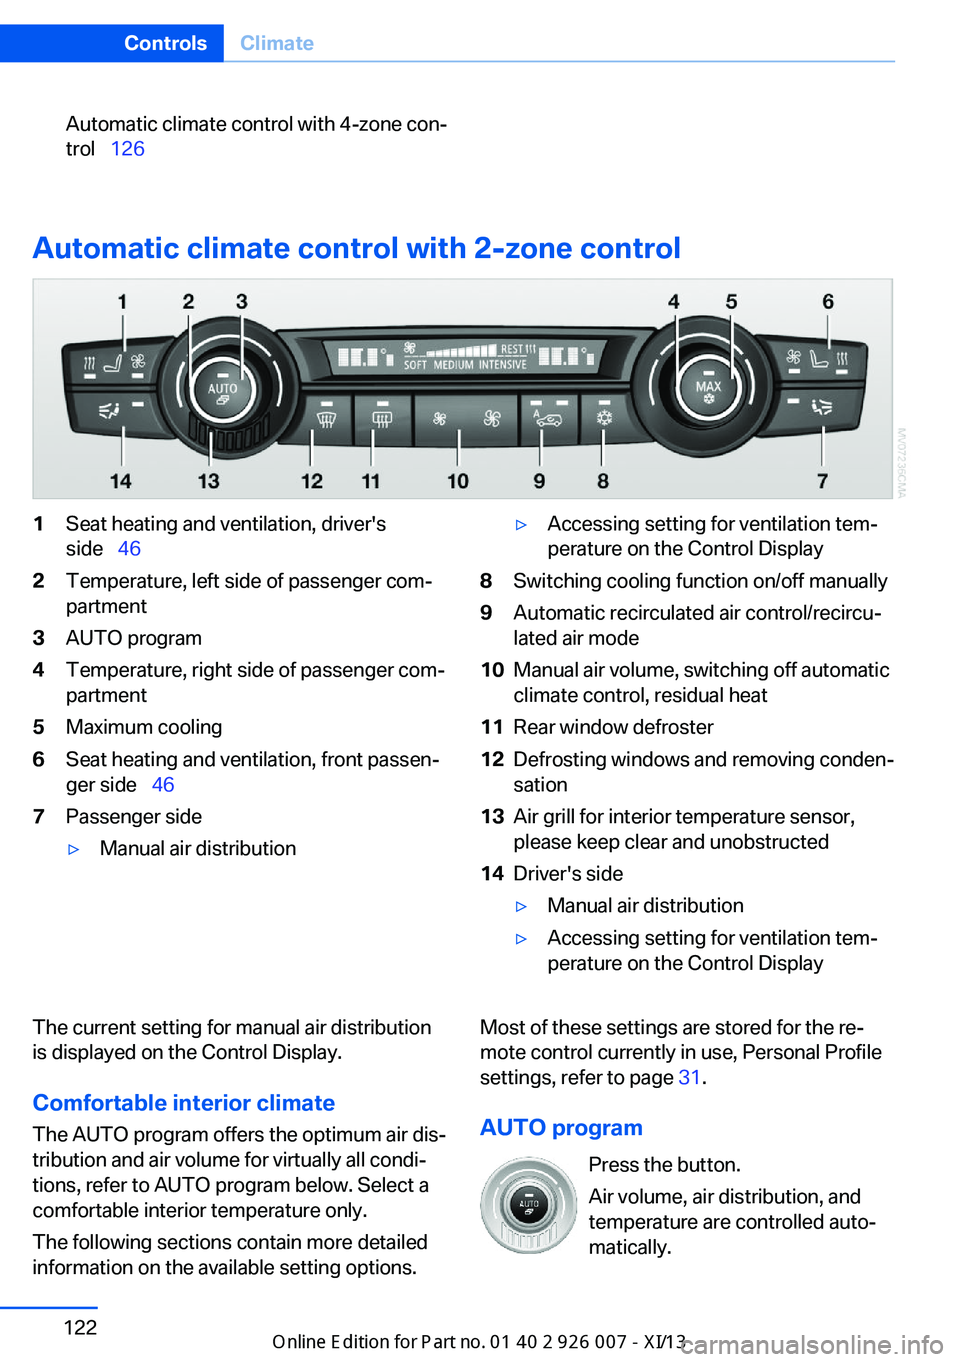
Automatic climate control with 2-zone control
1Seat heating and ventilation, driver's
side 462Temperature, left side of passenger com‐
partment3AUTO program4Temperature, right side of passenger com‐
partment5Maximum cooling6Seat heating and ventilation, front passen‐
ger side 467Passenger side▷Manual air distribution▷Accessing setting for ventilation tem‐
perature on the Control Display8Switching cooling function on/off manually9Automatic recirculated air control/recircu‐
lated air mode10Manual air volume, switching off automatic
climate control, residual heat11Rear window defroster12Defrosting windows and removing conden‐
sation13Air grill for interior temperature sensor,
please keep clear and unobstructed14Driver's side▷Manual air distribution▷Accessing setting for ventilation tem‐
perature on the Control DisplayThe current setting for manual air distribution
is displayed on the Control Display.
Comfortable interior climate The AUTO program offers the optimum air dis‐
tribution and air volume for virtually all condi‐
tions, refer to AUTO program below. Select a
comfortable interior temperature only.
The following sections contain more detailed
information on the available setting options.Most of these settings are stored for the re‐
mote control currently in use, Personal Profile
settings, refer to page 31.
AUTO program Press the button.
Air volume, air distribution, and
temperature are controlled auto‐
matically.Seite 122ControlsClimate122
Online Edition for Part no. 01 40 2 910 876 - VII/13
Page 127 of 327
Depending on the selected temperature,
AUTO intensity, and outside influences, the air
is directed to the windshield, side windows,
upper body, and into the footwell.
The cooling function is switched on automati‐
cally with the AUTO program.
At the same time, a condensation sensor con‐
trols the program in such a way that window
condensation is prevented as much as possi‐
ble.
To switch off the program: press the button
again or manually adjust the air distribution.
Intensity of the AUTO program
Pressing the AUTO button repeatedly adjusts
the intensity of the AUTO program. The se‐
lected intensity, SOFT, MEDIUM or INTEN‐
SIVE, appears on the display of the automatic
climate control.
Temperature Turn the wheel to set the desired
temperature.
The automatic climate control
achieves this temperature as
quickly as possible, if necessary with the maxi‐
mum cooling or heating capacity, and then
keeps it constant.
Avoid rapidly switching between different tem‐
perature settings. The automatic climate con‐
trol will not have sufficient time to adjust the set temperature.
Maximum heating power can be obtained with
the highest setting, regardless of the external
temperature.
At the lowest setting, cooling is continuous, re‐
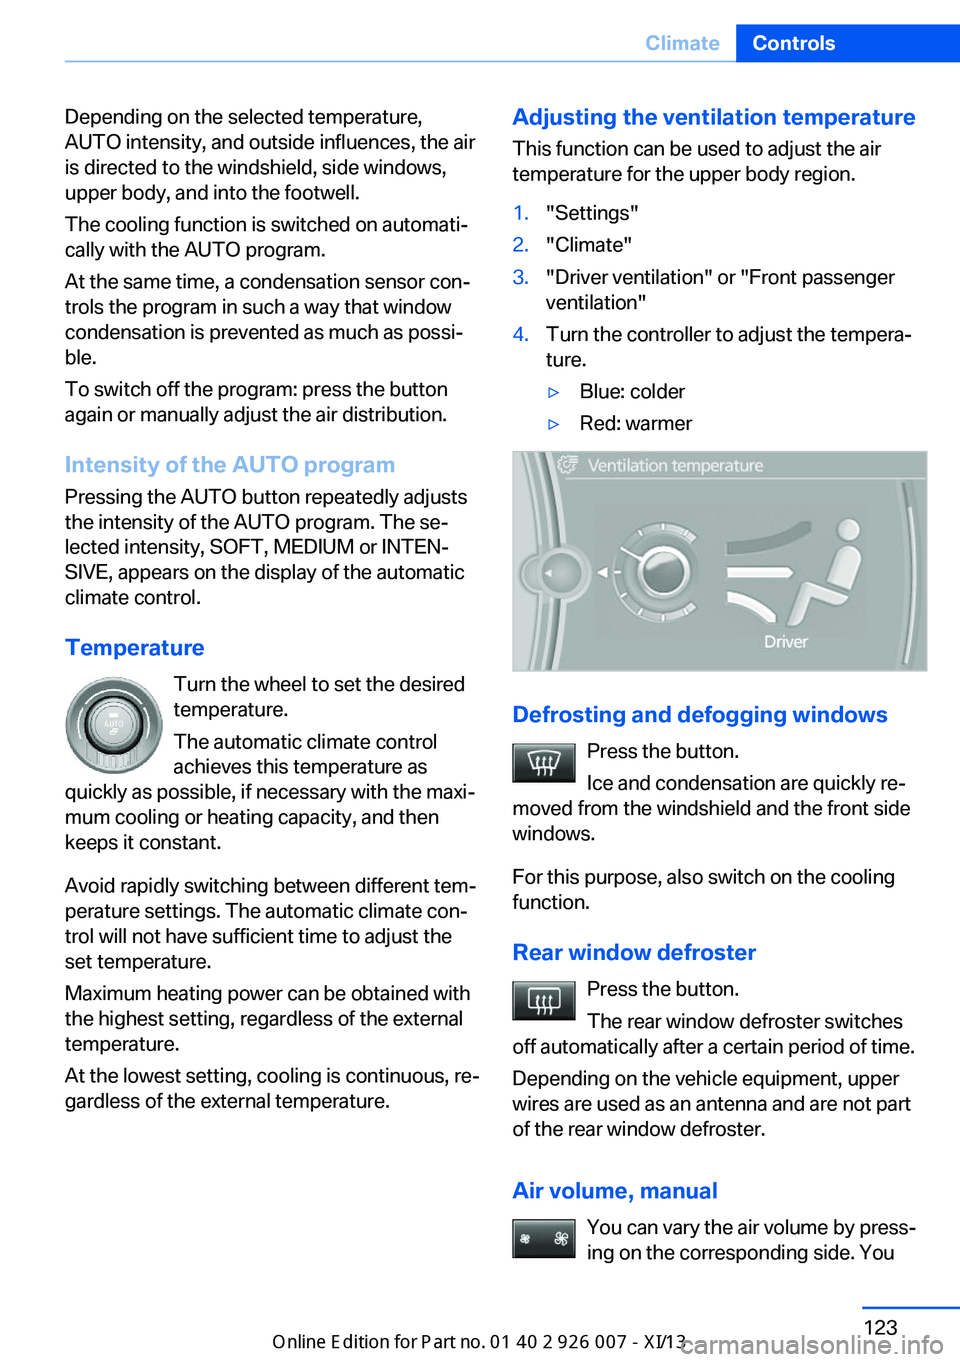
gardless of the external temperature.Adjusting the ventilation temperature
This function can be used to adjust the air
temperature for the upper body region.1."Settings"2."Climate"3."Driver ventilation" or "Front passenger
ventilation"4.Turn the controller to adjust the tempera‐
ture.▷Blue: colder▷Red: warmer
Defrosting and defogging windows
Press the button.
Ice and condensation are quickly re‐
moved from the windshield and the front side
windows.
For this purpose, also switch on the cooling
function.
Rear window defroster Press the button.
The rear window defroster switches
off automatically after a certain period of time.
Depending on the vehicle equipment, upper
wires are used as an antenna and are not part
of the rear window defroster.
Air volume, manual You can vary the air volume by press‐
ing on the corresponding side. You
Seite 123ClimateControls123
Online Edition for Part no. 01 40 2 910 876 - VII/13
Page 128 of 327
can reactivate the automatic mode for the air
volume with the AUTO button.
Manual air distribution
The air flow can be guided into the vehicle in‐
terior, separately for the driver's and front pas‐
senger side, using one of the following pro‐
grams:▷Upper body region.▷Upper body region and footwell.▷Footwell.▷Driver's side: in addition, the windshield,
side windows, and footwell.
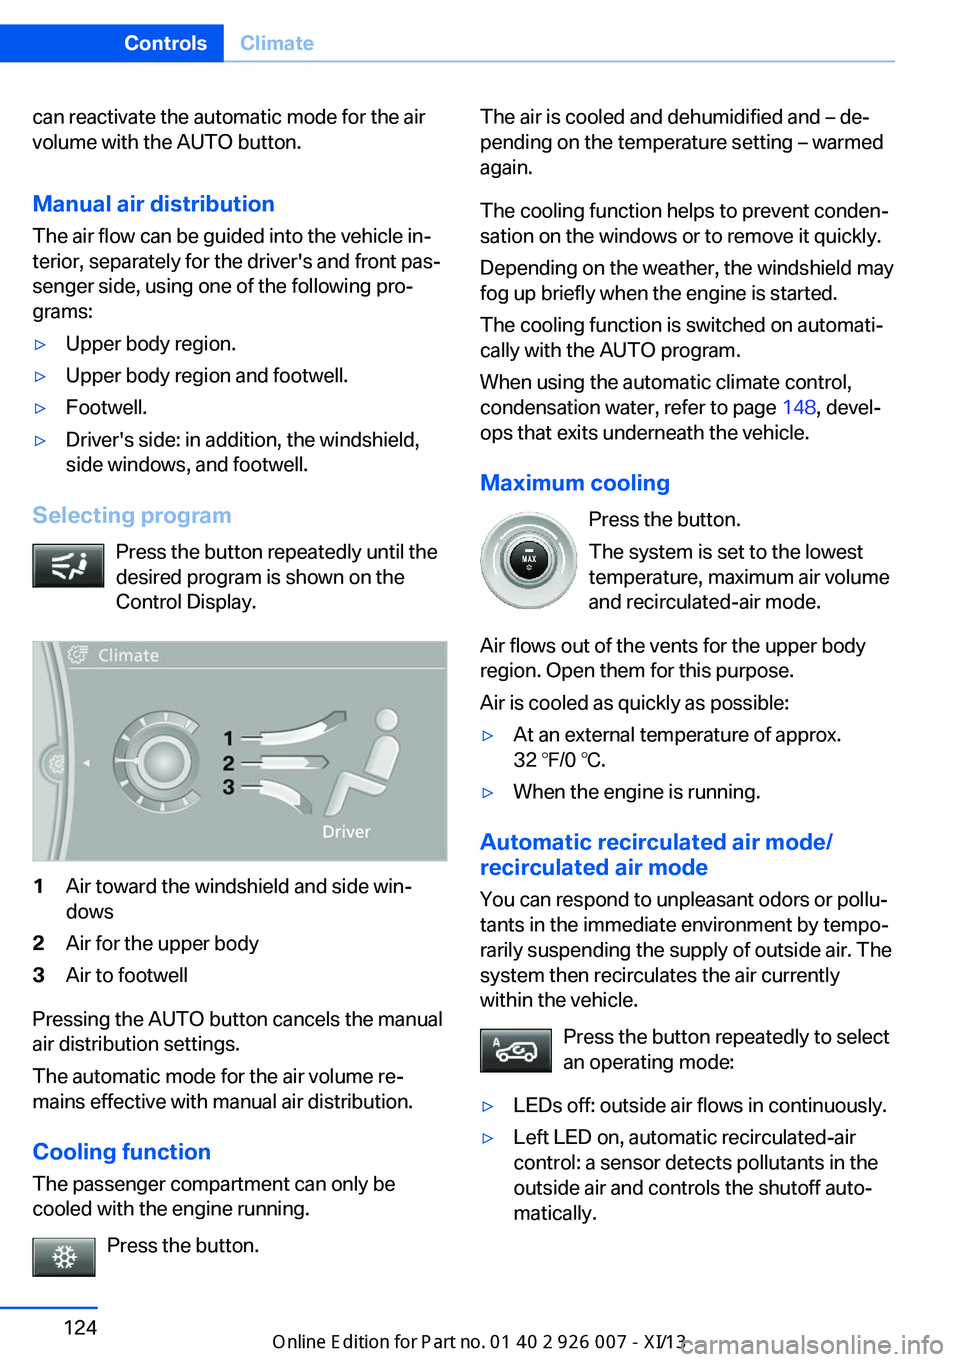
Selecting program
Press the button repeatedly until the
desired program is shown on the
Control Display.
1Air toward the windshield and side win‐
dows2Air for the upper body3Air to footwell
Pressing the AUTO button cancels the manual
air distribution settings.
The automatic mode for the air volume re‐
mains effective with manual air distribution.
Cooling function
The passenger compartment can only be
cooled with the engine running.
Press the button.
The air is cooled and dehumidified and – de‐
pending on the temperature setting – warmed
again.
The cooling function helps to prevent conden‐
sation on the windows or to remove it quickly.
Depending on the weather, the windshield may
fog up briefly when the engine is started.
The cooling function is switched on automati‐
cally with the AUTO program.
When using the automatic climate control,
condensation water, refer to page 148, devel‐
ops that exits underneath the vehicle.
Maximum cooling Press the button.
The system is set to the lowest
temperature, maximum air volume
and recirculated-air mode.
Air flows out of the vents for the upper body
region. Open them for this purpose.
Air is cooled as quickly as possible:▷At an external temperature of approx.
32 ℉/0 ℃.▷When the engine is running.
Automatic recirculated air mode/
recirculated air mode
You can respond to unpleasant odors or pollu‐
tants in the immediate environment by tempo‐
rarily suspending the supply of outside air. The
system then recirculates the air currently
within the vehicle.
Press the button repeatedly to select
an operating mode:
▷LEDs off: outside air flows in continuously.▷Left LED on, automatic recirculated-air
control: a sensor detects pollutants in the
outside air and controls the shutoff auto‐
matically.Seite 124ControlsClimate124
Online Edition for Part no. 01 40 2 910 876 - VII/13
Page 129 of 327
▷Right LED on, recirculated air mode: the
supply of outside air into the vehicle is per‐
manently blocked.
If the windows are fogged over, switch off the
recirculated-air mode and press the AUTO
button to utilize the condensation sensor.
Make sure that air can flow onto the wind‐
shield.
Continuous recirculated-air mode
The recirculated air mode should not be
used for an extended period of time, as the air
quality inside the vehicle deteriorates stead‐
ily.◀
Residual heat
The heat stored in the engine is used to heat
the interior.
Functional requirement
▷Up to 15 minutes after the engine has been
switched off.▷Warm engine.▷The battery is sufficiently charged.▷External temperature below 77 ℉/25 ℃.
Switching on
1.Switch off the ignition.2.Press the right-hand button.
REST appears on the display of the automatic
climate control when the residual heat utiliza‐
tion is switched on.
From radio readiness the interior temperature,
the air volume and the air distribution can be
set.
Switching off
You can select the lowest blower speed by
pressing and holding the left side. Pressing
again switches off the residual heat utilization.
REST disappears from the display of the auto‐
matic climate control.
Switching on/off the automatic
climate control
Switching off With the blower at its lowest setting,
press the left side of the button to
switch off the automatic climate control.
Switching on Press any button to switch the automatic cli‐mate control back on.
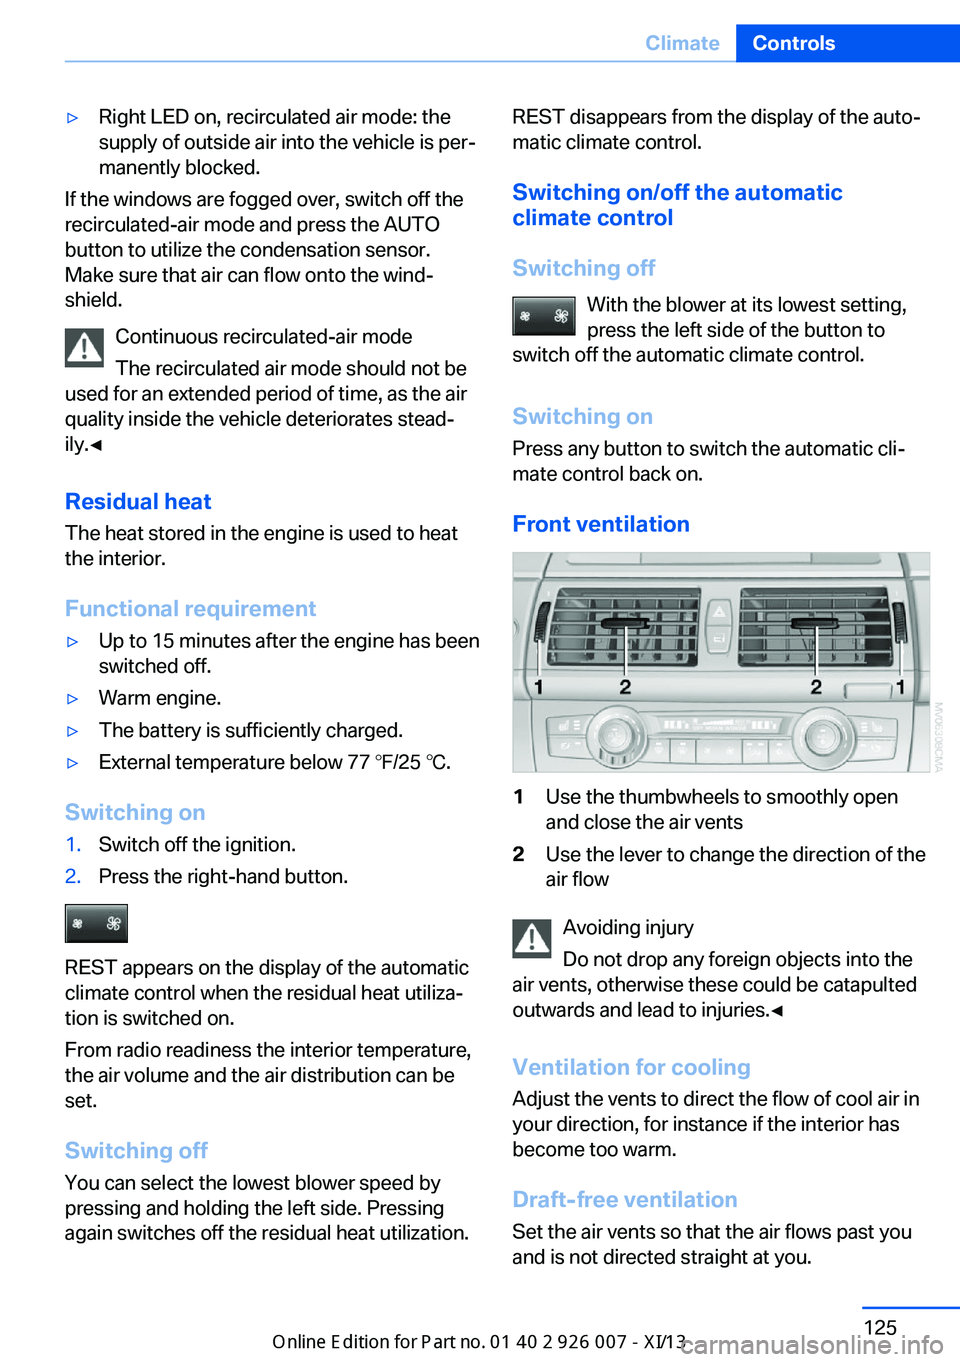
Front ventilation1Use the thumbwheels to smoothly open
and close the air vents2Use the lever to change the direction of the
air flow
Avoiding injury
Do not drop any foreign objects into the
air vents, otherwise these could be catapulted
outwards and lead to injuries.◀
Ventilation for cooling
Adjust the vents to direct the flow of cool air in
your direction, for instance if the interior has
become too warm.
Draft-free ventilation Set the air vents so that the air flows past you
and is not directed straight at you.
Seite 125ClimateControls125
Online Edition for Part no. 01 40 2 910 876 - VII/13
Page 131 of 327
AUTO programThe AUTO program automatically
sets the air distribution toward the
upper body and in the footwell, as
well as the air flow rate. It also
adapts your instructions for the
temperature to outside influences throughout
the year.
Temperature Set the desired temperature indi‐
vidually on the left and right side.
The automatic climate control achieves this
temperature as quickly as possible regardless
of the season, using maximum cooling or heat‐
ing power if necessary, and then maintains it.
When switching between different tempera‐
ture settings in rapid succession, the auto‐
matic climate control does not have sufficient
time to adjust the set temperature.
Air volume, manual The air flow rate can be varied by
pressing on the corresponding side.
The automatic mode for the air flow rate can
be switched on again using the AUTO button.
Switching off rear automatic climate
control
With the blower at its lowest setting,
press the left side of the button to
switch off the automatic climate control.
The automatic climate control can also be
switched off with iDrive. To switch on the auto‐
matic climate control again, the system must
first be reactivated, refer to Activating/deacti‐
vating.
The system is switched on again by pressing
any button of the rear automatic climate con‐
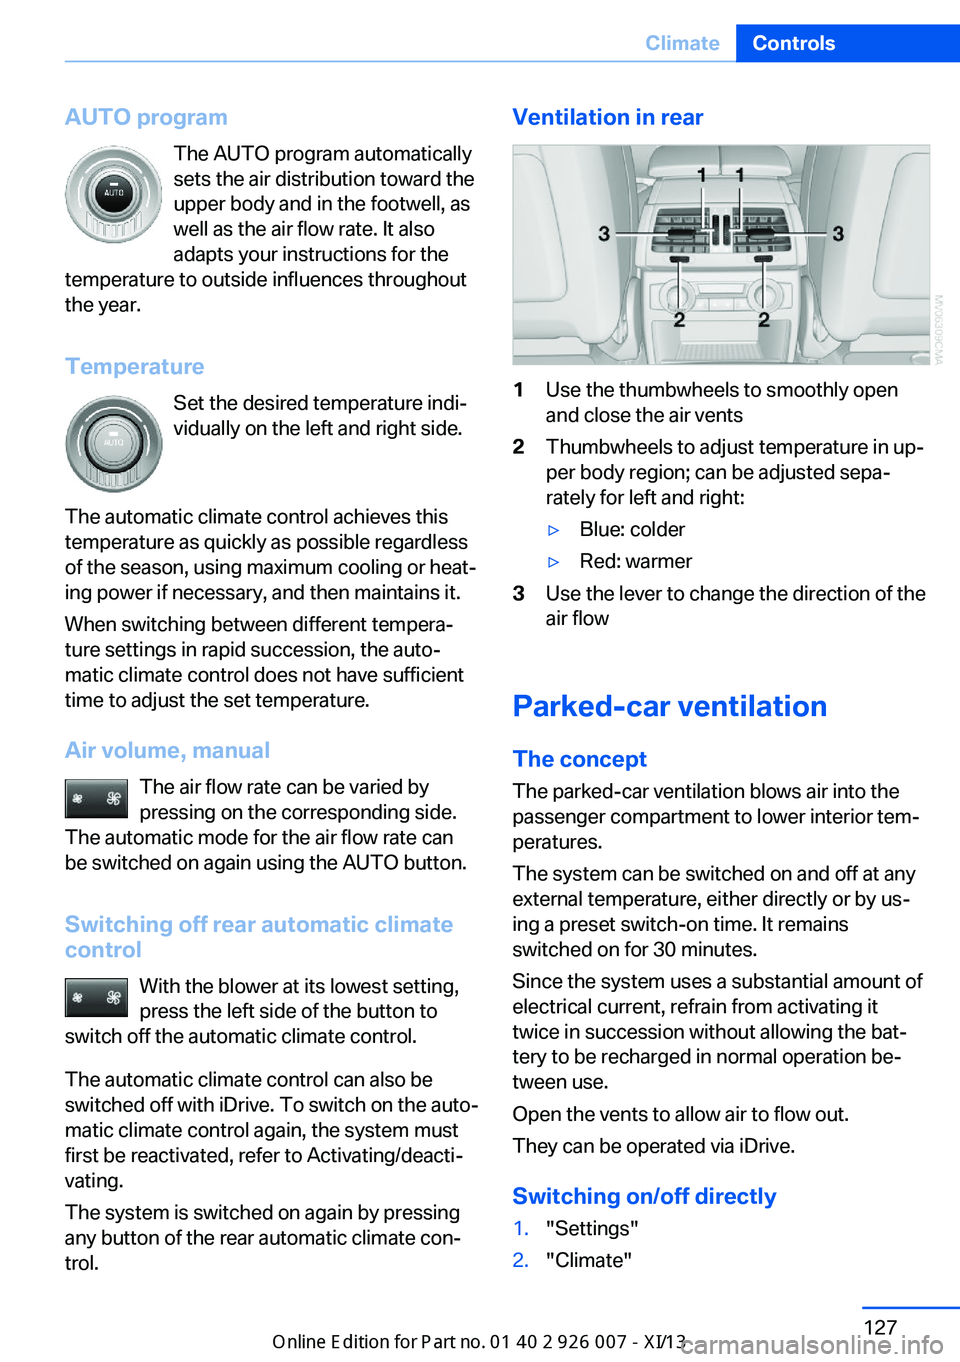
trol.Ventilation in rear1Use the thumbwheels to smoothly open
and close the air vents2Thumbwheels to adjust temperature in up‐
per body region; can be adjusted sepa‐
rately for left and right:▷Blue: colder▷Red: warmer3Use the lever to change the direction of the
air flow
Parked-car ventilation
The concept The parked-car ventilation blows air into the
passenger compartment to lower interior tem‐
peratures.
The system can be switched on and off at any
external temperature, either directly or by us‐
ing a preset switch-on time. It remains
switched on for 30 minutes.
Since the system uses a substantial amount of
electrical current, refrain from activating it
twice in succession without allowing the bat‐
tery to be recharged in normal operation be‐
tween use.
Open the vents to allow air to flow out.
They can be operated via iDrive.
Switching on/off directly
1."Settings"2."Climate"Seite 127ClimateControls127
Online Edition for Part no. 01 40 2 910 876 - VII/13
Page 199 of 327
The CD/DVD is drawn in automatically and
placed into the selected compartment.
Sliding in CDs/DVDs
Do not insert the CD/DVD until the LEDs
on the DVD slot are flashing; otherwise, the
CD/DVD or the CD/DVD changer could be
damaged.
Do not continue to push on the CD/DVD; this
may cause it to jam and prevent it from being
able to eject again.◀
Loading all empty CD/DVD
compartments
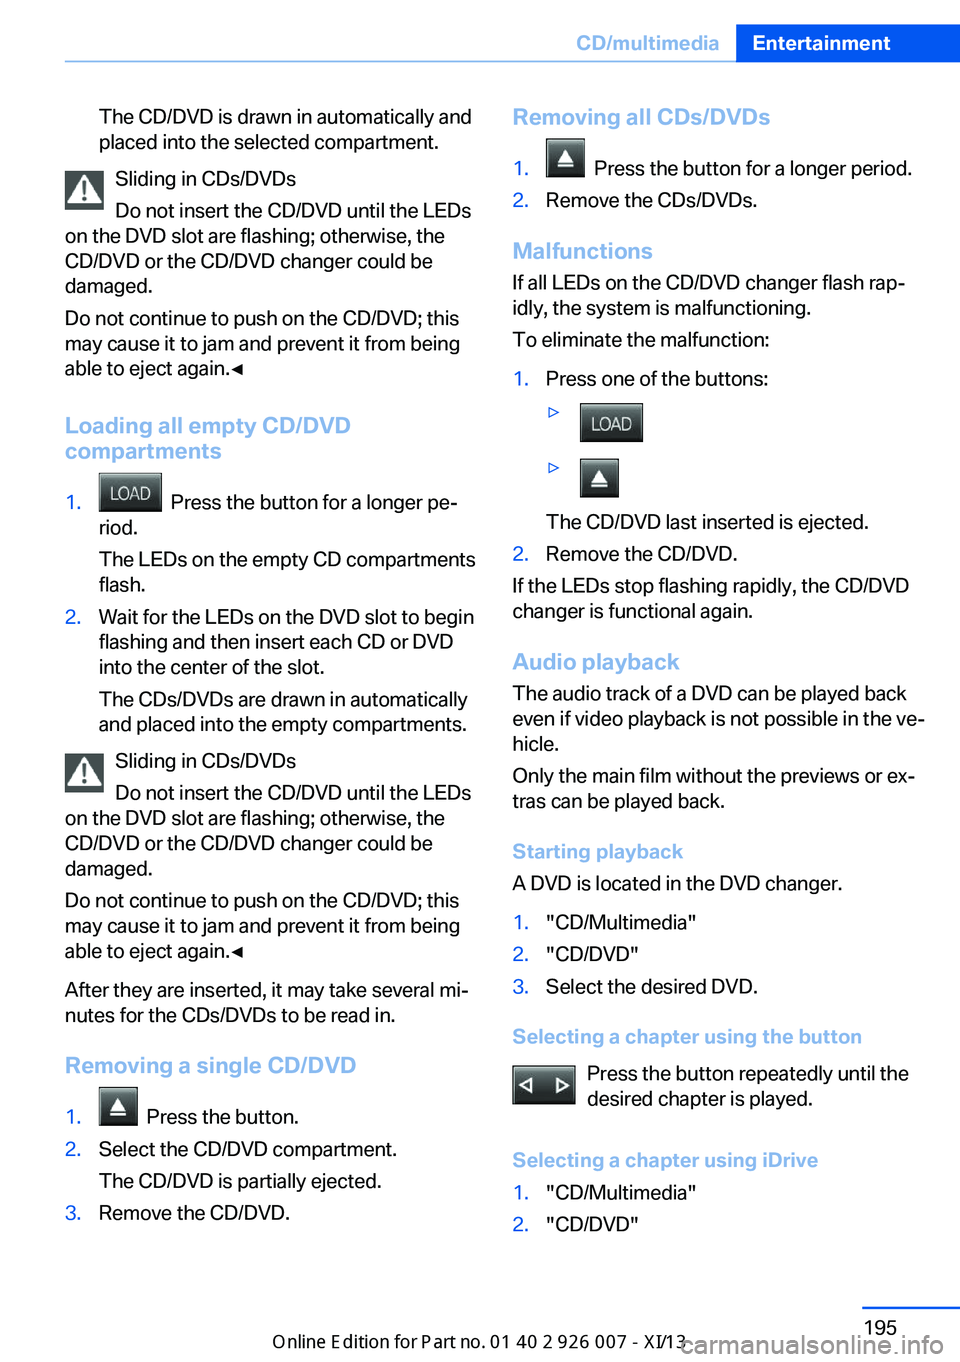
1. Press the button for a longer pe‐
riod.
The LEDs on the empty CD compartments
flash.2.Wait for the LEDs on the DVD slot to begin
flashing and then insert each CD or DVD
into the center of the slot.
The CDs/DVDs are drawn in automatically
and placed into the empty compartments.
Sliding in CDs/DVDs
Do not insert the CD/DVD until the LEDs
on the DVD slot are flashing; otherwise, the
CD/DVD or the CD/DVD changer could be
damaged.
Do not continue to push on the CD/DVD; this
may cause it to jam and prevent it from being
able to eject again.◀
After they are inserted, it may take several mi‐
nutes for the CDs/DVDs to be read in.
Removing a single CD/DVD
1. Press the button.2.Select the CD/DVD compartment.
The CD/DVD is partially ejected.3.Remove the CD/DVD.Removing all CDs/DVDs1. Press the button for a longer period.2.Remove the CDs/DVDs.
Malfunctions If all LEDs on the CD/DVD changer flash rap‐
idly, the system is malfunctioning.
To eliminate the malfunction:
1.Press one of the buttons:▷▷
The CD/DVD last inserted is ejected.
2.Remove the CD/DVD.
If the LEDs stop flashing rapidly, the CD/DVD
changer is functional again.
Audio playback
The audio track of a DVD can be played back
even if video playback is not possible in the ve‐
hicle.
Only the main film without the previews or ex‐
tras can be played back.
Starting playback
A DVD is located in the DVD changer.
1."CD/Multimedia"2."CD/DVD"3.Select the desired DVD.
Selecting a chapter using the button
Press the button repeatedly until the
desired chapter is played.
Selecting a chapter using iDrive
1."CD/Multimedia"2."CD/DVD"Seite 195CD/multimediaEntertainment195
Online Edition for Part no. 01 40 2 910 876 - VII/13
Page 200 of 327
3.Select the desired DVD.4.Select the desired chapter.
Fast forward/reversePress and hold the button.
Selecting the language
The languages that are available depend on
the DVD.
1."CD/Multimedia"2."CD/DVD"3.Select the desired DVD.4.Open "Options".5."Audio/language"6.Select the desired language.
Notes
CD/DVD player and changer Do not remove the cover
BMW CD/DVD players and changers are
officially designated Class 1 laser products. Do
not operate if the cover is damaged; otherwise,
severe eye damage can result.◀
CDs and DVDs Use of CDs/DVDs
▷Do not use self-recorded CDs/DVDs
with labels applied, as these can be‐
come detached during playback due
to heat buildup and can cause irrep‐
arable damage to the device.▷Only use round CDs/DVDs with a standard
diameter of 4.7 in/12 cm and do not play
CDs/DVDs with an adapter, e.g., single
CDs; otherwise, the CDs or the adapter
may jam and no longer eject.▷Do not use combined CDs/DVDs, e.g., DVD
Plus, as the CDs/DVDs can jam and will no
longer eject.◀General malfunctions▷CD/DVD changers and players have been
optimized for performance in vehicles. In
some instances they may be more sensi‐
tive to faulty CDs/DVDs than stationary de‐
vices would be.▷If a CD/DVD cannot be played, first check
whether it has been inserted correctly.
Humidity
High levels of humidity can lead to condensa‐
tion on the CD/DVD or the laser's scan lens,
and temporarily prevent playback.
Malfunctions involving individual CDs/
DVDs
If malfunctions occur only with particular CDs/
DVDs, this can be due to one of the following
causes:
Self-recorded CDs/DVDs
▷Possible reasons for malfunctions with
self-recorded CDs/DVDs are inconsistent
data creation or recording processes, or
poor quality or old age of the blank CD/
DVD.▷Only label CDs/DVDs on the upper side
with a pen intended for this purpose.
Damage
▷Avoid fingerprints, dust, scratches and
moisture.▷Store CDs/DVDs in a sleeve.▷Do not subject CDs/DVDs to temperatures
over 122 ℉/50 ℃, high humidity or direct
sunlight.
CDs/DVDs with copy protection
CDs/DVDs are often provided with a copy pro‐
tection feature by the manufacturer. This can
mean that some CDs/DVDs cannot be played
or can only be played to a limited extent.
Seite 196EntertainmentCD/multimedia196
Online Edition for Part no. 01 40 2 910 876 - VII/13
Page 212 of 327
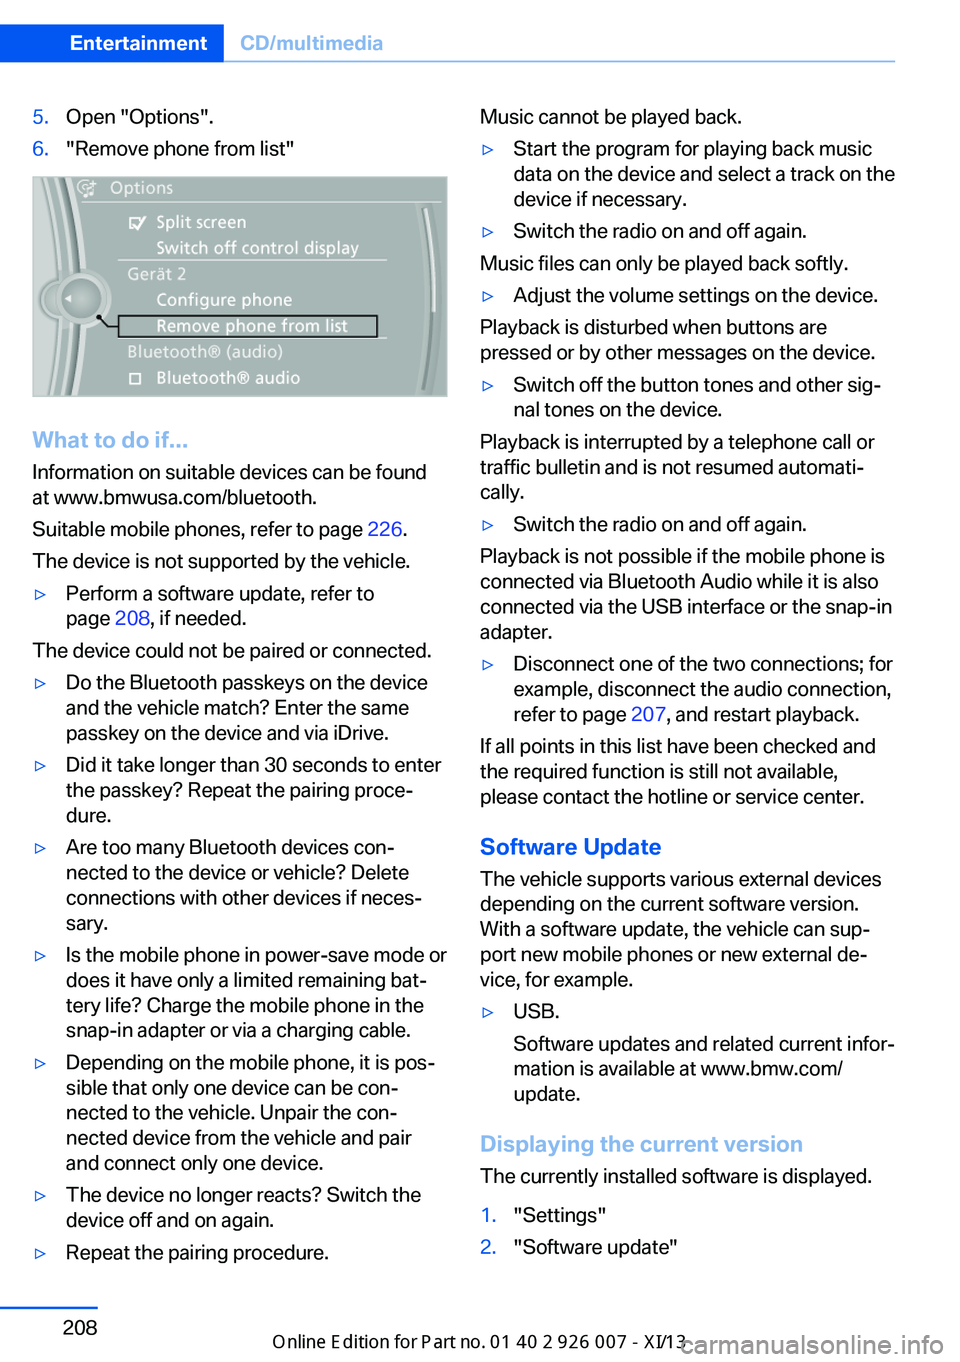
5.Open "Options".6."Remove phone from list"
What to do if...
Information on suitable devices can be found
at www.bmwusa.com/bluetooth.
Suitable mobile phones, refer to page 226.
The device is not supported by the vehicle.
▷Perform a software update, refer to
page 208, if needed.
The device could not be paired or connected.
▷Do the Bluetooth passkeys on the device
and the vehicle match? Enter the same
passkey on the device and via iDrive.▷Did it take longer than 30 seconds to enter
the passkey? Repeat the pairing proce‐
dure.▷Are too many Bluetooth devices con‐
nected to the device or vehicle? Delete
connections with other devices if neces‐
sary.▷Is the mobile phone in power-save mode or
does it have only a limited remaining bat‐
tery life? Charge the mobile phone in the
snap-in adapter or via a charging cable.▷Depending on the mobile phone, it is pos‐
sible that only one device can be con‐
nected to the vehicle. Unpair the con‐
nected device from the vehicle and pair
and connect only one device.▷The device no longer reacts? Switch the
device off and on again.▷Repeat the pairing procedure.Music cannot be played back.▷Start the program for playing back music
data on the device and select a track on the
device if necessary.▷Switch the radio on and off again.
Music files can only be played back softly.
▷Adjust the volume settings on the device.
Playback is disturbed when buttons are
pressed or by other messages on the device.
▷Switch off the button tones and other sig‐
nal tones on the device.
Playback is interrupted by a telephone call or
traffic bulletin and is not resumed automati‐
cally.
▷Switch the radio on and off again.
Playback is not possible if the mobile phone is
connected via Bluetooth Audio while it is also
connected via the USB interface or the snap-in
adapter.
▷Disconnect one of the two connections; for
example, disconnect the audio connection,
refer to page 207, and restart playback.
If all points in this list have been checked and
the required function is still not available,
please contact the hotline or service center.
Software Update
The vehicle supports various external devices
depending on the current software version.
With a software update, the vehicle can sup‐
port new mobile phones or new external de‐
vice, for example.
▷USB.
Software updates and related current infor‐
mation is available at www.bmw.com/
update.
Displaying the current version
The currently installed software is displayed.
1."Settings"2."Software update"Seite 208EntertainmentCD/multimedia208
Online Edition for Part no. 01 40 2 910 876 - VII/13
Page 241 of 327
Snap-in adapter
General information More information on compatible snap-in
adapters that support the functions of the mo‐
bile phone is available at the service center.
Notes At high temperatures, the charging function of
the mobile phone may be limited and functions
may not be executed.
When using the mobile phone via the vehicle,
note the operating instructions of the mobile
phone.
Installation position
In the center armrest.
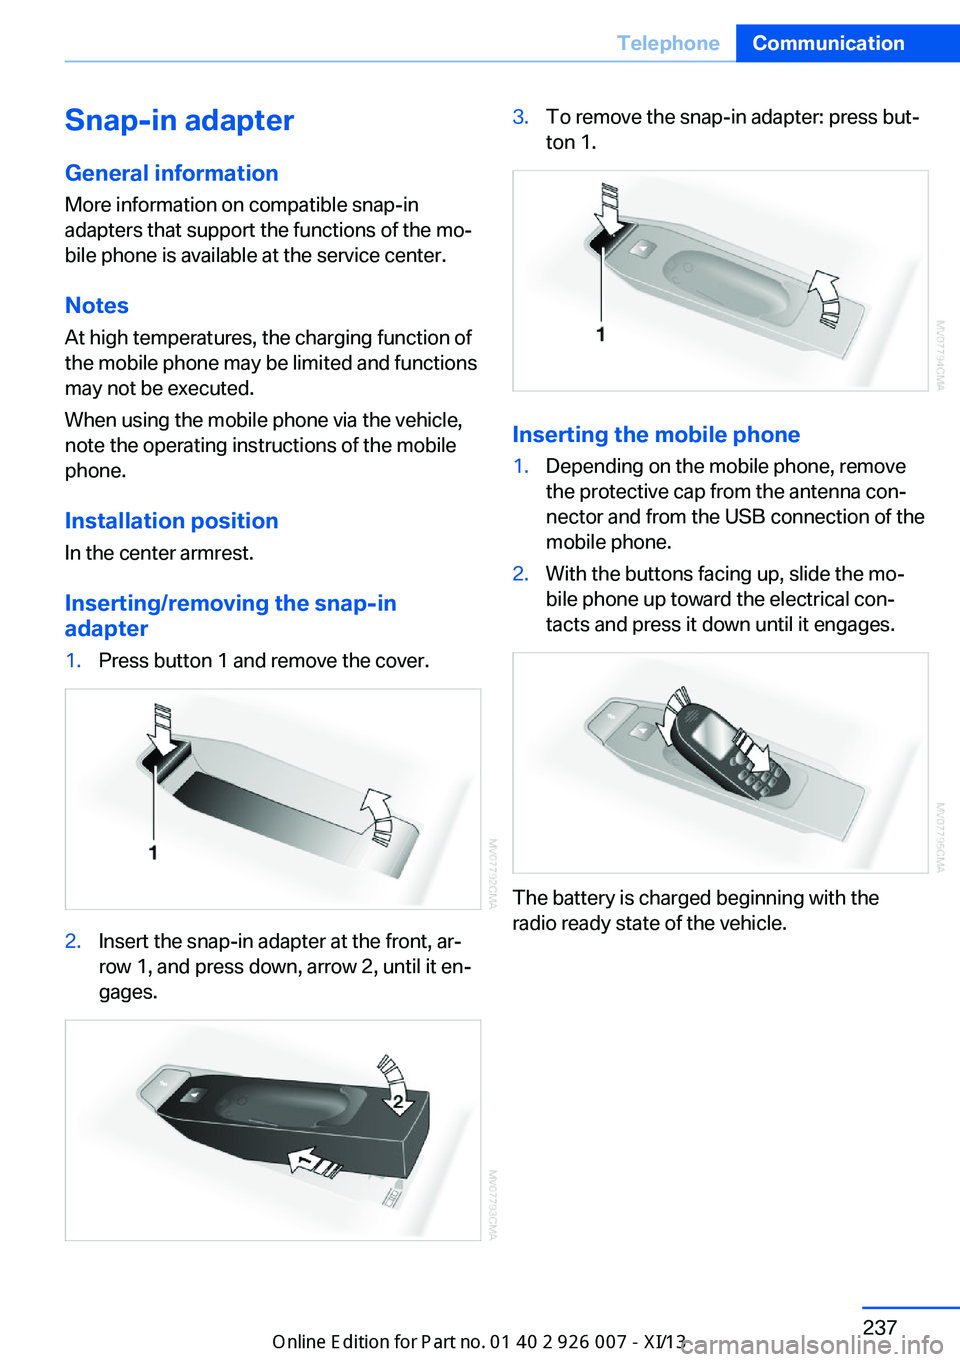
Inserting/removing the snap-in
adapter1.Press button 1 and remove the cover.2.Insert the snap-in adapter at the front, ar‐
row 1, and press down, arrow 2, until it en‐
gages.3.To remove the snap-in adapter: press but‐
ton 1.
Inserting the mobile phone
1.Depending on the mobile phone, remove
the protective cap from the antenna con‐
nector and from the USB connection of the
mobile phone.2.With the buttons facing up, slide the mo‐
bile phone up toward the electrical con‐
tacts and press it down until it engages.
The battery is charged beginning with the
radio ready state of the vehicle.
Seite 237TelephoneCommunication237
Online Edition for Part no. 01 40 2 910 876 - VII/13
Page 291 of 327
Once the BMW Response Center has re‐
ceived your Emergency Request, the BMW
Response Center contacts you and takes
further steps to help you.
Even if you are unable to respond, the
BMW Response Center can take further
steps to help you under certain circum‐
stances.
For this purpose, data that are used to de‐
termine the necessary rescue measures,
such as the current position of the vehicle
if it can be established, are transmitted to
the BMW Response Center.▷If the LED is flashing but the BMW Re‐
sponse Center cannot be heard on the
hands-free system, the hands-free system
may be malfunctioning. However, the
BMW Response Center may still be able to
hear you.
Initiating an Emergency Request
automatically
Under certain conditions, an Emergency Re‐
quest is automatically initiated immediately af‐
ter a severe accident. Automatic Collision Noti‐
fication is not affected by pressing the SOS
button.
Roadside Assistance
Service availability Roadside Assistance can be reached around
the clock in many countries. You can obtain as‐
sistance there in the event of a vehicle break‐
down.
Roadside Assistance The Roadside Assistance, refer to page 252,
phone number can be viewed on the iDrive or a
connection to Roadside Assistance can be es‐
tablished directly.
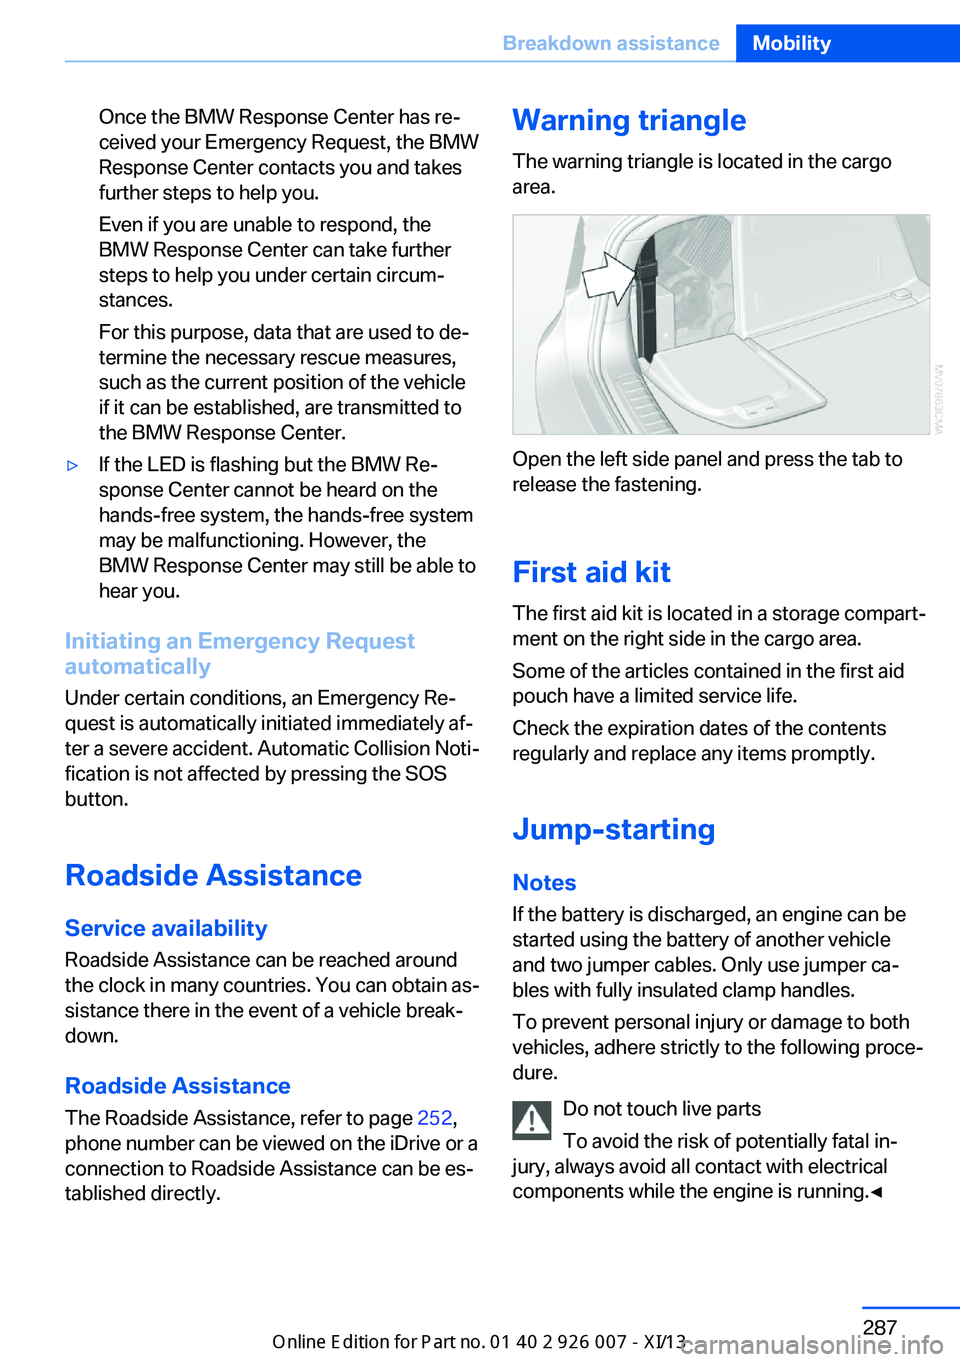
Warning triangle
The warning triangle is located in the cargo
area.
Open the left side panel and press the tab to
release the fastening.
First aid kit
The first aid kit is located in a storage compart‐
ment on the right side in the cargo area.
Some of the articles contained in the first aid
pouch have a limited service life.
Check the expiration dates of the contents
regularly and replace any items promptly.
Jump-starting Notes
If the battery is discharged, an engine can be
started using the battery of another vehicle
and two jumper cables. Only use jumper ca‐
bles with fully insulated clamp handles.
To prevent personal injury or damage to both
vehicles, adhere strictly to the following proce‐
dure.
Do not touch live parts
To avoid the risk of potentially fatal in‐
jury, always avoid all contact with electrical
components while the engine is running.◀
Seite 287Breakdown assistanceMobility287
Online Edition for Part no. 01 40 2 910 876 - VII/13