parking brake BMW Z4 ROADSTER 2006 E85 Owner's Manual
[x] Cancel search | Manufacturer: BMW, Model Year: 2006, Model line: Z4 ROADSTER, Model: BMW Z4 ROADSTER 2006 E85Pages: 128, PDF Size: 4.41 MB
Page 15 of 128
At a glance
Controls
Driving tips
Mobility Reference
13
Colors
The indicator and warning lamps can light up in
various colors and combinations.
>Red:
Stop the vehicle immediately
or
an important reminder
>Red and yellow:
Continue driving cautiously
>Yellow:
Have the system checked soon
or
for your information
>Green or blue:
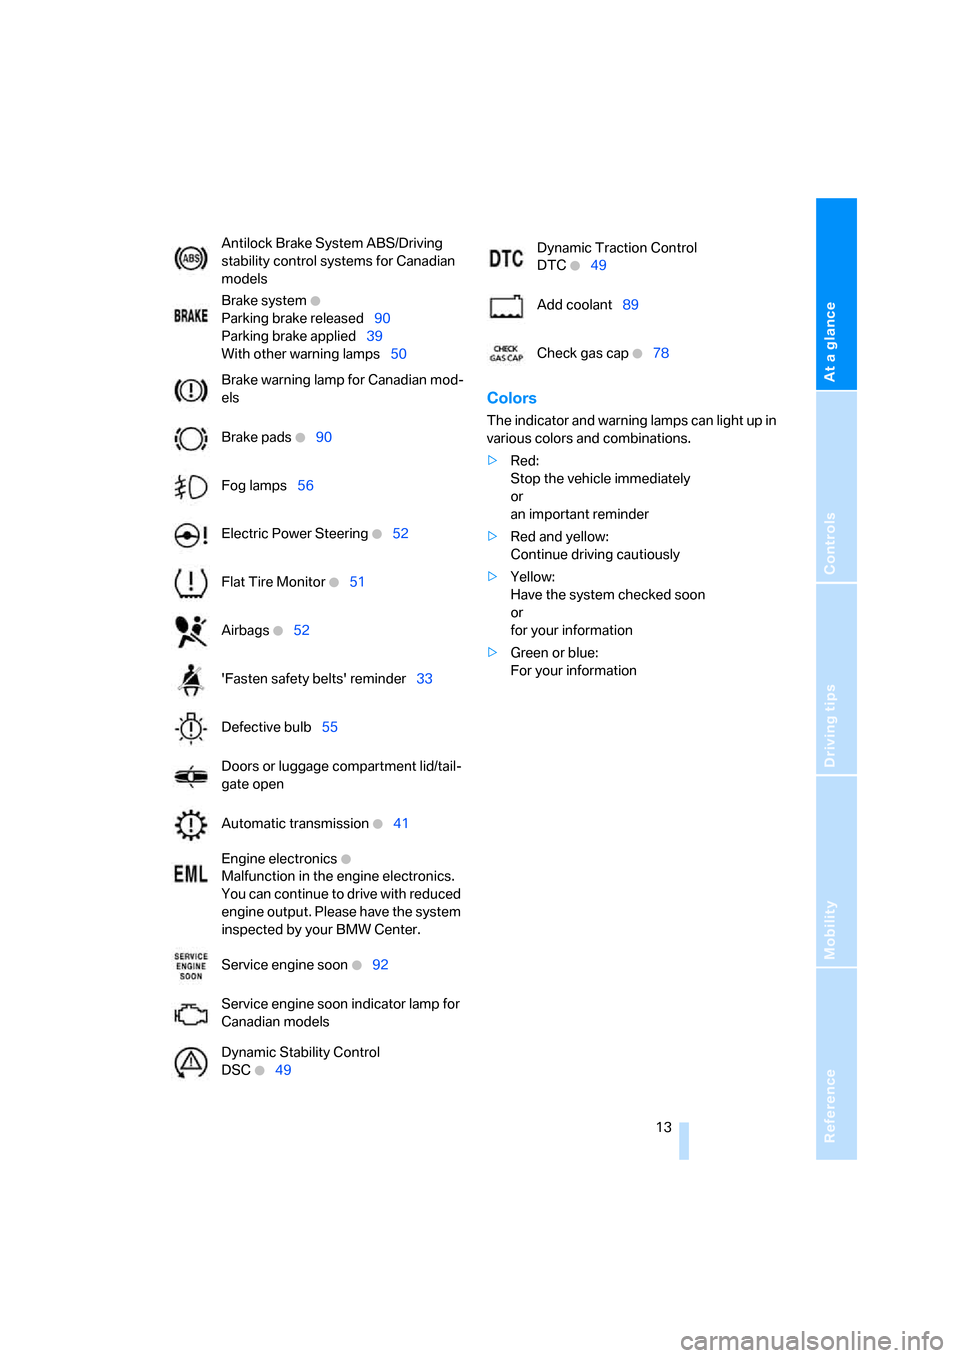
For your information Antilock Brake System ABS/Driving
stability control systems for Canadian
models
Brake system
+
Parking brake released90
Parking brake applied39
With other warning lamps50
Brake warning lamp for Canadian mod-
els
Brake pads
+90
Fog lamps56
Electric Power Steering
+52
Flat Tire Monitor
+51
Airbags
+52
'Fasten safety belts' reminder33
Defective bulb55
Doors or luggage compartment lid/tail-
gate open
Automatic transmission
+41
Engine electronics
+
Malfunction in the engine electronics.
You can continue to drive with reduced
engine output. Please have the system
inspected by your BMW Center.
Service engine soon
+92
Service engine soon indicator lamp for
Canadian models
Dynamic Stability Control
DSC
+49
Dynamic Traction Control
DTC
+49
Add coolant89
Check gas cap
+78
Page 41 of 128
Reference
At a glance
Controls
Driving tips
Mobility
39
Automatic transmission
1.Depress the brake.
2.Start the engine.
Special starting conditions
In the following situations, press the accelerator
pedal halfway down when starting the engine:
>If the engine does not start on the first
attempt, for instance when it is extremely
hot or cold.
>If the engine is started at very low tempera-
tures, below approx. +57/–156, at high
altitudes above approx. 3,300 ft/1,000 m.
Avoid frequent starting attempts in quick
succession or repeated starting attempts
during which the engine does not start. Other-
wise, the fuel is not burned or inadequately
burned; there is a danger of overheating and
damaging the catalytic converter.<
Switching off the engine
Do not remove the key while the vehicle is
still moving. Otherwise, the steering lock
would engage when the steering wheel is
turned.
When you leave the vehicle, always remove the
key and engage the steering lock.
Apply the parking brake when parking on steep
gradients, otherwise the vehicle could start to
roll.<
You can have an acoustic signal set as a
reminder that the key is still in the ignition
switch after the driver's door has been
opened.<
Manual transmission
1.Turn the key to position 1 or 0.
2.Engage first gear or reverse gear.
3.Apply the handbrake.
Automatic transmission
1.With the car at a standstill, move the selec-
tor lever to position P.
2.Turn the key to position 1 or 0.
Parking brake
The parking brake is designed primarily to pre-
vent the vehicle from rolling when parked. It
operates against the rear wheels.
Indicator lamp
The indicator lamp is lit, and when you
drive off a signal sounds in addition.
The handbrake is still applied.
Indicator lamp for Canadian models.
Applying
The lever locks in position automatically.
Releasing
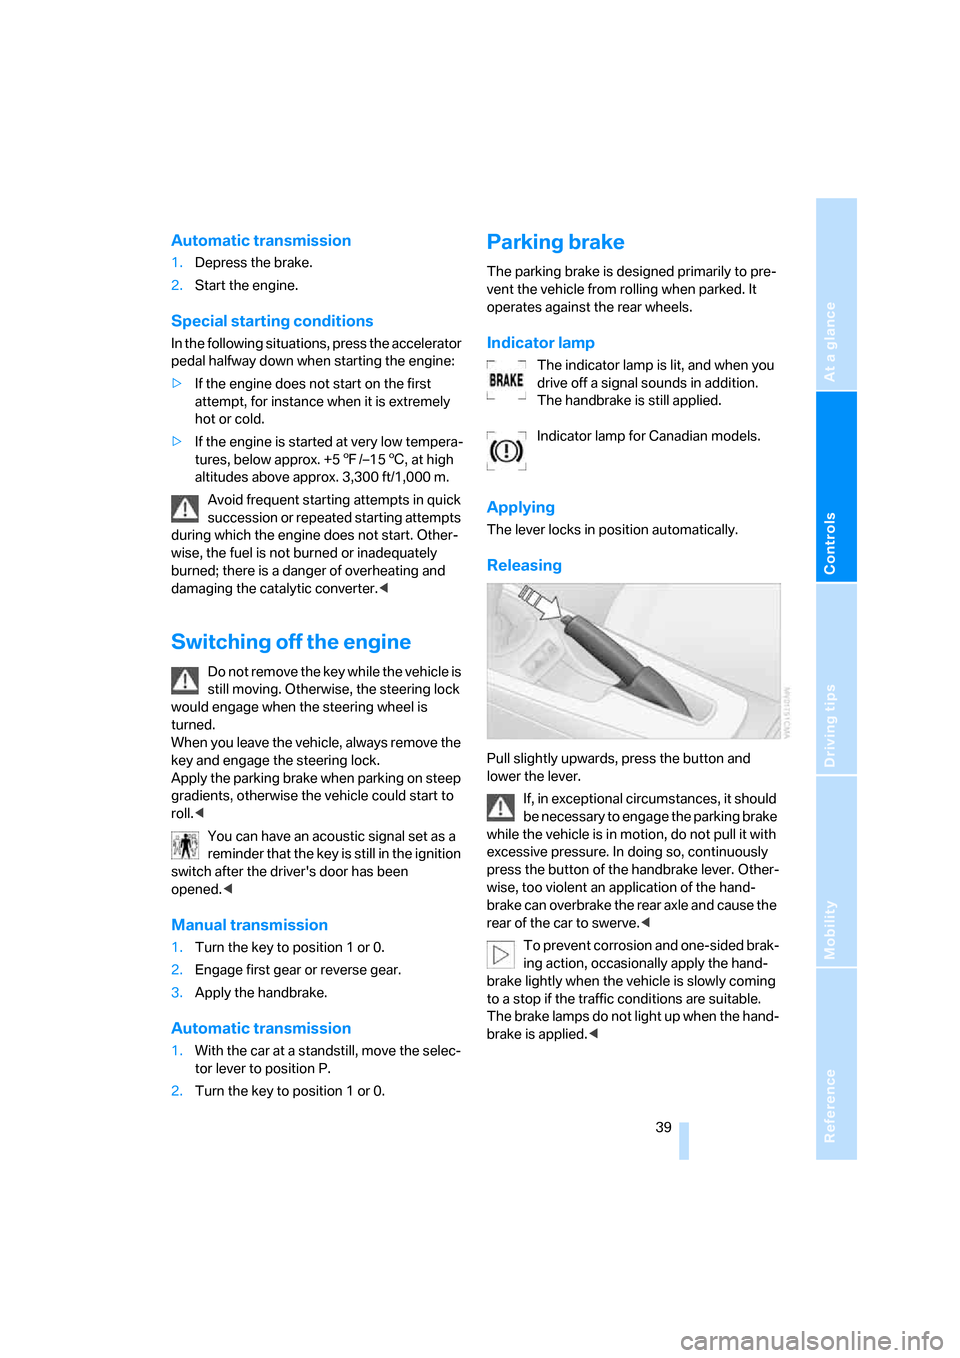
Pull slightly upwards, press the button and
lower the lever.
If, in exceptional circumstances, it should
be necessary to engage the parking brake
while the vehicle is in motion, do not pull it with
excessive pressure. In doing so, continuously
press the button of the handbrake lever. Other-
wise, too violent an application of the hand-
brake can overbrake the rear axle and cause the
rear of the car to swerve.<
To prevent corrosion and one-sided brak-
ing action, occasionally apply the hand-
brake lightly when the vehicle is slowly coming
to a stop if the traffic conditions are suitable.
The brake lamps do not light up when the hand-
brake is applied.<
Page 42 of 128
Driving
40
Manual transmission
When shifting into 5th or 6th gear, press
the gearshift lever to the right. Otherwise,
the engine could be damaged by accidentally
engaging 3rd or 4th gear.<
Reverse
Select only when the vehicle is stationary.
When the gearshift lever is pressed to the left, a
slight resistance has to be overcome.
Automatic transmission with
Steptronic*
In addition to operating the Steptronic as a fully
automatic transmission, you can also shift
gears manually with it, refer to page41.
Vehicle parking
To prevent the vehicle from rolling,
always select position P before leaving
the vehicle with the engine running.<
Removing the key
To turn the key in the ignition lock back to posi-
tion 0 or to remove it, first engage selector lever
position P and switch off the engine: interlock.
Selector lever positions
P R N D M/S + –
Displays in the instrument cluster
P R N D SD M1 to M6
The selector lever position is displayed; in the
manual mode, the gear currently engaged is
shown.
Range selection
>With the ignition switched on or the engine
running, the selector lever can be moved
out of position P: interlock.
>Before moving the lever away from P or N
with the vehicle stationary, first depress the
brake; otherwise the selector lever will
refuse to move: shiftlock.
To prevent the vehicle from creeping
after you select a driving position,
depress the brake until you are ready to
start.<
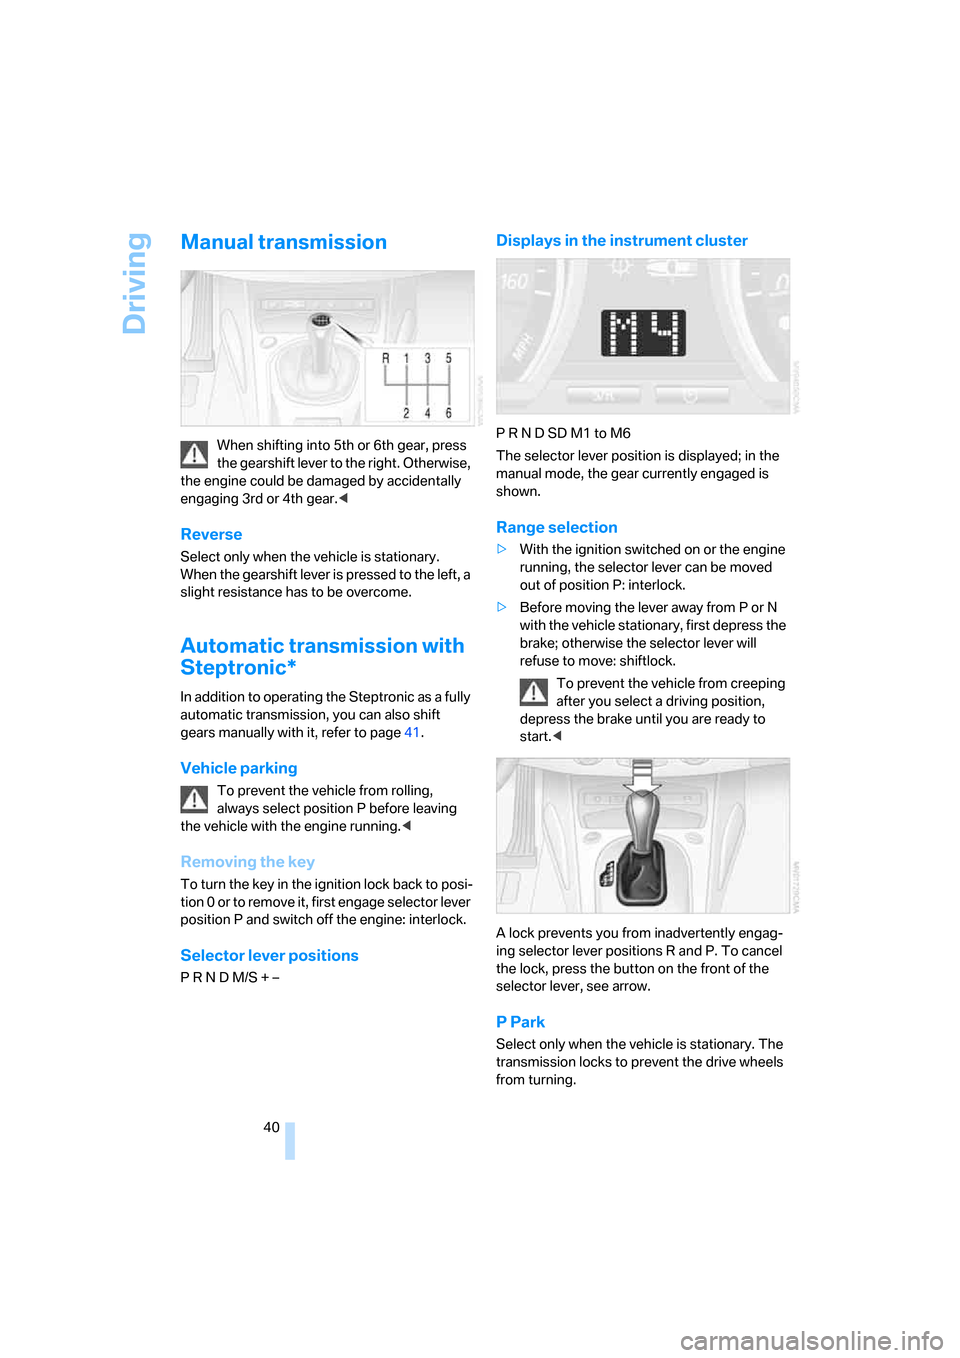
A lock prevents you from inadvertently engag-
ing selector lever positions R and P. To cancel
the lock, press the button on the front of the
selector lever, see arrow.
P Park
Select only when the vehicle is stationary. The
transmission locks to prevent the drive wheels
from turning.
Page 72 of 128
Special operating instructions
70
Special operating instructions
Break-in procedures
Moving parts need to be given some time until
they can interact smoothly with one another. To
ensure that your vehicle provides maximum
economy throughout a long service life, we
request that you observe the following:
Always obey all official speed limits.
Engine and differential
Up to 1,200 miles/2,000 km
Drive at varying engine and road speeds, but do
not exceed 4,500 rpm or 100 mph/160 km/h.
Refrain from using full throttle and avoid press-
ing the accelerator beyond the kickdown point.
After driving 1,200 miles/2,000 km
Engine and vehicle speeds can be gradually
increased.
Tires
Due to technical factors associated with their
manufacture, tires do not achieve their full trac-
tion potential until an initial break-in period has
elapsed. Therefore, drive cautiously during the
first 200 miles/300 km.
Brake system
Brakes require an initial break-in period of
approx. 300 miles/500 km to achieve optimized
contact and wear patterns between brake pads
and rotors. Drive cautiously during this break-in
period.
Clutch
The function of the clutch reaches its optimal
level only after a distance driven of approx.
300 miles/500 km. Shift gears carefully during
the break-in period.
After replacing components
The same break-in procedures should be
observed if any of the components mentioned
above have to be renewed in the course of the
vehicle's operating life.
Driving notes
Closing the luggage compartment lid/
tailgate
Operate the vehicle only when the lug-
gage compartment lid/tailgate is closed.
Otherwise, exhaust fumes could enter the inte-
rior of the vehicle.<
Should it be absolutely necessary to operate
the vehicle with the luggage compartment lid/
tailgate open:
1.Coupe: close both windows.
Roadster: close all windows if the convert-
ible top is closed.
2.Greatly increase the air flow from the air
conditioning or automatic climate control,
refer to page58 or61.
Hot exhaust system
In all vehicles, extremely high tempera-
tures are generated in the exhaust sys-
tem. Never remove the heat shields installed in
the area of the exhaust system, nor apply
undercoating to their surfaces. When driving,
standing at idle or parking the vehicle, take care
to avoid contact between the hot exhaust sys-
tem and flammable materials, e.g. hay, leaves,
grass, etc. Such contact could lead to a fire,
resulting in serious personal injury and property
damage.<
Mobile communications in the vehicle
BMW advises against using mobile com-
munications devices, e.g. mobile phones,
inside the vehicle without connecting them
directly to an outside antenna. Otherwise, it
Page 73 of 128
Reference
At a glance
Controls
Driving tips
Mobility
71
cannot be ruled out that vehicle electronics and
the mobile communications device interfere
with one another. In addition, it is not ensured
that the radio waves emitted during transmis-
sion are directed outside of the vehicle inte-
rior.<
Interior and exterior mirrors with
automatic dimming feature*
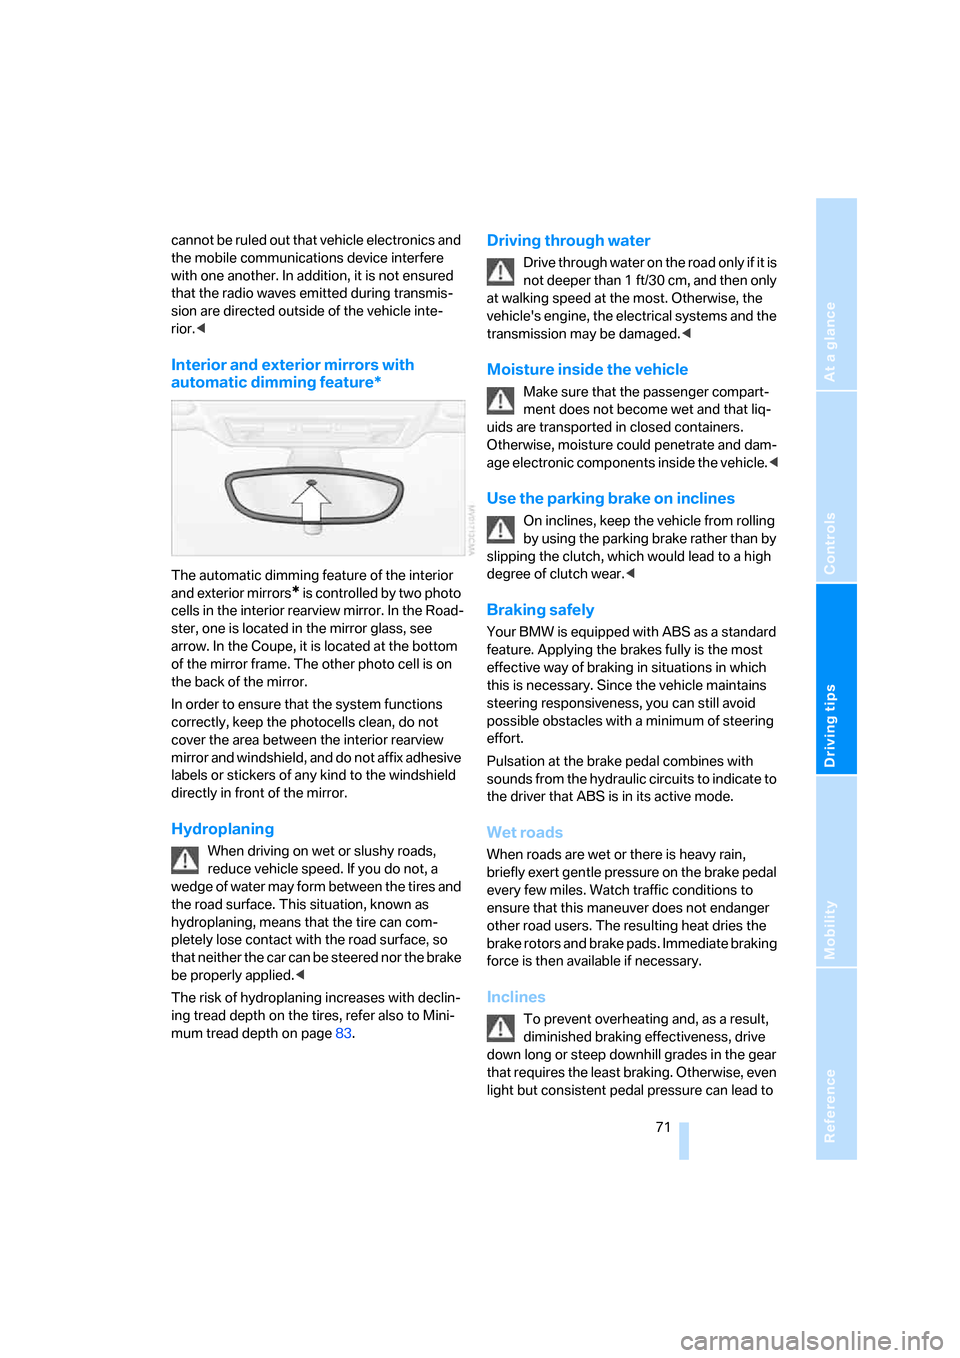
The automatic dimming feature of the interior
and exterior mirrors
* is controlled by two photo
cells in the interior rearview mirror. In the Road-
ster, one is located in the mirror glass, see
arrow. In the Coupe, it is located at the bottom
of the mirror frame. The other photo cell is on
the back of the mirror.
In order to ensure that the system functions
correctly, keep the photocells clean, do not
cover the area between the interior rearview
mirror and windshield, and do not affix adhesive
labels or stickers of any kind to the windshield
directly in front of the mirror.
Hydroplaning
When driving on wet or slushy roads,
reduce vehicle speed. If you do not, a
wedge of water may form between the tires and
the road surface. This situation, known as
hydroplaning, means that the tire can com-
pletely lose contact with the road surface, so
that neither the car can be steered nor the brake
be properly applied.<
The risk of hydroplaning increases with declin-
ing tread depth on the tires, refer also to Mini-
mum tread depth on page83.
Driving through water
Drive through water on the road only if it is
not deeper than 1 ft/30 cm, and then only
at walking speed at the most. Otherwise, the
vehicle's engine, the electrical systems and the
transmission may be damaged.<
Moisture inside the vehicle
Make sure that the passenger compart-
ment does not become wet and that liq-
uids are transported in closed containers.
Otherwise, moisture could penetrate and dam-
age electronic components inside the vehicle.<
Use the parking brake on inclines
On inclines, keep the vehicle from rolling
by using the parking brake rather than by
slipping the clutch, which would lead to a high
degree of clutch wear.<
Braking safely
Your BMW is equipped with ABS as a standard
feature. Applying the brakes fully is the most
effective way of braking in situations in which
this is necessary. Since the vehicle maintains
steering responsiveness, you can still avoid
possible obstacles with a minimum of steering
effort.
Pulsation at the brake pedal combines with
sounds from the hydraulic circuits to indicate to
the driver that ABS is in its active mode.
Wet roads
When roads are wet or there is heavy rain,
briefly exert gentle pressure on the brake pedal
every few miles. Watch traffic conditions to
ensure that this maneuver does not endanger
other road users. The resulting heat dries the
brake rotors and brake pads. Immediate braking
force is then available if necessary.
Inclines
To prevent overheating and, as a result,
diminished braking effectiveness, drive
down long or steep downhill grades in the gear
that requires the least braking. Otherwise, even
light but consistent pedal pressure can lead to
Page 92 of 128
Under the hood
90 pressure to escape, then continue turning
to open.
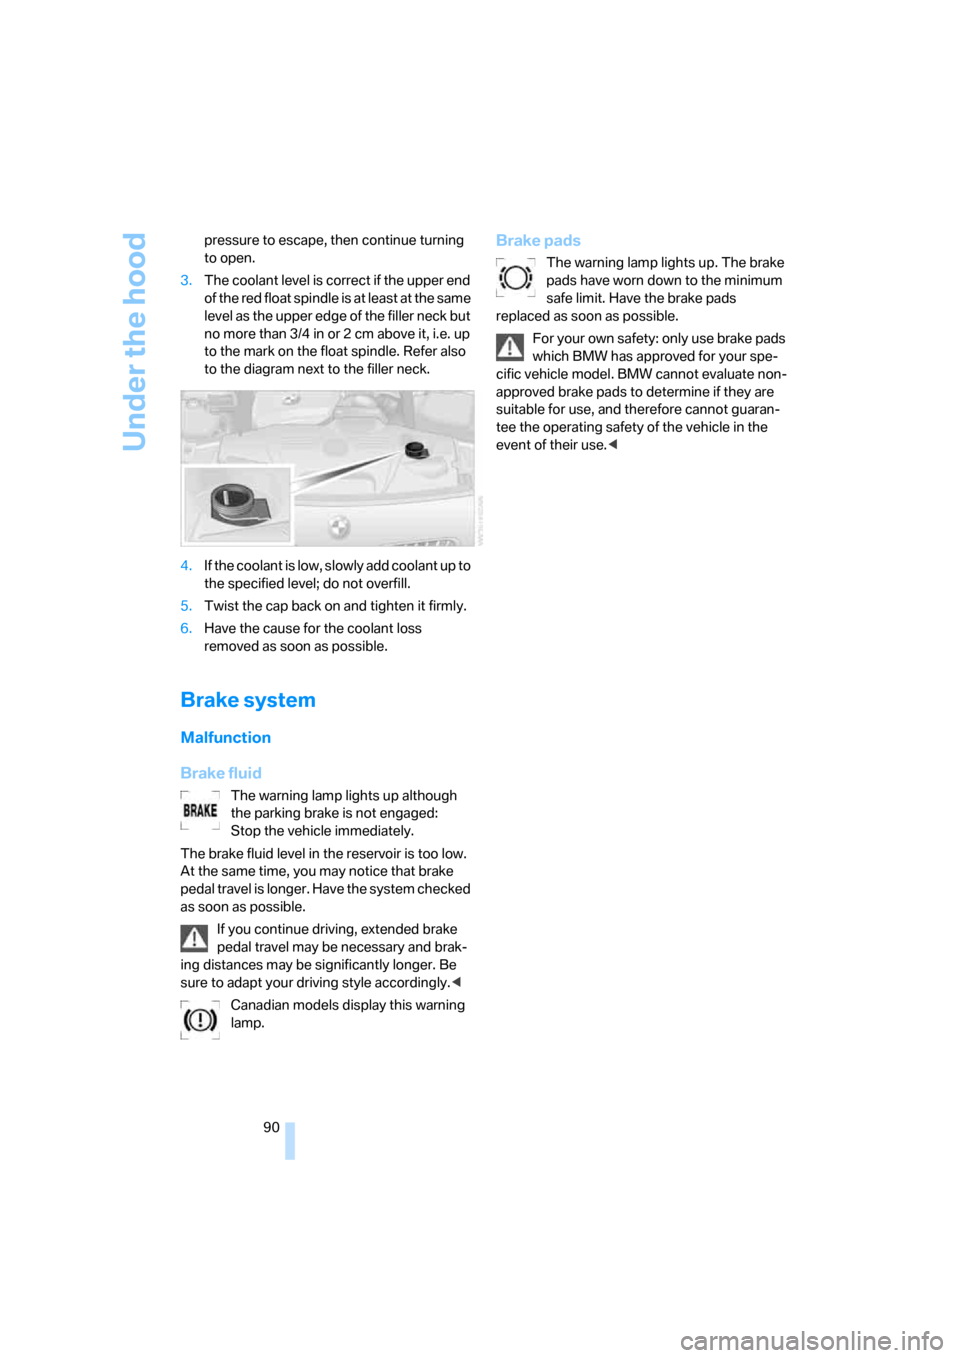
3.The coolant level is correct if the upper end
of the red float spindle is at least at the same
level as the upper edge of the filler neck but
no more than 3/4 in or 2 cm above it, i.e. up
to the mark on the float spindle. Refer also
to the diagram next to the filler neck.
4.If the coolant is low, slowly add coolant up to
the specified level; do not overfill.
5.Twist the cap back on and tighten it firmly.
6.Have the cause for the coolant loss
removed as soon as possible.
Brake system
Malfunction
Brake fluid
The warning lamp lights up although
the parking brake is not engaged:
Stop the vehicle immediately.
The brake fluid level in the reservoir is too low.
At the same time, you may notice that brake
pedal travel is longer. Have the system checked
as soon as possible.
If you continue driving, extended brake
pedal travel may be necessary and brak-
ing distances may be significantly longer. Be
sure to adapt your driving style accordingly.<
Canadian models display this warning
lamp.
Brake pads
The warning lamp lights up. The brake
pads have worn down to the minimum
safe limit. Have the brake pads
replaced as soon as possible.
For your own safety: only use brake pads
which BMW has approved for your spe-
cific vehicle model. BMW cannot evaluate non-
approved brake pads to determine if they are
suitable for use, and therefore cannot guaran-
tee the operating safety of the vehicle in the
event of their use.<
Page 100 of 128
Giving and receiving assistance
98
Giving and receiving assistance
Receiving assistance
If your vehicle has the necessary equipment,
you can use buttons in the center console to
contact Roadside Assistance or issue an emer-
gency call.
Requirements for initiating an emergency call or
contacting Roadside Assistance:
>The key must be in position 1 or higher.
>The car phone must be logged on to a
mobile telephone network.
>The emergency call system must be opera-
ble.
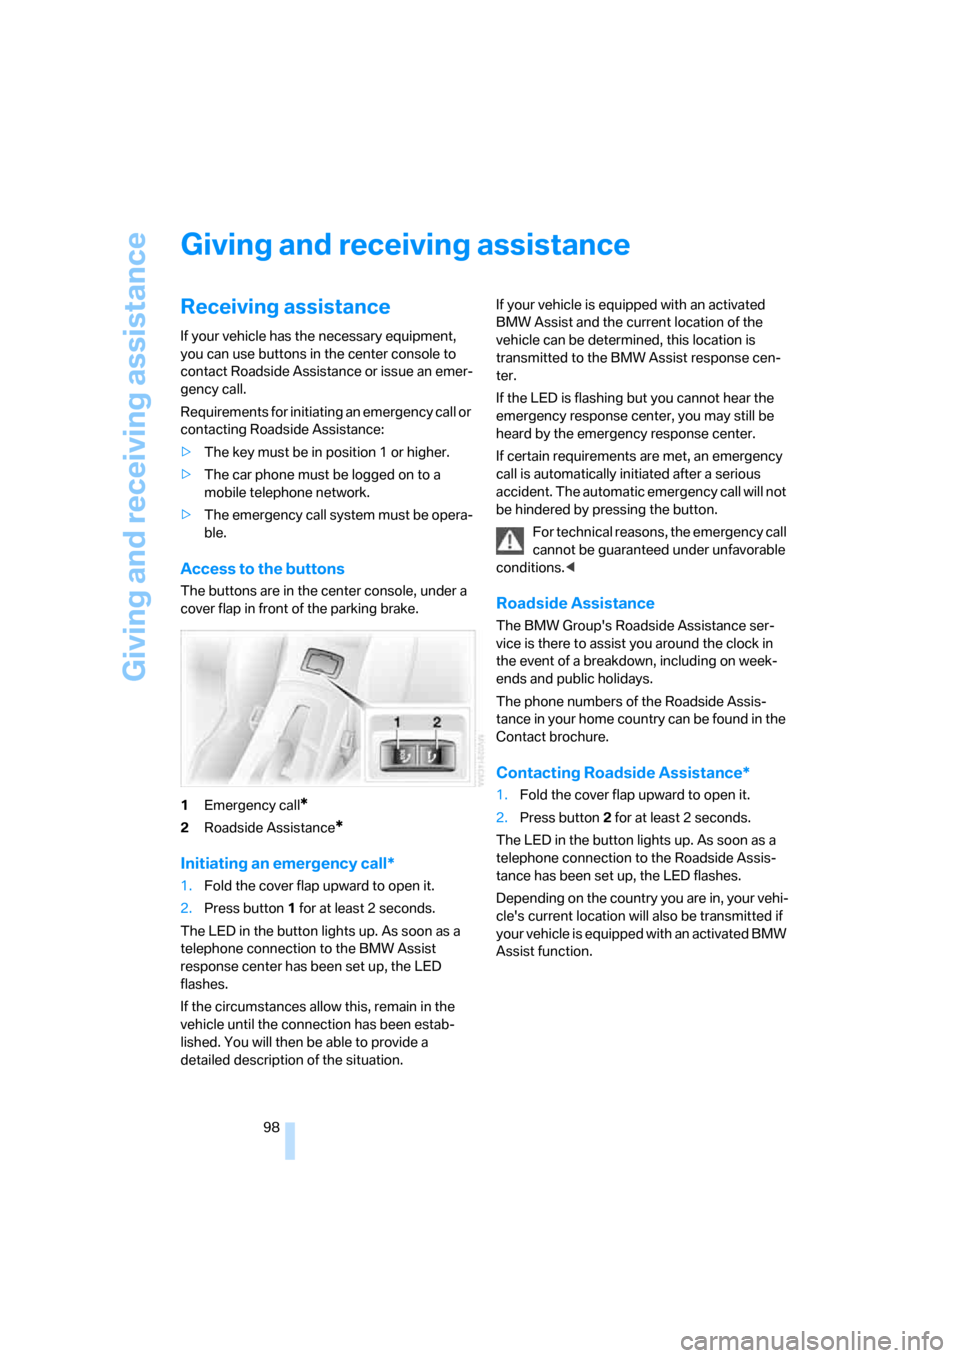
Access to the buttons
The buttons are in the center console, under a
cover flap in front of the parking brake.
1Emergency call
*
2Roadside Assistance*
Initiating an emergency call*
1.Fold the cover flap upward to open it.
2.Press button1 for at least 2 seconds.
The LED in the button lights up. As soon as a
telephone connection to the BMW Assist
response center has been set up, the LED
flashes.
If the circumstances allow this, remain in the
vehicle until the connection has been estab-
lished. You will then be able to provide a
detailed description of the situation.If your vehicle is equipped with an activated
BMW Assist and the current location of the
vehicle can be determined, this location is
transmitted to the BMW Assist response cen-
ter.
If the LED is flashing but you cannot hear the
emergency response center, you may still be
heard by the emergency response center.
If certain requirements are met, an emergency
call is automatically initiated after a serious
accident. The automatic emergency call will not
be hindered by pressing the button.
For technical reasons, the emergency call
cannot be guaranteed under unfavorable
conditions.<
Roadside Assistance
The BMW Group's Roadside Assistance ser-
vice is there to assist you around the clock in
the event of a breakdown, including on week-
ends and public holidays.
The phone numbers of the Roadside Assis-
tance in your home country can be found in the
Contact brochure.
Contacting Roadside Assistance*
1.Fold the cover flap upward to open it.
2.Press button2 for at least 2 seconds.
The LED in the button lights up. As soon as a
telephone connection to the Roadside Assis-
tance has been set up, the LED flashes.
Depending on the country you are in, your vehi-
cle's current location will also be transmitted if
your vehicle is equipped with an activated BMW
Assist function.
Page 115 of 128
Reference
At a glance
Controls
Driving tips
Mobility
113
Backup lamps
– bulb replacement96
Bandages, refer to First-aid
kit99
Bar, refer to Towing
methods101
Battery97
– charging97
– disposal97
– indicator/warning
lamp12,97
– jump-starting99
– power supply interruption97
– remote control18
Being towed101
Belts, refer to Safety belts33
Belt tensioner, refer to Safety
belts33
Beverage holders65
Blower, refer to Air flow
rate59,62
BMW Homepage4
BMW Maintenance
System91
Bottle holders, refer to
Beverage holders65
Brake assist, refer to Dynamic
Brake Control DBC49
Brake fluid90
– indicator/warning lamp13
– level90
– warning lamp90
Brake Force Display52
Brake hydraulics, refer to
Brake system90
Brake hydraulic system
– indicator/warning lamp13
Brake lamps
– brake force display52
– bulb replacement96
– indicator lamp, defective
lamp13
Brake pads90
– break-in procedures70
– warning lamp90
Brake pad wear indicator
– brake pads90
– indicator/warning lamp13Brake rotors72
– brake system72
– break-in procedures70
Brakes
– ABS49
– brake fluid90
– brake pads90
– braking safely71
– break-in procedures
70
– indicator/warning
lamps13,50
– parking brake39
Brake system90
– brake fluid90
– brake pads90
– break-in procedures70
– disc brakes72
– indicator/warning lamp13
Brake wear warning90
Breakdown
– Flat Tire Monitor51
Breaking in the clutch70
Breaking in the differential,
refer to Engine and
differential70
Break-in procedures70
Bridging, refer to Jump-
starting99
Bulb changing, refer to Lamps
and bulbs93
Bulb replacement, refer to
Lamps and bulbs93
Burned fuel, refer to
Fuel specifications79
Buttons on the steering
wheel11
C
California laws
– Event Data Recorders92
– Proposition 65 warning5
Can holders, refer to Beverage
holders65
Capacity
– cargo bay, refer to
Weights109
Car battery, refer to Vehicle
battery97Car care, refer to the Caring
for your vehicle brochure
Care, refer to the Caring for
your vehicle brochure
Care products, refer to the
Caring for your vehicle
brochure
Cargo bay23
– capacity109
– floor panel93
– increasing capacity23
– opening and closing21,22
– opening from inside the
vehicle21,22
– opening from the outside21
– roller-blind cover65
Cargo loading
– stowing cargo73
– vehicle72
Car jack
– jacking points97
Car keys, refer to The key
set18
Carpet care, refer to the
Caring for your vehicle
brochure
Car phone, refer to the
separate Owner's Manual
Car radio, refer to the separate
Owner's Manual
Car wash, refer to the Caring
for your vehicle brochure
Catalytic converter, refer to
Hot exhaust system70
CD changer, refer to Owner's
Manual for Radio/Onboard
Computer
CD operation, refer to Owner's
Manual for Radio/Onboard
Computer
Center console, refer to
Around the center
console14
Center high-mount brake
lamp, bulb replacement96
Central locking
– from inside21
Central locking system19
Page 117 of 128
Reference
At a glance
Controls
Driving tips
Mobility
115
Defrost position, refer to
Defrosting windows59,62
Dehumidifying air, refer to
Switching cooling function
on/off59,62
Digital clock47
Dimensions107,108
Dimming mirrors71
Directional indicators, refer to
Turn signal indicators42
Disc brakes72
Displacement, refer to Engine
data106
Display elements, refer to
Instrument cluster12
Display lighting, refer to
Instrument lighting56
Displays, refer to Instrument
cluster12
Displays and controls10
Disposal
– coolant89
– vehicle battery97
Distance remaining, refer to
Cruising range48
Door keys, refer to The key
set18
Door lock20
Doors, unlocking and locking
– acknowledgment
signals19,20
– from inside21
– from outside19
DOT quality grades82
Draft-free ventilation59,63
Drive-off assistant50
Driving Dynamic Control42
Driving light, refer to Parking
lamps/Low beams55
Driving notes70
Driving stability control
systems49
Driving through water71
Driving tips, refer to Driving
notes70
Dry air, refer to Switching
cooling function on/
off59,62DSC Dynamic Stability
Control49
– indicator/warning lamp49
– indicator lamp13
DTC Dynamic Traction
Control49
– indicator/warning
lamp13
,50
Dynamic Brake Control
DBC49
– indicator/warning lamp13
Dynamic Stability Control
DSC49
– indicator/warning lamp49
Dynamic Traction Control
DTC49
– indicator/warning lamp50
E
EBV Electronic brake-force
distribution49
Electric
– seat adjustment31
Electrical malfunction
– automatic transmission with
Steptronic41
– convertible top28
– door lock20
– fuel filler door78
– luggage compartment lid22
– storage compartments64
– tailgate22
Electric Power Steering
EPS52
– indicator/warning
lamp13,52
Electric power windows25
– power loss25
Electronic
– brake-force distribution49
– oil level check88
Emergency call98
– button98
Emergency operation, refer to
Opening manually
– tailgate22
Emergency services, refer to
Roadside Assistance98Engine38
– break-in period70
– electronics13
– indicator lamp13
– overheated, refer to Coolant
thermometer47
– speed46
– starting38
– switching off39
– temperature47
Engine compartment87
Engine coolant, refer to
Coolant89
Engine oil87
– adding89
– additives, refer to Approved
engine oils89
– alternative oil grades89
– approved engine oils89
– capacity110
– change intervals, refer to
Service and Warranty
Information Booklet for US
models, Warranty and
Service Guide Booklet for
Canadian models
– change intervals, refer to
Service interval display47
– checking level88
– indicator/warning lamp12
– oil level87
– pressure
87
Engine output, refer to Engine
data106
Engine starting, refer to
Starting the engine38
EPS Electric Power
Steering52
Equipment scope, refer to the
Service and Warranty
Information Booklet for US
models, Warranty and
Service Guide Booklet
ESP Electronic Stability
Program, refer to DSC
Dynamic Stability
Control49
Exhaust system, refer to Hot
exhaust system70
Page 118 of 128
Everything from A to Z
116 Exterior mirrors34
– adjusting34
– automatic dimming
feature71
– automatic heating34
– folding in and out34
Eyeglasses compartment65
Eyes, tow-starting and towing
away100
F
False alarm
– refer to Avoiding
unintentional alarms24
– refer to Switching off an
alarm24
Fasten safety belts, refer to
Safety belts33
Filter
– refer to Microfilter60
– refer to Microfilter/activated-
charcoal filter63
Fine wood, refer to the Caring
for your vehicle brochure
First aid, refer to First-aid
kit99
First-aid kit99
Flat
– Run-Flat Tires84
Flat tire51
– Flat Tire Monitor51
– indicator/warning lamp13
– refer to Changing a wheel96
– refer to Tire condition83
– Run-Flat Tires84
Flat Tire Monitor FTM51
– indicator/warning lamp51
– initializing the system51
– snow chains85
– system limits51
Flat tire service, refer to
Roadside Assistance98
Floods, refer to Driving
through water71
Floor covers, carpets, refer to
the Caring for your vehicle
brochureFloor mats, refer to the Caring
for your vehicle brochure
Fog lamps56
– indicator lamp13
Footbrake, refer to Braking
safely71
For your own safety5
Front airbags52
FTM, refer to Flat Tire
Monitor51
Fuel
– average consumption48
– capacity, refer to
Capacities110
– display46
– quality79
– tank capacity79
Fuel display, refer to Fuel
gauge46
Fuel filler flap, refer to Gas
cap78
Fuel level
– refer to Fuel tank capacity79
Fuel tank capacity, refer to
Capacities110
Fully automatic convertible
top27
Fuses97
G
Gas cap78
Gasoline, refer to Fuel
specifications79
Gasoline gauge, refer to Fuel
gauge46
Gear indicator, automatic
transmission with
Steptronic40
Gear lever
– automatic transmission with
Steptronic40
– manual transmission40
Gearshifts
– automatic transmission with
Steptronic40
– manual transmission40
Glove compartment64Gross weight, refer to
Weights109
H
Halogen lamps
– replacing bulbs94
Handbrake, refer to Parking
brake39
Hands-free microphone67
Hardtop, refer to the separate
Owner's Manual
Hardtop preparation73
Hazard warning flashers14
Headlamp control,
automatic55
Headlamp flasher42
– indicator lamp12
Headlamps
– bulb replacement94
– care, refer to the Caring for
your vehicle brochure
– cleaning43
– cleaning system, washer
fluid44
– cover94
– glass, care, refer to the
Caring for your vehicle
brochure
– washer reservoir, refer to
Washer fluid reservoir44
– washer reservoir volume,
refer to Capacities110
Head restraints32
– safe seating position30
Heated
– rear window59,63
– seats33
Heated mirrors34
Heating
– mirrors34
– rear window59,63
– seats33
Heavy loads, refer to Cargo
loading72
Height, refer to
Dimensions107,108