jump start BMW Z4 ROADSTER 3.0I 2004 E85 Owner's Manual
[x] Cancel search | Manufacturer: BMW, Model Year: 2004, Model line: Z4 ROADSTER 3.0I, Model: BMW Z4 ROADSTER 3.0I 2004 E85Pages: 120, PDF Size: 3.44 MB
Page 13 of 120
At a glance
Controls
Driving tips
Mobility Reference
11
8
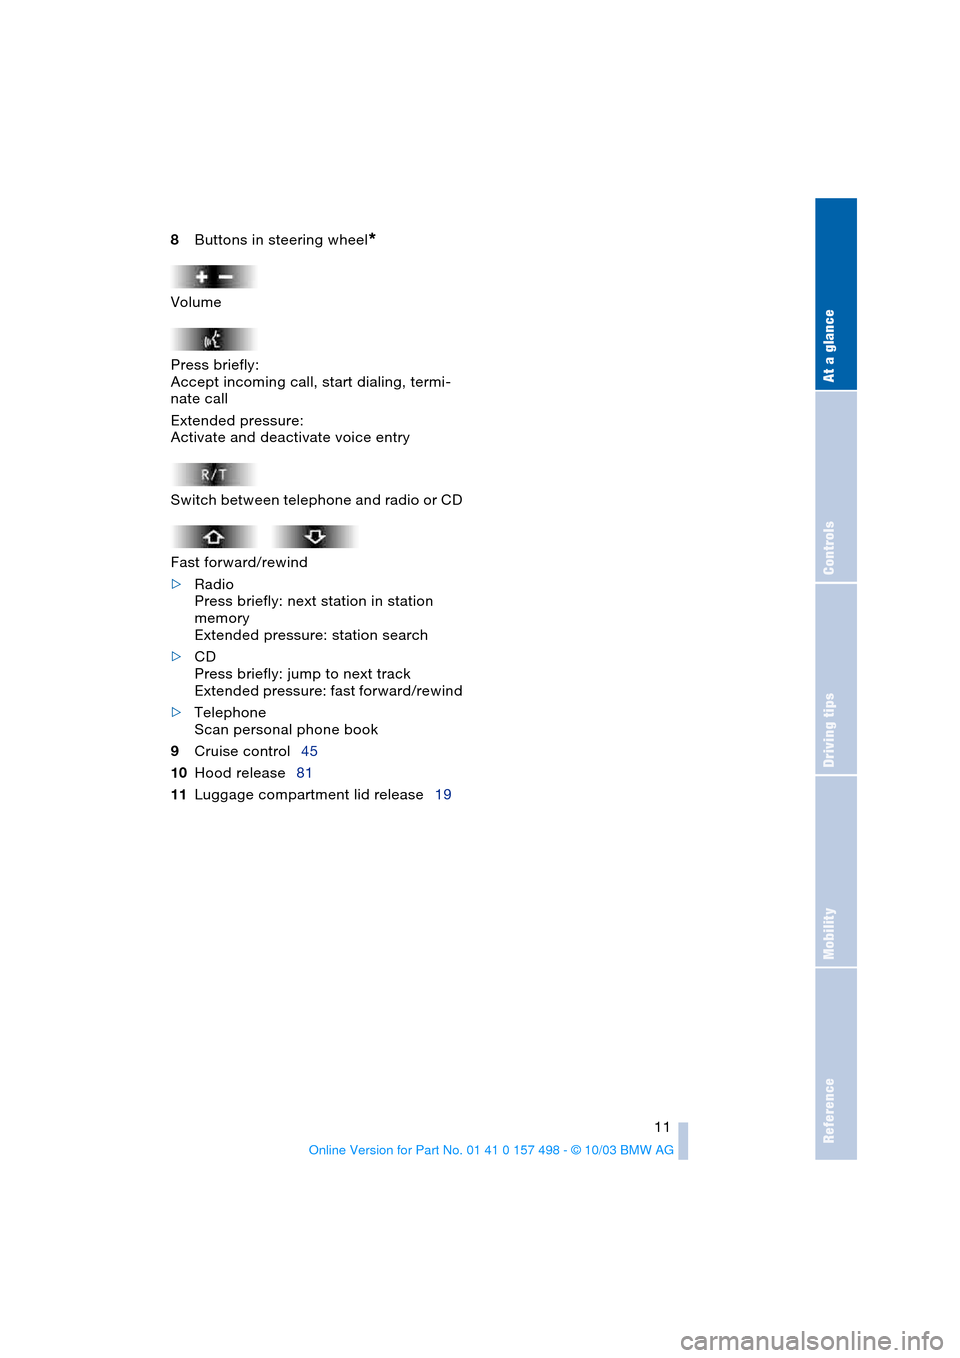
Buttons in steering wheel
*
Volume
Press briefly:
Accept incoming call, start dialing, termi-
nate call
Extended pressure:
Activate and deactivate voice entry
Switch between telephone and radio or CD
Fast forward/rewind
>
Radio
Press briefly: next station in station
memory
Extended pressure: station search
>
CD
Press briefly: jump to next track
Extended pressure: fast forward/rewind
>
Telephone
Scan personal phone book
9
Cruise control45
10
Hood release81
11
Luggage compartment lid release19
Page 42 of 120
Driving
40 direction, the transmission shifts up. When
the lever is tapped in the – direction, the
transmission shifts down. M1 to M 5 appear
in the gear indicator.
The Adaptive Transmission Control ATC
executes upshifts or downshifts only when
the new gear will provide a suitable combi-
nation of engine and road speed, e.g. ATC
will not execute downshifts if the engine
speed is too high. The desired gear will
appear briefly in the instrument cluster, fol-
lowed by the actual gear.
If you are driving in the manual mode
and wish to accelerate rapidly, e.g. to
pass another vehicle, shift down manually
or with the kickdown function.<
Shifting from M/S to selector lever posi-
tions P, R and N is possible only by going
through position D.
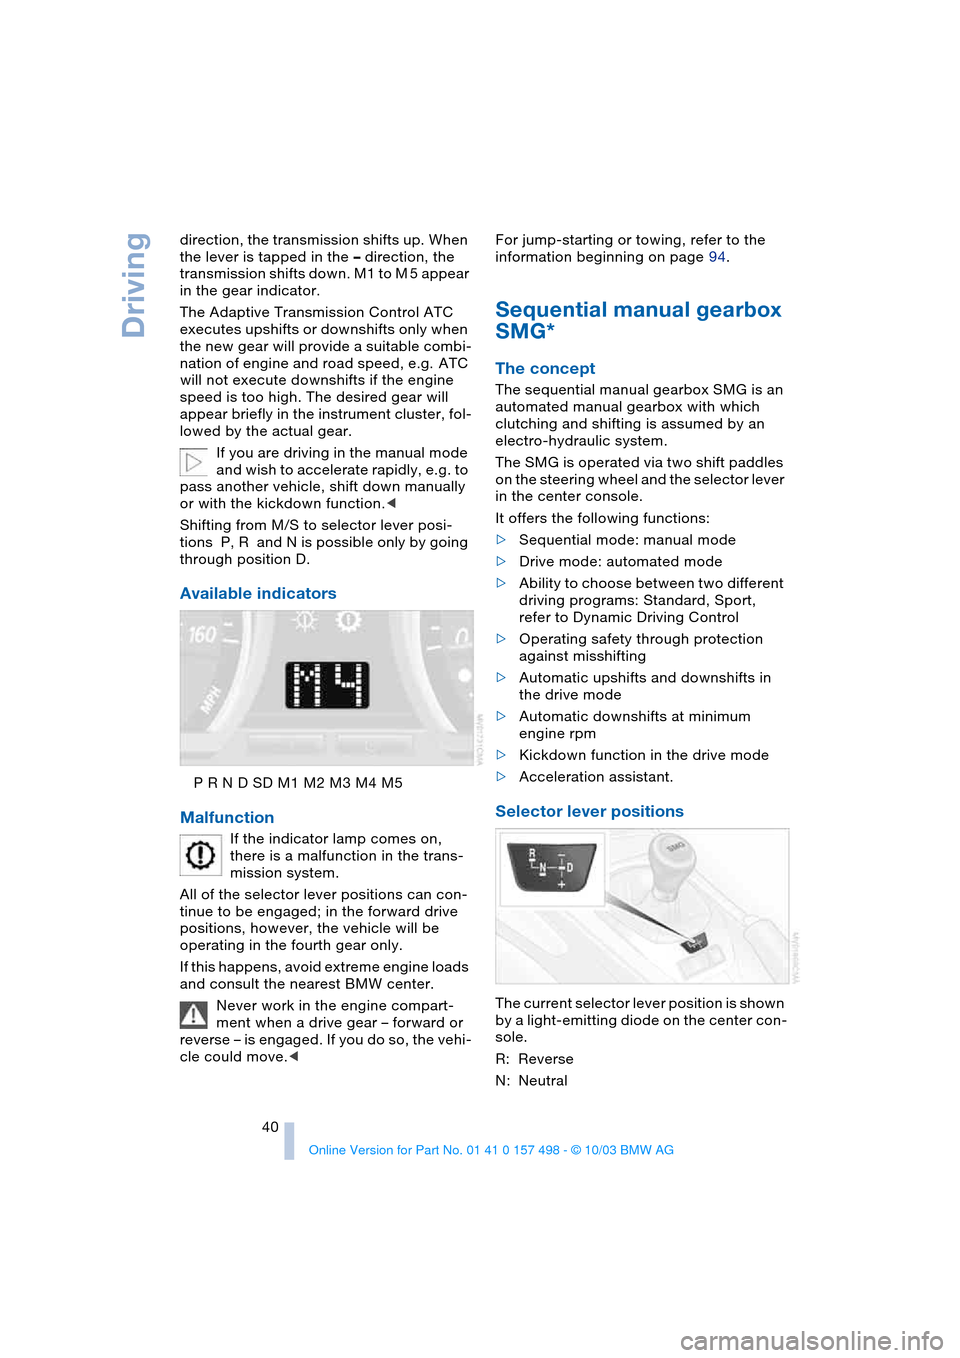
Available indicators
P R N D SD M1 M2 M3 M4 M5
Malfunction
If the indicator lamp comes on,
there is a malfunction in the trans-
mission system.
All of the selector lever positions can con-
tinue to be engaged; in the forward drive
positions, however, the vehicle will be
operating in the fourth gear only.
If this happens, avoid extreme engine loads
and consult the nearest BMW center.
Never work in the engine compart-
ment when a drive gear – forward or
reverse – is engaged. If you do so, the vehi-
cle could move.
Sequential manual gearbox
SMG*
The concept
The sequential manual gearbox SMG is an
automated manual gearbox with which
clutching and shifting is assumed by an
electro-hydraulic system.
The SMG is operated via two shift paddles
on the steering wheel and the selector lever
in the center console.
It offers the following functions:
>Sequential mode: manual mode
>Drive mode: automated mode
>Ability to choose between two different
driving programs: Standard, Sport,
refer to Dynamic Driving Control
>Operating safety through protection
against misshifting
>Automatic upshifts and downshifts in
the drive mode
>Automatic downshifts at minimum
engine rpm
>Kickdown function in the drive mode
>Acceleration assistant.
Selector lever positions
The current selector lever position is shown
by a light-emitting diode on the center con-
sole.
R: Reverse
N: Neutral
Page 44 of 120
Driving
42 You accelerate from higher gears, e.g. dur-
ing passing, by downshifting manually.
In the following situations, the SMG in the
sequential mode assists you:
>The transmission will only execute
upshifts and downshifts that will result
in an appropriate combination of vehi-
cle speed and engine rpm. For
instance, downshifts that would result
in excessive engine speed cannot be
executed
>During a stop the gearbox is automati-
cally downshifted into first gear
>Shortly before a gear-dependent mini-
mum speed is reached, the gearbox
shifts down automatically without you
taking any action.
Display in the instrument cluster
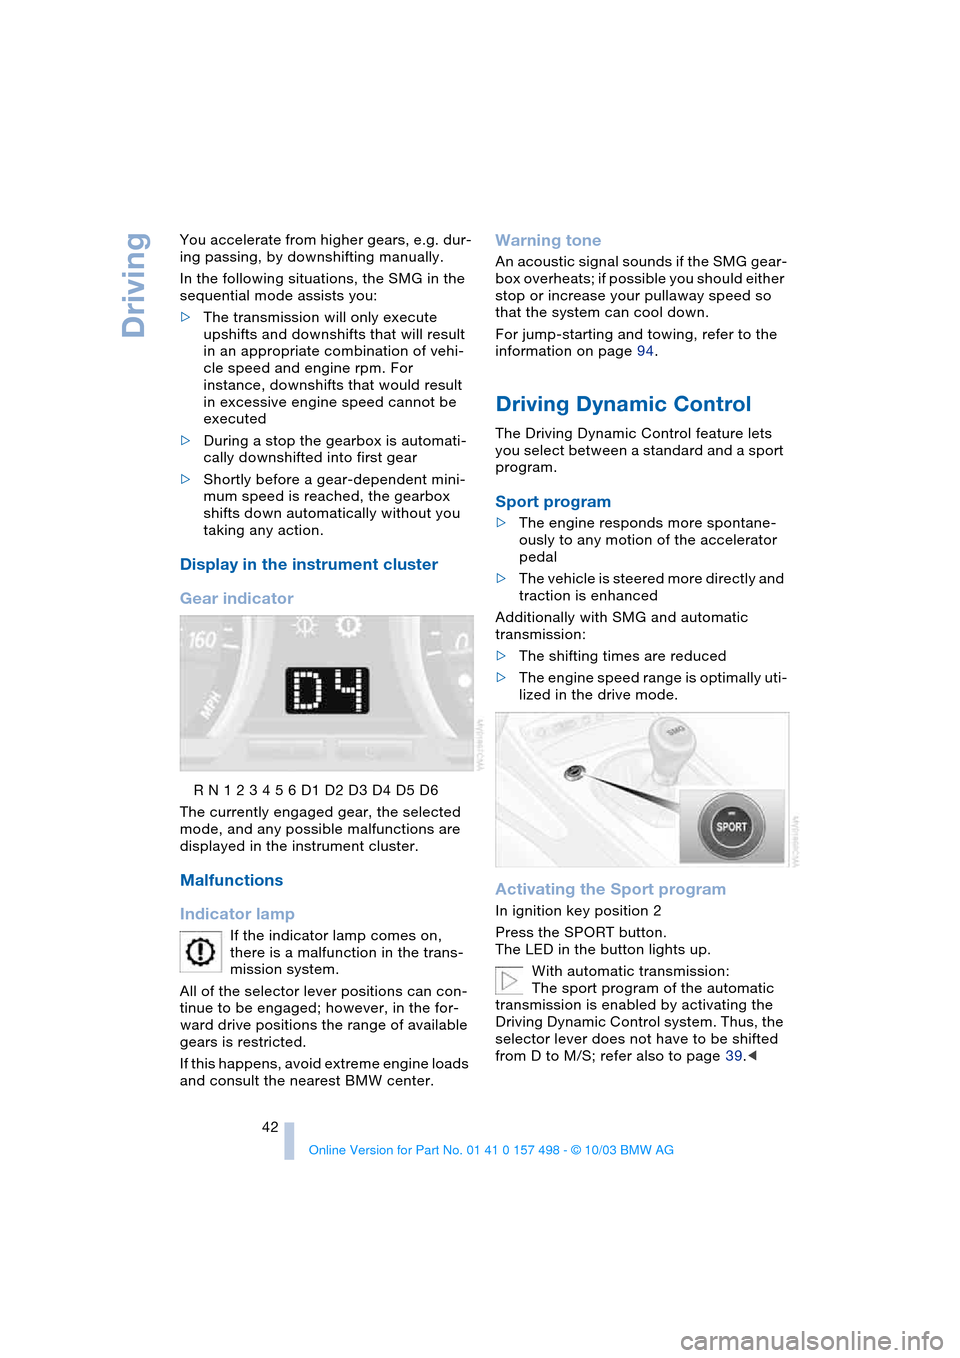
Gear indicator
R N 1 2 3 4 5 6 D1 D2 D3 D4 D5 D6
The currently engaged gear, the selected
mode, and any possible malfunctions are
displayed in the instrument cluster.
Malfunctions
Indicator lamp
If the indicator lamp comes on,
there is a malfunction in the trans-
mission system.
All of the selector lever positions can con-
tinue to be engaged; however, in the for-
ward drive positions the range of available
gears is restricted.
If this happens, avoid extreme engine loads
and consult the nearest BMW center.
Warning tone
An acoustic signal sounds if the SMG gear-
box overheats; if possible you should either
stop or increase your pullaway speed so
that the system can cool down.
For jump-starting and towing, refer to the
information on page 94.
Driving Dynamic Control
The Driving Dynamic Control feature lets
you select between a standard and a sport
program.
Sport program
>The engine responds more spontane-
ously to any motion of the accelerator
pedal
>The vehicle is steered more directly and
traction is enhanced
Additionally with SMG and automatic
transmission:
>The shifting times are reduced
>The engine speed range is optimally uti-
lized in the drive mode.
Activating the Sport program
In ignition key position 2
Press the SPORT button.
The LED in the button lights up.
With automatic transmission:
The sport program of the automatic
transmission is enabled by activating the
Driving Dynamic Control system. Thus, the
selector lever does not have to be shifted
from D to M/S; refer also to page 39.<
Page 84 of 120
In the engine compartment
82
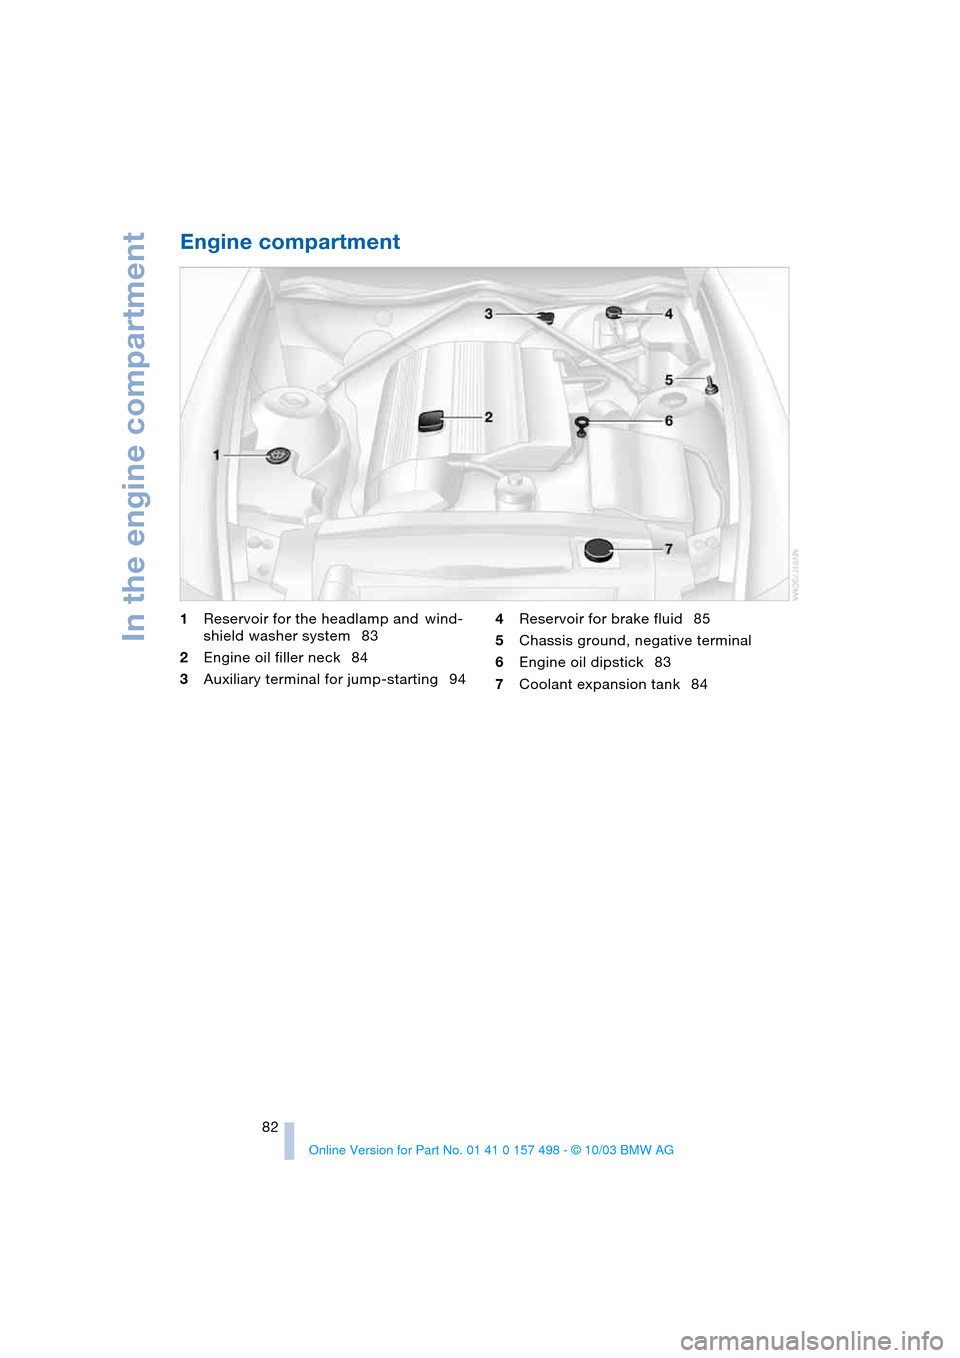
Engine compartment
1Reservoir for the headlamp and wind-
shield washer system 83
2Engine oil filler neck 84
3Auxiliary terminal for jump-starting 944Reservoir for brake fluid 85
5Chassis ground, negative terminal
6Engine oil dipstick 83
7Coolant expansion tank 84
Page 94 of 120
Replacement procedures
92
Charging the battery
Charge the battery in the vehicle only when
the engine is not running. For information
on connections, refer to Jump-starting on
page 94.
Battery disposal
Return used batteries to a recycling
point or to your BMW center. Maintain
the battery in an upright position for trans-
port and storage. Secure the battery
against tilting when transporting.<
Fuses
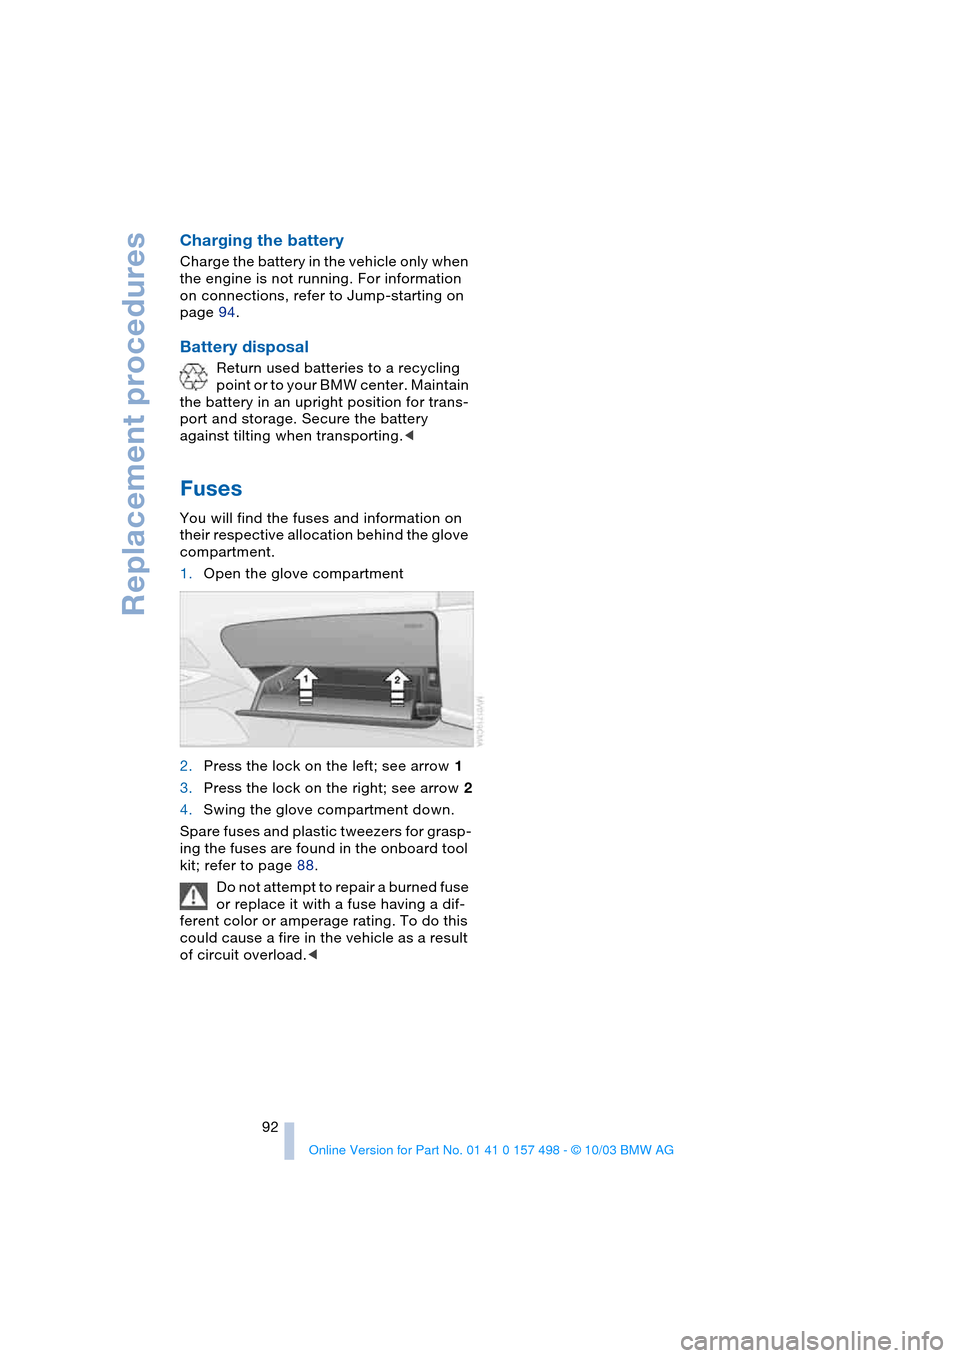
You will find the fuses and information on
their respective allocation behind the glove
compartment.
1.Open the glove compartment
2.Press the lock on the left; see arrow 1
3.Press the lock on the right; see arrow 2
4.Swing the glove compartment down.
Spare fuses and plastic tweezers for grasp-
ing the fuses are found in the onboard tool
kit; refer to page 88.
Do not attempt to repair a burned fuse
or replace it with a fuse having a dif-
ferent color or amperage rating. To do this
could cause a fire in the vehicle as a result
of circuit overload.<
Page 96 of 120
Giving and receiving assistance
94
Warning triangle*
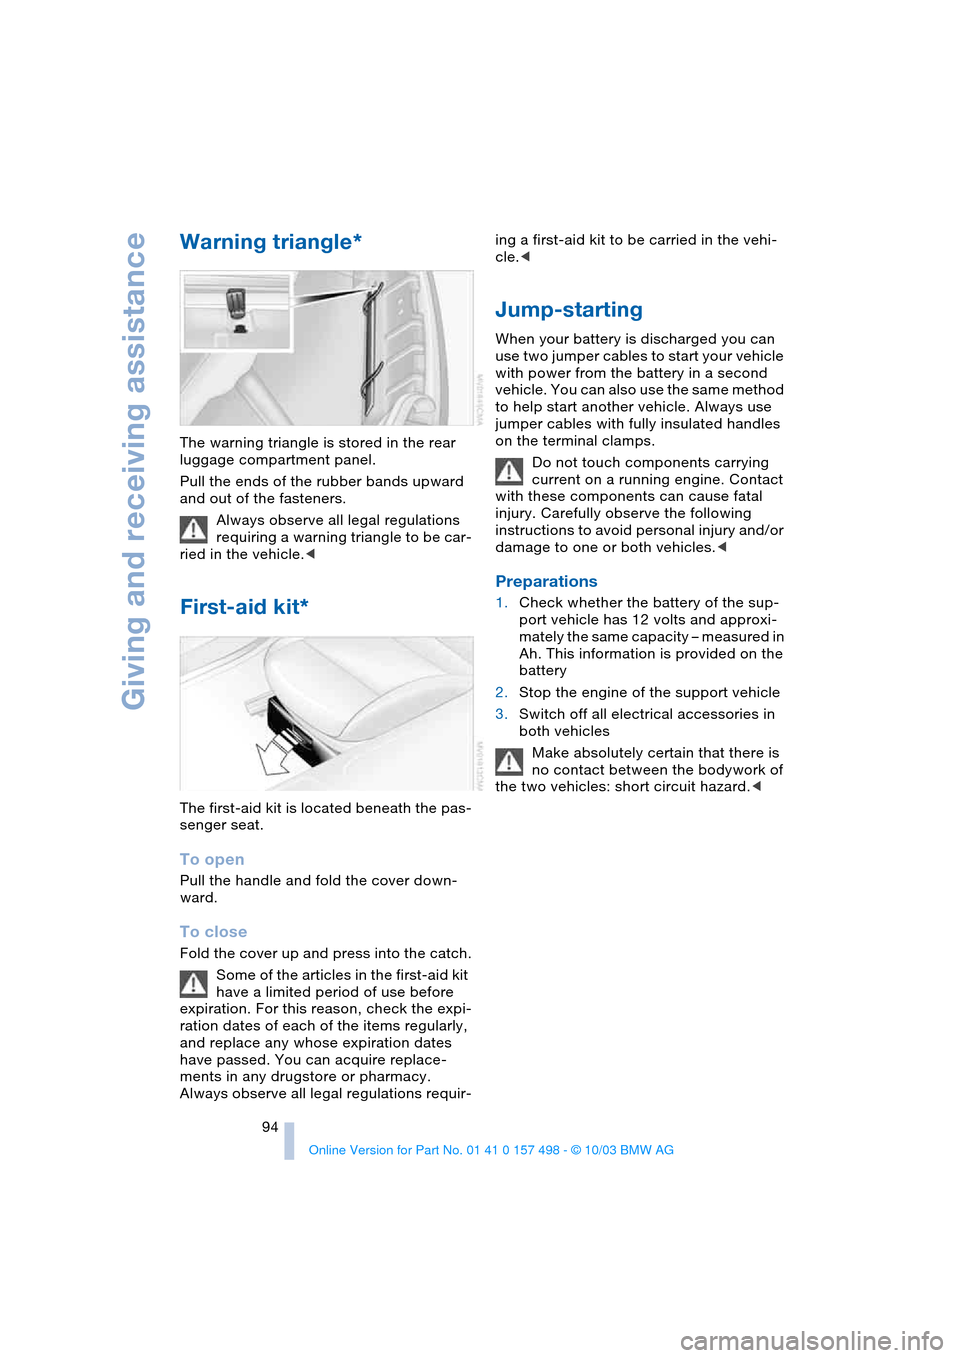
The warning triangle is stored in the rear
luggage compartment panel.
Pull the ends of the rubber bands upward
and out of the fasteners.
Always observe all legal regulations
requiring a warning triangle to be car-
ried in the vehicle.<
First-aid kit*
The first-aid kit is located beneath the pas-
senger seat.
To open
Pull the handle and fold the cover down-
ward.
To close
Fold the cover up and press into the catch.
Some of the articles in the first-aid kit
have a limited period of use before
expiration. For this reason, check the expi-
ration dates of each of the items regularly,
and replace any whose expiration dates
have passed. You can acquire replace-
ments in any drugstore or pharmacy.
Always observe all legal regulations requir-ing a first-aid kit to be carried in the vehi-
cle.<
Jump-starting
When your battery is discharged you can
use two jumper cables to start your vehicle
with power from the battery in a second
vehicle. You can also use the same method
to help start another vehicle. Always use
jumper cables with fully insulated handles
on the terminal clamps.
Do not touch components carrying
current on a running engine. Contact
with these components can cause fatal
injury. Carefully observe the following
instructions to avoid personal injury and/or
damage to one or both vehicles.<
Preparations
1.Check whether the battery of the sup-
port vehicle has 12 volts and approxi-
mately the same capacity – measured in
Ah. This information is provided on the
battery
2.Stop the engine of the support vehicle
3.Switch off all electrical accessories in
both vehicles
Make absolutely certain that there is
no contact between the bodywork of
the two vehicles: short circuit hazard.<
Page 97 of 120
Reference
At a glance
Controls
Driving tips
Mobility
95
Connecting jumper cables
Always adhere to this sequence when
connecting jumper cables; failure to
observe this procedure can lead to sparks
at the battery terminals and pose an injury
hazard.<
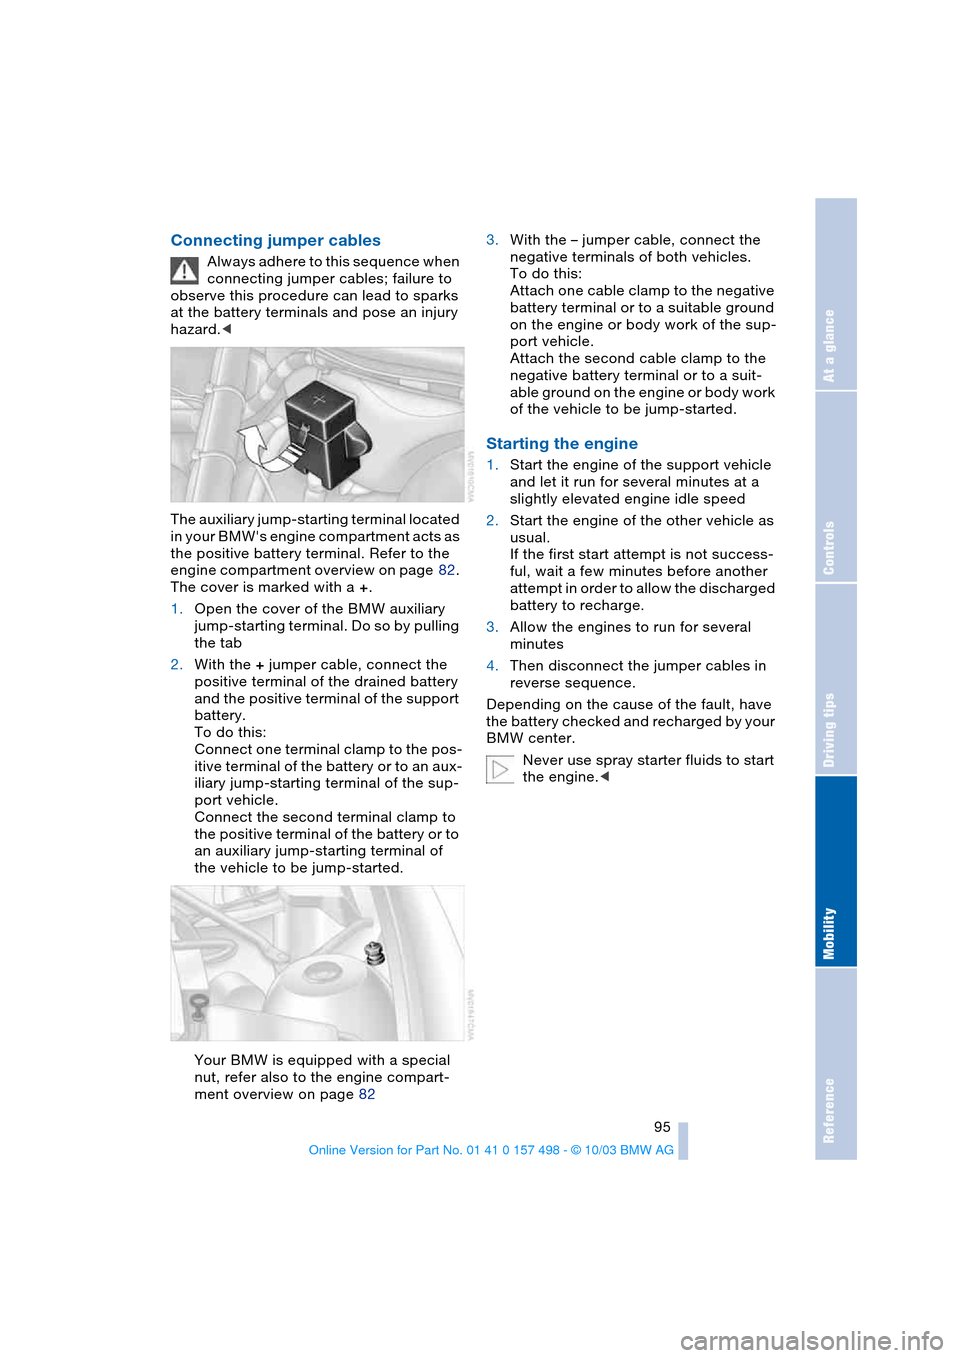
The auxiliary jump-starting terminal located
in your BMW's engine compartment acts as
the positive battery terminal. Refer to the
engine compartment overview on page 82.
The cover is marked with a +.
1.Open the cover of the BMW auxiliary
jump-starting terminal. Do so by pulling
the tab
2.With the + jumper cable, connect the
positive terminal of the drained battery
and the positive terminal of the support
battery.
To do this:
Connect one terminal clamp to the pos-
itive terminal of the battery or to an aux-
iliary jump-starting terminal of the sup-
port vehicle.
Connect the second terminal clamp to
the positive terminal of the battery or to
an auxiliary jump-starting terminal of
the vehicle to be jump-started.
Your BMW is equipped with a special
nut, refer also to the engine compart-
ment overview on page 823.With the – jumper cable, connect the
negative terminals of both vehicles.
To do this:
Attach one cable clamp to the negative
battery terminal or to a suitable ground
on the engine or body work of the sup-
port vehicle.
Attach the second cable clamp to the
negative battery terminal or to a suit-
able ground on the engine or body work
of the vehicle to be jump-started.
Starting the engine
1.Start the engine of the support vehicle
and let it run for several minutes at a
slightly elevated engine idle speed
2.Start the engine of the other vehicle as
usual.
If the first start attempt is not success-
ful, wait a few minutes before another
attempt in order to allow the discharged
battery to recharge.
3.Allow the engines to run for several
minutes
4.Then disconnect the jumper cables in
reverse sequence.
Depending on the cause of the fault, have
the battery checked and recharged by your
BMW center.
Never use spray starter fluids to start
the engine.<
Page 107 of 120
Reference
At a glance
Controls
Driving tips
Mobility
105
Battery 91
– disposal 92
– indicator lamp 13, 91
– jump-starting 94
– remote control 17
Belts, refer to Safety
belts 30
Belt tensioner, refer to
Safety belts 30
Beverage holders 65
Blower
– air conditioning 59
– automatic climate
control 62
Blower, refer to Air
supply 59, 62
BMW 5
Bore, refer to Engine
data 100
Bottle holders, refer to
Beverage holders 65
Brake fluid 85
– filling 85
– indicator/warning
lamp 13, 85
– level 85
Brake force display 53
Brake hydraulic system 85
– indicator/warning
lamp 13, 69, 85
Brake lamps
– bulb replacement 90
– indicator lamp, defective
lamp 13
Brake pads 70
– break-in procedures 68
– indicator lamp 70
Brake pad wear indicator
– brake pads 70
– indicator lamp 13
Brake rotors
– brake system 69
– break-in procedures 68
Brakes 69
– ABS 54
– brake fluid 85
– break-in procedures 68
– indicator/warning
lamps 13, 52, 53, 54
– parking brake 38Brake system 69
– brake fluid level 85
– brake pads 70
– break-in procedures 68
– disc brakes 69
– indicator lamp 13
Breakdown
– Flat Tire Monitor 54
Break-in procedures 68
Bulb replacement, refer to
Lamps and bulbs 88
Buttons in steering
wheel 11
C
California Proposition
65 warning 87
Can holders, refer to
Beverage holders 65
Capacities 103
Car battery 91
Car care, refer to the Caring
for your vehicle brochure
Car-care products, refer to
the Caring for your
vehicle brochure
Care, refer to the Caring for
your vehicle brochure
Cargo loading
– vehicle 70
Car keys, refer to Keys 16
Carpet care, refer to the
Caring for your vehicle
brochure
Car radio, refer to Owner's
Manual for Radio
Car telephone, refer to
Owner's Manual for
Telephone
Car wash, refer to the
Caring for your vehicle
brochure
Catalytic converter, refer to
High temperatures 69
CD player operation, refer
to Owner's Manual
for Radio
Center high-mount brake
lamp
– bulb replacement 90Central locking system 16
– interior 18
Changing a wheel 91
Charge indicator
lamp 13, 91
Check Gas Cap
– indicator lamp 13
Child-restraint mounting
system, LATCH 35
Child-restraint systems 33
Child seat, refer to Child-
restraint systems 33
Chrome parts, refer to the
Caring for your vehicle
brochure
Cigarette lighter 65
Cigarette lighter socket 65
Cleaning the rear window,
refer to the Caring for
your vehicle brochure
Cleaning the vehicle, refer
to the Caring for your
vehicle brochure
Cleaning the windshield 44
Clock 49, 50
– 12- or 24-hour mode 50
– refer to Owner's Manual
for Radio/Onboard
Computer
– setting 49
Clothes hooks 25
Clutch
– break-in procedures 68
Cockpit 10
Cold start, refer to
Starting the engine 36
Compact disc operation,
refer to Owner's Manual
for Radio
Compartments 64
Compression ratio, refer to
Engine data 100
Computer 50
– clock, 12- or 24-hour
mode 50
– refer to Owner's Manual
for Onboard Computer
Computer, refer to
Onboard Computer 50
Condensation, refer to Air
conditioning mode 59, 62
Page 110 of 120
Everything from A to Z
108 Hazard warning flashers 10
Headlamp cover, care,
refer to the Caring for
your vehicle brochure
Headlamp flasher 43
– indicator lamp 13
Headlamps
– bulb replacement 88
– care, refer to the Caring
for your vehicle brochure
– cleaning 44
Headlamps, automatic
control 46
Headlamp washer
reservoir 83
– content, refer to
Capacities 103
Headlamp washer
system
– cleaning the
headlamps 44
– washing fluids 83
Head restraints 28
Heated mirrors 31
Heated seats 30
Heating 58
– exterior mirrors 31
– rear window 59, 63
– seats 30
Heavy loads, refer to
Stowing cargo 70
Height, refer to
Dimensions 102
Height adjustment
– seats 28
– steering wheel 30
High beams 47
– bulb replacement 89
– headlamp flasher 43
– indicator lamp 13
High Performance
Synthetic Oil 84
– alternative oils 84
– approved oils 84
High temperatures 69
Holders for beverages 65
Hood 81
Horn 10
Hydraulic Brake Assistant,
refer to Dynamic Brake
Control DBC 52Hydraulics
– brakes 85
Hydroplaning 69
I
Ice warning 50
Identification mark
– Run Flat tires 80
Ignition 36
Ignition key 16
Ignition lock 36
Inclines 69
Index 104
Indicator/warning lamp
– airbags 57
– alarm system 26
– brakes 13
– coolant temperature 49
– DSC 52
– engine temperature 48
– Flat Tire Monitor 55
– fog lamps 47
– passenger airbags 34
– please fasten safety
belts 30
– reserve 48
Indicator and warning
lamps, overview 12
Individual air
distribution 59, 62
Individual settings, refer to
Vehicle Memory,
Key Memory 31
Inflation pressure, tires 75
Inflation pressure
monitoring, refer to Flat
Tire Monitor 54
INSPECTION 49
Instrument cluster 12
Instrument lighting 47
Instrument panel, refer to
Cockpit 10
Interior lamps 47
– remote control 17
Interior motion sensor 26
Interior rearview mirror 31
– automatic dimming
feature 31
Interior temperature
– adjusting 59, 62Interlock, refer to
Steering lock 36
Intermittent
– operation, wipers 44
Interval
– display, service 49
J
Jack 91
Jacking points 91
Jets, refer to
Ventilation 59, 63
Jump-starting 94
K
Key Memory 31
Keys 16
Key switch for passenger
airbags 33
Kickdown 39
Knock control 74
L
Lamps 46
Lamps and bulbs 88
LATCH, child-restraint
mounting system 35
Leather care, refer to the
Caring for your vehicle
brochure
Length, refer to
Dimensions 102
License plate lamps
– bulb replacement 91
Light-alloy wheels, care,
refer to the Caring for
your vehicle brochure
Lighter 65
Lighting
– of the instruments 47
Lighting of the instruments,
refer to Instrument
lighting 47
LIGHTS ON warning 46
Light switch 46
Loads, refer to Cargo
loading 70
Loads, securing 70
Page 113 of 120
Reference
At a glance
Controls
Driving tips
Mobility
111
Securing, locking the
vehicle
– from inside 19
– from outside 17
Securing loads,
refer to Cargo loading 70
Selector lever
– automatic transmission
with Steptronic 39
Selector lever lock, refer to
Shiftlock 39
Selector lever positions
– automatic transmission
with Steptronic 39
Service, see Service and
Warranty Information
Booklet for US models,
Warranty and Service
Guide Booklet for
Canadian models 86
Service and warranty 6
Service interval
display 49, 86
Shifting gears
– automatic transmission
with Steptronic 39
– manual transmission 38
Shiftlock 39
Side airbags 56
Side turn signal indicators
– bulb replacement 90
Signal horn, refer to
Horn 10
Slipstream deflector, refer
to Wind deflector 24
Smokers' package, refer to
Ashtray 65
Snow chains 80
Socket, refer to Cigarette
lighter 65
Socket for Onboard
Diagnostics 87
SOS, refer to Emergency
call 93
Spare fuses 92
Spare key 16
Special oils, refer to
Specified engine oils 84
Special wash program,
refer to the Caring for
your vehicle brochureSpecified engine oils 84
Speed
– winter tires 79
Speedometer 12
Sport program
– automatic transmission
with Steptronic 39
– Driving Dynamic
Control 42
Sports seat 29
Stability control, refer to
– Dynamic Stability Control
DSC 52
Standing lamps 47
Starting 36
– engine 36
Starting assistance
– Dynamic Stability Control
DSC 52
Starting difficulties
– jump-starting 94
– temperature 37
Status of the Owner's
Manual 5
Steering lock 36
Steering wheel 10
– adjusting 30
Steptronic, refer to Manual
mode 39
Storage, tires 79
Storage compartments 64
– electrical fault 64
– opening manually 64
Storage nets 64
Storage space, refer to
Luggage compartment 20
Storage space, refer to
Storage
compartments 64
Storing seat position, refer
to Seat memory 29
Stroke, refer to Engine
data 100
Summer tires, refer to
Wheels and tires 75
Surface ice, refer to Ice
warning 50
Switches, refer to
Cockpit 10
Switch for passenger
airbags 33Switching gears, refer to
Automatic transmission
with Steptronic 39
Switching off
– engine 37
– vehicle 38
Symbols 4
T
Tachometer 48
Tail lamps
– bulb replacement 90
– indicator lamp, defective
lamp 13
Tail lamps, refer to Rear
lamps 90
– bulb replacement 90
Tank capacity, refer to Fuel
tank capacity 103
Tank indicator, refer to Fuel
gauge 48
Technical data 100
Technical modifications,
refer to For your own
safety 5
Telephone, refer to the
separate Owner's Manual
Telephone preparation 65
Temperature
– air conditioning 59
– automatic climate
control 62
– engine 48
Temperature display
– ice warning 50
– outside
temperature 49, 50
– setting units of
measure 50
Tempomat, refer to Cruise
control 45
The BMW Maintenance
System 86
Third brake lamp
– bulb replacement 90
Third brake lamp, refer to
Center high-mount brake
lamp 90
Three-point seat belt, refer
to Safety belts 30