BMW Z4 ROADSTER SDRIVE35I 2010 E89 Owner's Manual
Manufacturer: BMW, Model Year: 2010, Model line: Z4 ROADSTER SDRIVE35I, Model: BMW Z4 ROADSTER SDRIVE35I 2010 E89Pages: 254, PDF Size: 8.04 MB
Page 151 of 254
Navigation
Entertainment
Driving tips
149Reference
At a glance
Controls
Communications
Mobility
5.Select the desired league.
6.Select "Add all teams" or the desired team.
Opening the favorites
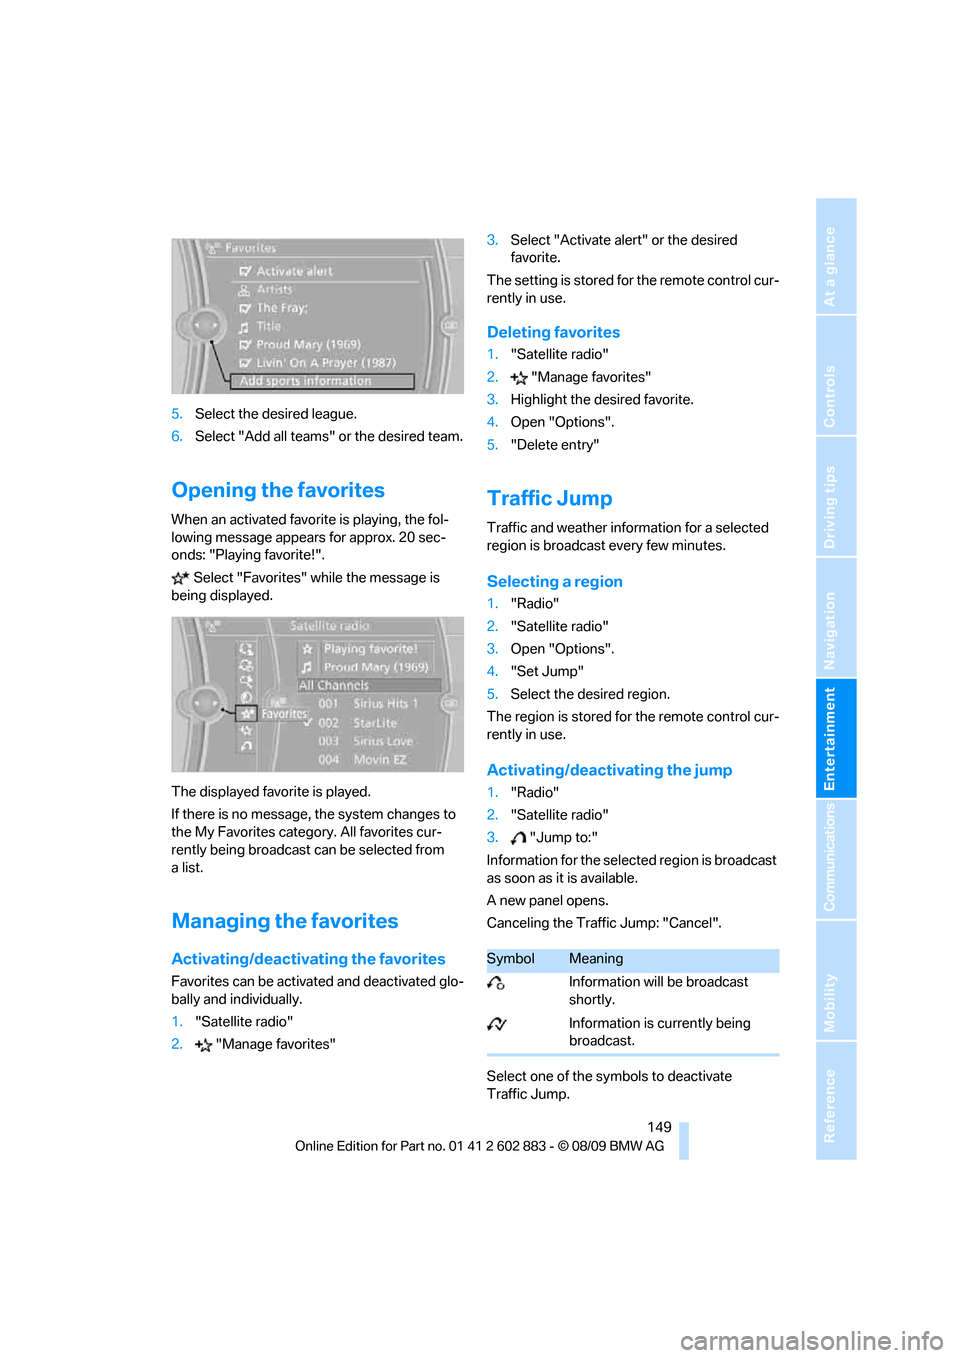
When an activated favorite is playing, the fol-
lowing message appears for approx. 20 sec-
onds: "Playing favorite!".
Select "Favorites" while the message is
being displayed.
The displayed favorite is played.
If there is no message, the system changes to
the My Favorites category. All favorites cur-
rently being broadcast can be selected from
a list.
Managing the favorites
Activating/deactivating the favorites
Favorites can be activated and deactivated glo-
bally and individually.
1."Satellite radio"
2."Manage favorites"3.Select "Activate alert" or the desired
favorite.
The setting is stored for the remote control cur-
rently in use.
Deleting favorites
1."Satellite radio"
2."Manage favorites"
3.Highlight the desired favorite.
4.Open "Options".
5."Delete entry"
Traffic Jump
Traffic and weather information for a selected
region is broadcast every few minutes.
Selecting a region
1."Radio"
2."Satellite radio"
3.Open "Options".
4."Set Jump"
5.Select the desired region.
The region is stored for the remote control cur-
rently in use.
Activating/deactivating the jump
1."Radio"
2."Satellite radio"
3."Jump to:"
Information for the selected region is broadcast
as soon as it is available.
A new panel opens.
Canceling the Traffic Jump: "Cancel".
Select one of the symbols to deactivate
Traffic Jump.
SymbolMeaning
Information will be broadcast
shortly.
Information is currently being
broadcast.
Page 152 of 254
Satellite radio
150
Automatic update
About twice a year, Sirius performs an update of
the channel names and positions. The update
takes place automatically and may take several
minutes.
Notes
>Reception may not be available in some sit-
uations, such as under certain environmen-
tal or topographic conditions. The satellite
radio cannot influence this.
>The signal may not be available in tunnels or
underground garages; next to tall buildings;
or near trees, mountains or other powerful
sources of radio interference.
Page 153 of 254
Navigation
Entertainment
Driving tips
151Reference
At a glance
Controls
Communications
Mobility
CD/DVD player and CD/DVD changer
CD/DVD playback
Inserting a CD/DVD
Insert the CD/DVD into the drive with the
printed side up. The CD/DVD is drawn in auto-
matically.
Playback starts automatically if the sound out-
put is on. When playing CDs/DVDs with com-
pressed audio files, it may take several minutes
to read in the data, depending on the directory
structure.
Playable formats
CD/DVD player
>DVD: DVD-ROM, DVD-R, DVD+R, DVD-
RW, DVD+RW, DVD-R DL, DVD+R DL, DVD
audio (video part only), DVD video
>CD: CD-ROM, CD-R, CD-RW, CD-DA,
VCD, SVCD
>Compressed audio files: MP3, WMA, AAC
CD changer
*
>CD: CD-ROM, CD-R, CD-RW, CD-DA
DVD changer
*
>DVD: DVD-ROM, DVD-R, DVD+R, DVD-
RW, DVD+RW, DVD-R DL, DVD+R DL, DVD
audio (video part only), DVD video, CD: CD-
ROM, CD-R, CD-RW, CD-DA, VCD, SVCD
Starting playback
Via iDrive
Fill the CD/DVD magazine and insert it, refer
to page155.
To start playback if a CD is already located in
the player or changer:
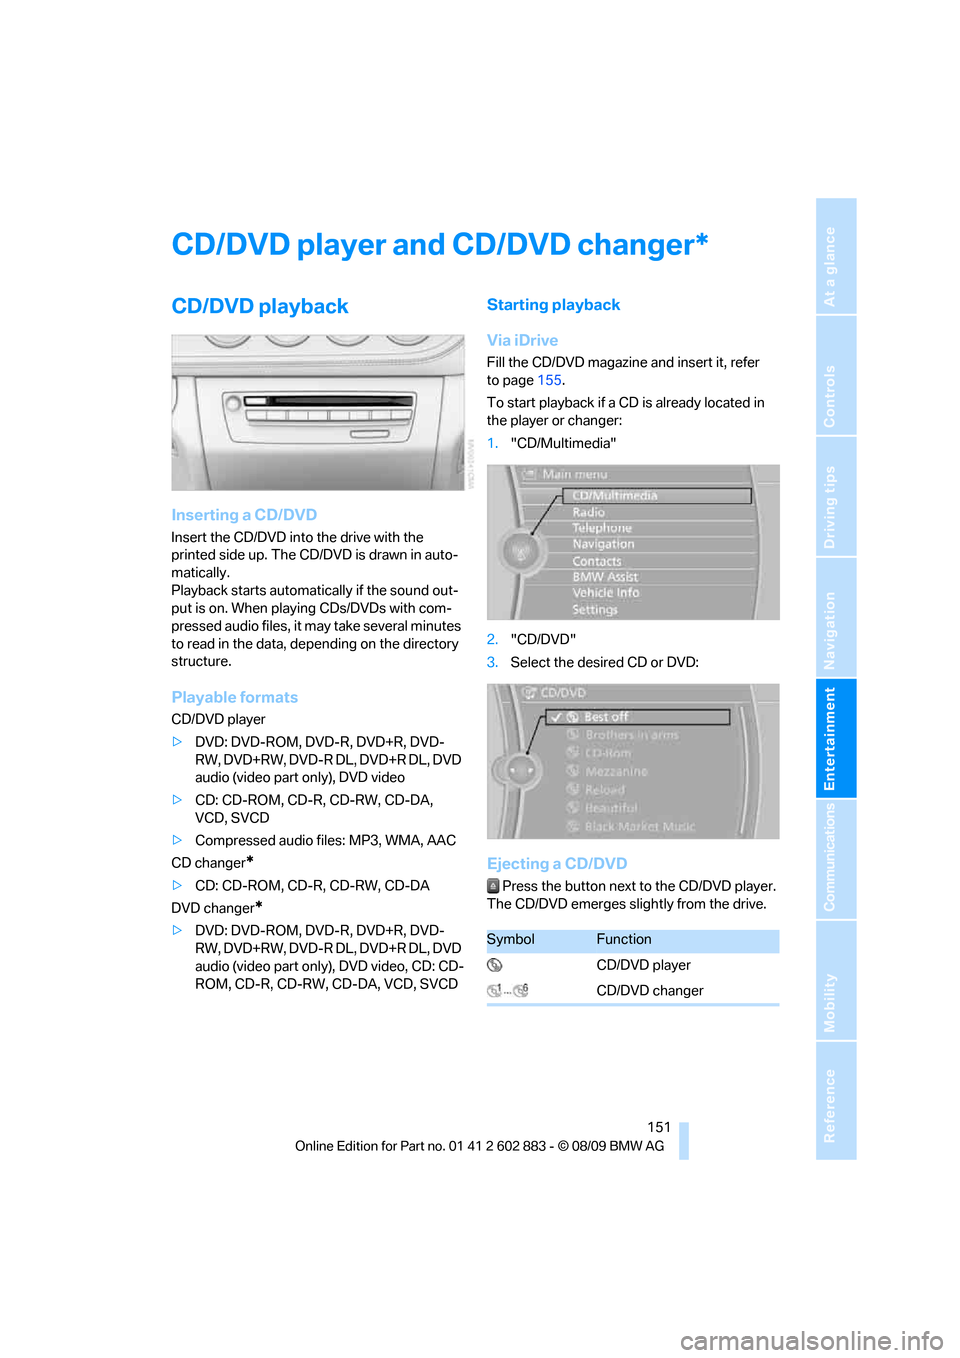
1."CD/Multimedia"
2."CD/DVD"
3.Select the desired CD or DVD:
Ejecting a CD/DVD
Press the button next to the CD/DVD player.
The CD/DVD emerges slightly from the drive.
*
SymbolFunction
CD/DVD player
CD/DVD changer
Page 154 of 254
CD/DVD player and CD/DVD changer
152
Audio playback
Selecting a track using the button
Press the button for the appropriate
direction as often as necessary until the desired
track is reached.
Selecting a track using iDrive
Audio CDs
1."CD/Multimedia"
2."CD/DVD"
3.Select the desired CD or DVD.
4.Select the desired track to begin playback.
CDs/CDs/DVDs with compressed audio
files*
Depending on the data, some letters and num-
bers of the CD/DVD may not be displayed cor-
rectly.
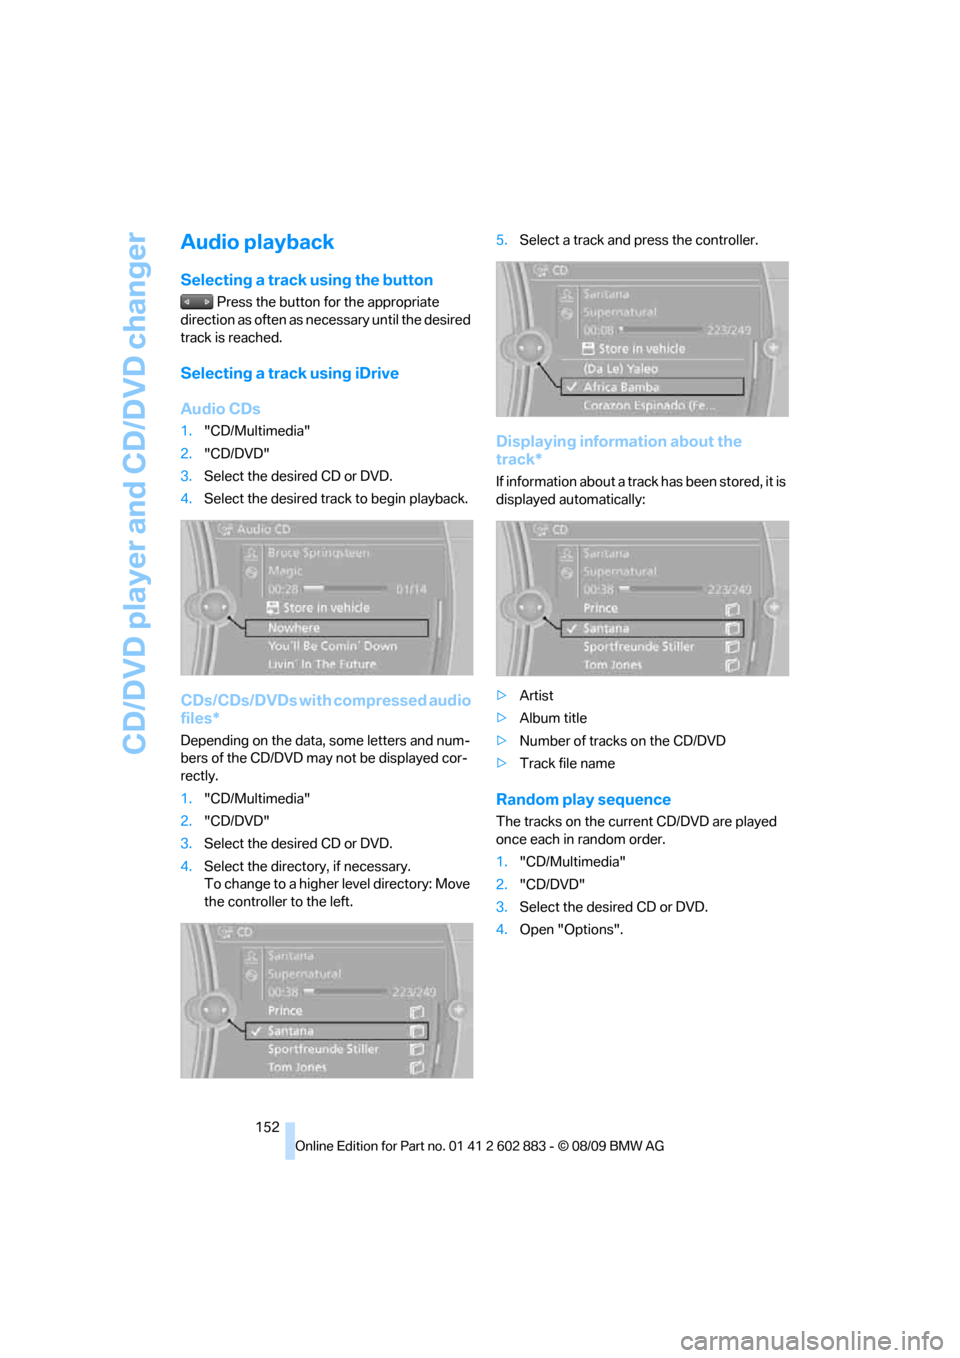
1."CD/Multimedia"
2."CD/DVD"
3.Select the desired CD or DVD.
4.Select the directory, if necessary.
To change to a higher level directory: Move
the controller to the left.5.Select a track and press the controller.
Displaying information about the
track*
If information about a track has been stored, it is
displayed automatically:
>Artist
>Album title
>Number of tracks on the CD/DVD
>Track file name
Random play sequence
The tracks on the current CD/DVD are played
once each in random order.
1."CD/Multimedia"
2."CD/DVD"
3.Select the desired CD or DVD.
4.Open "Options".
Page 155 of 254
Navigation
Entertainment
Driving tips
153Reference
At a glance
Controls
Communications
Mobility
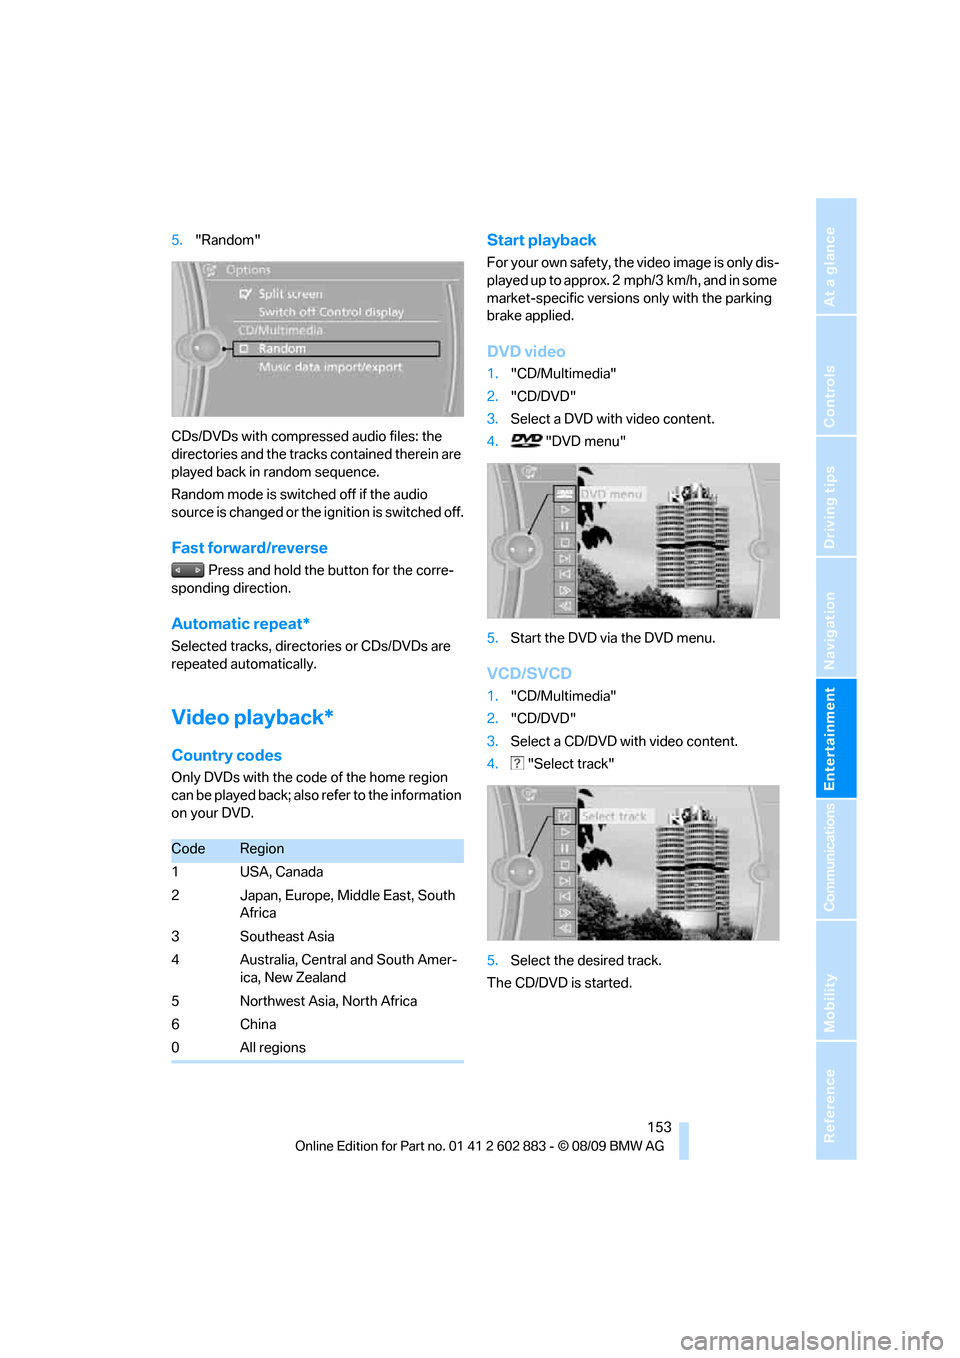
5."Random"
CDs/DVDs with compressed audio files: the
directories and the tracks contained therein are
played back in random sequence.
Random mode is switched off if the audio
source is changed or the ignition is switched off.
Fast forward/reverse
Press and hold the button for the corre-
sponding direction.
Automatic repeat*
Selected tracks, directories or CDs/DVDs are
repeated automatically.
Video playback*
Country codes
Only DVDs with the code of the home region
can be played back; also refer to the information
on your DVD.
Start playback
For your own safety, the video image is only dis-
played up to approx. 2 mph/3 km/h, and in some
market-specific versions only with the parking
brake applied.
DVD video
1."CD/Multimedia"
2."CD/DVD"
3.Select a DVD with video content.
4. "DVD menu"
5.Start the DVD via the DVD menu.
VCD/SVCD
1."CD/Multimedia"
2."CD/DVD"
3.Select a CD/DVD with video content.
4. "Select track"
5.Select the desired track.
The CD/DVD is started.
CodeRegion
1USA, Canada
2 Japan, Europe, Middle East, South
Africa
3 Southeast Asia
4 Australia, Central and South Amer-
ica, New Zealand
5 Northwest Asia, North Africa
6China
0 All regions
Page 156 of 254
CD/DVD player and CD/DVD changer
154
Video menu
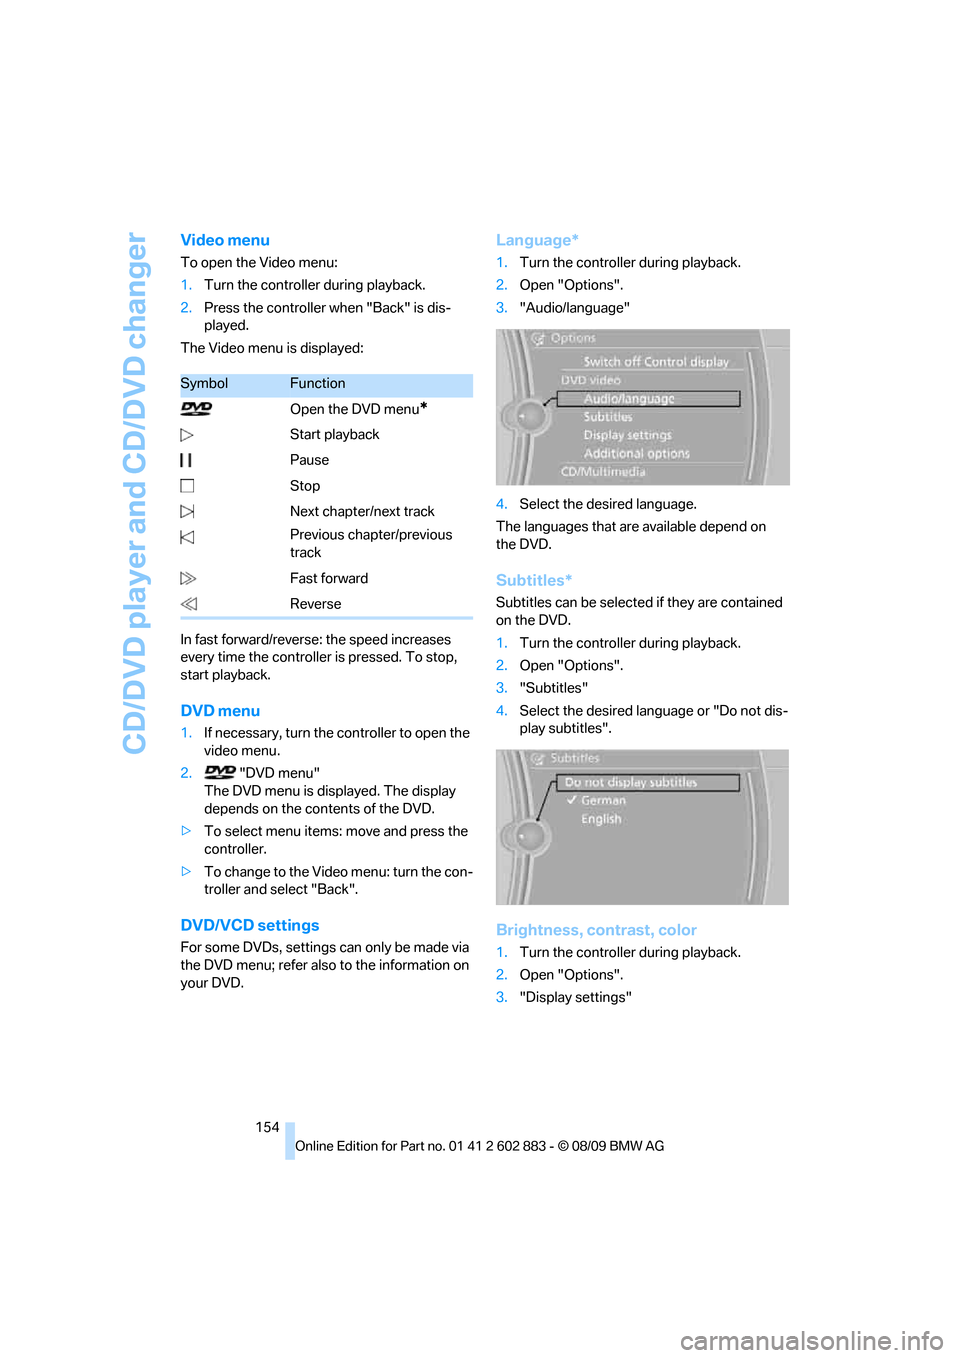
To open the Video menu:
1.Turn the controller during playback.
2.Press the controller when "Back" is dis-
played.
The Video menu is displayed:
In fast forward/reverse: the speed increases
every time the controller is pressed. To stop,
start playback.
DVD menu
1.If necessary, turn the controller to open the
video menu.
2. "DVD menu"
The DVD menu is displayed. The display
depends on the contents of the DVD.
>To select menu items: move and press the
controller.
>To change to the Video menu: turn the con-
troller and select "Back".
DVD/VCD settings
For some DVDs, settings can only be made via
the DVD menu; refer also to the information on
your DVD.
Language*
1.Turn the controller during playback.
2.Open "Options".
3."Audio/language"
4.Select the desired language.
The languages that are available depend on
the DVD.
Subtitles*
Subtitles can be selected if they are contained
on the DVD.
1.Turn the controller during playback.
2.Open "Options".
3."Subtitles"
4.Select the desired language or "Do not dis-
play subtitles".
Brightness, contrast, color
1.Turn the controller during playback.
2.Open "Options".
3."Display settings"
SymbolFunction
Open the DVD menu
*
Start playback
Pause
Stop
Next chapter/next track
Previous chapter/previous
track
Fast forward
Reverse
Page 157 of 254
Navigation
Entertainment
Driving tips
155Reference
At a glance
Controls
Communications
Mobility
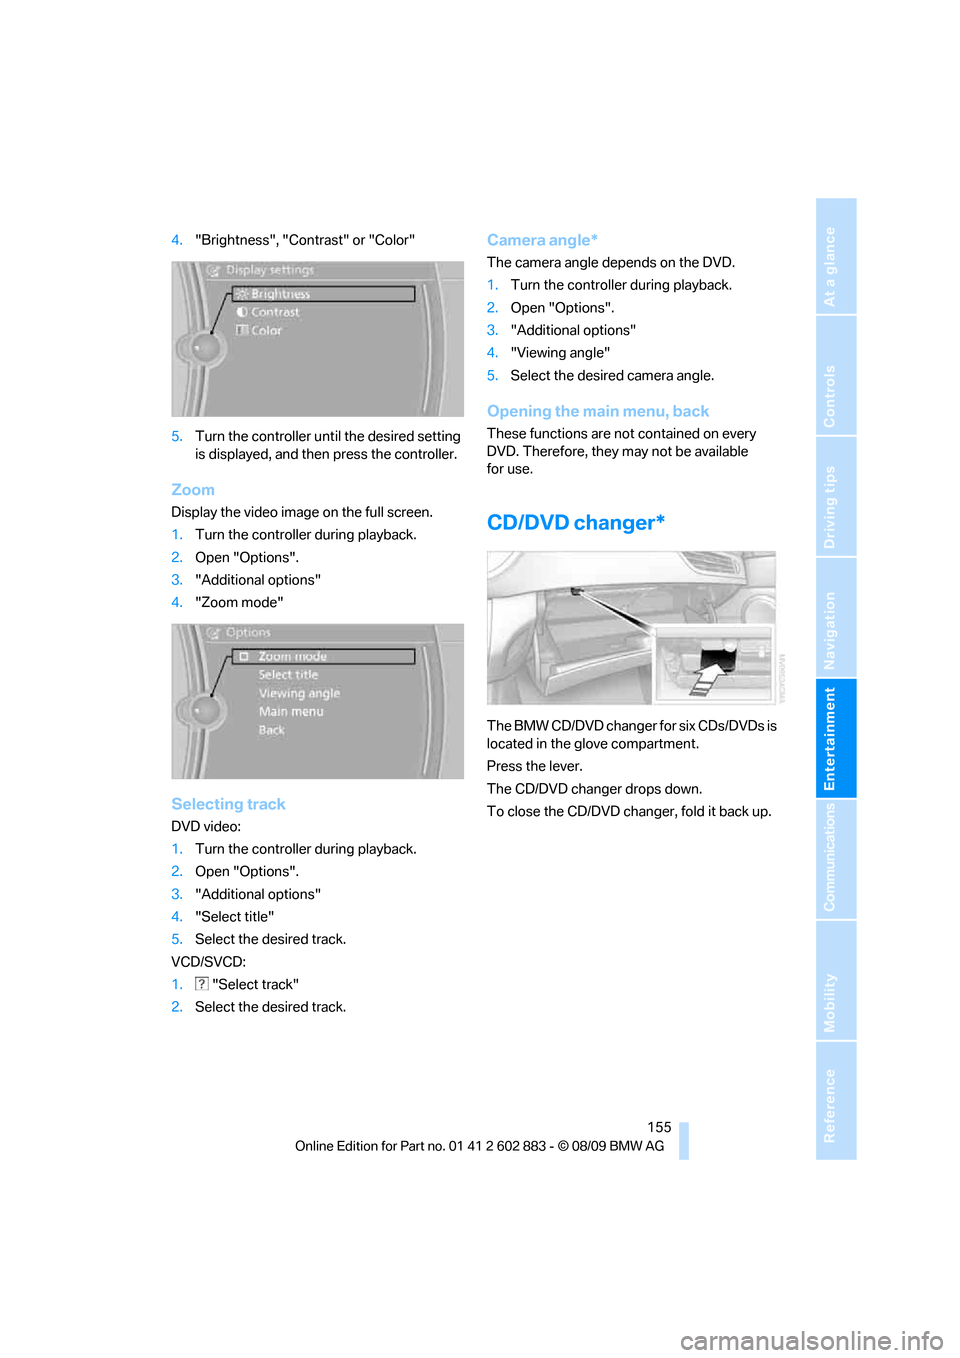
4."Brightness", "Contrast" or "Color"
5.Turn the controller until the desired setting
is displayed, and then press the controller.
Zoom
Display the video image on the full screen.
1.Turn the controller during playback.
2.Open "Options".
3."Additional options"
4."Zoom mode"
Selecting track
DVD video:
1.Turn the controller during playback.
2.Open "Options".
3."Additional options"
4."Select title"
5.Select the desired track.
VCD/SVCD:
1. "Select track"
2.Select the desired track.
Camera angle*
The camera angle depends on the DVD.
1.Turn the controller during playback.
2.Open "Options".
3."Additional options"
4."Viewing angle"
5.Select the desired camera angle.
Opening the main menu, back
These functions are not contained on every
DVD. Therefore, they may not be available
for use.
CD/DVD changer*
The BMW CD/DVD changer for six CDs/DVDs is
located in the glove compartment.
Press the lever.
The CD/DVD changer drops down.
To close the CD/DVD changer, fold it back up.
Page 158 of 254
CD/DVD player and CD/DVD changer
156
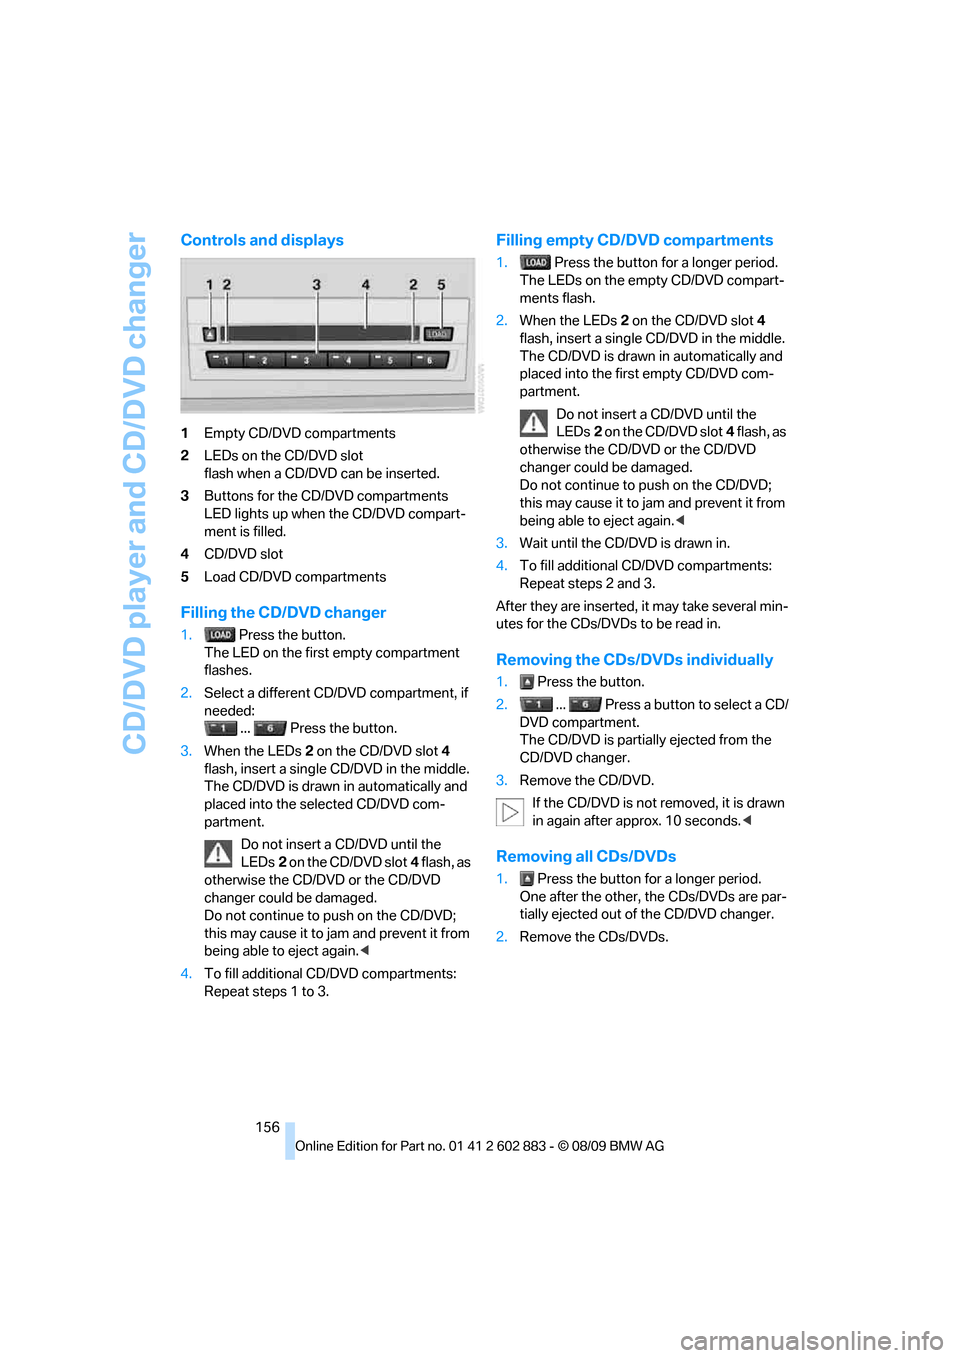
Controls and displays
1Empty CD/DVD compartments
2LEDs on the CD/DVD slot
flash when a CD/DVD can be inserted.
3Buttons for the CD/DVD compartments
LED lights up when the CD/DVD compart-
ment is filled.
4CD/DVD slot
5Load CD/DVD compartments
Filling the CD/DVD changer
1. Press the button.
The LED on the first empty compartment
flashes.
2.Select a different CD/DVD compartment, if
needed:
... Press the button.
3.When the LEDs 2 on the CD/DVD slot4
flash, insert a single CD/DVD in the middle.
The CD/DVD is drawn in automatically and
placed into the selected CD/DVD com-
partment.
Do not insert a CD/DVD until the
LEDs2 on the CD/DVD slot4 flash, as
otherwise the CD/DVD or the CD/DVD
changer could be damaged.
Do not continue to push on the CD/DVD;
this may cause it to jam and prevent it from
being able to eject again.<
4.To fill additional CD/DVD compartments:
Repeat steps 1 to 3.
Filling empty CD/DVD compartments
1. Press the button for a longer period.
The LEDs on the empty CD/DVD compart-
ments flash.
2.When the LEDs 2 on the CD/DVD slot4
flash, insert a single CD/DVD in the middle.
The CD/DVD is drawn in automatically and
placed into the first empty CD/DVD com-
partment.
Do not insert a CD/DVD until the
LEDs2 on the CD/DVD slot4 flash, as
otherwise the CD/DVD or the CD/DVD
changer could be damaged.
Do not continue to push on the CD/DVD;
this may cause it to jam and prevent it from
being able to eject again.<
3.Wait until the CD/DVD is drawn in.
4.To fill additional CD/DVD compartments:
Repeat steps 2 and 3.
After they are inserted, it may take several min-
utes for the CDs/DVDs to be read in.
Removing the CDs/DVDs individually
1. Press the button.
2. ... Press a button to select a CD/
DVD compartment.
The CD/DVD is partially ejected from the
CD/DVD changer.
3.Remove the CD/DVD.
If the CD/DVD is not removed, it is drawn
in again after approx. 10 seconds.<
Removing all CDs/DVDs
1. Press the button for a longer period.
One after the other, the CDs/DVDs are par-
tially ejected out of the CD/DVD changer.
2.Remove the CDs/DVDs.
Page 159 of 254
Navigation
Entertainment
Driving tips
157Reference
At a glance
Controls
Communications
Mobility
Malfunctions
If all LEDs on the CD/DVD changer flash rapidly,
the system is malfunctioning.
To correct the malfunction:
1.Press the or button.
The CD/DVD inserted last is ejected.
2.Remove the CD/DVD.
If the LEDs stop flashing rapidly, the CD/DVD
changer is functional again.
Notes
BMW CD/DVD players and changers are
officially designated Class 1 laser prod-
ucts. Do not operate if the cover is damaged;
otherwise, severe eye damage can result.
Do not use self-recorded CDs/DVDs with labels
applied as these can become detached during
playback due to heat build-up and can cause
irreparable damage to the device.
Only use round CDs/DVDs with a standard
diameter of 4.7 in/12 cm and do not play CDs/
DVDs with an adapter, e.g., Single-CDs; other-
wise, the CDs or the adapter can jam and will no
longer eject.
Do not use a combined CD/DVD, e.g., DVD
Plus;
otherwise, the CD/DVD can jam and will no
longer eject.<
General malfunctions
BMW CD/DVD changers and players have been
optimized for performance in vehicles. In some
instances they may be more sensitive to faulty
CDs/DVDs than stationary devices would be.
If a CD/DVD cannot be played, first check if it
has been inserted correctly.
Humidity
High levels of humidity can lead to condensa-
tion on the CD/DVD or the laser's scan lens and
temporarily prevent playback.
Malfunctions with individual CDs/DVDs
If malfunctions occur only with particular CDs/
DVDs, this may be due to one of the following
reasons.
Self-recorded CDs/DVDs
Possible reasons for malfunctions with self-
recorded CDs/DVDs are inconsistent data-cre-
ation or recording processes, or poor quality or
old age of the CD/DVD blank.
Only label CDs/DVDs on the top, with a pen
designed for this purpose.
Damage
Avoid leaving fingerprints, as well as dust,
scratches or moisture on the CDs/DVDs.
Keep CDs/DVDs in protective sleeves or cases.
Do not subject CDs/DVDs to temperatures over
1227/506, high levels of humidity or direct
sunlight.
CDs/DVDs with copy protection
CDs/DVDs are often copy-protected by the
manufacturer. This can mean that some CDs/
DVDs cannot be played or can only be played to
a limited extent.
MACROVISION
This product contains copyrighted technology
that is based on multiple registered US patents
and the intellectual property of the Macrovision
Corporation and other manufacturers. The use
of this copy protection must be approved by
Macrovision. Media protected by this product -
unless otherwise agreed with Macrovision -
may only be used for private purposes. Copying
of this technology is prohibited.
Page 160 of 254
Music collection
158
Music collection
Storing music
The music tracks from CDs, DVDs and USB
devices can be stored in the music collection in
the vehicle and played from there.
>Audio CD: tracks are converted into a com-
pressed audio format when they are stored.
If available, information on the album, such
as the artist, is stored as well.
>CD/DVD or USB device with compressed
audio files: The entire content of the CD/
DVD or the USB device is stored in the vehi-
cle as an album. After storing, the tracks and
directories can be deleted individually. Files
are only stored in the WMA, MP3, and AAC
formats.
Tracks with DRM copy protection can
be stored in the vehicle but cannot be
played back.
Regularly back up the music data; other-
wise, it could be lost if there is a fault on
the hard drive.<
Music recognition technology and
related data are provided by
Gracenote®. Gracenote® is the industry stan-
dard in music recognition technology and
related content delivery. For more information,
please visit www.gracenote.com.
CD and music-related data from Gracenote,
Inc., copyright
© 2000-2009 Gracenote. Gracenote Software,
copyright 2000-2009 Gracenote. This product
and service may practice one or more of the fol-
lowing U.S. Patents: #5,987,525; #6,061,680;
#6,154,773, #6,161,132, #6,230,192,
#6,230,207, #6,240,459, #6,330,593, and
other patents issued or pending. Some services
supplied under license from Open Globe, Inc.
for U.S. Patent: 6.304.523.Gracenote and CDDB are registered trade
marks of Gracenote. The Gracenote logo, the
logo typeface and the "powered by Gracenote"
logo are trade marks of Gracenote.
Storing from CDs/DVDs
CDs/DVDs can only be stored from the CD/DVD
player.
1.Insert a CD/DVD into the CD/DVD player.
2."CD/Multimedia"
3."CD/DVD"
4. Select the symbol for the CD/DVD
player.
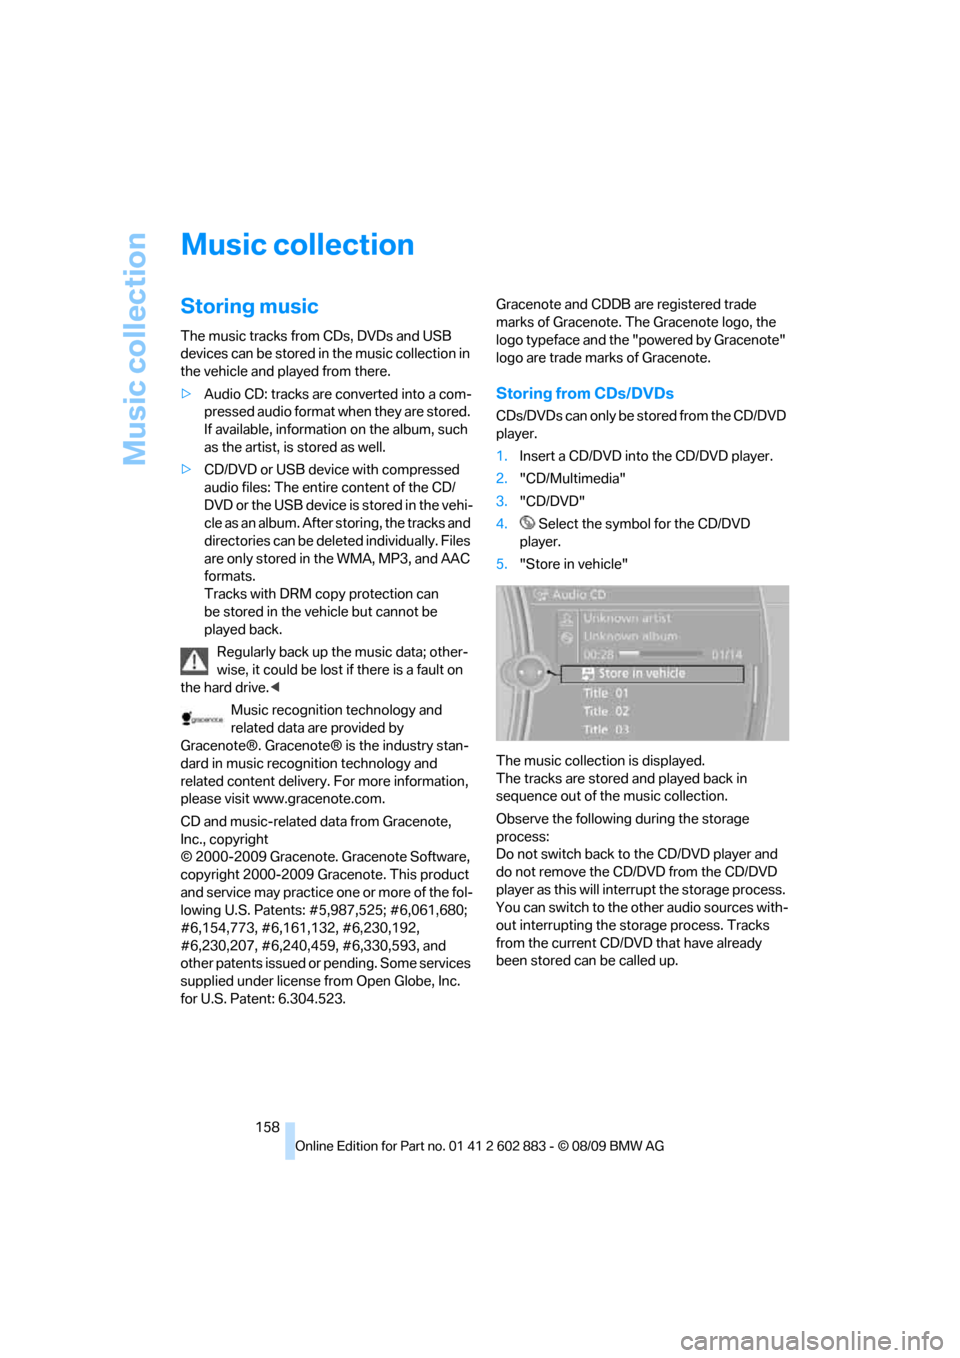
5."Store in vehicle"
The music collection is displayed.
The tracks are stored and played back in
sequence out of the music collection.
Observe the following during the storage
process:
Do not switch back to the CD/DVD player and
do not remove the CD/DVD from the CD/DVD
player as this will interrupt the storage process.
You can switch to the other audio sources with-
out interrupting the storage process. Tracks
from the current CD/DVD that have already
been stored can be called up.