cooling BMW Z4 ROADSTER SDRIVE35I 2010 E89 Owner's Manual
[x] Cancel search | Manufacturer: BMW, Model Year: 2010, Model line: Z4 ROADSTER SDRIVE35I, Model: BMW Z4 ROADSTER SDRIVE35I 2010 E89Pages: 254, PDF Size: 8.04 MB
Page 17 of 254
At a glance
15Reference
Controls
Driving tips
Communications
Navigation
Entertainment
Mobility
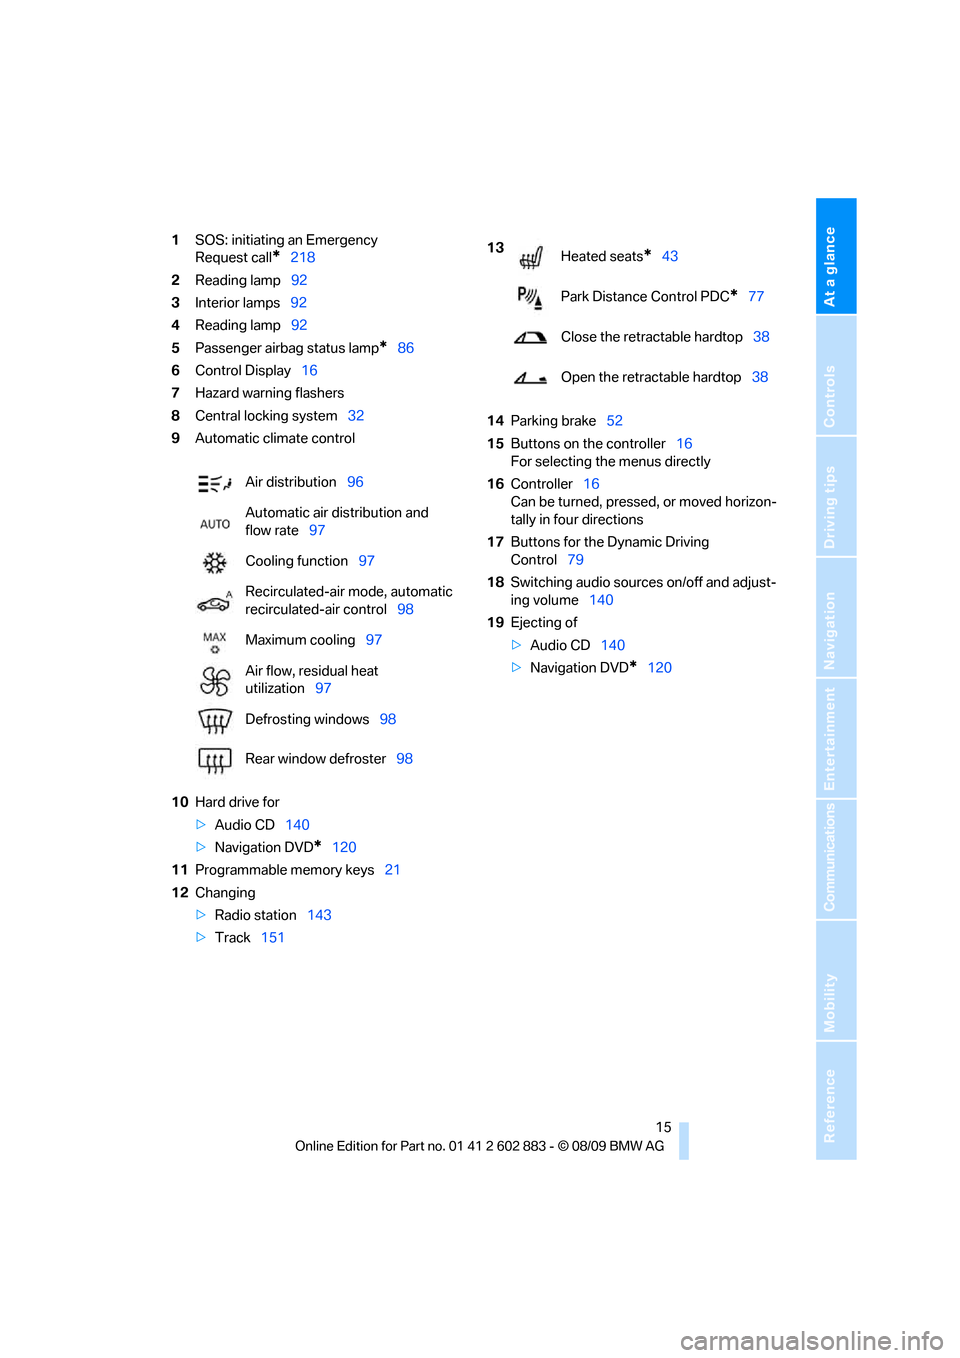
1SOS: initiating an Emergency
Request call
*218
2Reading lamp92
3Interior lamps92
4Reading lamp92
5Passenger airbag status lamp
*86
6Control Display16
7Hazard warning flashers
8Central locking system32
9Automatic climate control
10Hard drive for
>Audio CD140
>Navigation DVD
*120
11Programmable memory keys21
12Changing
>Radio station143
>Track15114Parking brake52
15Buttons on the controller16
For selecting the menus directly
16Controller16
Can be turned, pressed, or moved horizon-
tally in four directions
17Buttons for the Dynamic Driving
Control79
18Switching audio sources on/off and adjust-
ing volume140
19Ejecting of
>Audio CD140
>Navigation DVD
*120 Air distribution96
Automatic air distribution and
flow rate97
Cooling function97
Recirculated-air mode, automatic
recirculated-air control98
Maximum cooling97
Air flow, residual heat
utilization97
Defrosting windows98
Rear window defroster98
13
Heated seats*43
Park Distance Control PDC
*77
Close the retractable hardtop38
Open the retractable hardtop38
Page 31 of 254
Controls
29Reference
At a glance
Driving tips
Communications
Navigation
Entertainment
Mobility
>Settings for the display on the Control Dis-
play and in the instrument cluster:
>12h/24h format of the clock, refer
to page71
>Date format, refer to page72
>Brightness of Control Display, refer
to page76
>Language on the Control Display, refer
to page75
>Split screen, refer to page20
>Units of measure for fuel consumption,
distance covered/remaining distances,
and temperature, refer to page68
>Show visual warning for Park Distance Con-
trol PDC
*, refer to page77
>Light settings:
>Welcome lamps, refer to page88
>Pathway lighting, refer to page89
>Daytime running lights, refer to page89
>High-beam assistant
*, refer to page90
>Automatic climate control: activating/deac-
tivating AUTO program, cooling function
and automatic recirculated-air control, set-
ting temperature, air flow rate and distribu-
tion, refer to page96 ff
>Entertainment:
>Tone control, refer to page140
>Volume, refer to page142
Central locking system
The concept
The central locking system functions when the
driver's door is closed.
The system simultaneously engages and
releases the locks on the following:
>Doors
>Luggage compartment lid
>Fuel filler flap
>Center armrest
*
Operating from outside
>Via the remote control
>Using the door lock
>In cars with Comfort Access
*, via the han-
dles on the driver's and passenger doors
In addition, if the remote control is used, the
welcome lamps, interior lamps and the door's
courtesy lamps
* are switched on or off. The
alarm system
* is also armed or disarmed.
For further details of the alarm system,
refer
to page33.
Operating from inside
By means of the button for central locking, refer
to page32.
In the event of a sufficiently severe accident, the
central locking system unlocks automatically. In
addition, the hazard warning flashers and inte-
rior lamps come on.
Opening and closing:
Using the remote control
Persons or animals in a parked vehicle
could lock the doors from the inside. You
should therefore take the remote control with
you when you leave the vehicle so that the latter
can be opened from outside.<
To operate the retractable hardtop with
the remote control, the doors and lug-
gage compartment lid must be closed and the
cargo area partition must be folded down and
engaged on both sides. Refer also to page38.<
Unlocking
Press the button.
The interior lamps, the courtesy lamps
* and the
welcome lamps come on.
Setting unlocking characteristics
You can set whether only the driver's door or
the entire vehicle is to be unlocked when the
button is pressed for the first time.
Page 96 of 254
Climate
94
Air conditioning system
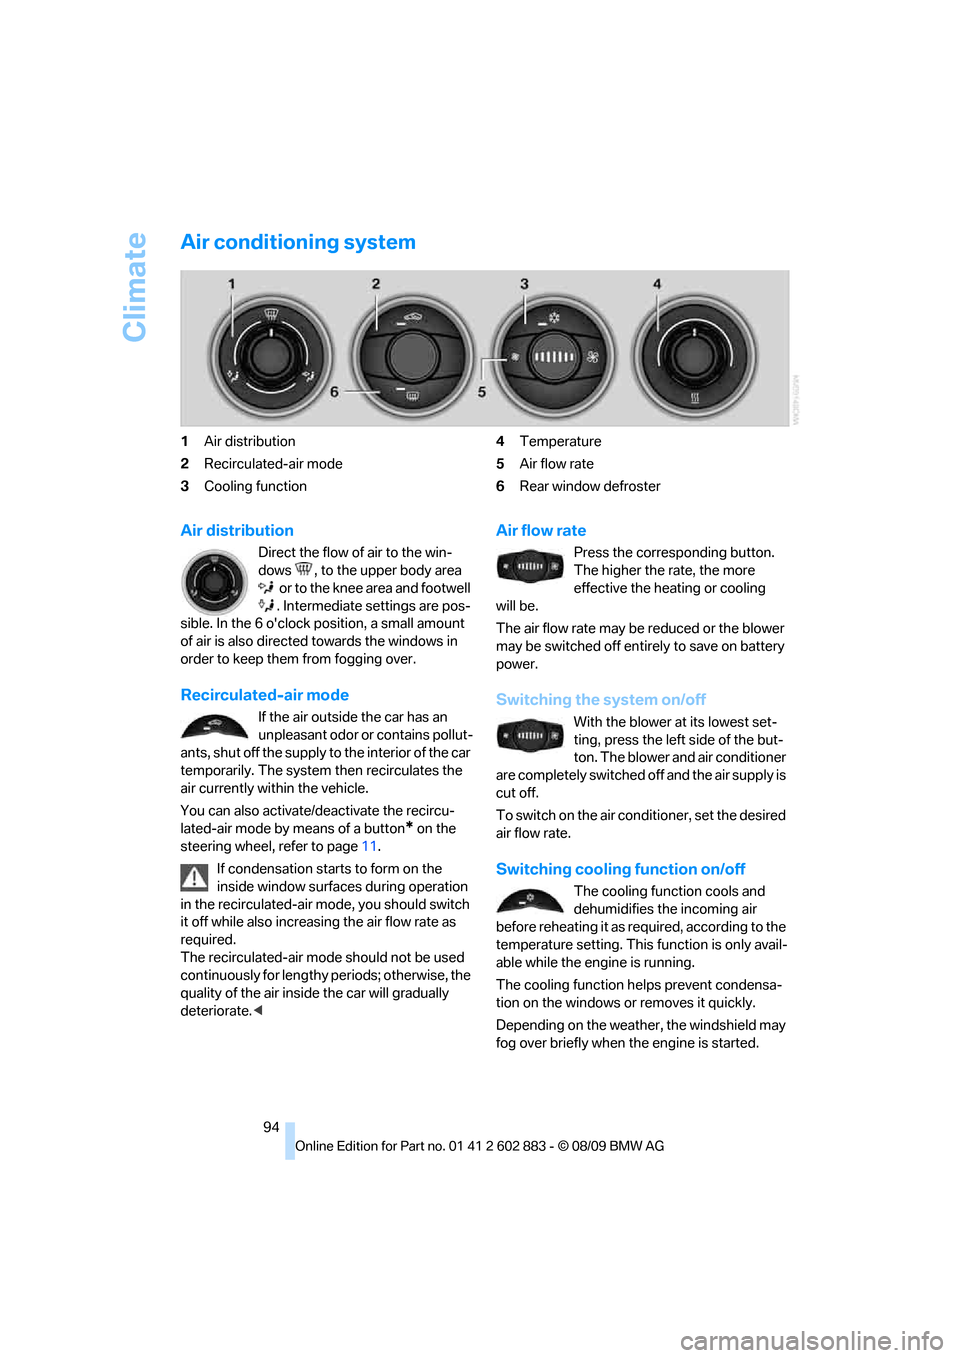
1Air distribution
2Recirculated-air mode
3Cooling function4Temperature
5Air flow rate
6Rear window defroster
Air distribution
Direct the flow of air to the win-
dows , to the upper body area
o r to the kne e a rea and fo otwe ll
. Intermediate settings are pos-
sible. In the 6 o'clock position, a small amount
of air is also directed towards the windows in
order to keep them from fogging over.
Recirculated-air mode
If the air outside the car has an
unpleasant odor or contains pollut-
ants, shut off the supply to the interior of the car
temporarily. The system then recirculates the
air currently within the vehicle.
You can also activate/deactivate the recircu-
lated-air mode by means of a button
* on the
steering wheel, refer to page11.
If condensation starts to form on the
inside window surfaces during operation
in the recirculated-air mode, you should switch
it off while also increasing the air flow rate as
required.
The recirculated-air mode should not be used
continuously for lengthy periods; otherwise, the
quality of the air inside the car will gradually
deteriorate.<
Air flow rate
Press the corresponding button.
The higher the rate, the more
effective the heating or cooling
will be.
The air flow rate may be reduced or the blower
may be switched off entirely to save on battery
power.
Switching the system on/off
With the blower at its lowest set-
ting, press the left side of the but-
ton. The blower and air conditioner
are completely switched off and the air supply is
cut off.
To switch on the air conditioner, set the desired
air flow rate.
Switching cooling function on/off
The cooling function cools and
dehumidifies the incoming air
before reheating it as required, according to the
temperature setting. This function is only avail-
able while the engine is running.
The cooling function helps prevent condensa-
tion on the windows or removes it quickly.
Depending on the weather, the windshield may
fog over briefly when the engine is started.
Page 97 of 254
Controls
95Reference
At a glance
Driving tips
Communications
Navigation
Entertainment
Mobility
Rear window defroster
The defroster switches off auto-
matically after a certain time or
when the hardtop is opened.
Temperature
To increase the temperature, turn
the rotary switch clockwise
towards red.
For a lower temperature, turn the
rotary switch counterclockwise towards blue.
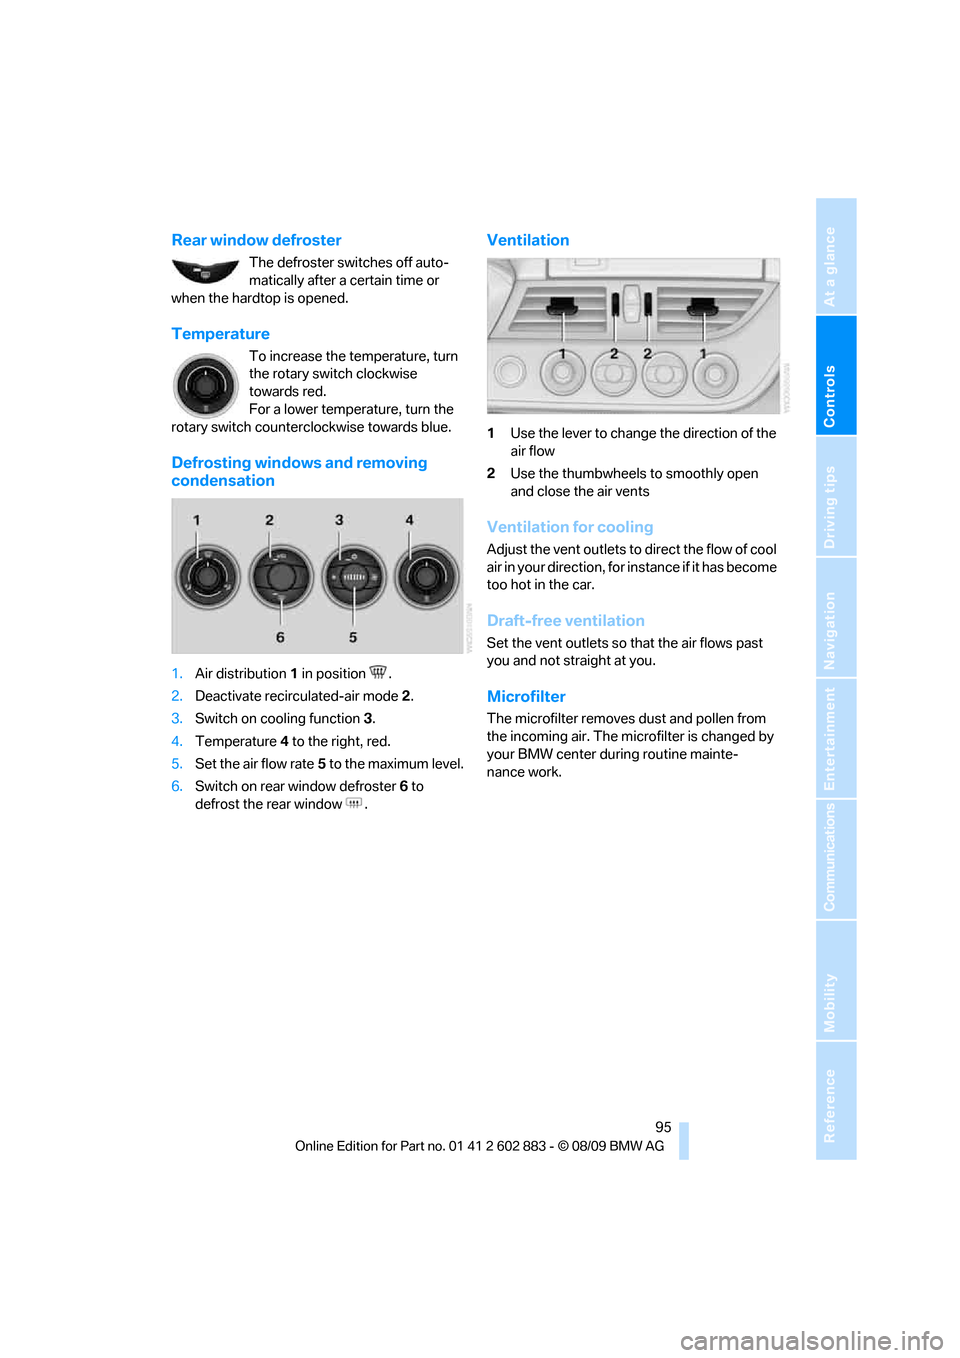
Defrosting windows and removing
condensation
1.Air distribution1 in position .
2.Deactivate recirculated-air mode 2.
3.Switch on cooling function 3.
4.Temperature4 to the right, red.
5.Set the air flow rate5 to the maximum level.
6.Switch on rear window defroster 6 to
defrost the rear window .
Ventilation
1Use the lever to change the direction of the
air flow
2Use the thumbwheels to smoothly open
and close the air vents
Ventilation for cooling
Adjust the vent outlets to direct the flow of cool
air in your direction, for instance if it has become
too hot in the car.
Draft-free ventilation
Set the vent outlets so that the air flows past
you and not straight at you.
Microfilter
The microfilter removes dust and pollen from
the incoming air. The microfilter is changed by
your BMW center during routine mainte-
nance work.
Page 98 of 254
Climate
96
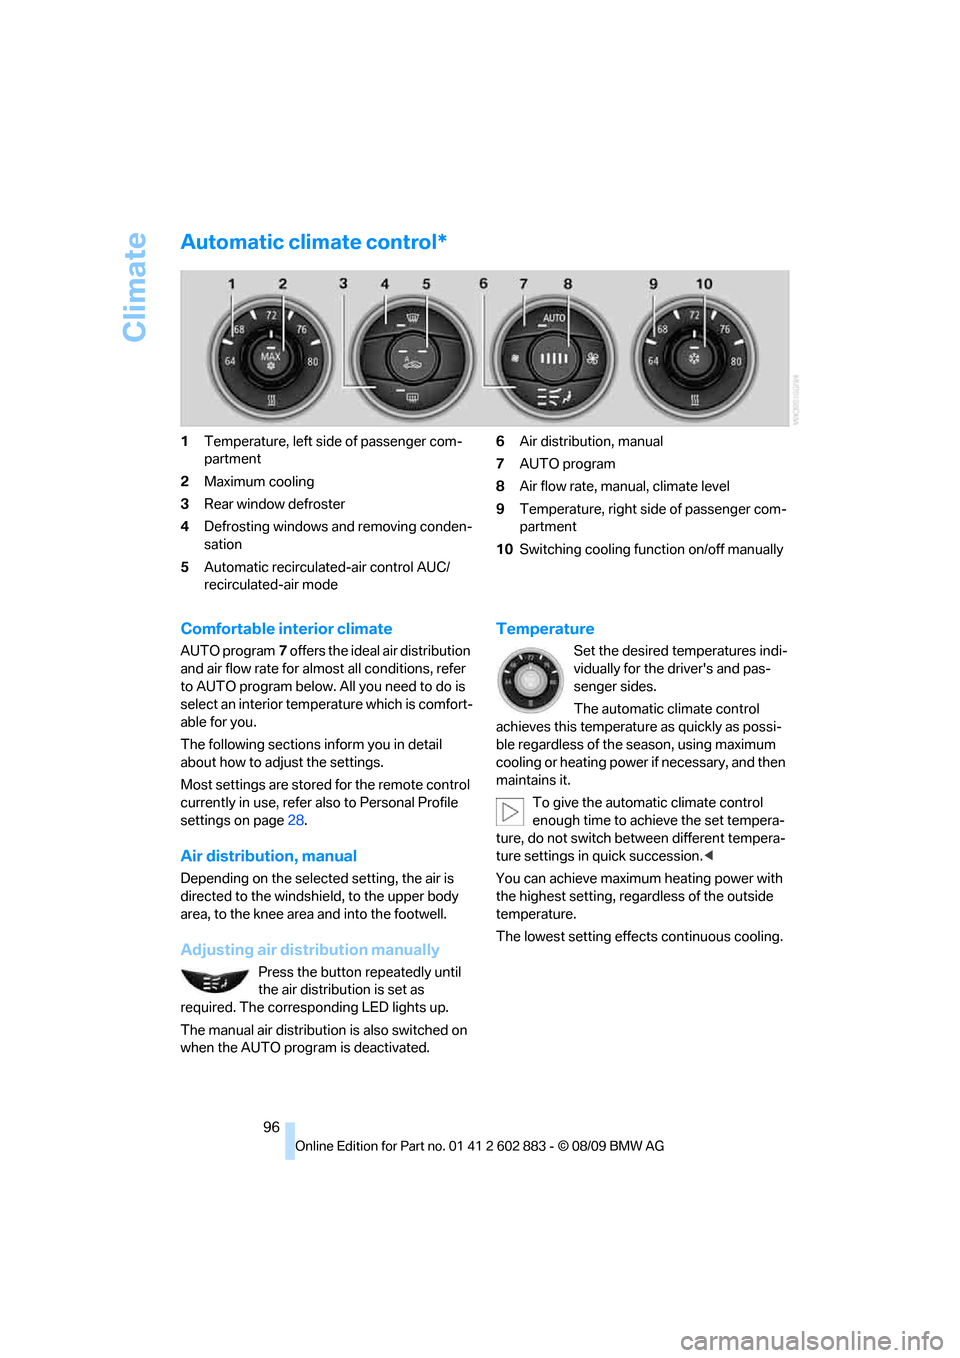
Automatic climate control*
1Temperature, left side of passenger com-
partment
2Maximum cooling
3Rear window defroster
4Defrosting windows and removing conden-
sation
5Automatic recirculated-air control AUC/
recirculated-air mode6Air distribution, manual
7AUTO program
8Air flow rate, manual, climate level
9Temperature, right side of passenger com-
partment
10Switching cooling function on/off manually
Comfortable interior climate
AUTO program7 offers the ideal air distribution
and air flow rate for almost all conditions, refer
to AUTO program below. All you need to do is
select an interior temperature which is comfort-
able for you.
The following sections inform you in detail
about how to adjust the settings.
Most settings are stored for the remote control
currently in use, refer also to Personal Profile
settings on page28.
Air distribution, manual
Depending on the selected setting, the air is
directed to the windshield, to the upper body
area, to the knee area and into the footwell.
Adjusting air distribution manually
Press the button repeatedly until
the air distribution is set as
required. The corresponding LED lights up.
The manual air distribution is also switched on
when the AUTO program is deactivated.
Temperature
Set the desired temperatures indi-
vidually for the driver's and pas-
senger sides.
The automatic climate control
achieves this temperature as quickly as possi-
ble regardless of the season, using maximum
cooling or heating power if necessary, and then
maintains it.
To give the automatic climate control
enough time to achieve the set tempera-
ture, do not switch between different tempera-
ture settings in quick succession.<
You can achieve maximum heating power with
the highest setting, regardless of the outside
temperature.
The lowest setting effects continuous cooling.
Page 99 of 254
Controls
97Reference
At a glance
Driving tips
Communications
Navigation
Entertainment
Mobility
Switching the cooling function on
and off
The cooling function cools and
dehumidifies the incoming air
before reheating it as required,
according to the temperature set-
ting. This function is only available while the
engine is running.
The cooling function helps prevent condensa-
tion on the windows or removes it quickly.
Depending on the weather, the windshield may
fog over briefly when the engine is started.
The cooling function is automatically switched
on along with the AUTO program.
Maximum cooling
Maximum cooling is achieved most
quickly at outside temperatures
above 327/06 and when the
engine is running.
The automatic climate control goes into recir-
culated-air mode at the lowest temperature. Air
flows at maximum rate from the vents for the
upper body area. You should therefore open the
vents for maximum cooling.
AUTO program
The AUTO program automatically adjusts the
air distribution to the windshield and side win-
dows, towards the upper body area, and into the
footwell and knee area.
The air flow rate and air distribution, in addition
to your temperature specifications, will be
adapted to outside influences as a result of sea-
sonal changes, e.g., sunlight or window con-
densation.
The cooling is switched on automatically with
the AUTO program.
Switching on/off
Press the button.
Manual air distribution and air flow rate are acti-
vated when the AUTO program is deactivated.
AUTO program climate level
The climate levels can be used to vary the inten-
sity when the AUTO program is switched on.
For example, air flow is adjusted automatically
to optimize climate control.
When the AUTO program is
switched on, you can select the cli-
mate level of the AUTO program
using the buttons for controlling the manual air
flow rate.
The selected climate level is displayed by
an LED.
Convertible program
When the hardtop is open, the convertible pro-
gram is activated as well. In the convertible pro-
gram, the automatic climate control is opti-
mized for driving with the hardtop open. In
addition, the air flow rate is increased as vehicle
speed increases.
The effectiveness of the convertible pro-
gram can be enhanced considerably by
installing the wind deflector.<
Adjusting air flow rate manually
Press the left side of the button to
reduce air flow. Press the right side
of the button to increase it.
The air flow rate may be reduced to save battery
power. The display remains the same.
Switching the system on/off
With the blower at its lowest setting, press the
left side of the button to switch off the auto-
matic climate control. All displays are cleared
except for the rear window defroster if it is
switched on.
Press any button except the rear window
defroster to reactivate the automatic climate
control.
Page 100 of 254
Climate
98
Residual heat
The heat stored in the engine is used to heat the
interior.
This function can be switched on
using the right button under the
following conditions:
>Up to 15 minutes after the engine has been
switched off
>While the engine is at operating tem-
perature
>As long as battery voltage is sufficient
>At an outside temperature below 777/
256
The middle LED is lit when the function is on.
Automatic recirculated-air control
AUC/recirculated-air mode
Switch on the desired operating
mode by pressing this button
repeatedly:
>LED off: outside air flows in continuously.
>Left-hand LED on, AUC mode: a sensor
detects pollutants in the outside air. If nec-
essary, the system blocks the supply of out-
side air and recirculates the inside air. As
soon as the concentration of pollutants in
the outside air has decreased sufficiently,
the system automatically switches back to
outside air supply.
>Right-hand LED on, recirculated-air mode:
the supply of outside air is permanently
shut off. The system then recirculates the
air currently within the vehicle.
If condensation starts to form on the
inside window surfaces during operation
in the recirculated-air mode, you should switch
it off while also increasing the air flow rate as
required.
The recirculated-air mode should not be used
over an extended period of time; otherwise, the
air quality inside the car will deteriorate contin-
uously.<
Defrosting windows and removing
condensation
Quickly removes ice and conden-
sation from the windshield and
front side windows.
Switch on the cooling function as well.
Rear window defroster
The defroster switches off auto-
matically after a certain time or
when the hardtop is opened.
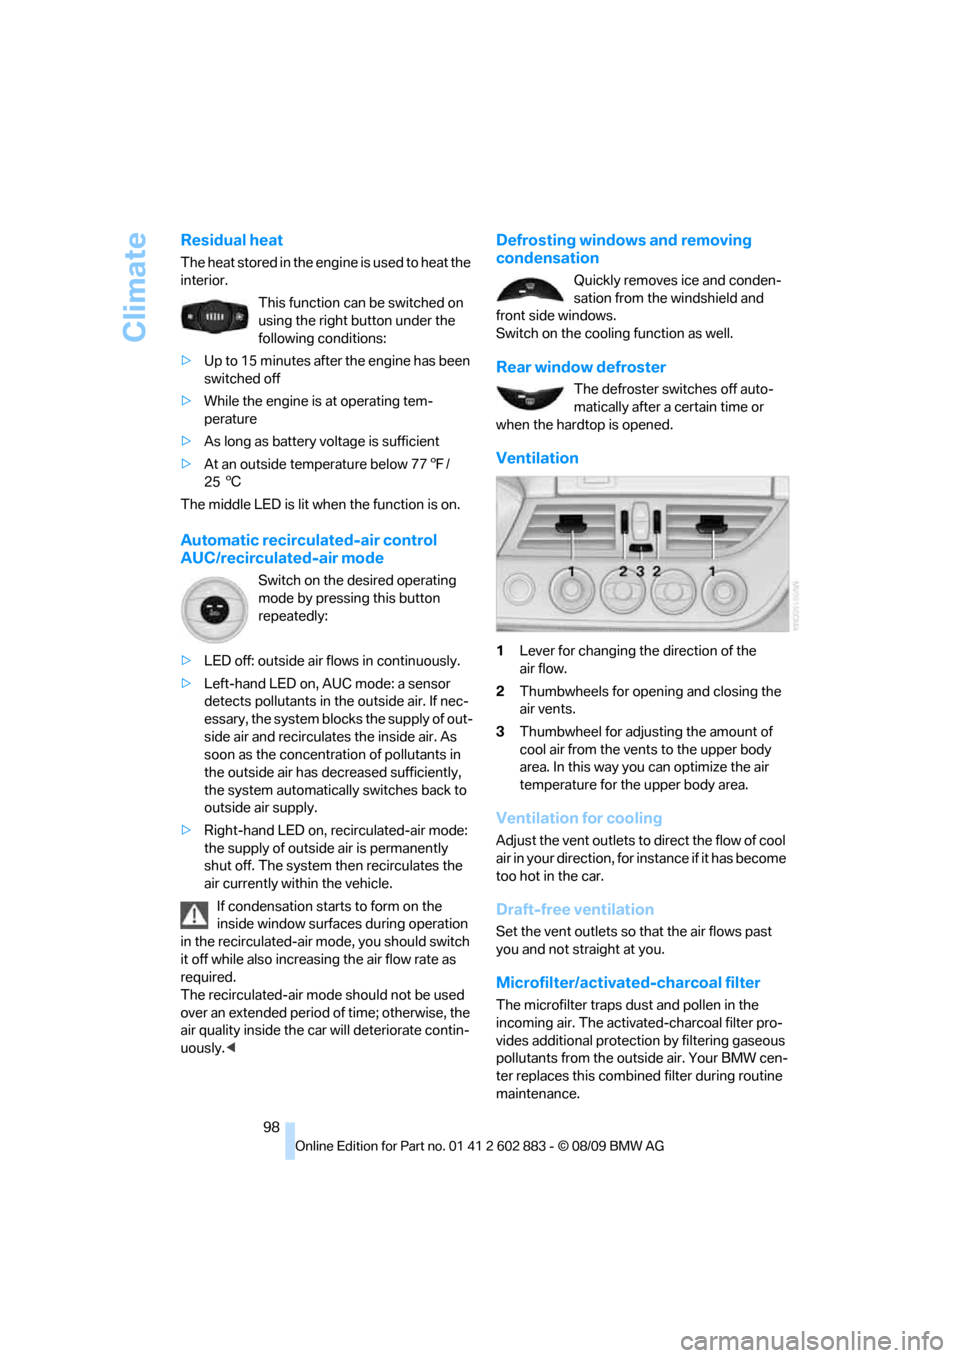
Ventilation
1Lever for changing the direction of the
air flow.
2Thumbwheels for opening and closing the
air vents.
3Thumbwheel for adjusting the amount of
cool air from the vents to the upper body
area. In this way you can optimize the air
temperature for the upper body area.
Ventilation for cooling
Adjust the vent outlets to direct the flow of cool
air in your direction, for instance if it has become
too hot in the car.
Draft-free ventilation
Set the vent outlets so that the air flows past
you and not straight at you.
Microfilter/activated-charcoal filter
The microfilter traps dust and pollen in the
incoming air. The activated-charcoal filter pro-
vides additional protection by filtering gaseous
pollutants from the outside air. Your BMW cen-
ter replaces this combined filter during routine
maintenance.
Page 206 of 254
Under the hood
204 >"Measurement inactive. Have this
checked."
Do not add engine oil. You can continue
your journey. Note the newly calculated dis-
tance remaining to the next oil service, refer
to page69. Have the system checked as
soon as possible.
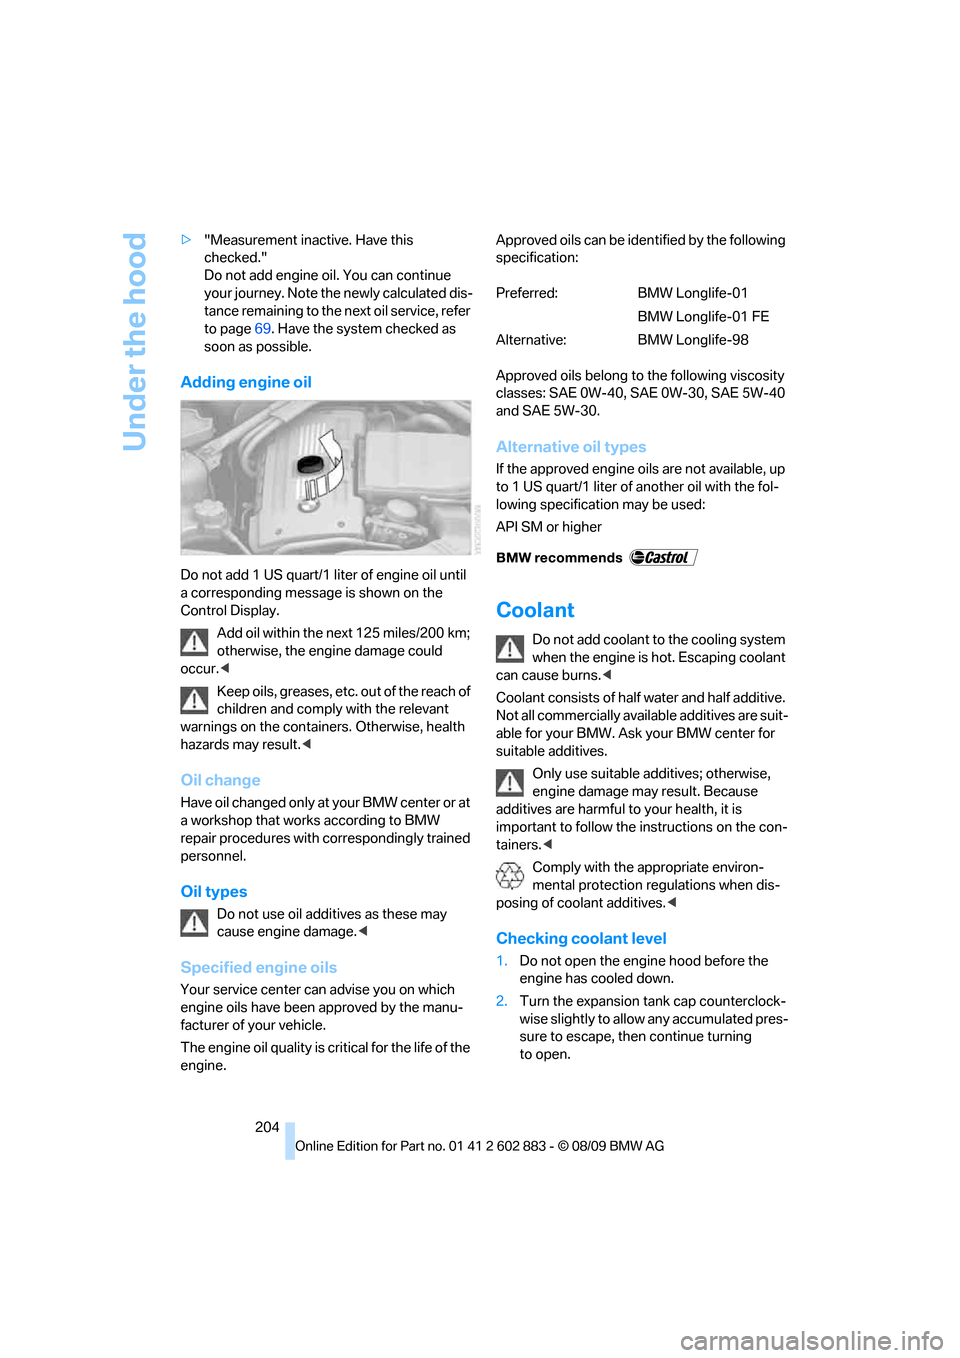
Adding engine oil
Do not add 1 US quart/1 liter of engine oil until
a corresponding message is shown on the
Control Display.
Add oil within the next 125 miles/200 km;
otherwise, the engine damage could
occur.<
Keep oils, greases, etc. out of the reach of
children and comply with the relevant
warnings on the containers. Otherwise, health
hazards may result.<
Oil change
Have oil changed only at your BMW center or at
a workshop that works according to BMW
repair procedures with correspondingly trained
personnel.
Oil types
Do not use oil additives as these may
cause engine damage.<
Specified engine oils
Your service center can advise you on which
engine oils have been approved by the manu-
facturer of your vehicle.
The engine oil quality is critical for the life of the
engine.Approved oils can be identified by the following
specification:
Approved oils belong to the following viscosity
classes: SAE 0W-40, SAE 0W-30, SAE 5W-40
and SAE 5W-30.
Alternative oil types
If the approved engine oils are not available, up
to 1 US quart/1 liter of another oil with the fol-
lowing specification may be used:
API SM or higher
Coolant
Do not add coolant to the cooling system
when the engine is hot. Escaping coolant
can cause burns.<
Coolant consists of half water and half additive.
Not all commercially available additives are suit-
able for your BMW. Ask your BMW center for
suitable additives.
Only use suitable additives; otherwise,
engine damage may result. Because
additives are harmful to your health, it is
important to follow the instructions on the con-
tainers.<
Comply with the appropriate environ-
mental protection regulations when dis-
posing of coolant additives.<
Checking coolant level
1.Do not open the engine hood before the
engine has cooled down.
2.Turn the expansion tank cap counterclock-
wise slightly to allow any accumulated pres-
sure to escape, then continue turning
to open.
Preferred: BMW Longlife-01
BMW Longlife-01 FE
Alternative: BMW Longlife-98
Page 241 of 254
Reference 239
At a glance
Controls
Driving tips
Communications
Navigation
Entertainment
Mobility
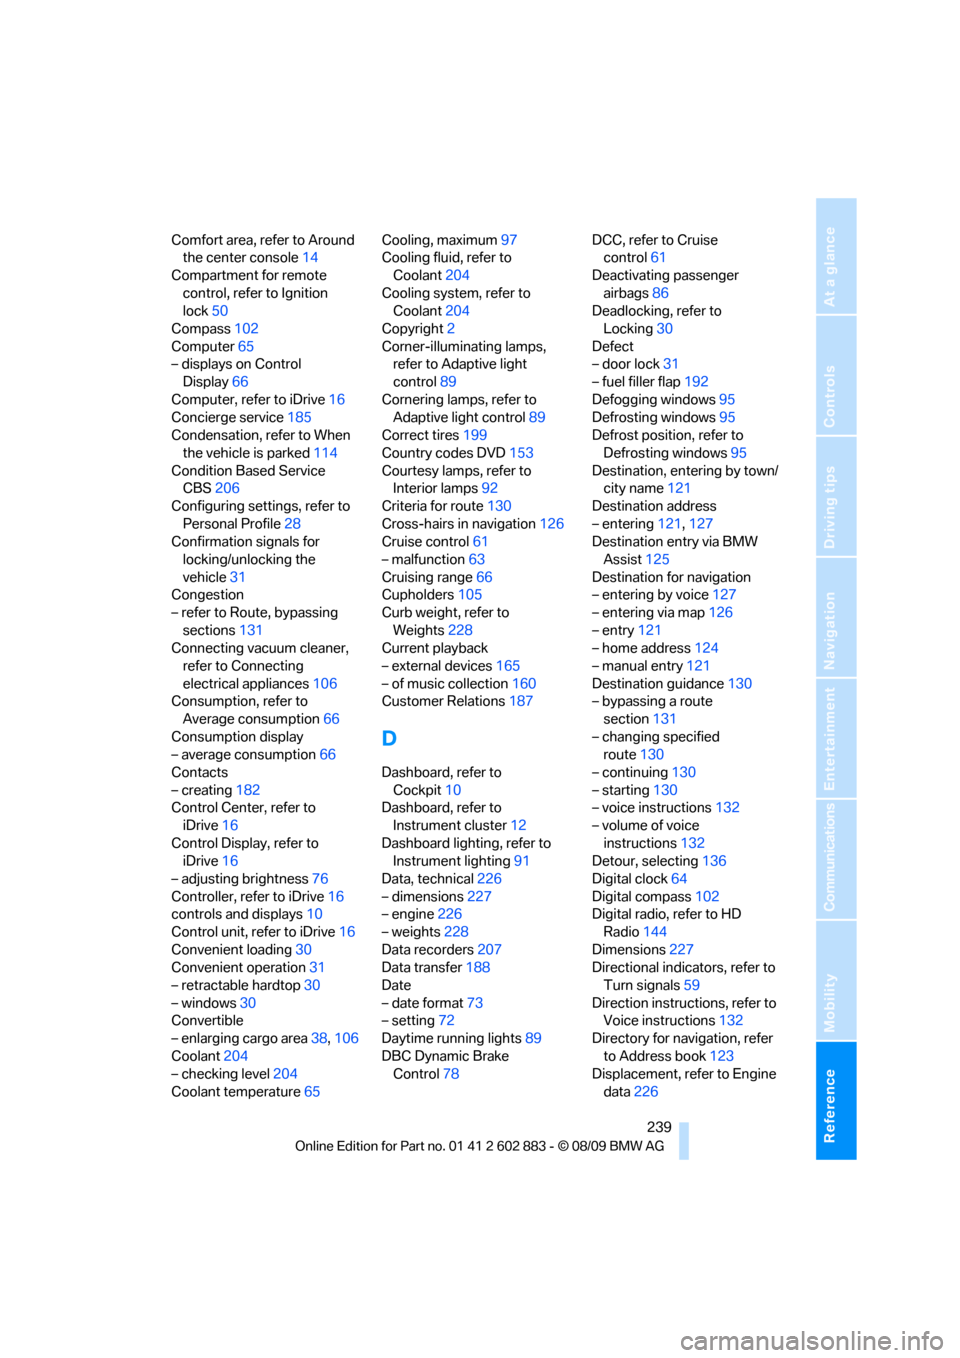
Comfort area, refer to Around
the center console14
Compartment for remote
control, refer to Ignition
lock50
Compass102
Computer65
– displays on Control
Display66
Computer, refer to iDrive16
Concierge service185
Condensation, refer to When
the vehicle is parked114
Condition Based Service
CBS206
Configuring settings, refer to
Personal Profile28
Confirmation signals for
locking/unlocking the
vehicle31
Congestion
– refer to Route, bypassing
sections131
Connecting vacuum cleaner,
refer to Connecting
electrical appliances106
Consumption, refer to
Average consumption66
Consumption display
– average consumption66
Contacts
– creating182
Control Center, refer to
iDrive16
Control Display, refer to
iDrive16
– adjusting brightness76
Controller, refer to iDrive16
controls and displays10
Control unit, refer to iDrive16
Convenient loading30
Convenient operation31
– retractable hardtop30
– windows30
Convertible
– enlarging cargo area38,106
Coolant204
– checking level204
Coolant temperature65Cooling, maximum97
Cooling fluid, refer to
Coolant204
Cooling system, refer to
Coolant204
Copyright2
Corner-illuminating lamps,
refer to Adaptive light
control89
Cornering lamps, refer to
Adaptive light control89
Correct tires199
Country codes DVD153
Courtesy lamps, refer to
Interior lamps
92
Criteria for route130
Cross-hairs in navigation126
Cruise control61
– malfunction63
Cruising range66
Cupholders105
Curb weight, refer to
Weights228
Current playback
– external devices165
– of music collection160
Customer Relations187
D
Dashboard, refer to
Cockpit10
Dashboard, refer to
Instrument cluster12
Dashboard lighting, refer to
Instrument lighting91
Data, technical226
– dimensions227
– engine226
– weights228
Data recorders207
Data transfer188
Date
– date format73
– setting72
Daytime running lights89
DBC Dynamic Brake
Control78DCC, refer to Cruise
control61
Deactivating passenger
airbags86
Deadlocking, refer to
Locking30
Defect
– door lock31
– fuel filler flap192
Defogging windows95
Defrosting windows95
Defrost position, refer to
Defrosting windows95
Destination, entering by town/
city name121
Destination address
– entering121,127
Destination entry via BMW
Assist125
Destination for navigation
– entering by voice127
– entering via map126
– entry121
– home address124
– manual entry121
Destination guidance130
– bypassing a route
section131
– changing specified
route130
– continuing130
– starting130
– voice instructions132
– volume of voice
instructions132
Detour, selecting136
Digital clock64
Digital compass102
Digital radio, refer to HD
Radio144
Dimensions227
Directional indicators, refer to
Turn signals59
Direction instructions, refer to
Voice instructions132
Directory for navigation, refer
to Address book123
Displacement, refer to Engine
data226
Page 245 of 254
Reference 243
At a glance
Controls
Driving tips
Communications
Navigation
Entertainment
Mobility
Keyless opening and closing,
refer to Comfort Access34
Key Memory, refer to Personal
Profile28
Kickdown54
– automatic transmission with
Steptronic54
Knock control193
L
Lamps
– automatic headlamp
control88
– parking lamps/low beams88
Lamps and bulbs, replacing
bulbs212
Language, changing on
Control Display75
Lap-and-shoulder belt, refer
to Safety belts44
Lashing eyes, refer to
Securing cargo116
Last destinations124
Launch Control58
Leather care210
LED Light-emitting
diodes212
Length, refer to
Dimensions227
License plate lamp, replacing
bulb215
Light
– high-beam assistant90
– refer to High-beam
assistant90
Light-alloy wheels210
Light-emitting diodes
LED212
Lighter
– connecting electrical
appliances106
Lighting
– instruments91
– lamps and bulbs212
– vehicle, refer to Lamps88Light switch88
Limit, refer to Speed limit74
Load securing equipment,
refer to Securing cargo116
Lockable lug bolts, refer to
Lug bolt lock215
Lock buttons, doors, refer to
Locking32
Locking
– adjusting confirmation
signal31
– from inside32
– from outside30
– without remote control, refer
to Comfort Access34
Locking and unlocking doors
– confirmation signals31
– from inside32
– from outside29
Low beam control, refer to
High-beam assistant90
Low-beam headlamps88
– automatic88
Lower back support, refer to
Lumbar support43
Lug bolt lock215
Luggage compartment lid32
– Comfort Access
35
– emergency release33
– opening from inside32
– opening from outside33
– remote control30
Lumbar support43
M
M+S tires, refer to Winter
tires200
Maintenance, refer to Service
Booklet
Maintenance system206
Malfunction
– automatic transmission with
Steptronic55
– tires81Malfunction warnings, refer to
Check Control73
Managing music161
Manual air distribution94
Manual car wash209
Manual mode, automatic
transmission with
Steptronic54
Manual operation
– door lock31
– driver's door31
– fuel filler flap192
– transmission lock58
– transmission lock, automatic
transmission55
Manual transmission53
Map display132
Map for navigation
– changing scale133
– entering destination126
Master key, refer to Remote
control with integrated
key28
Maximum cooling97
Maximum speed
– with winter tires200
M dual clutch transmission
with Drivelogic
– Launch Control58
– manually releasing
transmission lock58
– neutral56
– reverse gear56
Measurements, refer to
Dimensions227
Memory, refer to Seat and
mirror memory43
MENU button16
Menus, refer to iDrive16
Messages176
Messages from the concierge
service177