CD player BMW Z4 SDRIVE28I 2013 Owners Manual
[x] Cancel search | Manufacturer: BMW, Model Year: 2013, Model line: Z4 SDRIVE28I, Model: BMW Z4 SDRIVE28I 2013Pages: 220, PDF Size: 9.9 MB
Page 103 of 220
Storage compartmentsVehicle equipment
This chapter describes all series equipment as
well as country-specific and special equipment
offered for this model series.Therefore, it also
describes equipment that may not be found in
your vehicle, for instance due to the selected
special equipment or the country version. This
also applies to safety-related functions and sys‐
tems.
Glove compartment
Opening
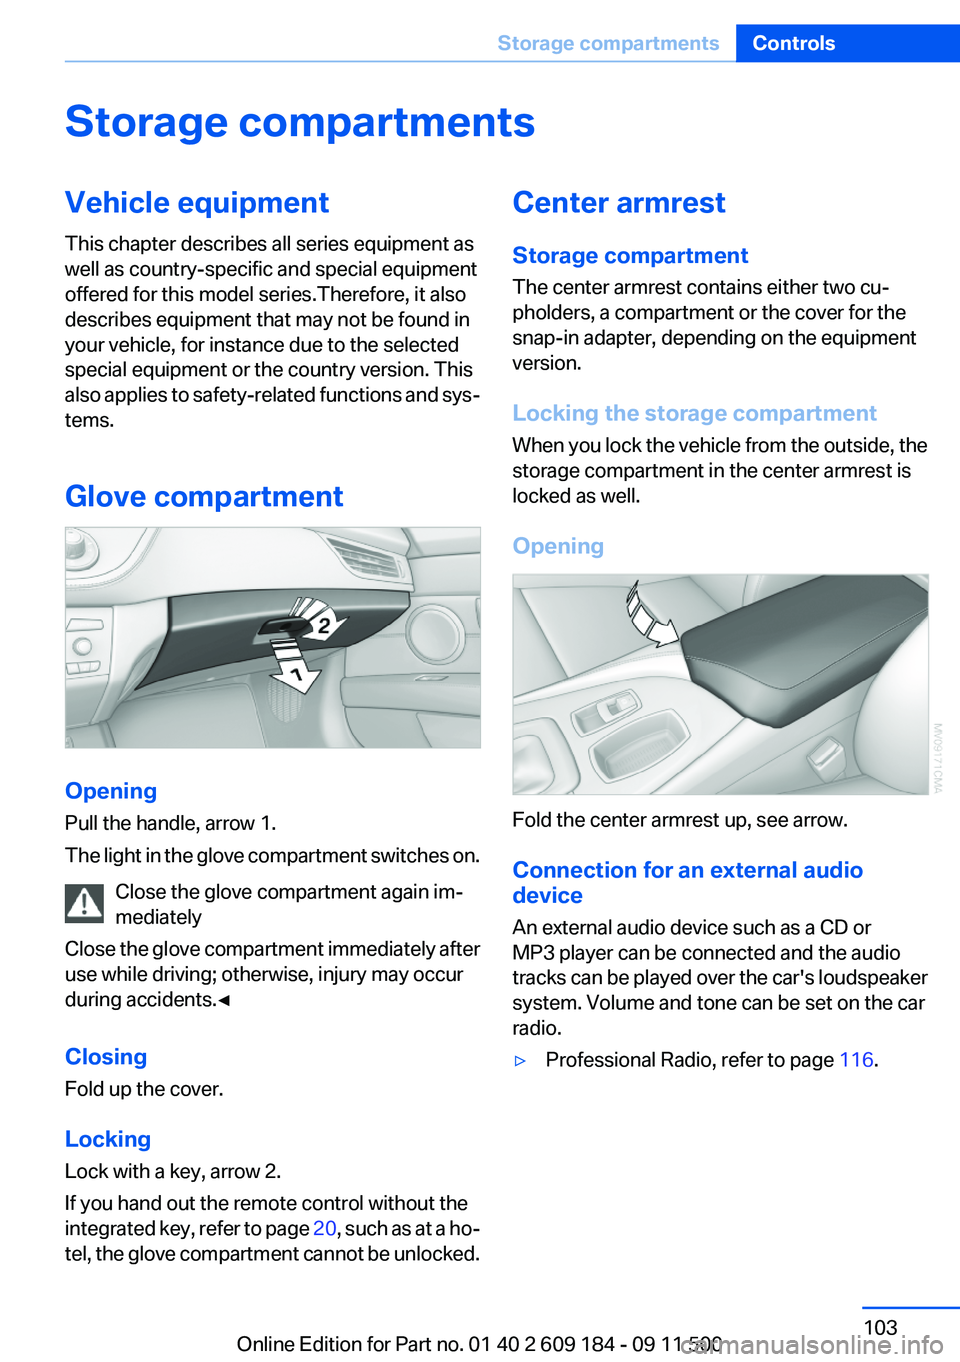
Pull the handle, arrow 1.
The light in the glove compartment switches on.
Close the glove compartment again im‐
mediately
Close the glove compartment immediately after
use while driving; otherwise, injury may occur
during accidents.◀
Closing
Fold up the cover.
Locking
Lock with a key, arrow 2.
If you hand out the remote control without the
integrated key, refer to page 20, such as at a ho‐
tel, the glove compartment cannot be unlocked.
Center armrest
Storage compartment
The center armrest contains either two cu‐
pholders, a compartment or the cover for the
snap-in adapter, depending on the equipment
version.
Locking the storage compartment
When you lock the vehicle from the outside, the
storage compartment in the center armrest is
locked as well.
Opening
Fold the center armrest up, see arrow.
Connection for an external audio
device
An external audio device such as a CD or
MP3 player can be connected and the audio
tracks can be played over the car's loudspeaker
system. Volume and tone can be set on the car
radio.
▷Professional Radio, refer to page 116.Seite 103Storage compartmentsControls103
Online Edition for Part no. 01 40 2 609 184 - 09 11 500
Page 118 of 220
approx. 20 minutes. To listen to the radio, switch
it back on.
To spare the battery, ensure that the radio is
switched off when you leave the vehicle.
Adjusting the volume
Turn the left knob. The setting is stored for the
remote control currently in use.
When a call is placed using the hands-free sys‐
tem, the audio sources are muted.
Speed-dependent volume and volumes
of PDC signal tone and gong▷"PDC" : volume of the PDC signal tone com‐
pared to the audio sources.▷"GONG": volume of the gong compared to
the audio sources.▷"S-VOL": speed-dependent volume con‐
trol.
Set the audio sources to a high volume to be able
to adjust the volume of the signal tones more
easily.
1. Press the button.2. Select the symbol if necessary.3.Select the desired volume setting.4.Set the desired volume and press the right
knob.
Volume of external audio devices
An external audio device such as an MP3 player
can be connected via the AUX-IN port in the
center armrest and the audio tracks can be
played over the car's loudspeaker system.
The volume of the external audio device can be
adjusted to the car radio.
1. Press the button.2."AUX"3."Vol-AUX"4.Set the desired volume and press the right
knob.Tone settings▷"BASS": depth adjustment.▷"TREBLE": treble adjustment.▷"FADER": front/rear volume distribution.▷"BAL": left/right volume distribution.▷"DOLBY": spatial acoustics effect.▷"EQSET": equalizer setting.
Setting the treble, bass, and volume
distribution
1. Press the button.2.Highlight the desired tone setting and press
the right knob.3.Create the desired setting and press the
right knob.
Switching on the spatial acoustics
effect
1. Press the button.2. Select the symbol if necessary.3."DOLBY"
Equalizer
1."EQSET"2.Press the button of the desired frequency
range.3.Create the settings and press the right knob.
Resetting the equalizer
1. Press the button.2.Turn the right knob.3."EQSET"4."RESET"
Resetting the tone settings
The tone settings are reset to medium values.
1. Press the button.
Seite 118EntertainmentProfessional Radio118
Online Edition for Part no. 01 40 2 609 184 - 09 11 500
Page 123 of 220
Changing the channel using the buttons
Press the button for the correspond‐
ing direction. The next enabled channel is
opened.
Search
1. Press and hold the button for the
corresponding direction. The activated
channels appear on the display one after the
other.2.Release the button to select the displayed
channel.
Notes
When there is a signal blockage or the transmis‐
sion is suspended momentarily for more than
4 seconds, a message will appear on the display.
Service may be interrupted or unavailable for
specific reasons such as environmental or topo‐
graphic conditions and others that Satellite
Radio cannot directly control. Signal may not be
available under tunnels, in parking garages, next
to tall buildings, nearby trees with dense foliage,
nearby mountains or other possible strong sour‐
ces of radio interference. Service should resume
normally after the source of signal unavailability
has been cleared.
CD/multimedia
CD player and CD/DVD changer
Filling the CD player
Insert the CD into the CD drive with the printed
side up.
Playback begins automatically.
Reading can take a few minutes with com‐
pressed audio files.
Starting the CD player
A CD is contained in the CD player.1.Switch on the car radio if necessary.2. Press the button.3."CD"
Starting the CD/DVD changer
1.Switch on the car radio if necessary.2.Fill the CD/DVD compartments, refer to
page 125.3. Press the button.4."DVD"5.Press the button of the desired CD/DVD
number.
The corresponding CD/DVD number is shown
on the display. At the end of the last track, the
device changes to the next CD/DVD.
Skipping to another track
Press the button repeatedly until the
desired track is played.
With the right knob:
Turn the right knob until the desired track is
played back.
Fast forward/reverse
Hold the button down.
Tracks can be heard but are distorted.
Briefly playing and selecting a track
"SC"
All tracks are played briefly one after the other.
To interrupt the function and select a track:
"SC"
Random playback
"RND"
Seite 123Professional RadioEntertainment123
Online Edition for Part no. 01 40 2 609 184 - 09 11 500
Page 124 of 220
To end random playback:
"RND"
Compressed audio files
CD players and CD/DVD changers can play back
CDs or DVDs with compressed audio data: MP3
and WMA.
Selecting a track1."LIST"2.Select the desired directory using the right
knob.▷ : press the right knob to open a di‐
rectory.▷ : press the right knob to close a di‐
rectory.3.Select other directories if you wish.4.Highlight the desired track and press the
right knob.
You can scroll through the directories during
playback.
To change to the current track:
"CURR"
Displaying information on the track
Any information stored on the currently selected
track can be displayed.
1."LIST"2."TRACK"CD/DVD changer
In the glove compartment
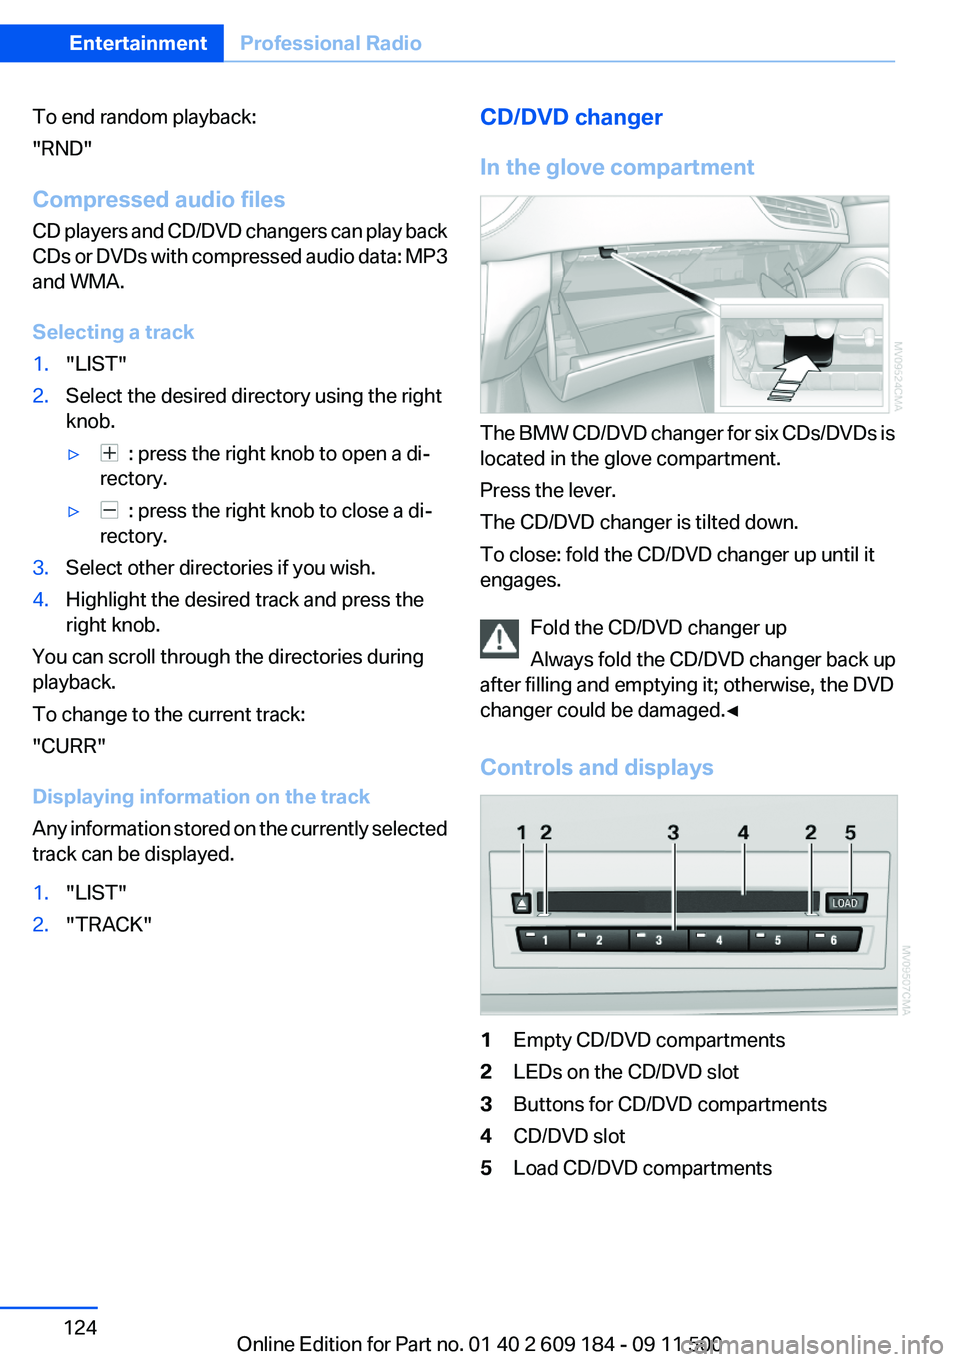
The BMW CD/DVD changer for six CDs/DVDs is
located in the glove compartment.
Press the lever.
The CD/DVD changer is tilted down.
To close: fold the CD/DVD changer up until it
engages.
Fold the CD/DVD changer up
Always fold the CD/DVD changer back up
after filling and emptying it; otherwise, the DVD
changer could be damaged.◀
Controls and displays
1Empty CD/DVD compartments2LEDs on the CD/DVD slot3Buttons for CD/DVD compartments4CD/DVD slot5Load CD/DVD compartmentsSeite 124EntertainmentProfessional Radio124
Online Edition for Part no. 01 40 2 609 184 - 09 11 500
Page 126 of 220
Selecting a chapter using the button
Press the button repeatedly until the
desired chapter is played.
Fast forward/reverse
Hold the button down.
Selecting the language
The languages that are available depend on the
DVD.
1."AUDIO"2.Select the desired language with the right
knob.
Operational displays
CD player
▷"Insert CD"
The CD slot is empty.▷"Error CD"
The CD cannot be read or is defective.▷"Temp. CD"
Operating temperature is too high.
CD/DVD changer
▷"Insert DVD"
The CD/DVD is incorrectly inserted or the
compartments are empty.▷"Error DVD"
The CD/DVD cannot be read or is defective.▷"Temp DVD"
Operating temperature is too high.Notes
CD/DVD player and changer Do not remove the cover
BMW CD/DVD players and changers are
officially designated Class 1 laser products. Do
not operate if the cover is damaged; otherwise,
severe eye damage can result.◀
CDs and DVDs Use of CDs/DVDs▷Do not use self-recorded CDs/DVDs
with labels applied, as these can be‐
come detached during playback due
to heat buildup and can cause irrepar‐
able damage to the device.▷Only use round CDs/DVDs with a standard
diameter of 4.7 in/12 cm and do not play
CDs/DVDs with an adapter, e.g., single CDs;
otherwise, the CDs or the adapter may jam
and no longer eject.▷Do not use combined CDs/DVDs, e.g., DVD
Plus, as the CDs/DVDs can jam and will no
longer eject.◀
General malfunctions
▷CD/DVD changers and players have been
optimized for performance in vehicles. In
some instances they may be more sensitive
to faulty CDs/DVDs than stationary devices
would be.▷If a CD/DVD cannot be played, first check
whether it has been inserted correctly.
Humidity
High levels of humidity can lead to condensation
on the CD/DVD or the laser's scan lens, and
temporarily prevent playback.
Seite 126EntertainmentProfessional Radio126
Online Edition for Part no. 01 40 2 609 184 - 09 11 500
Page 127 of 220
Malfunctions involving individual CDs/
DVDs
If malfunctions occur only with particular CDs/
DVDs, this can be due to one of the following
causes:
Self-recorded CDs/DVDs▷Possible reasons for malfunctions with self-
recorded CDs/DVDs are inconsistent data
creation or recording processes, or poor
quality or old age of the blank CD/DVD.▷Only label CDs/DVDs on the upper side with
a pen intended for this purpose.
Damage
▷Avoid fingerprints, dust, scratches and
moisture.▷Store CDs/DVDs in a sleeve.▷Do not subject CDs/DVDs to temperatures
over 122 ℉/50 ℃, high humidity or direct
sunlight.
CDs/DVDs with copy protection
CDs/DVDs are often provided with a copy pro‐
tection feature by the manufacturer. This can
mean that some CDs/DVDs cannot be played or
can only be played to a limited extent.
MACROVISION
This product contains copyrighted technology
that is based on multiple registered US patents
and the intellectual property of the Macrovision
Corporation and other manufacturers. The use
of this copy protection must be approved by
Macrovision. Media protected by this product -
unless otherwise agreed with Macrovision - may
only be used for private purposes. Copying of
this technology is prohibited.
External devices
AUX-IN port
At a glance▷For connecting audio devices, e.g., MP3
player. The sound is output on the vehicle
loudspeakers.▷Recommendation: use medium tone and
volume settings on the audio device. The
tone depends on the quality of the audio
files.
Connecting
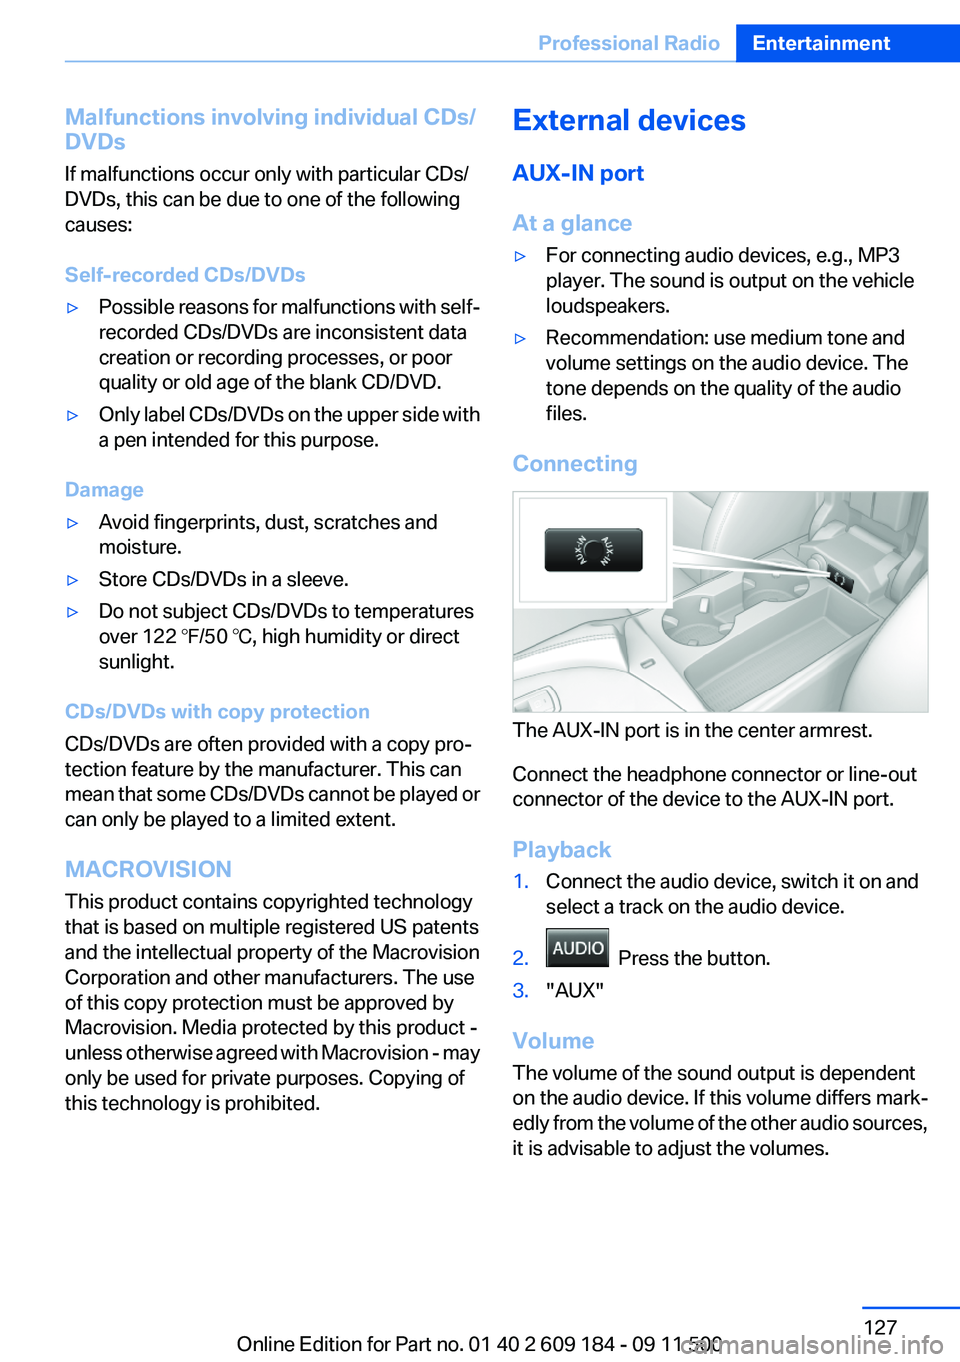
The AUX-IN port is in the center armrest.
Connect the headphone connector or line-out
connector of the device to the AUX-IN port.
Playback
1.Connect the audio device, switch it on and
select a track on the audio device.2. Press the button.3."AUX"
Volume
The volume of the sound output is dependent
on the audio device. If this volume differs mark‐
edly from the volume of the other audio sources,
it is advisable to adjust the volumes.
Seite 127Professional RadioEntertainment127
Online Edition for Part no. 01 40 2 609 184 - 09 11 500
Page 128 of 220
Adjusting the volume1. Press the button.2."AUX"3."Vol-AUX"4.Connect the audio device, switch it on and
select a track on the audio device.
USB audio interface/mobile phone
audio interface
At a glance
It is possible to connect external audio devices.
The sound is output on the vehicle loudspeak‐
ers.
Connectors for external devices
▷Connection via USB audio interface: Apple
iPod/iPhone, USB devices, e.g., MP3 play‐
ers, USB flash drives, or mobile phones that
are supported by the USB audio interface.▷Connection via snap-in adapter, refer to
page 143, when equipped with extended
connectivity of the music player in the mo‐
bile phone: Apple iPhone or mobile phones.
Playback is only possible if no audio device
is connected to the analog AUX-IN port.
Due to the large number of different audio devi‐
ces available on the market, it cannot be ensured
that every audio device/mobile phone is opera‐
ble on the vehicle.
Ask your service center about suitable audio de‐
vices/mobile phones.
Audio files
Standard audio files can be played back:
▷MP3.▷WMA.▷WAV (PCM).▷AAC, M4A.▷Playback lists: M3U, WPL, PLS.File system
Standard file systems for USB devices are sup‐
ported. The FAT 32 format is recommended.
Connecting
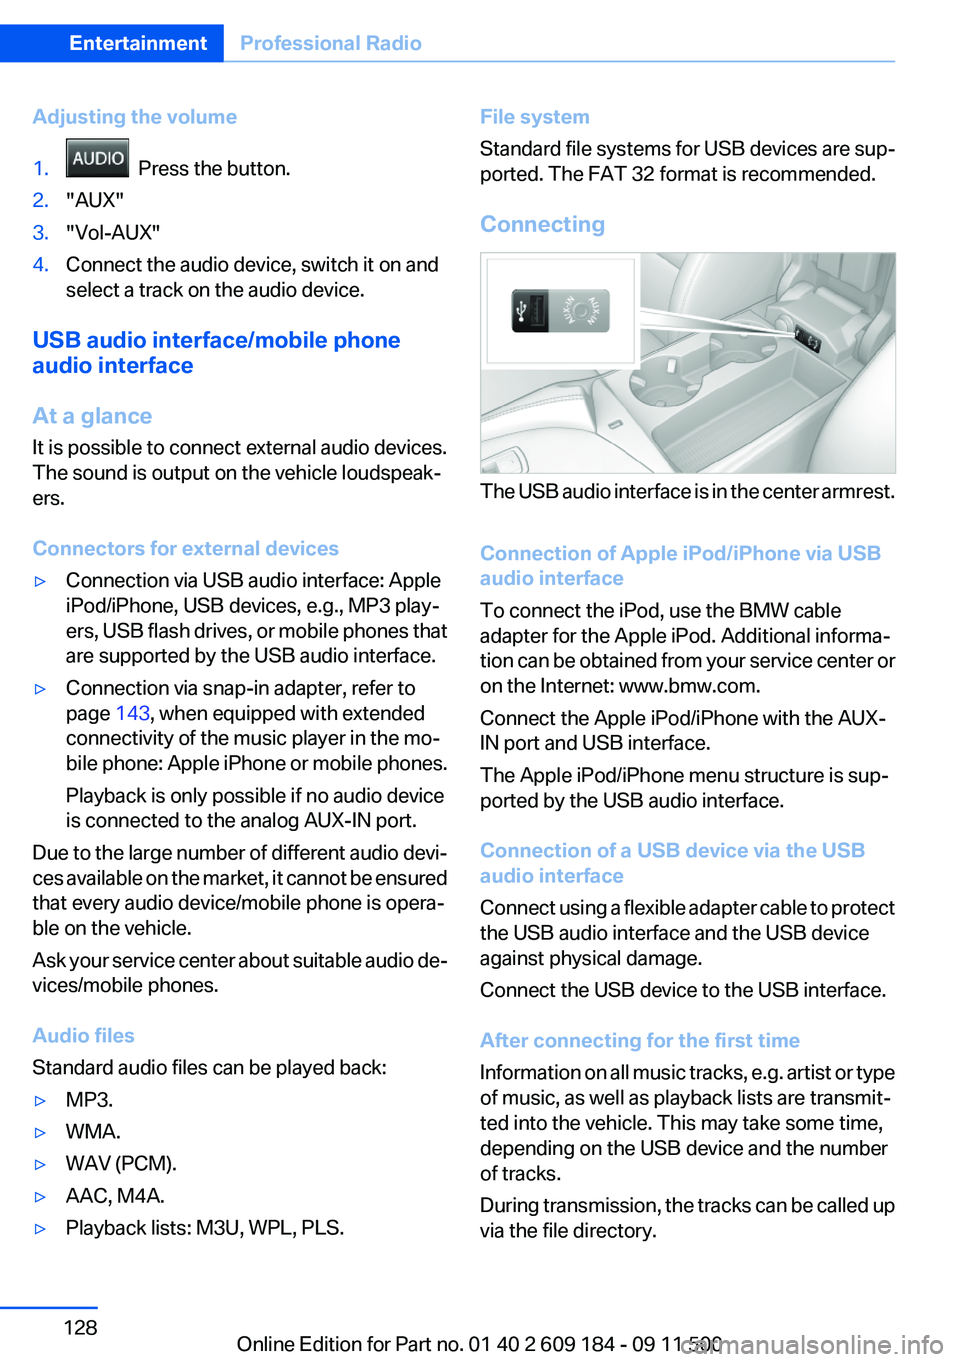
The USB audio interface is in the center armrest.
Connection of Apple iPod/iPhone via USB
audio interface
To connect the iPod, use the BMW cable
adapter for the Apple iPod. Additional informa‐
tion can be obtained from your service center or
on the Internet: www.bmw.com.
Connect the Apple iPod/iPhone with the AUX-
IN port and USB interface.
The Apple iPod/iPhone menu structure is sup‐
ported by the USB audio interface.
Connection of a USB device via the USB
audio interface
Connect using a flexible adapter cable to protect
the USB audio interface and the USB device
against physical damage.
Connect the USB device to the USB interface.
After connecting for the first time
Information on all music tracks, e.g. artist or type
of music, as well as playback lists are transmit‐
ted into the vehicle. This may take some time,
depending on the USB device and the number
of tracks.
During transmission, the tracks can be called up
via the file directory.
Seite 128EntertainmentProfessional Radio128
Online Edition for Part no. 01 40 2 609 184 - 09 11 500