parking brake BMW Z4 SDRIVE30I 2009 Owners Manual
[x] Cancel search | Manufacturer: BMW, Model Year: 2009, Model line: Z4 SDRIVE30I, Model: BMW Z4 SDRIVE30I 2009Pages: 248, PDF Size: 7.63 MB
Page 15 of 248
At a glance
13Reference
Controls
Driving tips
Communications
Navigation
Entertainment
Mobility
Indicator and warning lamps
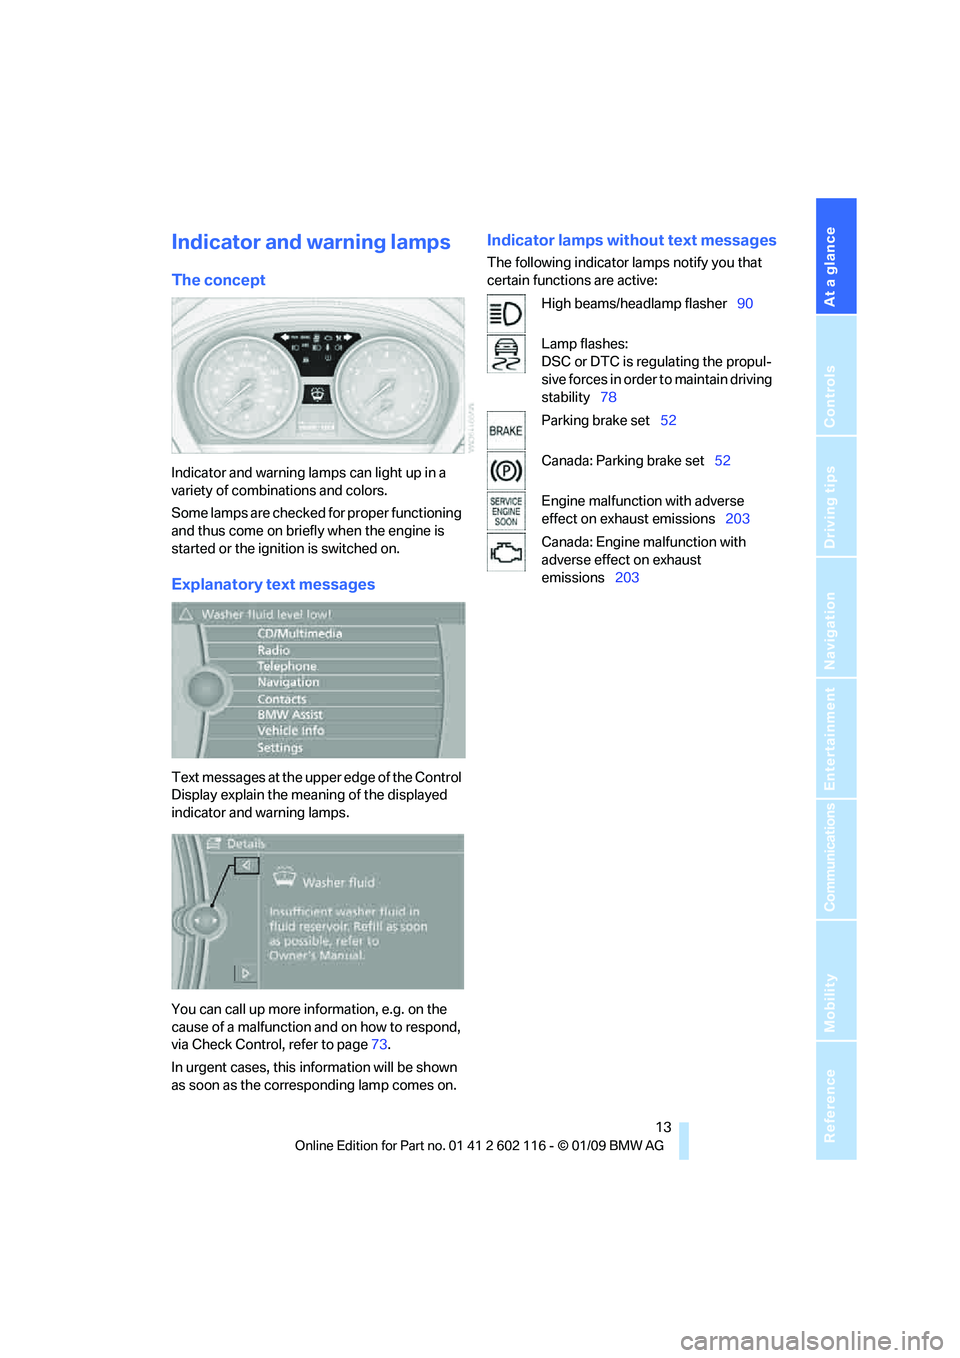
The concept
Indicator and warning lamps can light up in a
variety of combinations and colors.
Some lamps are checked for proper functioning
and thus come on briefly when the engine is
started or the ignition is switched on.
Explanatory text messages
Text messages at the upper edge of the Control
Display explain the meaning of the displayed
indicator and warning lamps.
You can call up more information, e.g. on the
cause of a malfunction and on how to respond,
via Check Control, refer to page 73.
In urgent cases, this information will be shown
as soon as the corresponding lamp comes on.
Indicator lamps without text messages
The following indicator lamps notify you that
certain functions are active:
High beams/headlamp flasher 90
Lamp flashes:
DSC or DTC is regulating the propul-
sive forces in order to maintain driving
stability 78
Parking brake set 52
Canada: Parking brake set 52
Engine malfunction with adverse
effect on exhaust emissions 203
Canada: Engine malfunction with
adverse effect on exhaust
emissions 203
Page 17 of 248
At a glance
15Reference
Controls
Driving tips
Communications
Navigation
Entertainment
Mobility
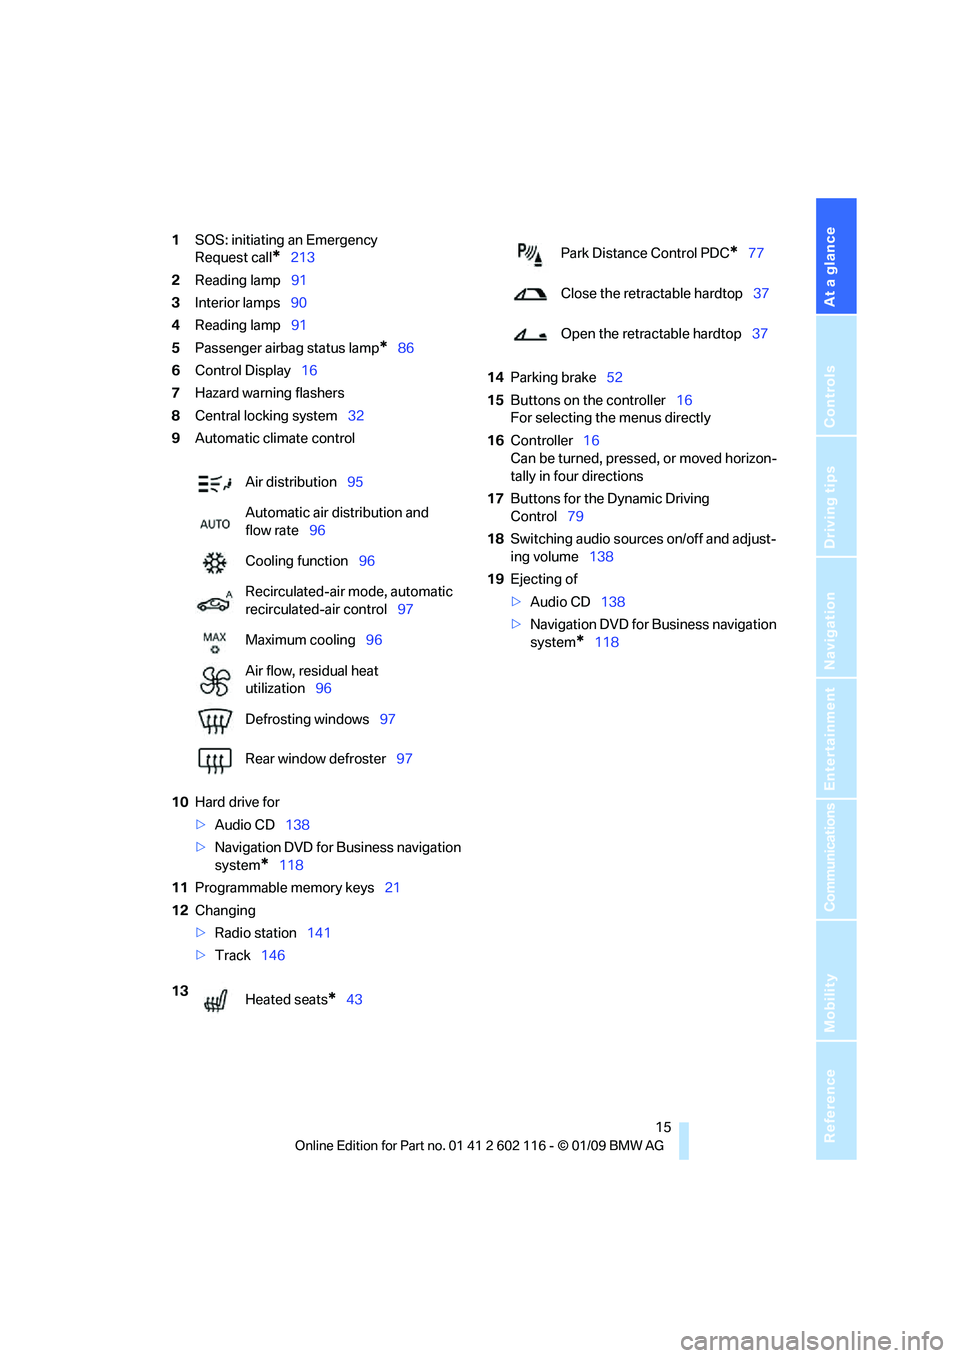
1SOS: initiating an Emergency
Request call
*213
2 Reading lamp 91
3 Interior lamps 90
4 Reading lamp 91
5 Passenger airbag status lamp
*86
6 Control Display 16
7 Hazard warning flashers
8 Central locking system 32
9 Automatic climate control
10 Hard drive for
>Audio CD 138
> Navigation DVD for Business navigation
system
*118
11 Programmable memory keys 21
12 Changing
>Radio station 141
> Track 146 14
Parking brake 52
15 Buttons on the controller 16
For selecting the menus directly
16 Controller 16
Can be turned, pressed, or moved horizon-
tally in four directions
17 Buttons for the Dynamic Driving
Control 79
18 Switching audio sources on/off and adjust-
ing volume 138
19 Ejecting of
>Audio CD 138
> Navigation DVD for Business navigation
system
*118
Air distribution
95
Automatic air distribution and
flow rate 96
Cooling function 96
Recirculated-air mode, automatic
recirculated-air control 97
Maximum cooling 96
Air flow, residual heat
utilization 96
Defrosting windows 97
Rear window defroster 97
13 Heated seats
*43
Park Distance Control PDC*77
Close the retractable hardtop 37
Open the retractable hardtop 37
Page 53 of 248
Controls
51Reference
At a glance
Driving tips
Communications
Navigation
Entertainment
Mobility
Starting the engine
Do not run the engine in closed rooms,
otherwise the inhalation of toxic exhaust
gases can cause unconsciousness and death.
The exhaust gases contain carbon monoxide,
an odorless and colorless, but highly toxic gas.
Never leave an unattended vehicle with the
engine running, otherwis e such a vehicle repre-
sents a potential safety hazard.
Before leaving the car wi th the engine running,
place the transmission in neutral or move the
selector lever to position P and set the parking
brake to prevent the car from moving. <
Avoid frequent starting in quick succes-
sion as well as repeat ed start attempts in
which the engine does no t start. Otherwise, the
fuel is not burned or incompletely burned and
there is a danger of overheating and damaging
the catalytic converter. <
Do not wait for the engine to warm up while the
vehicle remains stationary. Start driving right
away, but at moderate engine speeds.
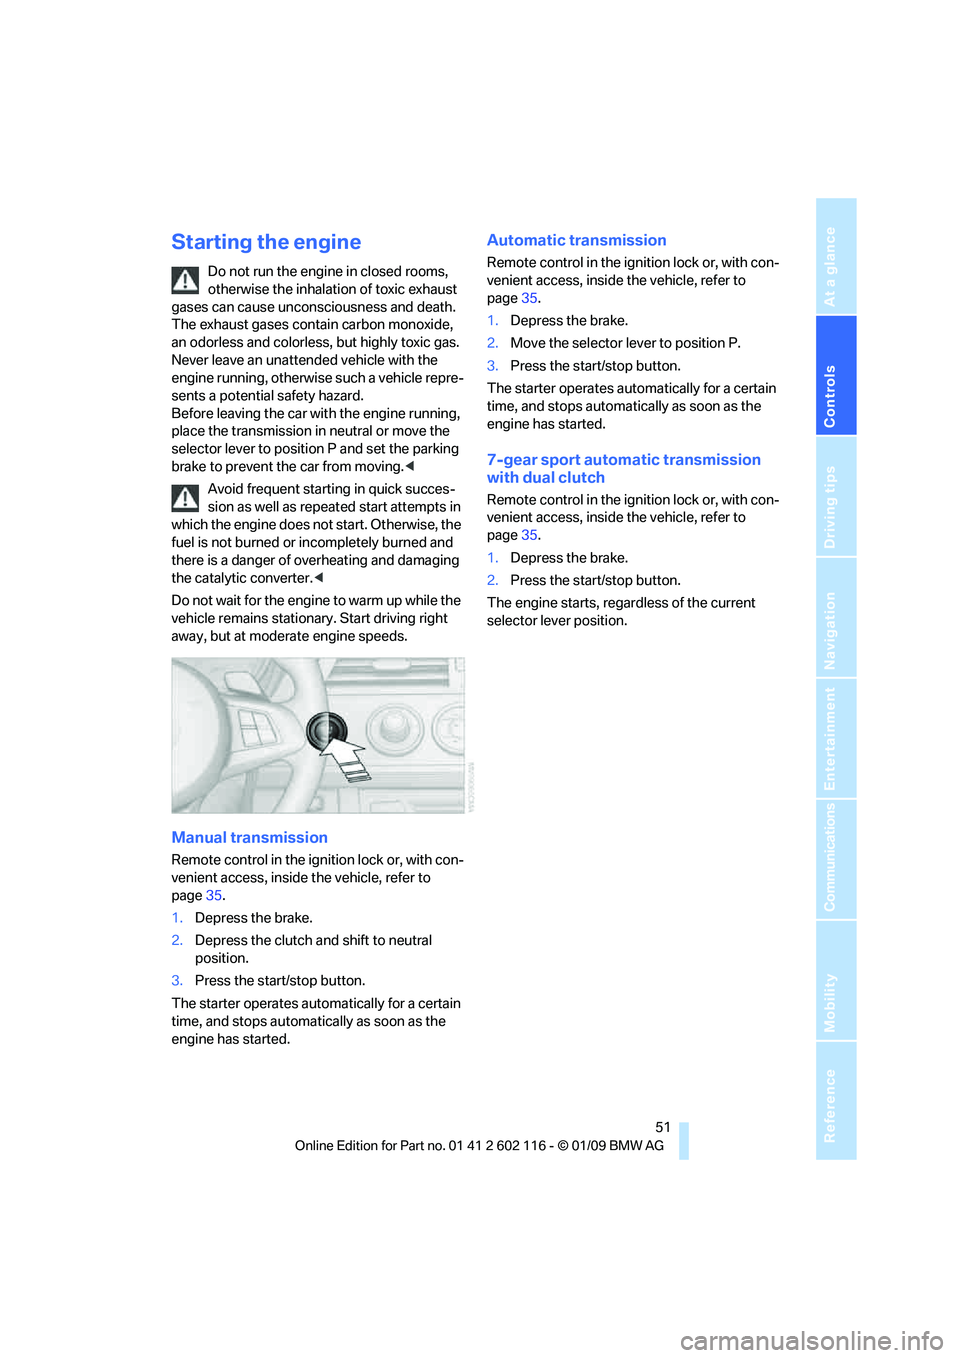
Manual transmission
Remote control in the ignition lock or, with con-
venient access, inside the vehicle, refer to
page 35.
1. Depress the brake.
2. Depress the clutch and shift to neutral
position.
3. Press the start/stop button.
The starter operates automatically for a certain
time, and stops automatically as soon as the
engine has started.
Automatic transmission
Remote control in the ignition lock or, with con-
venient access, inside the vehicle, refer to
page 35.
1. Depress the brake.
2. Move the selector lever to position P.
3. Press the start/stop button.
The starter operates automatically for a certain
time, and stops automatically as soon as the
engine has started.
7-gear sport automatic transmission
with dual clutch
Remote control in the ignition lock or, with con-
venient access, inside the vehicle, refer to
page 35.
1. Depress the brake.
2. Press the start/stop button.
The engine starts, regardless of the current
selector lever position.
Page 54 of 248
Driving
52
Switching off the engine
Always take the remote control with you
when you leave the vehicle.
Set the parking brake firmly when parking; oth-
erwise, the vehicle could roll. <
Manual transmission
1.With the car at a standstill, press the start/
stop button.
2. Shift into first gear or reverse.
3. Set the parking brake.
4. Removing the remote control from the igni-
tion lock, refer to page 50.
Automatic transmission
1. With the car at a stan dstill, move the selec-
tor lever to position P.
2. Press the start/stop button.
3. Set the parking brake.
4. Removing the remote control from the igni-
tion lock, refer to page 50.
7-gear sport automatic transmission
with dual clutch
1. With the car at a stan dstill, engage trans-
mission position P.
2. Press the start/stop button.
3. Set the parking brake.
4. Removing the remote control from the igni-
tion lock, refer to page 50.
Parking brake
The concept
Your BMW is equipped with an electromechan-
ical parking brake that can be set and released
by using a button.
The parking brake is primarily used to prevent
the vehicle from rolling when it is parked.
When the vehicle is stationary, the parking
brake acts on the rear wheels via an electrome-
chanical mechanism. When the vehicle is rolling
or being driven, the parking brake acts on the disc brakes of the front and rear wheels via the
hydraulic brake system.
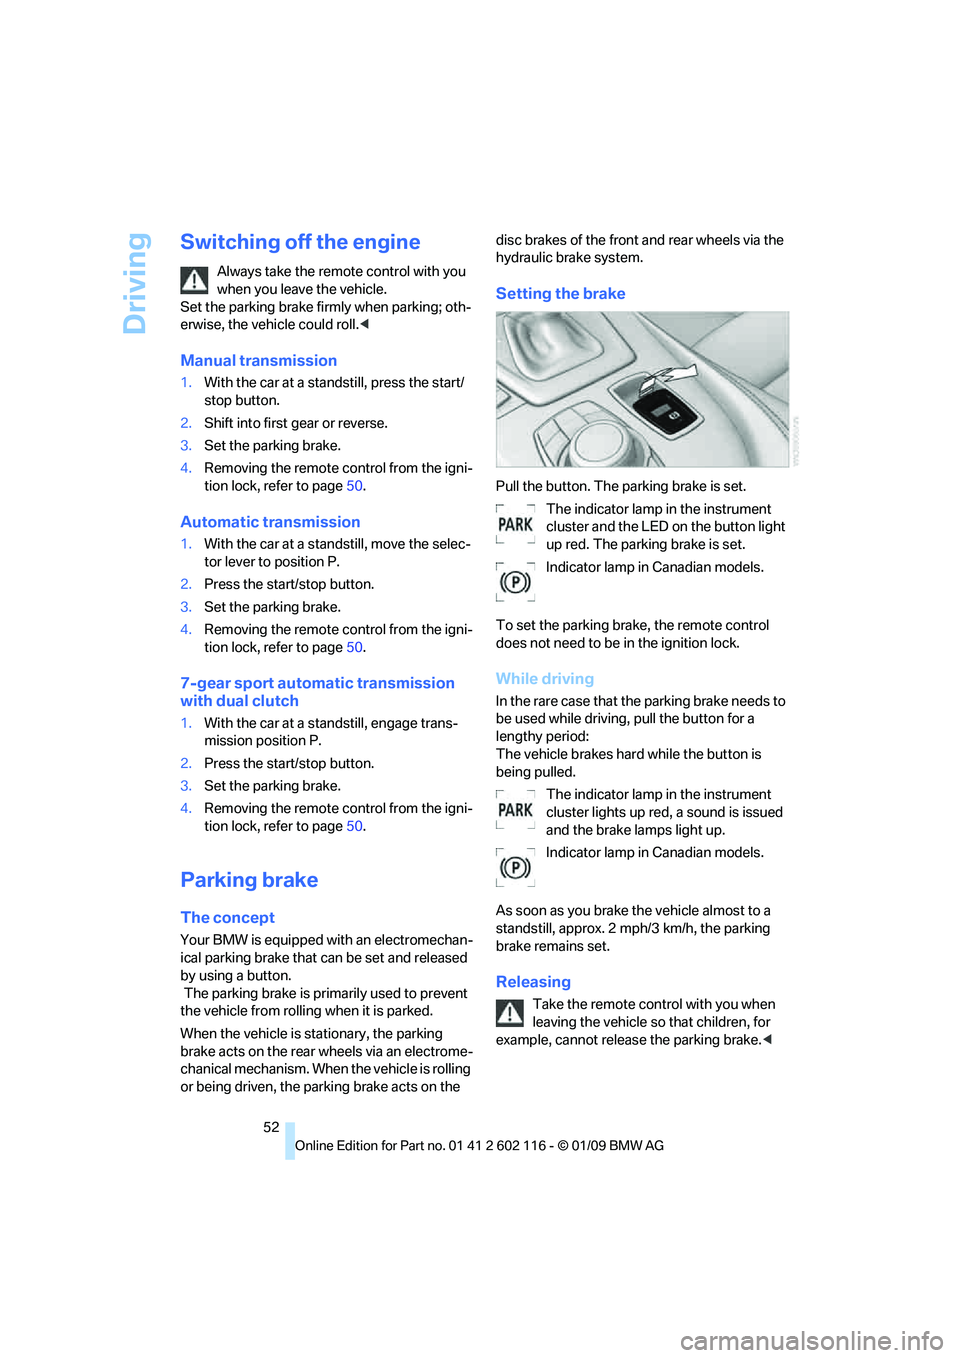
Setting the brake
Pull the button. The parking brake is set.
The indicator lamp in the instrument
cluster and the LED on the button light
up red. The parking brake is set.
Indicator lamp in Canadian models.
To set the parking brake, the remote control
does not need to be in the ignition lock.
While driving
In the rare case that the parking brake needs to
be used while driving, pull the button for a
lengthy period:
The vehicle brakes hard while the button is
being pulled. The indicator lamp in the instrument
cluster lights up red, a sound is issued
and the brake lamps light up.
Indicator lamp in Canadian models.
As soon as you brake the vehicle almost to a
standstill, approx. 2 mph/3 km/h, the parking
brake remains set.
Releasing
Take the remote cont rol with you when
leaving the vehicle so that children, for
example, cannot release the parking brake. <
Page 55 of 248
Controls
53Reference
At a glance
Driving tips
Communications
Navigation
Entertainment
Mobility
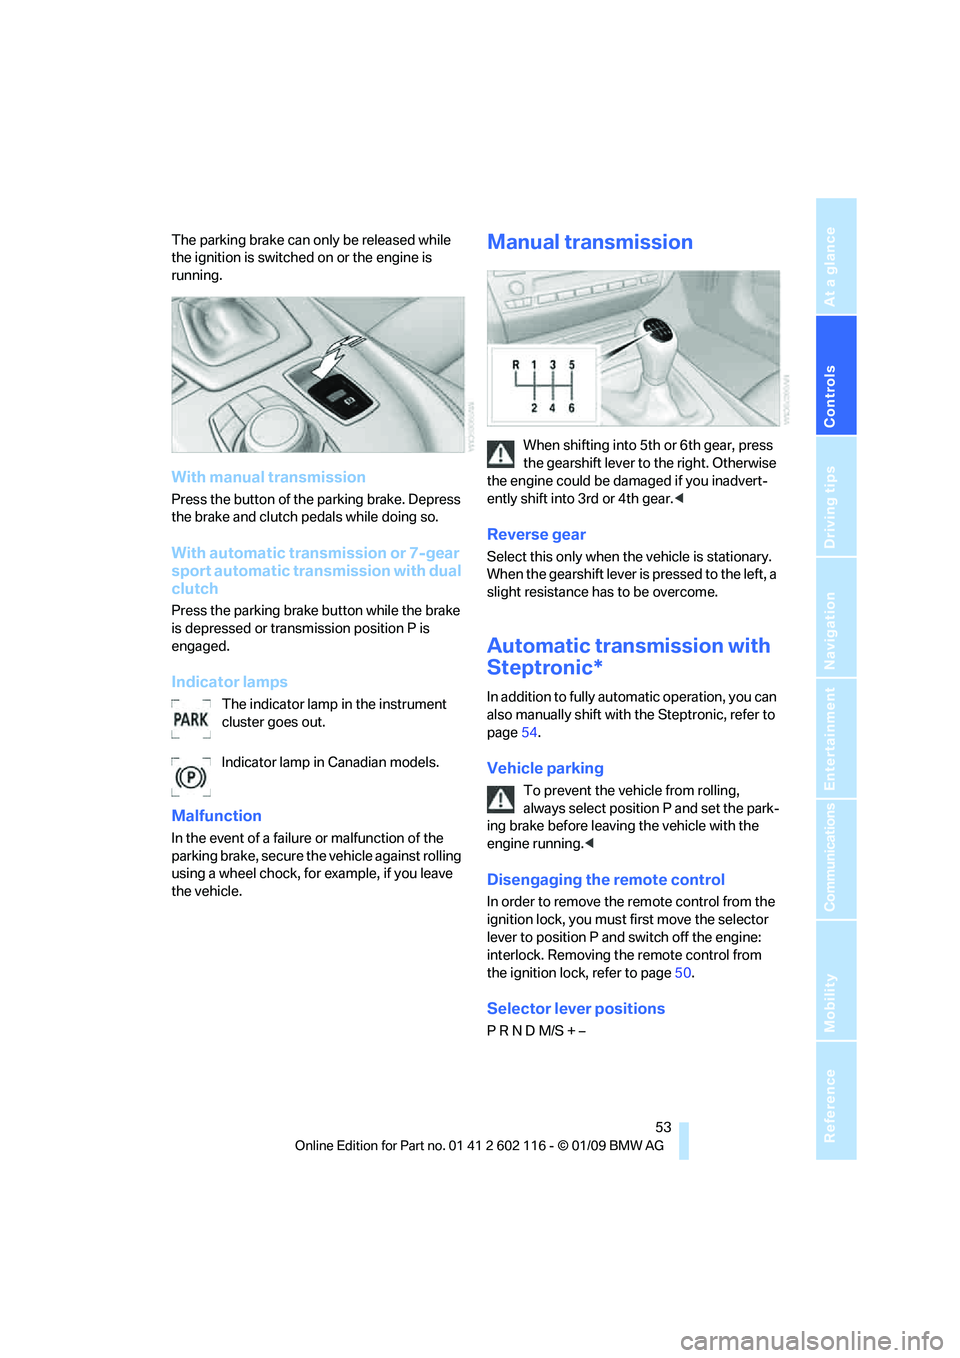
The parking brake can only be released while
the ignition is switched on or the engine is
running.
With manual transmission
Press the button of the parking brake. Depress
the brake and clutch pedals while doing so.
With automatic transmission or 7-gear
sport automatic transmission with dual
clutch
Press the parking brake button while the brake
is depressed or transmission position P is
engaged.
Indicator lamps
The indicator lamp in the instrument
cluster goes out.
Indicator lamp in Canadian models.
Malfunction
In the event of a failure or malfunction of the
parking brake, secure the vehicle against rolling
using a wheel chock, for example, if you leave
the vehicle.
Manual transmission
When shifting into 5th or 6th gear, press
the gearshift lever to the right. Otherwise
the engine could be da maged if you inadvert-
ently shift into 3rd or 4th gear. <
Reverse gear
Select this only when the vehicle is stationary.
When the gearshift lever is pressed to the left, a
slight resistance has to be overcome.
Automatic transmission with
Steptronic*
In addition to fully automatic operation, you can
also manually shift with the Steptronic, refer to
page 54.
Vehicle parking
To prevent the vehicle from rolling,
always select position P and set the park-
ing brake before leavin g the vehicle with the
engine running. <
Disengaging the remote control
In order to remove the remote control from the
ignition lock, you must first move the selector
lever to position P and switch off the engine:
interlock. Removing th e remote control from
the ignition lock, refer to page 50.
Selector lever positions
P R N D M/S + –
Page 60 of 248
Driving
58
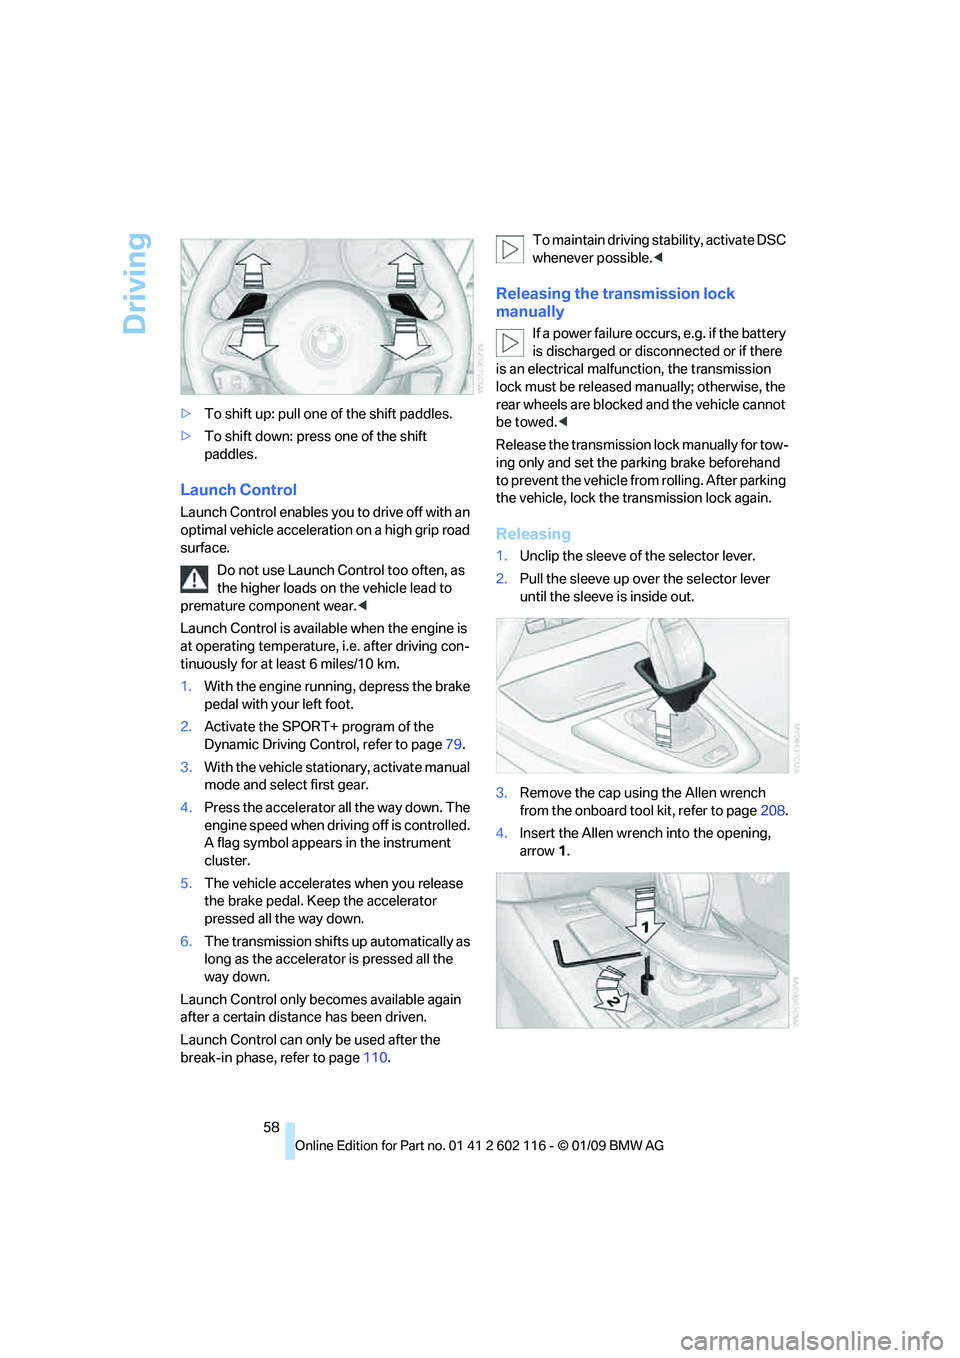
>
To shift up: pull one of the shift paddles.
> To shift down: press one of the shift
paddles.
Launch Control
Launch Control enables you to drive off with an
optimal vehicle acceleration on a high grip road
surface.
Do not use Launch Control too often, as
the higher loads on the vehicle lead to
premature component wear. <
Launch Control is availa ble when the engine is
at operating temperature, i.e. after driving con-
tinuously for at least 6 miles/10 km.
1. With the engine running, depress the brake
pedal with your left foot.
2. Activate the SPORT+ program of the
Dynamic Driving Control, refer to page 79.
3. With the vehicle stationary, activate manual
mode and select first gear.
4. Press the accelerator all the way down. The
engine speed when driving off is controlled.
A flag symbol appears in the instrument
cluster.
5. The vehicle accelerates when you release
the brake pedal. Keep the accelerator
pressed all the way down.
6. The transmission shifts up automatically as
long as the accelerator is pressed all the
way down.
Launch Control only be comes available again
after a certain distance has been driven.
Launch Control can only be used after the
break-in phase, refer to page 110.To maintain driving stability, activate DSC
whenever possible.
<
Releasing the transmission lock
manually
If a power failure occurs, e.g. if the battery
is discharged or disconnected or if there
is an electrical malfun ction, the transmission
lock must be released manually; otherwise, the
rear wheels are blocked and the vehicle cannot
be towed. <
Release the transmission lock manually for tow-
ing only and set the parking brake beforehand
to prevent the vehicle from rolling. After parking
the vehicle, lock the transmission lock again.
Releasing
1. Unclip the sleeve of the selector lever.
2. Pull the sleeve up over the selector lever
until the sleeve is inside out.
3. Remove the cap using the Allen wrench
from the onboard tool kit, refer to page 208.
4. Insert the Allen wrench into the opening,
arrow 1.
Page 61 of 248
Controls
59Reference
At a glance
Driving tips
Communications
Navigation
Entertainment
Mobility
5.Turn the Allen wrench as far as it will go,
arrow 2. The transmission lock is released.
Do not turn the Allen wrench in the
opposite direction as this may dam-
age the mechanism.<
6. Draw the Allen wrench out of the opening.
After parking the vehicle, lock the trans-
mission lock again. Otherwise, there is a
danger of the vehicle rolling. <
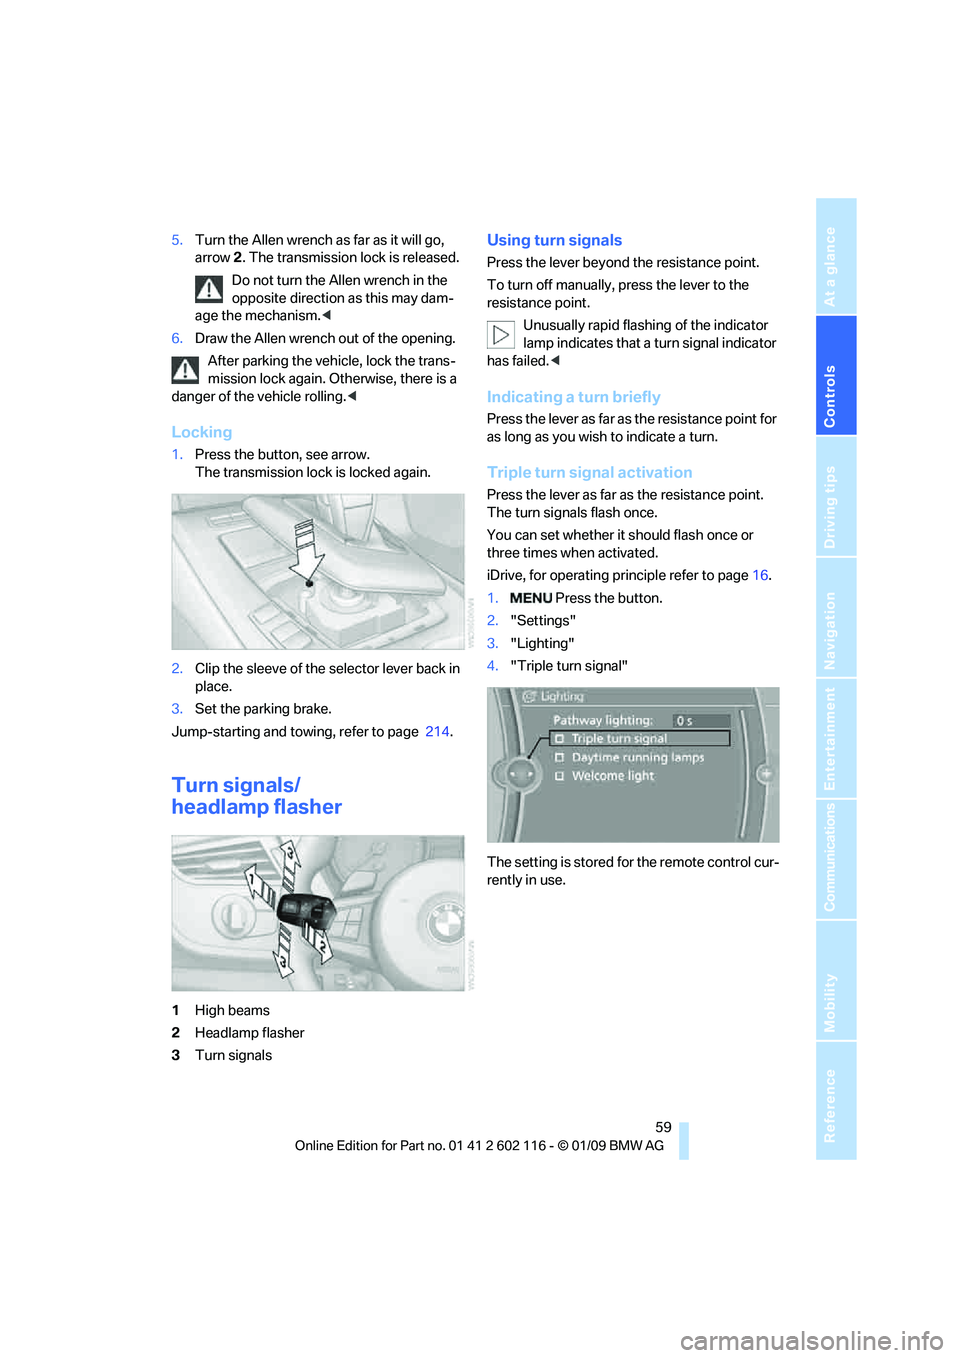
Locking
1.Press the button, see arrow.
The transmission lock is locked again.
2. Clip the sleeve of the selector lever back in
place.
3. Set the parking brake.
Jump-starting and towing, refer to page 214.
Turn signals/
headlamp flasher
1High beams
2 Headlamp flasher
3 Turn signals
Using turn signals
Press the lever beyond the resistance point.
To turn off manually, press the lever to the
resistance point.
Unusually rapid flashi ng of the indicator
lamp indicates that a turn signal indicator
has failed. <
Indicating a turn briefly
Press the lever as far as the resistance point for
as long as you wish to indicate a turn.
Triple turn signal activation
Press the lever as far as the resistance point.
The turn signals flash once.
You can set whether it should flash once or
three times when activated.
iDrive, for operating pr inciple refer to page16.
1. Press the button.
2. "Settings"
3. "Lighting"
4. "Triple turn signal"
The setting is stored for the remote control cur-
rently in use.
Page 82 of 248
Technology for driving comfort and safety
80
The DSC indicator lamp in
the instrument clus-
ter lights up.
Deactivating TRACTION
Press the button again.
TRACTION and the DSC indicator
lamp go out.
For better control
TRACTION is displayed in the instrument
cluster.
The indicator lamp lights up: DTC
Dynamic Traction Control is activated.
SPORT+
Sporty driving with a tight suspension and lim-
ited driving stabilization.
Dynamic Traction Control is switched on.
The driver handles seve ral of the stabilization
tasks.
Activating SPORT+
Press the button repeatedly until
SPORT+ appears in the instrument
cluster and the DSC indicator lamp lights up.
For better control
SPORT+ is displayed in the instrument cluster.
The indicator lamp lights up: DTC
Dynamic Traction Control is activated.
SPORT
Consistently sporty tuning of the suspension
for greater driving agility with maximum driving
stabilization.
Activating SPORT
Press the button repeatedly until
SPORT+ appears in the instrument
cluster.
NORMAL
For a balanced tuning with maximum driving
stabilization.
Activating NORMAL
Press the button repeatedly until the
program display disappears in the
instrument cluster.
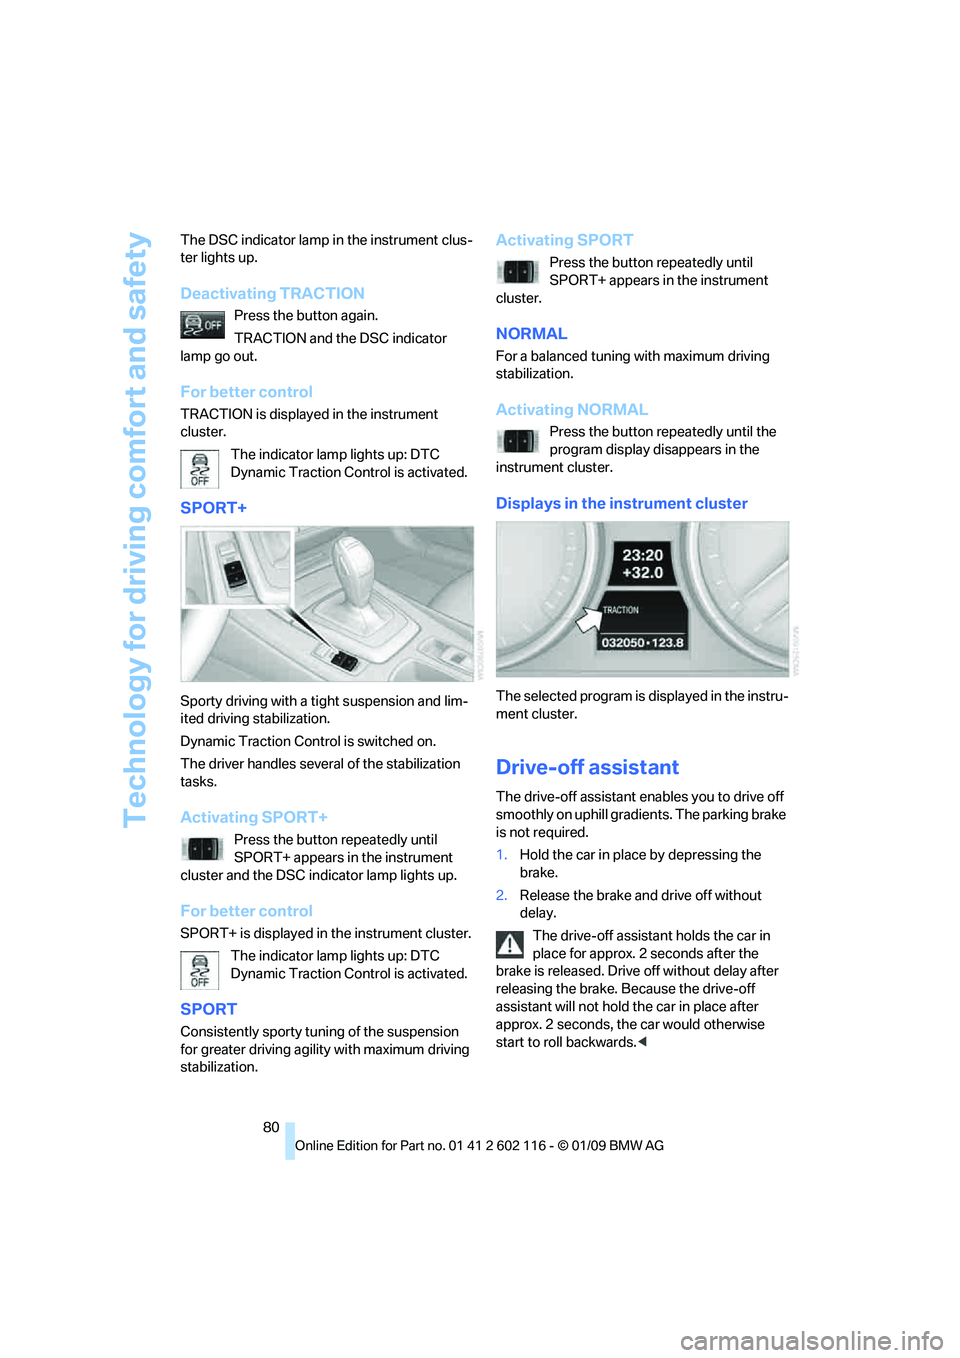
Displays in the instrument cluster
The selected program is displayed in the instru-
ment cluster.
Drive-off assistant
The drive-off assistant enables you to drive off
smoothly on uphill gradients. The parking brake
is not required.
1. Hold the car in place by depressing the
brake.
2. Release the brake and drive off without
delay.
The drive-off assistant holds the car in
place for approx. 2 seconds after the
brake is released. Drive off without delay after
releasing the brake. Because the drive-off
assistant will not hold the car in place after
approx. 2 seconds, the car would otherwise
start to roll backwards. <
Page 114 of 248
Things to remember when driving
112
The risk of hydroplaning
increases with declin-
ing tread depth on the tire s, refer also to Mini-
mum tread depth on page 194.
Driving through water
Drive though calm water only if it is not
deeper than 1 ft/25 cm and at this height
no faster than walking speed, up to 6 mph/
10 km/h. Otherwise, the vehicle's engine, the
electrical systems and the transmission may be
damaged. <
Use the parking brake on inclines
On inclines, do not hold the vehicle for a
lengthy period using the clutch; use the
parking brake instead. Ot herwise greater clutch
wear will result. <
For more information about the drive-off assis-
tant, refer to page 80.
Braking safely
Your BMW is equipped with ABS as a standard
feature. Applying the brakes fully is the most
effective way of braking in situations in which
this is necessary. Since the vehicle maintains
steering responsiveness, you can still avoid
possible obstacles with a minimum of steering
effort.
Pulsation of the brake pedal, combined with
sounds from the hydraulic circuits, indicate that
ABS is in its active mode.
Driving in wet conditions
When roads are wet or there is heavy rain,
briefly exert gentle pre ssure on the brake pedal
every few miles. Monitor traffic conditions to
ensure that this maneuver does not endanger
other road users. The heat generated in this
process helps dry the pads and rotors. Full
braking efficiency will th en be available when
you need it.
Hills
To prevent overheating and the resulting
reduced efficiency of the brake system,
drive long or steep downhill gradients in the
gear in which the least br aking is required. Even light but consistent brak
e pressure can lead to
high temperatures, brake wear and possibly
even brake failure. <
You can increase the engine's braking effect by
shifting down, all the way to first gear if neces-
sary. This strategy helps you avoid placing
excessive loads on the brake system. Down-
shifting in manual mode of the automatic trans-
mission, refer to page 54.
7-gear sport automatic transmission with
dual clutch: Never drive with the trans-
mission in neutral or with the engine switched
off; otherwise, engine braking action will not be
present or there will be no power assistance to
the brakes or steering.
Manual transmission: Never drive with the
clutch held down, with the transmission in neu-
tral or with the engine switched off; otherwise,
engine braking action will not be present or
there will be no power a ssistance to the brakes
or steering.
Never allow floor mats, carpets or any other
objects to protrude into the area around the
pedals, otherwise peda l function could be
impaired. <
Corrosion on brake rotors
When the vehicle is driv en only occasionally,
during extended periods when the vehicle is not
used at all, and in op erating conditions where
brake applications are less frequent, there is an
increased tendency for corrosion to form on
rotors, while contaminan ts accumulate on the
brake pads. This occurs because the minimum
pressure which must be exerted by the pads
during brake applications to clean the rotors is
not reached.
Should corrosion form on the brake rotors, the
brakes will tend to re spond with a pulsating
effect that even extended application will fail
to cure.
When the vehicle is parked
Condensation forms wh ile the automatic cli-
mate control is in operation, and then exits
under the vehicle. Traces of condensed water
under the vehicle are therefore normal.
Page 150 of 248
CD/DVD player and CD/DVD changer
148
5.
"Random"
CDs/DVDs with compressed audio files: the
directories and the tracks contained therein are
played back in random sequence.
Random mode is switched off if the audio
source is changed or the ignition is switched off.
Fast forward/reverse
Press and hold the button for the corre-
sponding direction.
Video playback*
Country codes
Only DVDs with the code of the home region
can be played back; also refer to the information
on your DVD.
Start playback
For your own safety, the video image is only dis-
played up to a vehicle speed of approx. 2 mph/
3 km/h and in some countries only with the parking brake set or the automatic transmission
in position P.
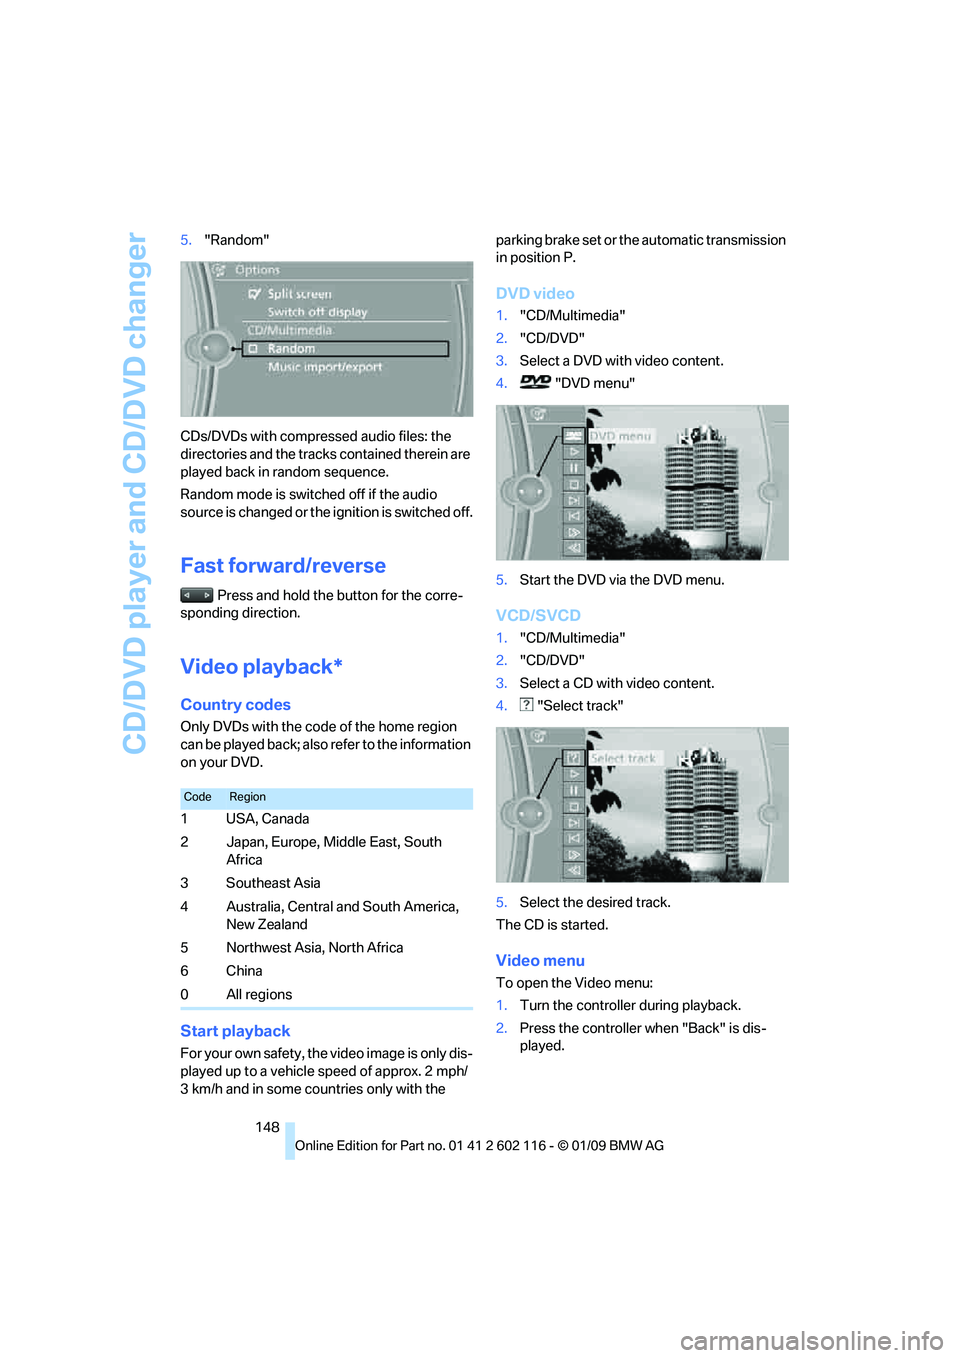
DVD video
1.
"CD/Multimedia"
2. "CD/DVD"
3. Select a DVD with video content.
4. "DVD menu"
5. Start the DVD via the DVD menu.
VCD/SVCD
1."CD/Multimedia"
2. "CD/DVD"
3. Select a CD with video content.
4. "Select track"
5. Select the desired track.
The CD is started.
Video menu
To open the Video menu:
1. Turn the controller during playback.
2. Press the controller when "Back" is dis-
played.
CodeRegion
1USA, Canada
2 Japan, Europe, Middle East, South
Africa
3Southeast Asia
4 Australia, Central and South America, New Zealand
5 Northwest Asia, North Africa
6China
0 All regions