airbag BMW Z4 SDRIVE30I ROADSTER 2009 Owners Manual
[x] Cancel search | Manufacturer: BMW, Model Year: 2009, Model line: Z4 SDRIVE30I ROADSTER, Model: BMW Z4 SDRIVE30I ROADSTER 2009Pages: 248, PDF Size: 7.63 MB
Page 17 of 248
At a glance
15Reference
Controls
Driving tips
Communications
Navigation
Entertainment
Mobility
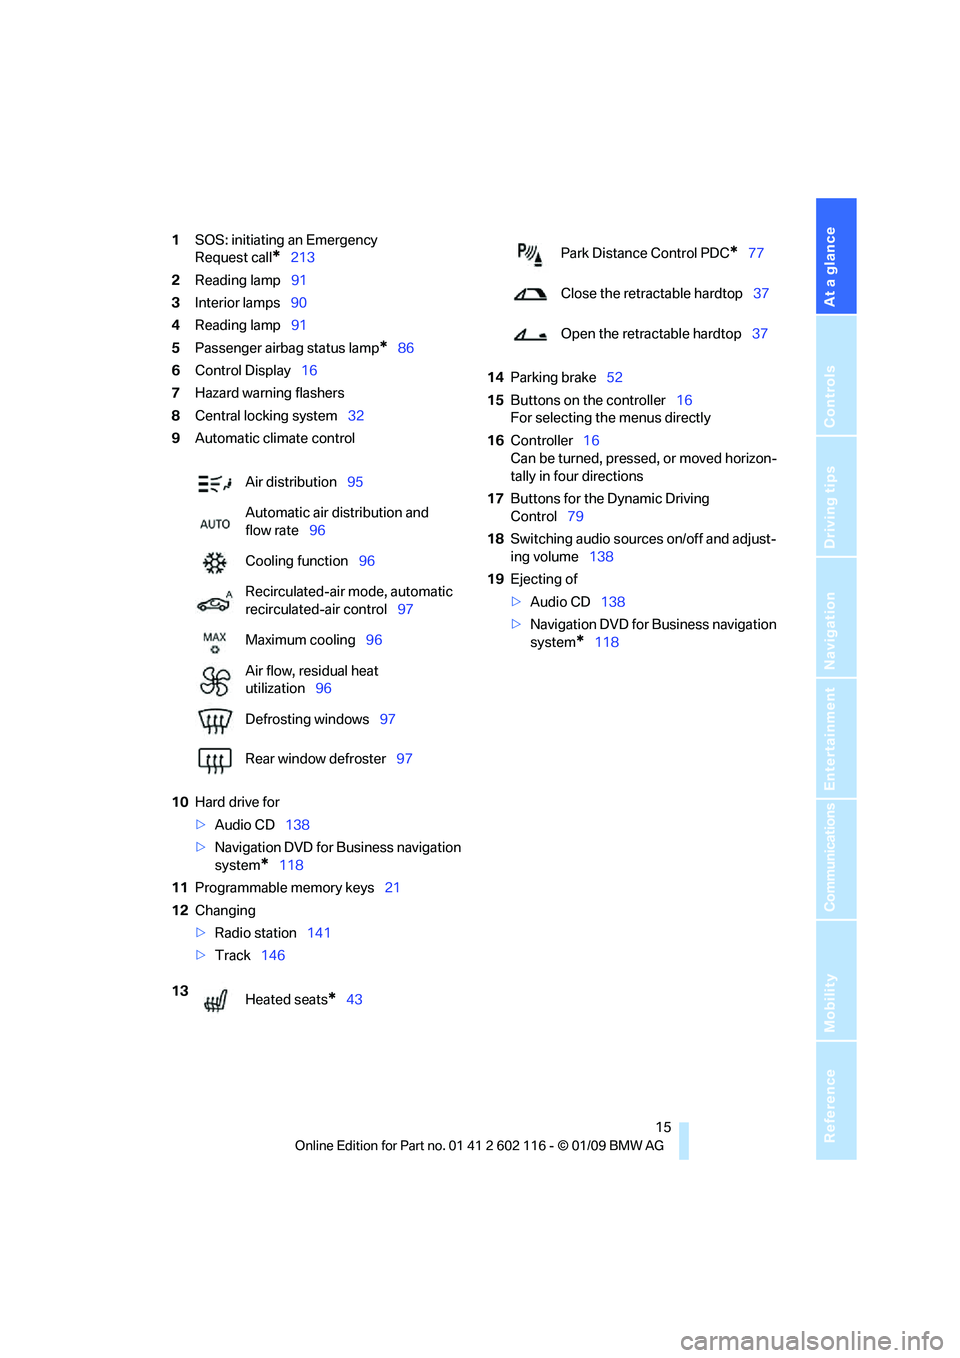
1SOS: initiating an Emergency
Request call
*213
2 Reading lamp 91
3 Interior lamps 90
4 Reading lamp 91
5 Passenger airbag status lamp
*86
6 Control Display 16
7 Hazard warning flashers
8 Central locking system 32
9 Automatic climate control
10 Hard drive for
>Audio CD 138
> Navigation DVD for Business navigation
system
*118
11 Programmable memory keys 21
12 Changing
>Radio station 141
> Track 146 14
Parking brake 52
15 Buttons on the controller 16
For selecting the menus directly
16 Controller 16
Can be turned, pressed, or moved horizon-
tally in four directions
17 Buttons for the Dynamic Driving
Control 79
18 Switching audio sources on/off and adjust-
ing volume 138
19 Ejecting of
>Audio CD 138
> Navigation DVD for Business navigation
system
*118
Air distribution
95
Automatic air distribution and
flow rate 96
Cooling function 96
Recirculated-air mode, automatic
recirculated-air control 97
Maximum cooling 96
Air flow, residual heat
utilization 96
Defrosting windows 97
Rear window defroster 97
13 Heated seats
*43
Park Distance Control PDC*77
Close the retractable hardtop 37
Open the retractable hardtop 37
Page 43 of 248
Controls
41Reference
At a glance
Driving tips
Communications
Navigation
Entertainment
Mobility
Adjustments
Sitting safely
The ideal sitting position can make a vital con-
tribution to relaxed, fati gue-free driving. In con-
junction with the safe ty belts, the head
restraints and the airbags, the seated position
has a major influence on your safety in the event
of an accident. To ensu re that the safety sys-
tems operate with optimal efficiency, we
strongly urge you to observe the instructions
contained in the following section.
For additional information on transporting chil-
dren safely, refer to page 48.
Airbags
Always maintain an adequate distance
between yourself and the airbags. Always
grip the steering wheel on the rim, with your
hands in the 3 o'clock and 9 o'clock positions,
to minimize the risk of injury to the hands or
arms in the event of the airbag being triggered
off. No one and nothing is to come between the
airbags and the seat occupant.
Do not use the cover of the front airbag on the
passenger side as a st orage area. Make sure
that the passenger is sitting correctly, e.g.
keeping his or her feet or legs in the footwell
and not on the dashboard; otherwise, leg inju-
ries can occur if the front airbag deploys.
Make sure that passengers do not lean their
heads against the side airbag; otherwise, seri-
ous injuries could result if the airbag suddenly
deployed. <
Even if you follow all the instructions, injuries
resulting from contact with airbags cannot be
fully excluded, depending on the circum-
stances. The ignition and inflation noise may
provoke a mild hearing loss in extremely sensi-
tive individuals. This e ffect is usually only tem-
porary.
For airbag locations and additional information
on airbags, refer to page 85.
Safety belt
Before every drive, make sure that all occupants
wear their safety belts. Airbags complement the
safety belt as an additi onal safety device, but
they do not represent a substitute.
Your vehicle has two seats, each of which is
equipped with a safety belt.
Never allow more than one person to
wear a single safety belt. Never allow
infants or small children to ride in a passenger's
lap. Make sure that the be lt in the lap area sits
low across the hips and does not press against
the abdomen.
The safety belt must not rest against the throat,
run across sharp edges, pass over hard or frag-
ile objects or be pinched. Fasten the safety belt
so that it sits as snugly as possible against the
lap and shoulder withou t being twisted. Other-
wise the belt could slide over your hips and
injure your abdomen in the event of a frontal
collision.
Avoid wearing bulky clothing and regularly pull
the belt in the upper-bo dy area taut, otherwise
its restraining effect could be impaired. <
Safety belts, refer to page 44.
Seats
Note before adjusting
Never attempt to adjust your seat while
the vehicle is moving. The seat could
respond with unexpected movement, and the
ensuing loss of vehicle control could lead to an
accident.
On the passenger seat as well, do not incline
the backrest too far to th e rear while the vehicle
is being driven, otherwise there is a danger in
the event of an accident of sliding under the
safety belt, eliminating the protection normally
provided by the belt. <
Note the information on safety belt damage on
page 45.
Page 46 of 248
Adjustments
44
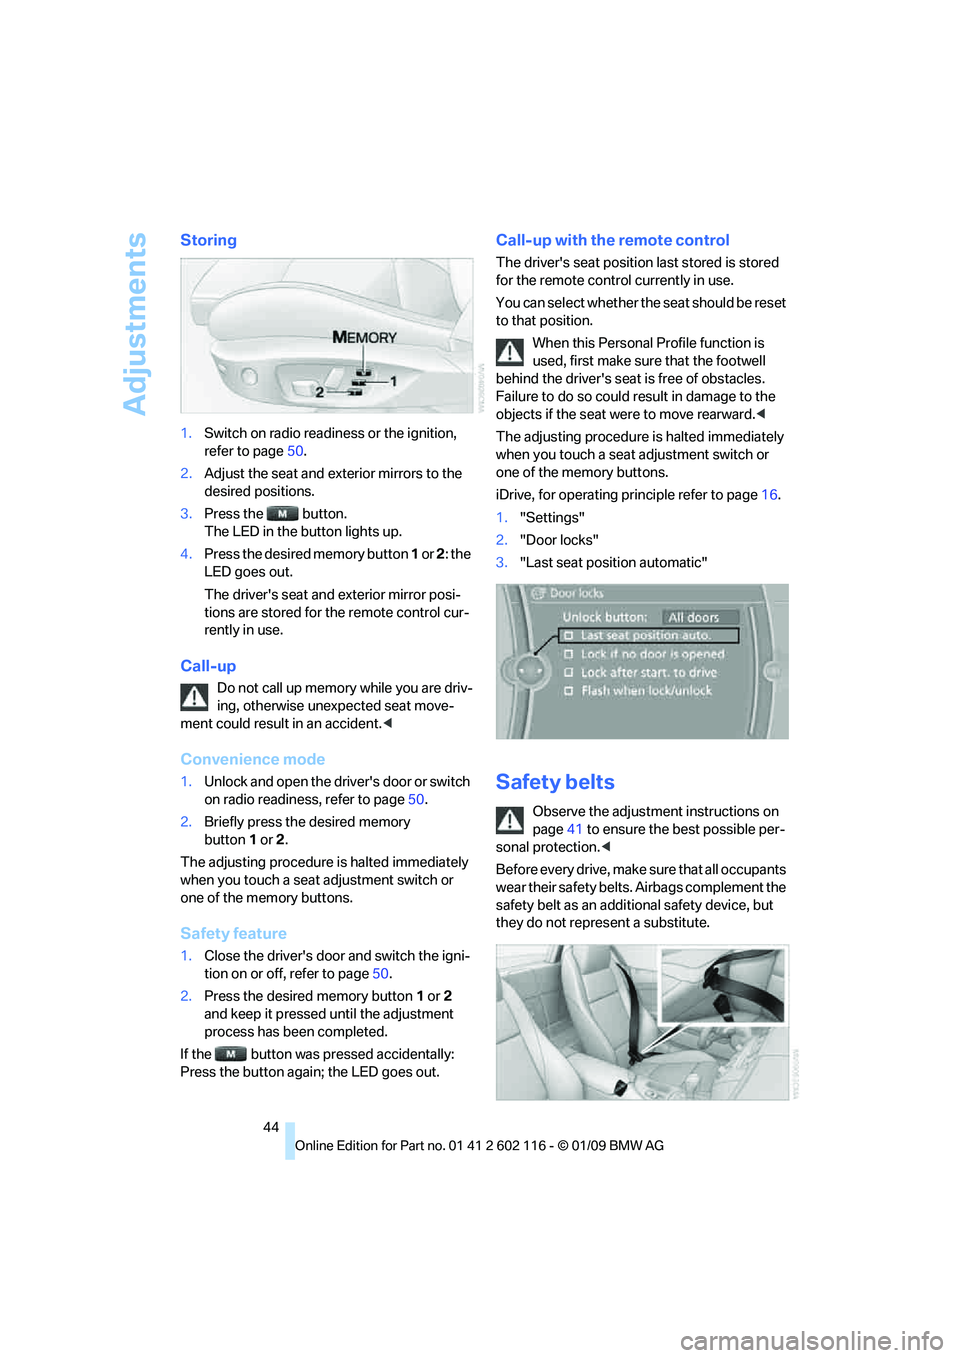
Storing
1.Switch on radio readiness or the ignition,
refer to page 50.
2. Adjust the seat and exterior mirrors to the
desired positions.
3. Press the button.
The LED in the button lights up.
4. Press the desired memory button 1 or 2 : the
LED goes out.
The driver's seat and exterior mirror posi-
tions are stored for th e remote control cur-
rently in use.
Call-up
Do not call up memory while you are driv-
ing, otherwise unexpected seat move-
ment could result in an accident. <
Convenience mode
1.Unlock and open the driver's door or switch
on radio readiness, refer to page 50.
2. Briefly press the desired memory
button 1or 2.
The adjusting procedure is halted immediately
when you touch a seat adjustment switch or
one of the memory buttons.
Safety feature
1. Close the driver's door and switch the igni-
tion on or off, refer to page 50.
2. Press the desired memory button 1 or 2
and keep it pressed until the adjustment
process has been completed.
If the button was pressed accidentally:
Press the button again; the LED goes out.
Call-up with the remote control
The driver's seat position last stored is stored
for the remote control currently in use.
You can select whether the seat should be reset
to that position.
When this Personal Profile function is
used, first make sure that the footwell
behind the driver's seat is free of obstacles.
Failure to do so could re sult in damage to the
objects if the seat were to move rearward. <
The adjusting procedure is halted immediately
when you touch a seat adjustment switch or
one of the memory buttons.
iDrive, for operating pr inciple refer to page16.
1. "Settings"
2. "Door locks"
3. "Last seat position automatic"
Safety belts
Observe the adjustment instructions on
page 41 to ensure the best possible per-
sonal protection. <
Before every drive, make sure that all occupants
wear their safety belts. Airbags complement the
safety belt as an additi onal safety device, but
they do not repres ent a substitute.
Page 50 of 248
Transporting children safely
48
Transporting children safely
The right place for children
Do not leave children unattended in the
vehicle, otherwise they could endanger
themselves and/or other persons by opening
the doors, for example. <
Children on the passenger seat
Always transport children under the age
of 13 or smaller than 5 ft/150 cm in a
child-restraint system suitable for their age,
weight and size, and with the passenger airbag
deactivated. Otherwise, there is an increased
risk of injury in the event of an accident or if the
airbags deploy. <
Children 13 years of age or older must be buck-
led in with a safety belt as soon as there no
longer is any child-restr aint system that is
appropriate for their age, size and weight.
For more information on automatic deactivation
of the passenger airbags refer to page 86.
Installing child-restraint
systems
After installing a child-restraint system on
the passenger seat, make sure that the
front and side airbags for the passenger are
deactivated; otherwise, there is an increased
risk of injury if the airbags deploy.
Observe the child-restraint system manufac-
turer's instructions when selecting, installing
and using child-restraint systems. Otherwise
the protective effect may be diminished. <
Standard child-restraint systems are designed
to be secured with a lap be lt or with the lap-belt
section of a lap-and-shou lder belt. Incorrectly
or improperly installed child-restraint systems
can increase the risk of injury to children.
Always follow the installa tion instructions for
the system with the greatest care.
On the passenger seat
After installing a child-restraint system on
the passenger seat, make sure that the
front and side airbags for the passenger are
deactivated, otherwise there is an increased
risk of injury if the airbags deploy. <
Seat position
Before installing a child-restraint system, move
the passenger seat as far back and up
* as pos-
sible to obtain the best possible position for
the belt.
Backrest width*
The backrest width of the passenger's
seat must be at its widest possible set-
ting. Do not change the setting after installing
the child seat. Otherwise the child seat's stabil-
ity on the passenger's seat is limited. <
1. Adjust the backrest width to its widest set-
ting, refer to page 43.
2. Install the child seat.
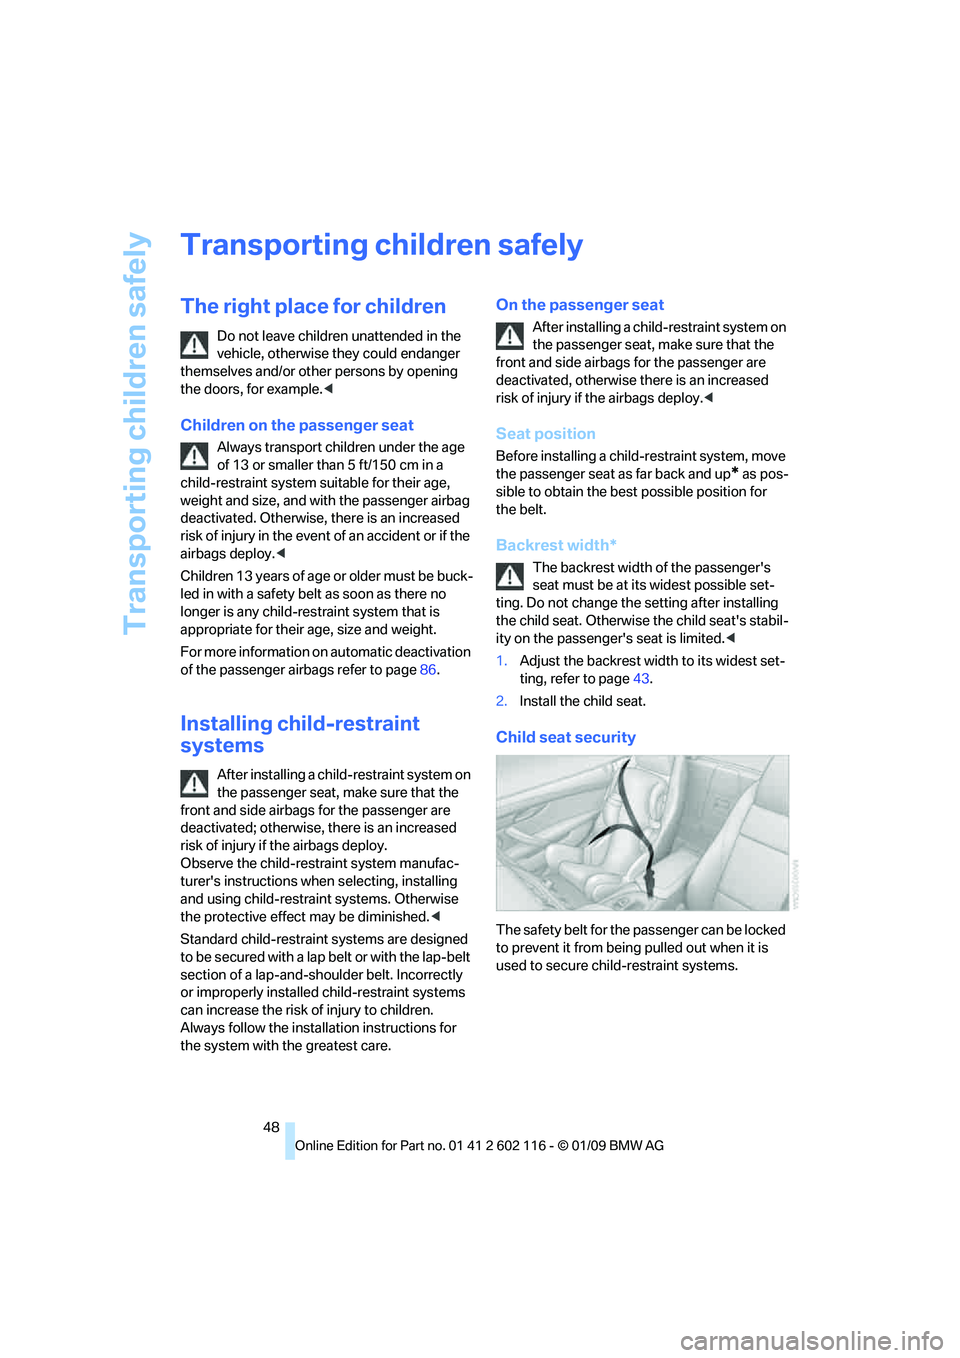
Child seat security
The safety belt for the passenger can be locked
to prevent it from being pulled out when it is
used to secure child-restraint systems.
Page 87 of 248
Controls
85Reference
At a glance
Driving tips
Communications
Navigation
Entertainment
Mobility
The TPMS malfunction indicator is combined
with the low tire pressure telltale. When the sys-
tem detects a malfunction, the telltale will flash
for approximately one minute and then remain
continuously lit. This sequence will continue
upon subsequent vehicle startups as long as
the malfunction exists. When the malfunction
indicator is illuminated, the system may not be
able to detect or signal low tire pressure as
intended. TPMS malfunctions may occur for a
variety of reasons, including the installation of
replacement or alternate tires or wheels on the
vehicle that prevent the TPMS from functioning
properly. Always check the TPMS malfunction
telltale after replacing one or more tires or
wheels on your vehicle to ensure that the
replacement or alternate tires and wheels allow
the TPMS to continue to function properly.
Servotronic*
The concept
The Servotronic varies the steering force
required to turn the wh eels depending on the
speed at which you are driving. When you are
driving at low speeds, power steering provides
more support, i. e. little effort is needed to turn
the wheels. Power steering support lessens as
your speed increases.
The system works automatically.
Malfunction
Malfunctions are displayed via Check Control
Airbags
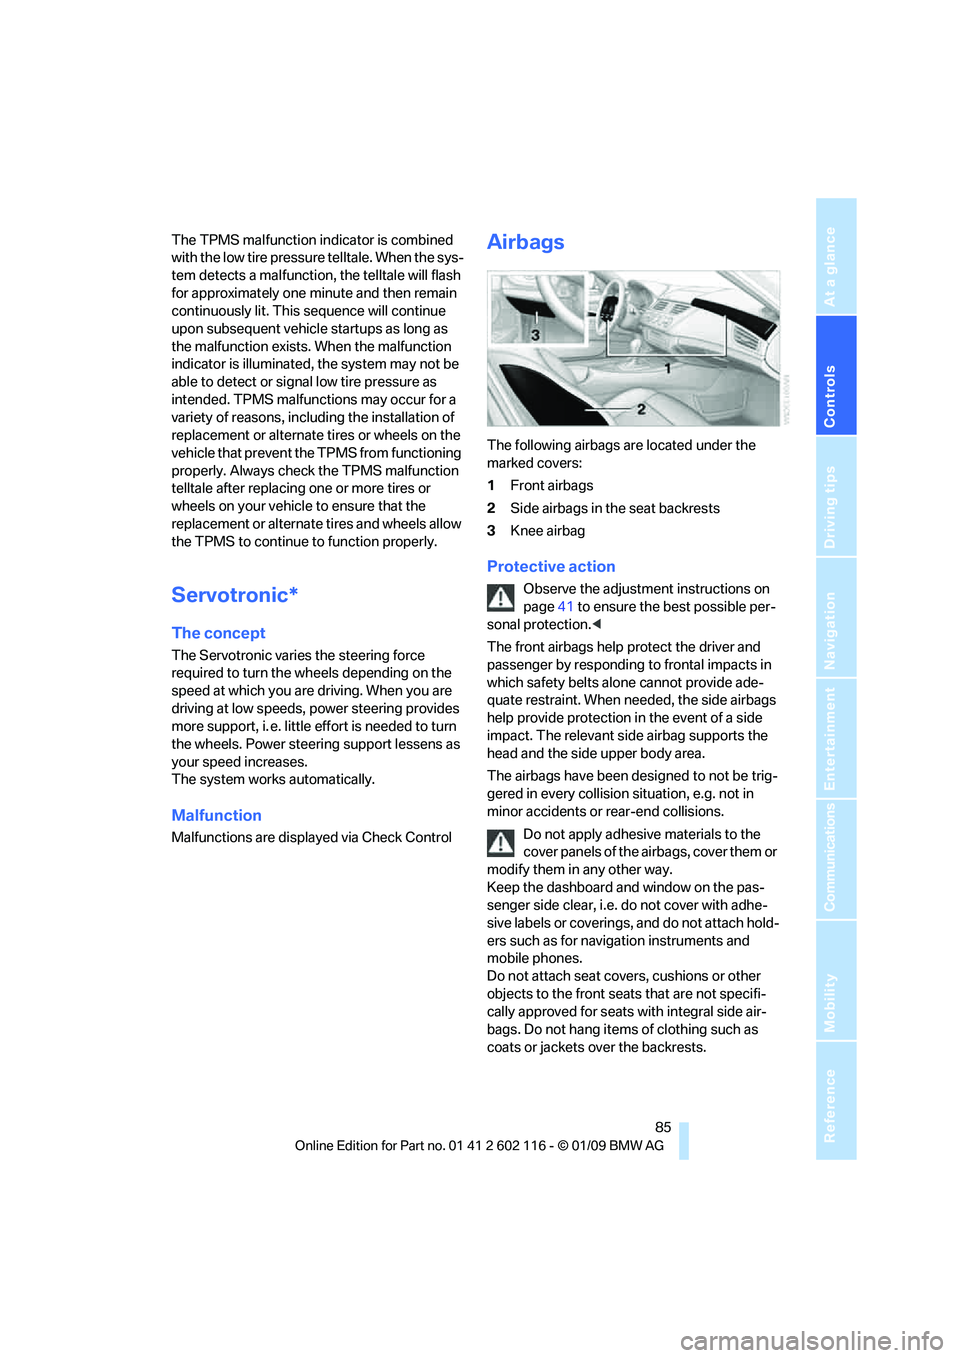
The following airbags are located under the
marked covers:
1 Front airbags
2 Side airbags in the seat backrests
3 Knee airbag
Protective action
Observe the adjustment instructions on
page 41 to ensure the best possible per-
sonal protection. <
The front airbags help protect the driver and
passenger by responding to frontal impacts in
which safety belts alone cannot provide ade-
quate restraint. When needed, the side airbags
help provide protection in the event of a side
impact. The relevant side airbag supports the
head and the side upper body area.
The airbags have been designed to not be trig-
gered in every collision situation, e.g. not in
minor accidents or rear-end collisions.
Do not apply adhesive materials to the
cover panels of the airbags, cover them or
modify them in any other way.
Keep the dashboard and window on the pas-
senger side clear, i.e. do not cover with adhe-
sive labels or coverings, and do not attach hold-
ers such as for navigation instruments and
mobile phones.
Do not attach seat cove rs, cushions or other
objects to the front seats that are not specifi-
cally approved for seats with integral side air-
bags. Do not hang items of clothing such as
coats or jackets over the backrests.
Page 88 of 248
Technology for driving comfort and safety
86
Do not attempt to remove
the airbag retention
system from the vehicle. Do not modify the indi-
vidual components of the system or its wiring in
any way. This includes the upholstered covers
of the steering wheel, the dashboard and the
seats. Do not attempt to remove or dismantle
the steering wheel.
Do not touch the individual components imme-
diately after the system has been triggered,
because there is a danger of burns.
In the event of malfunctions, deactivation or
triggering of the airbag restraint system, have
the testing, repair, remo val and disposal of air-
bag generators executed only by a BMW center
or a workshop that works according to repair
procedures of BMW with correspondingly
trained personnel and th at has the required
explosives licenses. Unprofessional attempts to
work on the system could lead to failure in an
emergency or to undesi red airbag activation,
either of which could resu lt in personal injury.<
Warning notices and information about the air-
bags can also be found on the sun visors.
Automatic deactivation of the
passenger airbags
The system determines whether the passenger
seat is occupied by meas uring the resistance of
the human body. Front, knee and side airbags
on the passenger side ar e activated or deacti-
vated accordingly.
Make sure that the passenger keeps his
or her feet in the footwell; otherwise, the
passenger airbags may not function properly. <
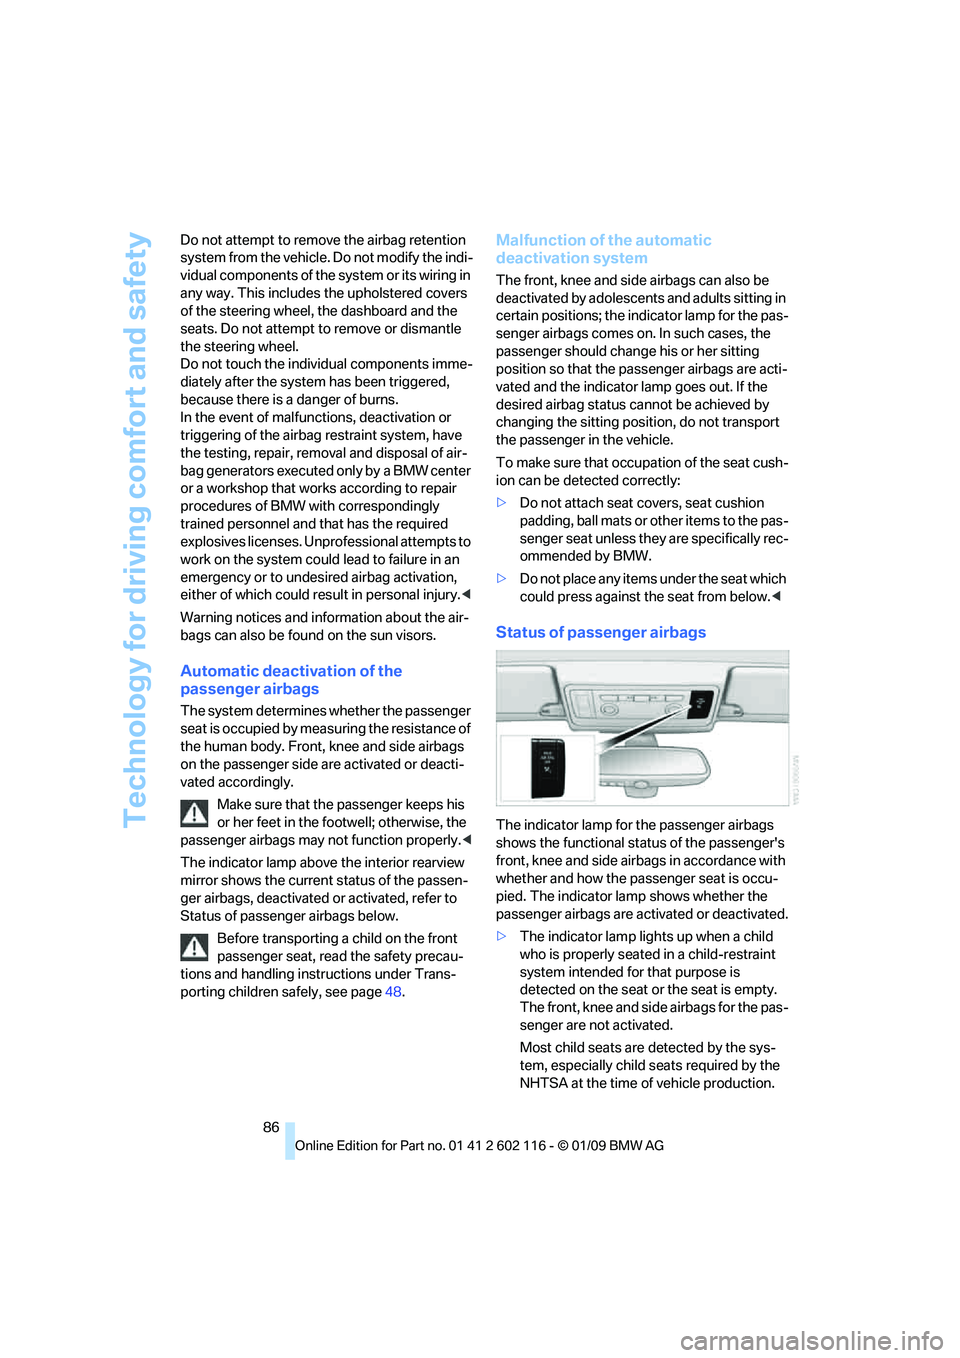
The indicator lamp above the interior rearview
mirror shows the current status of the passen-
ger airbags, deactivated or activated, refer to
Status of passenger airbags below.
Before transporting a child on the front
passenger seat, read the safety precau-
tions and handling instructions under Trans-
porting children safely, see page 48.
Malfunction of the automatic
deactivation system
The front, knee and side airbags can also be
deactivated by adolescents and adults sitting in
certain positions; the in dicator lamp for the pas-
senger airbags comes on. In such cases, the
passenger should change his or her sitting
position so that the pa ssenger airbags are acti-
vated and the indicator la mp goes out. If the
desired airbag status cannot be achieved by
changing the sitting posi tion, do not transport
the passenger in the vehicle.
To make sure that occupa tion of the seat cush-
ion can be detected correctly:
> Do not attach seat covers, seat cushion
padding, ball mats or other items to the pas-
senger seat unless they are specifically rec-
ommended by BMW.
> Do not place any items under the seat which
could press against the seat from below. <
Status of passenger airbags
The indicator lamp for the passenger airbags
shows the functional status of the passenger's
front, knee and side airbags in accordance with
whether and how the passenger seat is occu-
pied. The indicator lamp shows whether the
passenger airbags are activated or deactivated.
> The indicator lamp lights up when a child
who is properly seated in a child-restraint
system intended for that purpose is
detected on the seat or the seat is empty.
The front, knee and side airbags for the pas-
senger are not activated.
Most child seats are detected by the sys-
tem, especially child seats required by the
NHTSA at the time of vehicle production.
Page 89 of 248
Controls
87Reference
At a glance
Driving tips
Communications
Navigation
Entertainment
Mobility
After mounting a child seat, ensure that the
indicator lamp for the pa ssenger airbag is lit.
It indicates that the child seat has been
detected and that th e passenger airbags
are deactivated.
> The indicator lamp does not come on as
long as a person of sufficient size and in a
correct sitting position is detected on
the seat.
The front, knee and passenger airbags for
the passenger are activated.
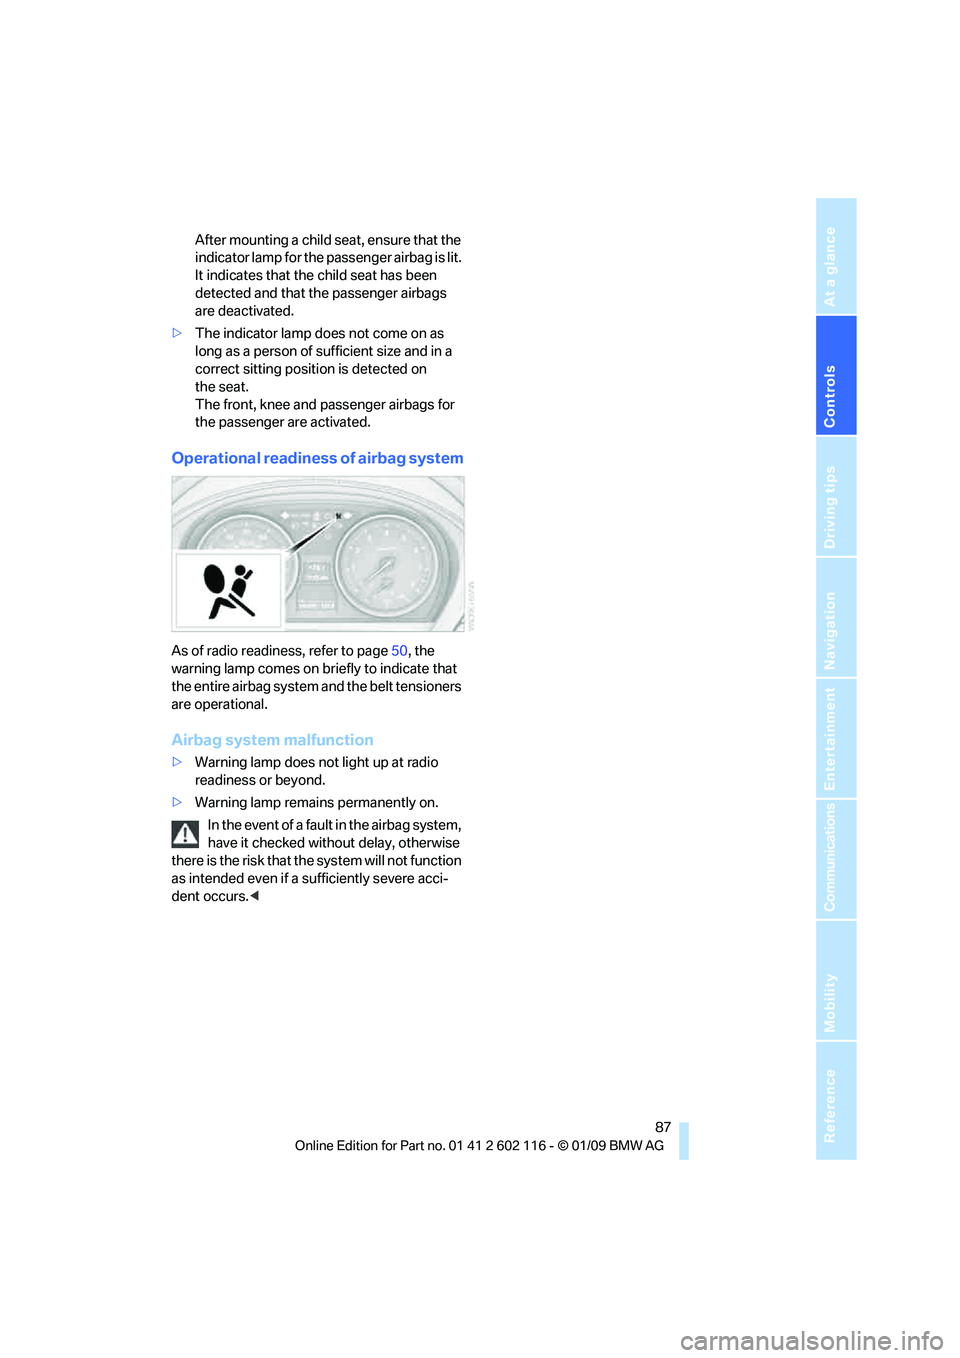
Operational readiness of airbag system
As of radio readiness, refer to page 50, the
warning lamp comes on br iefly to indicate that
the entire airbag system and the belt tensioners
are operational.
Airbag system malfunction
> Warning lamp does not light up at radio
readiness or beyond.
> Warning lamp remains permanently on.
In the event of a fault in the airbag system,
have it checked without delay, otherwise
there is the risk that th e system will not function
as intended even if a sufficiently severe acci-
dent occurs. <
Page 232 of 248
Everything from A to Z
230
Everything from A to Z
Index
"..." Identifies Control Display texts used to select
individual functions and
refers you to the page where
these texts can be found.
A
ABS Antilock Brake System 78
Acceleration assistant, refer to Launch Control 58
Accident, refer to Sending an Emergency Request 213
Activated-charcoal filter for
automatic climate
control 97
Adaptive Head Light 89
Additional connection of the music player in the mobile
phone 158
Additives
– coolant 200
Address for navigation,
entering 119
Adjusting temperature inside the car, refer to Air
conditioner 93
Adjusting temperature inside the car, refer to Automatic
climate control 95
Adjusting the thigh support 42
Adjusting the tone during audio operation, refer to
Tone control 138
Airbags 85
– indicator/warning lamp 87
– sitting safely 41
Air conditioner 92 Air conditioning mode
– air conditioner
93
– automatic climate control 95
– ventilation 94,97
Air distribution
– automatic 96
– individual 93
– manual 93
Air flow rate 93,96
Airing, refer to Ventilation 94
Airing, refer to Ventilation 94,97
Air outlets, refer to Air vents 92
Air pressure, refer to Tire
inflation pressure 190
Air recirculation, refer to Recirculated-air
mode 93,97
Air supply
– air conditioner 93
– automatic climate control 95
– ventilation 94,97
Air vents 92
AKI, refer to Fuel specifications 189
Alarm system 33
– avoiding unintentional alarms 34
–
interior motion sensor 34
– switching off an alarm 34
– tilt alarm sensor 34
Albums of music
collection 155
All-season tires, refer to Winter tires 196
AM, waveband 141
Ambient air, refer to Recirculated-air
mode 93,97
Antenna for mobile phone 164Antifreeze
– coolant
200
– washer fluid 61
Antilock Brake System ABS 78
Anti-theft alarm system, refer
to Alarm system 33
Anti-theft system 29
– for lug bolts, refer to Lug bolt
lock 211
Approved axle loads, refer to Weights 222
Approved gross vehicle weight, refer to Weights 222
Armrest, refer to Center
armrest 102
Arrival time, refer to Computer 66
Ashtray
– front 104
Assistance systems, refer to
Driving stability control
systems 78
AUC automatic recirculated-
air control 97
Audio 138
– controls 138
– switching on/off 138
– tone control 138
– volume 138
Audio device, external 102
Automatic
– air distribution 96
– air flow rate 96
– cruise control 61
– headlamp control 88
Automatic car washes 204
Automatic climate control 92
– automatic air distribution 96
Automatic curb monitor 46
Automatic recirculated-air control AUC 97
Page 235 of 248
Reference 233
At a glance
Controls
Driving tips
Communications
Navigation
Entertainment
Mobility
Congestion
– refer to Route, bypassing sections 129
Connecting vacuum cleaner, refer to Connecting
electrical appliances 104
Consumption, refer to Average consumption 66
Consumption display
– average consumption 66
Contacts 176
Control Center, refer to iDrive 16
Control Display, refer to iDrive
– adjusting brightness 76
Control Display, refer to
iDrive 16
Controller, refer to iDrive 16
controls and displays 10
Control unit, refer to iDrive 16
Convenient access 35
– replacing the battery 36
– what to observe before entering a car wash 36
Convenient loading 30
Convenient operation 31
– retractable hardtop 30
– windows 30
Convertible
– enlarging cargo bay 38,105
Coolant 200
– checking level 201
Coolant temperature 65
Cooling, maximum 96
Cooling fluid, refer to Coolant 200
Cooling system, refer to
Coolant 200
Copyright 2
Corner-illuminating lamps,
refer to Adaptive
Head Light 89
Cornering lamps, refer to
Adaptive Head Light 89
Correct tires 195
Country codes DVD 148
Courtesy lamps, refer to Interior lamps 90 Criteria for route
128
Cross-hairs in navigation 124
Cruise control 61
– malfunction 63
Cruising range 65
Cup holders 103
Curb weight, refer to Weights 222
Current playback
– external devices 160
– music collection 155
Current position, displayin
g134
Customer Relations 183
D
Dashboard, refer to
Cockpit 10
Dashboard, refer to Instrument cluster 12
Dashboard lighting, refer to
Instrument lighting 90
Data, technical 220
– dimensions 221
– engine 220
– weights 222
Data recorders 203
Data transfer 184
Date
– date format 73
– setting 72
Daytime running lamps 89
DBC Dynamic Brake
Control 78
DCC, refer to Cruise control 61
Deactivating passenger airbags 86
Deadlocking, refer to
Locking 30
Defect
– door lock 32
– fuel filler door 188
Defogging windows 94
Defrosting windows 94
Defrost position, refer to Defrosting windows 94Destination for navigation
– entering by voice
125
– entry 119
– home address 122
– manual entry 119
– selecting via map 124
Destination guidance 128
– bypassing a
route section 129
– changing specified route 128
– continuing 128
– starting 128
– voice instructions 129
– volume of voice instructions 130
Destination state/province, entering for navigation 119
Destination town/city,
entering for navigation 119
Digital clock 64
Digital compass 100
Digital radio, refer to High Definition Radio 142
Dimensions 221
Directional indicators, refer to Turn signals 59
Direction instructions, refer to
Voice instructions 129
Directory for navigation, refer to Address book 121
Displace
ment, refer to Engine
data 220
Display, refer to iDrive
controls 16
Display lighting, refer to Instrument lighting 90
Displays
– on the Control Display 16
Displays, refer to Instrument
cluster 12
Displays and controls 10
Disposal
– coolant 200
– remote control battery 36
– vehicle battery 212
Distance remaining to service, refer to Service
requirements 69
Page 237 of 248
Reference 235
At a glance
Controls
Driving tips
Communications
Navigation
Entertainment
Mobility
Fastening safety belts, refer to Safety belts 44
Fastest route for navigation 128
Fault
– parking brake 53
Filter
– refer to Microfilter/activated-
charcoal filter for automatic
climate control 97
– refer to Microfilter for air
conditioner 94
First aid pouch 214
Fixture for remote control, refer to Ignition lock 50
Flash when locking/
unlocking 31
Flat tire
– Run-Flat Tires 195
– Tire Pressure Monitor TPM 82
Flat Tire Monitor FTM 81
– indicating a flat tire 81
– indicator/warning lamp 81
– initializing the system 81
– snow chains 81,196
– system limits 81
Flat tires, refer to Tire
condition 194
Fluid reservoir, refer to Washer fluid reservoir 61
FM, waveband 141
Folding in the mirrors, before driving into a car wash 45
Footbrake, refer to Braking safely 112
Footwell lamps, refer to
Interior lamps 90
Forward
– CD/DVD changer 148
– CD/DVD player 148
Forward gear, engaging, refer to Transmission
positions 56
For your own safety 5
Free memory capacity, music
collection 156
Front airbags 85 FTM, refer to Flat Tire
Monitor 81
Fuel 189
– average consumption 66
– gauge 65
– high-quality brands 189
– quality 189
– specifications 189
– tank contents, refer to Capacities 222
Fuel clock, refer to Fuel
gauge 65
Fuel display, refer to Fuel
gauge 65
Fuel filler door 188
– releasing in the event of
electrical malfunction 18
8
Fuses 212
G
Garage door opener, refer to
Integrated universal remote
control 98
Gasoline
– refer to Average consumption 66
Gasoline, refer to Required
fuel 189
Gasoline display, refer to Fuel gauge 65
Gear display, refer to Displays in the instrument cluster 56
Gear indicator, automatic
transmission with
Steptronic 53
Gears, changing 57
Gearshift lever
– automatic transmission with Steptronic 54
– manual transmission 53
Gearshifts
– automatic transmission with
Steptronic 54
– manual transmission 53
General driving notes 111
Glove compartment 101GPS navigation, refer to
Navigation system 118
Grills, refer to Air vents 92
Gross vehicle weight, refer to Weights 222
H
Handbrake, refer to Parking
brake 52
Hands-free system 14
Hazard warning flashers 14
HD radio, refer to High
Definition Radio 142
Head airbags 85
Headlamp control,
automatic 88
Headlamp flasher 59
– indicator lamp 11,13
Heated
– mirrors 46
– rear window 94,97
– seats 43
Heating 92
– mirrors 46
– rear window 94,97
– seats 43
Heating and ventilation, refer
to Climate 92
Heavy loads, refer to Stowing cargo 114
Height, refer to Dimensions 221
Height adjustment
– seats 42
– steering wheel 46
High beams 90
– headlamp flasher 90
– indicator lamp 13
High Definition Radio 142
High-pressure washer 204,205
High-pressure
washer 204,205
High water, refer to Driving through water 112
Highways, refer to Route criteria 128