driver seat adjustment BMW Z4 SDRIVE30I ROADSTER 2009 Owners Manual
[x] Cancel search | Manufacturer: BMW, Model Year: 2009, Model line: Z4 SDRIVE30I ROADSTER, Model: BMW Z4 SDRIVE30I ROADSTER 2009Pages: 248, PDF Size: 7.63 MB
Page 46 of 248
Adjustments
44
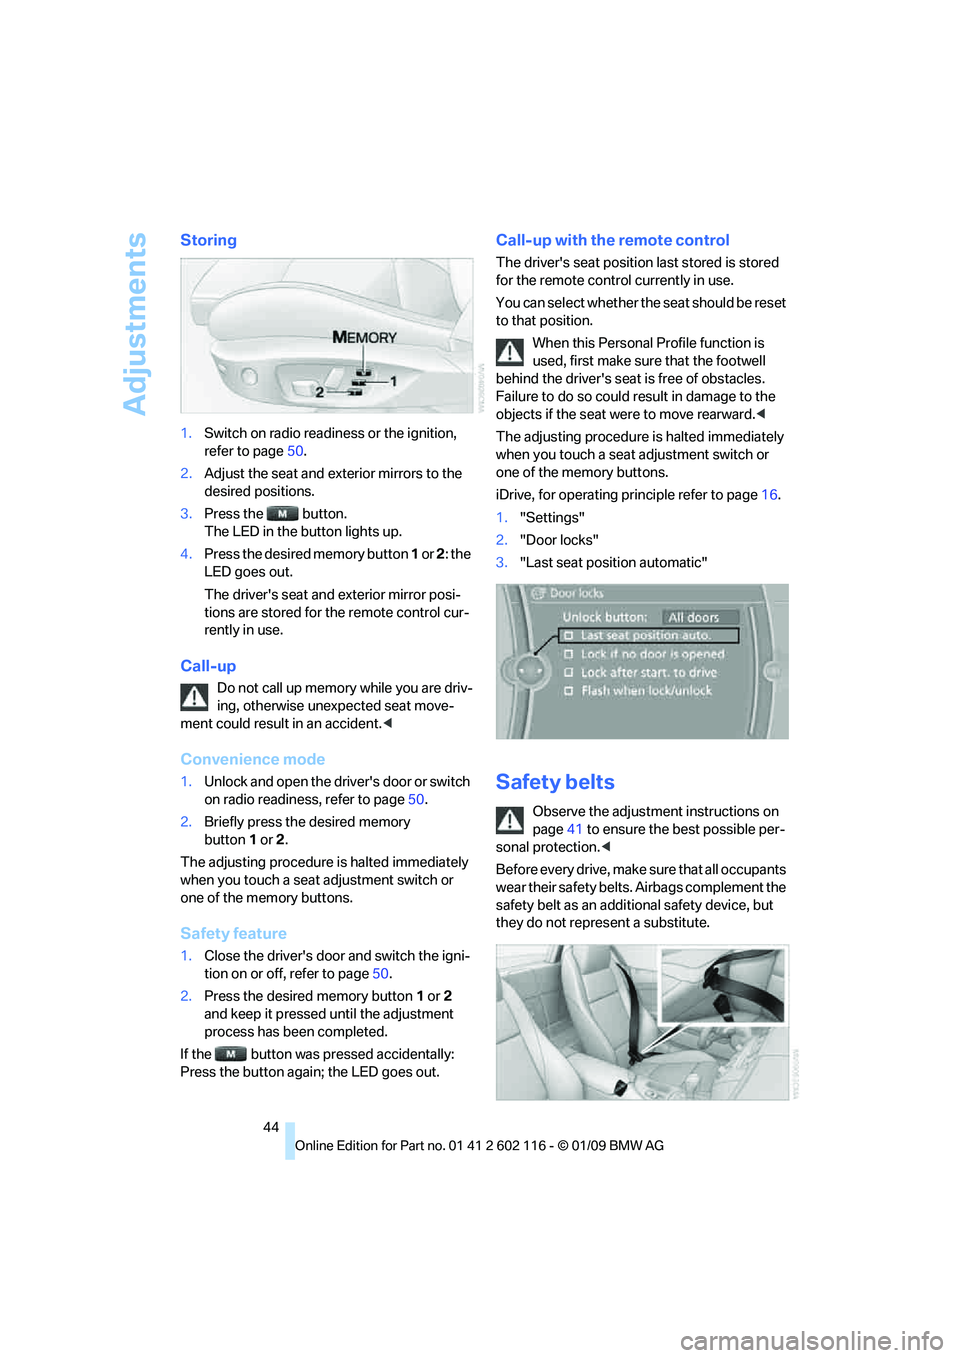
Storing
1.Switch on radio readiness or the ignition,
refer to page 50.
2. Adjust the seat and exterior mirrors to the
desired positions.
3. Press the button.
The LED in the button lights up.
4. Press the desired memory button 1 or 2 : the
LED goes out.
The driver's seat and exterior mirror posi-
tions are stored for th e remote control cur-
rently in use.
Call-up
Do not call up memory while you are driv-
ing, otherwise unexpected seat move-
ment could result in an accident. <
Convenience mode
1.Unlock and open the driver's door or switch
on radio readiness, refer to page 50.
2. Briefly press the desired memory
button 1or 2.
The adjusting procedure is halted immediately
when you touch a seat adjustment switch or
one of the memory buttons.
Safety feature
1. Close the driver's door and switch the igni-
tion on or off, refer to page 50.
2. Press the desired memory button 1 or 2
and keep it pressed until the adjustment
process has been completed.
If the button was pressed accidentally:
Press the button again; the LED goes out.
Call-up with the remote control
The driver's seat position last stored is stored
for the remote control currently in use.
You can select whether the seat should be reset
to that position.
When this Personal Profile function is
used, first make sure that the footwell
behind the driver's seat is free of obstacles.
Failure to do so could re sult in damage to the
objects if the seat were to move rearward. <
The adjusting procedure is halted immediately
when you touch a seat adjustment switch or
one of the memory buttons.
iDrive, for operating pr inciple refer to page16.
1. "Settings"
2. "Door locks"
3. "Last seat position automatic"
Safety belts
Observe the adjustment instructions on
page 41 to ensure the best possible per-
sonal protection. <
Before every drive, make sure that all occupants
wear their safety belts. Airbags complement the
safety belt as an additi onal safety device, but
they do not repres ent a substitute.
Page 47 of 248
Controls
45Reference
At a glance
Driving tips
Communications
Navigation
Entertainment
Mobility
Closing
Make sure you hear the latch plate engage in
the belt buckle.
The upper belt anchor is suitable for adults of
any stature as long as the seat is adjusted prop-
erly, refer to page 41.
Opening
1. Grasp the belt firmly.
2. Press the red button in the buckle.
3. Guide the belt into its reel.
Fasten safety belts reminder for driver
and passenger*
The indicator lamp comes on and an
acoustic signal sounds. In addition, a
message appears on the Control Dis-
play. Check whether the safety belt
has been fastened correctly.
The 'Fasten safety belts' reminder is issued as
long as the driver's safe ty belt has not been fas-
tened. In some country- specific versions, the
'Fasten safety belts' remi nder is also activated
at road speeds above approx. 5 mph or 8 km/h if
the passenger's safety belt is not fastened, if
objects are placed on the passenger seat, or if
driver or passenger unfasten their safety belts.
Damage to safety belts
If the safety belts are damaged or
stressed in an accident: have the belt sys-
tem, including any belt tensioners or child-
restraint systems, replaced and the belt
anchors checked. Have this work done only by
your BMW center or at a workshop that works
according to BMW repair procedures with cor-
respondingly trained perso nnel. Otherwise, it is
not guaranteed that the safety devices will func-
tion properly. <
Mirrors
Exterior mirrors
The passenger's mirror is more convex
than the driver's mirror. The objects seen
in the mirror are closer than they appear. Do not
gauge your distance from traffic behind you on
the basis of what you see in the mirror; other-
wise there is an increased risk of an accident. <
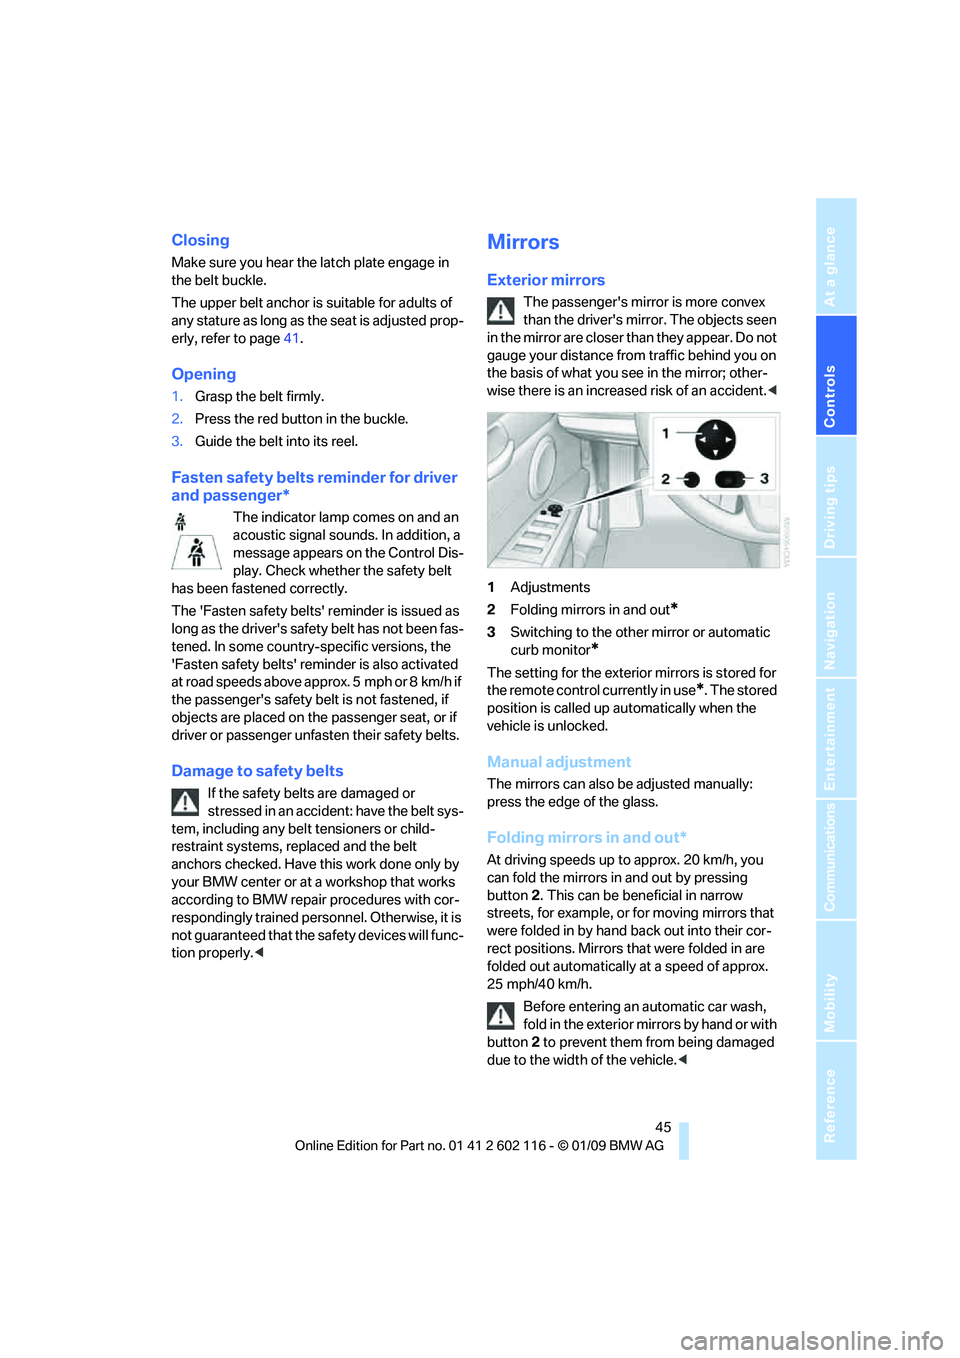
1 Adjustments
2 Folding mirrors in and out
*
3Switching to the other mirror or automatic
curb monitor
*
The setting for the exterior mirrors is stored for
the remote control currently in use
*. The stored
position is called up automatically when the
vehicle is unlocked.
Manual adjustment
The mirrors can also be adjusted manually:
press the edge of the glass.
Folding mirrors in and out*
At driving speeds up to approx. 20 km/h, you
can fold the mirrors in and out by pressing
button 2. This can be beneficial in narrow
streets, for example, or for moving mirrors that
were folded in by hand back out into their cor-
rect positions. Mirrors that were folded in are
folded out automatically at a speed of approx.
25 mph/40 km/h.
Before entering an automatic car wash,
fold in the exterior mi rrors by hand or with
button 2 to prevent them from being damaged
due to the width of the vehicle. <
Page 48 of 248
Adjustments
46
Automatic heating
Depending on the outside temperature, both
exterior mirrors are heat ed automatically when
the engine is running or the ignition is
switched on.
Passenger-side mirror tilt function –
automatic curb monitor*
Activating
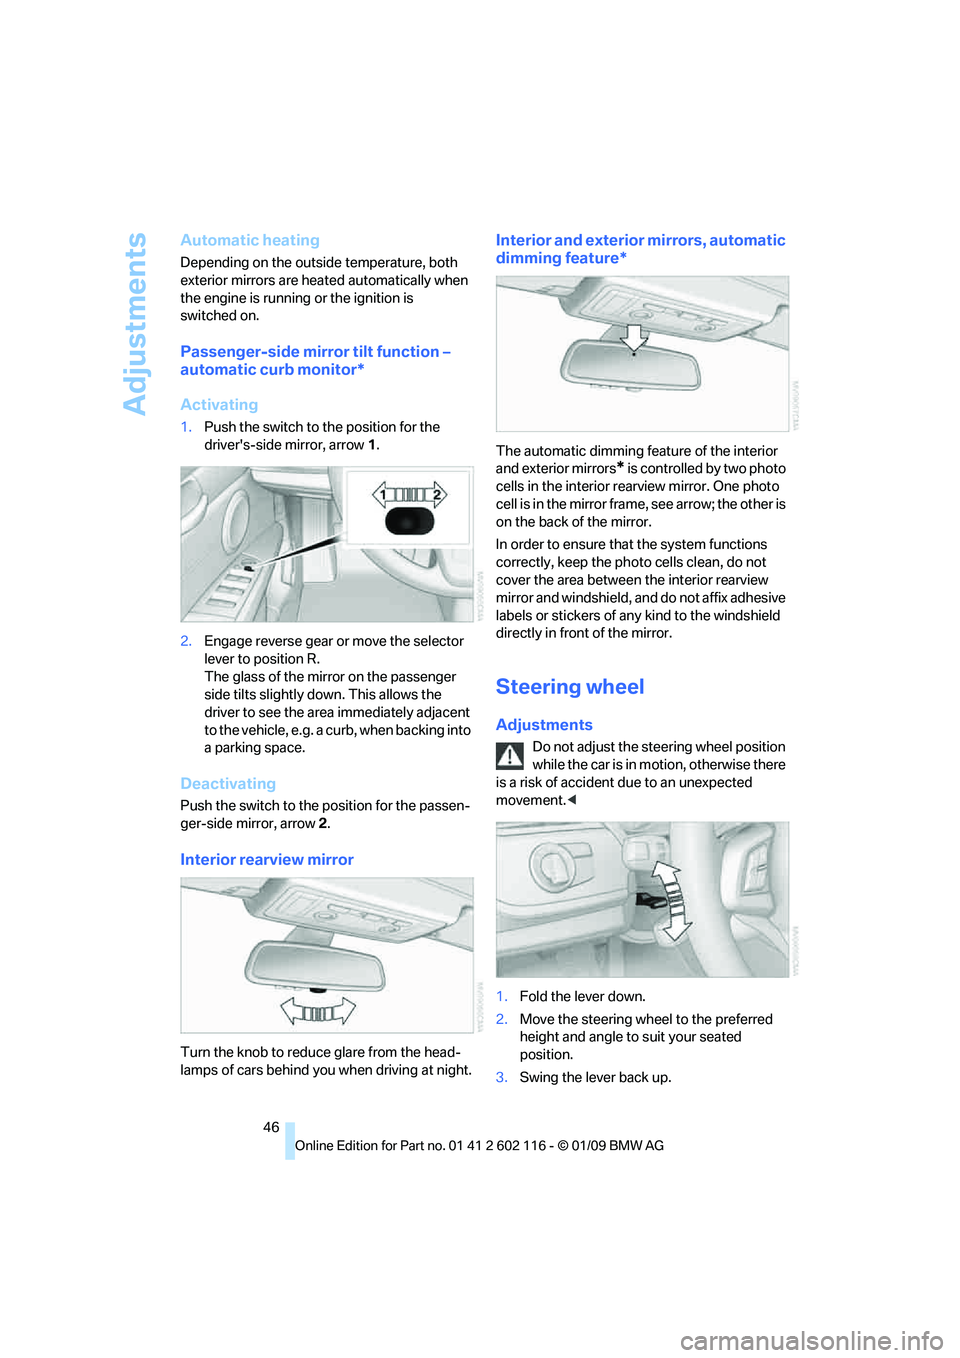
1. Push the switch to the position for the
driver's-side mirror, arrow 1.
2. Engage reverse gear or move the selector
lever to position R.
The glass of the mirror on the passenger
side tilts slightly do wn. This allows the
driver to see the area immediately adjacent
to the vehicle, e.g. a curb, when backing into
a parking space.
Deactivating
Push the switch to the position for the passen-
ger-side mirror, arrow 2.
Interior rearview mirror
Turn the knob to reduce glare from the head-
lamps of cars behind you when driving
at night.
Interior and exterior mirrors, automatic
dimming feature*
The automatic dimming feature of the interior
and exterior mirrors
* is controlled by two photo
cells in the interior rearview mirror. One photo
cell is in the mirror frame, see arrow; the other is
on the back of the mirror.
In order to ensure that the system functions
correctly, keep the photo cells clean, do not
cover the area between the interior rearview
mirror and windshield, and do not affix adhesive
labels or stickers of an y kind to the windshield
directly in front of the mirror.
Steering wheel
Adjustments
Do not adjust the steering wheel position
while the car is in mo tion, otherwise there
is a risk of accident due to an unexpected
movement. <
1. Fold the lever down.
2. Move the steering wheel to the preferred
height and angle to suit your seated
position.
3. Swing the lever back up.
Page 87 of 248
Controls
85Reference
At a glance
Driving tips
Communications
Navigation
Entertainment
Mobility
The TPMS malfunction indicator is combined
with the low tire pressure telltale. When the sys-
tem detects a malfunction, the telltale will flash
for approximately one minute and then remain
continuously lit. This sequence will continue
upon subsequent vehicle startups as long as
the malfunction exists. When the malfunction
indicator is illuminated, the system may not be
able to detect or signal low tire pressure as
intended. TPMS malfunctions may occur for a
variety of reasons, including the installation of
replacement or alternate tires or wheels on the
vehicle that prevent the TPMS from functioning
properly. Always check the TPMS malfunction
telltale after replacing one or more tires or
wheels on your vehicle to ensure that the
replacement or alternate tires and wheels allow
the TPMS to continue to function properly.
Servotronic*
The concept
The Servotronic varies the steering force
required to turn the wh eels depending on the
speed at which you are driving. When you are
driving at low speeds, power steering provides
more support, i. e. little effort is needed to turn
the wheels. Power steering support lessens as
your speed increases.
The system works automatically.
Malfunction
Malfunctions are displayed via Check Control
Airbags
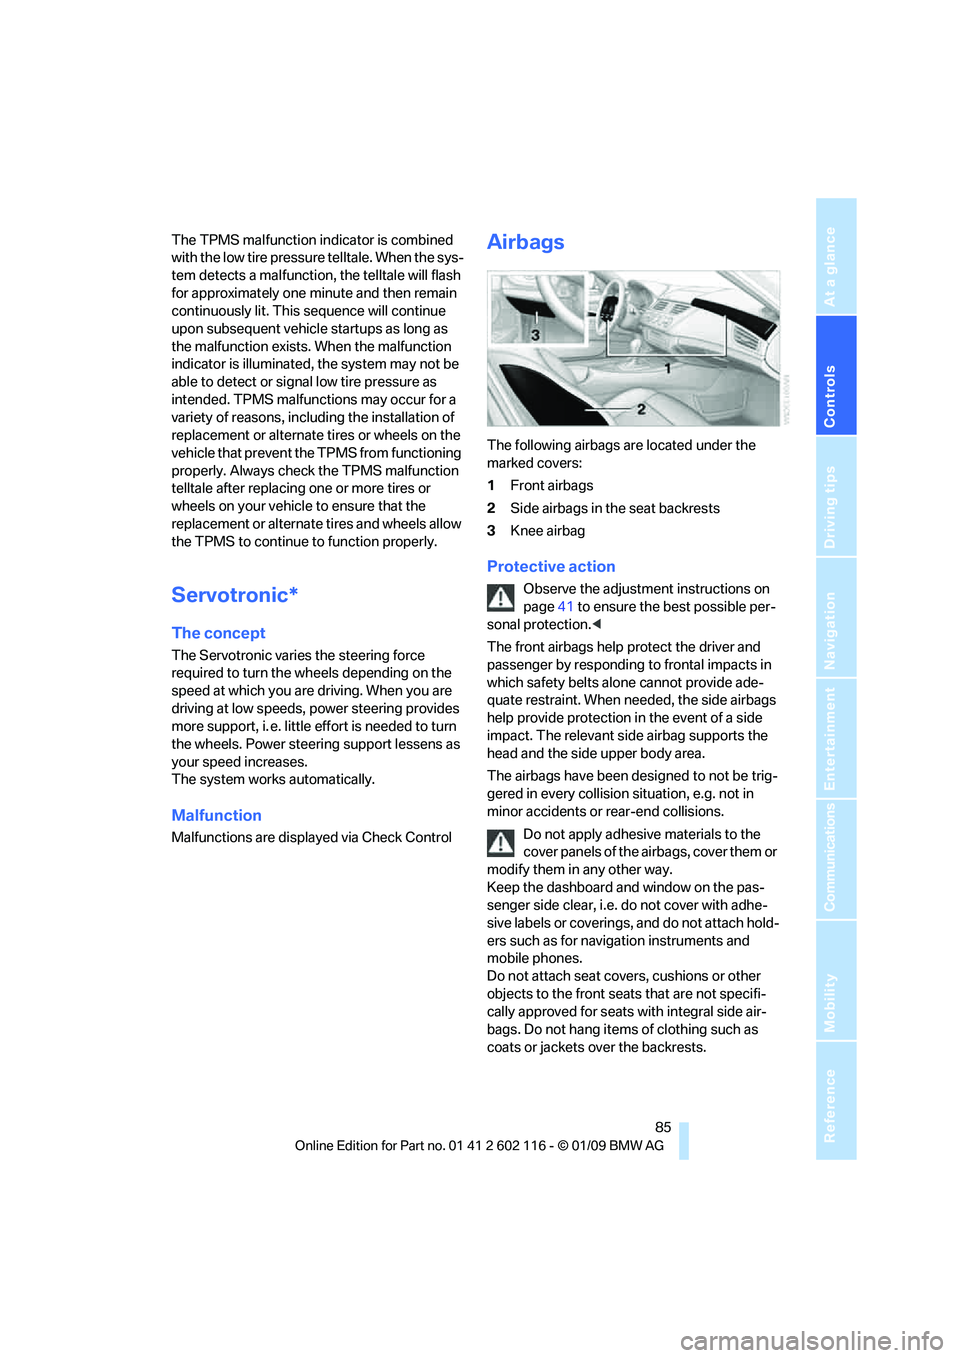
The following airbags are located under the
marked covers:
1 Front airbags
2 Side airbags in the seat backrests
3 Knee airbag
Protective action
Observe the adjustment instructions on
page 41 to ensure the best possible per-
sonal protection. <
The front airbags help protect the driver and
passenger by responding to frontal impacts in
which safety belts alone cannot provide ade-
quate restraint. When needed, the side airbags
help provide protection in the event of a side
impact. The relevant side airbag supports the
head and the side upper body area.
The airbags have been designed to not be trig-
gered in every collision situation, e.g. not in
minor accidents or rear-end collisions.
Do not apply adhesive materials to the
cover panels of the airbags, cover them or
modify them in any other way.
Keep the dashboard and window on the pas-
senger side clear, i.e. do not cover with adhe-
sive labels or coverings, and do not attach hold-
ers such as for navigation instruments and
mobile phones.
Do not attach seat cove rs, cushions or other
objects to the front seats that are not specifi-
cally approved for seats with integral side air-
bags. Do not hang items of clothing such as
coats or jackets over the backrests.
Page 236 of 248
Everything from A to Z
234
Distance warning, refer to
Park Distance Control
PDC 77
Door key, refer to Remote control with integrated
key 28
Door lock 31
Doors, emergency
operation 32
DOT Quality Grades 193
Draft-free ventilation 94,97
Drinks holders, refer to Cup holders 103
Drive mode 57
Drive-off assistance, refer to Dynamic Stability Control
DSC 78
Drive-off assistant 80
Driving lamps, refer to Parking
lamps/low beams 88
Driving notes 110
Driving off on hills, refer to
Drive-off assistant 80
Driving position, engaging, refer to Transmission
positions 56
Driving stability control systems 78,79
Driving through water 112
Driving tips, refer to Driving notes 110
DSC Dynamic Stability Control 78
Dual clutch transmission 55
– kick-down 57
DVD
– country codes 148
– settings 149
– video playback 148
DVD changer
– malfunctions 151
DVD menu 149
DVD video 148
Dynamic Brake Control DBC 78
Dynamic Driving Control 79
E
Eject button, refer to Buttons
on the CD/DVD player 138
Electrical malfunction
– door lock 32
– driver's door 32
– fuel filler door 188
– M dual clutch transmission with Drivelogic 58
Electric seat adjustment 42
Electric steering wheel lock
– with convenient access 35
Electronic brake-force distribution EBV 78
Electronic oil level check 198
Electronic Stability Program ESP, refer to Dynamic
Stability Control DSC 78
Emergency actuation, automatic transmission,
refer to Overriding selector
lever lock 55
Emergency operation
– fuel filler door, manual
release 188
Emergency operation, refer to Manual operation
– door lock 32
Emergency release
– luggage compartment lid
from inside 33
Emergency Request 213
Emergency services, refer to
Roadside Assistance 213
Energy, saving
– saving fuel 110
Engine
– breaking in 110
– data 220
– overheated, refer to Coolant temperature 65
– speed 220
– starting 51
– starting, convenient access 35
– switching off 52
Engine compartment 198Engine coolant, refer to
Coolant 200
Engine oil
– adding 200
– BMW Maintenance
System 202
– capacity 222
– checking level 198
– intervals between changes, refer to Service
requirements 69
Engine output, refer to Engine data 220
Engine speed, refer to Engine data 220
Engine starting, refer to
Starting the engine 51
Entering the address 119
Entry lamps, refer to Interior
lamps 90
Entry map for destination 124
Equalizer, tone setting 139
Error messages, refer to Check C
ontrol73
Exhaust system, refer to Hot
exhaust system 111
Exterior mirrors 45
– adjusting 45
– automatic dimming feature 46
– automatic heating 46
– folding in and out 45
External audio device 102
Eyes
– for tow-starting and towing away 215
– for tying down loads 114
F
Failure messages, refer to
Check Control 73
Failure of an electrical
consumer 212
False alarm
– avoiding unintentional
alarm 34
– switching off an alarm 34