radio controls BMW Z4 SDRIVE35I 2009 Owners Manual
[x] Cancel search | Manufacturer: BMW, Model Year: 2009, Model line: Z4 SDRIVE35I, Model: BMW Z4 SDRIVE35I 2009Pages: 248, PDF Size: 7.63 MB
Page 5 of 248
Reference
At a glance
Controls
Driving tips
Communications
Navigation
Entertainment
Mobility
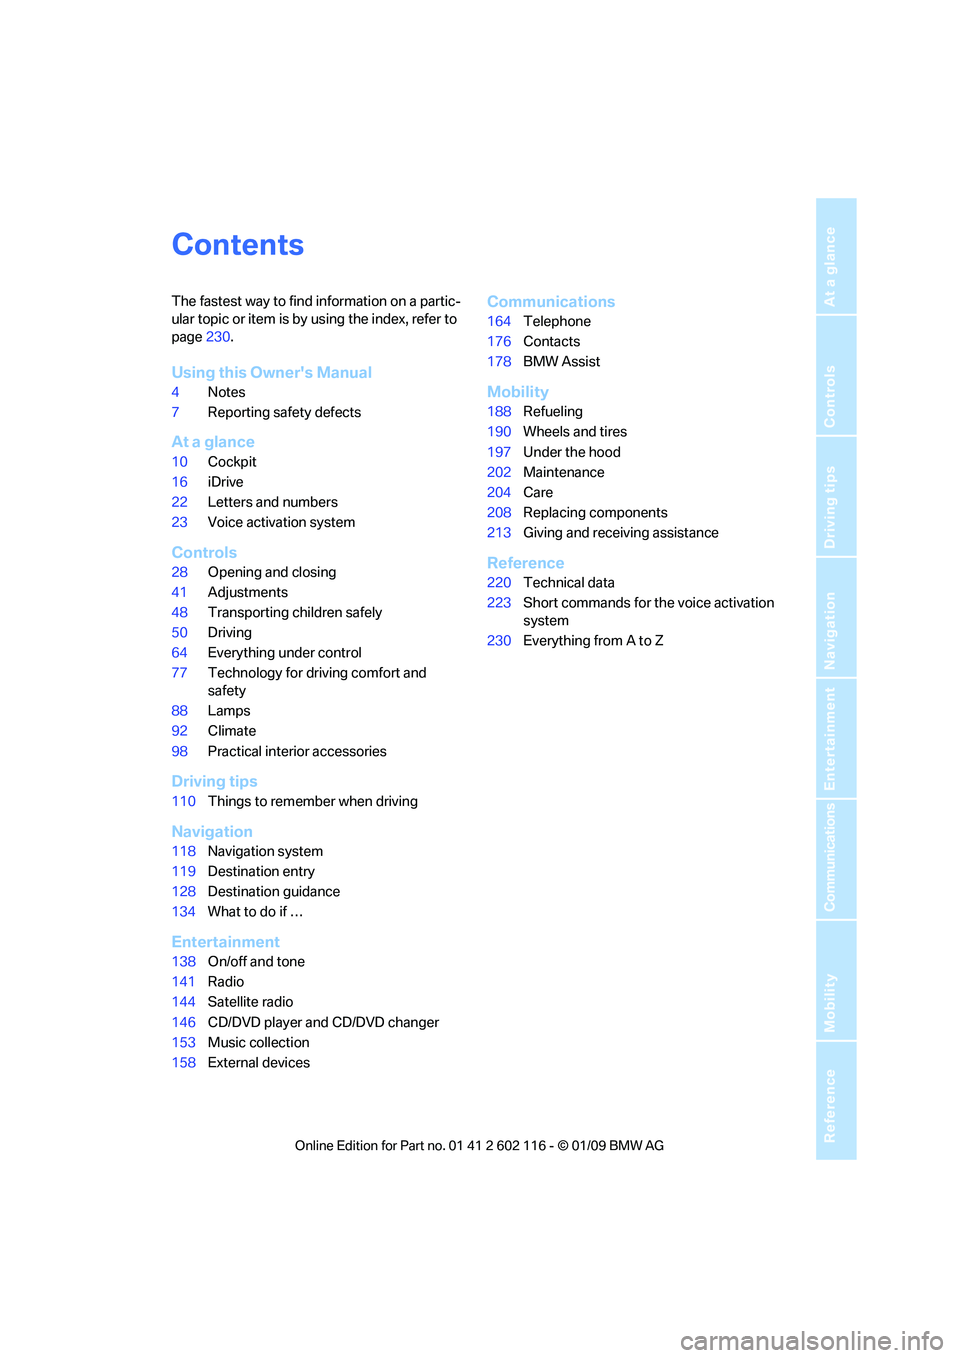
Contents
The fastest way to find information on a partic-
ular topic or item is by using the index, refer to
page230.
Using this Owner's Manual
4 Notes
7 Reporting safety defects
At a glance
10Cockpit
16 iDrive
22 Letters and numbers
23 Voice activation system
Controls
28Opening and closing
41 Adjustments
48 Transporting children safely
50 Driving
64 Everything under control
77 Technology for driving comfort and
safety
88 Lamps
92 Climate
98 Practical interior accessories
Driving tips
110Things to remember when driving
Navigation
118Navigation system
119 Destination entry
128 Destination guidance
134 What to do if …
Entertainment
138On/off and tone
141 Radio
144 Satellite radio
146 CD/DVD player and CD/DVD changer
153 Music collection
158 External devices
Communications
164Telephone
176 Contacts
178 BMW Assist
Mobility
188Refueling
190 Wheels and tires
197 Under the hood
202 Maintenance
204 Care
208 Replacing components
213 Giving and rece iving assistance
Reference
220Technical data
223 Short commands for the voice activation
system
230 Everything from A to Z
Page 13 of 248
At a glance
11Reference
Controls
Driving tips
Communications
Navigation
Entertainment
Mobility
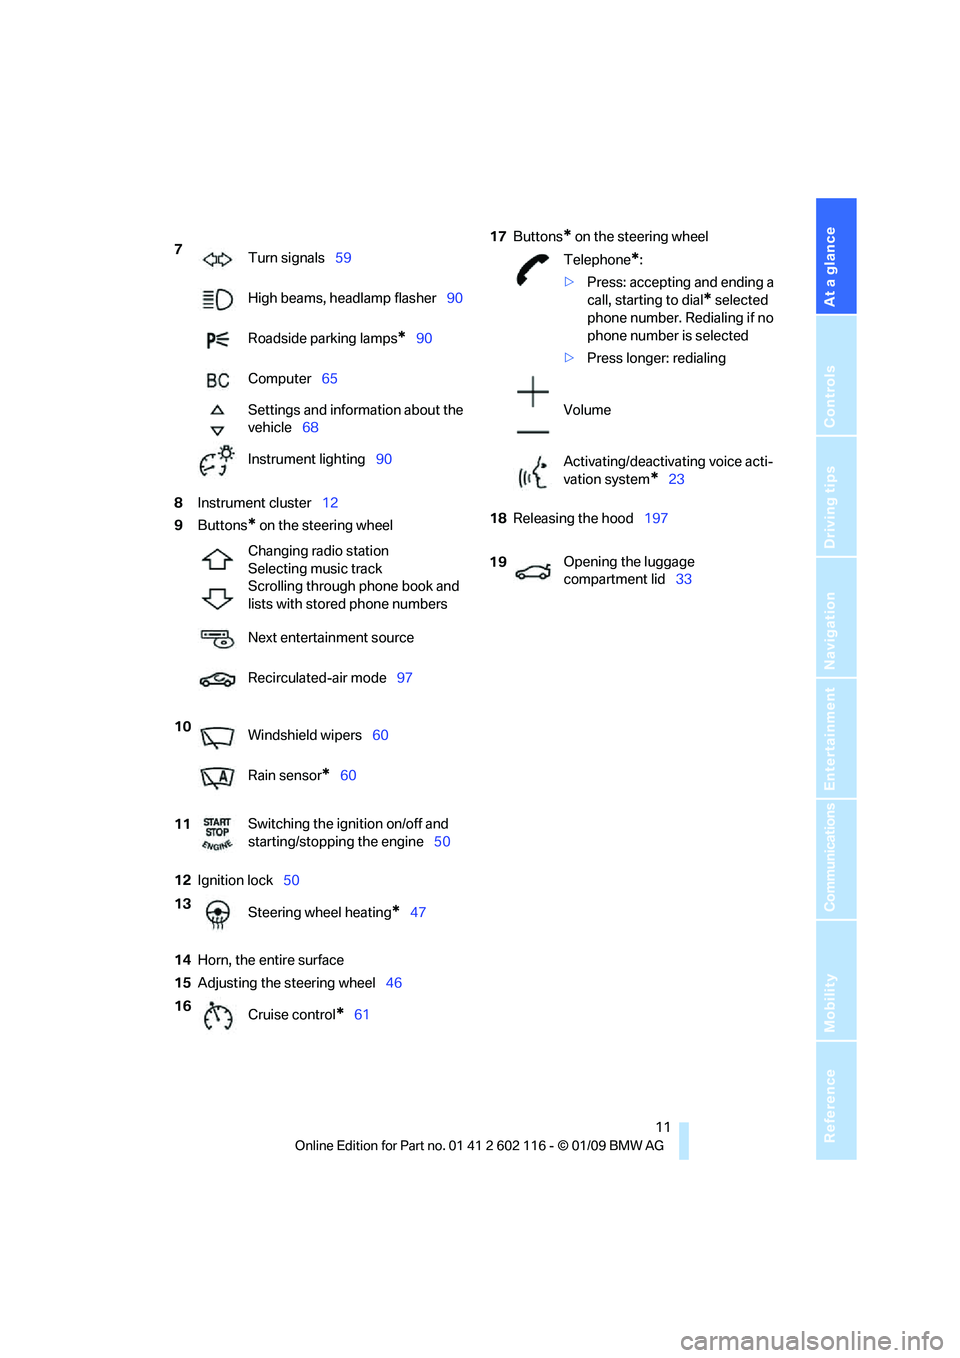
8Instrument cluster 12
9 Buttons
* on the steering wheel
12 Ignition lock 50
14 Horn, the entire surface
15 Adjusting the steering wheel 4617
Buttons
* on the steering wheel
18 Releasing the hood 197
7
Turn signals 59
High beams, headlamp flasher 90
Roadside parking lamps
*90
Computer 65
Settings and information about the
vehicle 68
Instrument lighting 90
Changing radio station
Selecting music track
Scrolling through phone book and
lists with stored phone numbers
Next entertainment source
Recirculated-air mode 97
10 Windshield wipers 60
Rain sensor
*60
11 Switching the ignition on/off and
starting/stopping the engine
50
13 Steering wheel heating
*47
16 Cruise control
*61
Telephone*:
> Press: accepting and ending a
call, starting to dial
* selected
phone number. Redialing if no
phone number is selected
> Press longer: redialing
Volume
Activating/deactivating voice acti-
vation system
*23
19 Opening the luggage
compartment lid
33
Page 17 of 248
At a glance
15Reference
Controls
Driving tips
Communications
Navigation
Entertainment
Mobility
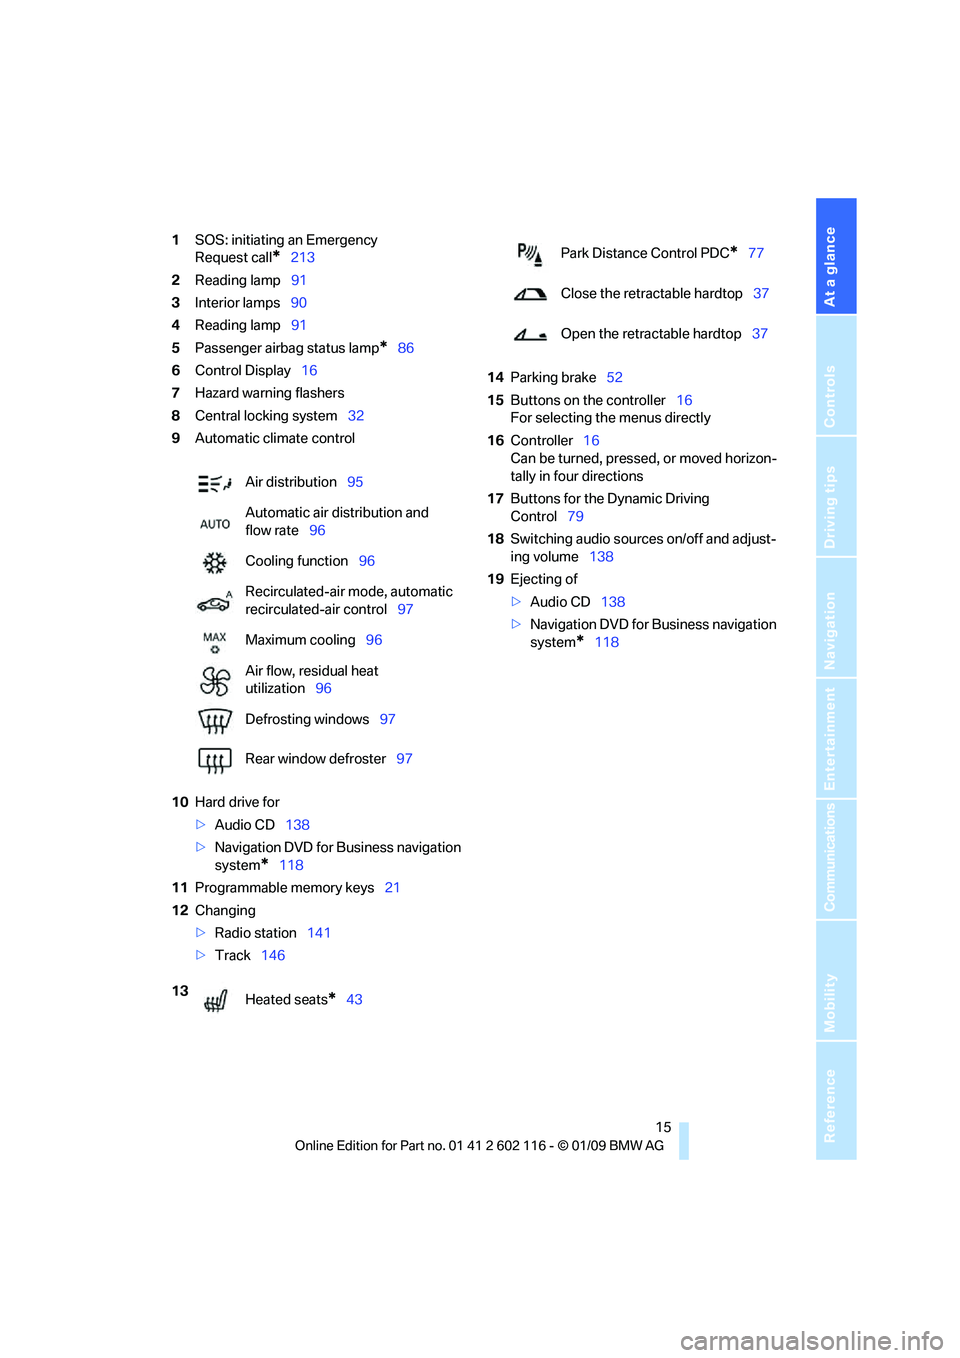
1SOS: initiating an Emergency
Request call
*213
2 Reading lamp 91
3 Interior lamps 90
4 Reading lamp 91
5 Passenger airbag status lamp
*86
6 Control Display 16
7 Hazard warning flashers
8 Central locking system 32
9 Automatic climate control
10 Hard drive for
>Audio CD 138
> Navigation DVD for Business navigation
system
*118
11 Programmable memory keys 21
12 Changing
>Radio station 141
> Track 146 14
Parking brake 52
15 Buttons on the controller 16
For selecting the menus directly
16 Controller 16
Can be turned, pressed, or moved horizon-
tally in four directions
17 Buttons for the Dynamic Driving
Control 79
18 Switching audio sources on/off and adjust-
ing volume 138
19 Ejecting of
>Audio CD 138
> Navigation DVD for Business navigation
system
*118
Air distribution
95
Automatic air distribution and
flow rate 96
Cooling function 96
Recirculated-air mode, automatic
recirculated-air control 97
Maximum cooling 96
Air flow, residual heat
utilization 96
Defrosting windows 97
Rear window defroster 97
13 Heated seats
*43
Park Distance Control PDC*77
Close the retractable hardtop 37
Open the retractable hardtop 37
Page 19 of 248
At a glance
17Reference
Controls
Driving tips
Communications
Navigation
Entertainment
Mobility
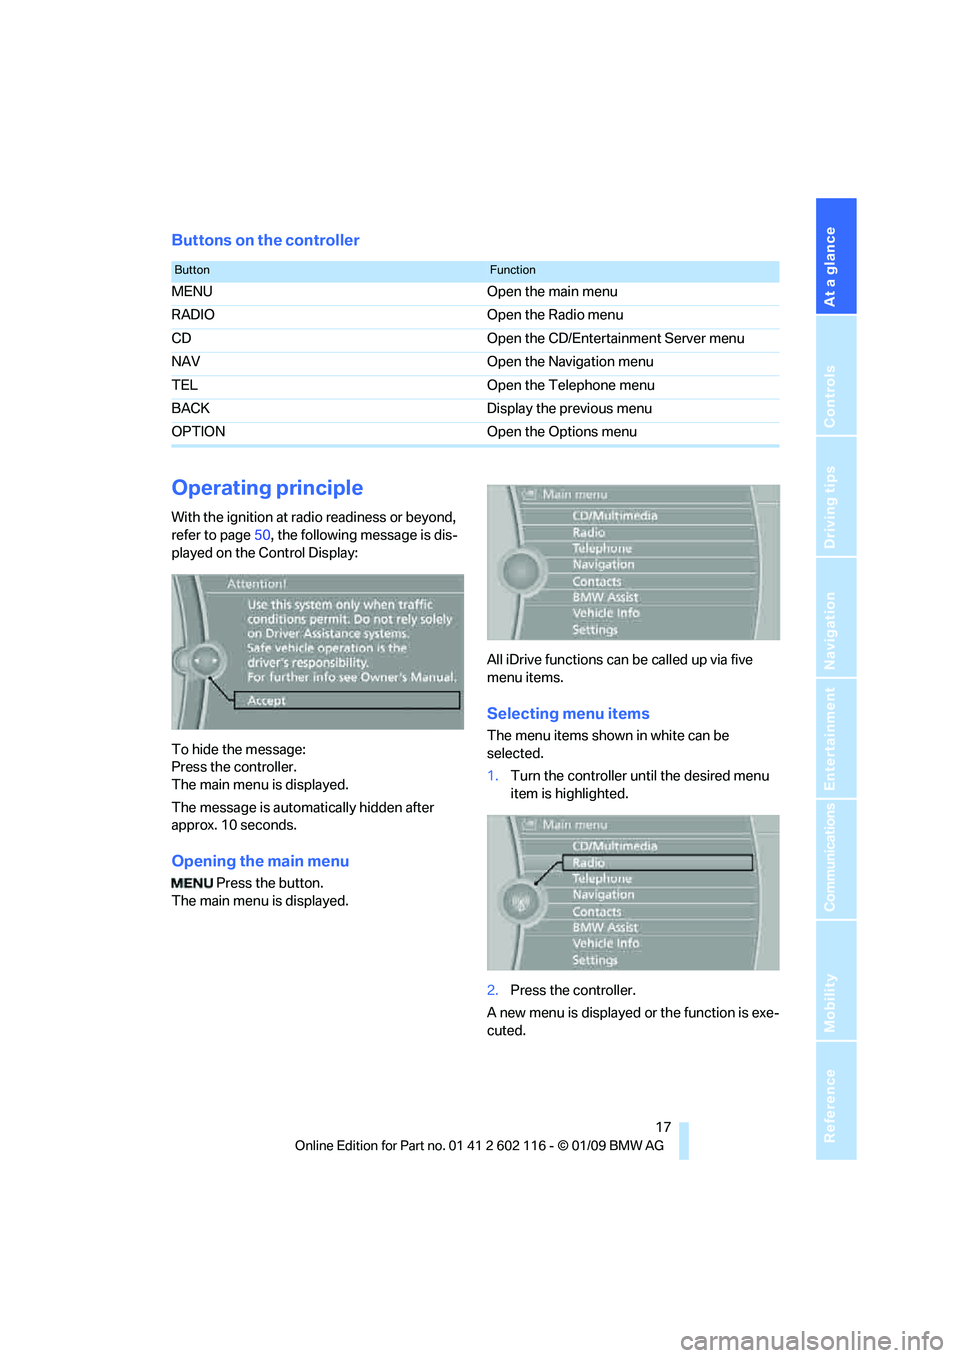
Buttons on the controller
Operating principle
With the ignition at radio readiness or beyond,
refer to page50, the following message is dis-
played on the Control Display:
To hide the message:
Press the controller.
The main menu is displayed.
The message is automa tically hidden after
approx. 10 seconds.
Opening the main menu
Press the button.
The main menu is displayed. All iDrive functions can be called up via five
menu items.
Selecting menu items
The menu items shown in white can be
selected.
1.
Turn the controller until the desired menu
item is highlighted.
2. Press the controller.
A new menu is displayed or the function is exe-
cuted.
ButtonFunction
MENU Open the main menu
RADIO Open the Radio menu
CD Open the CD/Entertainment Server menu
NAV Open the Navigation menu
TEL Open the Telephone menu
BACK Display the previous menu
OPTION Open the Options menu
Page 23 of 248
At a glance
21Reference
Controls
Driving tips
Communications
Navigation
Entertainment
Mobility
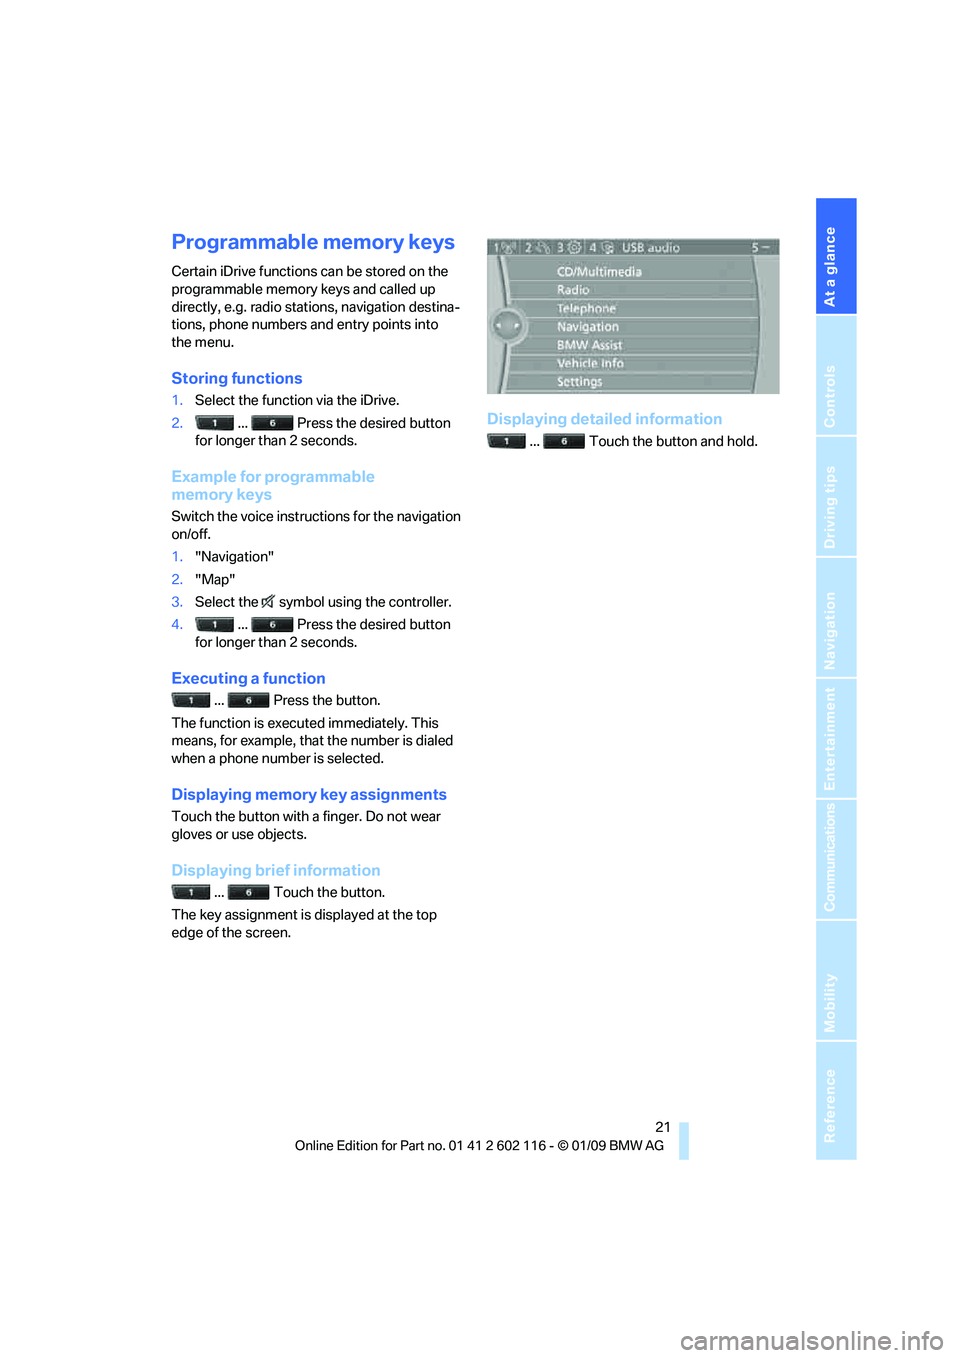
Programmable memory keys
Certain iDrive functions can be stored on the
programmable memory keys and called up
directly, e.g. radio stations, navigation destina-
tions, phone numbers and entry points into
the menu.
Storing functions
1. Select the function via the iDrive.
2. ... Press the desired button
for longer than 2 seconds.
Example for programmable
memory keys
Switch the voice instructions for the navigation
on/off.
1. "Navigation"
2. "Map"
3. Select the symbol using the controller.
4. ... Press the desired button
for longer than 2 seconds.
Executing a function
... Press the button.
The function is executed immediately. This
means, for example, that the number is dialed
when a phone number is selected.
Displaying memory key assignments
Touch the button with a finger. Do not wear
gloves or use objects.
Displaying brief information
... Touch the button.
The key assignment is displayed at the top
edge of the screen.
Displaying detailed information
... Touch the button and hold.
Page 33 of 248
Controls
31Reference
At a glance
Driving tips
Communications
Navigation
Entertainment
Mobility
3.Press down the cargo bay partition until it
engages on both sides and close the lug-
gage compartment lid.
4. Press the button for a longer period to
fold the retractabl e hardtop back in.
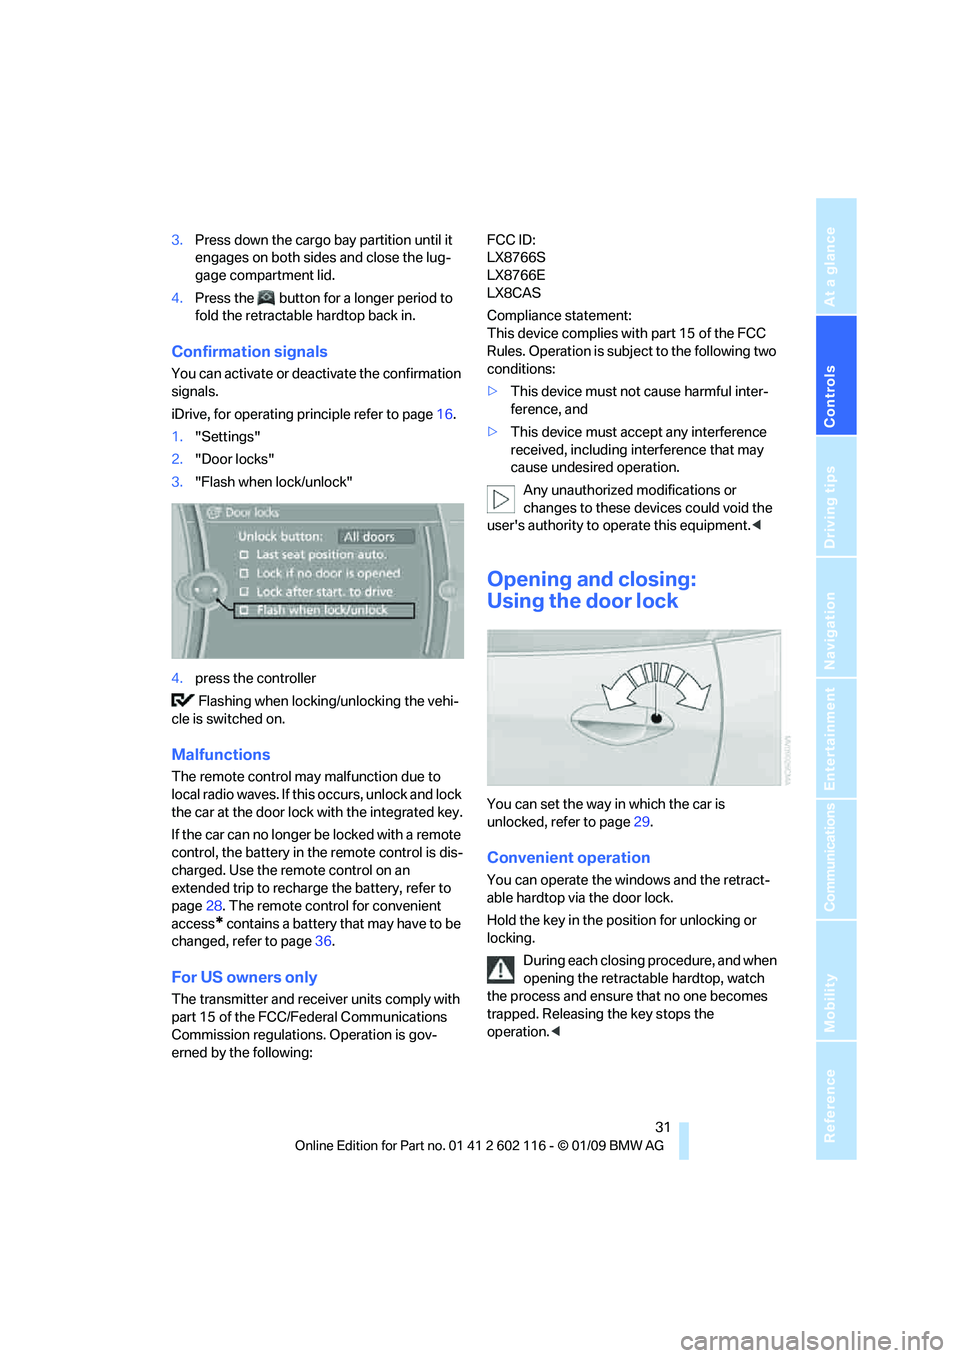
Confirmation signals
You can activate or deac tivate the confirmation
signals.
iDrive, for operating principle refer to page 16.
1. "Settings"
2. "Door locks"
3. "Flash when lock/unlock"
4. press the controller
Flashing when locking/unlocking the vehi-
cle is switched on.
Malfunctions
The remote control may malfunction due to
local radio waves. If this occurs, unlock and lock
the car at the door lock with the integrated key.
If the car can no longer be locked with a remote
control, the battery in the remote control is dis-
charged. Use the remote control on an
extended trip to rechar ge the battery, refer to
page 28. The remote control for convenient
access
* contains a battery that may have to be
changed, refer to page 36.
For US owners only
The transmitter and receiver units comply with
part 15 of the FCC/Fe deral Communications
Commission regulations. Operation is gov-
erned by the following: FCC ID:
LX8766S
LX8766E
LX8CAS
Compliance statement:
This device complies with part 15 of the FCC
Rules. Operation is subject to the following two
conditions:
>
This device must not cause harmful inter-
ference, and
> This device must accept any interference
received, including in terference that may
cause undesired operation.
Any unauthorized modifications or
changes to these devices could void the
user's authority to operate this equipment. <
Opening and closing:
Using the door lock
You can set the way in which the car is
unlocked, refer to page29.
Convenient operation
You can operate the wi ndows and the retract-
able hardtop via the door lock.
Hold the key in the position for unlocking or
locking.
During each closing procedure, and when
opening the retractable hardtop, watch
the process and ensure that no one becomes
trapped. Releasing the key stops the
operation. <
Page 37 of 248
Controls
35Reference
At a glance
Driving tips
Communications
Navigation
Entertainment
Mobility
Convenient access*
Convenient access enables you to enter your
vehicle without needing to hold the remote con-
trol in your hand. All you need to do is wear the
remote control close to your body, e.g. in your
jacket pocket. The vehicle detects the corre-
sponding remote control within the immediate
vicinity or in the passenger compartment.
Convenient access supports the following
functions:
> Unlocking/locking the vehicle
> Unlocking the luggage compartment lid
separately
> Starting the engine
> Convenient closing
Functional requirement
>The vehicle or the luggage compartment lid
can only be locked when the vehicle detects
that the remote contro l currently in use is
outside of the vehicle.
> The vehicle cannot be locked or unlocked
again until after approx. 2 seconds.
> The engine can only be started when the
vehicle detects that th e remote control cur-
rently in use is inside the vehicle.
Comparison to the standard remote
control
In general, there is no difference between using
convenient access or pressing the buttons on
the remote control to carry out the functions
mentioned above. You should therefore first
familiarize yourself with the instructions on
opening and closing starting on page 28.
Special features regarding the use of conve-
nient access are described below. If you notice a brief delay while opening or
closing the windows or retractable hard-
top, the system is chec king whether a remote
control is inside the vehi cle. Please repeat the
opening or closing procedure, if necessary. <
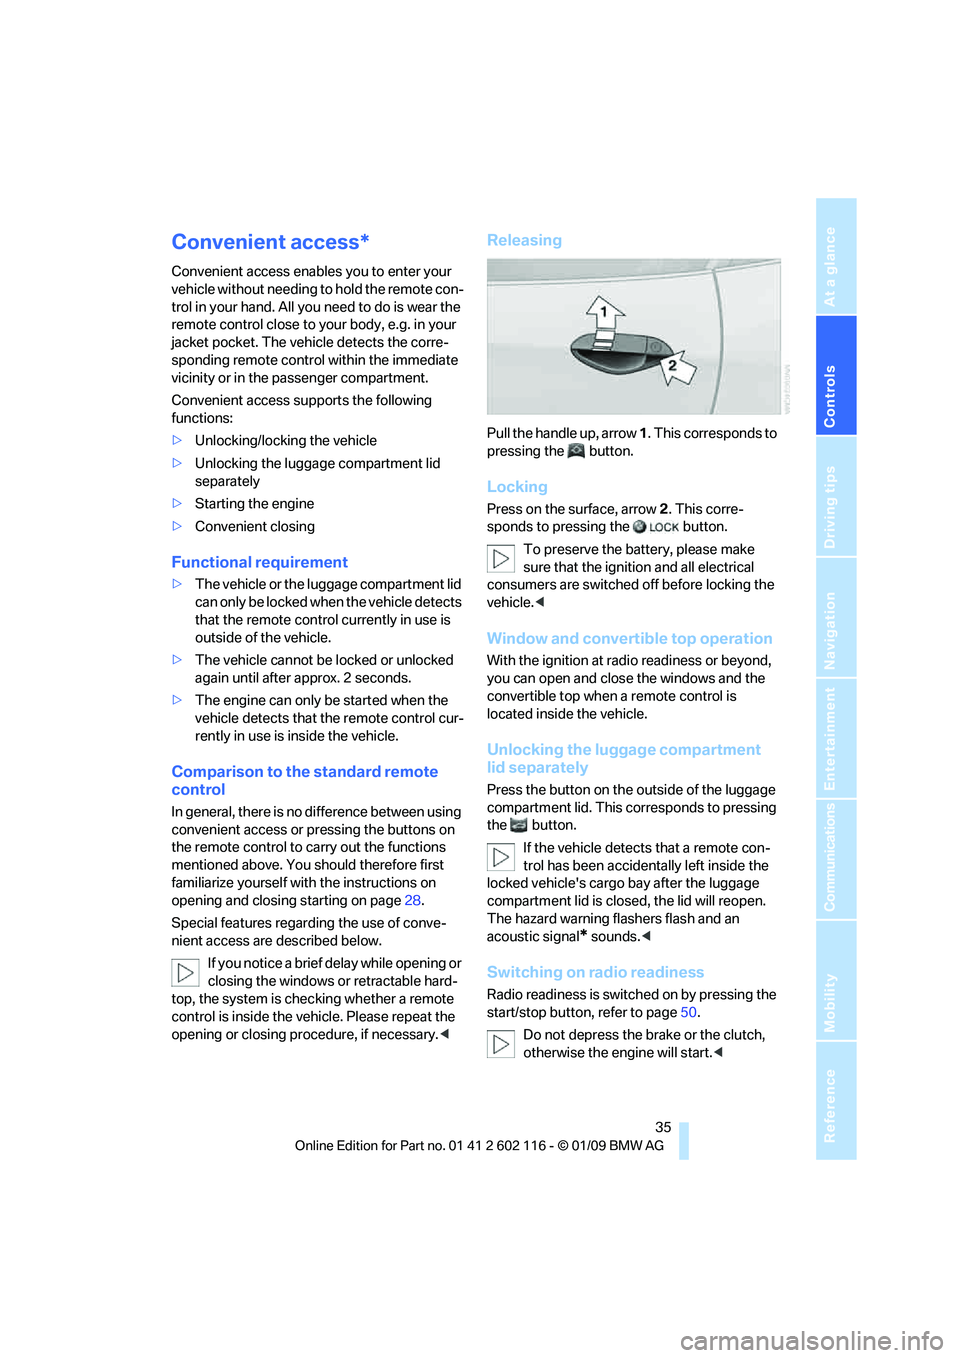
Releasing
Pull the handle up, arrow 1. This corresponds to
pressing the button.
Locking
Press on the surface, arrow 2. This corre-
sponds to pressing the button.
To preserve the ba ttery, please make
sure that the ignition and all electrical
consumers are switched off before locking the
vehicle. <
Window and convertible top operation
With the ignition at radio readiness or beyond,
you can open and close the windows and the
convertible top when a remote control is
located inside the vehicle.
Unlocking the luggage compartment
lid separately
Press the button on the outside of the luggage
compartment lid. This corresponds to pressing
the button.
If the vehicle detects that a remote con-
trol has been accident ally left inside the
locked vehicle's cargo bay after the luggage
compartment lid is closed, the lid will reopen.
The hazard warning flashers flash and an
acoustic signal
* sounds. <
Switching on radio readiness
Radio readiness is switch ed on by pressing the
start/stop button, refer to page50.
Do not depress the br ake or the clutch,
otherwise the engine will start. <
Page 41 of 248
Controls
39Reference
At a glance
Driving tips
Communications
Navigation
Entertainment
Mobility
Opening and closing
When the vehicle is stationary and at radio
readiness or beyond, refer to page50:
If possible, conserve the battery by only
operating the retrac table hardtop when
the engine is running.
Before closing the retrac table hardtop, remove
all foreign objects from the windshield frame as
these could prevent the hardtop from closing
properly. <
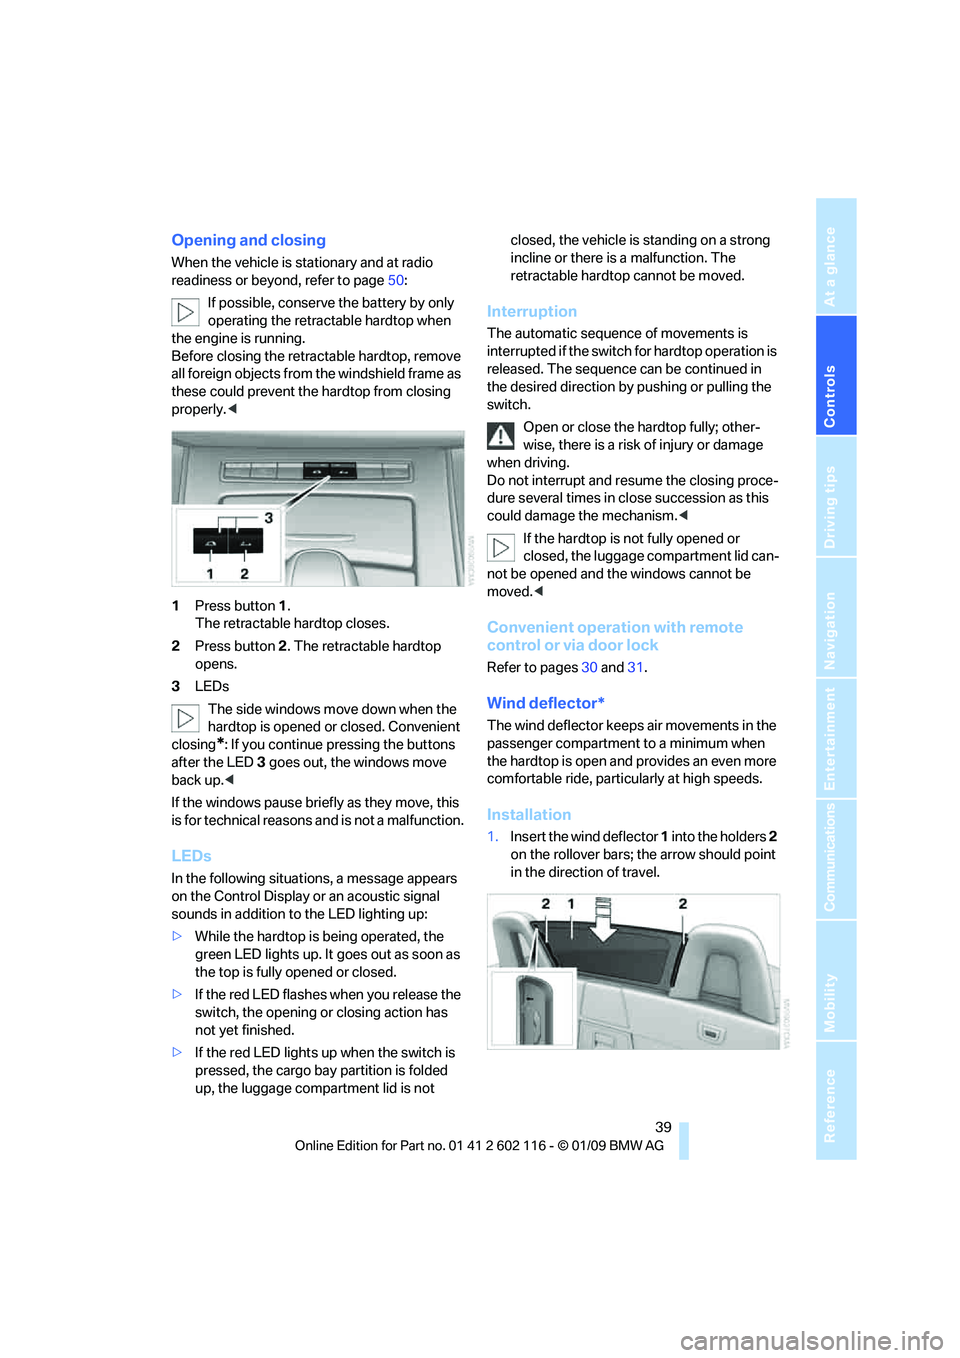
1 Press button 1.
The retractable hardtop closes.
2 Press button 2. The retractable hardtop
opens.
3 LEDs
The side windows move down when the
hardtop is opened or closed. Convenient
closing
*: If you continue pressing the buttons
after the LED 3 goes out, the windows move
back up. <
If the windows pause brie fly as they move, this
is for technical reasons and is not a malfunction.
LEDs
In the following situations, a message appears
on the Control Display or an acoustic signal
sounds in addition to the LED lighting up:
> While the hardtop is being operated, the
green LED lights up. It goes out as soon as
the top is fully opened or closed.
> If the red LED flashes when you release the
switch, the opening or closing action has
not yet finished.
> If the red LED lights up when the switch is
pressed, the cargo bay partition is folded
up, the luggage compartment lid is not closed, the vehicle is standing on a strong
incline or there is a malfunction. The
retractable hardto
p cannot be moved.
Interruption
The automatic sequence of movements is
interrupted if the switch for hardtop operation is
released. The sequence can be continued in
the desired direction by pushing or pulling the
switch.
Open or close the hardtop fully; other-
wise, there is a risk of injury or damage
when driving.
Do not interrupt and re sume the closing proce-
dure several times in cl ose succession as this
could damage the mechanism. <
If the hardtop is not fully opened or
closed, the luggage compartment lid can-
not be opened and the windows cannot be
moved. <
Convenient operation with remote
control or via door lock
Refer to pages 30 and 31.
Wind deflector*
The wind deflector keeps air movements in the
passenger compartment to a minimum when
the hardtop is open and provides an even more
comfortable ride, particul arly at high speeds.
Installation
1.Insert the wind deflector 1 into the holders 2
on the rollover bars; the arrow should point
in the direction of travel.
Page 85 of 248
Controls
83Reference
At a glance
Driving tips
Communications
Navigation
Entertainment
Mobility
Green
The tire inflation pressure corresponds to the
established target value.
"TPM active" appears on the Control Display.
One wheel yellow
There is a flat tire or substantial loss of tire pres-
sure in the indicated tire. A message appears on
the Control Display.
All wheels yellow
There is a flat tire or su bstantial loss of tire pres-
sure in several tires. A message appears on the
Control Display.
Gray
The system cannot detect a puncture.
Possible reasons for this:
> TPM is being reset
> Temporary malfunction caused by systems
or devices using the same radio frequency
> Malfunction
Resetting the system
Each time a tire inflation pressure has
been corrected or a wheel or tire has been
changed, reset the system. <
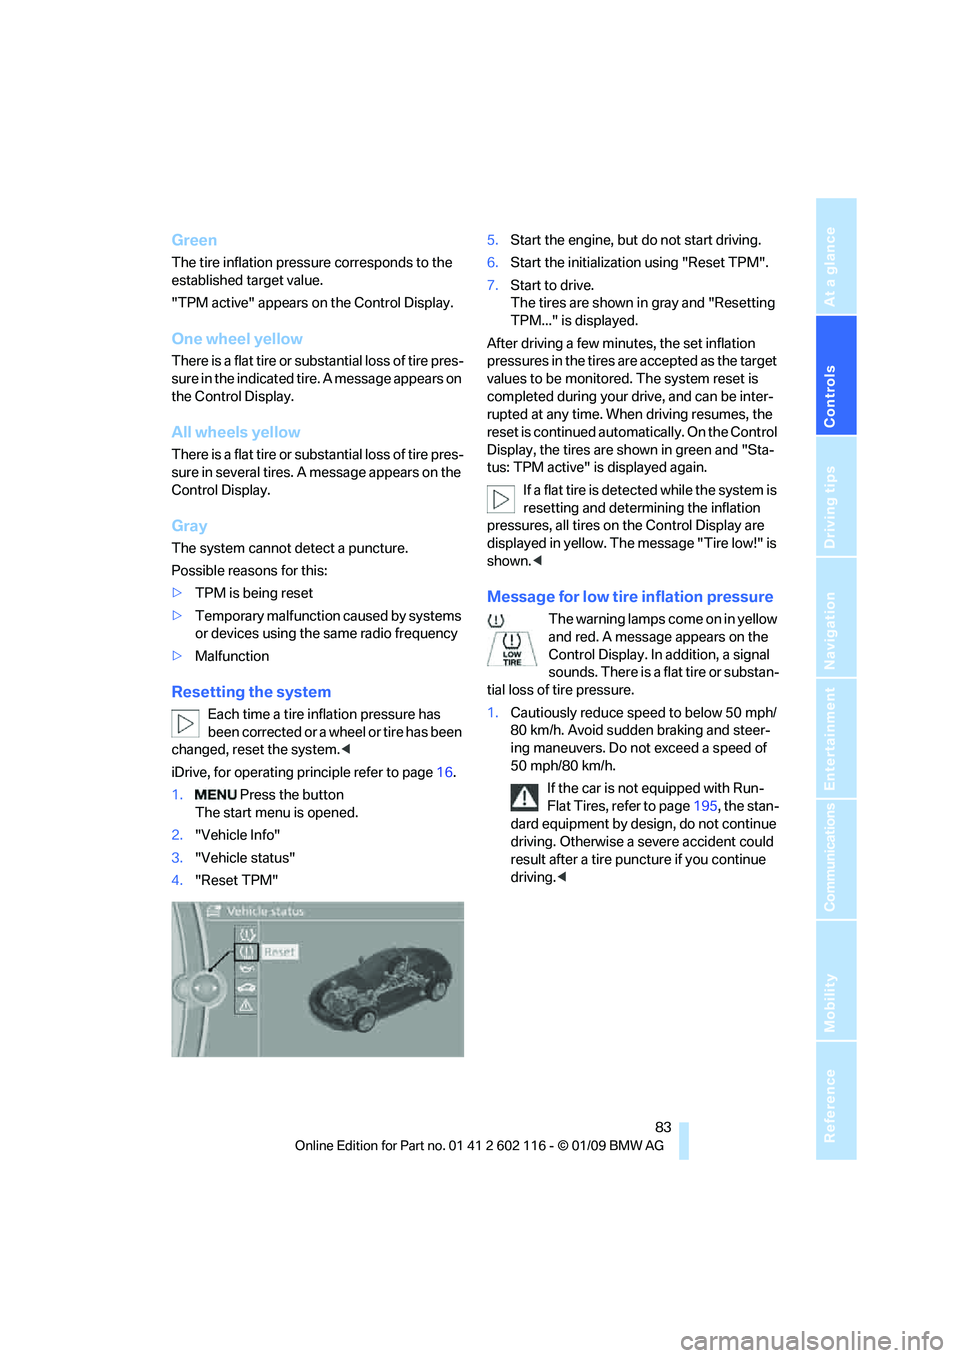
iDrive, for operating principle refer to page 16.
1. Press the button
The start menu is opened.
2. "Vehicle Info"
3. "Vehicle status"
4. "Reset TPM" 5.
Start the engine, but do not start driving.
6. Start the initializatio n using "Reset TPM".
7. Start to drive.
The tires are shown in gray and "Resetting
TPM..." is displayed.
After driving a few minutes, the set inflation
pressures in the tires are accepted as the target
values to be monitored. The system reset is
completed during your drive, and can be inter-
rupted at any time. When driving resumes, the
reset is continued automatically. On the Control
Display, the tires are shown in green and "Sta-
tus: TPM active" is displayed again. If a flat tire is detected while the system is
resetting and determining the inflation
pressures, all tires on the Control Display are
displayed in yellow. The message "Tire low!" is
shown. <
Message for low tire inflation pressure
The warning lamps come on in yellow
and red. A message appears on the
Control Display. In addition, a signal
sounds. There is a flat tire or substan-
tial loss of tire pressure.
1. Cautiously reduce speed to below 50 mph/
80 km/h. Avoid sudden braking and steer-
ing maneuvers. Do not exceed a speed of
50 mph/80 km/h.
If the car is not equipped with Run-
Flat Tires, refer to page 195, the stan-
dard equipment by design, do not continue
driving. Otherwise a severe accident could
result after a tire punc ture if you continue
driving. <
Page 89 of 248
Controls
87Reference
At a glance
Driving tips
Communications
Navigation
Entertainment
Mobility
After mounting a child seat, ensure that the
indicator lamp for the pa ssenger airbag is lit.
It indicates that the child seat has been
detected and that th e passenger airbags
are deactivated.
> The indicator lamp does not come on as
long as a person of sufficient size and in a
correct sitting position is detected on
the seat.
The front, knee and passenger airbags for
the passenger are activated.
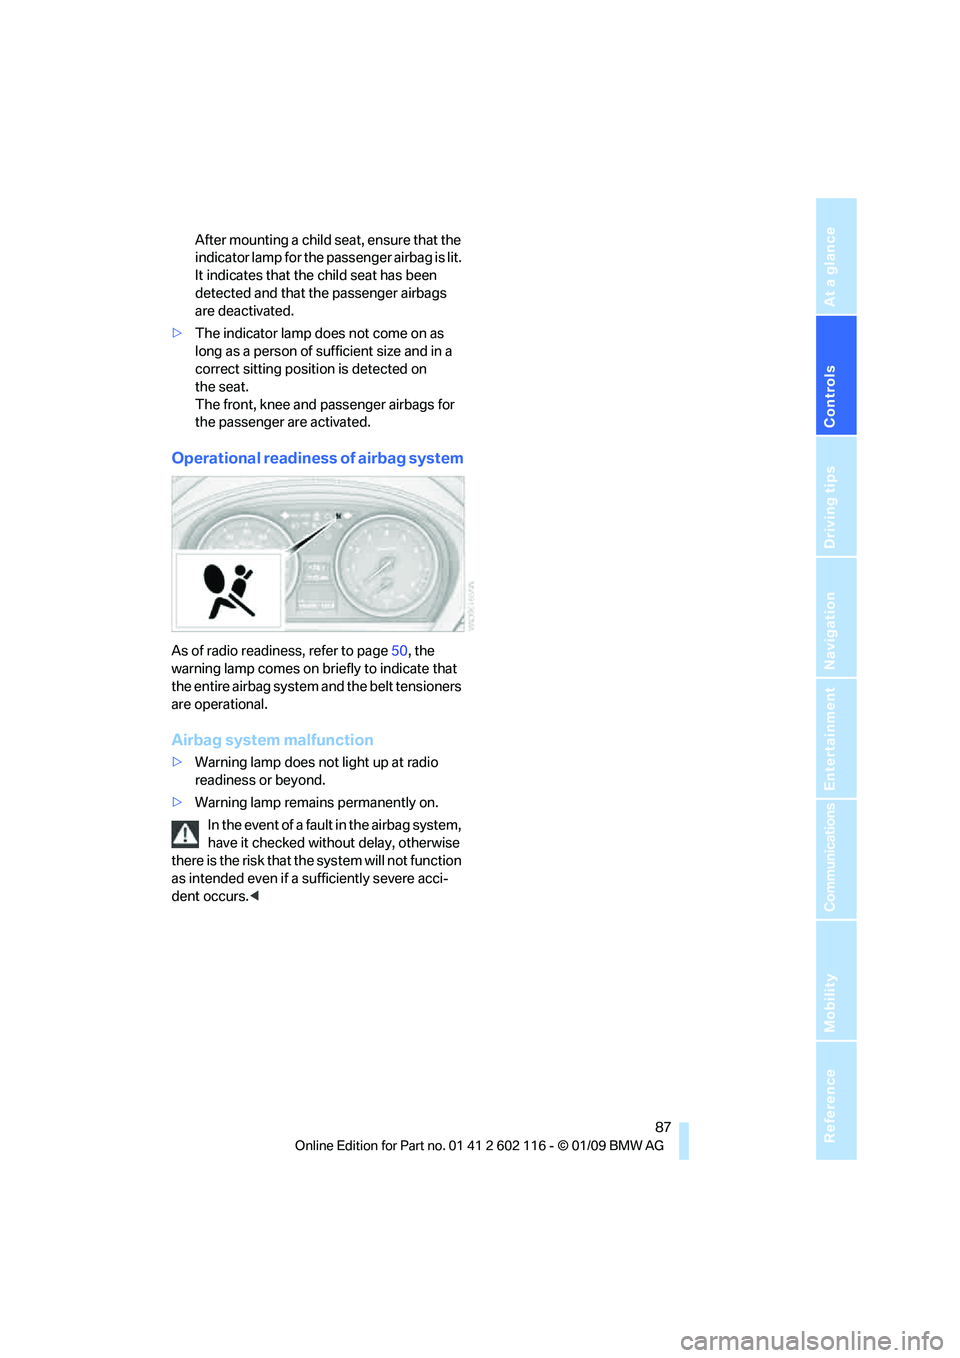
Operational readiness of airbag system
As of radio readiness, refer to page 50, the
warning lamp comes on br iefly to indicate that
the entire airbag system and the belt tensioners
are operational.
Airbag system malfunction
> Warning lamp does not light up at radio
readiness or beyond.
> Warning lamp remains permanently on.
In the event of a fault in the airbag system,
have it checked without delay, otherwise
there is the risk that th e system will not function
as intended even if a sufficiently severe acci-
dent occurs. <