BMW Z4 SDRIVE35I 2012 Repair Manual
Manufacturer: BMW, Model Year: 2012, Model line: Z4 SDRIVE35I, Model: BMW Z4 SDRIVE35I 2012Pages: 220, PDF Size: 9.9 MB
Page 61 of 220
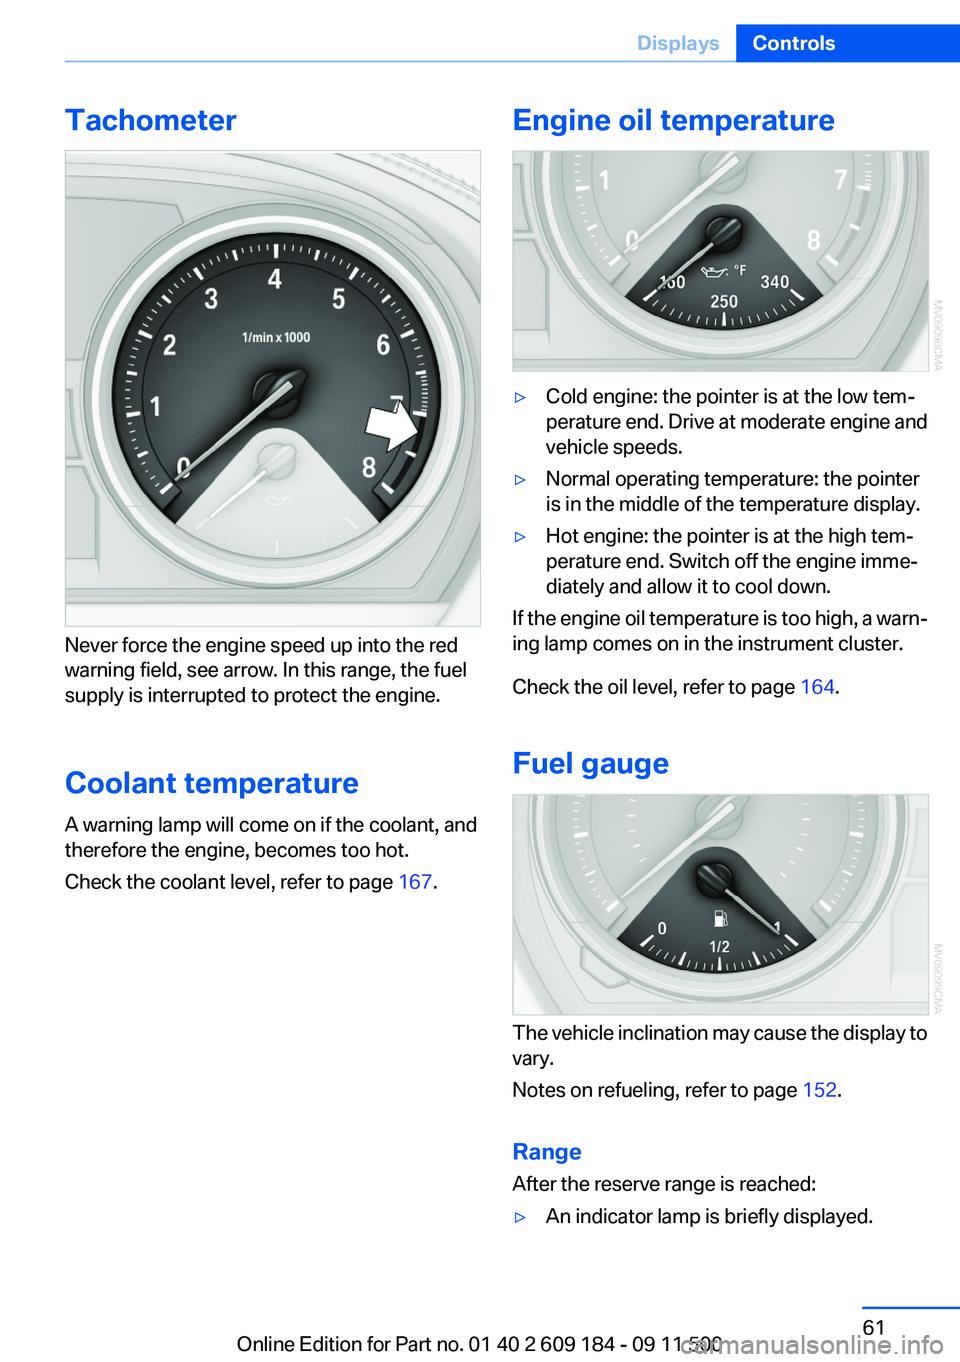
Tachometer
Never force the engine speed up into the red
warning field, see arrow. In this range, the fuel
supply is interrupted to protect the engine.
Coolant temperature
A warning lamp will come on if the coolant, and
therefore the engine, becomes too hot.
Check the coolant level, refer to page 167.
Engine oil temperature▷Cold engine: the pointer is at the low tem‐
perature end. Drive at moderate engine and
vehicle speeds.▷Normal operating temperature: the pointer
is in the middle of the temperature display.▷Hot engine: the pointer is at the high tem‐
perature end. Switch off the engine imme‐
diately and allow it to cool down.
If the engine oil temperature is too high, a warn‐
ing lamp comes on in the instrument cluster.
Check the oil level, refer to page 164.
Fuel gauge
The vehicle inclination may cause the display to
vary.
Notes on refueling, refer to page 152.
Range
After the reserve range is reached:
▷An indicator lamp is briefly displayed.Seite 61DisplaysControls61
Online Edition for Part no. 01 40 2 609 184 - 09 11 500
Page 62 of 220
▷The remaining range is shown on the com‐
puter.▷When a dynamic driving style is used, such
as when corners are taken rapidly, engine
functions are not ensured.
Below a range of approx. 30 miles/50 km, the
indicator lamp is displayed continuously.
Refuel promptly
At the latest, refuel at a range of 30 miles/
50 km; otherwise, the engine function is not en‐
sured and damage may occur.◀
Computer
Displays in the instrument cluster
Calling up information
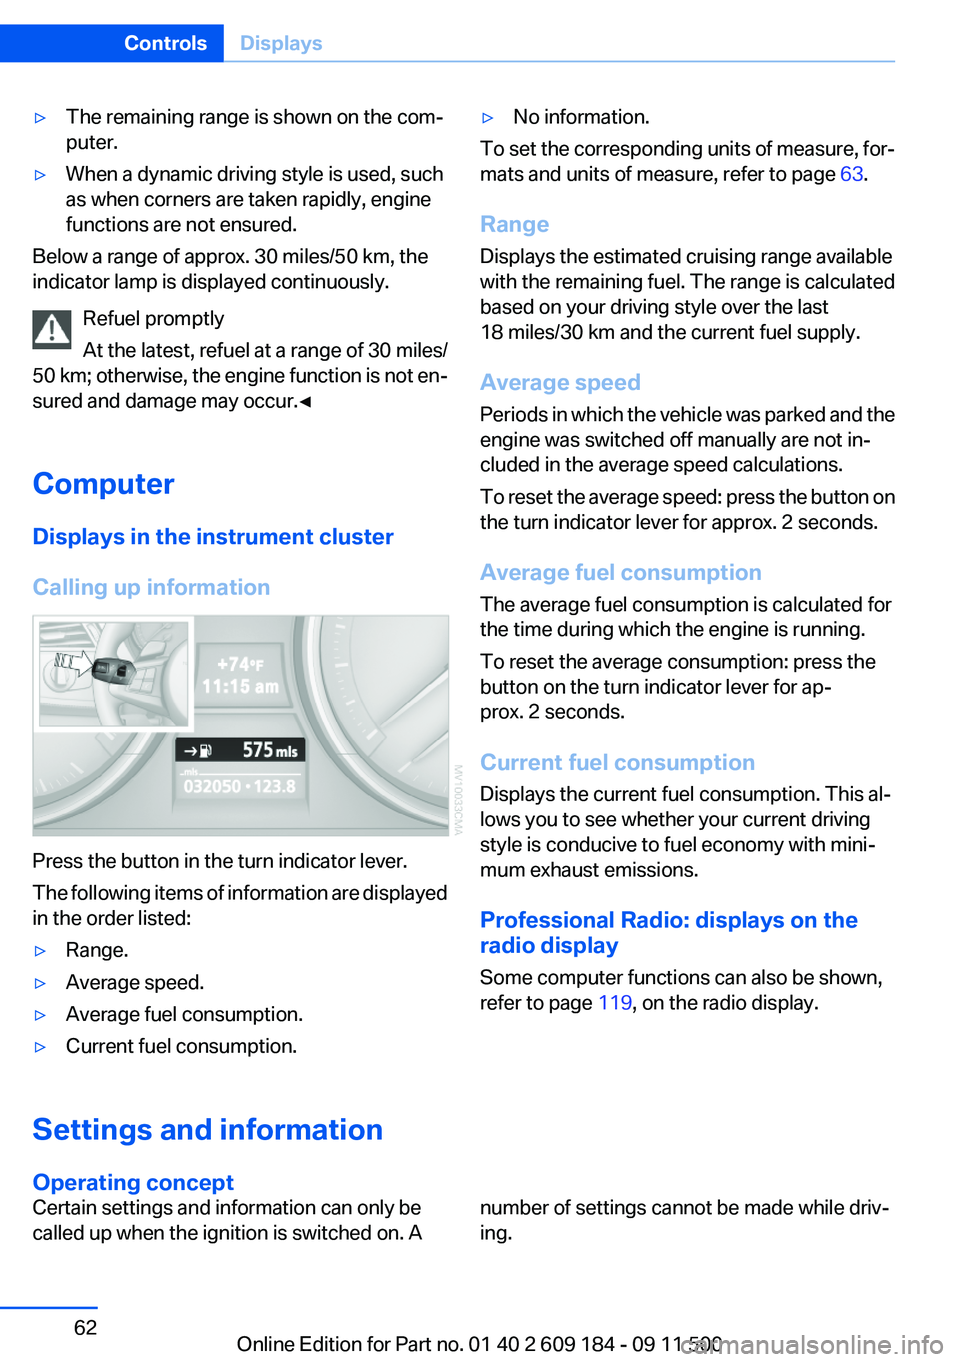
Press the button in the turn indicator lever.
The following items of information are displayed
in the order listed:
▷Range.▷Average speed.▷Average fuel consumption.▷Current fuel consumption.▷No information.
To set the corresponding units of measure, for‐
mats and units of measure, refer to page 63.
Range
Displays the estimated cruising range available
with the remaining fuel. The range is calculated
based on your driving style over the last
18 miles/30 km and the current fuel supply.
Average speed
Periods in which the vehicle was parked and the
engine was switched off manually are not in‐
cluded in the average speed calculations.
To reset the average speed: press the button on
the turn indicator lever for approx. 2 seconds.
Average fuel consumption
The average fuel consumption is calculated for
the time during which the engine is running.
To reset the average consumption: press the
button on the turn indicator lever for ap‐
prox. 2 seconds.
Current fuel consumption
Displays the current fuel consumption. This al‐
lows you to see whether your current driving
style is conducive to fuel economy with mini‐
mum exhaust emissions.
Professional Radio: displays on the
radio display
Some computer functions can also be shown,
refer to page 119, on the radio display.Settings and information
Operating concept
Certain settings and information can only be
called up when the ignition is switched on. Anumber of settings cannot be made while driv‐
ing.Seite 62ControlsDisplays62
Online Edition for Part no. 01 40 2 609 184 - 09 11 500
Page 63 of 220
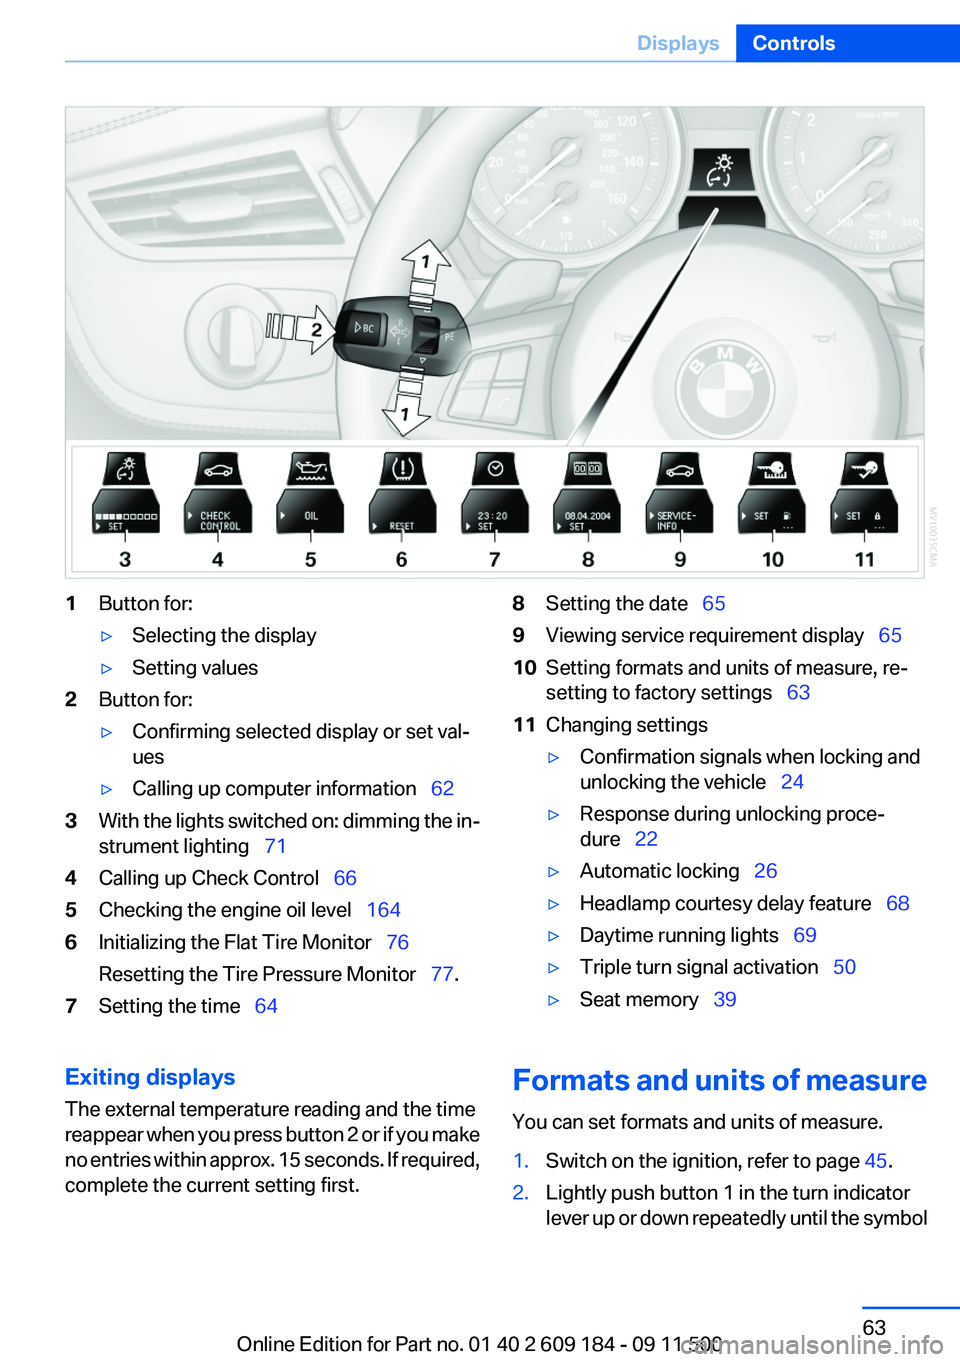
1Button for:▷Selecting the display▷Setting values2Button for:▷Confirming selected display or set val‐
ues▷Calling up computer information 623With the lights switched on: dimming the in‐
strument lighting 714Calling up Check Control 665Checking the engine oil level 1646Initializing the Flat Tire Monitor 76
Resetting the Tire Pressure Monitor 77.7Setting the time 648Setting the date 659Viewing service requirement display 6510Setting formats and units of measure, re‐
setting to factory settings 6311Changing settings▷Confirmation signals when locking and
unlocking the vehicle 24▷Response during unlocking proce‐
dure 22▷Automatic locking 26▷Headlamp courtesy delay feature 68▷Daytime running lights 69▷Triple turn signal activation 50▷Seat memory 39Exiting displays
The external temperature reading and the time
reappear when you press button 2 or if you make
no entries within approx. 15 seconds. If required,
complete the current setting first.Formats and units of measure
You can set formats and units of measure.1.Switch on the ignition, refer to page 45.2.Lightly push button 1 in the turn indicator
lever up or down repeatedly until the symbolSeite 63DisplaysControls63
Online Edition for Part no. 01 40 2 609 184 - 09 11 500
Page 64 of 220
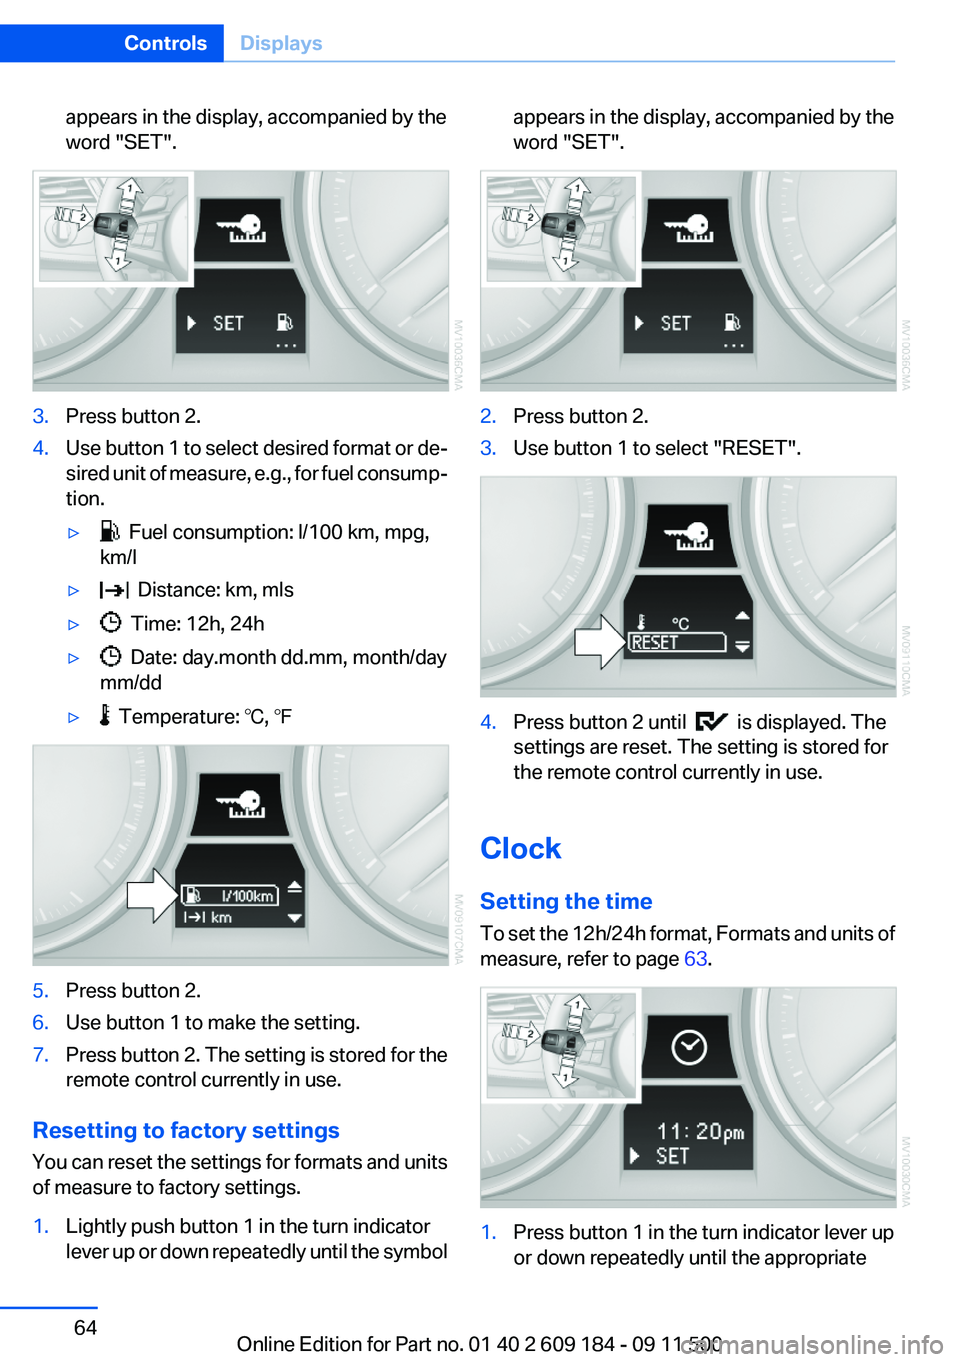
appears in the display, accompanied by the
word "SET".3.Press button 2.4.Use button 1 to select desired format or de‐
sired unit of measure, e.g., for fuel consump‐
tion.▷ Fuel consumption: l/100 km, mpg,
km/l▷ Distance: km, mls▷ Time: 12h, 24h▷ Date: day.month dd.mm, month/day
mm/dd▷ Temperature: ℃, ℉5.Press button 2.6.Use button 1 to make the setting.7.Press button 2. The setting is stored for the
remote control currently in use.
Resetting to factory settings
You can reset the settings for formats and units
of measure to factory settings.
1.Lightly push button 1 in the turn indicator
lever up or down repeatedly until the symbolappears in the display, accompanied by the
word "SET".2.Press button 2.3.Use button 1 to select "RESET".4.Press button 2 until is displayed. The
settings are reset. The setting is stored for
the remote control currently in use.
Clock
Setting the time
To set the 12h/24h format, Formats and units of
measure, refer to page 63.
1.Press button 1 in the turn indicator lever up
or down repeatedly until the appropriateSeite 64ControlsDisplays64
Online Edition for Part no. 01 40 2 609 184 - 09 11 500
Page 65 of 220
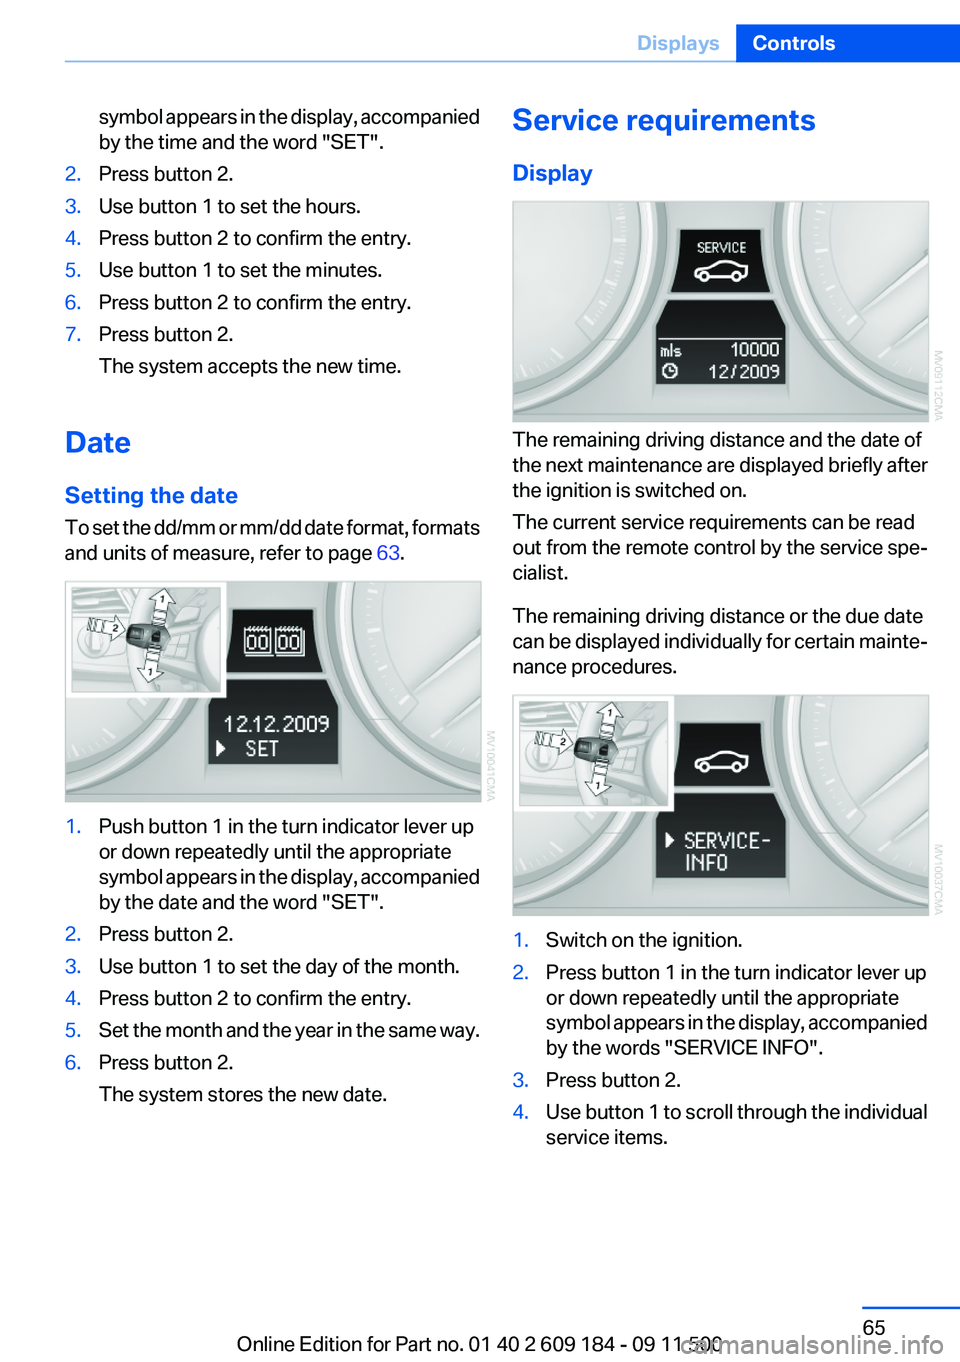
symbol appears in the display, accompanied
by the time and the word "SET".2.Press button 2.3.Use button 1 to set the hours.4.Press button 2 to confirm the entry.5.Use button 1 to set the minutes.6.Press button 2 to confirm the entry.7.Press button 2.
The system accepts the new time.
Date
Setting the date
To set the dd/mm or mm/dd date format, formats
and units of measure, refer to page 63.
1.Push button 1 in the turn indicator lever up
or down repeatedly until the appropriate
symbol appears in the display, accompanied
by the date and the word "SET".2.Press button 2.3.Use button 1 to set the day of the month.4.Press button 2 to confirm the entry.5.Set the month and the year in the same way.6.Press button 2.
The system stores the new date.Service requirements
Display
The remaining driving distance and the date of
the next maintenance are displayed briefly after
the ignition is switched on.
The current service requirements can be read
out from the remote control by the service spe‐
cialist.
The remaining driving distance or the due date
can be displayed individually for certain mainte‐
nance procedures.
1.Switch on the ignition.2.Press button 1 in the turn indicator lever up
or down repeatedly until the appropriate
symbol appears in the display, accompanied
by the words "SERVICE INFO".3.Press button 2.4.Use button 1 to scroll through the individual
service items.Seite 65DisplaysControls65
Online Edition for Part no. 01 40 2 609 184 - 09 11 500
Page 66 of 220
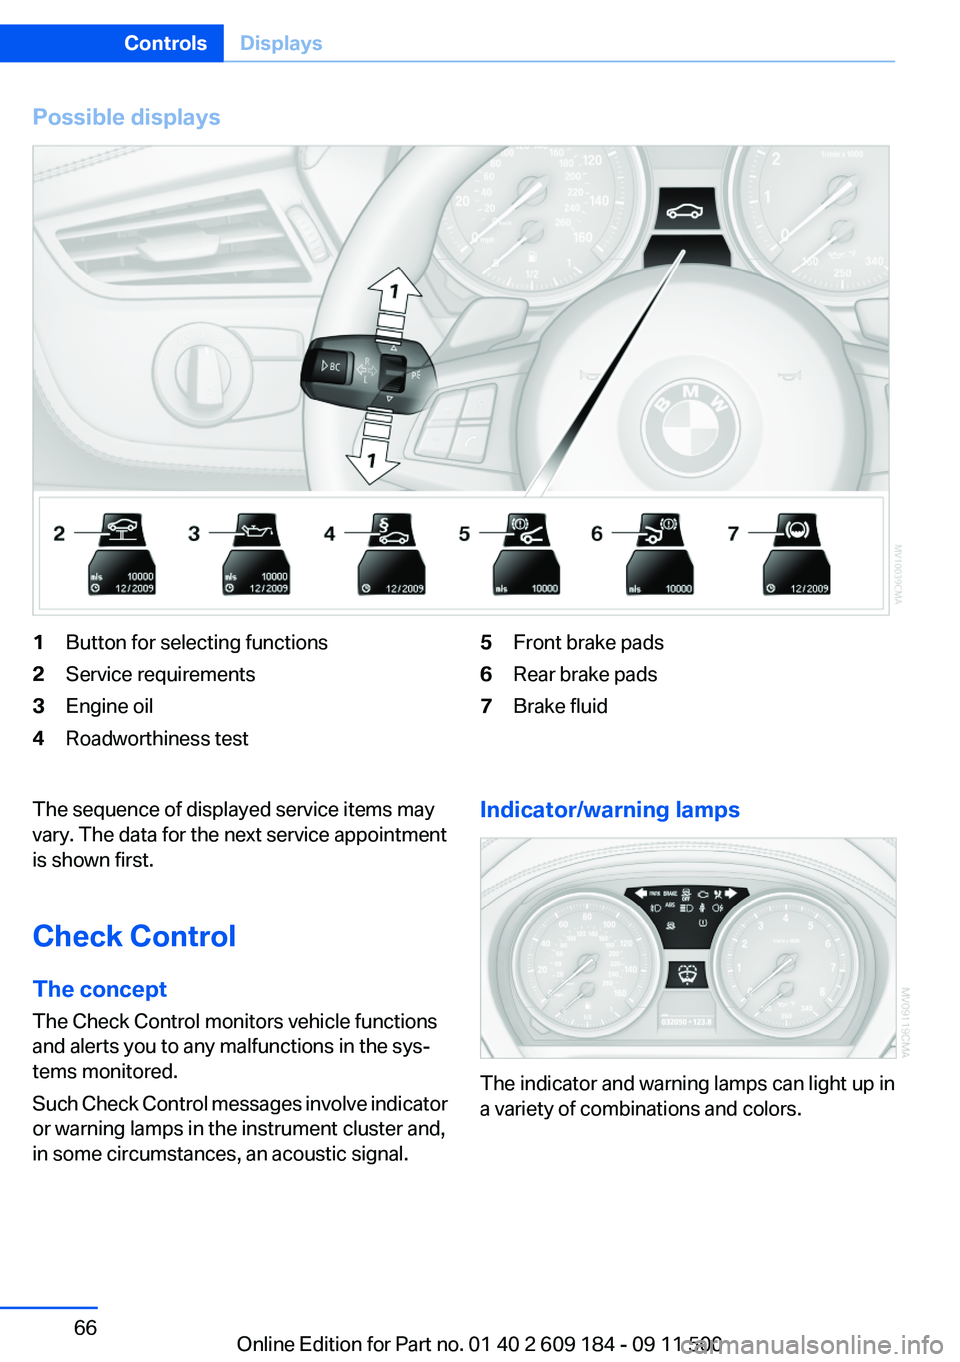
Possible displays1Button for selecting functions2Service requirements3Engine oil4Roadworthiness test5Front brake pads6Rear brake pads7Brake fluidThe sequence of displayed service items may
vary. The data for the next service appointment
is shown first.
Check Control
The concept
The Check Control monitors vehicle functions
and alerts you to any malfunctions in the sys‐
tems monitored.
Such Check Control messages involve indicator
or warning lamps in the instrument cluster and,
in some circumstances, an acoustic signal.Indicator/warning lamps
The indicator and warning lamps can light up in
a variety of combinations and colors.
Seite 66ControlsDisplays66
Online Edition for Part no. 01 40 2 609 184 - 09 11 500
Page 67 of 220
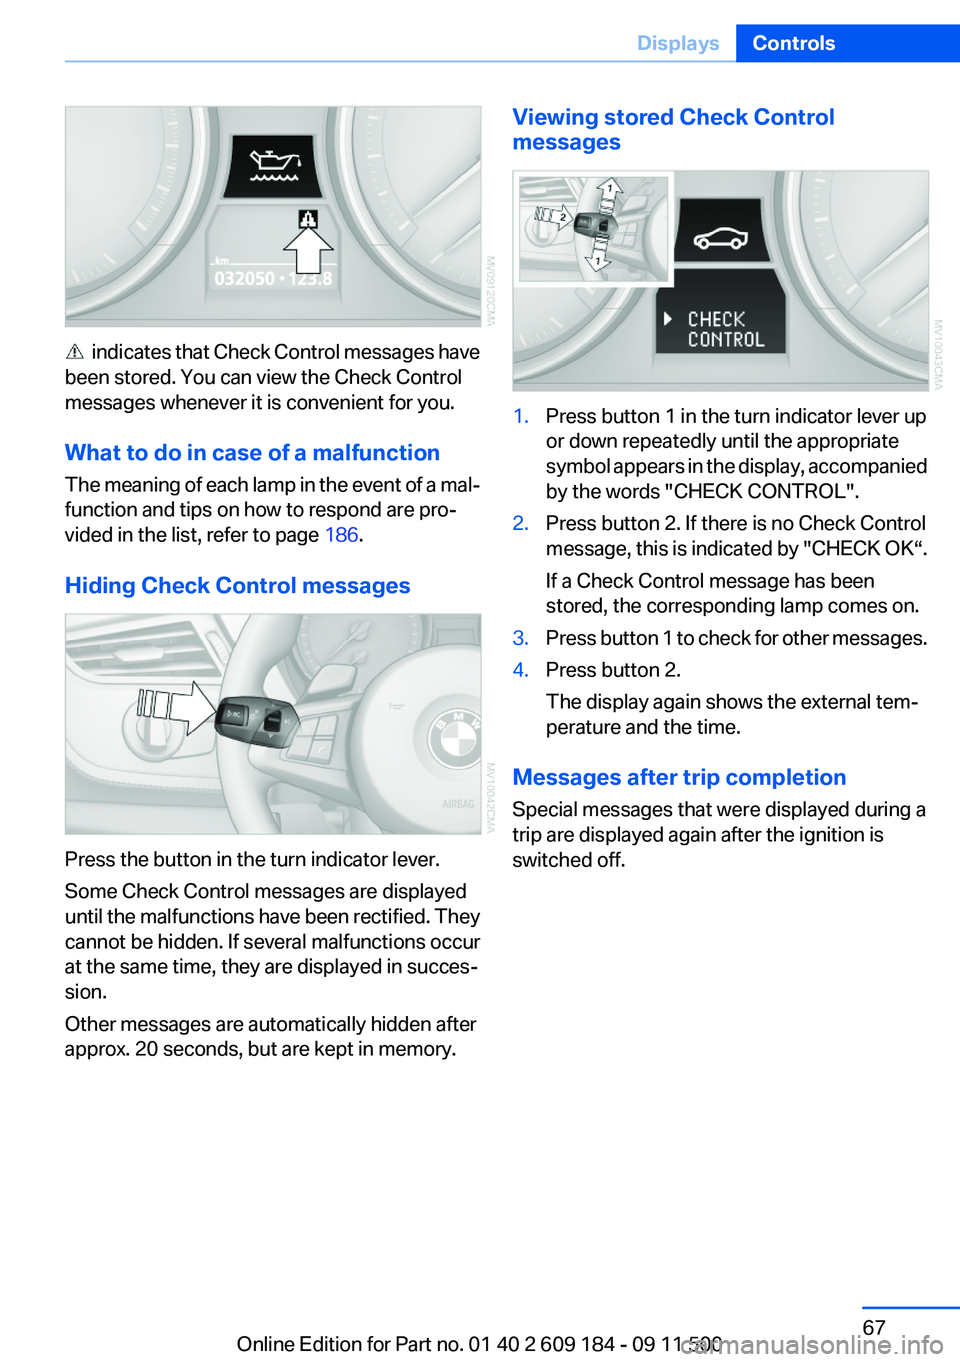
indicates that Check Control messages have
been stored. You can view the Check Control
messages whenever it is convenient for you.
What to do in case of a malfunction
The meaning of each lamp in the event of a mal‐
function and tips on how to respond are pro‐
vided in the list, refer to page 186.
Hiding Check Control messages
Press the button in the turn indicator lever.
Some Check Control messages are displayed
until the malfunctions have been rectified. They
cannot be hidden. If several malfunctions occur
at the same time, they are displayed in succes‐
sion.
Other messages are automatically hidden after
approx. 20 seconds, but are kept in memory.
Viewing stored Check Control
messages1.Press button 1 in the turn indicator lever up
or down repeatedly until the appropriate
symbol appears in the display, accompanied
by the words "CHECK CONTROL".2.Press button 2. If there is no Check Control
message, this is indicated by "CHECK OK“.
If a Check Control message has been
stored, the corresponding lamp comes on.3.Press button 1 to check for other messages.4.Press button 2.
The display again shows the external tem‐
perature and the time.
Messages after trip completion
Special messages that were displayed during a
trip are displayed again after the ignition is
switched off.
Seite 67DisplaysControls67
Online Edition for Part no. 01 40 2 609 184 - 09 11 500
Page 68 of 220
LampsVehicle equipment
This chapter describes all series equipment as
well as country-specific and special equipment
offered for this model series.Therefore, it also
describes equipment that may not be found in
your vehicle, for instance due to the selected
special equipment or the country version. This
also applies to safety-related functions and sys‐
tems.
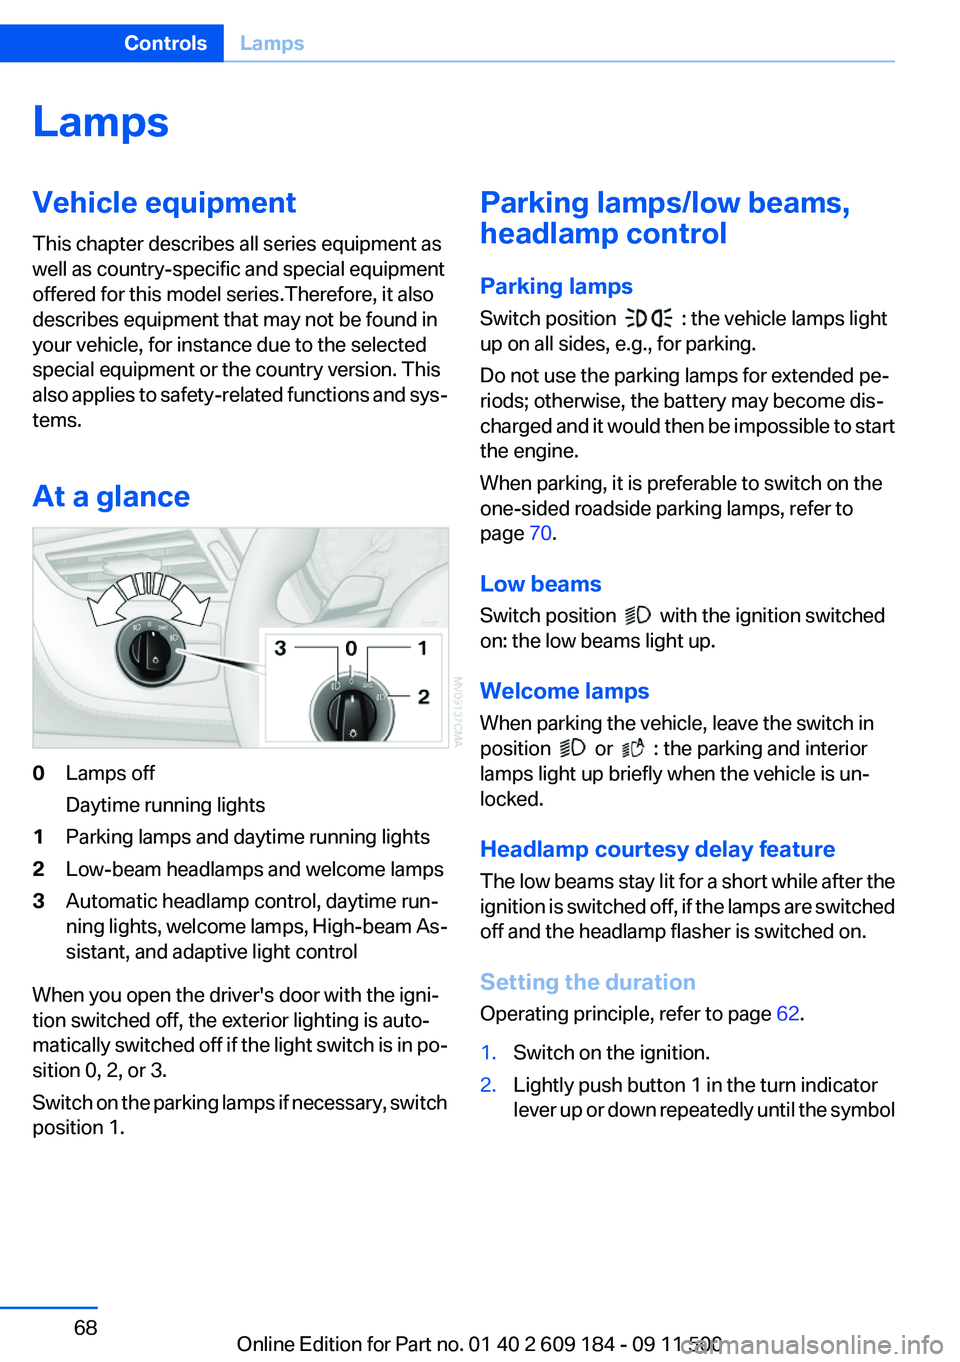
At a glance0Lamps off
Daytime running lights1Parking lamps and daytime running lights2Low-beam headlamps and welcome lamps3Automatic headlamp control, daytime run‐
ning lights, welcome lamps, High-beam As‐
sistant, and adaptive light control
When you open the driver's door with the igni‐
tion switched off, the exterior lighting is auto‐
matically switched off if the light switch is in po‐
sition 0, 2, or 3.
Switch on the parking lamps if necessary, switch
position 1.
Parking lamps/low beams,
headlamp control
Parking lamps
Switch position
: the vehicle lamps light
up on all sides, e.g., for parking.
Do not use the parking lamps for extended pe‐
riods; otherwise, the battery may become dis‐
charged and it would then be impossible to start
the engine.
When parking, it is preferable to switch on the
one-sided roadside parking lamps, refer to
page 70.
Low beams
Switch position
with the ignition switched
on: the low beams light up.
Welcome lamps
When parking the vehicle, leave the switch in
position
or : the parking and interior
lamps light up briefly when the vehicle is un‐
locked.
Headlamp courtesy delay feature
The low beams stay lit for a short while after the
ignition is switched off, if the lamps are switched
off and the headlamp flasher is switched on.
Setting the duration
Operating principle, refer to page 62.
1.Switch on the ignition.2.Lightly push button 1 in the turn indicator
lever up or down repeatedly until the symbolSeite 68ControlsLamps68
Online Edition for Part no. 01 40 2 609 184 - 09 11 500
Page 69 of 220
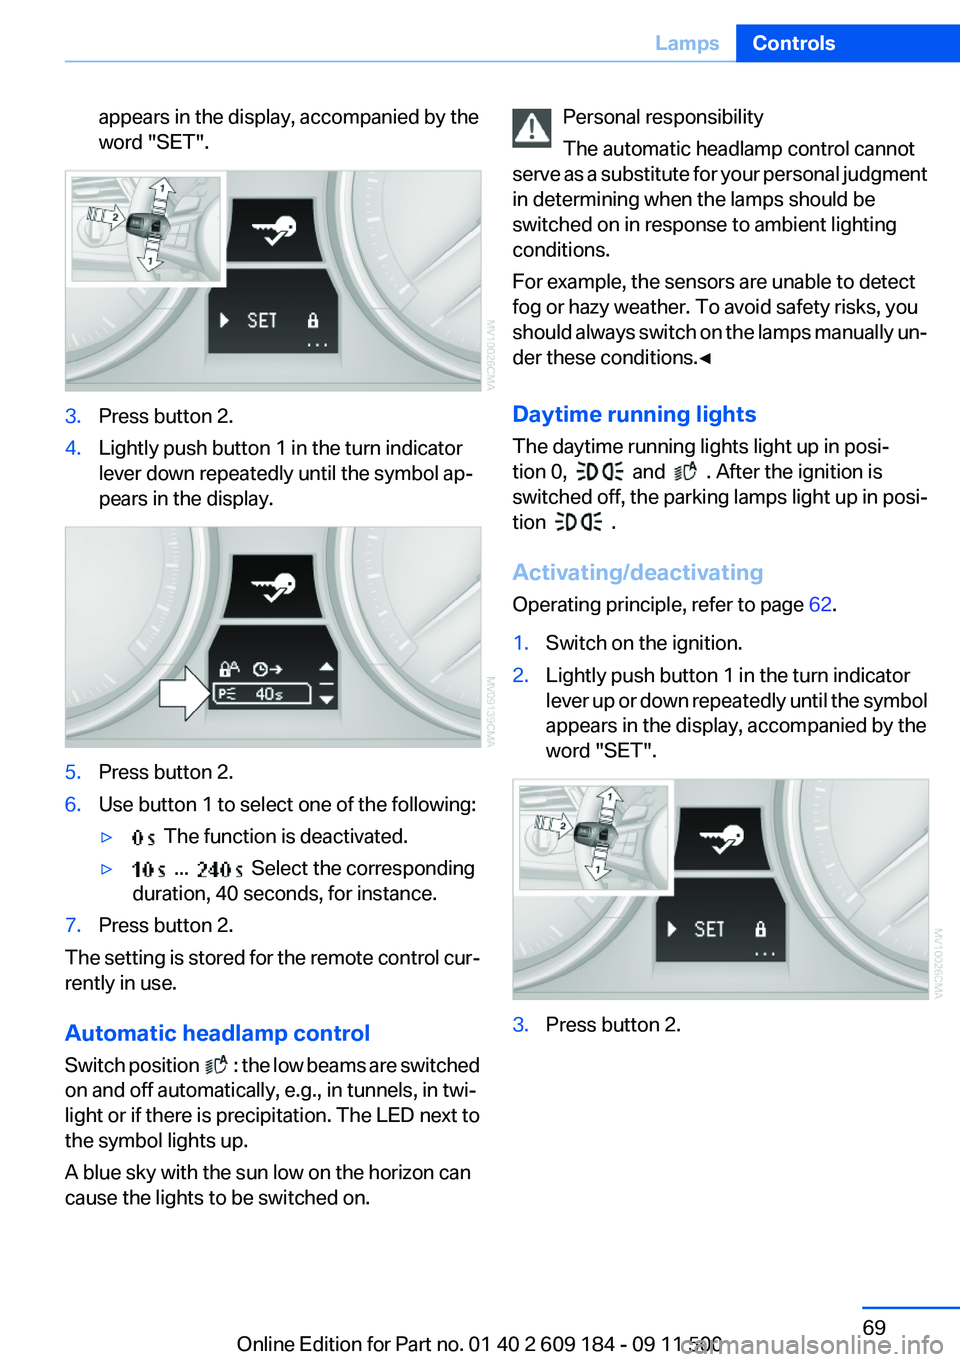
appears in the display, accompanied by the
word "SET".3.Press button 2.4.Lightly push button 1 in the turn indicator
lever down repeatedly until the symbol ap‐
pears in the display.5.Press button 2.6.Use button 1 to select one of the following:▷ The function is deactivated.▷ ... Select the corresponding
duration, 40 seconds, for instance.7.Press button 2.
The setting is stored for the remote control cur‐
rently in use.
Automatic headlamp control
Switch position
: the low beams are switched
on and off automatically, e.g., in tunnels, in twi‐
light or if there is precipitation. The LED next to
the symbol lights up.
A blue sky with the sun low on the horizon can
cause the lights to be switched on.
Personal responsibility
The automatic headlamp control cannot
serve as a substitute for your personal judgment
in determining when the lamps should be
switched on in response to ambient lighting
conditions.
For example, the sensors are unable to detect
fog or hazy weather. To avoid safety risks, you
should always switch on the lamps manually un‐
der these conditions.◀
Daytime running lights
The daytime running lights light up in posi‐
tion 0,
and . After the ignition is
switched off, the parking lamps light up in posi‐
tion
.
Activating/deactivating
Operating principle, refer to page 62.
1.Switch on the ignition.2.Lightly push button 1 in the turn indicator
lever up or down repeatedly until the symbol
appears in the display, accompanied by the
word "SET".3.Press button 2.Seite 69LampsControls69
Online Edition for Part no. 01 40 2 609 184 - 09 11 500
Page 70 of 220
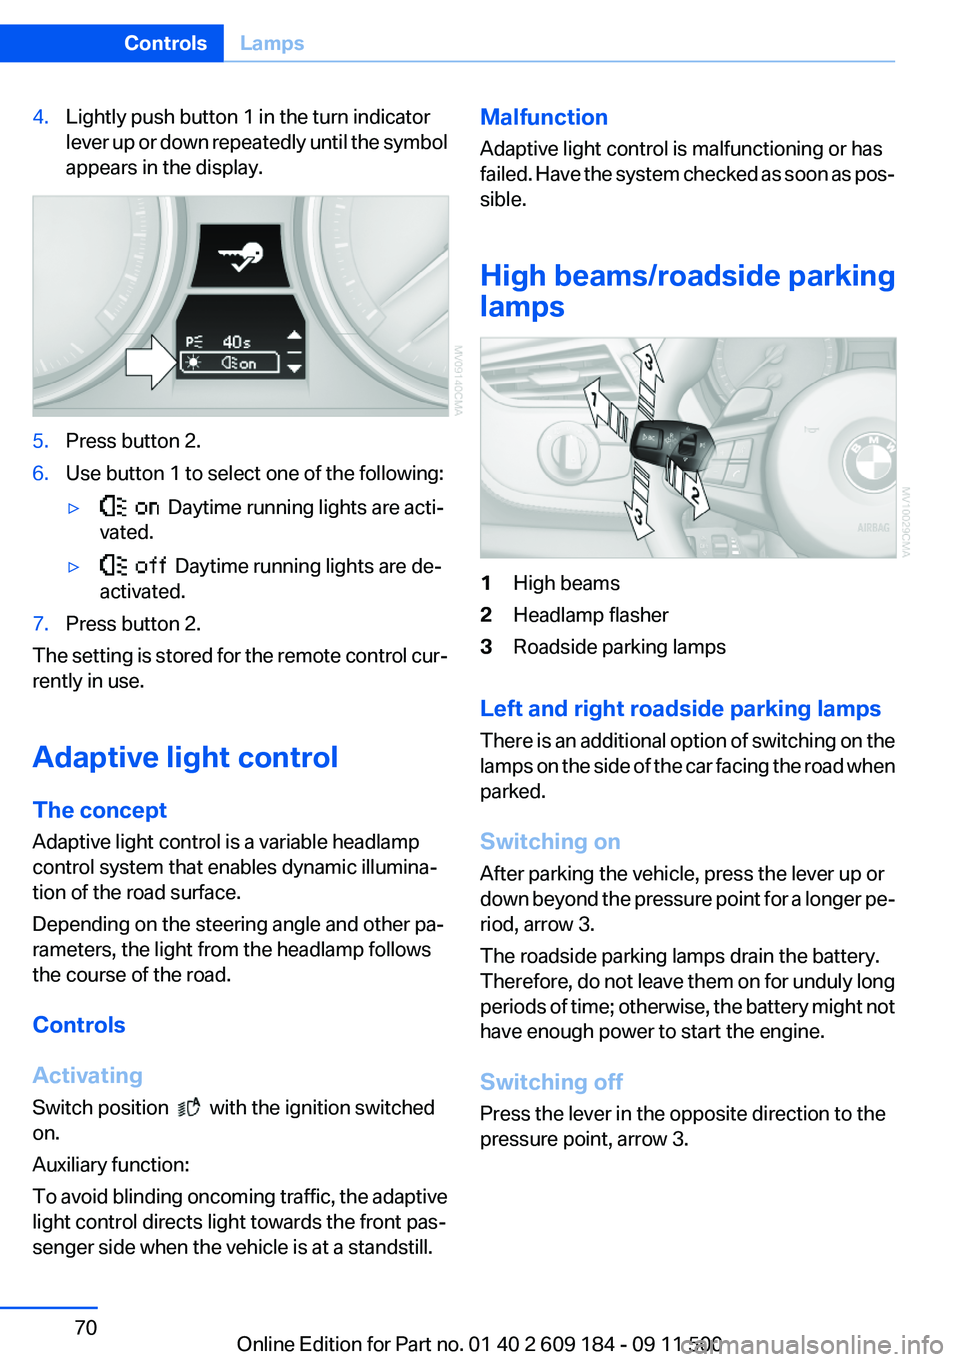
4.Lightly push button 1 in the turn indicator
lever up or down repeatedly until the symbol
appears in the display.5.Press button 2.6.Use button 1 to select one of the following:▷ Daytime running lights are acti‐
vated.▷ Daytime running lights are de‐
activated.7.Press button 2.
The setting is stored for the remote control cur‐
rently in use.
Adaptive light control
The concept
Adaptive light control is a variable headlamp
control system that enables dynamic illumina‐
tion of the road surface.
Depending on the steering angle and other pa‐
rameters, the light from the headlamp follows
the course of the road.
Controls
Activating
Switch position
with the ignition switched
on.
Auxiliary function:
To avoid blinding oncoming traffic, the adaptive
light control directs light towards the front pas‐
senger side when the vehicle is at a standstill.
Malfunction
Adaptive light control is malfunctioning or has
failed. Have the system checked as soon as pos‐
sible.
High beams/roadside parking
lamps1High beams2Headlamp flasher3Roadside parking lamps
Left and right roadside parking lamps
There is an additional option of switching on the
lamps on the side of the car facing the road when
parked.
Switching on
After parking the vehicle, press the lever up or
down beyond the pressure point for a longer pe‐
riod, arrow 3.
The roadside parking lamps drain the battery.
Therefore, do not leave them on for unduly long
periods of time; otherwise, the battery might not
have enough power to start the engine.
Switching off
Press the lever in the opposite direction to the
pressure point, arrow 3.
Seite 70ControlsLamps70
Online Edition for Part no. 01 40 2 609 184 - 09 11 500