heating BMW Z4 SDRIVE35I 2012 Owners Manual
[x] Cancel search | Manufacturer: BMW, Model Year: 2012, Model line: Z4 SDRIVE35I, Model: BMW Z4 SDRIVE35I 2012Pages: 220, PDF Size: 9.9 MB
Page 13 of 220
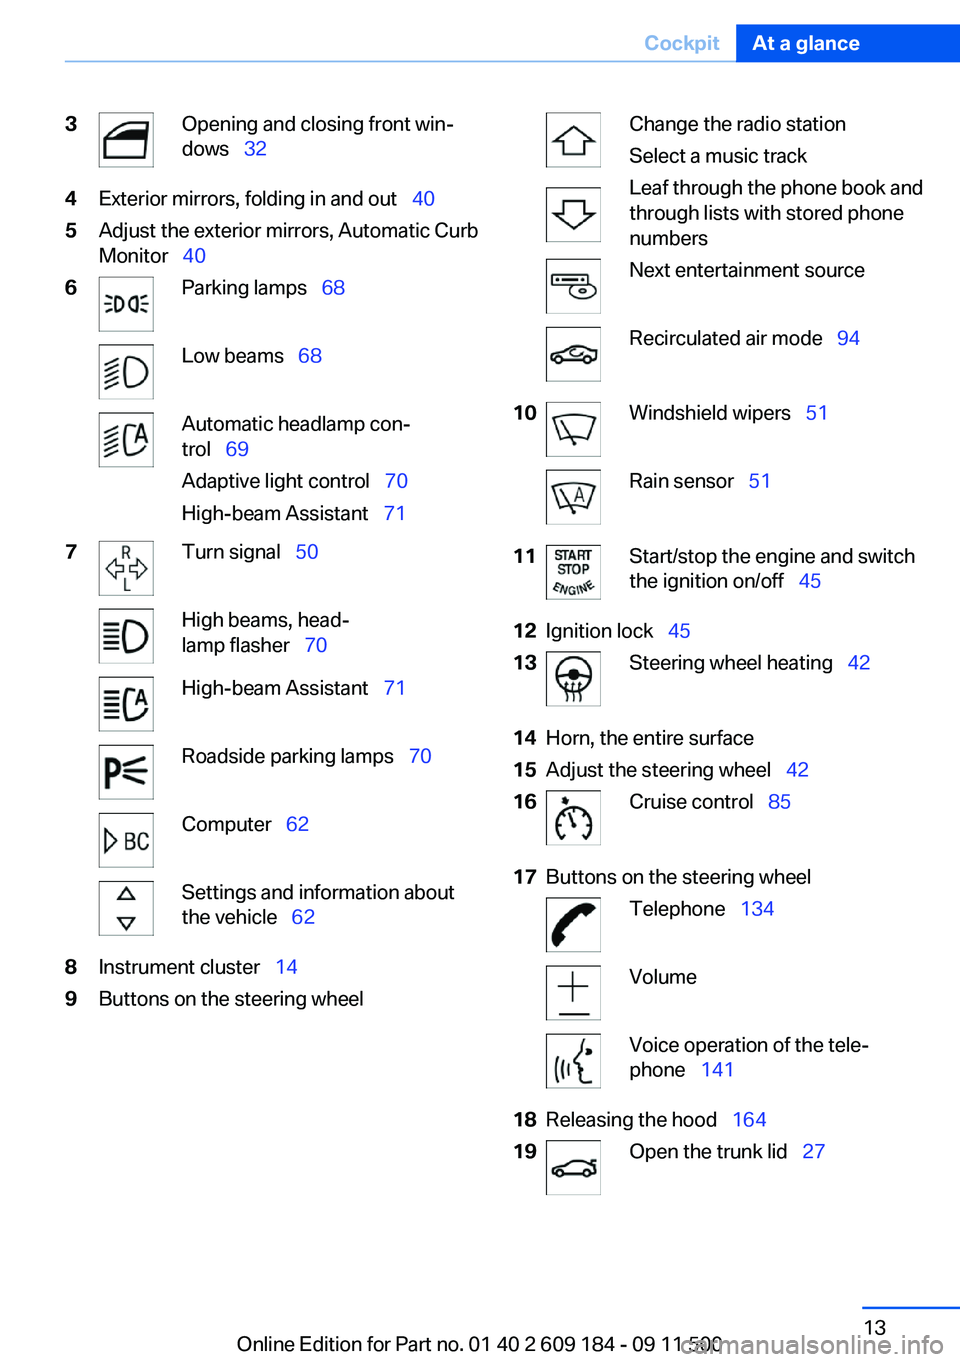
3Opening and closing front win‐
dows 324Exterior mirrors, folding in and out 405Adjust the exterior mirrors, Automatic Curb
Monitor 406Parking lamps 68Low beams 68Automatic headlamp con‐
trol 69
Adaptive light control 70
High-beam Assistant 717Turn signal 50High beams, head‐
lamp flasher 70High-beam Assistant 71Roadside parking lamps 70Computer 62Settings and information about
the vehicle 628Instrument cluster 149Buttons on the steering wheelChange the radio station
Select a music track
Leaf through the phone book and
through lists with stored phone
numbersNext entertainment sourceRecirculated air mode 9410Windshield wipers 51Rain sensor 5111Start/stop the engine and switch
the ignition on/off 4512Ignition lock 4513Steering wheel heating 4214Horn, the entire surface15Adjust the steering wheel 4216Cruise control 8517Buttons on the steering wheelTelephone 134VolumeVoice operation of the tele‐
phone 14118Releasing the hood 16419Open the trunk lid 27Seite 13CockpitAt a glance13
Online Edition for Part no. 01 40 2 609 184 - 09 11 500
Page 15 of 220
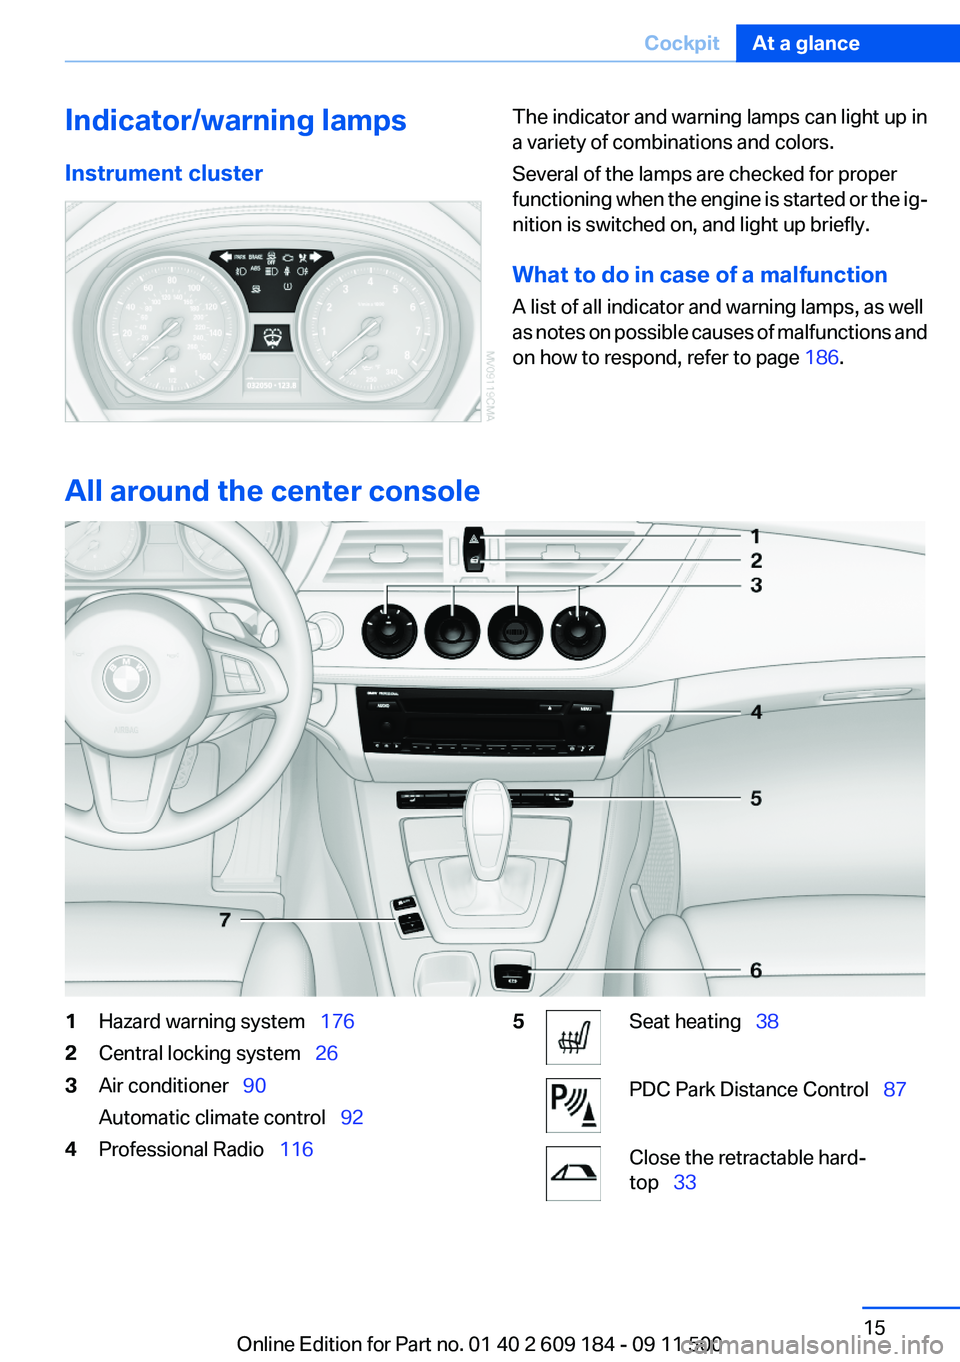
Indicator/warning lamps
Instrument clusterThe indicator and warning lamps can light up in
a variety of combinations and colors.
Several of the lamps are checked for proper
functioning when the engine is started or the ig‐
nition is switched on, and light up briefly.
What to do in case of a malfunction
A list of all indicator and warning lamps, as well
as notes on possible causes of malfunctions and
on how to respond, refer to page 186.
All around the center console
1Hazard warning system 1762Central locking system 263Air conditioner 90
Automatic climate control 924Professional Radio 1165Seat heating 38PDC Park Distance Control 87Close the retractable hard‐
top 33Seite 15CockpitAt a glance15
Online Edition for Part no. 01 40 2 609 184 - 09 11 500
Page 38 of 220
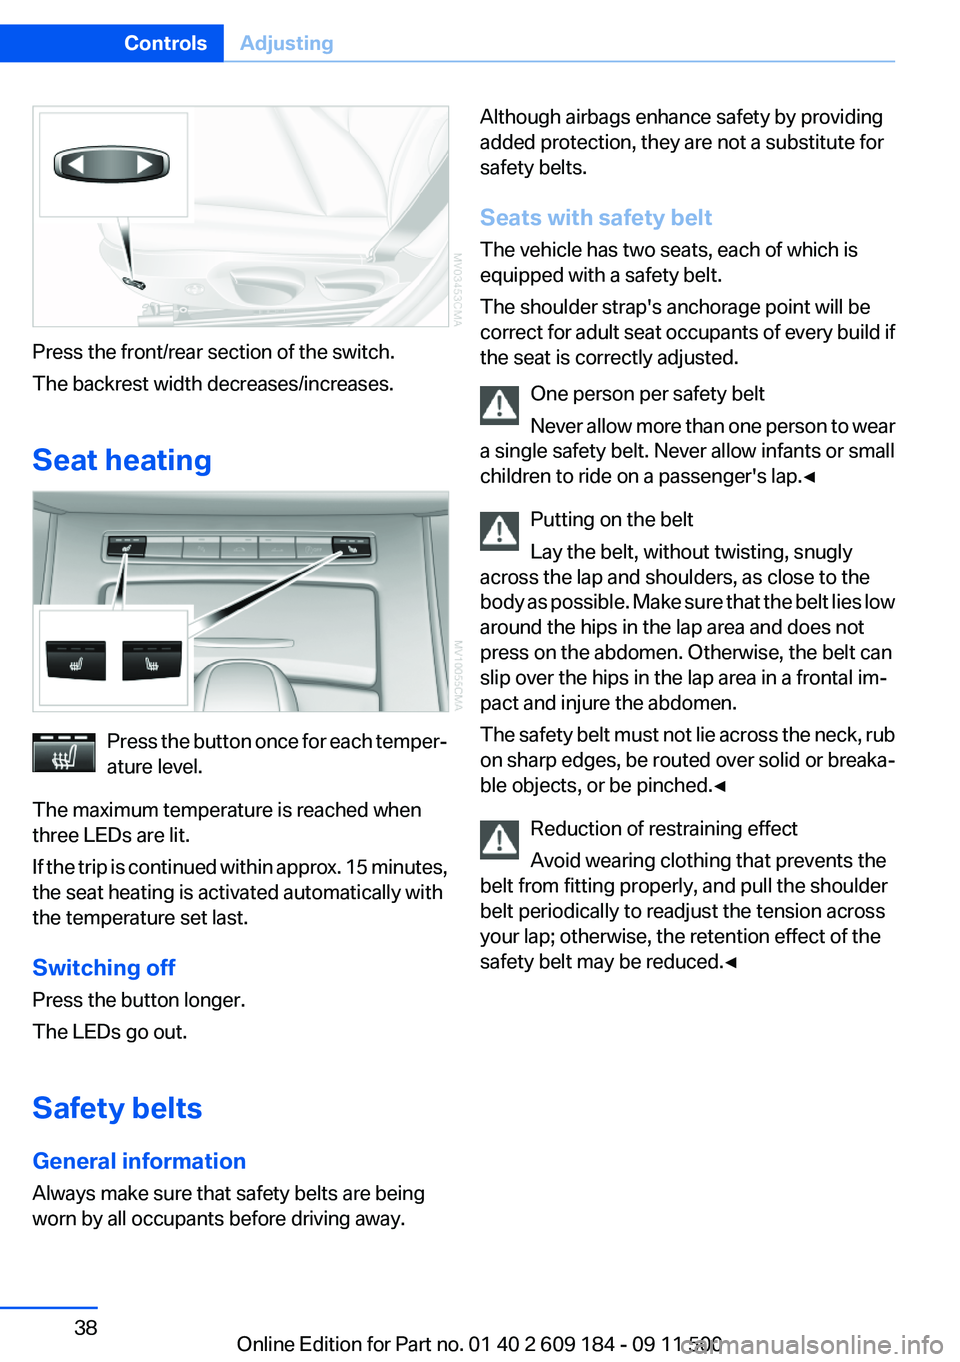
Press the front/rear section of the switch.
The backrest width decreases/increases.
Seat heating
Press the button once for each temper‐
ature level.
The maximum temperature is reached when
three LEDs are lit.
If the trip is continued within approx. 15 minutes,
the seat heating is activated automatically with
the temperature set last.
Switching off
Press the button longer.
The LEDs go out.
Safety belts
General information
Always make sure that safety belts are being
worn by all occupants before driving away.
Although airbags enhance safety by providing
added protection, they are not a substitute for
safety belts.
Seats with safety belt
The vehicle has two seats, each of which is
equipped with a safety belt.
The shoulder strap's anchorage point will be
correct for adult seat occupants of every build if
the seat is correctly adjusted.
One person per safety belt
Never allow more than one person to wear
a single safety belt. Never allow infants or small
children to ride on a passenger's lap.◀
Putting on the belt
Lay the belt, without twisting, snugly
across the lap and shoulders, as close to the
body as possible. Make sure that the belt lies low
around the hips in the lap area and does not
press on the abdomen. Otherwise, the belt can
slip over the hips in the lap area in a frontal im‐
pact and injure the abdomen.
The safety belt must not lie across the neck, rub
on sharp edges, be routed over solid or breaka‐
ble objects, or be pinched.◀
Reduction of restraining effect
Avoid wearing clothing that prevents the
belt from fitting properly, and pull the shoulder
belt periodically to readjust the tension across
your lap; otherwise, the retention effect of the
safety belt may be reduced.◀Seite 38ControlsAdjusting38
Online Edition for Part no. 01 40 2 609 184 - 09 11 500
Page 41 of 220
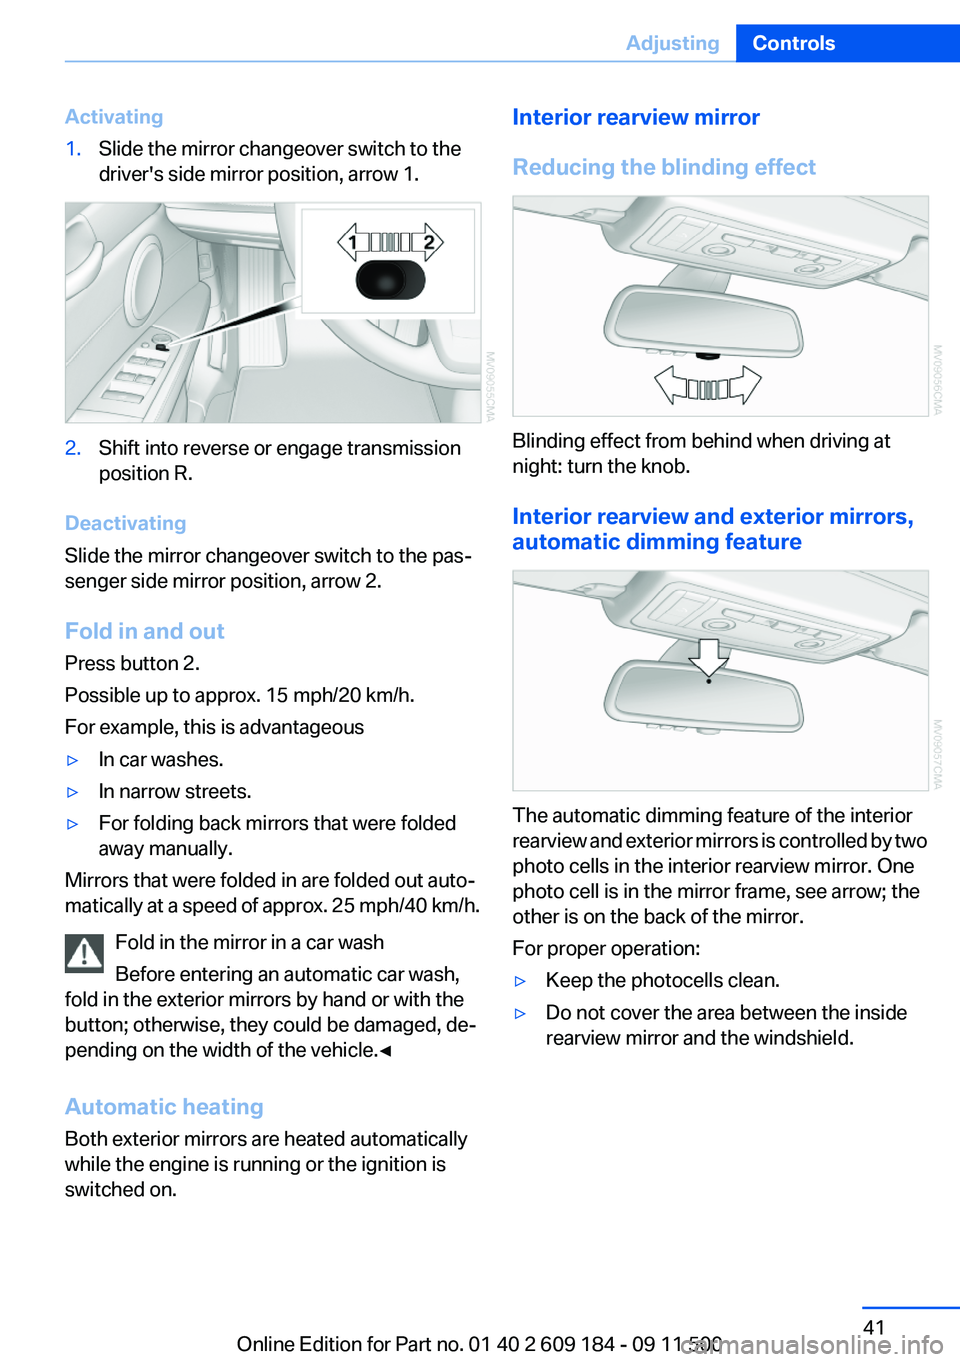
Activating1.Slide the mirror changeover switch to the
driver's side mirror position, arrow 1.2.Shift into reverse or engage transmission
position R.
Deactivating
Slide the mirror changeover switch to the pas‐
senger side mirror position, arrow 2.
Fold in and out
Press button 2.
Possible up to approx. 15 mph/20 km/h.
For example, this is advantageous
▷In car washes.▷In narrow streets.▷For folding back mirrors that were folded
away manually.
Mirrors that were folded in are folded out auto‐
matically at a speed of approx. 25 mph/40 km/h.
Fold in the mirror in a car wash
Before entering an automatic car wash,
fold in the exterior mirrors by hand or with the
button; otherwise, they could be damaged, de‐
pending on the width of the vehicle.◀
Automatic heating
Both exterior mirrors are heated automatically
while the engine is running or the ignition is
switched on.
Interior rearview mirror
Reducing the blinding effect
Blinding effect from behind when driving at
night: turn the knob.
Interior rearview and exterior mirrors,
automatic dimming feature
The automatic dimming feature of the interior
rearview and exterior mirrors is controlled by two
photo cells in the interior rearview mirror. One
photo cell is in the mirror frame, see arrow; the
other is on the back of the mirror.
For proper operation:
▷Keep the photocells clean.▷Do not cover the area between the inside
rearview mirror and the windshield.Seite 41AdjustingControls41
Online Edition for Part no. 01 40 2 609 184 - 09 11 500
Page 42 of 220
Steering wheel
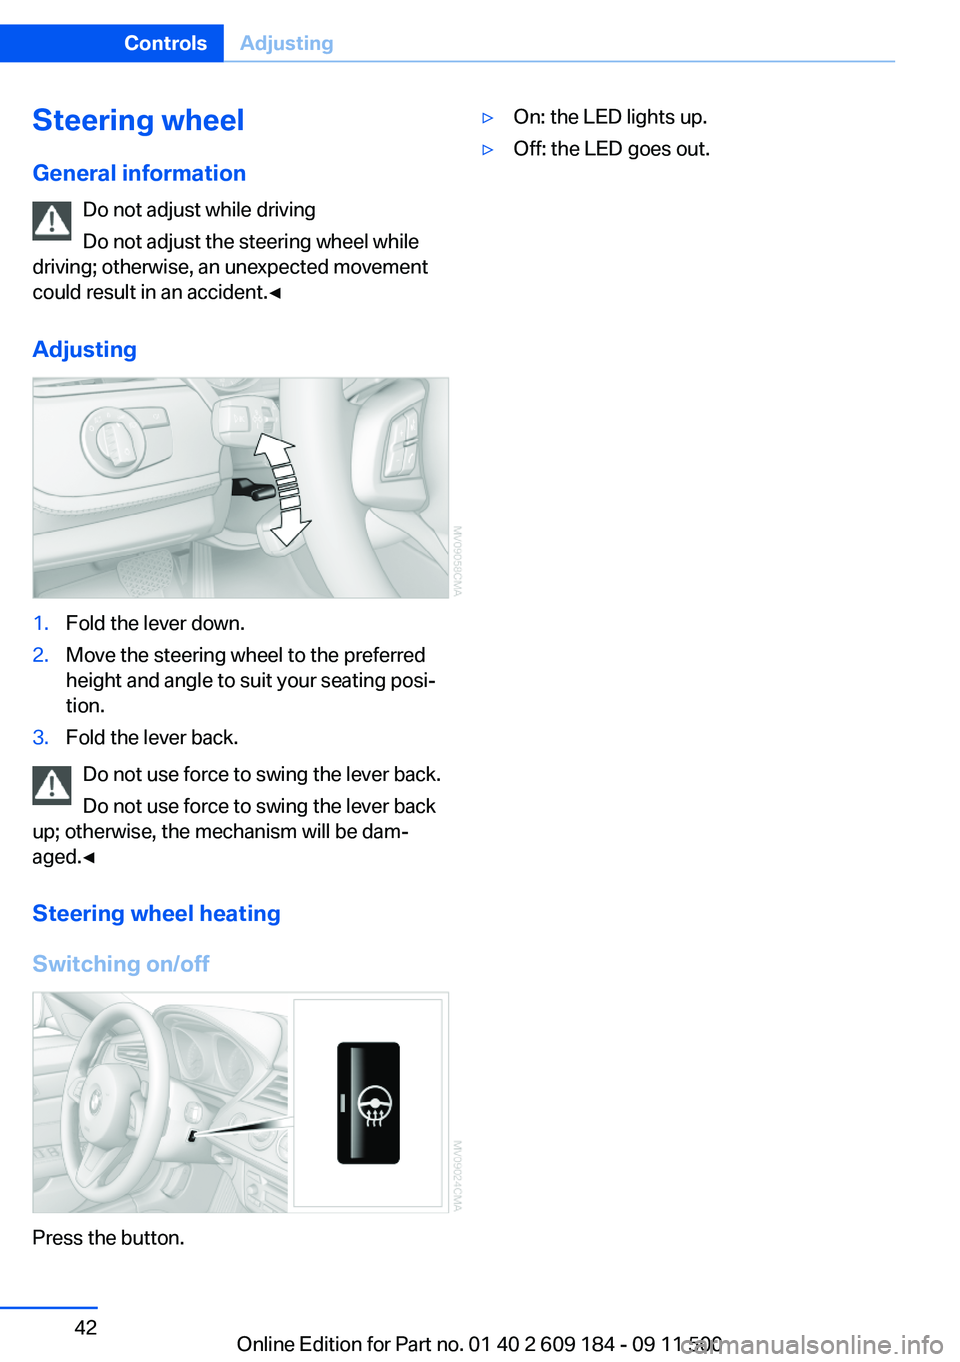
General information Do not adjust while driving
Do not adjust the steering wheel while
driving; otherwise, an unexpected movement
could result in an accident.◀
Adjusting1.Fold the lever down.2.Move the steering wheel to the preferred
height and angle to suit your seating posi‐
tion.3.Fold the lever back.
Do not use force to swing the lever back.
Do not use force to swing the lever back
up; otherwise, the mechanism will be dam‐
aged.◀
Steering wheel heating
Switching on/off
Press the button.
▷On: the LED lights up.▷Off: the LED goes out.Seite 42ControlsAdjusting42
Online Edition for Part no. 01 40 2 609 184 - 09 11 500
Page 46 of 220
Ignition on
All electrical consumers can operate. The od‐
ometer and trip odometer are displayed in the
instrument cluster.
To save battery power when the engine is off,
switch off the ignition and any unnecessary
electronic systems/power consumers.
Radio ready state and ignition off
All indicator and warning lamps as well as dis‐
plays in the instrument cluster go out.
Sport automatic transmission
In certain situations, transmission position P is
engaged automatically. To make it possible for
the vehicle to roll, such as in an automatic car
wash, follow the instructions in Car washes, re‐
fer to page 182.
Starting the engine Enclosed areas
Do not let the engine run in enclosed
areas; otherwise, breathing of exhaust fumes
may lead to loss of consciousness and death.
The exhaust gases contain carbon monoxide, an
odorless and colorless but highly toxic gas.◀
Unattended vehicle
Do not leave the car unattended with the
engine running; otherwise, it presents a poten‐
tial source of danger.
Before leaving the car with the engine running,
set the parking brake and place the transmission
in position P or neutral to prevent the car from
moving.◀
Frequent starting in quick succession
Avoid repeated futile attempts at starting
the car and avoid starting the car frequently in
quick succession. Otherwise, the fuel is not
burned or is inadequately burned, and there is
the danger of overheating and damaging the
catalytic converter.◀Do not wait for the engine to warm up while the
vehicle remains stationary. Start driving right
away, but at moderate engine speeds.
Manual transmission
Remote control in the ignition lock or, with Com‐
fort Access, inside the vehicle, refer to page 28.
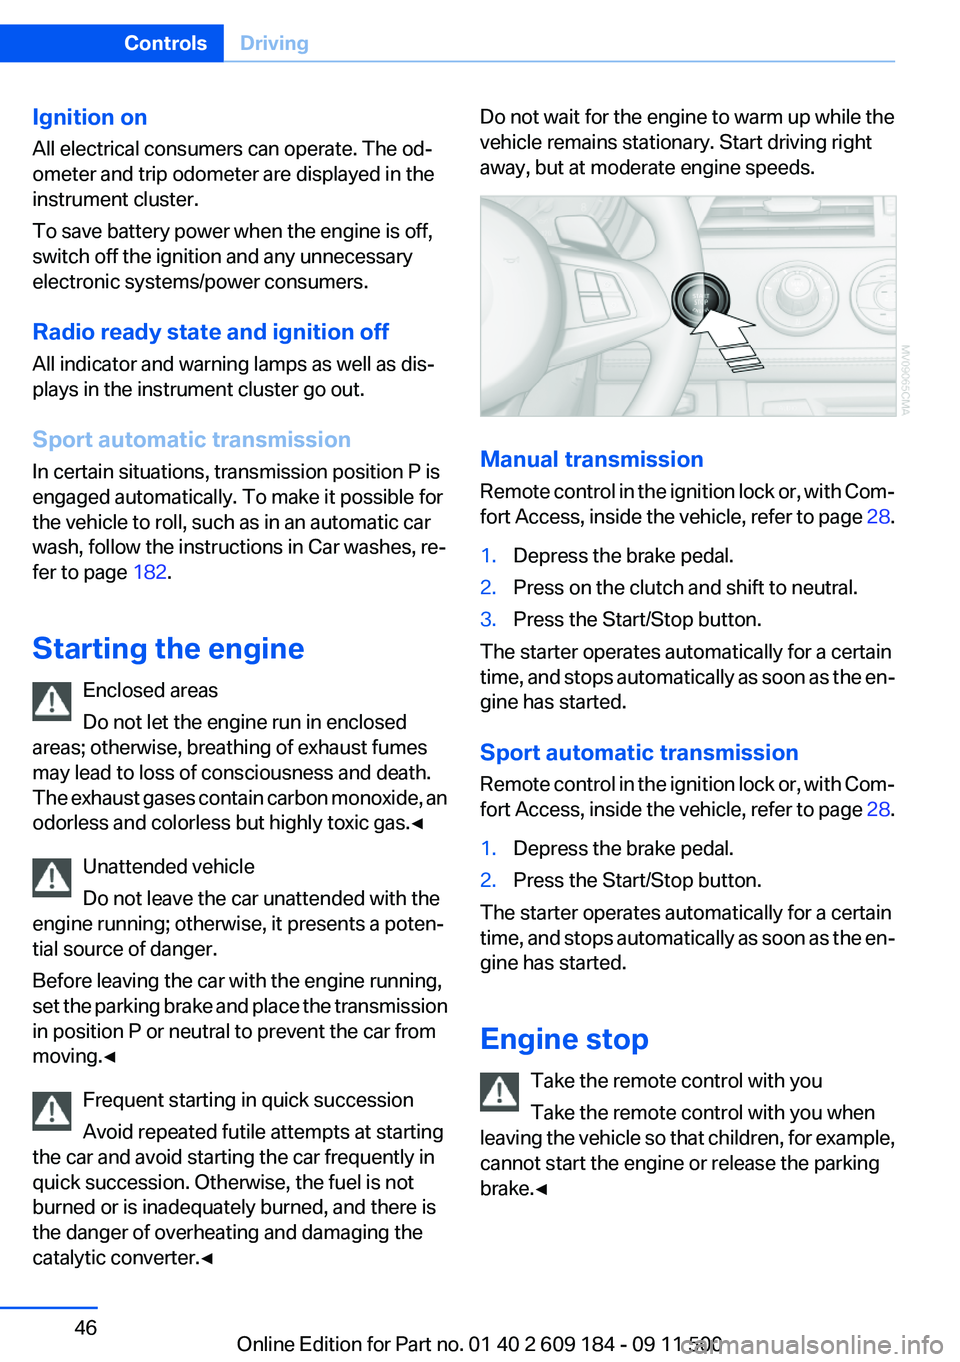
1.Depress the brake pedal.2.Press on the clutch and shift to neutral.3.Press the Start/Stop button.
The starter operates automatically for a certain
time, and stops automatically as soon as the en‐
gine has started.
Sport automatic transmission
Remote control in the ignition lock or, with Com‐
fort Access, inside the vehicle, refer to page 28.
1.Depress the brake pedal.2.Press the Start/Stop button.
The starter operates automatically for a certain
time, and stops automatically as soon as the en‐
gine has started.
Engine stop Take the remote control with you
Take the remote control with you when
leaving the vehicle so that children, for example,
cannot start the engine or release the parking
brake.◀
Seite 46ControlsDriving46
Online Edition for Part no. 01 40 2 609 184 - 09 11 500
Page 48 of 220
Parking the vehicle during an
automatic engine stop
The vehicle can be parked safely during an au‐
tomatic engine stop, such as when you wish to
leave the vehicle.1.Press the Start/Stop button. The ignition is
switched off. The Auto Start/Stop function
is deactivated.2.Set the parking brake.
Start the engine as usual using the Start/Stop
button.
Automatic engine start
To drive away, the engine starts automatically as
soon as the clutch pedal is depressed.
After the engine starts, accelerate as usual.
Safety mode
The engine does not start by itself after it is
switched off automatically if any of the following
conditions are fulfilled:
▷The driver's safety belt is unfastened or the
driver's door is open.▷Hood was unlocked.
The indicator lamp lights up.
The engine can only be started via the
Start/Stop button.
More information, refer to page 186.
Note
Even if you do not wish to drive away, the stop‐
ped engine still starts automatically in the fol‐
lowing situations:
▷The interior has heated up strongly with the
cooling function switched on.▷The steering wheel is turned.▷The vehicle begins to roll.▷Fogging of the windows when the automatic
climate control is switched on.▷Vehicle battery charge is very low.▷The interior has cooled down strongly with
the heating switched on.▷Low braking pressure, such as from de‐
pressing the brake pedal a number of times
consecutively.
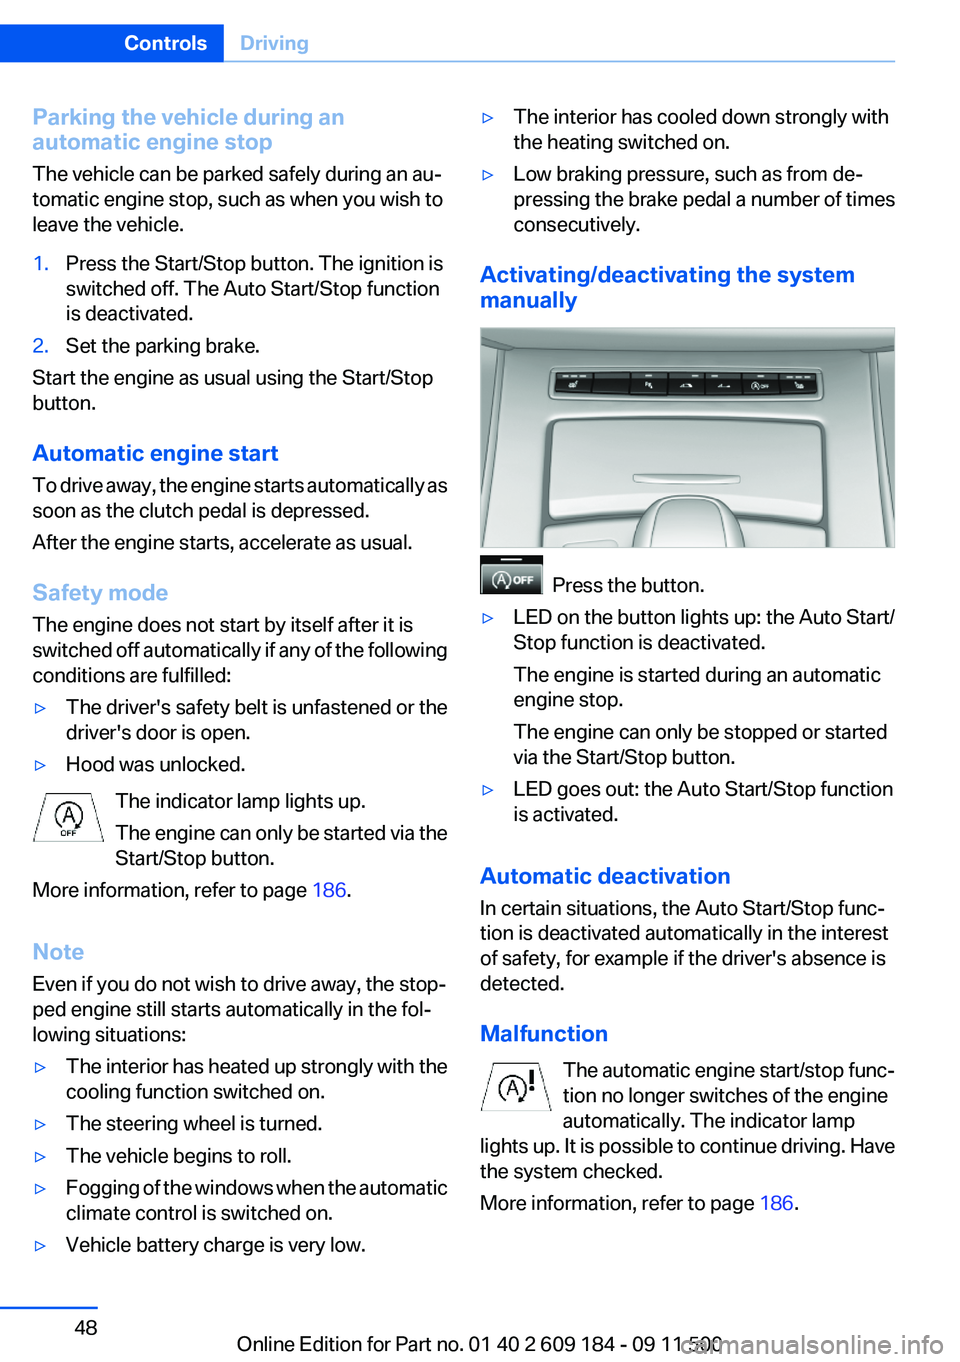
Activating/deactivating the system
manually
Press the button.
▷LED on the button lights up: the Auto Start/
Stop function is deactivated.
The engine is started during an automatic
engine stop.
The engine can only be stopped or started
via the Start/Stop button.▷LED goes out: the Auto Start/Stop function
is activated.
Automatic deactivation
In certain situations, the Auto Start/Stop func‐
tion is deactivated automatically in the interest
of safety, for example if the driver's absence is
detected.
Malfunction The automatic engine start/stop func‐
tion no longer switches of the engine
automatically. The indicator lamp
lights up. It is possible to continue driving. Have
the system checked.
More information, refer to page 186.
Seite 48ControlsDriving48
Online Edition for Part no. 01 40 2 609 184 - 09 11 500
Page 90 of 220
supply continuously; the levers change the
direction of the airflow.5Air vent: air for the knee area, footwell
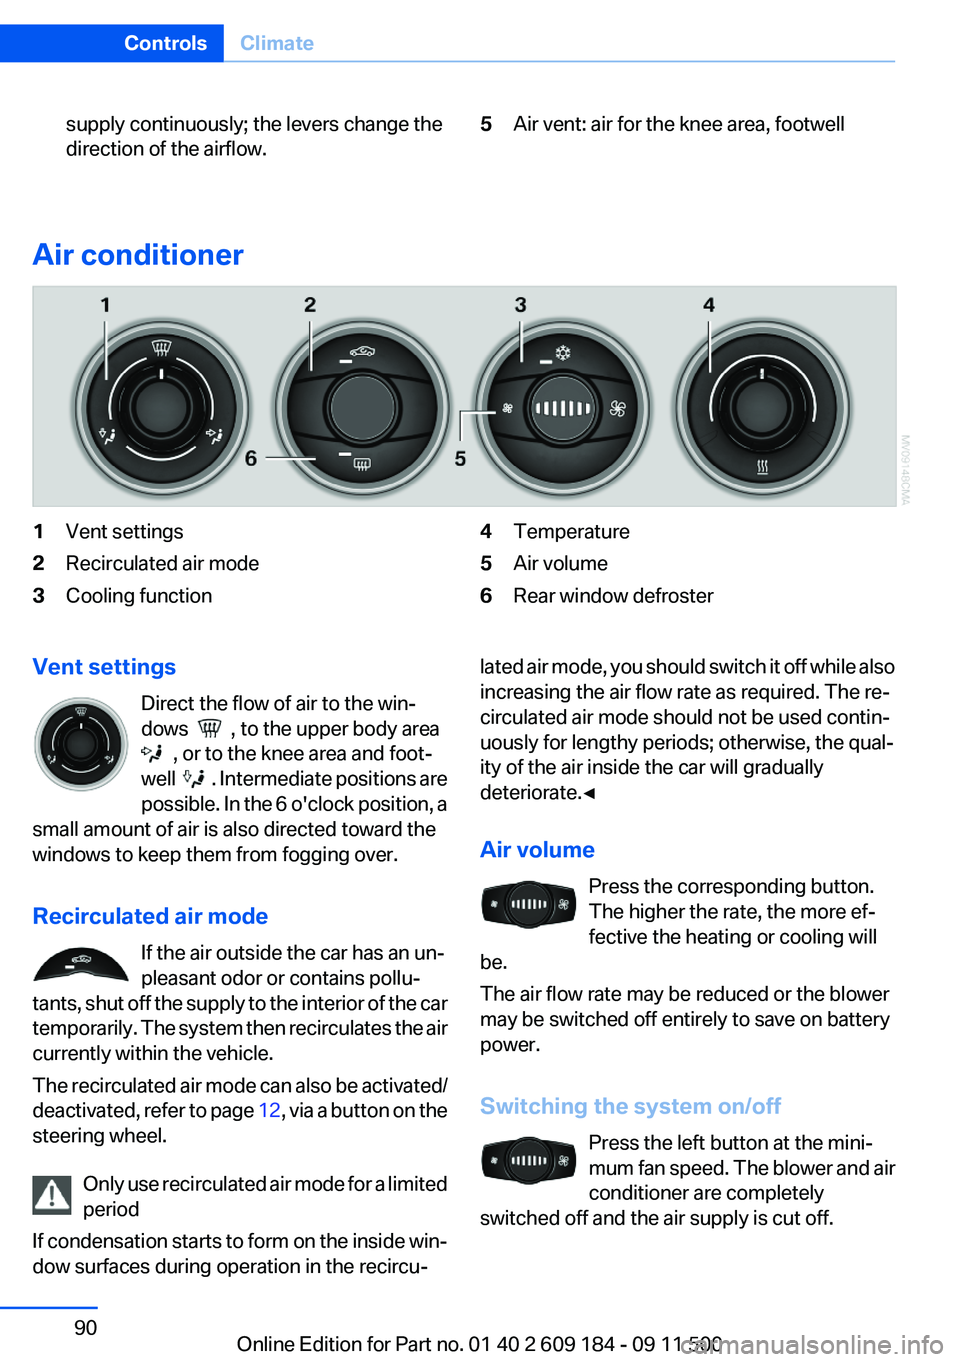
Air conditioner
1Vent settings2Recirculated air mode3Cooling function4Temperature5Air volume6Rear window defrosterVent settings
Direct the flow of air to the win‐
dows
, to the upper body area
, or to the knee area and foot‐
well
. Intermediate positions are
possible. In the 6 o'clock position, a
small amount of air is also directed toward the
windows to keep them from fogging over.
Recirculated air mode If the air outside the car has an un‐
pleasant odor or contains pollu‐
tants, shut off the supply to the interior of the car
temporarily. The system then recirculates the air
currently within the vehicle.
The recirculated air mode can also be activated/
deactivated, refer to page 12, via a button on the
steering wheel.
Only use recirculated air mode for a limited
period
If condensation starts to form on the inside win‐
dow surfaces during operation in the recircu‐
lated air mode, you should switch it off while also
increasing the air flow rate as required. The re‐
circulated air mode should not be used contin‐
uously for lengthy periods; otherwise, the qual‐
ity of the air inside the car will gradually
deteriorate.◀
Air volume Press the corresponding button.
The higher the rate, the more ef‐
fective the heating or cooling will
be.
The air flow rate may be reduced or the blower
may be switched off entirely to save on battery
power.
Switching the system on/off Press the left button at the mini‐
mum fan speed. The blower and air
conditioner are completely
switched off and the air supply is cut off.Seite 90ControlsClimate90
Online Edition for Part no. 01 40 2 609 184 - 09 11 500
Page 91 of 220
To switch on the air conditioner, set the desired
air flow rate.
Switching cooling function on/off The cooling function cools and de‐
humidifies the incoming air before
reheating it as required, according to the tem‐
perature setting. This function is only available
while the engine is running.
The cooling function helps to prevent conden‐
sation on the windows or to remove it quickly.
Depending on the weather, the windshield may
fog over briefly when the engine is started.
Rear window defroster The defroster switches off auto‐
matically after a certain time or
when the hardtop is opened.
Temperature To increase the temperature, turn
the rotary switch clockwise to‐
wards red. For a lower temperature,
turn the rotary switch counter‐
clockwise towards blue.
Defrosting windows and removing
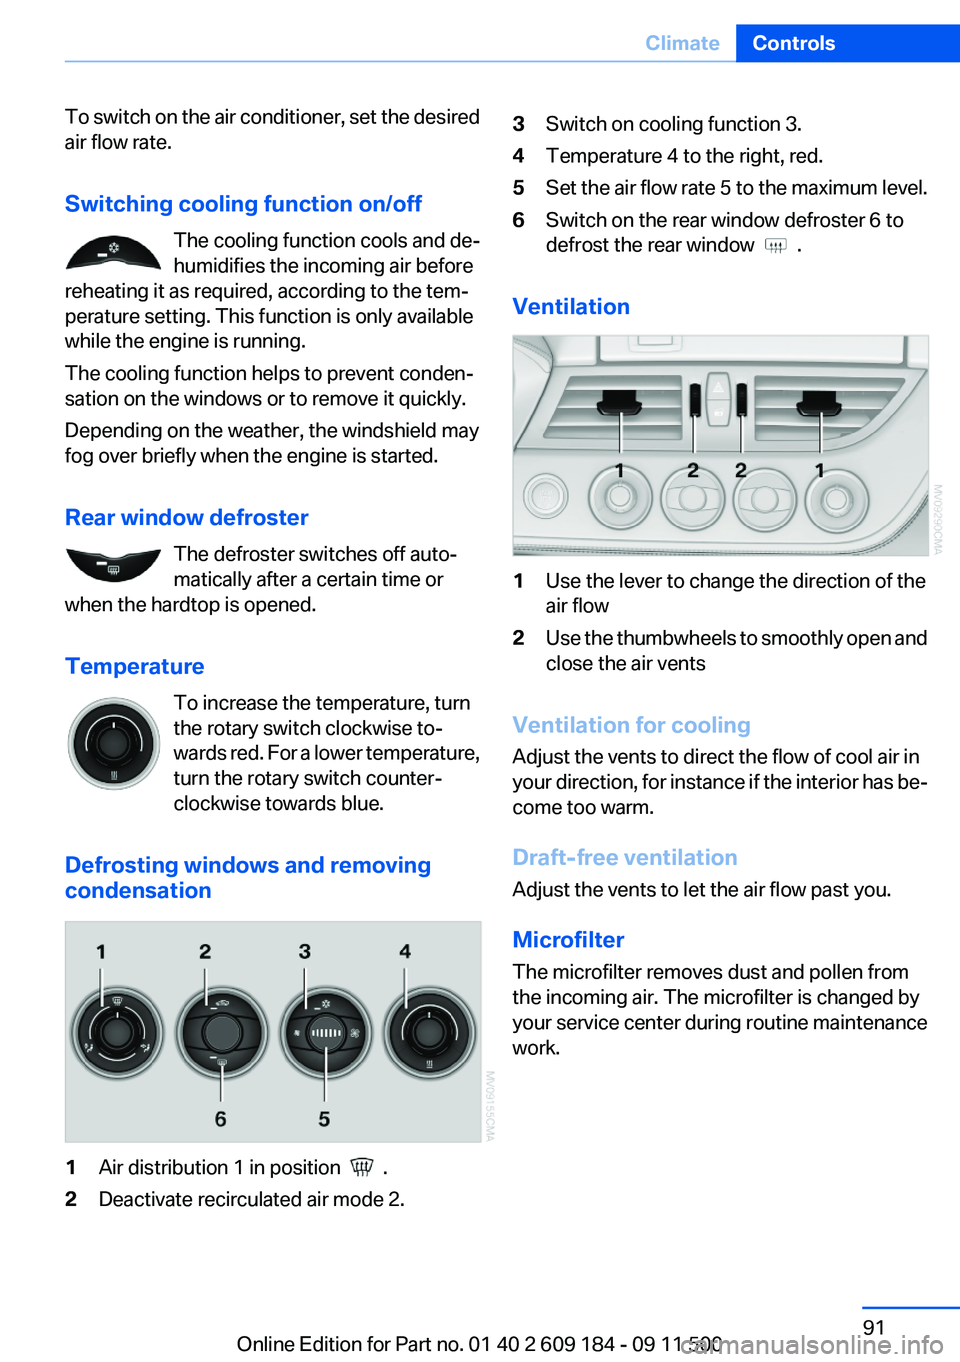
condensation1Air distribution 1 in position .2Deactivate recirculated air mode 2.3Switch on cooling function 3.4Temperature 4 to the right, red.5Set the air flow rate 5 to the maximum level.6Switch on the rear window defroster 6 to
defrost the rear window
.
Ventilation
1Use the lever to change the direction of the
air flow2Use the thumbwheels to smoothly open and
close the air vents
Ventilation for cooling
Adjust the vents to direct the flow of cool air in
your direction, for instance if the interior has be‐
come too warm.
Draft-free ventilation
Adjust the vents to let the air flow past you.
Microfilter
The microfilter removes dust and pollen from
the incoming air. The microfilter is changed by
your service center during routine maintenance
work.
Seite 91ClimateControls91
Online Edition for Part no. 01 40 2 609 184 - 09 11 500
Page 92 of 220
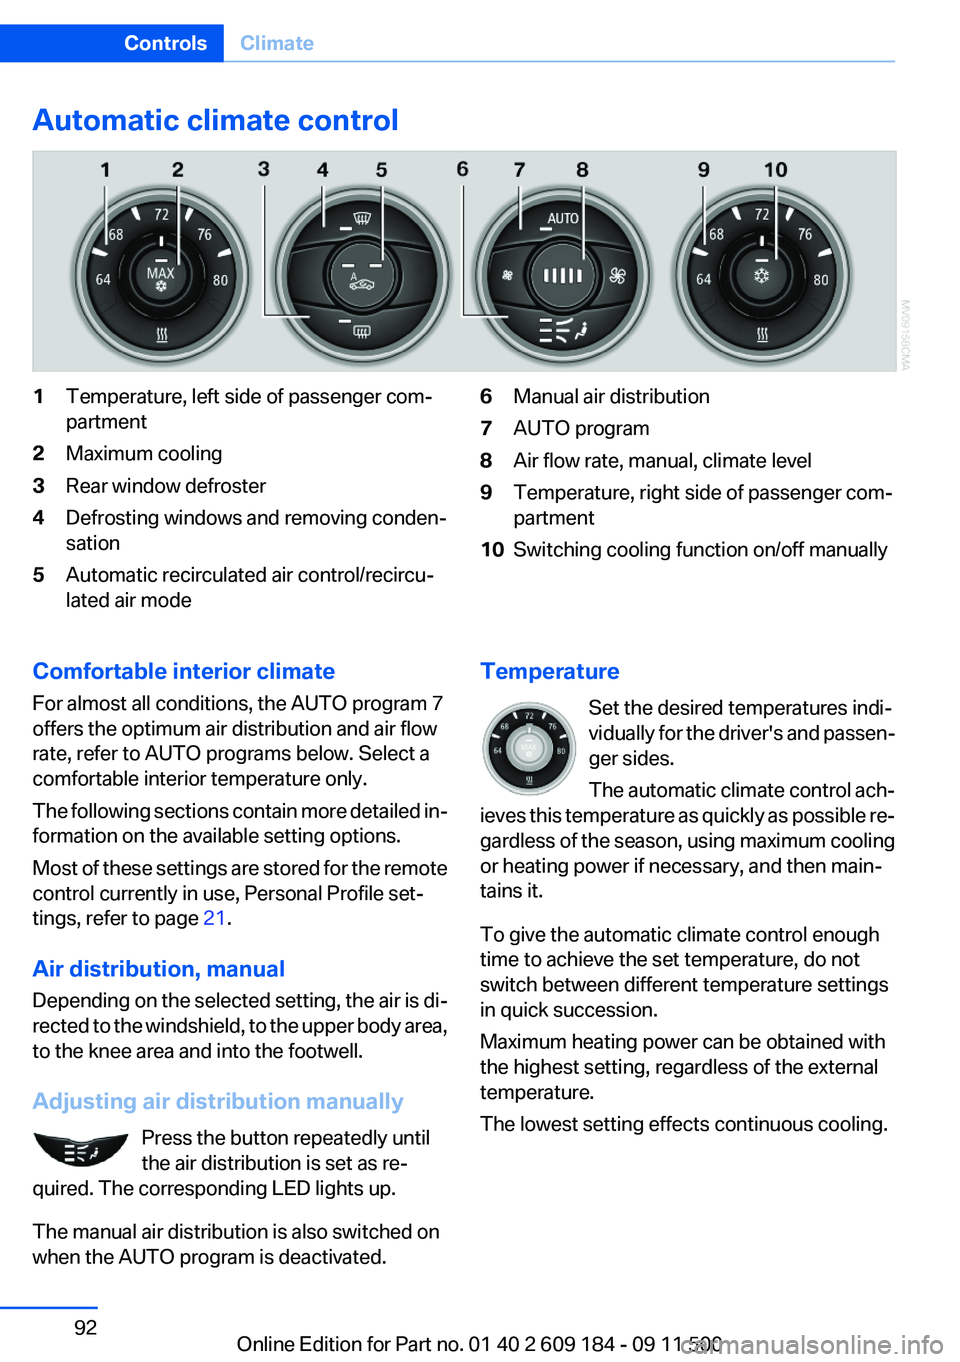
Automatic climate control1Temperature, left side of passenger com‐
partment2Maximum cooling3Rear window defroster4Defrosting windows and removing conden‐
sation5Automatic recirculated air control/recircu‐
lated air mode6Manual air distribution7AUTO program8Air flow rate, manual, climate level9Temperature, right side of passenger com‐
partment10Switching cooling function on/off manuallyComfortable interior climate
For almost all conditions, the AUTO program 7
offers the optimum air distribution and air flow
rate, refer to AUTO programs below. Select a
comfortable interior temperature only.
The following sections contain more detailed in‐
formation on the available setting options.
Most of these settings are stored for the remote
control currently in use, Personal Profile set‐
tings, refer to page 21.
Air distribution, manual
Depending on the selected setting, the air is di‐
rected to the windshield, to the upper body area,
to the knee area and into the footwell.
Adjusting air distribution manually Press the button repeatedly until
the air distribution is set as re‐
quired. The corresponding LED lights up.
The manual air distribution is also switched on
when the AUTO program is deactivated.Temperature
Set the desired temperatures indi‐
vidually for the driver's and passen‐
ger sides.
The automatic climate control ach‐
ieves this temperature as quickly as possible re‐
gardless of the season, using maximum cooling
or heating power if necessary, and then main‐
tains it.
To give the automatic climate control enough
time to achieve the set temperature, do not
switch between different temperature settings
in quick succession.
Maximum heating power can be obtained with
the highest setting, regardless of the external
temperature.
The lowest setting effects continuous cooling.Seite 92ControlsClimate92
Online Edition for Part no. 01 40 2 609 184 - 09 11 500