automatic transmission BMW Z4 SDRIVE35I ROADSTER 2010 User Guide
[x] Cancel search | Manufacturer: BMW, Model Year: 2010, Model line: Z4 SDRIVE35I ROADSTER, Model: BMW Z4 SDRIVE35I ROADSTER 2010Pages: 254, PDF Size: 8.04 MB
Page 60 of 254
Driving
58 >To shift down: press one of the shift pad-
dles forward, arrow2.
Gears can be shifted using the shift paddles in
drive mode or in manual mode.
Gear change in manual mode:
When manual mode is active, refer to page57,
gears can be changed using the shift paddles or
the selector lever.
Gear change in drive mode
The shift paddles can be used to change gears
in drive mode as well.
Afterwards, if the shift paddles are not used for
some time and vehicle acceleration is insuffi-
cient, the forward gears are changed again
automatically.
Launch Control
Launch Control enables you to drive off with an
optimal vehicle acceleration on a high grip road
surface.
Do not use Launch Control too often, as
the higher loads on the vehicle lead to
premature component wear.<
Launch Control is available when the engine is
at operating temperature, i.e., after driving con-
tinuously for at least 6 miles/10 km.
1.With the engine running, depress the brake
pedal with your left foot.
2.Activate the SPORT+ program of the
Dynamic Driving Control, refer to page79.
3.With the vehicle stationary, activate manual
mode and select first gear.
4.Press the accelerator all the way down. The
engine speed when driving off is controlled.
A flag symbol appears in the instrument
cluster.
5.The vehicle accelerates when you release
the brake pedal. Keep the accelerator
pressed all the way down.
6.The transmission shifts up automatically as
long as the accelerator is pressed all the
way down.Launch Control only becomes available again
after a certain distance has been driven.
Launch Control can only be used after the
break-in phase, refer to page112.
To maintain driving stability, activate DSC
whenever possible.<
Manually releasing and engaging the
transmission lock
If a power failure occurs, e.g., if the battery
is discharged or disconnected or if there
is an electrical malfunction, the transmission
lock must be released manually; otherwise, the
rear wheels are blocked and the vehicle cannot
be towed.<
Release the transmission lock manually for tow-
ing only and set the parking brake beforehand
to prevent the vehicle from rolling. After parking
the vehicle, lock the transmission lock again
manually, refer to page59.
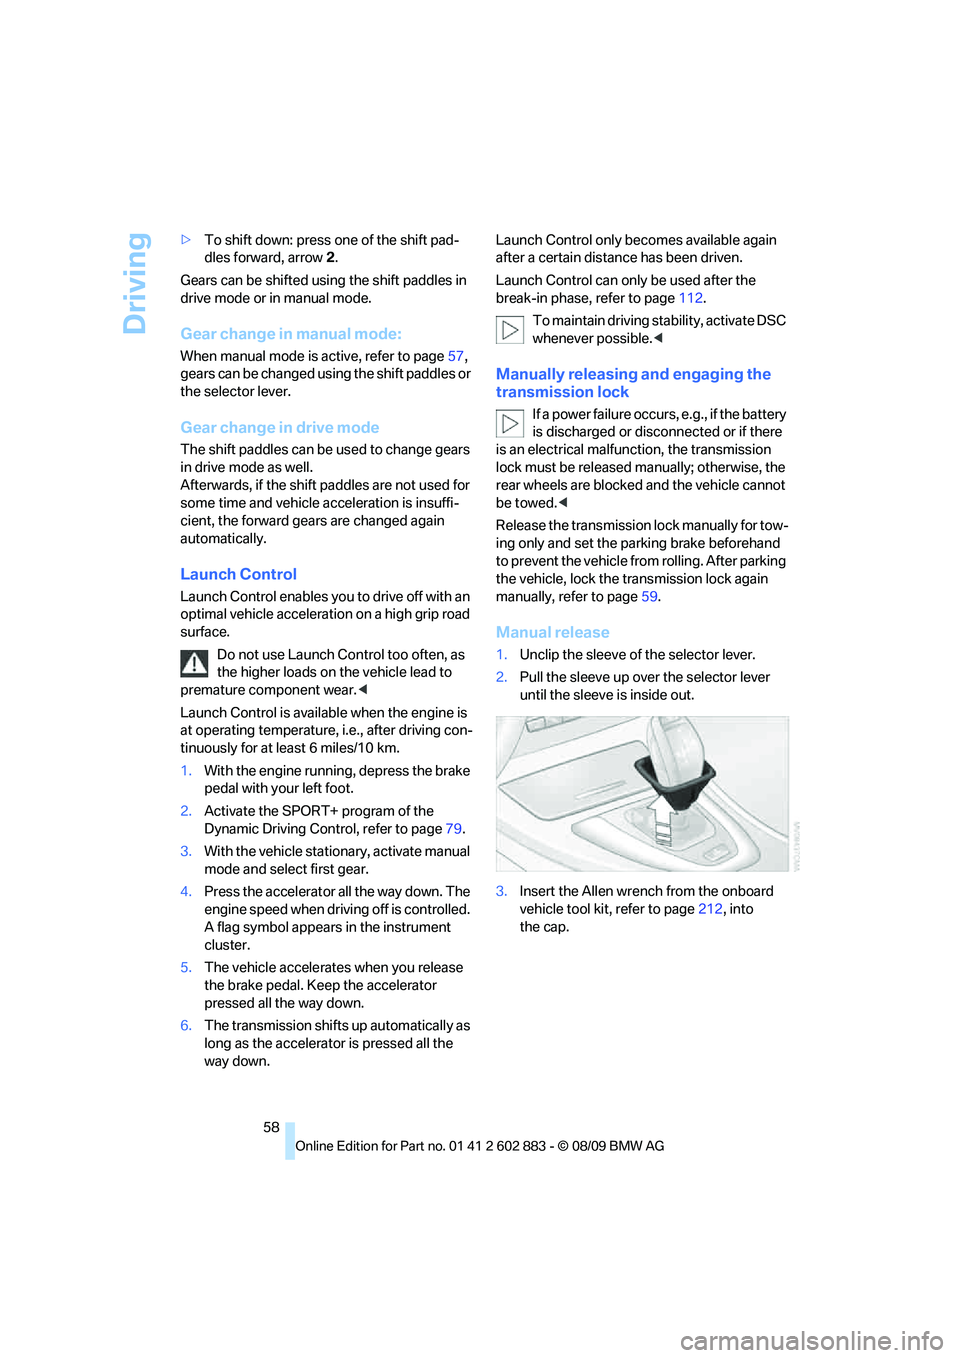
Manual release
1.Unclip the sleeve of the selector lever.
2.Pull the sleeve up over the selector lever
until the sleeve is inside out.
3.Insert the Allen wrench from the onboard
vehicle tool kit, refer to page212, into
the cap.
Page 63 of 254
Controls
61Reference
At a glance
Driving tips
Communications
Navigation
Entertainment
Mobility
Deactivating intermittent wipe or rain
sensor
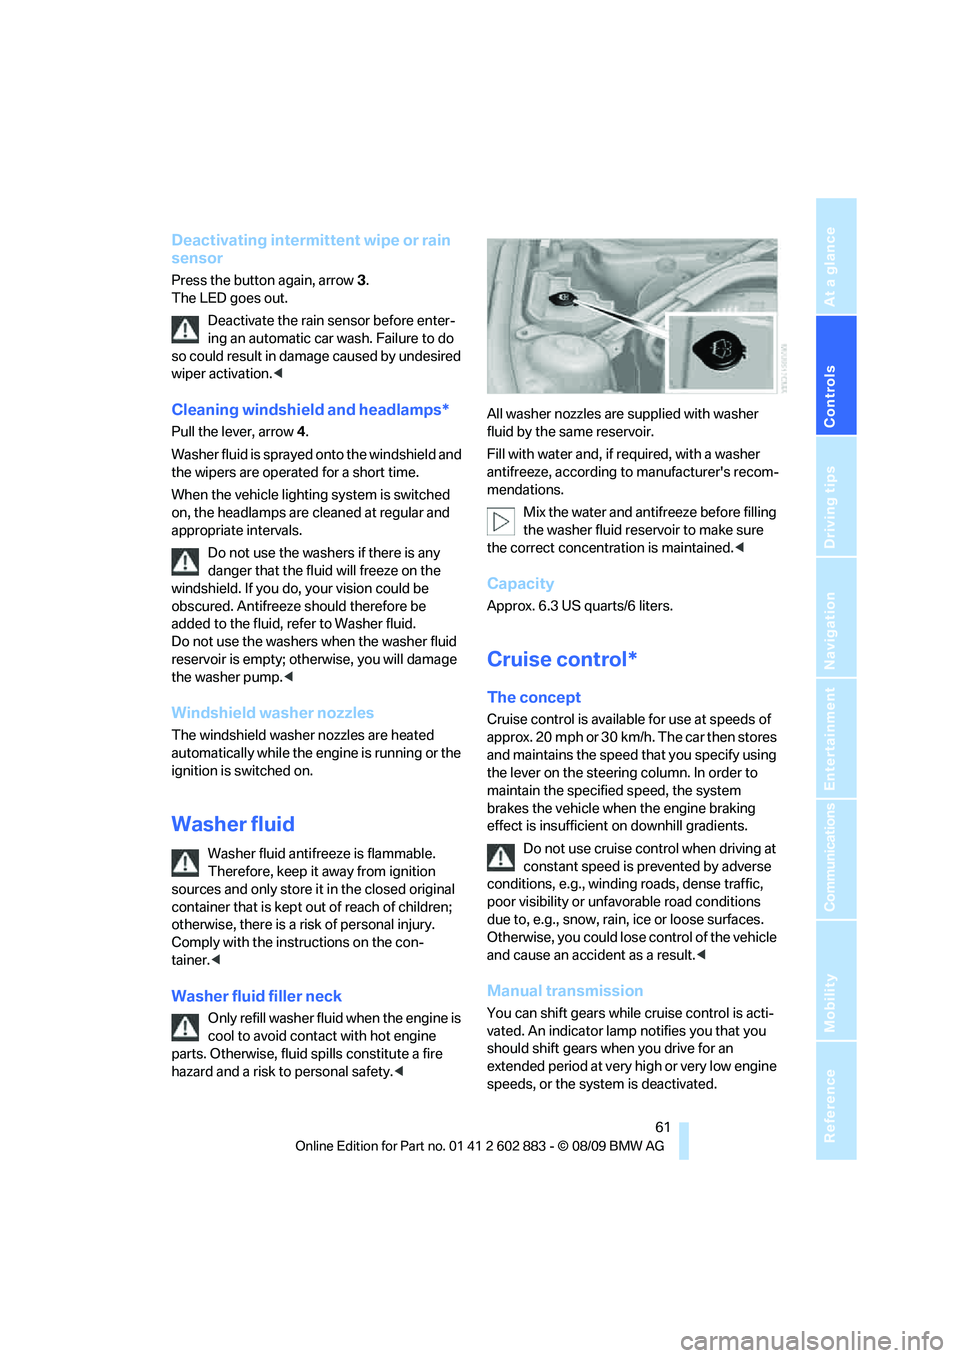
Press the button again, arrow3.
The LED goes out.
Deactivate the rain sensor before enter-
ing an automatic car wash. Failure to do
so could result in damage caused by undesired
wiper activation.<
Cleaning windshield and headlamps*
Pull the lever, arrow 4.
Washer fluid is sprayed onto the windshield and
the wipers are operated for a short time.
When the vehicle lighting system is switched
on, the headlamps are cleaned at regular and
appropriate intervals.
Do not use the washers if there is any
danger that the fluid will freeze on the
windshield. If you do, your vision could be
obscured. Antifreeze should therefore be
added to the fluid, refer to Washer fluid.
Do not use the washers when the washer fluid
reservoir is empty; otherwise, you will damage
the washer pump.<
Windshield washer nozzles
The windshield washer nozzles are heated
automatically while the engine is running or the
ignition is switched on.
Washer fluid
Washer fluid antifreeze is flammable.
Therefore, keep it away from ignition
sources and only store it in the closed original
container that is kept out of reach of children;
otherwise, there is a risk of personal injury.
Comply with the instructions on the con-
tainer.<
Washer fluid filler neck
Only refill washer fluid when the engine is
cool to avoid contact with hot engine
parts. Otherwise, fluid spills constitute a fire
hazard and a risk to personal safety.
Fill with water and, if required, with a washer
antifreeze, according to manufacturer's recom-
mendations.
Mix the water and antifreeze before filling
the washer fluid reservoir to make sure
the correct concentration is maintained.<
Capacity
Approx. 6.3 US quarts/6 liters.
Cruise control*
The concept
Cruise control is available for use at speeds of
approx. 20 mph or 30 km/h. The car then stores
and maintains the speed that you specify using
the lever on the steering column. In order to
maintain the specified speed, the system
brakes the vehicle when the engine braking
effect is insufficient on downhill gradients.
Do not use cruise control when driving at
constant speed is prevented by adverse
conditions, e.g., winding roads, dense traffic,
poor visibility or unfavorable road conditions
due to, e.g., snow, rain, ice or loose surfaces.
Otherwise, you could lose control of the vehicle
and cause an accident as a result.<
Manual transmission
You can shift gears while cruise control is acti-
vated. An indicator lamp notifies you that you
should shift gears when you drive for an
extended period at very high or very low engine
speeds, or the system is deactivated.
Page 64 of 254
Driving
62
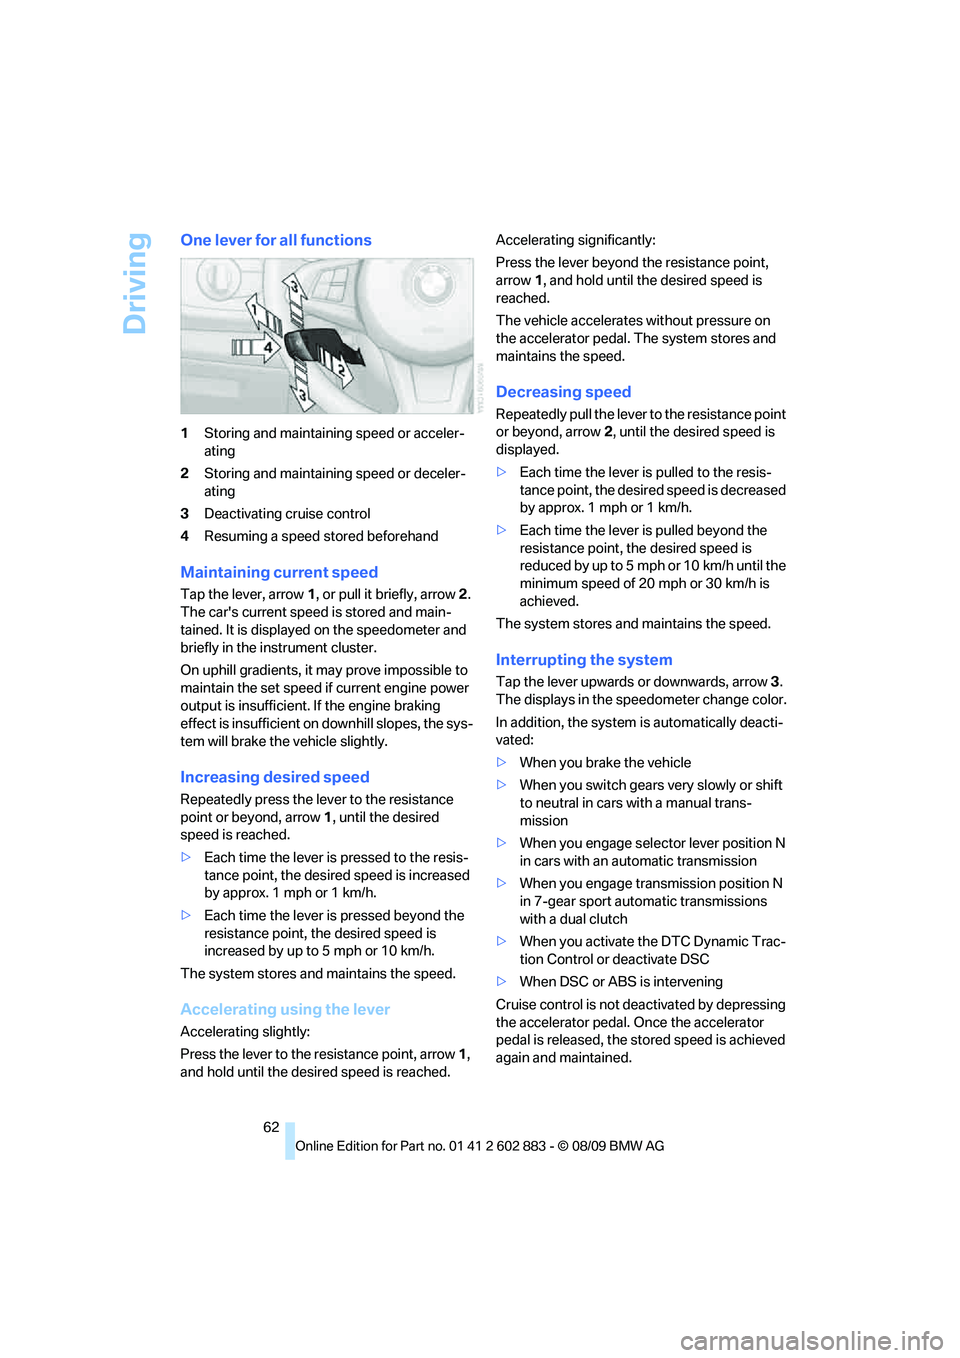
One lever for all functions
1Storing and maintaining speed or acceler-
ating
2Storing and maintaining speed or deceler-
ating
3Deactivating cruise control
4Resuming a speed stored beforehand
Maintaining current speed
Tap the lever, arrow 1, or pull it briefly, arrow 2.
The car's current speed is stored and main-
tained. It is displayed on the speedometer and
briefly in the instrument cluster.
On uphill gradients, it may prove impossible to
maintain the set speed if current engine power
output is insufficient. If the engine braking
effect is insufficient on downhill slopes, the sys-
tem will brake the vehicle slightly.
Increasing desired speed
Repeatedly press the lever to the resistance
point or beyond, arrow1, until the desired
speed is reached.
>Each time the lever is pressed to the resis-
tance point, the desired speed is increased
by approx. 1 mph or 1 km/h.
>Each time the lever is pressed beyond the
resistance point, the desired speed is
increased by up to 5 mph or 10 km/h.
The system stores and maintains the speed.
Accelerating using the lever
Accelerating slightly:
Press the lever to the resistance point, arrow 1,
and hold until the desired speed is reached.Accelerating significantly:
Press the lever beyond the resistance point,
arrow 1, and hold until the desired speed is
reached.
The vehicle accelerates without pressure on
the accelerator pedal. The system stores and
maintains the speed.
Decreasing speed
Repeatedly pull the lever to the resistance point
or beyond, arrow 2, until the desired speed is
displayed.
>Each time the lever is pulled to the resis-
tance point, the desired speed is decreased
by approx. 1 mph or 1 km/h.
>Each time the lever is pulled beyond the
resistance point, the desired speed is
reduc ed by up to 5 mph o r 10 km/h until the
minimum speed of 20 mph or 30 km/h is
achieved.
The system stores and maintains the speed.
Interrupting the system
Tap the lever upwards or downwards, arrow3.
The displays in the speedometer change color.
In addition, the system is automatically deacti-
vated:
>When you brake the vehicle
>When you switch gears very slowly or shift
to neutral in cars with a manual trans-
mission
>When you engage selector lever position N
in cars with an automatic transmission
>When you engage transmission position N
in 7-gear sport automatic transmissions
with a dual clutch
>When you activate the DTC Dynamic Trac-
tion Control or deactivate DSC
>When DSC or ABS is intervening
Cruise control is not deactivated by depressing
the accelerator pedal. Once the accelerator
pedal is released, the stored speed is achieved
again and maintained.
Page 79 of 254
Controls
77Reference
At a glance
Driving tips
Communications
Navigation
Entertainment
Mobility
Technology for driving comfort and safety
Park Distance Control PDC*
The concept
The PDC assists you with maneuvering in tight
parking spaces. Acoustic signals and a visual
indicator
warn you of the presence of an object
in front of
* or behind your vehicle. To measure
the distance, there are four ultrasonic sensors
in either bumper.
These sensors have a range of approx. 6.5 ft/
2 m. However, an acoustic warning does not
sound until an object is approx. 24 in/60 cm
from the corner sensors, or approx. 5 ft/1.50 m
from the center sensors.
PDC is a parking aid that can indicate
objects when they are approached
slowly, as is usually the case when parking.
Avoid approaching an objec t a t h i g h s p e e d ; o t h -
erwise, physical circumstances may lead to the
system warning being issued too late.<
Switching on automatically
With the engine running or the ignition switched
on, the system is activated after approx. 1 sec-
ond when you engage reverse gear or move the
automatic transmission selector lever to
position R. Wait this short period before driving.
Switching off automatically
After approx. 165 ft/50 m of driving or above
approx. 20 mph or 30 km/h, the system
switches off and the LED goes out.
Signal tones
When nearing an object, its position is indicated
correspondingly by an interval tone. As the dis-
tance between vehicle and object decreases,
the intervals between the tones become
shorter. If the distance to the nearest object
falls to below roughly 1 ft/30 cm, then a contin-
uous tone sounds.
An interval tone is interrupted after approx.
3seconds>If you remain in front of an object that has
been detected by only one of the corner
sensors
>If you are driving parallel to a wall.
Malfunction
The indicator lamp in the instrument
cluster comes on. PDC is malfunc-
tioning. A message appears on the
Control Display.Have the system checked.
To avoid this problem, keep the sensors clean
and free of ice or snow in order to ensure that
they will continue to operate effectively. When
using a high-pressure cleaner, do not spray the
sensors for extended periods of time and only
from a distance of at least 12 in/30 cm.
PDC with visual warning
The approach of the vehicle to an object is
shown on the Control Display. Objects that are
farther away are displayed on the Control Dis-
play before a signal tone sounds. The display
appears on the Control Display as soon as PDC
is activated.
System limitations
Even with PDC, final responsibility for
estimating the distance between the
vehicle and any obstructions always remains
with the driver. Even when sensors are pro-
vided, there is a blind spot in which objects can
no longer be detected. The system is also sub-
ject to the physical limits that apply to all forms
of ultrasonic measurement, such as those
encountered with trailer towbars and hitches,
thin or wedge-shaped objects, etc. Low objects
that have already been displayed, e.g., curbs,
can disappear again from the detection area of
the sensors before or after a continuous tone
sounds. Higher, protruding objects, e.g.,
ledges, cannot be detected. Therefore, always
drive cautiously; otherwise, there is a risk of
personal injury or property damage.
Page 81 of 254
Controls
79Reference
At a glance
Driving tips
Communications
Navigation
Entertainment
Mobility
Dynamic Driving Control
The concept
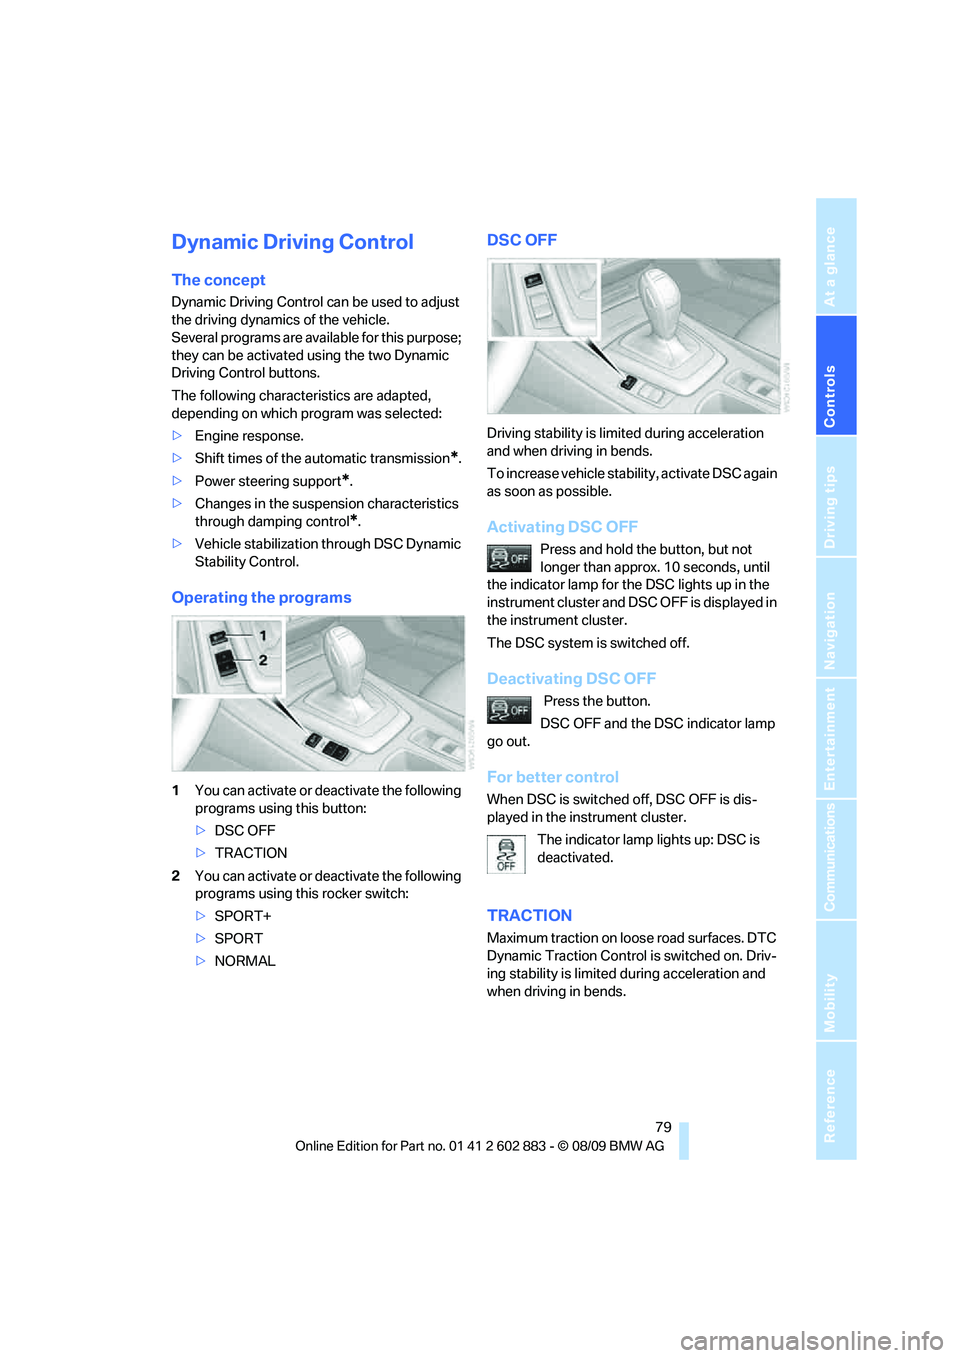
Dynamic Driving Control can be used to adjust
the driving dynamics of the vehicle.
Several programs are available for this purpose;
they can be activated using the two Dynamic
Driving Control buttons.
The following characteristics are adapted,
depending on which program was selected:
>Engine response.
>Shift times of the automatic transmission
*.
>Power steering support
*.
>Changes in the suspension characteristics
through damping control
*.
>Vehicle stabilization through DSC Dynamic
Stability Control.
Operating the programs
1You can activate or deactivate the following
programs using this button:
>DSC OFF
>TRACTION
2You can activate or deactivate the following
programs using this rocker switch:
>SPORT+
>SPORT
>NORMAL
DSC OFF
Driving stability is limited during acceleration
and when driving in bends.
To increase vehicle stability, activate DSC again
as soon as possible.
Activating DSC OFF
Press and hold the button, but not
longer than approx. 10 seconds, until
the indicator lamp for the DSC lights up in the
instrument cluster and DSC OFF is displayed in
the instrument cluster.
The DSC system is switched off.
Deactivating DSC OFF
Press the button.
DSC OFF and the DSC indicator lamp
go out.
For better control
When DSC is switched off, DSC OFF is dis-
played in the instrument cluster.
The indicator lamp lights up: DSC is
deactivated.
TRACTION
Maximum traction on loose road surfaces. DTC
Dynamic Traction Control is switched on. Driv-
ing stability is limited during acceleration and
when driving in bends.
Page 105 of 254
Controls
103Reference
At a glance
Driving tips
Communications
Navigation
Entertainment
Mobility
Calibrating the digital compass
The digital compass must be calibrated in the
following situations:
>An incorrect compass direction is shown.
>The compass direction shown does not
change although the direction of
travel does.
>Not all compass directions are shown.
Procedure
1.Make sure that no large metal objects or
overhead power lines are in the vicinity of
your vehicle and that you have enough
space to drive in a circle.
2.Set the currently valid compass zone.
3.Ensure that the retractable hardtop is fully
closed.
4.Press the adjustment button for approx.
6-7 seconds to call up C. Drive at least one
full circle at a maximum speed of 7 km/h.
After the system is calibrated correctly, dis-
play C is replaced by the compass direc-
tions.
5.Open the retractable hardtop fully and
repeat step 4.
Setting right-hand/left-hand steering
Your digital compass is factory-set to right-
hand or left-hand steering, in accordance with
your vehicle.
Setting the language
You can set the language of the display:
Press the adjustment button for approx.
12-13 seconds. Briefly press the adjustment
button again to switch between English, "E",
and German, "O".
The setting is automatically saved after approx.
10 seconds.
Glove compartment
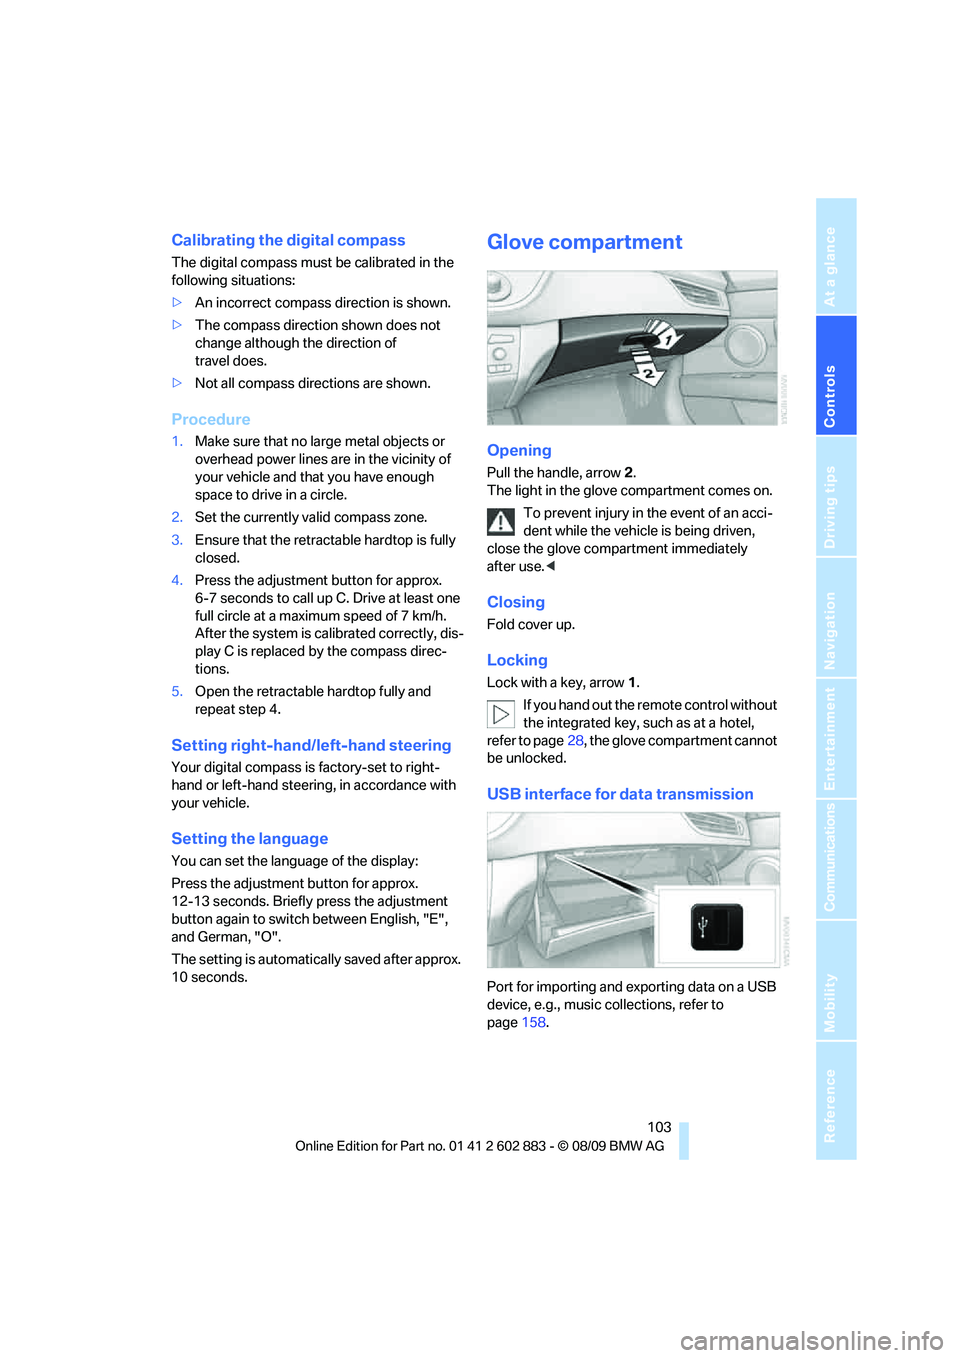
Opening
Pull the handle, arrow2.
The light in the glove compartment comes on.
To prevent injury in the event of an acci-
dent while the vehicle is being driven,
close the glove compartment immediately
after use.<
Closing
Fold cover up.
Locking
Lock with a key, arrow1.
If you hand out the remote control without
the integrated key, such as at a hotel,
refer to page28, the glove compartment cannot
be unlocked.
USB interface for data transmission
Port for importing and exporting data on a USB
device, e.g., music collections, refer to
page158.
Page 116 of 254
Things to remember when driving
114 The risk of hydroplaning increases with declin-
ing tread depth on the tires, refer also to Mini-
mum tread depth on page198.
Driving through water
Drive though calm water only if it is not
deeper than 1 ft/25 cm and at this height
no faster than walking speed, up to 6 mph/
10 km/h. Otherwise, the vehicle's engine, the
electrical systems and the transmission may be
damaged.<
Use the parking brake on inclines
On inclines, do not hold the vehicle for a
lengthy period using the clutch; use the
parking brake instead. Otherwise, greater
clutch wear will result.<
For more information about the drive-off assis-
tant, refer to page80.
Braking safely
Your BMW is equipped with ABS as a standard
feature. Applying the brakes fully is the most
effective way of braking in situations in which
this is necessary. Since the vehicle maintains
steering responsiveness, you can still avoid
possible obstacles with a minimum of steering
effort.
Pulsation of the brake pedal, combined with
sounds from the hydraulic circuits, indicate that
ABS is in its active mode.
Driving in wet conditions
When roads are wet or there is heavy rain,
briefly exert gentle pressure on the brake pedal
every few miles. Monitor traffic conditions to
ensure that this maneuver does not endanger
other road users. The heat generated in this
process helps dry the pads and rotors. Full
braking efficiency will then be available when
you need it.
Hills
To prevent overheating and the resulting
reduced efficiency of the brake system,
drive long or steep downhill gradients in the
gear in which the least braking is required. Even light but consistent brake pressure can lead to
high temperatures, brake wear and possibly
even brake failure.<
You can increase the engine's braking effect by
shifting down, all the way to first gear if neces-
sary. This strategy helps you avoid placing
excessive loads on the brake system. Down-
shifting in manual mode of the automatic trans-
mission, refer to page54.
7-gear sport automatic transmission with
dual clutch: Never drive with the trans-
mission in neutral or with the engine switched
off; otherwise, engine braking action will not be
present or there will be no power assistance to
the brakes or steering.
Manual transmission: Never drive with the
clutch held down, with the transmission in neu-
tral or with the engine switched off; otherwise,
engine braking action will not be present or
there will be no power assistance to the brakes
or steering.
Never allow floor mats, carpets or any other
objects to protrude into the area around the
pedals; otherwise, pedal function could be
impaired.<
Corrosion on brake rotors
When the vehicle is driven only occasionally,
during extended periods when the vehicle is not
used at all, and in operating conditions where
brake applications are less frequent, there is an
increased tendency for corrosion to form on
rotors, while contaminants accumulate on the
brake pads. This occurs because the minimum
pressure which must be exerted by the pads
during brake applications to clean the rotors is
not reached.
Should corrosion form on the brake rotors, the
brakes will tend to respond with a pulsating
effect that even extended application will fail
to cure.
When the vehicle is parked
Condensation forms while the automatic cli-
mate control is in operation, and then exits
under the vehicle. Traces of condensed water
under the vehicle are therefore normal.
Page 117 of 254
Driving tips
115Reference
At a glance
Controls
Communications
Navigation
Entertainment
Mobility
Before driving into a car wash
General information on caring for your BMW
can be found on page208.
With Comfort Access and automatic
transmission
Insert the remote control into the ignition
switch.
The engine can be switched off when the selec-
tor lever is in position N. Refer also to page208.
With Comfort Access and 7-gear sport
automatic transmission with dual
clutch
Insert the remote control into the ignition
switch.
The engine can be switched off when the trans-
mission is in position N. Refer also to page209.
Cargo loading
To avoid loading the tires beyond their
approved carrying capacity, never over-
load the vehicle. Overloading can lead to over-
heating and increases the rate at which damage
develops inside the tires. This can ultimately
result in a sudden blowout.<
Make sure that no liquids are spilled or
leak from their containers in the cargo
area, as this could result in damage to the
vehicle.<
Always position and secure the cargo as
described so that it cannot endanger the
car's occupants, for example if sudden braking
or swerving is necessary.
Never exceed either the approved gross vehicle
weight or either of the approved axle loads, refer
to page228, as excessive loads can pose a
safety hazard, and may also place you in viola-
tion of traffic safety laws.
Heavy or hard objects should not be carried
loose inside the car, since they could be thrown
around, for example as a result of heavy braking,
sudden swerves, etc., and endanger the occu-
pants.<
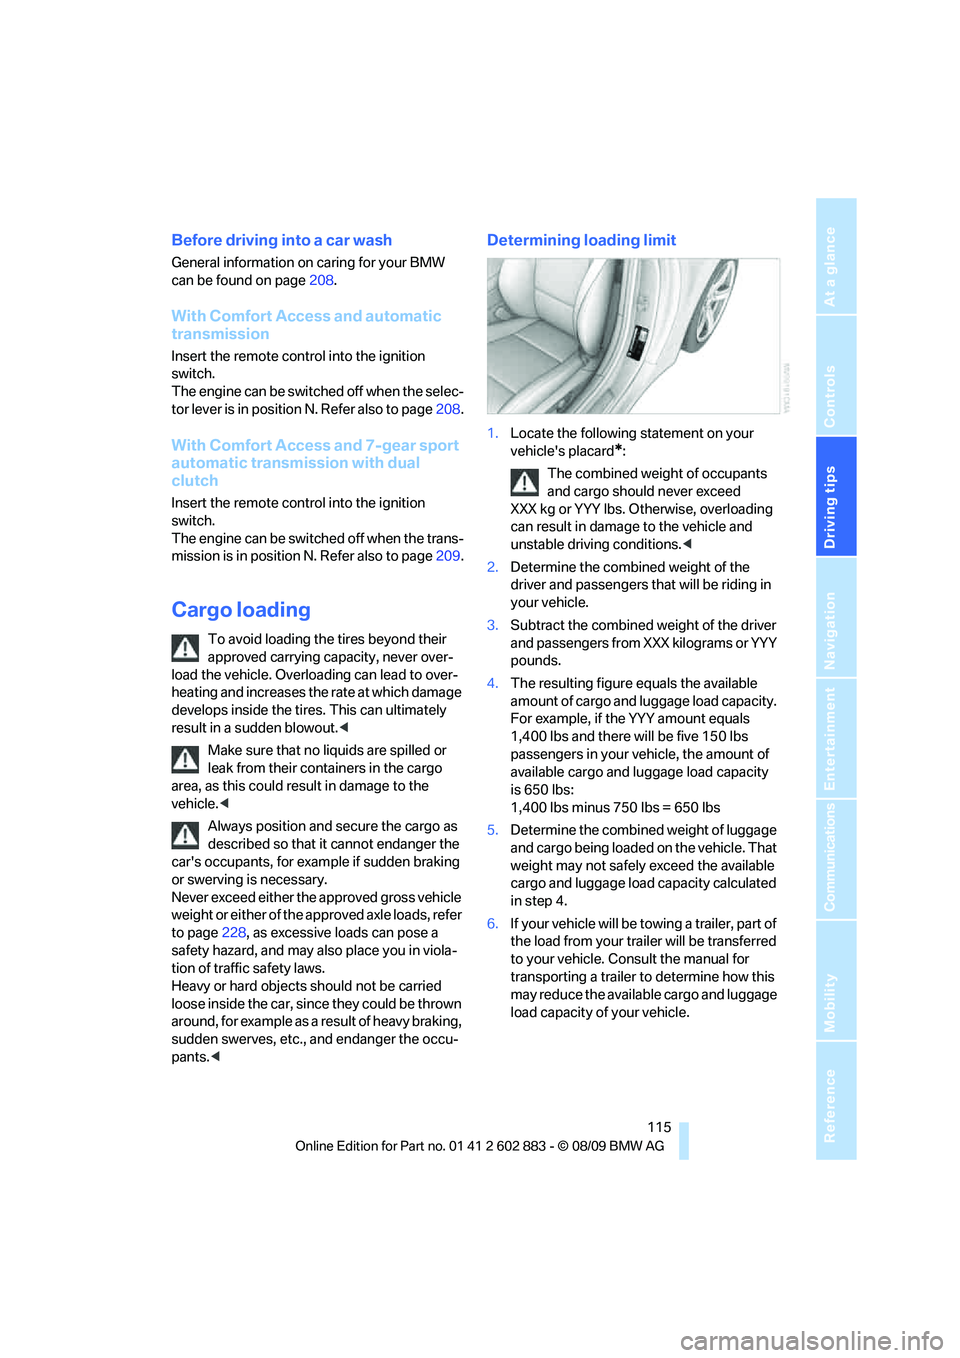
Determining loading limit
1.Locate the following statement on your
vehicle's placard
*:
The combined weight of occupants
and cargo should never exceed
XXX kg or YYY lbs. Otherwise, overloading
can result in damage to the vehicle and
unstable driving conditions.<
2.Determine the combined weight of the
driver and passengers that will be riding in
your vehicle.
3.Subtract the combined weight of the driver
and passengers from XXX kilograms or YYY
pounds.
4.The resulting figure equals the available
amount of cargo and luggage load capacity.
For example, if the YYY amount equals
1,400 lbs and there will be five 150 lbs
passengers in your vehicle, the amount of
available cargo and luggage load capacity
is 650 lbs:
1,400 lbs minus 750 lbs = 650 lbs
5.Determine the combined weight of luggage
and cargo being loaded on the vehicle. That
weight may not safely exceed the available
cargo and luggage load capacity calculated
in step 4.
6.If your vehicle will be towing a trailer, part of
the load from your trailer will be transferred
to your vehicle. Consult the manual for
transporting a trailer to determine how this
may reduce the available cargo and luggage
load capacity of your vehicle.
Page 210 of 254
Care
208
Care
Care products
Regular cleaning and care contributes signifi-
cantly to the value retention of your BMW.
BMW recommends cleaning and caring for your
vehicle with products that are approved by
BMW for this purpose.
Your BMW center will be happy to advise you on
the products and services available for cleaning
and caring for your BMW.
Original BMW CareProducts have been
material-tested, laboratory-checked and
proven in the field, and offer optimal care and
protection for your vehicle.<
Do not use cleaners that contain alcohol
or solvents as these may result in
damage.<
Cleaning agents can contain substances
that are dangerous or hazardous to your
health. Therefore, follow the warning and safety
instructions on the packaging. When cleaning
inside the vehicle, always open the doors or
windows of the vehicle. In enclosed areas, pro-
vide for sufficient ventilation. Only use products
designed for cleaning vehicles.<
Exterior care
Washing the vehicle
Especially during the winter months,
ensure that the vehicle is washed more
frequently. Heavy soiling and road salt can lead
to vehicle damage.<
After washing the vehicle, apply the
brakes briefly to dry them; otherwise,
water can reduce braking efficiency over the
short term and brake discs can corrode.<
Automatic car washes
Preference should be given to cloth car washes.
Do not use high-pressure car washes;
otherwise, water may drip into the vehicle
around the windows.<
Before driving into a car wash, ensure that it is
suitable for your BMW. Check the following:
>Dimensions of your vehicle, refer
to page227.
>If necessary: fold in the exterior mirrors,
refer to page45.
>Maximum permissible tire width.
Avoid car washes with guide rail heights
over 4 in/10 cm; otherwise, there is dan-
ger of damaging chassis parts.<
Preparations before driving into an automatic
car wash:
>Unscrew the rod antenna
*.
>Deactivate the rain sensor
* to avoid unin-
tentional activation of the wipers.
>Remove additional attachments, e.g., spoil-
ers or telephone antennas, if there is a pos-
sibility that they could be damaged.
Automatic transmission
Before driving into an automatic car wash, per-
form the following steps to ensure that the vehi-
cle can roll:
1.Insert the remote control, even with Com-
fort Access, into the ignition lock.
2.Move the selector lever to position N.
3.Release the parking brake.
4.Switch off the engine.
5.Leave the remote control in the ignition lock
so that the vehicle can roll.
Page 211 of 254
Mobility
209Reference
At a glance
Controls
Driving tips
Communications
Navigation
Entertainment
7-gear sport automatic transmission
with dual clutch
Before driving into an automatic car wash, per-
form the following steps to ensure that the vehi-
cle can roll:
1.Insert the remote control, even with Com-
fort Access, into the ignition lock.
2.Engage transmission position N.
3.Release the parking brake.
4.Switch off the engine.
5.Leave the remote control in the ignition lock
so that the vehicle can roll.
Transmission position P is engaged:
>Automatically after approx. 30 minutes
>When you take the remote control out of the
ignition lock
Steam jets / high-pressure washers
When using steam jets or high-pressure
washers, ensure that you maintain suffi-
cient clearance to the vehicle and do not exceed
a temperature of 1407/606.
Insufficient clearance or excessive pressure or
temperature can lead to component damage or
water penetration. Follow the operating instruc-
tions of the high-pressure washer.<
When using high-pressure washers, do
not spray against the seals of the retract-
able hardtop, the sensors and the cameras, e.g.,
of the Park Distance Control or Rear View Cam-
era, for an extended period and maintain a dis-
tance of at least 12 in/30 cm.<
Manual car wash
When washing the vehicle by hand, use large
quantities of water and car shampoo if neces-
sary. Clean the vehicle with a sponge or wash-
ing brush, applying light pressure only.
Before cleaning the windshield, deacti-
vate the rain sensor or switch off the igni-
tion to prevent unintentional activation of the
wipers.<
Observe local regulations pertaining to
washing vehicles by hand.<
Headlamps
Do not rub them dry and do not use abrasive or
corrosive cleaning agents.
Loosen dirt, e.g., insects, with shampoo or
insect remover and wash away with copious
quantities of water.
Thaw ice with a windshield deicer and do not
use an ice scraper.
Windows
Clean the inside and outside surfaces of the
windows and the mirrors with window cleaner.
Do not clean the mirrors with cleaners
containing quartz.<
Retractable hardtop
Proceed as you would in a normal car wash.
When you open a wet hardtop, water
drops may run into the cargo area. If nec-
essary, remove items from the cargo area
beforehand to avoid water stains or soiling.<
Paintwork care
Regular care contributes to value retention and
protects the paintwork against the long-term
effects of damaging substances.
Region-specific environmental influences can
damage the vehicle paintwork. Therefore, it is
important to adapt the frequency and scope of
car care accordingly.
Immediately remove aggressive materials such
as spilled fuel, oil, grease, brake fluid, tree sap
or bird droppings to prevent damage to the
paintwork.
Repairing paintwork damage
Immediately repair scratches or similar
damage, such as that caused by stones
hitting the vehicle, where necessary to prevent
rusting.<
BMW recommends having paintwork damage
repaired by a professional paint repair work-
shop according to BMW specifications using
original BMW paint materials.