BMW Z8 2002 Owners Manual
Manufacturer: BMW, Model Year: 2002, Model line: Z8, Model: BMW Z8 2002Pages: 174, PDF Size: 2.37 MB
Page 91 of 174

91n
IndexDataTechnologyRepairsCar careControlsOverview
Disc brakesDriving notesWhen driving in heavy rain and on wet
roads it is advisable to apply light pres-
sure to the brake pedal every few miles.
Monitor traffic conditions to ensure that
this maneuver does not pose a hazard
to you or to other road users. The heat
generated in this braking process helps
dry the pads and rotors
Maximum braking force is obtained
while the wheels are not locked, but
rather when they are still barely turning
immediately prior to locking. ABS main-
tains this state automatically. If the ABS
fails, you should revert to the staggered
braking technique (refer to page 93).
When descending steep hills and
extended grades, downshift to a gear
that will allow you to continue safely
with only a minimal amount of braking.
By minimizing the loads placed on the
brake system, this strategy helps
ensure that optimal brake system
response will remain available at all
times.
You can enhance the engine's braking
effect by downshifting, into first gear, if
necessary. Even if engine braking fails to slow the
vehicle sufficiently, you should still
make every effort to avoid prolonged
braking with continuous application of
low to moderate pressure at the pedal.
It is better to decelerate the vehicle by
applying a higher level of force at the
pedal (watch following traffic!) and then
subsequently pausing to allow the
brakes to cool briefly before starting on
your next braking cycle. By protecting
brake system components against
overheating, the cooling phases
afforded by this staggered, or intermit-
tent braking technique help maintain
consistent availability of optimal braking
response when it is needed.
Do not coast with the clutch pedal
depressed, the gear-shift lever in
neutral, or, above all, with the engine
off; otherwise, the engine will provide
no braking effect if the transmission is
in neutral, and there is no braking or
steering power assist if the engine is
not running. Never allow floor mats,
carpets or any other objects to obstruct
the accelerator, clutch or brake pedals
and pose a safety hazard by reducing
their available travel range.<
Page 92 of 174

92n
Brake system Winter operationBrake fluid level
The brake warning lamp comes
on with the parking brake
released:
The brake fluid level in the
reservoir is too low, refer to
page 114.
If the brake fluid level is too low and
brake pedal travel has become notice-
ably longer, there may be a defect in
one of the brake system's hydraulic
circuits.
Proceed to the nearest BMW
center. Higher brake application
pressure may be necessary under these
conditions, and brake pedal travel may
be significantly longer. Please
remember to adapt your driving style
accordingly.<
Brake pads
The warning lamp for the brake
pads comes on:
The brake pads have reached
their minimum thickness. Proceed to
the nearest BMW center as soon as
possible to have the pads replaced.
For your own safety: use only
brake pads which BMW has
approved for your specific vehicle
model. BMW cannot evaluate non-
approved brake pads to determine if
they are suited for use, and therefore
cannot ensure the operating safety of
the vehicle if they are installed.<
Winter is often accompanied by rapid
changes in weather, requiring not only a
different driving style, but also certain
preparations to the vehicle itself to
ensure that your progress through the
winter months remains safe and
trouble-free. CoolantBe sure that the coolant mixture
contains the year-round ratio of 50:50
water and extended-duty antifreeze
with corrosion inhibitor. This mixture
provides protection against freezing
down to approx. Ð34 7 (Ð37 6).LocksBMW door lock deicer can be used to
free doors if frozen. This deicer also
contains lubricant.
After using the deicer, treatment with
BMW lock cylinder grease is recom-
mended.
Page 93 of 174

93n
IndexDataTechnologyRepairsCar careControlsOverview
Winter operationRubber seals and componentsTo prevent the weather-stripping from
freezing, apply a spray-on rubber treat-
ment or silicone spray to the door, hood
and luggage compartment lid seals.
A full range of car-care products is
available from your BMW center.
on rear tires, complying with the manu-
facturer's safety precautions. Do not
exceed a maximum speed of 30 mph
(50 km/h) while the snow chains are
mounted and refrain from activating the
Flat Tire Monitor, as the snow chains
could trigger false alarms and/or
prevent the system from detecting
actual pressure loss.
Starting off When starting off in deep snow or when
"rocking" the vehicle to free it, it may be
advisable to temporarily deactivate the
DSC. Refer to page 65.
To maintain vehicle stability,
always drive with the system
switched on whenever possible.<
Driving on low-traction road
surfaces Do not activate the Sport mode (refer to
page 66). Use smooth, gentle pressure
to control the accelerator pedal. Avoid
excessive engine speeds and upshift
early. Downshift well in advance when
approaching uphill or downhill grades.
Maintain an adequate distance
between yourself and the vehicle
ahead. BrakesWinter road conditions substantially
reduce the amount of traction available
between the tires and the road surface.
The resulting increases in braking
distance are considerable and should
be kept in mind at all times.
ABS is intended to prevent the wheels
from locking during brake applications,
thus helping to maintain vehicle stability
and steering response. If the ABS does not respond in a critical
braking situation and the wheels lock,
reduce the pressure on the brake pedal
until the wheels just start to roll again
while still maintaining enough force to
continue braking.
Then increase the pressure, reduce the
pressure when the wheels lock, reapply
pressure etc.
This staggered braking procedure will
reduce braking distances while helping
you maintain steering control.
You can always then attempt to steer
around hazards after you have reduced
pressure on the brake pedal.
Never downshift to exploit engine
braking when driving on slippery
road surfaces, as this could lead to a
loss of traction at the rear wheels,
impairing your ability to control the
vehicle.<
Depress the clutch during hard
braking on road surfaces that
provide only poor or uneven traction.<
Page 94 of 174

94n
Winter operation Power steering Cellular phone Skid control Depress the clutch and release the
accelerator pedal. Countersteer care-
fully and attempt to regain control over
the vehicle.ParkingEngage first or reverse gear. Depending
on the steepness of the incline, you can
apply the parking brake as well. In order
to prevent the parking brake pads from
locking due to frost or corrosion, dry
them by gently applying the parking
brake as the vehicle is coming to a
stop. Make sure that following traffic is
not endangered.
The brake lamps do not come
on when the parking brake is
engaged.<
If there is a change in steering response
Ð e. g. difficult or over-responsive
steering Ð at increasing speeds, consult
a BMW center to have it checked.
If the power steering fails,
increased effort will be required to
steer the vehicle.<
Mobile communications systems
(cellular phone, radio, etc.) are
permitted with an output of up to
10 watts only. Mobile communications
devices not specifically designed for
use in your vehicle may trigger malfunc-
tions while you are operating your
vehicle. BMW can neither test nor
assume responsibility for every indi-
vidual product being offered on the
market. We recommend that you
consult your BMW center before
purchasing any device of this kind.
To ensure reliable and trouble-free
operation of your BMW, do not use any
cellular phones or other radio devices
where the antenna is located either
inside the passenger compartment or
otherwise not attached to the outside of
the vehicle.
You will find instructions for operating
your cellular phone in the supplemen-
tary Owner's Manual.
Page 95 of 174
95n
IndexDataTechnologyRepairsCar careControlsOverview
Car radio reception Wind deflectorThe reception and sound quality
obtained from mobile radios vary
according to a variety of factors,
including the broadcast range of the
transmitter and the directional orienta-
tion of the antenna. Interference factors
such as high-tension power lines,
structural or natural obstructions can all
lead to unavoidable reception interfer-
ence, regardless of how well the vehicle
sound system is operating. Climatic
factors such as intense solar radiation,
fog, rain and snow can also interfere
with reception.
Radio interference can also be caused
by either cellular phones not recom-
mended by BMW or by portable
phones. This phenomenon assumes the
form of a low-pitched hum emanating
from the speaker system.
Please refer to the Owner's Manual that
you received for detailed information on
settings and operation of your radio.
You will find additional details
concerning radio reception in the
chapter "Advanced technology" on
page 150.
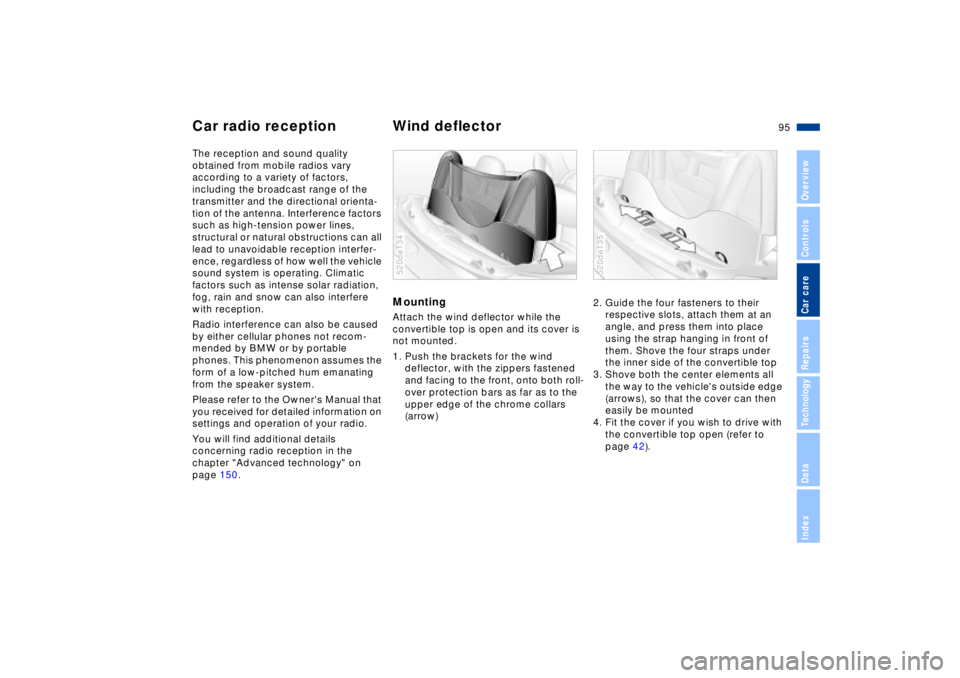
MountingAttach the wind deflector while the
convertible top is open and its cover is
not mounted.
1. Push the brackets for the wind
deflector, with the zippers fastened
and facing to the front, onto both roll-
over protection bars as far as to the
upper edge of the chrome collars
(arrow) 520de134
2. Guide the four fasteners to their
respective slots, attach them at an
angle, and press them into place
using the strap hanging in front of
them. Shove the four straps under
the inner side of the convertible top
3. Shove both the center elements all
the way to the vehicle's outside edge
(arrows), so that the cover can then
easily be mounted
4. Fit the cover if you wish to drive with
the convertible top open (refer to
page 42).520de135
Page 96 of 174
96n
Wind deflector HardtopRemovalPull the four straps to release the
retainers, then reverse the installation
sequence to remove the wind deflector.
Fold the wind deflector and place it in
its protective slipcase prior to storing it
in the luggage compartment.
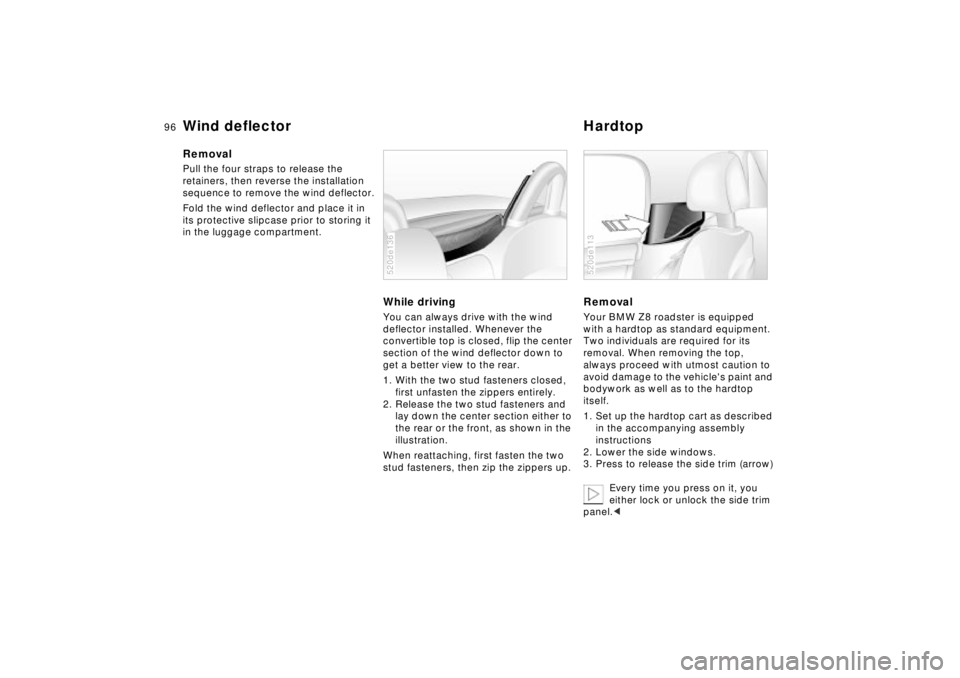
While drivingYou can always drive with the wind
deflector installed. Whenever the
convertible top is closed, flip the center
section of the wind deflector down to
get a better view to the rear.
1. With the two stud fasteners closed,
first unfasten the zippers entirely.
2. Release the two stud fasteners and
lay down the center section either to
the rear or the front, as shown in the
illustration.
When reattaching, first fasten the two
stud fasteners, then zip the zippers up.520de136
RemovalYour BMW Z8 roadster is equipped
with a hardtop as standard equipment.
Two individuals are required for its
removal. When removing the top,
always proceed with utmost caution to
avoid damage to the vehicle's paint and
bodywork as well as to the hardtop
itself.
1. Set up the hardtop cart as described
in the accompanying assembly
instructions
2. Lower the side windows.
3. Press to release the side trim (arrow)
Every time you press on it, you
either lock or unlock the side trim
panel.<520de113
Page 97 of 174
97n
IndexDataTechnologyRepairsCar careControlsOverview
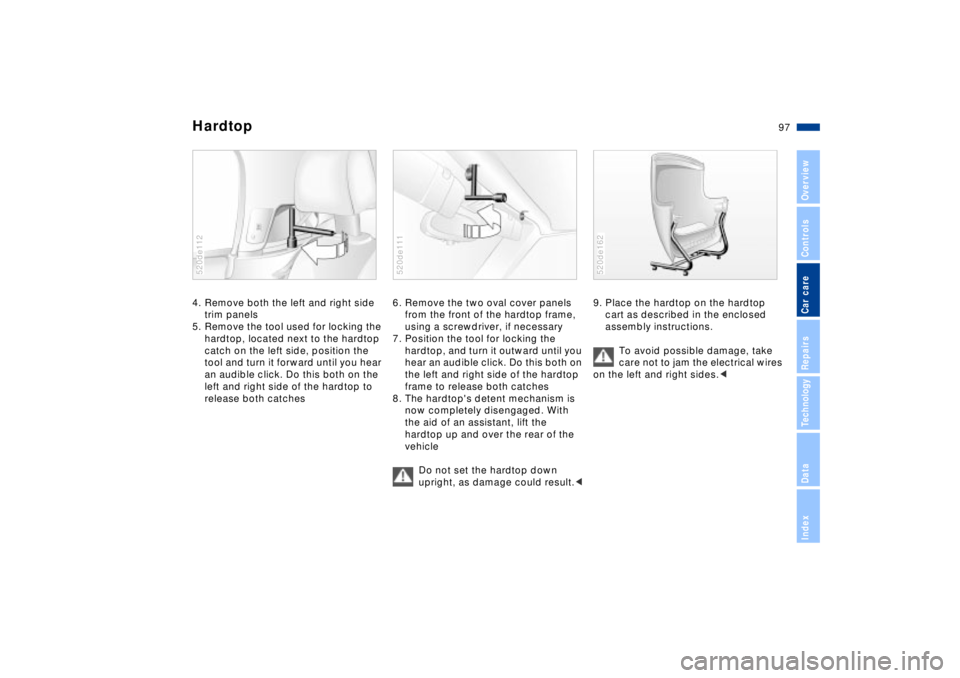
Hardtop4. Remove both the left and right side
trim panels
5. Remove the tool used for locking the
hardtop, located next to the hardtop
catch on the left side, position the
tool and turn it forward until you hear
an audible click. Do this both on the
left and right side of the hardtop to
release both catches520de112
6. Remove the two oval cover panels
from the front of the hardtop frame,
using a screwdriver, if necessary
7. Position the tool for locking the
hardtop, and turn it outward until you
hear an audible click. Do this both on
the left and right side of the hardtop
frame to release both catches
8. The hardtop's detent mechanism is
now completely disengaged. With
the aid of an assistant, lift the
hardtop up and over the rear of the
vehicle
Do not set the hardtop down
upright, as damage could result.<520de111
9. Place the hardtop on the hardtop
cart as described in the enclosed
assembly instructions.
To avoid possible damage, take
care not to jam the electrical wires
on the left and right sides.<520de162
Page 98 of 174
98n
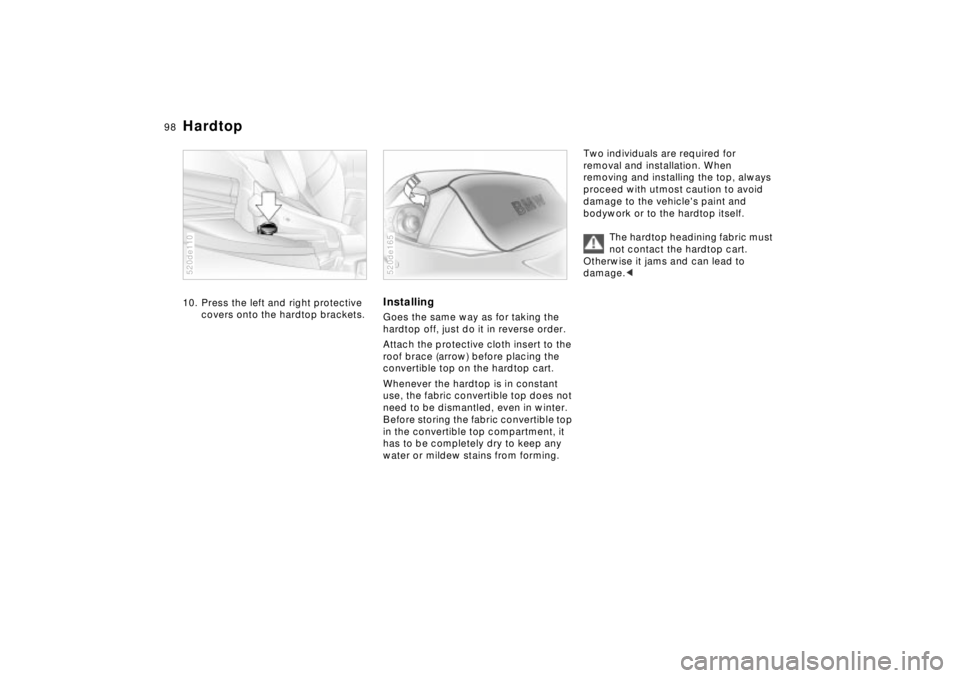
Hardtop10. Press the left and right protective
covers onto the hardtop brackets.520de110
InstallingGoes the same way as for taking the
hardtop off, just do it in reverse order.
Attach the protective cloth insert to the
roof brace (arrow) before placing the
convertible top on the hardtop cart.
Whenever the hardtop is in constant
use, the fabric convertible top does not
need to be dismantled, even in winter.
Before storing the fabric convertible top
in the convertible top compartment, it
has to be completely dry to keep any
water or mildew stains from forming.520de165
Two individuals are required for
removal and installation. When
removing and installing the top, always
proceed with utmost caution to avoid
damage to the vehicle's paint and
bodywork or to the hardtop itself.
The hardtop headining fabric must
not contact the hardtop cart.
Otherwise it jams and can lead to
damage.<
Page 99 of 174
99n
IndexDataTechnologyRepairsCar careControlsOverview
Information for your safetyThe vehicle's factory-approved safety
tires have been specially designed to
provide optimum safety and driving
comfort on your vehicle.
It is not merely the tire's service life, but
also driving comfort and Ð above all else
Ð driving safety that depend on the
condition of the tires and the mainte-
nance of the specified tire pressure.
Incorrect inflation pressure is a
frequent cause of tire damage. It
also significantly influences the road-
holding ability of your BMW. Check tire
inflation pressures regularly (refer to
page 26), at least every two weeks and
before beginning a longer trip. If this is
not done, incorrect tire pressures can
cause driving instability and tire
damage, ultimately resulting in acci-
dents.<
Safety tiresYour BMW Z8 is equipped with safety
tires.
The assembly consists of self-
supporting tires mounted on specially-
designed wheel rims. Special reinforce-
ment elements support the sidewalls in
the event of pressure loss. Although tire
performance is then restricted, the
vehicle can still be driven on the
deflated tire for a limited distance. Your
vehicle is equipped with a Flat Tire
Monitor that signals you in case of a flat
tire.
For further information, refer to
pages 67, 137.
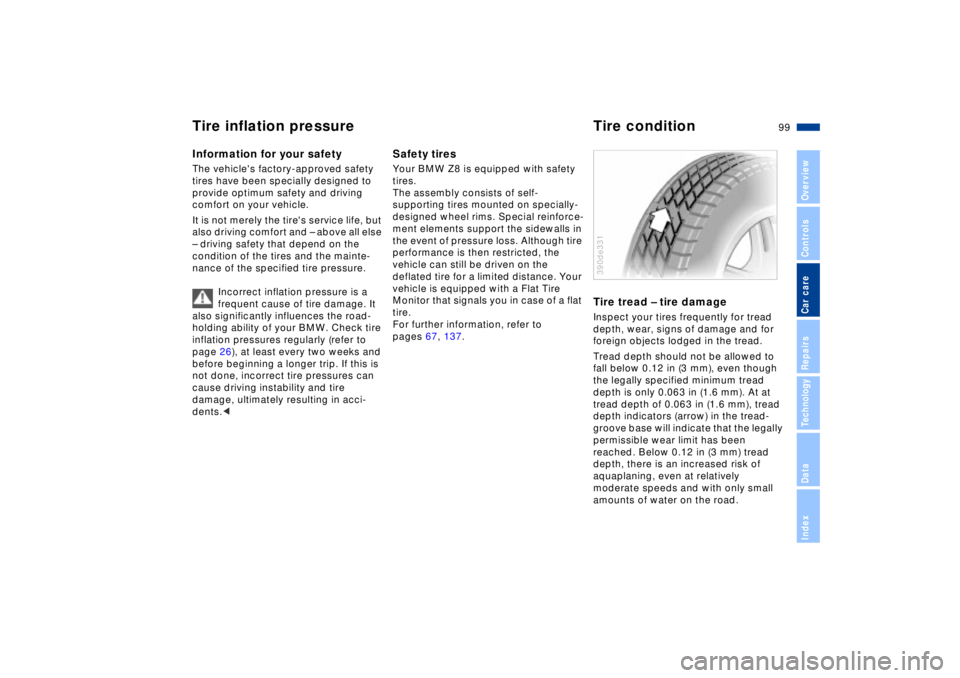
Tire tread Ð tire damageInspect your tires frequently for tread
depth, wear, signs of damage and for
foreign objects lodged in the tread.
Tread depth should not be allowed to
fall below 0.12 in (3 mm), even though
the legally specified minimum tread
depth is only 0.063 in (1.6 mm). At at
tread depth of 0.063 in (1.6 mm), tread
depth indicators (arrow) in the tread-
groove base will indicate that the legally
permissible wear limit has been
reached. Below 0.12 in (3 mm) tread
depth, there is an increased risk of
aquaplaning, even at relatively
moderate speeds and with only small
amounts of water on the road.390de331
Tire inflation pressure Tire condition
Page 100 of 174

100n
Avoid overloading the vehicle so
that the permitted load on the tires
is not exceeded. Overloading can lead
to overheating and increases the rate at
which damage develops inside the
tires. You could have a blowout as a
result.
Unusual vibrations encountered during
normal vehicle operation can indicate a
flat tire or some other vehicle defect, as
can variations in normal vehicle
response, such as a pronounced
tendency to pull to the left or right.
Should this occur, respond by immedi-
ately reducing your speed. Proceed
carefully to the nearest BMW center or
professional tire center, or have the
vehicle towed in to have it and its tires
inspected.
Tire damage can endanger the lives of
both the vehicle occupants and other
road users.<
To maintain good handling and vehicle
response, use only tires of a single
tread configuration from a single manu-
facturer. BMW tests and approves
wheel and tire combinations. Refer to
page 104.DOT Quality GradesTread wear
Traction AA A B C
Temperature A B C
All passenger vehicle tires
must conform to Federal Safety
Requirements in addition to these
grades.
when tested under controlled condi-
tions on a specified government test
course.
For example, a tire graded 150 would
wear one and one-half (1g) times as
well on the government course as a tire
graded 100. The relative performance
of tires depends upon the actual condi-
tions of their use, however, and may
depart significantly from the norm due
to variations in driving habits, service
practices and differences in road char-
acteristics and climate.TractionThe traction grades, from highest to
lowest, are AA, A, B and C.
Those grades represent the tire's ability
to stop on wet pavement as measured
under controlled conditions on speci-
fied government test surfaces of
asphalt and concrete. A tire marked C
may have poor traction performance.
The traction grade assigned to
this tire is based on straight-
ahead braking traction tests, and does
not include acceleration, cornering,
aquaplaning, or peak traction charac-
teristics.<
Tire condition Tire replacement