clock BUICK CASCADA 2016 Owner's Guide
[x] Cancel search | Manufacturer: BUICK, Model Year: 2016, Model line: CASCADA, Model: BUICK CASCADA 2016Pages: 381, PDF Size: 5.52 MB
Page 310 of 381

Buick Cascada Owner Manual (GMNA-Localizing-U.S-9186636) - 2016 - crc -
3/9/16
Vehicle Care 309
Tire Changing
Removing the Spare Tire and
Tools
1. Strap
2. Screwdriver
3. Jack
4. Wheel Wrench and Tow Eye(In Bag)
To access the spare tire and tools:
1. Open the trunk. See Trunk 029.
2. Lift the load floor.
3. Turn the retainer nut counterclockwise to remove it.
Remove the spare tire and
place it near the tire being
changed.
4. Remove the jack and tools and place them near the tire being
changed.
Removing the Flat Tire and
Installing the Spare Tire
1. Do a safety check beforeproceeding. See If a Tire Goes
Flat 0307.
2. Turn the wheel wrench
counterclockwise to loosen all
the wheel nuts, but do not
remove them yet.
3. Place the jack under the vehicle.
4. Place the hex tube end of the wheel wrench over the hex
head of the jack.
Page 312 of 381

Buick Cascada Owner Manual (GMNA-Localizing-U.S-9186636) - 2016 - crc -
3/9/16
Vehicle Care 311
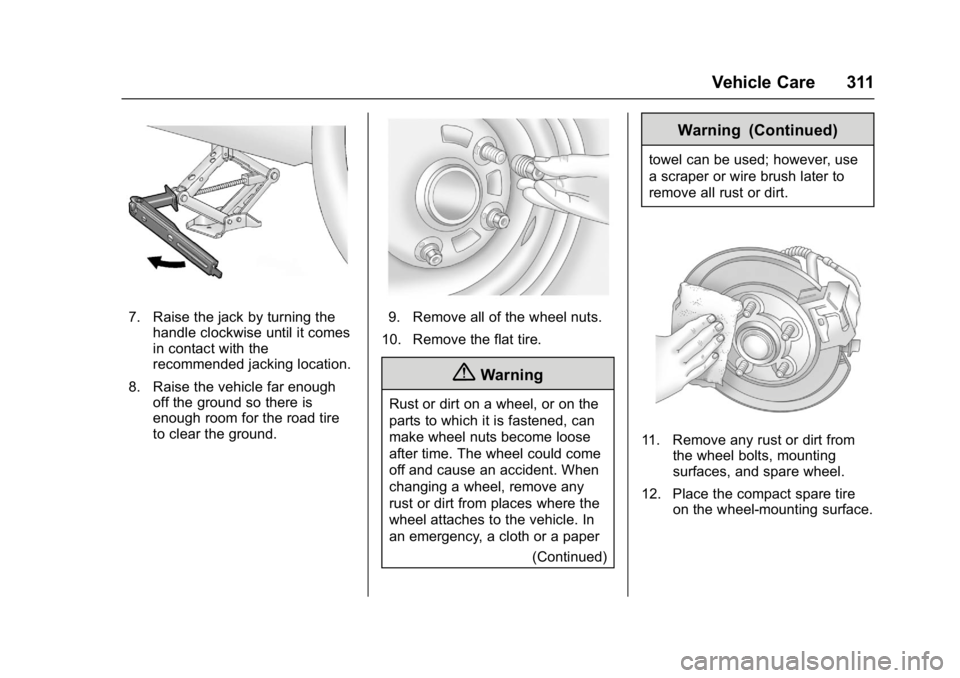
7. Raise the jack by turning thehandle clockwise until it comes
in contact with the
recommended jacking location.
8. Raise the vehicle far enough off the ground so there is
enough room for the road tire
to clear the ground.9. Remove all of the wheel nuts.
10. Remove the flat tire.
{Warning
Rust or dirt on a wheel, or on the
parts to which it is fastened, can
make wheel nuts become loose
after time. The wheel could come
off and cause an accident. When
changing a wheel, remove any
rust or dirt from places where the
wheel attaches to the vehicle. In
an emergency, a cloth or a paper (Continued)
Warning (Continued)
towel can be used; however, use
a scraper or wire brush later to
remove all rust or dirt.
11. Remove any rust or dirt fromthe wheel bolts, mounting
surfaces, and spare wheel.
12. Place the compact spare tire on the wheel-mounting surface.
Page 313 of 381

Buick Cascada Owner Manual (GMNA-Localizing-U.S-9186636) - 2016 - crc -
3/9/16
312 Vehicle Care
{Warning
Never use oil or grease on bolts
or nuts because the nuts might
come loose. The vehicle's wheel
could fall off, causing a crash.
13. Reinstall the wheel nuts. Tighten each nut by hand until
the wheel is held against
the hub.
14. Lower the vehicle by turning the jack handle
counterclockwise.
{Warning
Wheel nuts that are improperly or
incorrectly tightened can cause
the wheels to become loose or
come off. The wheel nuts should
be tightened with a torque wrench
to the proper torque specification
after replacing. Follow the torque
specification supplied by the
aftermarket manufacturer when
using accessory locking wheel
(Continued)
Warning (Continued)
nuts. SeeCapacities and
Specifications 0344 for original
equipment wheel nut torque
specifications.
Caution
Improperly tightened wheel nuts
can lead to brake pulsation and
rotor damage. To avoid expensive
brake repairs, evenly tighten the
wheel nuts in the proper
sequence and to the proper
torque specification. See
Capacities and Specifications
0 344 for the wheel nut torque
specification.
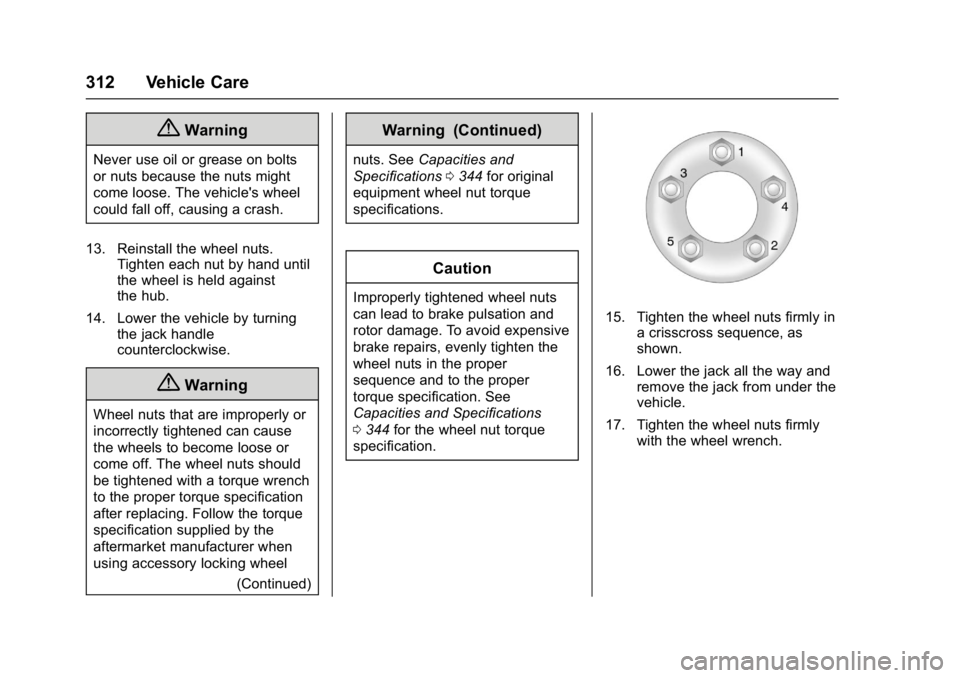
15. Tighten the wheel nuts firmly in a crisscross sequence, as
shown.
16. Lower the jack all the way and remove the jack from under the
vehicle.
17. Tighten the wheel nuts firmly with the wheel wrench.
Page 319 of 381

Buick Cascada Owner Manual (GMNA-Localizing-U.S-9186636) - 2016 - crc -
3/9/16
318 Vehicle Care
Towing the Vehicle
Caution
Incorrectly towing a disabled
vehicle may cause damage. The
damage would not be covered by
the vehicle warranty.
Do not lash or hook to
suspension components. Use the
proper straps around the tires to
secure the vehicle.
Have the vehicle towed on a flatbed
car carrier. A wheel lift tow truck
could damage the vehicle.
Consult your dealer or a
professional towing service if the
disabled vehicle must be towed.
Caution
Improper use of the tow eye can
cause vehicle damage. Use
caution and low speeds to
prevent damage to the vehicle. Front Tow Eye
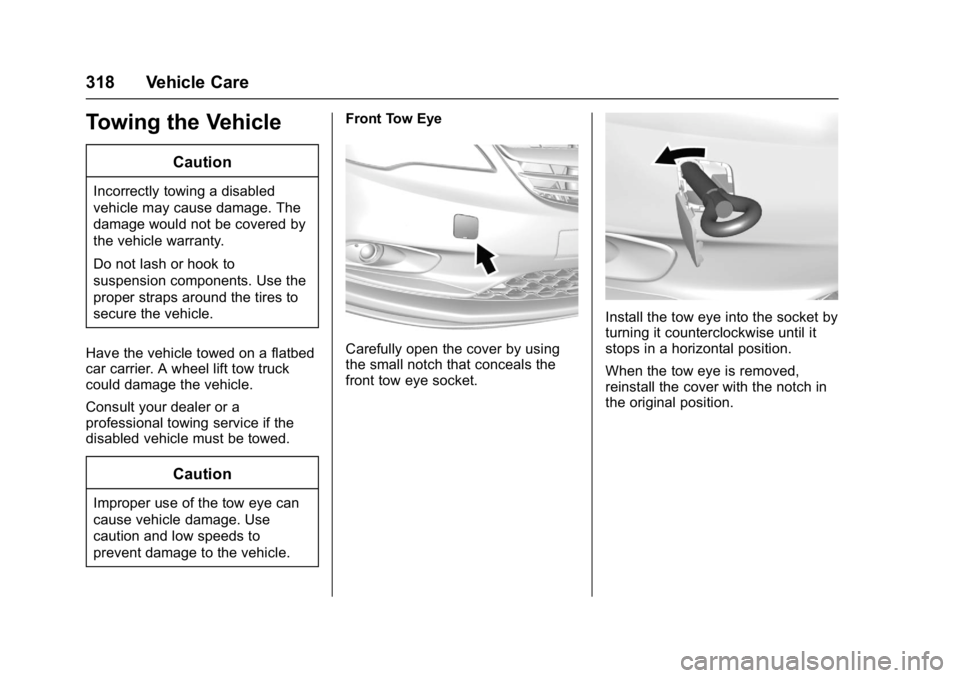
Carefully open the cover by using
the small notch that conceals the
front tow eye socket.
Install the tow eye into the socket by
turning it counterclockwise until it
stops in a horizontal position.
When the tow eye is removed,
reinstall the cover with the notch in
the original position.
Page 320 of 381

Buick Cascada Owner Manual (GMNA-Localizing-U.S-9186636) - 2016 - crc -
3/9/16
Vehicle Care 319
Rear Tow Eye
Carefully open the cover by using
the small notch that conceals the
rear tow eye socket.
Install the tow eye into the socket by
turning it counterclockwise until it
stops in a horizontal position.
When the tow eye is removed,
reinstall the cover with the notch in
the original position.
To tow the vehicle behind another
vehicle for recreational purposes,
such as behind a motor home, see
Recreational Vehicle Towing0319.
Recreational Vehicle
Towing
Recreational vehicle towing means
towing the vehicle behind another
vehicle –such as behind a motor home. The two most common types
of recreational vehicle towing are
known as dinghy towing and dolly
towing. Dinghy towing is towing the
vehicle with all four wheels on the
ground. Dolly towing is towing the
vehicle with two wheels on the
ground and two wheels up on a
device known as a dolly.
Here are some important things to
consider before recreational vehicle
towing:
.
What is the towing capacity of
the towing vehicle? Be sure to
read the tow vehicle
manufacturer's
recommendations.
. How far will the vehicle be
towed? Some vehicles have
restrictions on how far and how
long they can tow.
. Does the vehicle have the
proper towing equipment? See
your dealer or trailering
professional for additional advice
and equipment
recommendations.
Page 373 of 381

Buick Cascada Owner Manual (GMNA-Localizing-U.S-9186636) - 2016 - crc -
3/9/16
372 Index
Child Restraints (cont'd)Lower Anchors and Tethers
for Children . . . . . . . . . . . . . . . . . . . 76
Older Children . . . . . . . . . . . . . . . . . . 69
Securing . . . . . . . . . . . . . . . . . . . . 83, 86
Systems . . . . . . . . . . . . . . . . . . . . . . . . 73
Circuit Breakers . . . . . . . . . . . . . . . . 282
Cleaning Exterior Care . . . . . . . . . . . . . . . . . 321
Interior Care . . . . . . . . . . . . . . . . . . 326
Climate Control Systems Dual Automatic . . . . . . . . . . . . . . . 212
Clock . . . . . . . . . . . . . . . . . . . . . . . . . . . . 96
Cluster, Instrument . . . . . . . . . . . . . . 98
Collision Damage Repair . . . . . . . 353
Compact Spare Tire . . . . . . . . . . . . 314
Compartments Storage . . . . . . . . . . . . . . . . . . . . . . . . . 89
Compass . . . . . . . . . . . . . . . . . . . . . . . . 95
Configure Menu . . . . . . . . . . . . . . . . 183
Connections OnStar
®. . . . . . . . . . . . . . . . . . . . . . 362
Control
Traction and ElectronicStability . . . . . . . . . . . . . . . . . . . . . 239
Control of a Vehicle . . . . . . . . . . . . . 218
Controls Steering Wheel . . . . . . . . . . . . . . . 130 Convertible Top . . . . . . . . . . . . . . . . . . 37
Roll Bars . . . . . . . . . . . . . . . . . . . . . . . 63
Convex Mirrors . . . . . . . . . . . . . . . . . . 33
Coolant Engine . . . . . . . . . . . . . . . . . . . . . . . . 265
Engine Temperature Gauge . . 100
Cooling System . . . . . . . . . . . . . . . . . 264
Courtesy Lamps . . . . . . . . . . . . . . . . 123
Courtesy Transportation
Program . . . . . . . . . . . . . . . . . . . . . . . 352
Coverage Explanations . . . . . . . . . 191
Cruise Control . . . . . . . . . . . . . . . . . . 241
Light . . . . . . . . . . . . . . . . . . . . . . . . . . 109
Customer Assistance . . . . . . . . . . . 348 Offices . . . . . . . . . . . . . . . . . . . . . . . . 348
Text Telephone (TTY)Users . . . . . . . . . . . . . . . . . . . . . . . 348
Customer Information Service PublicationsOrdering Information . . . . . . . . 355
Customer Satisfaction
Procedure . . . . . . . . . . . . . . . . . . . . . 346
D
Damage Repair, Collision . . . . . . . 353
Danger, Warning, and Caution . . . . 2
Data Recorders, Event . . . . . . . . . 358
Database CoverageExplanations . . . . . . . . . . . . . . . . . . 191 Daytime Running
Lamps (DRL) . . . . . . . . . . . . . . . . . . 120
Defensive Driving . . . . . . . . . . . . . . . 217
Delayed Locking . . . . . . . . . . . . . . . . . 28
Destination . . . . . . . . . . . . . . . . . . . . . 172
Destination Download OnStar
®. . . . . . . . . . . . . . . . . . . . . . 182
Devices Auxiliary . . . . . . . . . . . . . . . . . . . . . . 164
USB . . . . . . . . . . . . . . . . . . . . . . . . . . 158
Diagnostics
OnStar
®. . . . . . . . . . . . . . . . . . . . . . 364
Distracted Driving . . . . . . . . . . . . . . . 217
Dome Lamps . . . . . . . . . . . . . . . . . . . 123
Door Ajar Light . . . . . . . . . . . . . . . . . . . . . 109
Delayed Locking . . . . . . . . . . . . . . . . 28
Locks . . . . . . . . . . . . . . . . . . . . . . . . . . . 27
Power Locks . . . . . . . . . . . . . . . . . . . . 28
Drive Belt Routing, Engine . . . . . . 345
Driver Information Center (DIC) . . . . . . . . . . . . . . . . . . 110
Driving Defensive . . . . . . . . . . . . . . . . . . . . . 217
Drunk . . . . . . . . . . . . . . . . . . . . . . . . . 217
For Better Fuel Economy . . . . . . . 19
Hill and Mountain Roads . . . . . . 221
If the Vehicle is Stuck . . . . . . . . . 223