recommended fluids BUICK CASCADA 2016 Owner's Manual
[x] Cancel search | Manufacturer: BUICK, Model Year: 2016, Model line: CASCADA, Model: BUICK CASCADA 2016Pages: 381, PDF Size: 5.52 MB
Page 262 of 381
Buick Cascada Owner Manual (GMNA-Localizing-U.S-9186636) - 2016 - crc -
3/9/16
Vehicle Care 261
When to Add Engine Oil
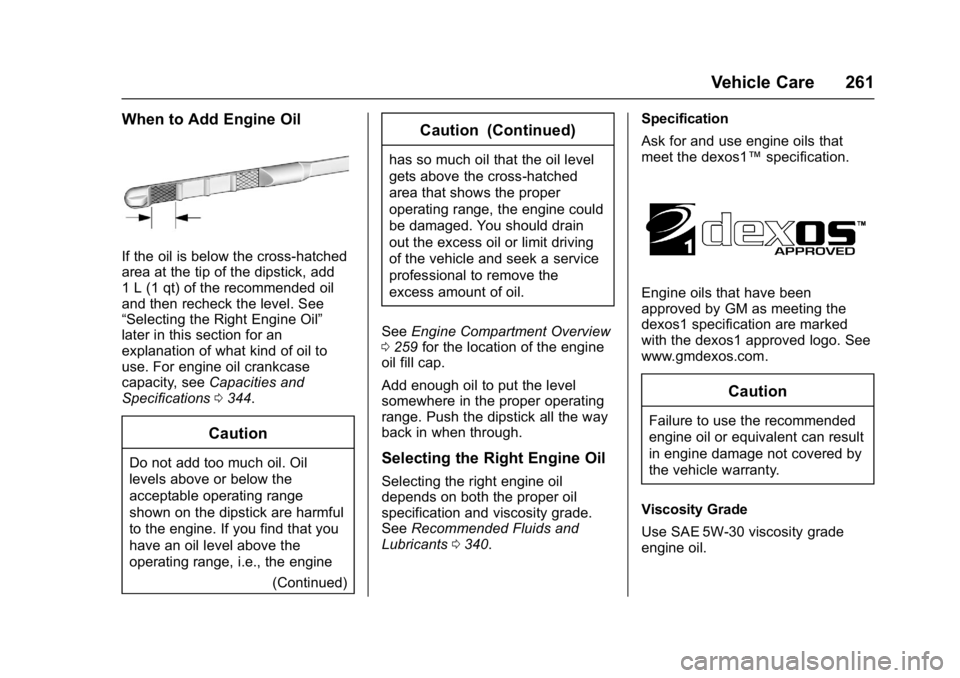
If the oil is below the cross-hatched
area at the tip of the dipstick, add
1 L (1 qt) of the recommended oil
and then recheck the level. See
“Selecting the Right Engine Oil”
later in this section for an
explanation of what kind of oil to
use. For engine oil crankcase
capacity, seeCapacities and
Specifications 0344.
Caution
Do not add too much oil. Oil
levels above or below the
acceptable operating range
shown on the dipstick are harmful
to the engine. If you find that you
have an oil level above the
operating range, i.e., the engine
(Continued)
Caution (Continued)
has so much oil that the oil level
gets above the cross-hatched
area that shows the proper
operating range, the engine could
be damaged. You should drain
out the excess oil or limit driving
of the vehicle and seek a service
professional to remove the
excess amount of oil.
See Engine Compartment Overview
0 259 for the location of the engine
oil fill cap.
Add enough oil to put the level
somewhere in the proper operating
range. Push the dipstick all the way
back in when through.
Selecting the Right Engine Oil
Selecting the right engine oil
depends on both the proper oil
specification and viscosity grade.
See Recommended Fluids and
Lubricants 0340. Specification
Ask for and use engine oils that
meet the dexos1™
specification.
Engine oils that have been
approved by GM as meeting the
dexos1 specification are marked
with the dexos1 approved logo. See
www.gmdexos.com.
Caution
Failure to use the recommended
engine oil or equivalent can result
in engine damage not covered by
the vehicle warranty.
Viscosity Grade
Use SAE 5W-30 viscosity grade
engine oil.
Page 264 of 381
Buick Cascada Owner Manual (GMNA-Localizing-U.S-9186636) - 2016 - crc -
3/9/16
Vehicle Care 263
How to Reset the Engine Oil
Life System
Reset the system whenever the
engine oil is changed so that the
system can calculate the next
engine oil change. To reset the
system:1. Turn the ignition to ON/RUN with the engine off.
2. Press the DIC MENU button on the turn signal lever to enter
the Vehicle Information Menu.
Use the thumbwheel to scroll
through the menu items until
you reach REMAINING
OIL LIFE.
3. Press SET/CLR to reset the oil life at 100%.
4. Turn the ignition to LOCK/OFF.
The system is reset when the
CHANGE ENGINE OIL SOON
message is off and the REMAINING
OIL LIFE 100% message is
displayed. If the CHANGE ENGINE OIL SOON
message comes back on when the
vehicle is started, the engine oil life
system has not been reset. Repeat
the procedure.
Automatic Transmission
Fluid
How to Check Automatic
Transmission Fluid
It is not necessary to check the
transmission fluid level.
A transmission fluid leak is the only
reason for fluid loss. If a leak
occurs, take the vehicle to your
dealer and have it repaired as soon
as possible.
There is a special procedure for
checking and changing the
transmission fluid. Because this
procedure is difficult, you should
have this done at your dealer.
Change the fluid at the intervals
listed in
Maintenance Schedule
0 331, and be sure to use the fluid
listed in Recommended Fluids and
Lubricants 0340.
Engine Air Cleaner/Filter
The engine air cleaner/filter is in the
engine compartment on the
passenger side of the vehicle. See
Engine Compartment
Overview 0259.
When to Inspect the Engine Air
Cleaner/Filter
For intervals on changing and
inspecting the engine air cleaner/
filter, see Maintenance
Schedule 0331.
How to Inspect the Engine Air
Cleaner/Filter
Do not start the engine or have the
engine running with the engine air
cleaner/filter housing open. Before
removing the engine air cleaner/
filter, make sure that the engine air
cleaner/filter housing and nearby
components are free of dirt and
debris. Remove the engine air
cleaner/filter. Lightly tap and shake
the engine air cleaner/filter (away
from the vehicle), to release loose
dust and dirt. Inspect the engine air
cleaner/filter for damage, and
Page 267 of 381
Buick Cascada Owner Manual (GMNA-Localizing-U.S-9186636) - 2016 - crc -
3/9/16
266 Vehicle Care
Caution
If improper coolant mixture,
inhibitors, or additives are used in
the vehicle cooling system, the
engine could overheat and be
damaged. Too much water in the
mixture can freeze and crack
engine cooling parts. The repairs
would not be covered by the
vehicle warranty. Use only the
proper mixture of engine coolant
for the cooling system. See
Recommended Fluids and
Lubricants0340.
Never dispose of engine coolant by
putting it in the trash, pouring it on
the ground, or into sewers, streams,
or bodies of water. Have the coolant
changed by an authorized service
center, familiar with legal
requirements regarding used
coolant disposal. This will help
protect the environment and your
health.
Checking Coolant
The vehicle must be on a level
surface when checking the coolant
level.
It is normal to see coolant moving in
the upper coolant hose return line
when the engine is running.
Check to see if coolant is visible in
the coolant surge tank. If the coolant
inside the coolant surge tank is
boiling, do not do anything else until
it cools down.
If coolant is visible but the coolant
level is not at or above the mark
pointed to, add a 50/50 mixture of
clean, drinkable water and
DEX-COOL coolant.
Be sure the cooling system is cool
before this is done.
If no coolant is visible in the coolant
surge tank, add coolant as follows:
How to Add Coolant to the
Coolant Surge Tank Caution
This vehicle has a specific
coolant fill procedure. Failure to
follow this procedure could cause
the engine to overheat and be
severely damaged.
If no problem is found, check to see
if coolant is visible in the coolant
surge tank. If coolant is visible but
the coolant level is not at the
indicated level mark, add a 50/
50 mixture of clean, drinkable water
and DEX-COOL coolant at the
coolant surge tank, but be sure the
cooling system, including the
coolant surge tank pressure cap, is
cool before you do it.
{Warning
Steam and scalding liquids from a
hot cooling system can blow out
and burn you badly. Never turn (Continued)
Page 272 of 381
Buick Cascada Owner Manual (GMNA-Localizing-U.S-9186636) - 2016 - crc -
3/9/16
Vehicle Care 271
There are only two reasons why the
brake fluid level in the reservoir may
go down:
.Normal brake lining wear. When
new linings are installed, the
fluid level goes back up.
. A fluid leak in the brake
hydraulic system. Have the
brake hydraulic system fixed.
With a leak, the brakes will not
work well.
Always clean the brake fluid
reservoir cap and the area around
the cap before removing it.
Do not top off the brake fluid.
Adding fluid does not correct a leak.
If fluid is added when the linings are
worn, there will be too much fluid
when new brake linings are
installed. Add or remove fluid, as
necessary, only when work is done
on the brake hydraulic system.{Warning
If too much brake fluid is added, it
can spill on the engine and burn,
if the engine is hot enough. You
or others could be burned, and
the vehicle could be damaged.
Add brake fluid only when work is
done on the brake hydraulic
system.
When the brake fluid falls to a low
level, the brake warning light comes
on. See Brake System Warning
Light 0104.
Brake fluid absorbs water over time
which degrades the effectiveness of
the brake fluid. Replace brake fluid
at the specified intervals to prevent
increased stopping distance. See
Maintenance Schedule 0331.
What to Add
Use only GM approved DOT 4
brake fluid from a clean, sealed
container. See Recommended
Fluids and Lubricants 0340.
{Warning
The wrong or contaminated brake
fluid could result in damage to the
brake system. This could result in
the loss of braking leading to a
possible injury. Always use the
proper GM approved brake fluid.
Caution
If brake fluid is spilled on the
vehicle's painted surfaces, the
paint finish can be damaged.
Immediately wash off any painted
surface.
Battery - North America
The original equipment battery is
maintenance free. Do not remove
the cap and do not add fluid.
Refer to the replacement number
shown on the original battery label
when a new battery is needed. See
Engine Compartment Overview
0259 for battery location.
Page 322 of 381
Buick Cascada Owner Manual (GMNA-Localizing-U.S-9186636) - 2016 - crc -
3/9/16
Vehicle Care 321
Caution
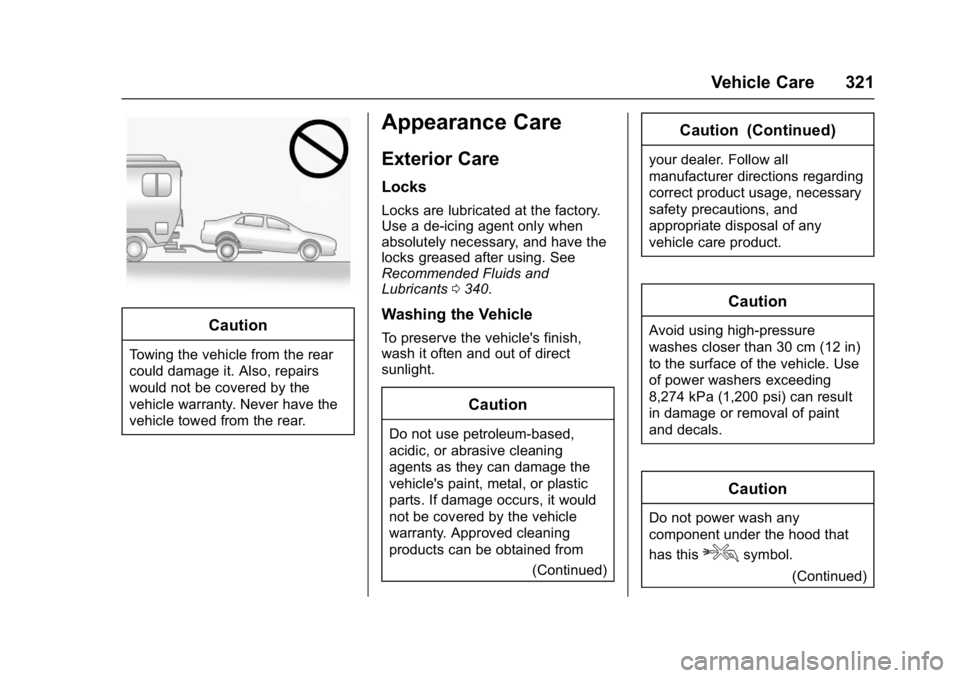
Towing the vehicle from the rear
could damage it. Also, repairs
would not be covered by the
vehicle warranty. Never have the
vehicle towed from the rear.
Appearance Care
Exterior Care
Locks
Locks are lubricated at the factory.
Use a de-icing agent only when
absolutely necessary, and have the
locks greased after using. See
Recommended Fluids and
Lubricants0340.
Washing the Vehicle
To preserve the vehicle's finish,
wash it often and out of direct
sunlight.
Caution
Do not use petroleum-based,
acidic, or abrasive cleaning
agents as they can damage the
vehicle's paint, metal, or plastic
parts. If damage occurs, it would
not be covered by the vehicle
warranty. Approved cleaning
products can be obtained from
(Continued)
Caution (Continued)
your dealer. Follow all
manufacturer directions regarding
correct product usage, necessary
safety precautions, and
appropriate disposal of any
vehicle care product.
Caution
Avoid using high-pressure
washes closer than 30 cm (12 in)
to the surface of the vehicle. Use
of power washers exceeding
8,274 kPa (1,200 psi) can result
in damage or removal of paint
and decals.
Caution
Do not power wash any
component under the hood that
has this
esymbol.
(Continued)
Page 325 of 381
Buick Cascada Owner Manual (GMNA-Localizing-U.S-9186636) - 2016 - crc -
3/9/16
324 Vehicle Care
Windshield and Wiper Blades
Clean the outside of the windshield
with glass cleaner.
Clean rubber blades using a lint-free
cloth or paper towel soaked with
windshield washer fluid or a mild
detergent. Wash the windshield
thoroughly when cleaning the
blades. Bugs, road grime, sap, and
a buildup of vehicle wash/wax
treatments may cause wiper
streaking.
Replace the wiper blades if they are
worn or damaged. Damage can be
caused by extreme dusty
conditions, sand, salt, heat, sun,
snow, and ice.
Weatherstrips
Apply Dielectric silicone grease on
weatherstrips to make them last
longer, seal better, and not stick or
squeak. Lubricate weatherstrips at
least once a year. Hot, dry climates
may require more frequent
application. Black marks from
rubber material on painted surfacescan be removed by rubbing with a
clean cloth. See
Recommended
Fluids and Lubricants 0340.
Tires
Use a stiff brush with tire cleaner to
clean the tires.
Caution
Using petroleum-based tire
dressing products on the vehicle
may damage the paint finish and/
or tires. When applying a tire
dressing, always wipe off any
overspray from all painted
surfaces on the vehicle.
Wheels and Trim —Aluminum
or Chrome
Use a soft, clean cloth with mild
soap and water to clean the wheels.
After rinsing thoroughly with clean
water, dry with a soft, clean towel.
A wax may then be applied.
Caution
Chrome wheels and other chrome
trim may be damaged if the
vehicle is not washed after driving
on roads that have been sprayed
with magnesium, calcium,
or sodium chloride. These
chlorides are used on roads for
conditions such as ice and dust.
Always wash the chrome with
soap and water after exposure.
Caution
To avoid surface damage, do not
use strong soaps, chemicals,
abrasive polishes, cleaners,
brushes, or cleaners that contain
acid on aluminum or
chrome-plated wheels. Use only
approved cleaners. Also, never
drive a vehicle with aluminum or
chrome-plated wheels through an
automatic car wash that uses
silicone carbide tire cleaning
(Continued)
Page 331 of 381
Buick Cascada Owner Manual (GMNA-Localizing-U.S-9186636) - 2016 - crc -
3/9/16
330 Service and Maintenance
Service and
Maintenance
General Information
General Information . . . . . . . . . . 330
Maintenance Schedule
Maintenance Schedule . . . . . . . 331
Special Application Services
Special ApplicationServices . . . . . . . . . . . . . . . . . . . . 337
Additional Maintenance
and Care
Additional Maintenanceand Care . . . . . . . . . . . . . . . . . . . . 337
Recommended Fluids,
Lubricants, and Parts
Recommended Fluids andLubricants . . . . . . . . . . . . . . . . . . . 340
Maintenance Replacement Parts . . . . . . . . . . . . . . . . . . . . . . . . 341
Maintenance Records
Maintenance Records . . . . . . . . 342
General Information
Your vehicle is an important
investment. This section describes
the required maintenance for the
vehicle. Follow this schedule to help
protect against major repair
expenses resulting from neglect or
inadequate maintenance. It may
also help to maintain the value of
the vehicle if it is sold. It is the
responsibility of the owner to have
all required maintenance performed.
Your dealer has trained technicians
who can perform required
maintenance using genuine
replacement parts. They have
up-to-date tools and equipment for
fast and accurate diagnostics. Many
dealers have extended evening and
Saturday hours, courtesy
transportation, and online
scheduling to assist with service
needs.
Your dealer recognizes the
importance of providing
competitively priced maintenance
and repair services. With trained
technicians, the dealer is the place
for routine maintenance such as oil changes and tire rotations and
additional maintenance items like
tires, brakes, batteries, and wiper
blades.
Caution
Damage caused by improper
maintenance can lead to costly
repairs and may not be covered
by the vehicle warranty.
Maintenance intervals, checks,
inspections, recommended fluids,
and lubricants are important to
keep the vehicle in good working
condition.
The Tire Rotation and Required
Services are the responsibility of the
vehicle owner. It is recommended to
have your dealer perform these
services every 12 000 km/7,500 mi.
Proper vehicle maintenance helps to
keep the vehicle in good working
condition, improves fuel economy,
and reduces vehicle emissions.
Because of the way people use
vehicles, maintenance needs vary.
There may need to be more
Page 339 of 381
Buick Cascada Owner Manual (GMNA-Localizing-U.S-9186636) - 2016 - crc -
3/9/16
338 Service and Maintenance
.To avoid break-down or failure to
start the vehicle, maintain a
battery with full cranking power.
. Trained dealer technicians have
the diagnostic equipment to test
the battery and ensure that the
connections and cables are
corrosion-free.
Belts
. Belts may need replacing if they
squeak or show signs of
cracking or splitting.
. Trained dealer technicians have
access to tools and equipment
to inspect the belts and
recommend adjustment or
replacement when necessary.
Brakes
Brakes stop the vehicle and are
crucial to safe driving.
. Signs of brake wear may include
chirping, grinding, or squealing
noises, or difficulty stopping. .
Trained dealer technicians have
access to tools and equipment
to inspect the brakes and
recommend quality parts
engineered for the vehicle.
Fluids
Proper fluid levels and approved
fluids protect the vehicle’s systems
and components. See
Recommended Fluids and
Lubricants 0340 for GM approved
fluids.
. Engine oil and windshield
washer fluid levels should be
checked at every fuel fill.
. Instrument cluster lights may
come on to indicate that fluids
may be low and need to be
filled.
Hoses
Hoses transport fluids and should
be regularly inspected to ensure
that there are no cracks or leaks.
With a multi-point inspection, your
dealer can inspect the hoses and
advise if replacement is needed. Lamps
Properly working headlamps,
taillamps, and brake lamps are
important to see and be seen on
the road.
.
Signs that the headlamps need
attention include dimming, failure
to light, cracking, or damage.
The brake lamps need to be
checked periodically to ensure
that they light when braking.
. With a multi-point inspection,
your dealer can check the lamps
and note any concerns.
Shocks and Struts
Shocks and struts help aid in control
for a smoother ride.
. Signs of wear may include
steering wheel vibration, bounce/
sway while braking, longer
stopping distance, or uneven
tire wear.
. As part of the multi-point
inspection, trained dealer
technicians can visually inspect
the shocks and struts for signs
Page 341 of 381
Buick Cascada Owner Manual (GMNA-Localizing-U.S-9186636) - 2016 - crc -
3/9/16
340 Service and Maintenance
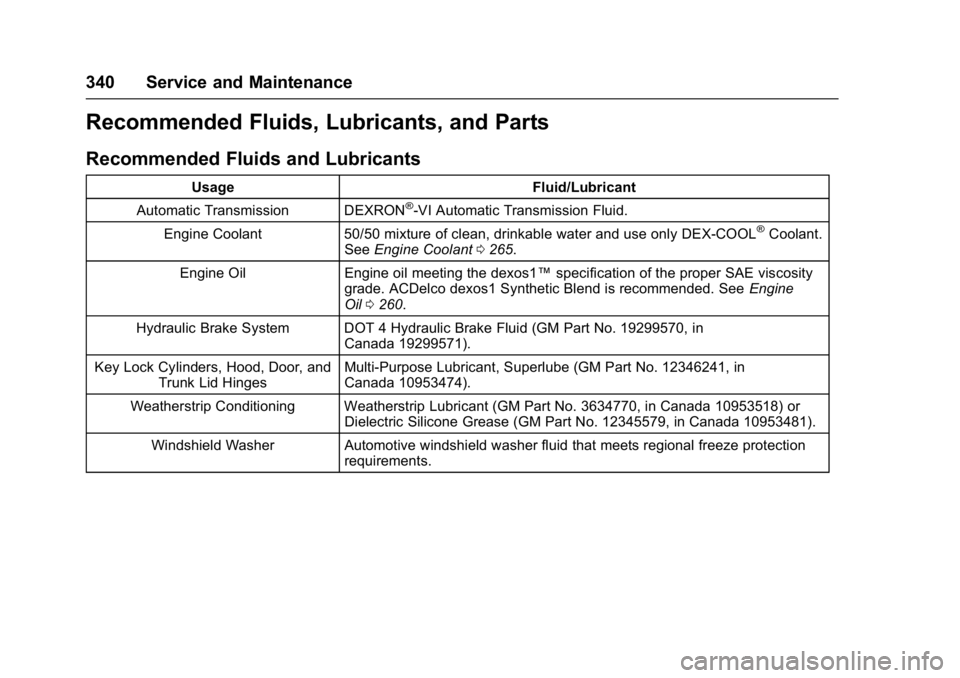
Recommended Fluids, Lubricants, and Parts
Recommended Fluids and Lubricants
UsageFluid/Lubricant
Automatic Transmission DEXRON
®-VI Automatic Transmission Fluid.
Engine Coolant 50/50 mixture of clean, drinkable water and use only DEX-COOL
®Coolant.
See Engine Coolant 0265.
Engine Oil Engine oil meeting the dexos1™ specification of the proper SAE viscosity
grade. ACDelco dexos1 Synthetic Blend is recommended. See Engine
Oil 0260.
Hydraulic Brake System DOT 4 Hydraulic Brake Fluid (GM Part No. 19299570, in Canada 19299571).
Key Lock Cylinders, Hood, Door, and Trunk Lid Hinges Multi-Purpose Lubricant, Superlube (GM Part No. 12346241, in
Canada 10953474).
Weatherstrip Conditioning Weatherstrip Lubricant (GM Part No. 3634770, in Canada 10953518) or Dielectric Silicone Grease (GM Part No. 12345579, in Canada 10953481).
Windshield Washer Automotive windshield washer fluid that meets regional freeze protection requirements.
Page 377 of 381

Buick Cascada Owner Manual (GMNA-Localizing-U.S-9186636) - 2016 - crc -
3/9/16
376 Index
Locks (cont'd)Door . . . . . . . . . . . . . . . . . . . . . . . . . . . . 27
Lockout Protection . . . . . . . . . . . . . . 29
Power Door . . . . . . . . . . . . . . . . . . . . . 28
Loss of Control . . . . . . . . . . . . . . . . . 219
Low Fuel Warning Light . . . . . . . . . 108
Low-Profile Tires . . . . . . . . . . . . . . . . 290
Lower Anchors and Tethers for Children (LATCH
System) . . . . . . . . . . . . . . . . . . . . . . . . 76
Lumbar Adjustment . . . . . . . . . . . . . . 48 Front Seats . . . . . . . . . . . . . . . . . . . . . 48
M
MaintenanceRecords . . . . . . . . . . . . . . . . . . . . . . 342
Maintenance and Care Additional . . . . . . . . . . . . . . . . . . . . . 337
Maintenance Schedule . . . . . . . . . 331
Recommended Fluids andLubricants . . . . . . . . . . . . . . . . . . . 340
Malfunction Indicator Lamp . . . . . 102
Manual Mode . . . . . . . . . . . . . . . . . . . 234
Map Data Updates . . . . . . . . . . . . . . 190
Maps . . . . . . . . . . . . . . . . . . . . . . . . . . . 170
Media Avoiding Untrusted Devices . . 155 Menu
Configure . . . . . . . . . . . . . . . . . . . . . 183
Messages Vehicle . . . . . . . . . . . . . . . . . . . . . . . .113
Messaging Text . . . . . . . . . . . . . . . . . . . . . . . . . . . 204
Mirrors
Automatic DimmingRearview . . . . . . . . . . . . . . . . . . . . . . 34
Convex . . . . . . . . . . . . . . . . . . . . . . . . . 33
Folding . . . . . . . . . . . . . . . . . . . . . . . . . 33
Heated . . . . . . . . . . . . . . . . . . . . . . . . . 33
Power . . . . . . . . . . . . . . . . . . . . . . . . . . 33
Mirrors, Interior Rearview . . . . . . . . 34
Monitor System, Tire Pressure . . . . . . . . . . . . . . . . . . . . . . 296
MP3 . . . . . . . . . . . . . . . . . . . . . . . . . . . . 157
Multi-band Antenna . . . . . . . . . . . . . 145
N
Navigation Destination . . . . . . . . . . . . . . . . . . . 172
OnStar
®. . . . . . . . . . . . . . . . . . . . . . 361
Using the System . . . . . . . . . . . . . 166
Navigation Symbols . . . . . . . . . . . . 170
New Vehicle Break-In . . . . . . . . . . . 226
O
Odometer . . . . . . . . . . . . . . . . . . . . . . . . 99 Trip . . . . . . . . . . . . . . . . . . . . . . . . . . . . . 99
Off-Road Recovery . . . . . . . . . . . . . . . . . . . . . 219
Oil Engine . . . . . . . . . . . . . . . . . . . . . . . . 260
Engine Oil Life System . . . . . . . 262
Pressure Light . . . . . . . . . . . . . . . . 107
Older Children, Restraints . . . . . . . 69
Online Owner Center . . . . . . . . . . . 349
OnStar . . . . . . . . . . . . . . . . . . . . . . . . . 358
OnStar System . . . . . . . . . . . . . . . . . 165
OnStar
®Additional
Information . . . . . . . . . . . . . . . . . . . . 364
OnStar
®Connections . . . . . . . . . . . 362
OnStar®Destination
Download . . . . . . . . . . . . . . . . . . . . . 182
OnStar
®Diagnostics . . . . . . . . . . . . 364
OnStar®Emergency . . . . . . . . . . . . 361
OnStar®Navigation . . . . . . . . . . . . . 361
OnStar®Overview . . . . . . . . . . . . . . 360
OnStar®Security . . . . . . . . . . . . . . . 361
Operate Pedal Light . . . . . . . . . . . . 105
Operation
Fog Lamps . . . . . . . . . . . . . . . . . . . 122