shift BUICK CASCADA 2016 Owner's Manual
[x] Cancel search | Manufacturer: BUICK, Model Year: 2016, Model line: CASCADA, Model: BUICK CASCADA 2016Pages: 381, PDF Size: 5.52 MB
Page 8 of 381

Buick Cascada Owner Manual (GMNA-Localizing-U.S-9186636) - 2016 - crc -
3/9/16
In Brief 7
1.Air Vents 0214.
2. Headlamp High/Low-Beam
Changer 0120.
Turn Signal Lever. See Turn
and Lane-Change
Signals 0122.
Driver Information Center (DIC)
Buttons. See Driver Information
Center (DIC) 0110.
3. Cruise Control 0241.
Forward Collision Alert (FCA)
System 0245 (If Equipped).
4. Instrument Cluster 098.
5. Driver Information Center
(DIC) 0110.
6. Steering Wheel Controls 093.
7. Windshield Wiper/Washer 094.
8. Central Locking Switch. See Power Door Locks 028.
Hazard Warning
Flashers 0122.
Passenger Airbag Status
Indicator 0101
9. Infotainment. See Overview 0127. 10. Anti-Theft Alarm System
Indicator. See Vehicle Alarm
System 031.
11. Traction Control/Electronic
Stability Control 0239.
Lane Departure Warning
(LDW) 0247.
Assistance Systems for
Parking or Backing 0243.
12. Dual Automatic Climate Control
System 0212.
Heated Front Seats 049 (If
Equipped).
Heated Steering Wheel 094 (If
Equipped).
13. USB 0158.
Input Jack. See Auxiliary
Devices 0164.
14. Convertible Top 037 (If
Equipped).
Central Power Window Switch.
See Power Windows 034.
15. Electric Parking Brake. See Parking Brake 0236 16. Shift Lever. See
Automatic
Transmission 0233.
17. Power Outlets 096.
18. Ignition Switch. See Ignition
Positions 0227.
19. Horn 094.
20. Steering Wheel
Adjustment 093.
21. Instrument Panel Storage 089.
Instrument Panel Fuse
Block 0285.
22. Hood Release. See Hood 0257.
23. Exterior Lamp Controls 0119.
Fog Lamps 0122.
Instrument Panel Illumination
Control 0123.
24. Data Link Connector (DLC) (Out of View). See Malfunction
Indicator Lamp (Check Engine
Light) 0102.
Page 16 of 381
Buick Cascada Owner Manual (GMNA-Localizing-U.S-9186636) - 2016 - crc -
3/9/16
In Brief 15
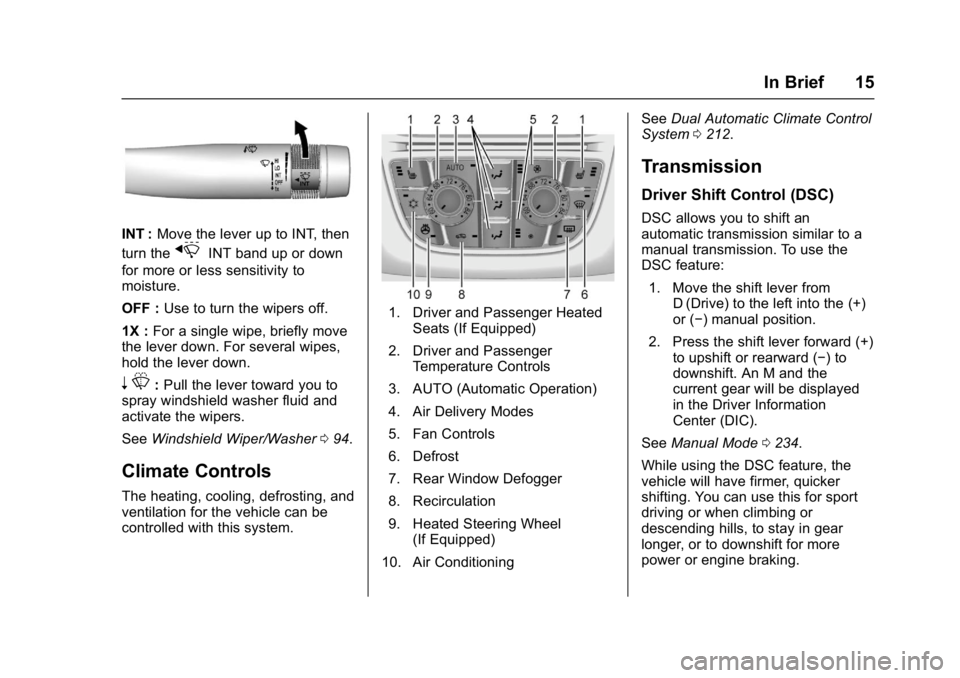
INT :Move the lever up to INT, then
turn the
xINT band up or down
for more or less sensitivity to
moisture.
OFF : Use to turn the wipers off.
1X : For a single wipe, briefly move
the lever down. For several wipes,
hold the lever down.
n L: Pull the lever toward you to
spray windshield washer fluid and
activate the wipers.
See Windshield Wiper/Washer 094.
Climate Controls
The heating, cooling, defrosting, and
ventilation for the vehicle can be
controlled with this system.
1. Driver and Passenger Heated
Seats (If Equipped)
2. Driver and Passenger Temperature Controls
3. AUTO (Automatic Operation)
4. Air Delivery Modes
5. Fan Controls
6. Defrost
7. Rear Window Defogger
8. Recirculation
9. Heated Steering Wheel (If Equipped)
10. Air Conditioning See
Dual Automatic Climate Control
System 0212.
Transmission
Driver Shift Control (DSC)
DSC allows you to shift an
automatic transmission similar to a
manual transmission. To use the
DSC feature:
1. Move the shift lever from D (Drive) to the left into the (+)
or (−) manual position.
2. Press the shift lever forward (+) to upshift or rearward (−) to
downshift. An M and the
current gear will be displayed
in the Driver Information
Center (DIC).
See Manual Mode 0234.
While using the DSC feature, the
vehicle will have firmer, quicker
shifting. You can use this for sport
driving or when climbing or
descending hills, to stay in gear
longer, or to downshift for more
power or engine braking.
Page 18 of 381
Buick Cascada Owner Manual (GMNA-Localizing-U.S-9186636) - 2016 - crc -
3/9/16
In Brief 17
SET/−:Move the thumbwheel down
briefly to set the speed and activate
cruise control. If cruise control is
already active, use to decrease
speed.
*: Press to disengage cruise
control without erasing the set
speed from memory.
See Cruise Control 0241.
Driver Information
Center (DIC)
The DIC display is in the center of
the instrument cluster. It shows the
status of many vehicle systems. The
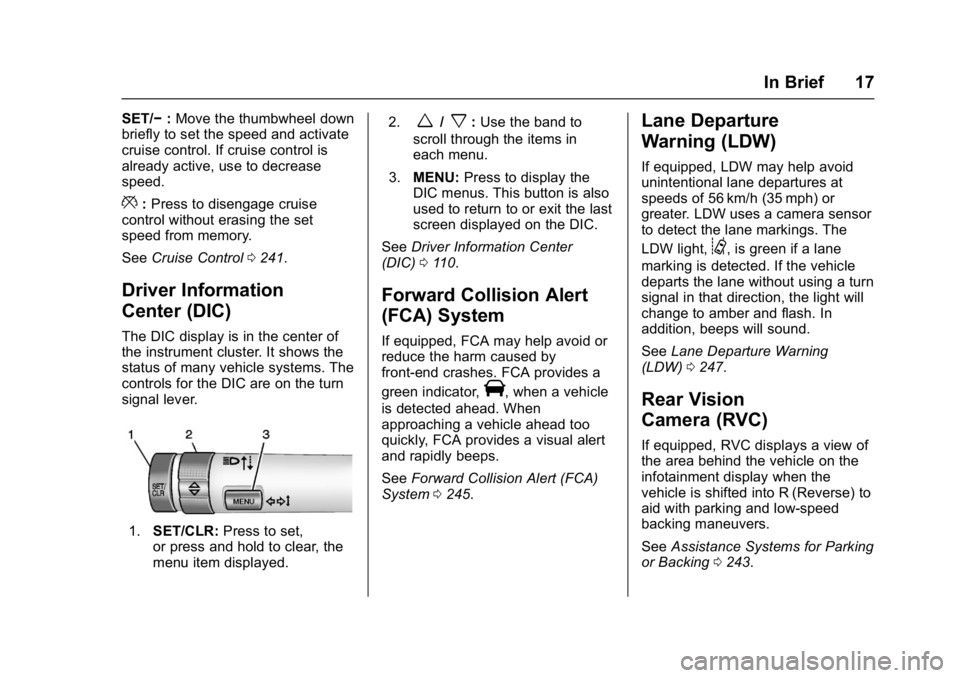
controls for the DIC are on the turn
signal lever.
1. SET/CLR: Press to set,
or press and hold to clear, the
menu item displayed. 2.
w/x:
Use the band to
scroll through the items in
each menu.
3. MENU: Press to display the
DIC menus. This button is also
used to return to or exit the last
screen displayed on the DIC.
See Driver Information Center
(DIC) 0110.
Forward Collision Alert
(FCA) System
If equipped, FCA may help avoid or
reduce the harm caused by
front-end crashes. FCA provides a
green indicator,
V, when a vehicle
is detected ahead. When
approaching a vehicle ahead too
quickly, FCA provides a visual alert
and rapidly beeps.
See Forward Collision Alert (FCA)
System 0245.
Lane Departure
Warning (LDW)
If equipped, LDW may help avoid
unintentional lane departures at
speeds of 56 km/h (35 mph) or
greater. LDW uses a camera sensor
to detect the lane markings. The
LDW light,
@, is green if a lane
marking is detected. If the vehicle
departs the lane without using a turn
signal in that direction, the light will
change to amber and flash. In
addition, beeps will sound.
See Lane Departure Warning
(LDW) 0247.
Rear Vision
Camera (RVC)
If equipped, RVC displays a view of
the area behind the vehicle on the
infotainment display when the
vehicle is shifted into R (Reverse) to
aid with parking and low-speed
backing maneuvers.
See Assistance Systems for Parking
or Backing 0243.
Page 29 of 381
Buick Cascada Owner Manual (GMNA-Localizing-U.S-9186636) - 2016 - crc -
3/9/16
28 Keys, Doors, and Windows
Free-Turning Locks
The door lock cylinder turns freely
when either the wrong key is used,
or the correct key is not fully
inserted. The free-turning door lock
feature prevents the lock from being
forced open.
To reset the lock, turn it to the
vertical position with the correct key
fully inserted. Remove the key and
insert it again.
If this does not reset the lock, turn
the key halfway around in the
cylinder and repeat the reset
procedure.Power Door Locks
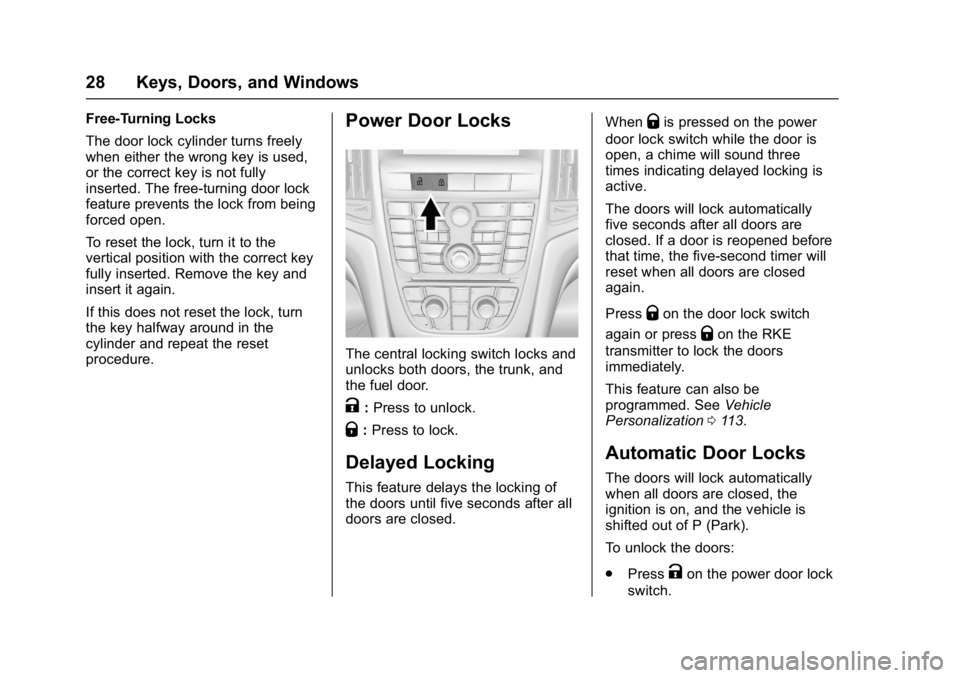
The central locking switch locks and
unlocks both doors, the trunk, and
the fuel door.
K:Press to unlock.
Q: Press to lock.
Delayed Locking
This feature delays the locking of
the doors until five seconds after all
doors are closed. When
Qis pressed on the power
door lock switch while the door is
open, a chime will sound three
times indicating delayed locking is
active.
The doors will lock automatically
five seconds after all doors are
closed. If a door is reopened before
that time, the five-second timer will
reset when all doors are closed
again.
Press
Qon the door lock switch
again or press
Qon the RKE
transmitter to lock the doors
immediately.
This feature can also be
programmed. See Vehicle
Personalization 0113.
Automatic Door Locks
The doors will lock automatically
when all doors are closed, the
ignition is on, and the vehicle is
shifted out of P (Park).
To unlock the doors:
.
Press
Kon the power door lock
switch.
Page 30 of 381
Buick Cascada Owner Manual (GMNA-Localizing-U.S-9186636) - 2016 - crc -
3/9/16
Keys, Doors, and Windows 29
.Shift the transmission into
P (Park).
Automatic door locking cannot be
disabled. Automatic door unlocking
can be programmed. See Vehicle
Personalization 0113.
Lockout Protection
When locking is requested with the
driver door open and the key in the
ignition, all the doors will lock and
then the driver door will unlock. This
can be manually overridden by
pressing and holding
Qon the
power door lock switch.
If Open Door Anti-Lockout is turned
on, the vehicle is off with the driver
door open, and door locking is
requested, all the doors will lock and
only the driver door will unlock. The
Open Door Anti-Lockout feature can
be turned on or off. See Vehicle
Personalization 0113.
Doors
Trunk
{Warning
Exhaust gases can enter the
vehicle if it is driven with the
liftgate or trunk/hatch open,
or with any objects that pass
through the seal between the
body and the trunk/hatch or
liftgate. Engine exhaust contains
carbon monoxide (CO) which
cannot be seen or smelled. It can
cause unconsciousness and even
death.
If the vehicle must be driven with
the liftgate or trunk/hatch open:
. Close all of the windows.
. Fully open the air outlets on
or under the instrument
panel.
. Adjust the climate control
system to a setting that
brings in only outside air
(Continued)
Warning (Continued)
and set the fan speed to the
highest setting. See
“Climate Control Systems”
in the Index.
. If the vehicle is equipped
with a power liftgate, disable
the power liftgate function.
See Engine Exhaust 0232.
Trunk Release
To open the trunk, the vehicle must
be off or the shift lever must be in
P (Park).
Page 111 of 381
Buick Cascada Owner Manual (GMNA-Localizing-U.S-9186636) - 2016 - crc -
3/9/16
110 Instruments and Controls
Information Displays
Driver Information
Center (DIC)
The DIC displays information about
the vehicle. It also displays warning
messages if a system problem is
detected. SeeVehicle Messages
0 113. All messages appear in the
DIC display in the center of the
instrument cluster.
DIC Operation and Displays
The DIC has different displays
which can be accessed by using the
DIC buttons on the turn signal lever.
The DIC displays trip, fuel, and
vehicle system information, and
warning messages if a system
problem is detected.
The bottom of the DIC display
shows the position of the shift lever
and the odometer. It may also show
the direction the vehicle is driving. DIC Buttons
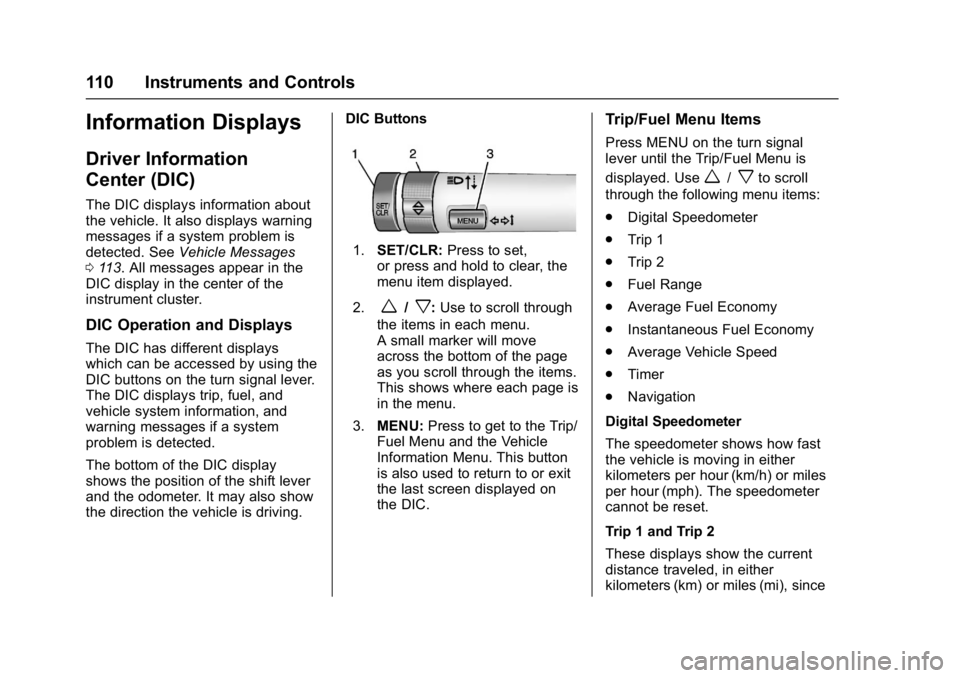
1.
SET/CLR: Press to set,
or press and hold to clear, the
menu item displayed.
2.
w/x: Use to scroll through
the items in each menu.
A small marker will move
across the bottom of the page
as you scroll through the items.
This shows where each page is
in the menu.
3. MENU: Press to get to the Trip/
Fuel Menu and the Vehicle
Information Menu. This button
is also used to return to or exit
the last screen displayed on
the DIC.
Trip/Fuel Menu Items
Press MENU on the turn signal
lever until the Trip/Fuel Menu is
displayed. Use
w/xto scroll
through the following menu items:
. Digital Speedometer
. Trip 1
. Trip 2
. Fuel Range
. Average Fuel Economy
. Instantaneous Fuel Economy
. Average Vehicle Speed
. Timer
. Navigation
Digital Speedometer
The speedometer shows how fast
the vehicle is moving in either
kilometers per hour (km/h) or miles
per hour (mph). The speedometer
cannot be reset.
Trip 1 and Trip 2
These displays show the current
distance traveled, in either
kilometers (km) or miles (mi), since
Page 118 of 381

Buick Cascada Owner Manual (GMNA-Localizing-U.S-9186636) - 2016 - crc -
3/9/16
Instruments and Controls 117
Comfort and Convenience
Select and the following may
display:
.Chime Volume
. Button Chime
Chime Volume
This allows the selection of the
chime volume level.
Select Low or High.
Button Chime
This allows the Button Chime
feature to be turned on or off.
Select to enable or disable.
Collision Detection Systems
Select and the following may
display:
. Park Assist
Park Assist
This allows the Parking Assist
feature to be turned on or off.
Select Off or On.
Lighting
Select and the following may
display:
. Vehicle Locator Lights
. Exit Lighting
Vehicle Locator Lights
This allows the vehicle locator lights
to be turned on or off.
Select to enable or disable.
Exit Lighting
This allows the selection of how
long the exterior lamps stay on
when leaving the vehicle when it is
dark outside.
Select Off, 30 Seconds, 1 Minute,
or 2 Minutes.
Power Door Locks
Select and the following may
display:
. Open Door Anti Lock Out
. Auto Door Unlock
. Delay Door Lock Open Door Anti Lock Out
When on, this feature will keep the
driver door from locking until the
door is closed. If this feature is
turned on, the Delayed Door Lock
menu will not be available.
Select to enable or disable.
Auto Door Unlock
This allows selection of which doors
will automatically unlock when the
vehicle is shifted into P (Park).
Select All Doors, Driver Door, or Off.
Delay Door Lock
When on, this feature will delay the
locking of the doors. See
Delayed
Locking 028.
Select to enable or disable.Remote Lock/Unlock/Start
Select and the following may
display:
. Remote Unlock Feedback
. Remote Lock Feedback
. Remote Door Unlock
Page 122 of 381
Buick Cascada Owner Manual (GMNA-Localizing-U.S-9186636) - 2016 - crc -
3/9/16
Lighting 121
To turn the DRL off or on again, turn
the exterior lamp control to
Oand
then release. For vehicles first sold
in Canada, the DRL cannot be
turned off.
Automatic Headlamp
System
When it is dark enough outside and
the exterior lamp control is in the
automatic position and the engine is
running, the headlamps come on
automatically. See Exterior Lamp
Controls 0119.
The system may also turn on the
headlamps when driving through a
parking garage or tunnel.
If the vehicle is started in a dark
garage, the automatic headlamp
system comes on immediately. If it
is light outside when the vehicle
leaves the garage, there is a slight
delay before the automatic
headlamp system changes to the
DRL. During that delay, the
instrument cluster may not be as
bright as usual. Make sure the
instrument panel brightness control is in the full bright position. See
Instrument Panel Illumination
Control
0123.
Lights On with Wipers
If the windshield wipers are
activated in daylight with the engine
on, and the exterior lamp control is
in AUTO, the headlamps, parking
lamps, and other exterior lamps
come on. The transition time for the
lamps coming on varies based on
wiper speed. When the wipers are
not operating, these lamps turn off.
Move the exterior lamp control to
P
or;to disable this feature.
Adaptive Forward
Lighting (AFL)
The AFL system adjusts the
headlamps to provide greater road
illumination in various driving
conditions.
To enable AFL, set the exterior lamp
control to the AUTO position.
Moving the control out of the AUTO
position will deactivate the system.
AFL will operate when the vehicle speed is greater than 3 km/h
(2 mph). AFL will not operate when
the transmission is in R (Reverse).
AFL is not immediately operable
after starting the vehicle; driving a
short distance is required to
calibrate the AFL. See
Exterior
Lamp Controls 0119.
Curve Lighting
The light beam pivots based on the
steering wheel position and vehicle
speed of at least 10 km/h (6 mph).
The headlamps shine at an angle of
up to 15 degrees to the right or left
of the direction of travel.
Corner Lighting
On tight bends or when making a
turn, depending on the steering
angle or the turn signal lamp, an
additional left or right reflector is
turned on to illuminate the road at a
right angle to the direction of travel.
It is activated up to a speed of
40 km/h (25 MPH).
Reversing Function
If the headlamps are on and the
shift lever is in R (Reverse), both
corner lights are turned on. They
Page 123 of 381
Buick Cascada Owner Manual (GMNA-Localizing-U.S-9186636) - 2016 - crc -
3/9/16
122 Lighting
remain on for 20 seconds after
moving the shift lever out of
R (Reverse) position or until the
vehicle is driving forward faster than
16 km/h (10 mph).
Headlamp Leveling
Control
The level of the headlamps is
adjusted automatically based on
vehicle load.
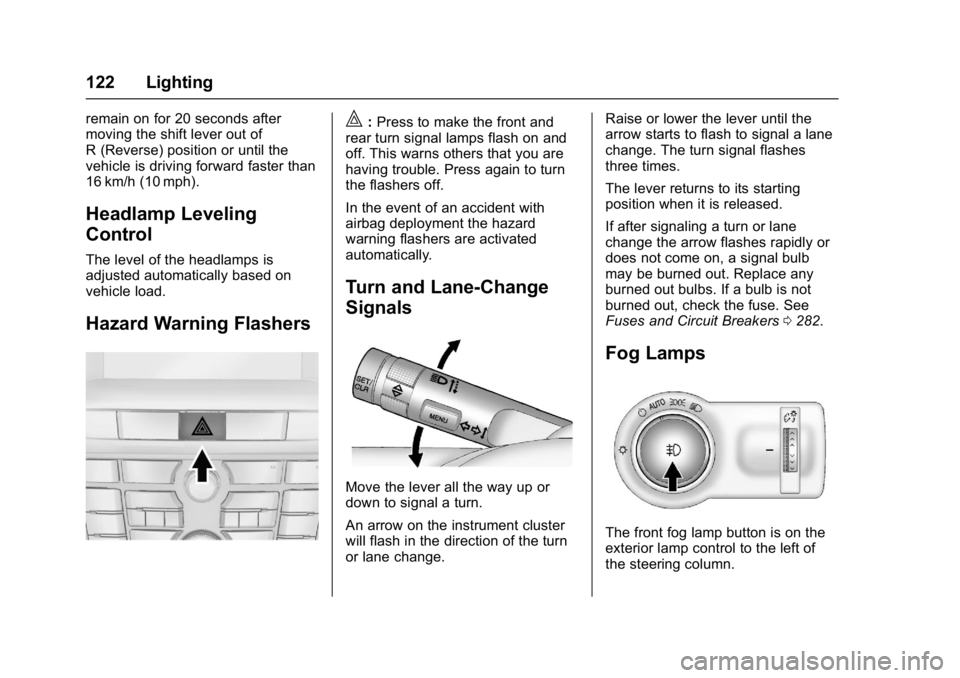
Hazard Warning Flashers
|:Press to make the front and
rear turn signal lamps flash on and
off. This warns others that you are
having trouble. Press again to turn
the flashers off.
In the event of an accident with
airbag deployment the hazard
warning flashers are activated
automatically.
Turn and Lane-Change
Signals
Move the lever all the way up or
down to signal a turn.
An arrow on the instrument cluster
will flash in the direction of the turn
or lane change. Raise or lower the lever until the
arrow starts to flash to signal a lane
change. The turn signal flashes
three times.
The lever returns to its starting
position when it is released.
If after signaling a turn or lane
change the arrow flashes rapidly or
does not come on, a signal bulb
may be burned out. Replace any
burned out bulbs. If a bulb is not
burned out, check the fuse. See
Fuses and Circuit Breakers
0282.
Fog Lamps
The front fog lamp button is on the
exterior lamp control to the left of
the steering column.
Page 217 of 381
Buick Cascada Owner Manual (GMNA-Localizing-U.S-9186636) - 2016 - crc -
3/9/16
216 Driving and Operating
Driving and
Operating
Driving Information
Distracted Driving . . . . . . . . . . . . 217
Defensive Driving . . . . . . . . . . . . . 217
Drunk Driving . . . . . . . . . . . . . . . . . 217
Control of a Vehicle . . . . . . . . . . . 218
Braking . . . . . . . . . . . . . . . . . . . . . . . 218
Steering . . . . . . . . . . . . . . . . . . . . . . 218
Off-Road Recovery . . . . . . . . . . . 219
Loss of Control . . . . . . . . . . . . . . . 219
Driving on Wet Roads . . . . . . . . 220
Hill and Mountain Roads . . . . . 221
Winter Driving . . . . . . . . . . . . . . . . 221
If the Vehicle Is Stuck . . . . . . . . 223
Vehicle Load Limits . . . . . . . . . . . 223
Starting and Operating
New Vehicle Break-In . . . . . . . . . 226
Ignition Positions . . . . . . . . . . . . . 227
Starting the Engine . . . . . . . . . . . 229
Retained AccessoryPower (RAP) . . . . . . . . . . . . . . . . 230
Shifting Into Park . . . . . . . . . . . . . 230
Shifting out of Park . . . . . . . . . . . 231
Parking over Things That Burn . . . . . . . . . . . . . . . . . . . 231
Engine Exhaust
Engine Exhaust . . . . . . . . . . . . . . 232
Running the Vehicle WhileParked . . . . . . . . . . . . . . . . . . . . . . 232
Automatic Transmission
Automatic Transmission . . . . . . 233
Manual Mode . . . . . . . . . . . . . . . . . 234
Brakes
Antilock BrakeSystem (ABS) . . . . . . . . . . . . . . . 236
Parking Brake . . . . . . . . . . . . . . . . 236
Brake Assist . . . . . . . . . . . . . . . . . . 238
Hill Start Assist (HSA) . . . . . . . . 238
Ride Control Systems
Traction Control/Electronic Stability Control . . . . . . . . . . . . . 239
Cruise Control
Cruise Control . . . . . . . . . . . . . . . . 241
Driver Assistance Systems
Assistance Systems forParking or Backing . . . . . . . . . . 243
Forward Collision Alert (FCA) System . . . . . . . . . . . . . . . . . . . . . . 245
Lane Departure Warning (LDW) . . . . . . . . . . . . . 247
Fuel
Fuel . . . . . . . . . . . . . . . . . . . . . . . . . . 248 California Fuel
Requirements . . . . . . . . . . . . . . . 249
Fuels in Foreign Countries . . . 249
Fuel Additives . . . . . . . . . . . . . . . . 249
Filling the Tank . . . . . . . . . . . . . . . 250
Filling a Portable Fuel Container . . . . . . . . . . . . . . . . . . . 251
Trailer Towing
General TowingInformation . . . . . . . . . . . . . . . . . . 252
Conversions and Add-Ons
Add-On ElectricalEquipment . . . . . . . . . . . . . . . . . . 252