BUICK CASCADA 2018 Owners Manual
Manufacturer: BUICK, Model Year: 2018, Model line: CASCADA, Model: BUICK CASCADA 2018Pages: 303, PDF Size: 5.87 MB
Page 111 of 303
Buick Cascada Owner Manual (GMNA-Localizing-U.S-11373983) - 2018 -
CRC - 7/10/17
110 Instruments and Controls
Door Ajar Light If equipped, this light comes on
when a door is open or not securely
latched. Before driving, check that
all doors are properly closed.
Information Displays Driver Information
Center (DIC) The DIC displays information about
the vehicle. It also displays warning
messages if a system problem is
detected. See Vehicle Messages
0 113 . All messages appear in the
DIC display in the center of the
instrument cluster.
DIC Operation and Displays The DIC has different displays
which can be accessed by using the
DIC buttons on the turn signal lever.
The DIC displays trip, fuel, and
vehicle system information, and
warning messages if a system
problem is detected.
The bottom of the DIC display
shows the position of the shift lever
and the odometer. It may also show
the direction the vehicle is driving. DIC Buttons
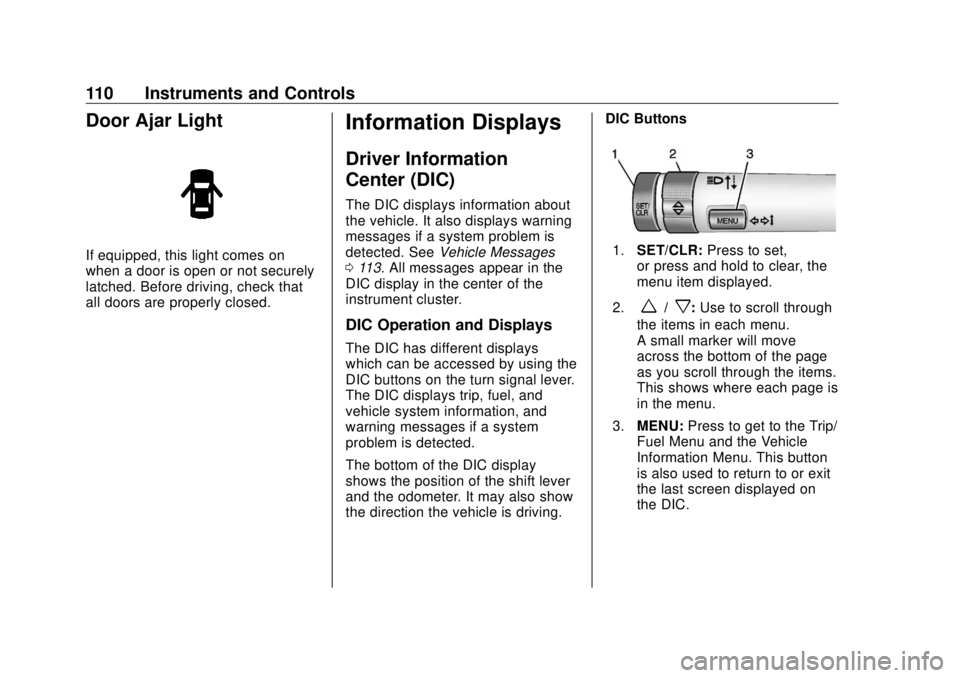
1. SET/CLR: Press to set,
or press and hold to clear, the
menu item displayed.
2.
w /
x : Use to scroll through
the items in each menu.
A small marker will move
across the bottom of the page
as you scroll through the items.
This shows where each page is
in the menu.
3. MENU: Press to get to the Trip/
Fuel Menu and the Vehicle
Information Menu. This button
is also used to return to or exit
the last screen displayed on
the DIC.
Page 112 of 303
Buick Cascada Owner Manual (GMNA-Localizing-U.S-11373983) - 2018 -
CRC - 7/10/17
Instruments and Controls 111Trip/Fuel Menu Items Press MENU on the turn signal
lever until the Trip/Fuel Menu is
displayed. Use
w /
x to scroll
through the following menu items:
.
Digital Speedometer
.
Trip 1
.
Trip 2
.
Fuel Range
.
Average Fuel Economy
.
Instantaneous Fuel Economy
.
Average Vehicle Speed
.
Timer
.
Navigation
Digital Speedometer
The speedometer shows how fast
the vehicle is moving in either
kilometers per hour (km/h) or miles
per hour (mph). The speedometer
cannot be reset. Trip 1 and Trip 2
These displays show the current
distance traveled, in either
kilometers (km) or miles (mi), since
the last reset for the trip odometer.
The trip odometer can be reset to
zero by pressing SET/CLR, or the
trip odometer reset stem in the
instrument cluster, while the trip
odometer display is showing.
Fuel Range
This display shows the approximate
distance the vehicle can be driven
without refueling. The fuel range
estimate is based on an average of
the vehicle's fuel economy over
recent driving history and the
amount of fuel remaining in the fuel
tank. Fuel range cannot be reset.
Average Fuel Economy
This display shows the approximate
average liters per 100 kilometers
(L/100 km) or miles per gallon
(mpg). Average fuel economy is
calculated based on the number of
L/100 km (mpg) recorded since the
last time this menu item was reset.
This number reflects only the approximate average fuel economy
that the vehicle has right now, and
will change as driving conditions
change. The average fuel economy
can be reset by pressing SET/CLR
while the Average Fuel Economy
display is showing.
Instantaneous Fuel Economy
The instantaneous fuel economy
display shows the current fuel
economy in liters per 100 kilometers
(L/100 km) or miles per gallon
(mpg). The instantaneous fuel
economy reflects only the current
approximate fuel economy, and
changes frequently as driving
conditions change. Unlike average
economy, this display cannot be
reset.
Average Vehicle Speed
This display shows the average
speed of the vehicle in kilometers
per hour (km/h) or miles per
hour (mph). This average is
calculated based on the various
vehicle speeds recorded since the
last reset of this value. The average
Page 113 of 303
Buick Cascada Owner Manual (GMNA-Localizing-U.S-11373983) - 2018 -
CRC - 7/10/17
112 Instruments and Controls speed can be reset by pressing
SET/CLR while the Average Vehicle
Speed display is showing.
Timer
This display can be used as a timer.
To start the timer, press SET/CLR
while Timer is displayed. The
display will show the amount of time
that has passed since the timer was
last reset, not including time the
ignition is off. Time will continue to
be counted as long as the ignition is
on, even if another display is being
shown on the DIC. The timer will
record up to 99 hours, 59 minutes,
and 59 seconds (99:59:59) after
which the display will return to zero.
To stop the timer, press SET/CLR
briefly while Timer is displayed. To
reset the timer to zero, press and
hold SET/CLR.
Navigation
If equipped, this display is used for
the Navigation System Turn-by-Turn
guidance. Vehicle Information Menu
Items Press MENU on the turn signal
lever until the Vehicle Information
Menu is displayed. Use
w /
x to
scroll through the following menu
items:
.
Unit
.
Tire Pressure
.
Remaining Oil Life
.
Battery Voltage
Unit
Press SET/CLR to set.
Move
w /
x to switch between
metric or US when the set Unit
display is active. Press SET/CLR to
confirm the setting. This will change
the displays on the cluster and DIC
to either metric or English (US)
measurements. Tire Pressure
The display will show a vehicle with
the approximate pressures of all
four tires. Tire pressure is displayed
in either kilopascal (kPa) or
pounds per square inch (psi).
See Tire Pressure Monitor System
0 217 and Tire Pressure Monitor
Operation 0 218 .
Remaining Oil Life
This display shows an estimate of
the oil's remaining useful life.
If REMAINING OIL LIFE 99% is
displayed, that means 99% of the
current oil life remains.
When the remaining oil life is low,
the CHANGE ENGINE OIL SOON
message will appear on the display.
The oil should be changed as soon
as possible. See Engine Oil 0 179 .
In addition to the engine oil life
system monitoring the oil life,
additional maintenance is
recommended. See Maintenance
Schedule 0 252 .
Page 114 of 303
Buick Cascada Owner Manual (GMNA-Localizing-U.S-11373983) - 2018 -
CRC - 7/10/17
Instruments and Controls 113Remember, the Remaining Oil Life
display must be reset after each oil
change. It will not reset itself. Also,
be careful not to reset the
Remaining Oil Life display
accidentally at any time other than
when the oil has just been changed.
It cannot be reset accurately until
the next oil change. To reset the
engine oil life system, press SET/
CLR while the Remaining Oil Life
display is active. See Engine Oil
Life System 0 181 .
Battery Voltage
This display shows the current
battery voltage. If the voltage is in
the normal range, the value will
display. For example, the display
may read Battery Voltage 15.0
Volts. The vehicle's charging system
regulates voltage based on the state
of the battery. The battery voltage
can fluctuate while viewing this
information on the DIC. This is
normal. See Charging System Light
0 102 . Vehicle Messages Messages displayed on the DIC
indicate the status of the vehicle or
some action that may be needed to
correct a condition. Multiple
messages may display one after the
other.
The messages that do not require
immediate action can be
acknowledged and cleared by
pressing SET/CLR. The messages
that require immediate action cannot
be cleared until that action is
performed. All messages should be
taken seriously and clearing the
messages does not correct the
problem.
Follow the instructions given in the
messages. The system displays
messages regarding the following
topics:
.
Service Messages
.
Fluid Levels
.
Vehicle Security
.
Brakes
.
Ride Control Systems .
Driver Assistance Systems
.
Cruise Control
.
Lighting and Bulb Replacement
.
Wiper/Washer Systems
.
Doors and Windows
.
Convertible Top
.
Seat Belts
.
Airbag Systems
.
Engine and Transmission
.
Tire Pressure
.
Battery
Engine Power Messages ENGINE POWER IS REDUCED This message displays when the
vehicle's propulsion power is
reduced. Reduced propulsion power
can affect the vehicle's ability to
accelerate. If this message is on,
but there is no observed reduction
in performance, proceed to your
destination. The performance may
be reduced the next time the vehicle
is driven. The vehicle may be driven
Page 115 of 303
Buick Cascada Owner Manual (GMNA-Localizing-U.S-11373983) - 2018 -
CRC - 7/10/17
114 Instruments and Controls while this message is on, but
maximum acceleration and speed
may be reduced. Anytime this
message stays on, or displays
repeatedly, the vehicle should be
taken to your dealer for service as
soon as possible.
Vehicle Speed Messages SPEED LIMITED TO
XXX KM/H (MPH) This message shows that the
vehicle speed has been limited to
the speed displayed. The limited
speed is a protection for various
propulsion and vehicle systems,
such as lubrication, thermal,
suspension, Teen Driver if
equipped, or tires. Vehicle
Personalization Use the audio system controls to
access the personalization menus
for customizing vehicle features.
The following are all possible
personalization features. Depending
on the vehicle, some may not be
available.
Infotainment System Audio
System Controls
Using the Center Stack Controls
Z Knob
.
Press the outer diameter
(chrome ring) to enter, select,
or activate a highlighted menu
option.
.
Turn to highlight a menu option.
.
Press the outer diameter
(chrome ring) to enable or
disable a system setting. BACK
.
Press to exit a menu.
.
Press to return to a previous
screen.
Using the Infotainment Display
Touch a screen feature to:
.
View more feature options.
.
Enable or disable the feature.
w : Touch to scroll up.
x : Touch to scroll down.
Back : Touch to return to the
previous menu.
To access the
personalization menu:
1. Touch Config on the Home
Page of the infotainment
display or press CONFIG on
the center stack.
2. Select the desired feature to
display a list of available
options.
3. Select the desired feature
setting.
Page 116 of 303
Buick Cascada Owner Manual (GMNA-Localizing-U.S-11373983) - 2018 -
CRC - 7/10/17
Instruments and Controls 115Personalization Menus
The following list of menu items may
be available:
.
Languages
.
Time and Date
.
Radio Settings
.
Phone Settings
.
Navigation Settings
.
Display Settings
.
Vehicle Settings
Each menu is detailed in the
following information.
Languages Select Languages, then select from
the available language(s).
Time and Date Manually set the time and date. See
Clock 0 96 .
Radio Settings
Select and the following may
display:
.
Auto Volume .
Gracenote Options
.
SXM Channel Art
.
Max Startup Volume
.
Number of Favorites Pages
.
SXM Categories
.
Software Versions Menu
Auto Volume
This feature adjusts the volume to
minimize the effects of unwanted
background noise that can result
from changing road surfaces, driving
speeds, or open windows. This
feature works best at lower volume
settings where background noise is
typically louder than the sound
system volume.
Select Off, Low, Medium, or High.
Gracenote Options
Select and the following may
display:
.
Normalization Normalization
This feature improves voice
recognition and media groupings.
See “ Configuration Menu ” in the
Infotainment Manual.
Select to enable or disable.
SXM Channel Art
This feature turns the SXM Audio
page background on the SXM
Channel display on and off.
Select to enable or disable.
Max Startup Volume
This feature sets the maximum
startup volume. If the vehicle is
started and the volume is greater
than this level, the volume is
adjusted to this level.
Touch + or − to increase or
decrease the volume.
Number of Favorite Pages
Select to set the number of favorite
pages to display.
Select the desired number.
Page 117 of 303
Buick Cascada Owner Manual (GMNA-Localizing-U.S-11373983) - 2018 -
CRC - 7/10/17
116 Instruments and Controls SXM Categories
This allows which available SXM
Categories are used and displayed.
Select to enable or disable available
categories.
Software Versions Menu
Select to display information about
the system and update software if
available.
Phone Settings Select and the following may
display:
.
Bluetooth
Bluetooth
Select and the following may
display:
.
Device List
.
Pair Device
Device List
Select to connect to a different
phone source, disconnect a phone,
or delete a phone. Pair Device
Select to pair a new device. See
“ Bluetooth ” in the Infotainment
Manual.
Navigation Settings See “ Configuration Menu ” in the
Infotainment Manual.
Display Settings Select and the following may
display:
.
Home Page Menu
.
Rear Camera Options
.
Display Off
.
Map Settings
Home Page Menu
Select and the following may
display:
.
Customize
.
Sort
.
Restore Home Page Defaults Customize
This feature allows the selection of
what icons will be on the first
Home Page.
Select and follow the screen
prompts.
Sort
This feature allows the icons on the
Home Page to be moved.
Select and follow the screen
prompts.
Restore Home Page Defaults
This feature will restore the Home
Page to the factory settings.
Select and follow the screen
prompts.
Rear Camera Options
Select and the following may
display:
.
Symbols
.
Guide Lines
Page 118 of 303
Buick Cascada Owner Manual (GMNA-Localizing-U.S-11373983) - 2018 -
CRC - 7/10/17
Instruments and Controls 117Symbols
See Assistance Systems for Parking
or Backing 0 162 .
Select to enable or disable.
Guide Lines
See Assistance Systems for Parking
or Backing 0 162 .
Select to enable or disable.
Display Off
Select to turn the display off. The
display will return when any controls
on the radio center stack are
pressed or the infotainment screen
is touched.
Map Settings
See “ Map Settings ” in the
infotainment manual.
Vehicle Settings
Select and the following may
display:
.
Climate and Air Quality
.
Comfort and Convenience
.
Collision Detection Systems .
Lighting
.
Power Door Locks
.
Remote Lock/Unlock/Start
.
Return to Factory Settings?
Climate and Air Quality Select and the following may
display:
.
Auto Fan Speed
.
Remote Start Auto Heat Seat
.
Auto Rear Defog
Auto Fan Speed
Choose the blower speed setting.
Select High, Medium, or Low.
Remote Start Auto Heat Seat
When on, this feature will turn the
heated seats on when using remote
start on cold days.
Select to enable or disable.
Auto Rear Defog
When on, this feature turns on the
rear window defogger at vehicle
start when the interior temperature
is cold and fog is likely. The auto rear defog function can be disabled
by selecting
1 . When off, the
feature can be turned on by
selecting
1 . See “ Rear Window
Defogger ” under Dual Automatic
Climate Control System 0 129 .
Select to enable or disable.
Comfort and Convenience Select and the following may
display:
.
Chime Volume
.
Button Chime
Chime Volume
This allows the selection of the
chime volume level.
Select Low or High.
Button Chime
This allows the Button Chime
feature to be turned on or off.
Select to enable or disable.
Page 119 of 303
Buick Cascada Owner Manual (GMNA-Localizing-U.S-11373983) - 2018 -
CRC - 7/10/17
118 Instruments and Controls Collision Detection Systems Select and the following may
display:
.
Park Assist
Park Assist
This allows the Parking Assist
feature to be turned on or off.
Select Off or On.
Lighting Select and the following may
display:
.
Vehicle Locator Lights
.
Exit Lighting
Vehicle Locator Lights
This allows the vehicle locator lights
to be turned on or off.
Select to enable or disable.
Exit Lighting
This allows the selection of how
long the exterior lamps stay on
when leaving the vehicle when it is
dark outside. Select Off, 30 Seconds, 1 Minute,
or 2 Minutes.
Power Door Locks Select and the following may
display:
.
Open Door Anti Lock Out
.
Auto Door Unlock
.
Delay Door Lock
Open Door Anti Lock Out
When on, this feature will keep the
driver door from locking until the
door is closed. If this feature is
turned on, the Delay Door Lock
menu will not be available.
Select to enable or disable.
Auto Door Unlock
This allows selection of which doors
will automatically unlock when the
vehicle is shifted into P (Park).
Select All Doors, Driver Door, or Off.
Delay Door Lock
When on, this feature will delay the
locking of the doors. See Delayed
Locking 0 28 . Select to enable or disable.
Remote Lock/Unlock/Start Select and the following may
display:
.
Remote Unlock Feedback
.
Remote Lock Feedback
.
Remote Door Unlock
Remote Unlock Feedback
When on, the exterior lamps will
flash when unlocking the vehicle
with the RKE transmitter.
Select Flash Lights or Off.
Remote Lock Feedback
This allows selection of what
feedback is provided when
unlocking the vehicle with the RKE
transmitter.
Select Lights and Horn, Lights Only,
Horn Only, or Off.
Remote Door Unlock
This allows selection of which doors
will unlock on the first press of
K on
the RKE transmitter. If Driver Door
Page 120 of 303
Buick Cascada Owner Manual (GMNA-Localizing-U.S-11373983) - 2018 -
CRC - 7/10/17
Instruments and Controls 119is selected, all doors will unlock on
the second press of
K within
five seconds of the prior press.
Select Driver Door or All Doors.
Return to Factory Settings? This returns all of the vehicle
personalization settings to the
factory settings.
Select Yes or No.