steering wheel BUICK CASCADA 2018 Owners Manual
[x] Cancel search | Manufacturer: BUICK, Model Year: 2018, Model line: CASCADA, Model: BUICK CASCADA 2018Pages: 303, PDF Size: 5.87 MB
Page 6 of 303

Buick Cascada Owner Manual (GMNA-Localizing-U.S-11373983) - 2018 -
CRC - 7/10/17
In Brief 5
In Brief Instrument Panel Instrument Panel Overview . . . . . . 6
Initial Drive Information Initial Drive Information . . . . . . . . . . 8
Remote Keyless Entry (RKE)
System . . . . . . . . . . . . . . . . . . . . . . . . 8
Remote Vehicle Start . . . . . . . . . . . 8
Door Locks . . . . . . . . . . . . . . . . . . . . . 9
Trunk Release . . . . . . . . . . . . . . . . . . 9
Windows . . . . . . . . . . . . . . . . . . . . . . . 10
Seat Adjustment . . . . . . . . . . . . . . . 10
Heated Seats . . . . . . . . . . . . . . . . . . 11
Head Restraint Adjustment . . . . 12
Seat Belts . . . . . . . . . . . . . . . . . . . . . 12
Passenger Sensing System . . . 12
Mirror Adjustment . . . . . . . . . . . . . . 13
Steering Wheel Adjustment . . . . 13
Interior Lighting . . . . . . . . . . . . . . . . 14
Exterior Lighting . . . . . . . . . . . . . . . 14
Windshield Wiper/Washer . . . . . . 15
Climate Controls . . . . . . . . . . . . . . . 15
Transmission . . . . . . . . . . . . . . . . . . 16
Vehicle Features
Infotainment System . . . . . . . . . . . 16
Steering Wheel Controls . . . . . . . 16 Cruise Control . . . . . . . . . . . . . . . . . 16
Driver Information
Center (DIC) . . . . . . . . . . . . . . . . . 17
Forward Collision Alert (FCA)
System . . . . . . . . . . . . . . . . . . . . . . . 17
Lane Departure
Warning (LDW) . . . . . . . . . . . . . . . 17
Rear Vision Camera (RVC) . . . . 17
Parking Assist . . . . . . . . . . . . . . . . . 18
Power Outlets . . . . . . . . . . . . . . . . . 18
Convertible . . . . . . . . . . . . . . . . . . . . 18
Performance and Maintenance Traction Control/Electronic
Stability Control . . . . . . . . . . . . . . 18
Tire Pressure Monitor . . . . . . . . . . 19
Fuel . . . . . . . . . . . . . . . . . . . . . . . . . . . 19
E85 or FlexFuel . . . . . . . . . . . . . . . . 20
Engine Oil Life System . . . . . . . . 20
Driving for Better Fuel
Economy . . . . . . . . . . . . . . . . . . . . . 20
Roadside Assistance
Program . . . . . . . . . . . . . . . . . . . . . . 20
Page 8 of 303

Buick Cascada Owner Manual (GMNA-Localizing-U.S-11373983) - 2018 -
CRC - 7/10/17
In Brief 71. Air Vents 0 132 .
2. Headlamp High/Low-Beam
Changer 0 121 .
Turn Signal Lever. See Turn
and Lane-Change Signals
0 123 .
Driver Information Center (DIC)
Buttons. See Driver Information
Center (DIC) 0 110 .
3. Cruise Control 0 159 .
Forward Collision Alert (FCA)
System 0 164 (If Equipped).
4. Instrument Cluster 0 98 .
5. Driver Information Center (DIC)
0 110 .
6. Steering Wheel Controls 0 94 .
7. Windshield Wiper/Washer 0 94 .
8. Central Locking Switch. See
Power Door Locks 0 28 .
Hazard Warning Flashers
0 123 .
Passenger Airbag Status
Indicator 0 101 . 9. AM-FM Radio. See the
infotainment manual.
10. Anti-Theft Alarm System
Indicator Light. See Vehicle
Alarm System 0 31 .
11. Traction Control/Electronic
Stability Control 0 157 .
Lane Departure Warning
(LDW) 0 166 .
Assistance Systems for
Parking or Backing 0 162 .
12. Dual Automatic Climate Control
System 0 129 .
Heated Front Seats 0 50 (If
Equipped).
Heated Steering Wheel 0 94 (If
Equipped).
13. USB Port. See the infotainment
manual.
Input Jack. See the
infotainment manual.
14. Convertible Top 0 37 .
All Window Switch. See Power
Windows 0 35 .
15. Electric Parking Brake 0 155 . 16. Shift Lever. See Automatic
Transmission 0 151 .
17. Power Outlets 0 96 .
18. Ignition Switch. See Ignition
Positions 0 145 .
19. Horn 0 94 .
20. Steering Wheel Adjustment
0 94 (Out of View).
21. Instrument Panel Storage 0 90 .
Instrument Panel Fuse Block
0 205 .
22. Hood Release. See Hood
0 176 .
23. Exterior Lamp Controls 0 120 .
Fog Lamps 0 124 (If
Equipped).
Instrument Panel Illumination
Control 0 124 .
24. Data Link Connector (DLC)
(Out of View). See Malfunction
Indicator Lamp (Check Engine
Light) 0 102 .
Page 14 of 303

Buick Cascada Owner Manual (GMNA-Localizing-U.S-11373983) - 2018 -
CRC - 7/10/17
In Brief 13
Mirror Adjustment Interior Mirrors Adjust the rearview mirror for a clear
view of the area behind your
vehicle.
Automatic Dimming Rearview
Mirror
Automatic dimming reduces the
glare of headlamps from behind.
The dimming feature comes on
when the vehicle is started.
See Automatic Dimming Rearview
Mirror 0 34 . Exterior Mirrors
1. Turn the selector switch to L
(Left) or R (Right) to choose
the driver or passenger mirror.
2. Move the control to adjust the
mirror.
3. Turn the selector switch to
9to deselect the mirror.
The vehicle has manual folding
mirrors. See Folding Mirrors 0 34 .Steering Wheel
Adjustment
To adjust the steering wheel:
1. Pull the lever down.
2. Move the steering wheel up
or down.
3. Pull or push the steering wheel
closer or away from you.
4. Lift the lever up to lock the
steering wheel in place.
Do not adjust the steering wheel
while driving.
Page 16 of 303

Buick Cascada Owner Manual (GMNA-Localizing-U.S-11373983) - 2018 -
CRC - 7/10/17
In Brief 15
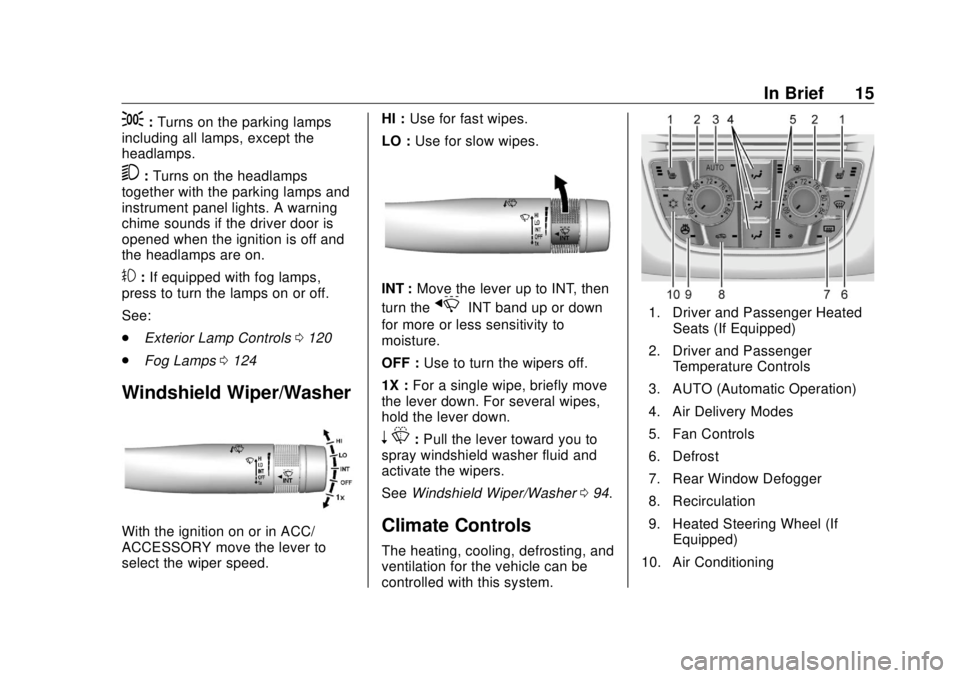
; : Turns on the parking lamps
including all lamps, except the
headlamps.
5 : Turns on the headlamps
together with the parking lamps and
instrument panel lights. A warning
chime sounds if the driver door is
opened when the ignition is off and
the headlamps are on.
# : If equipped with fog lamps,
press to turn the lamps on or off.
See:
.
Exterior Lamp Controls 0 120
.
Fog Lamps 0 124
Windshield Wiper/Washer
With the ignition on or in ACC/
ACCESSORY move the lever to
select the wiper speed. HI : Use for fast wipes.
LO : Use for slow wipes.
INT : Move the lever up to INT, then
turn the
x INT band up or down
for more or less sensitivity to
moisture.
OFF : Use to turn the wipers off.
1X : For a single wipe, briefly move
the lever down. For several wipes,
hold the lever down.
n L : Pull the lever toward you to
spray windshield washer fluid and
activate the wipers.
See Windshield Wiper/Washer 0 94 .
Climate Controls The heating, cooling, defrosting, and
ventilation for the vehicle can be
controlled with this system. 1. Driver and Passenger Heated
Seats (If Equipped)
2. Driver and Passenger
Temperature Controls
3. AUTO (Automatic Operation)
4. Air Delivery Modes
5. Fan Controls
6. Defrost
7. Rear Window Defogger
8. Recirculation
9. Heated Steering Wheel (If
Equipped)
10. Air Conditioning
Page 17 of 303

Buick Cascada Owner Manual (GMNA-Localizing-U.S-11373983) - 2018 -
CRC - 7/10/17
16 In Brief See Dual Automatic Climate Control
System 0 129 .
Transmission Driver Shift Control (DSC) DSC allows you to shift an
automatic transmission similar to a
manual transmission. To use the
DSC feature:
1. Move the shift lever from
D (Drive) to the left into the (+)
or ( − ) manual position.
2. Press the shift lever forward (+)
to upshift or rearward ( − ) to
downshift. An M and the
current gear will be displayed
in the Driver Information
Center (DIC).
See Manual Mode 0 153 .
While using the DSC feature, the
vehicle will have firmer, quicker
shifting. You can use this for sport
driving or when climbing or
descending hills, to stay in gear
longer, or to downshift for more
power or engine braking. Vehicle Features Infotainment System See the infotainment manual for
information on the radio, audio
players, phone, navigation system,
and voice or speech recognition.
It also includes information on
settings.
Steering Wheel Controls The infotainment system can be
operated by using the steering
wheel controls. See "Steering
Wheel Controls" in the infotainment
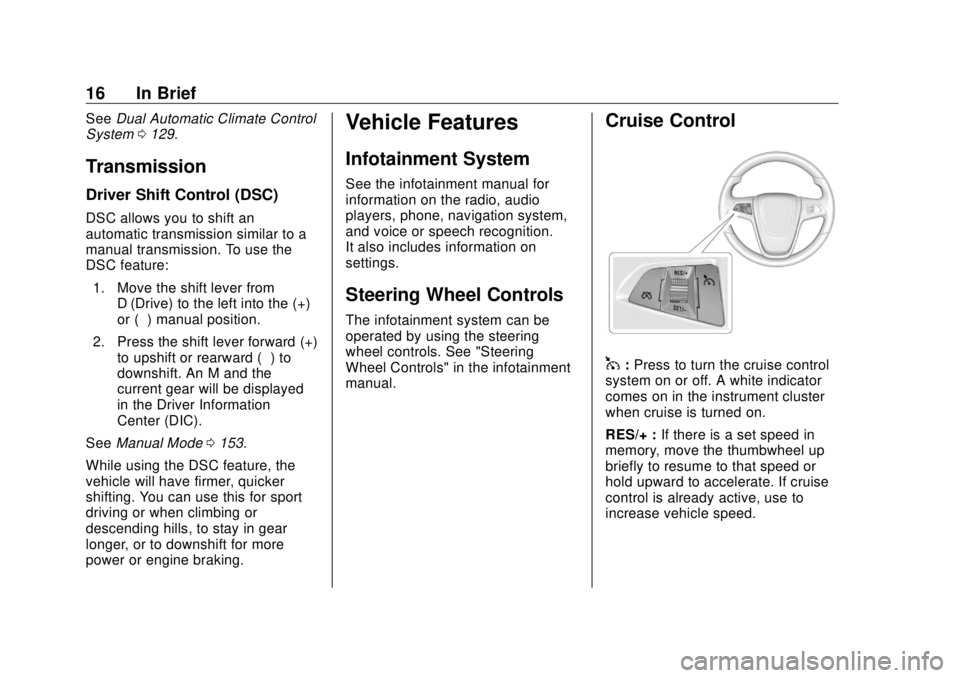
manual. Cruise Control
1 : Press to turn the cruise control
system on or off. A white indicator
comes on in the instrument cluster
when cruise is turned on.
RES/+ : If there is a set speed in
memory, move the thumbwheel up
briefly to resume to that speed or
hold upward to accelerate. If cruise
control is already active, use to
increase vehicle speed.
Page 23 of 303

Buick Cascada Owner Manual (GMNA-Localizing-U.S-11373983) - 2018 -
CRC - 7/10/17
22 Keys, Doors, and Windows
{ WarningIf the key is unintentionally
rotated while the vehicle is
running, the ignition could be
moved out of the RUN position.
This could be caused by heavy
items hanging from the key ring,
or by large or long items attached
to the key ring that could be
contacted by the driver or
steering wheel. If the ignition
moves out of the RUN position,
the engine will shut off, braking
and steering power assist may be
(Continued) Warning (Continued) impacted, and airbags may not
deploy. To reduce the risk of
unintentional rotation of the
ignition key, do not change the
way the ignition key and Remote
Keyless Entry (RKE) transmitter,
if equipped, are connected to the
provided key rings.
The ignition key, key rings, and RKE
transmitter, if equipped, are
designed to work together. As a
system, it reduces the risk of
unintentionally moving the key out
of the RUN position. If replacements
or additions are required, see your
dealer. Limit added items to a few
essential keys or small, light items
no larger than an RKE transmitter. Interference from radio-frequency
identification (RFID) tags may
prevent the key from starting the
vehicle. Keep RFID tags away from
the key when starting the vehicle.
The key that is part of the RKE
transmitter can be used for the
ignition and driver side lock.
Page 60 of 303

Buick Cascada Owner Manual (GMNA-Localizing-U.S-11373983) - 2018 -
CRC - 7/10/17
Seats and Restraints 59
Replacing Seat Belt
System Parts after a
Crash
{ WarningA crash can damage the seat belt
system in the vehicle. A damaged
seat belt system may not properly
protect the person using it,
resulting in serious injury or even
death in a crash. To help make
sure the seat belt systems are
working properly after a crash,
have them inspected and any
necessary replacements made as
soon as possible. After a minor crash, replacement of
seat belts may not be necessary.
But the seat belt assemblies that
were used during any crash may
have been stressed or damaged.
See your dealer to have the seat
belt assemblies inspected or
replaced.
New parts and repairs may be
necessary even if the seat belt
system was not being used at the
time of the crash.
Have the seat belt pretensioners
checked if the vehicle has been in a
crash, or if the airbag readiness light
stays on after you start the vehicle
or while you are driving. See Airbag
Readiness Light 0 101 .Airbag System The vehicle has the following
airbags:
.
A frontal airbag for the driver
.
A frontal airbag for the front
outboard passenger
.
A knee airbag for the driver
.
A knee airbag for the front
outboard passenger
.
A seat-mounted side impact
airbag for the driver
.
A seat-mounted side impact
airbag for the front outboard
passenger
All vehicle airbags have the word
AIRBAG on the trim or on a label
near the deployment opening.
For frontal airbags, the word
AIRBAG is on the center of the
steering wheel for the driver and on
the instrument panel for the front
outboard passenger.
For knee airbags, the word AIRBAG
is on the lower part of the
instrument panel.
Page 62 of 303

Buick Cascada Owner Manual (GMNA-Localizing-U.S-11373983) - 2018 -
CRC - 7/10/17
Seats and Restraints 61
There is an airbag readiness light
on the instrument cluster, which
shows the airbag symbol. The
system checks the airbag electrical
system for malfunctions. The light
tells you if there is an electrical
problem. See Airbag Readiness
Light 0 101 .
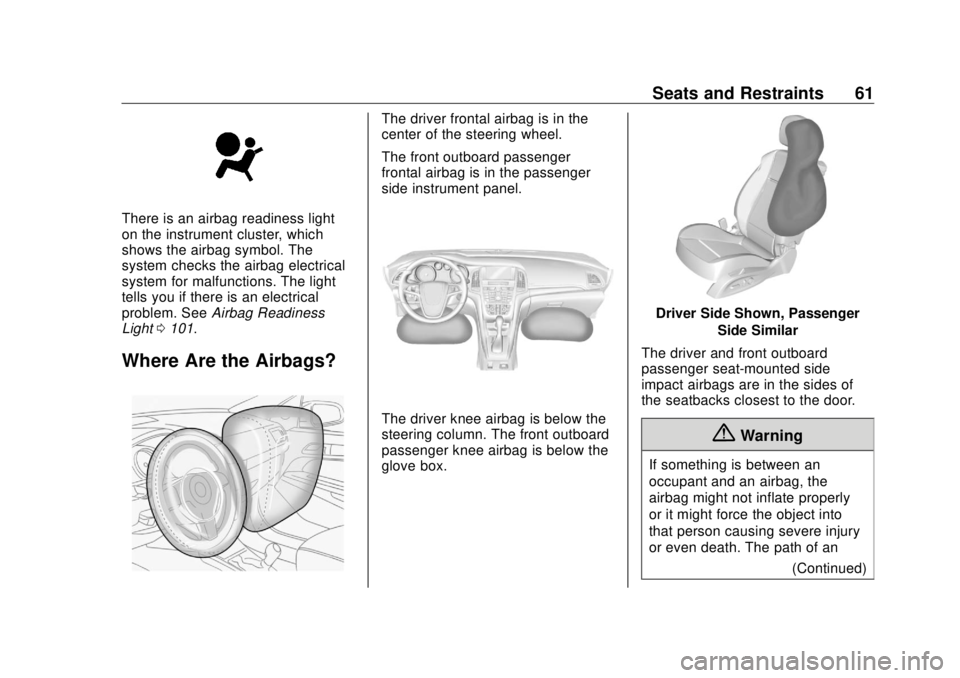
Where Are the Airbags? The driver frontal airbag is in the
center of the steering wheel.
The front outboard passenger
frontal airbag is in the passenger
side instrument panel.
The driver knee airbag is below the
steering column. The front outboard
passenger knee airbag is below the
glove box. Driver Side Shown, Passenger
Side Similar
The driver and front outboard
passenger seat-mounted side
impact airbags are in the sides of
the seatbacks closest to the door.
{ Warning
If something is between an
occupant and an airbag, the
airbag might not inflate properly
or it might force the object into
that person causing severe injury
or even death. The path of an
(Continued)
Page 63 of 303

Buick Cascada Owner Manual (GMNA-Localizing-U.S-11373983) - 2018 -
CRC - 7/10/17
62 Seats and Restraints Warning (Continued)inflating airbag must be kept
clear. Do not put anything
between an occupant and an
airbag, and do not attach or put
anything on the steering wheel
hub or on or near any other
airbag covering.
Do not use seat accessories that
block the inflation path of a
seat-mounted side impact airbag.
When Should an Airbag
Inflate? This vehicle is equipped with
airbags. See Airbag System 0 59 .
Airbags are designed to inflate if the
impact exceeds the specific airbag
system's deployment threshold.
Deployment thresholds are used to
predict how severe a crash is likely
to be in time for the airbags to
inflate and help restrain the
occupants. The vehicle has
electronic sensors that help the
airbag system determine the severity of the impact. Deployment
thresholds can vary with specific
vehicle design.
Frontal airbags are designed to
inflate in moderate to severe frontal
or near frontal crashes to help
reduce the potential for severe
injuries, mainly to the driver's or
front outboard passenger's head
and chest.
Whether the frontal airbags will or
should inflate is not based primarily
on how fast the vehicle is traveling.
It depends on what is hit, the
direction of the impact, and how
quickly the vehicle slows down.
Frontal airbags may inflate at
different crash speeds depending on
whether the vehicle hits an object
straight on or at an angle, and
whether the object is fixed or
moving, rigid or deformable, narrow
or wide.
Frontal airbags are not intended to
inflate during vehicle rollovers, in
rear impacts, or in many side
impacts. In addition, the vehicle has
advanced technology frontal
airbags. Advanced technology
frontal airbags adjust the restraint
according to crash severity.
Knee airbags are designed to inflate
in moderate to severe frontal or
near frontal impacts. Knee airbags
are not designed to inflate during
vehicle rollovers, in rear impacts,
or in many side impacts.
Seat-mounted side impact airbags
are designed to inflate in moderate
to severe side crashes depending
on the location of the impact.
Seat-mounted side impact airbags
are not designed to inflate in frontal
impacts, near frontal impacts,
rollovers, or rear impacts.
A seat-mounted side impact airbag
is designed to inflate on the side of
the vehicle that is struck.
In any particular crash, no one can
say whether an airbag should have
inflated simply because of the
vehicle damage or repair costs.
Page 64 of 303

Buick Cascada Owner Manual (GMNA-Localizing-U.S-11373983) - 2018 -
CRC - 7/10/17
Seats and Restraints 63
What Makes an Airbag
Inflate? In a deployment event, the sensing
system sends an electrical signal
triggering a release of gas from the
inflator. Gas from the inflator fills the
airbag causing the bag to break out
of the cover. The inflator, the airbag,
and related hardware are all part of
the airbag module.
For airbag locations, see Where Are
the Airbags? 0 61 .
How Does an Airbag
Restrain? In moderate to severe frontal or
near frontal collisions, even belted
occupants can contact the steering
wheel or the instrument panel. In
moderate to severe side collisions,
even belted occupants can contact
the inside of the vehicle.
Airbags supplement the protection
provided by seat belts by
distributing the force of the impact
more evenly over the
occupant's body. But airbags would not help in many
types of collisions, primarily
because the occupant's motion is
not toward those airbags. See When
Should an Airbag Inflate? 0 62 .
Airbags should never be regarded
as anything more than a supplement
to seat belts.
What Will You See after
an Airbag Inflates? After the frontal and seat-mounted
side impact airbags inflate, they
quickly deflate, so quickly that some
people may not even realize the
airbags inflated. Some components
of the airbag module may be hot for
several minutes. For location of the
airbags, see Where Are the
Airbags? 0 61 .
The parts of the airbag that come
into contact with you may be warm,
but not too hot to touch. There may
be some smoke and dust coming
from the vents in the deflated
airbags. Airbag inflation does not
prevent the driver from seeing out of the windshield or being able to steer
the vehicle, nor does it prevent
people from leaving the vehicle.
{ WarningWhen an airbag inflates, there
may be dust in the air. This dust
could cause breathing problems
for people with a history of
asthma or other breathing trouble.
To avoid this, everyone in the
vehicle should get out as soon as
it is safe to do so. If you have
breathing problems but cannot
get out of the vehicle after an
airbag inflates, then get fresh air
by opening a window or a door.
If you experience breathing
problems following an airbag
deployment, you should seek
medical attention.
The vehicle has a feature that may
automatically unlock the doors, turn
on the interior lamps and hazard
warning flashers, and shut off the
fuel system after the airbags inflate.
The feature may also activate,