remote start BUICK CENTURY 1997 Owners Manual
[x] Cancel search | Manufacturer: BUICK, Model Year: 1997, Model line: CENTURY, Model: BUICK CENTURY 1997Pages: 406, PDF Size: 20.64 MB
Page 77 of 406
Section 2 Features and Controls
Here you can learn about the many standard and optional features on your Buick, and information on starting, shifting
and braking. Also explained are the instrument panel and the warning systems that tell you
if everything is working
properly
-- and what to do if you have a problem.
2-2
2-4
2-9
2- 14
2-15
2-16 2-17
2-17
2- 19
2-20
3-22
2-26
2-27
2-29
2-30
2-30
2-3 1
Keys
Door Locks
Remote Keyless Entry TrUnk
Theft
PASS-Key@ I1
New Vehicle “Break-In”
Ignition Positions Starting Your Engine
Engine Coolant Heater
Automatic Transaxle Operation
Parking Brake
Shifting Into PARK
(P)
Shifting Out of PARK (P)
Parking Over Things That Burn
Engine Exhaust
Running Your Engine While
You’re Parked 2-32
2-33
2-33
2-34
2-4 1
2-44
2-46
2-49
2-50
2-50
2-5 1.
2-52
2-52
2-53
2-54
2-55 Windows
Horn
Tilt Steering Wheel
Turn SignalMultifunction Lever
Exterior Lamps
Interior Lamps
Mirrors
Storage Compartments
Ashtrays and Lighter
Sun Visors
Auxiliary Power Connection
Sunroof
Cellular Phone Provisions
Instrument Panel
-- Your Information System
Instrument Panel Cluster
Warning Lights, Gages and Indicators
2-1
ProCarManuals.com
Page 87 of 406
Security Feedback
Security Feedback provides audible and/or visible
feedback that a remote keyless entry lock or unlock
command has been received and executed. Your
vehicle’s ignition must be off for this feature to work.
You may select one of four operating modes for
reception
of a lock command. You may also select one
of four operating modes for reception of an unlock
command. The selection and programming of the lock
and unlock operating modes are independent of each
other. The following modes are available for either lock
or unlock verification:
Mode
1 : No Verification
Mode
2: Horn Chirp only
Mode
3: Headlamp Flash only
Mode
4: Horn Chirp and Headlamp Flash
The operating mode
of the Security Feedback lock
function will be changed when you perform the following
sequence with your vehicle’s doors closed and the ignition
key in
RUN:
Press and hold the power’door lock switch. While
holding the door lock switch, press and release the
remote keyless entry
(RKE) transmitter lock switch.
This will initialize the customization mode. While in the customization
mode, the chime will sound the number
of chimes corresponding to the current Security
Feedback lock mode. Each additional press of the
RKE
transmitter lock switch will cause your vehicle to
advance the lock mode by one, starting from the current
Security Feedback lock mode. If cycled beyond lock
Mode
4, the vehicle will enter lock Mode 1. During this
procedure, the chime will sound the number
of chimes
corresponding
to the current lock mode, providing you
with feedback. When the door lock switch is released,
the vehicle will remain in the most recent lock mode.
The operating mode
of the Security Feedback unlock
function will
be changed when you perform the
following sequence with your vehicle’s doors closed and
the ignition key in
RUN:
Press and hold the power door unlock switch. While
holding the door unlock switch, press and release the
RKE
transmitter unlock switch. This will initialize the
customization mode. While in the customization mode, the
chime will sound the number
of chimes corresponding to
the current unlock mode. Each additional press of the
RKE transmitter unlock switch will cause your vehicle to
advance the unlock mode by one, starting from the current
unlock mode. If cycled beyond unlock Mode
4, the vehicle
will enter unlock Mode
1. During this procedure, the
chime will sound the number
of chimes corresponding to
2-11
ProCarManuals.com
Page 120 of 406
Interior Lamps
Instrument Panel Brightness Control
You can brighten or dim the instrument panel lights by
moving the LIGHTS dial.
If you turn the dial past
MAX, your courtesy or interior lamps will come on.
Courtesy Lamps
When any door is opened, several lamps come on. These
lamps are courtesy lamps. They make it easy for you to
enter and leave your vehicle.
You can also turn these
lamps
on by moving the interior lamps dial all the way
to the right.
Illuminated Entry
Your courtesy lamps will come on and stay on for a set
time whenever you press UNLOCK on the remote
keyless entry transmitter.
If you open a door, the lamps will stay on while it’s open
and then turn
off automatically about 25 seconds after
you close it. If you press UNLOCK and don’t open a
door, the lamps will turn off after about 40 seconds.
Illuminated Entry includes
a feature called theater
dimming. With theater dimming, the lamps don’t just
turn off at the end of the delay time. Instead, they slowly dim after the delay time until they go out. The delay
time
is canceled if you turn the ignition key to RUN or
START,
so the lamps will dim right away.
When the ignition is on, Illuminated Entry is inactive,
which means the courtesy lamps won’t come on unless a
door is opened.
Delayed Entry Lighting
Delayed Entry Lighting illuminates your vehicle’s
interior for
a period of time after all the doors have been
closed.
The ignition must be off for Delayed Entry Lighting
to
work. Just after all the doors have been closed, the
Delayed Entry Lighting feature will continue to
work until:
0 The ignition is turned to the RUN position.
The doors are locked.
An illumination period of 25 seconds has elapsed.
If during
the illumination period a door is opened, the
timed illumination period will be canceled and the interior lamps will remain on since a door is open.
2-44
ProCarManuals.com
Page 231 of 406
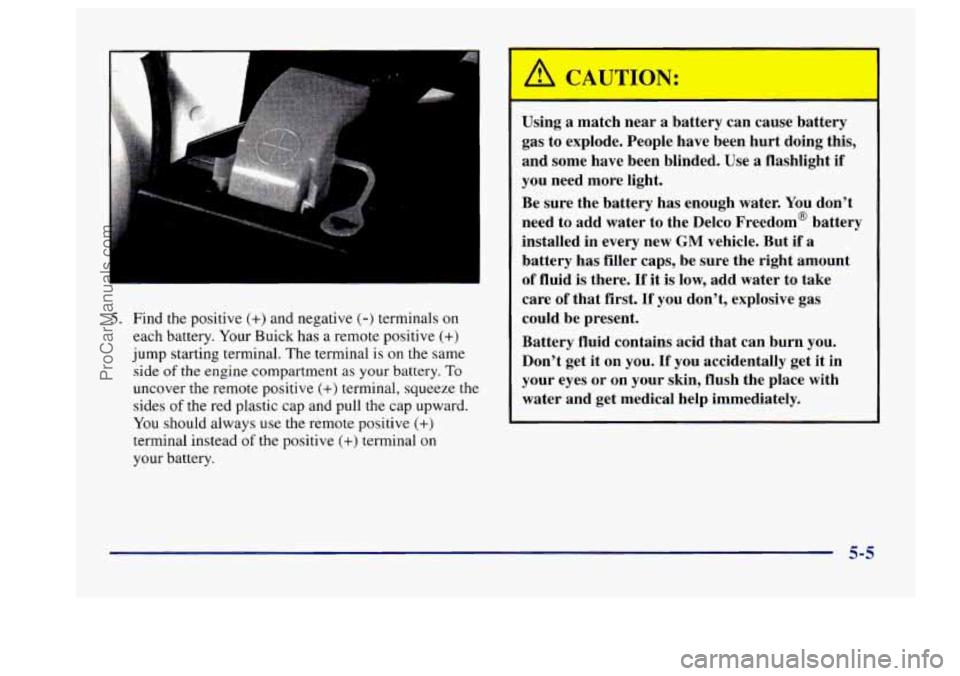
5. Find the positive (+) and negative (-) terminals on
each battery. Your Buick has a remote positive
(+)
jump starting terminal. The terminal is on the same
side
of the engine compartment as your battery. To
uncover the remote positive (+) terminal, squeeze the
sides
of the red plastic cap and pull the cap upward.
You should always use the remote positive
(+)
terminal instead of the positive (+) terminal on
your battery. Using
a match near a battery can cause battery
gas to explode. People have been hurt doing this,
and some have been blinded. Use
a flashlight if
you need more light.
Be sure the battery has enough water. You don’t
need to add water to the Delco Freedom’ battery
installed in every new
GM vehicle. But if a
battery has filler caps, be sure the right amount
of fluid is there. If it is low, add water to take
care of that first.
If you don’t, explosive gas
could be present.
Battery fluid contains acid that can burn you.
Don’t get it on you. If you accidentally get it in
your eyes or
on your skin, flush the place with
water and get medical help immediately.
5-5
ProCarManuals.com
Page 234 of 406
10. 11.
12.
13.
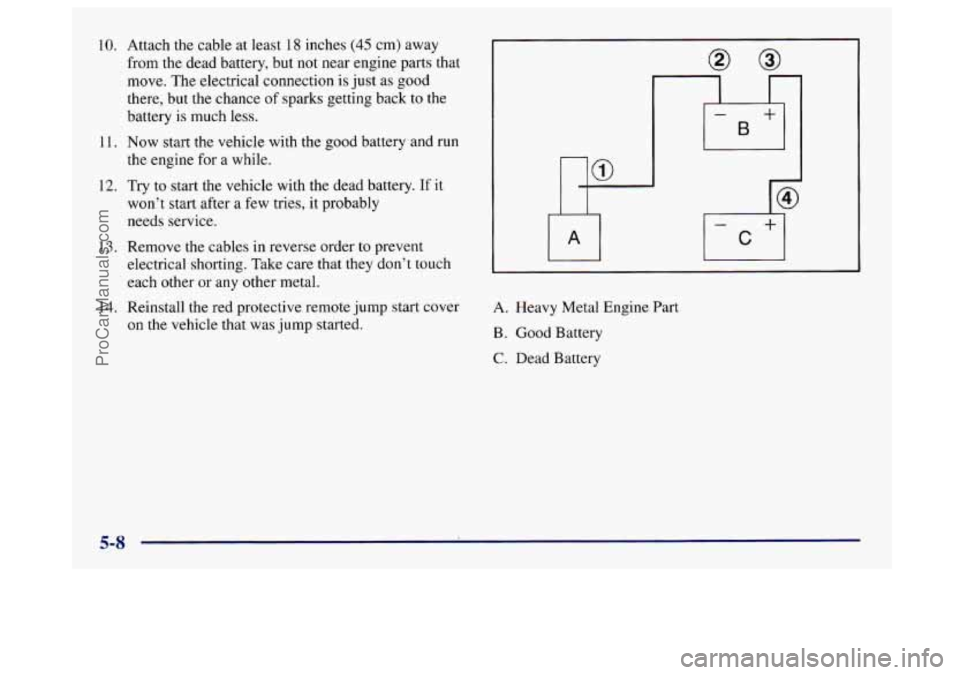
14. Attach the cable at least 18 inches (45 c’m)
away
from the dead battery, but not near engine parts that
move. The electrical connection
is just as good
there, but
the chance of sparks getting back to the
battery is much less.
Now start the vehicle with the good battery and run
the engine for a while.
Try to start the vehicle with the dead battery. If it
won’t start after a few tries, it probably
needs service.
Remove the cables in reverse order
to prevent
electrical shorting. Take care that they don’t touch
each other or any other metal.
Reinstall the red protective remote jump start cover
on the vehicle that was jump started. A.
Heavy Metal Engine Part
B. Good Battery
C. Dead Battery
5-8
ProCarManuals.com
Page 394 of 406
Back-up Lamp Bulb Replacement ................. 6-35
Battery
....................................... 6-29
Jump Starting
................................. 5-3
Replacement. Remote Keyless Entry
.............. 2- 13
Rundown Protection ........................... 2-46
Warnings
................................ 5.3. 5.5
RBB Auto Line ................................. 8-7
Better Business Bureau Mediation
................... 8-7
Brake
Adjustment
.................................. 6-29
Fluid
....................................... 6-26
Master Cylinder
.............................. 6-26
Replacing System Parts
........................ 6-29
System Warning Light
......................... 2-57
Parking
..................................... 2-26
PedalTravel
................................. 6-29
Trailer
...................................... 4-34
Transaxle Shift Interlock
....................... 2-29
Transaxle Shift Interlock Check
.................. 7-39
Wear
....................................... 6-28
Brakes. Anti-Lock
............................... 4-7
Braking
........................................ 4-6
Braking
in Emergencies ........................... 4-9
Break-In. New Vehicle
.......................... 2- I7
BTSICheck ................................... 7-39
Built-in Child Restraint .......................... 1-34
Built-in Child Restraint. Cleaning
.................. 6-48
Built-in Child Restraint Harness. Cleaning
........... 6-49
Bulb Replacement
.............................. 6-30
BTSI
......................................... 2-29 Canadian
Roadside Assistance
.................... 8-5
Capacities and Specifications
...................... 6-62
Carbon Monoxide
............... 2.14.2.30.4.27. 4.33
Cassette Deck Service
........................... 7-37
Cassette Tape Player
.................. 3- 16.3.20. 3.28
Cassette Tape Player Care ........................ 3-35
Cellular Phone Provisions
........................ 2-52
Center High-Mounted Stoplamp
Bulb Replacement .... 6-32
Certification
Label .............................. 4-29
Chains. Safety
................................. 4-34
Chains. Tire
................................... 6-44
Change Oil Soon Light
.......................... 2-66
Changing
a Flat Tire ............................. 5-25
Charging System Light
.......................... 2-57
Checking Your Restraint Systems
.................. 1-60
Chemical Paint Spotting .......................... 6-53
Child Restraints
...................... 1.32. 1.33. 1-49
Built-in
..................................... 1-34
Securing
in a Rear Outside Seat Position ........... 1-51
Securing in the Center Rear Seat Position .......... 1-53
Securing in the Right Front Seat Position .......... 1-54
TopStrap ................................... 1-50
Wheretoput
................................ 1-49
Cigarette Lighter
............................... 2-50
Circuit Breakers and Fuses ....................... 6-57
Cleaner. Air
................................... 6-15
Aluminum Wheels
............................ 6-51
Built-in Child Restraint
........................ 6-48
Built-in Child Restraint Harness
................. 6-49
Fabric
...................................... 6-46
Glass ....................................... 6-49
Cassette
Tape Player Errors
............. 3- 17.3.21. 3.28
Center Passenger Position
........................ 1-25
Cleaning
...................................... 6-45
9-2
ProCarManuals.com
Page 401 of 406
Safety Belts. Care ............................... 6-49
Safety Chains
.................................. 4-34
Safety Defects. Reporting
......................... 8-8
Safety Warnings and Symbols ...................... v111
Scheduled Maintenance Services ............... : .... 7-4
Seatback Reclining Front
............................... 1-3
Seats ManualFront
................................. 1-2
Power
....................................... 1-3
Restraint Systems
.............................. 1 - 1
Seatcontrols ................................. 1-2
Securing a Child Restraint . . 1-49. 1-50. 1-5 1. 1-53. 1-54
Six-Way Power
............................... 1-3
Two-WayManual
............................. 1-2
Second Gear. Automatic Transaxle
................. 2-25
Security Light
.................................. 2-66
Security System
................................ 2- 16
Service ........................................ 6-2
Bulletins. Ordering
............................ 8- 10
Engine Soon Light
............................ 2-62
Manuals. Ordering
............................ 8- 10
Parts Identification Label
....................... 6-55
Publications. Ordering
......................... 8- 10
Work. Doing Your Own ......................... 6-2
Service and Appearance Care
...................... 6- 1
Service Vehicle Soon Light ....................... 2-67
Servicing Your Air Bag-Equipped Buick
............ 1-24
Sheet Metal Damage
............................ 6-52
ShiftLever
.................................... 2-22
Shifting Automatic Transaxle
.......................... 2-22
...
IntoPark .................................... 2-27
Outofpark
.................................. 2-29
Shoulder Belt Height Adjuster
..................... 1 . 13
Signaling Turns ................................ 2-34
Six-Way Power Seat
............................. 1-3
Skidding ...................................... 4-13
Sound Equipment. Adding
........................ 3-35
Spare Tire. Compact
............................. 5-37
Specifications and Capacities
...................... 6-62
Specifications. Engine
........................... 6-63
Speech Impaired. Customer Assistance
............... 8-4
Speedometer
................................... 2-55
SRS
......................................... 1-19
Stains. Cleaning
................................ 6-46
Starter Switch Check
............................ 7-39
Starting Your Engine
............................ 2-19
Steam
........................................ 5-15
Steering
....................................... 4-9
in Emergencies ............................... 4-10
Power ....................................... 4-9
Tips
......................................... 4-9
Variable Assist (Magnasteer
TM ) ................... 4-9
Wheel.
Tilt .................................. 2-33
Steering Wheel Touch Controls. Audio
.............. 3-33
Storage Armrest
................................ 2-49
Storage Compartments
........................... 2-49
Storage. Vehicle
................................ 6-30
Stuck: In Sand. Mud. Ice or Snow .................. 5-38
Sunvisors .................................... 2-50
Sunroof
....................................... 2-52
Symbols. Vehicle .................................. x
Synchronization. Remote Keyless Entry ............. 2-14
9-9
ProCarManuals.com