radio controls BUICK CENTURY 2003 Owner's Manual
[x] Cancel search | Manufacturer: BUICK, Model Year: 2003, Model line: CENTURY, Model: BUICK CENTURY 2003Pages: 344, PDF Size: 2.57 MB
Page 107 of 344
Instrument Panel Overview...............................3-2
Hazard Warning Flashers................................3-3
Other Warning Devices...................................3-4
Horn.............................................................3-4
Tilt Wheel.....................................................3-4
Turn Signal/Multifunction Lever.........................3-5
Exterior Lamps.............................................3-11
Interior Lamps..............................................3-14
Auxiliary Power Connection
(Power Drop)............................................3-16
Ashtrays and Cigarette Lighter........................3-16
Climate Controls............................................3-17
Dual Climate Control System..........................3-17
Outlet Adjustment.........................................3-20
Passenger Compartment Air Filter...................3-20
Warning Lights, Gages and Indicators.............3-22
Instrument Panel Cluster................................3-23
Speedometer and Odometer...........................3-24
Safety Belt Reminder Light.............................3-24
Air Bag Readiness Light................................3-25
Charging System Light..................................3-26
Brake System Warning Light..........................3-27
Anti-Lock Brake System Warning Light.............3-28
Enhanced Traction System Warning Light.........3-28
Low Traction Light........................................3-29Engine Coolant Temperature Warning Light......3-29
Engine Coolant Temperature Gage..................3-30
Tire Pressure Light.......................................3-30
Malfunction Indicator Lamp.............................3-31
Oil Pressure Light.........................................3-34
Low Oil Level Light.......................................3-35
Change Engine Oil Light................................3-35
Security Light...............................................3-36
Cruise Control Light......................................3-36
Low Washer Fluid Warning Light.....................3-36
Door/Trunk Ajar Warning Light........................3-36
Service Vehicle Soon Light............................3-37
Fuel Gage...................................................3-37
Low Fuel Warning Light.................................3-38
Audio System(s).............................................3-39
Setting the Time...........................................3-39
AM-FM Radio...............................................3-40
Radio with Cassette and CD..........................3-42
Theft-Deterrent Feature..................................3-48
Audio Steering Wheel Controls.......................3-50
Understanding Radio Reception......................3-50
Care of Your Cassette Tape Player.................3-51
Care of Your CDs.........................................3-52
Care of Your CD Player................................3-52
Fixed Mast Antenna......................................3-52
Section 3 Instrument Panel
3-1
Page 145 of 344
Audio System(s)
Notice:Before you add any sound equipment to
your vehicle ± like a tape player, CB radio, mobile
telephone or two-way radio ± be sure you can
add what you want. If you can, it's very important to
do it properly. Added sound equipment may
interfere with the operation of your vehicle's engine,
radio or other systems, and even damage them.
Your vehicle's systems may interfere with the
operation of sound equipment that has been added
improperly.
So, before adding sound equipment, check with
your dealer and be sure to check federal rules
covering mobile radio and telephone units.
Your audio system has been designed to operate easily
and to give years of listening pleasure. You will get
the most enjoyment out of it if you acquaint yourself with
it ®rst. Figure out which radio you have in your vehicle,®nd out what your audio system can do and how to
operate all of its controls to be sure you're getting the
most out of the advanced engineering that went into it.
Your vehicle has a feature called Retained Accessory
Power (RAP). With RAP, you can play your audio
system even after the ignition is turned off. See
ªRetained Accessory Power (RAP)º under
Ignition
Positions on page 2-19.
Setting the Time
Press and hold HRS until the correct hour appears on
the display. Press and hold MIN until the correct minute
also appears.
You may set the time with the ignition off if you push
RECALL ®rst.
3-39
Page 150 of 344
Adjusting the Speakers (Balance/Fade)
BAL (Balance):Press this knob lightly so it extends.
Turn the knob to move the sound toward the left or the
right speakers.
FADE:Press this knob lightly so it extends. Turn the
knob to move the sound toward the front or the
rear speakers.
Return these knobs to their stored positions when
you're not using them.
Playing a Cassette Tape
The longer side with the tape visible should face to the
right. If the ignition and the radio are on, the tape can be
inserted and will begin playing. If you hear nothing or hear
a garbled sound, the tape may not be in squarely. Press
EJECT to remove the tape and start over.
While the tape is playing, use the VOLUME, SEEK,
FADE, BAL, BASS and TREB controls just as you do for
the radio. Other controls may have different functions
when a tape is inserted. The display will show an arrow
to show which side of the tape is playing.If you want to insert a tape while the ignition or radio is
off, ®rst press EJECT or RECALL.
Your tape bias is set automatically.
If an error appears on the display, see ªCassette Tape
Messagesº later in this section.
1 PREV (Previous):Your tape must have at least three
seconds of silence between each selection for previous
to work. Press this pushbutton to search for the
previous selection on the tape.
2 NEXT:Your tape must have at least three seconds of
silence between each selection for next to work.
Press this pushbutton to search for the next selection
on the tape.
3
r(Reverse):Press this pushbutton to reverse the
tape rapidly. The radio will play while the tape
reverses. Press it again to return to playing speed.
4
[(Forward):Press this pushbutton to advance
quickly to another part of the tape. The radio will play
while the tape advances. Press it again to return to
playing speed.
5 SIDE:Press this pushbutton to play the other side of
the tape.
3-44
Page 156 of 344
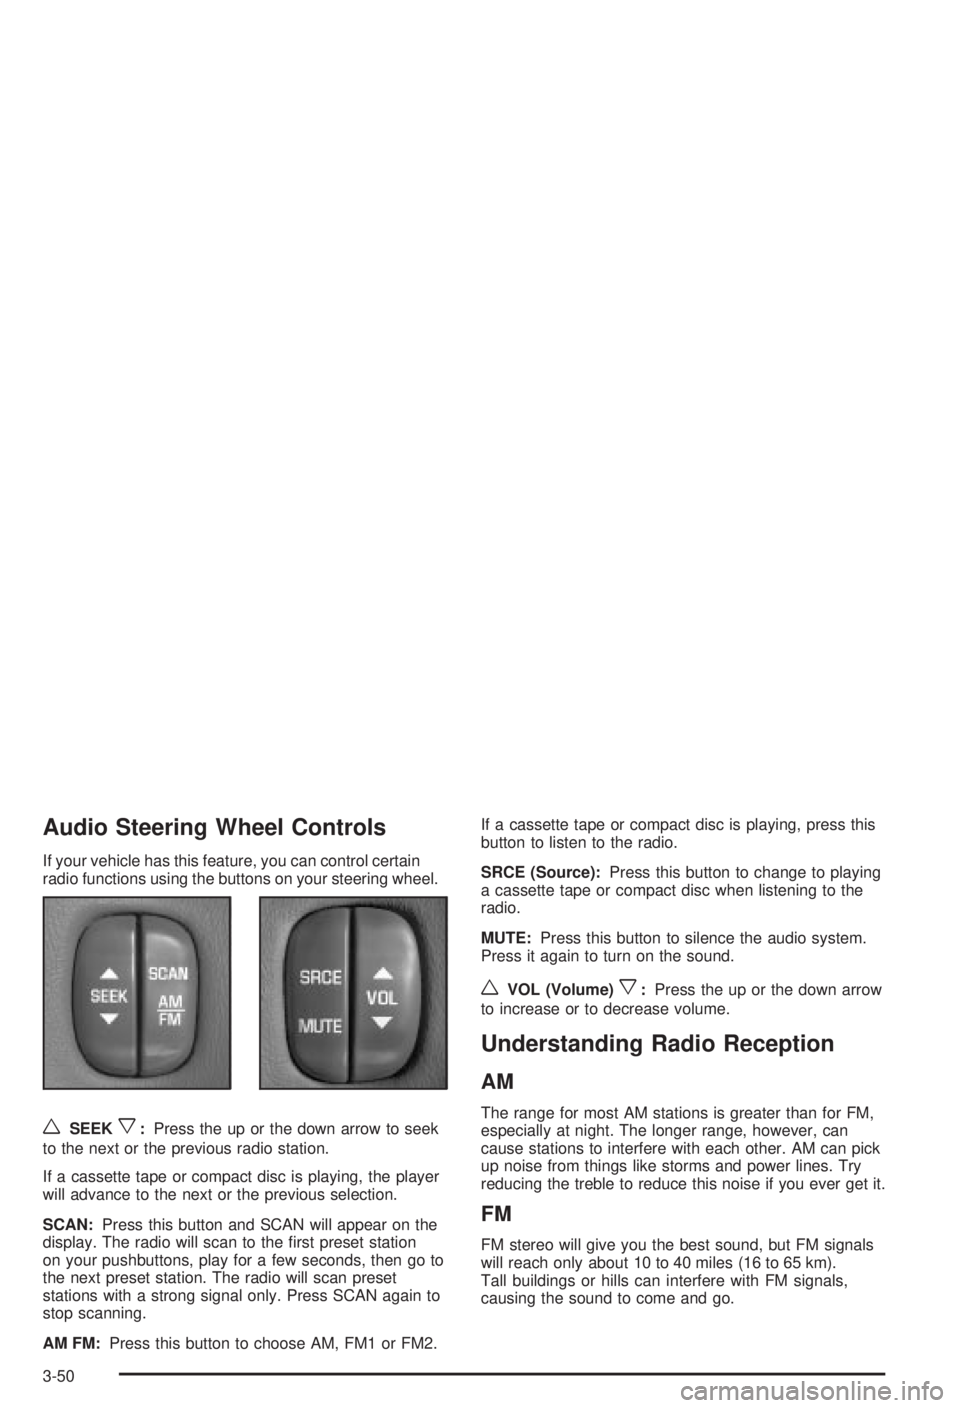
Audio Steering Wheel Controls
If your vehicle has this feature, you can control certain
radio functions using the buttons on your steering wheel.
wSEEKx:Press the up or the down arrow to seek
to the next or the previous radio station.
If a cassette tape or compact disc is playing, the player
will advance to the next or the previous selection.
SCAN:Press this button and SCAN will appear on the
display. The radio will scan to the ®rst preset station
on your pushbuttons, play for a few seconds, then go to
the next preset station. The radio will scan preset
stations with a strong signal only. Press SCAN again to
stop scanning.
AM FM:Press this button to choose AM, FM1 or FM2.If a cassette tape or compact disc is playing, press this
button to listen to the radio.
SRCE (Source):Press this button to change to playing
a cassette tape or compact disc when listening to the
radio.
MUTE:Press this button to silence the audio system.
Press it again to turn on the sound.
wVOL (Volume)x:Press the up or the down arrow
to increase or to decrease volume.
Understanding Radio Reception
AM
The range for most AM stations is greater than for FM,
especially at night. The longer range, however, can
cause stations to interfere with each other. AM can pick
up noise from things like storms and power lines. Try
reducing the treble to reduce this noise if you ever get it.
FM
FM stereo will give you the best sound, but FM signals
will reach only about 10 to 40 miles (16 to 65 km).
Tall buildings or hills can interfere with FM signals,
causing the sound to come and go.
3-50
Page 291 of 344
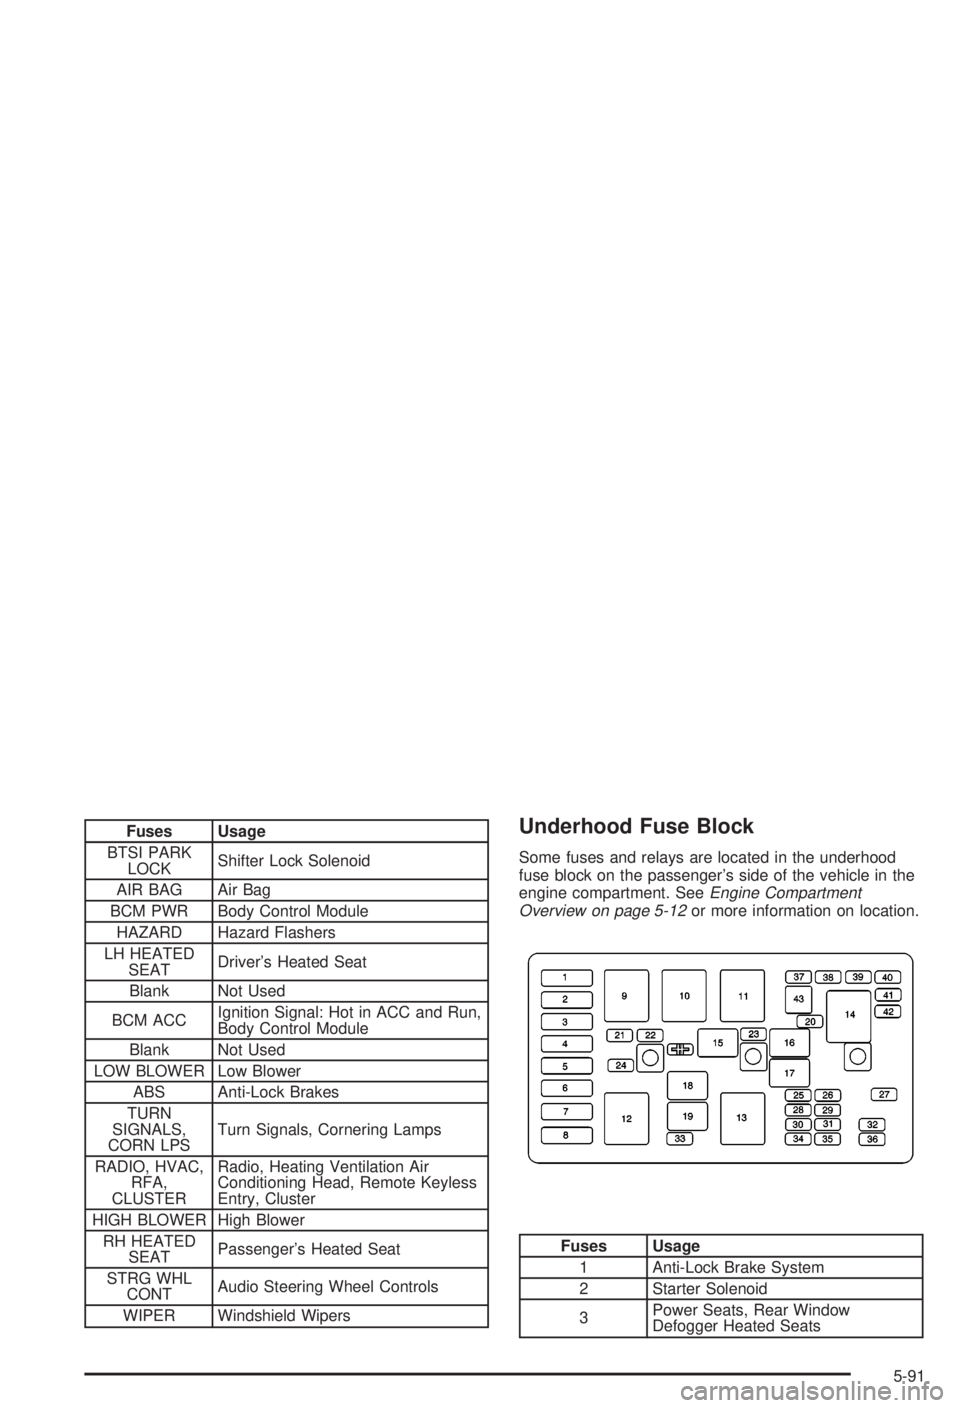
Fuses Usage
BTSI PARK
LOCKShifter Lock Solenoid
AIR BAG Air Bag
BCM PWR Body Control Module
HAZARD Hazard Flashers
LH HEATED
SEATDriver's Heated Seat
Blank Not Used
BCM ACCIgnition Signal: Hot in ACC and Run,
Body Control Module
Blank Not Used
LOW BLOWER Low Blower
ABS Anti-Lock Brakes
TURN
SIGNALS,
CORN LPSTurn Signals, Cornering Lamps
RADIO, HVAC,
RFA,
CLUSTERRadio, Heating Ventilation Air
Conditioning Head, Remote Keyless
Entry, Cluster
HIGH BLOWER High Blower
RH HEATED
SEATPassenger's Heated Seat
STRG WHL
CONTAudio Steering Wheel Controls
WIPER Windshield WipersUnderhood Fuse Block
Some fuses and relays are located in the underhood
fuse block on the passenger's side of the vehicle in the
engine compartment. See
Engine Compartment
Overview on page 5-12or more information on location.
Fuses Usage
1 Anti-Lock Brake System
2 Starter Solenoid
3Power Seats, Rear Window
Defogger Heated Seats
5-91
Page 292 of 344
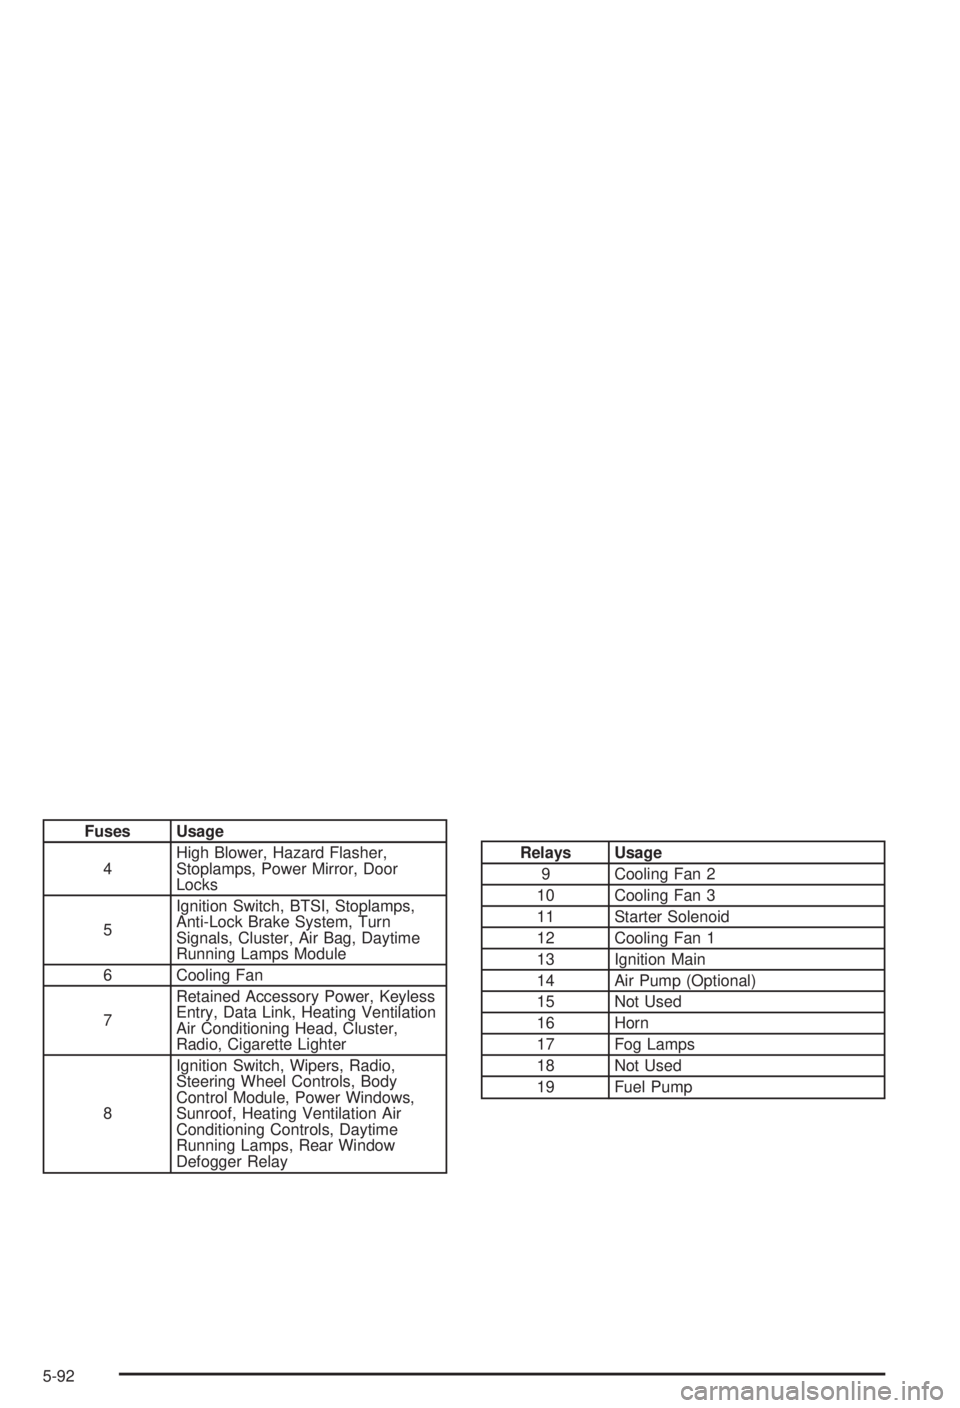
Fuses Usage
4High Blower, Hazard Flasher,
Stoplamps, Power Mirror, Door
Locks
5Ignition Switch, BTSI, Stoplamps,
Anti-Lock Brake System, Turn
Signals, Cluster, Air Bag, Daytime
Running Lamps Module
6 Cooling Fan
7Retained Accessory Power, Keyless
Entry, Data Link, Heating Ventilation
Air Conditioning Head, Cluster,
Radio, Cigarette Lighter
8Ignition Switch, Wipers, Radio,
Steering Wheel Controls, Body
Control Module, Power Windows,
Sunroof, Heating Ventilation Air
Conditioning Controls, Daytime
Running Lamps, Rear Window
Defogger Relay
Relays Usage
9 Cooling Fan 2
10 Cooling Fan 3
11 Starter Solenoid
12 Cooling Fan 1
13 Ignition Main
14 Air Pump (Optional)
15 Not Used
16 Horn
17 Fog Lamps
18 Not Used
19 Fuel Pump
5-92
Page 329 of 344
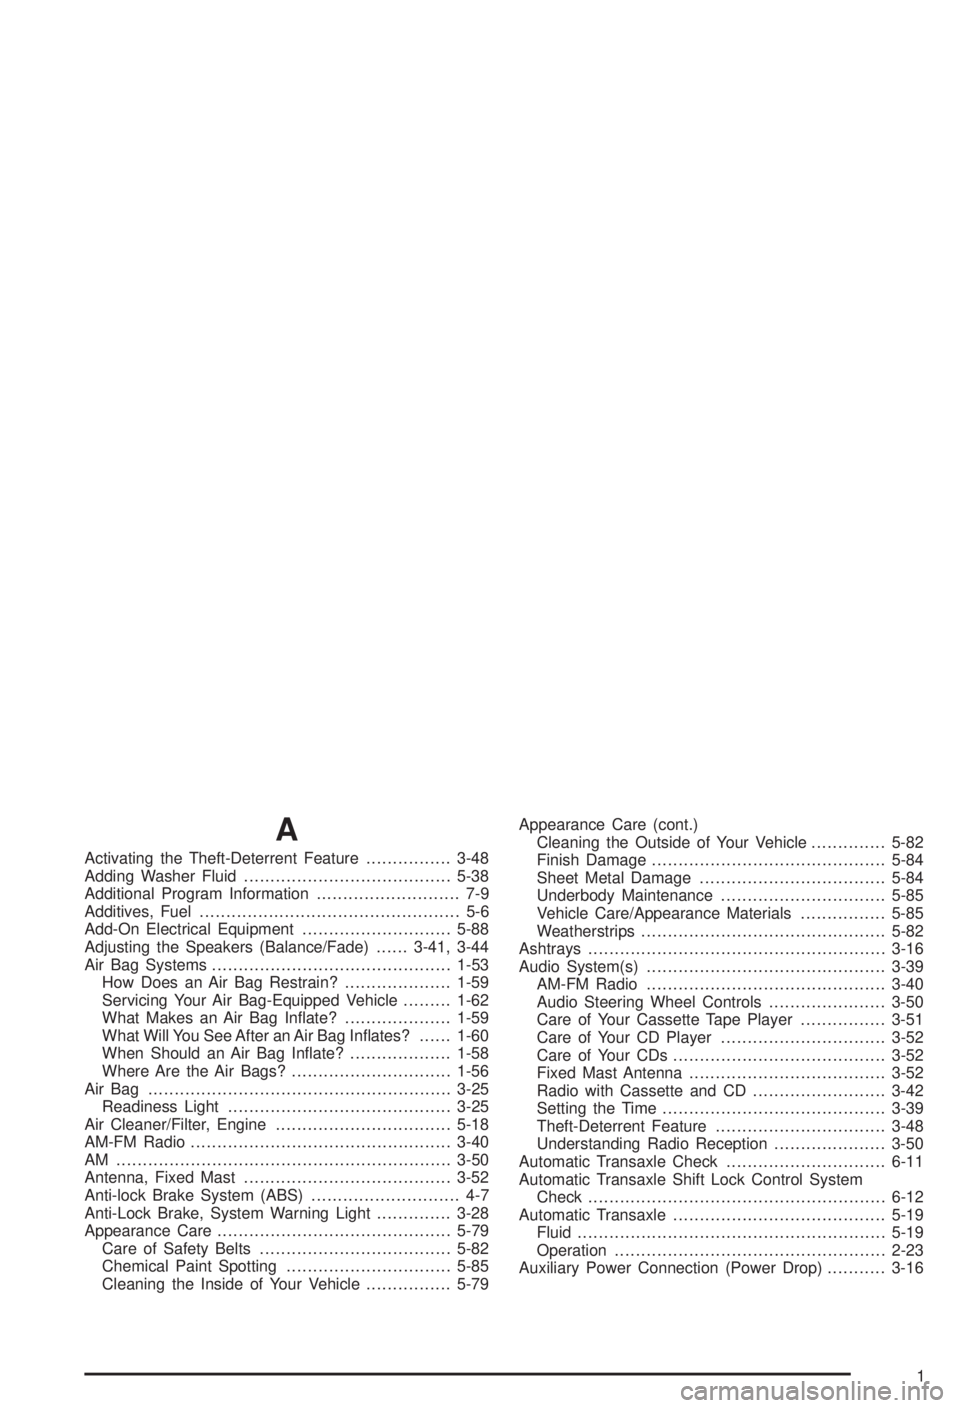
A
Activating the Theft-Deterrent Feature................3-48
Adding Washer Fluid.......................................5-38
Additional Program Information........................... 7-9
Additives, Fuel................................................. 5-6
Add-On Electrical Equipment............................5-88
Adjusting the Speakers (Balance/Fade)......3-41, 3-44
Air Bag Systems.............................................1-53
How Does an Air Bag Restrain?....................1-59
Servicing Your Air Bag-Equipped Vehicle.........1-62
What Makes an Air Bag In¯ate?....................1-59
What Will You See After an Air Bag In¯ates?......1-60
When Should an Air Bag In¯ate?...................1-58
Where Are the Air Bags?..............................1-56
Air Bag .........................................................3-25
Readiness Light..........................................3-25
Air Cleaner/Filter, Engine.................................5-18
AM-FM Radio.................................................3-40
AM ...............................................................3-50
Antenna, Fixed Mast.......................................3-52
Anti-lock Brake System (ABS)............................ 4-7
Anti-Lock Brake, System Warning Light..............3-28
Appearance Care............................................5-79
Care of Safety Belts....................................5-82
Chemical Paint Spotting...............................5-85
Cleaning the Inside of Your Vehicle................5-79Appearance Care (cont.)
Cleaning the Outside of Your Vehicle..............5-82
Finish Damage............................................5-84
Sheet Metal Damage...................................5-84
Underbody Maintenance...............................5-85
Vehicle Care/Appearance Materials................5-85
Weatherstrips..............................................5-82
Ashtrays........................................................3-16
Audio System(s).............................................3-39
AM-FM Radio.............................................3-40
Audio Steering Wheel Controls......................3-50
Care of Your Cassette Tape Player................3-51
Care of Your CD Player...............................3-52
Care of Your CDs........................................3-52
Fixed Mast Antenna.....................................3-52
Radio with Cassette and CD.........................3-42
Setting the Time..........................................3-39
Theft-Deterrent Feature................................3-48
Understanding Radio Reception.....................3-50
Automatic Transaxle Check..............................6-11
Automatic Transaxle Shift Lock Control System
Check........................................................6-12
Automatic Transaxle........................................5-19
Fluid..........................................................5-19
Operation...................................................2-23
Auxiliary Power Connection (Power Drop)...........3-16
1
Page 341 of 344
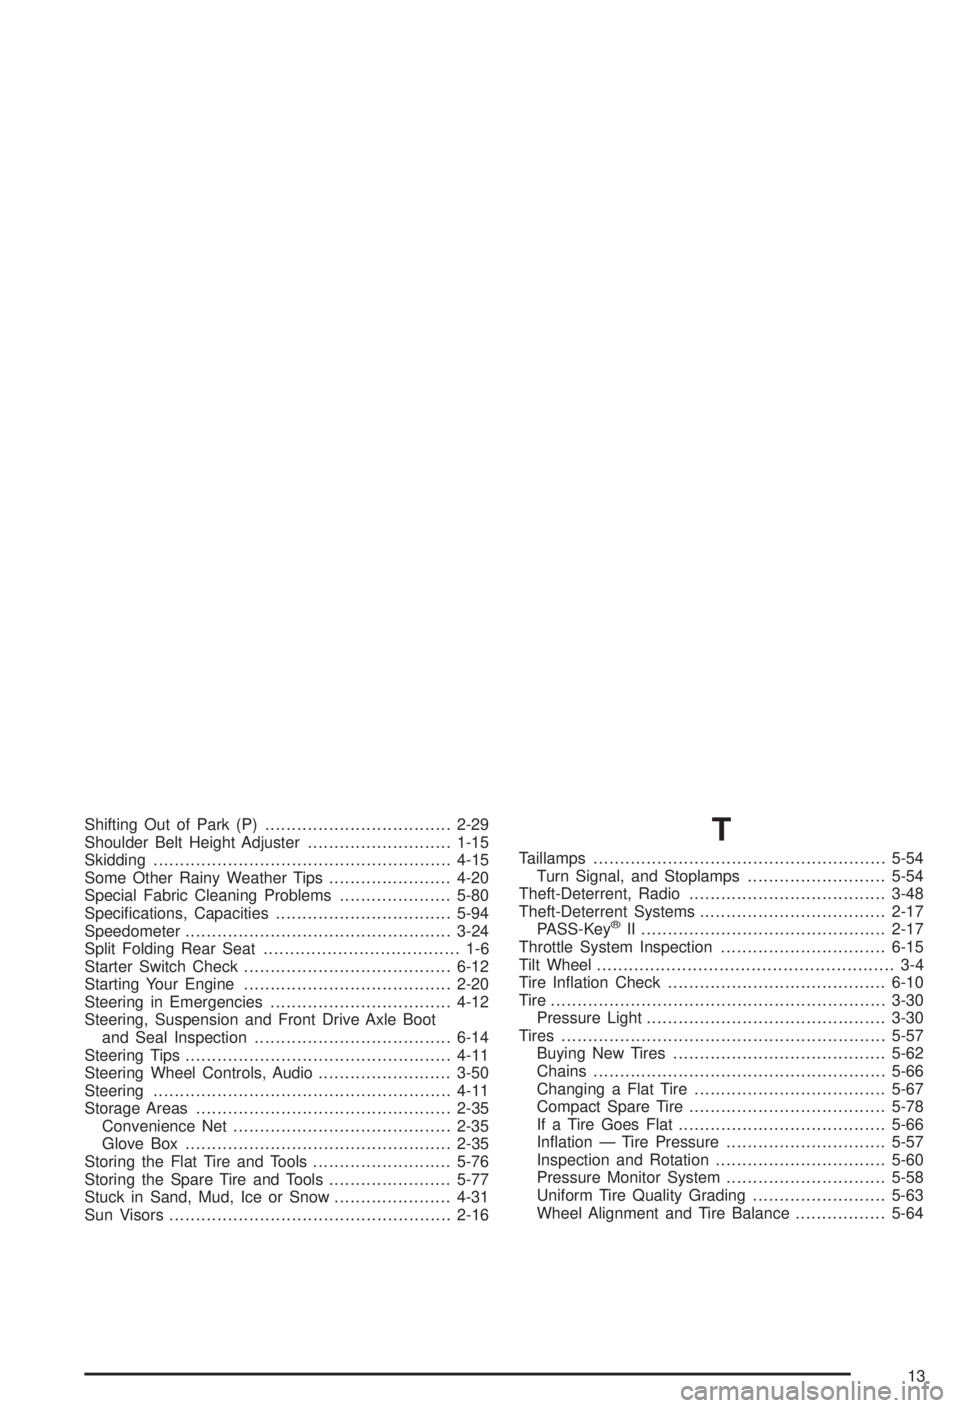
Shifting Out of Park (P)...................................2-29
Shoulder Belt Height Adjuster...........................1-15
Skidding........................................................4-15
Some Other Rainy Weather Tips.......................4-20
Special Fabric Cleaning Problems.....................5-80
Speci®cations, Capacities.................................5-94
Speedometer..................................................3-24
Split Folding Rear Seat..................................... 1-6
Starter Switch Check.......................................6-12
Starting Your Engine.......................................2-20
Steering in Emergencies..................................4-12
Steering, Suspension and Front Drive Axle Boot
and Seal Inspection.....................................6-14
Steering Tips..................................................4-11
Steering Wheel Controls, Audio.........................3-50
Steering........................................................4-11
Storage Areas................................................2-35
Convenience Net.........................................2-35
Glove Box..................................................2-35
Storing the Flat Tire and Tools..........................5-76
Storing the Spare Tire and Tools.......................5-77
Stuck in Sand, Mud, Ice or Snow......................4-31
Sun Visors.....................................................2-16T
Taillamps.......................................................5-54
Turn Signal, and Stoplamps..........................5-54
Theft-Deterrent, Radio.....................................3-48
Theft-Deterrent Systems...................................2-17
PASS-Key
žII ..............................................2-17
Throttle System Inspection...............................6-15
Tilt Wheel........................................................ 3-4
Tire In¯ation Check.........................................6-10
Tire ...............................................................3-30
Pressure Light.............................................3-30
Tires.............................................................5-57
Buying New Tires........................................5-62
Chains.......................................................5-66
Changing a Flat Tire....................................5-67
Compact Spare Tire.....................................5-78
If a Tire Goes Flat.......................................5-66
In¯ation Ð Tire Pressure..............................5-57
Inspection and Rotation................................5-60
Pressure Monitor System..............................5-58
Uniform Tire Quality Grading.........................5-63
Wheel Alignment and Tire Balance.................5-64
13