clock BUICK ENCLAVE 2008 Owner's Manual
[x] Cancel search | Manufacturer: BUICK, Model Year: 2008, Model line: ENCLAVE, Model: BUICK ENCLAVE 2008Pages: 436
Page 101 of 436
Ignition Positions
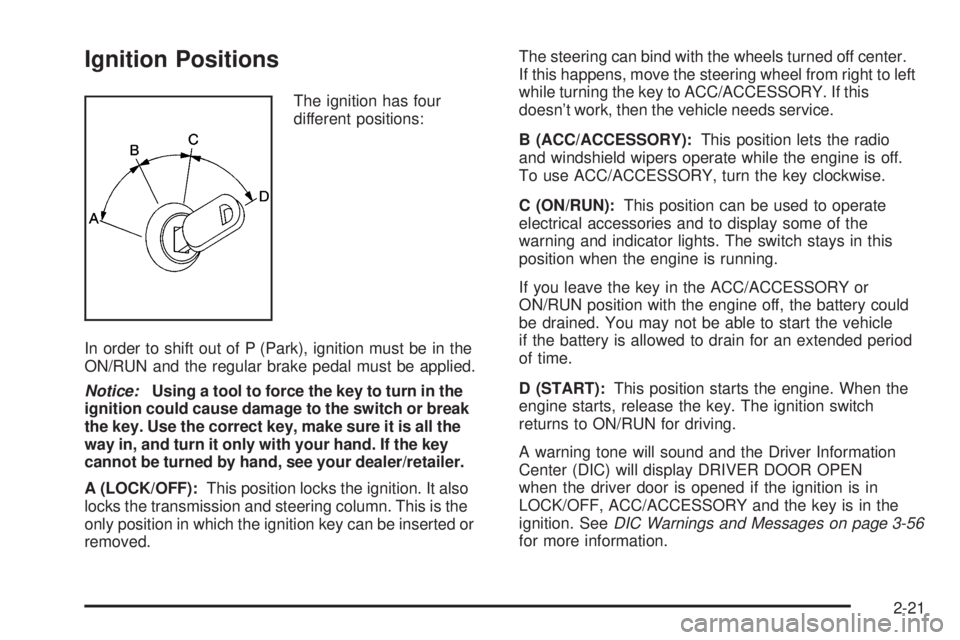
The ignition has four
different positions:
In order to shift out of P (Park), ignition must be in the
ON/RUN and the regular brake pedal must be applied.
Notice:Using a tool to force the key to turn in the
ignition could cause damage to the switch or break
the key. Use the correct key, make sure it is all the
way in, and turn it only with your hand. If the key
cannot be turned by hand, see your dealer/retailer.
A (LOCK/OFF):This position locks the ignition. It also
locks the transmission and steering column. This is the
only position in which the ignition key can be inserted or
removed.The steering can bind with the wheels turned off center.
If this happens, move the steering wheel from right to left
while turning the key to ACC/ACCESSORY. If this
doesn’t work, then the vehicle needs service.
B (ACC/ACCESSORY):This position lets the radio
and windshield wipers operate while the engine is off.
To use ACC/ACCESSORY, turn the key clockwise.
C (ON/RUN):This position can be used to operate
electrical accessories and to display some of the
warning and indicator lights. The switch stays in this
position when the engine is running.
If you leave the key in the ACC/ACCESSORY or
ON/RUN position with the engine off, the battery could
be drained. You may not be able to start the vehicle
if the battery is allowed to drain for an extended period
of time.
D (START):This position starts the engine. When the
engine starts, release the key. The ignition switch
returns to ON/RUN for driving.
A warning tone will sound and the Driver Information
Center (DIC) will display DRIVER DOOR OPEN
when the driver door is opened if the ignition is in
LOCK/OFF, ACC/ACCESSORY and the key is in the
ignition. SeeDIC Warnings and Messages on page 3-56
for more information.
2-21
Page 102 of 436
Retained Accessory Power (RAP)
The following accessories can be used for up to
10 minutes after the engine is turned off.
Audio System
Audio Steering Wheel (if equipped)
Clock
Power Windows
Sunroof (if equipped)
Power to these accessories works up to 10 minutes or
until the driver door is opened.The instrument panel cluster lights stay on for a
few seconds, then will go out. Once the driver door
is opened, the power shuts off to these accessories.
The vehicle has a feature designed to protect the battery
against drainage. For more information seeInadvertent
Power Battery Saver on page 3-19andElectric
Power Management on page 3-19.
Starting the Engine
Move the shift lever to P (Park) or N (Neutral). The
engine will not start in any other position. To restart
the engine when the vehicle is already moving, use
N (Neutral) only.
Notice:Do not try to shift to P (Park) if the vehicle
is moving. If you do, you could damage the
transmission. Shift to P (Park) only when the
vehicle is stopped.
2-22
Page 140 of 436
Lane Departure Warning Light........................3-41
Engine Coolant Temperature Warning Light......3-42
Engine Coolant Temperature Gage..................3-42
Tire Pressure Light.......................................3-43
Malfunction Indicator Lamp.............................3-43
Oil Pressure Light.........................................3-46
Security Light...............................................3-46
Fog Lamp Light............................................3-47
Cruise Control Light......................................3-47
Highbeam On Light.......................................3-47
Fuel Gage...................................................3-48
Driver Information Center (DIC).......................3-49
DIC Operation and Displays...........................3-49
DIC Compass..............................................3-54DIC Warnings and Messages.........................3-56
DIC Vehicle Customization.............................3-66
Audio System(s).............................................3-75
Setting the Clock..........................................3-76
Radio(s)......................................................3-78
Using an MP3..............................................3-88
XM Radio Messages.....................................3-92
Navigation/Radio System...............................3-93
Bluetooth
®...................................................3-93
Theft-Deterrent Feature................................3-104
Audio Steering Wheel Controls......................3-104
Radio Reception.........................................3-105
Backglass Antenna......................................3-106
XM™ Satellite Radio Antenna System............3-106
Section 3 Instrument Panel
3-2
Page 155 of 436
Fog Lamps
For vehicles with fog lamps, the button is located on
the exterior lamps control. The exterior lamps control is
located on the instrument panel to the left of the steering
column.
#(Fog Lamps):Press the exterior lamps button
to turn the fog lamps on or off. A light comes on in the
instrument panel cluster to show that the fog lamps
are on. SeeInstrument Panel Cluster on page 3-33.
The ignition must be in the ON/RUN position and
the parking lamps must be on for the fog lamps to
illuminate.
The fog lamps will go off while you change to high-beam
headlamps.
Some localities have laws that require the headlamps to
be on along with the fog lamps.
Cornering Lamps
For vehicles with this feature, the cornering lamps come
on when: the headlamps or parking lamps are on, the
vehicle is not in P (Park), and you signal a turn with
the turn signal/multifunction lever. They provide
more light for cornering.
Exterior Lighting Battery Saver
If the exterior lamp button has been left on, the exterior
lamps will turn off about 10 minutes after the ignition is
turned to LOCK/OFF and a door has been opened. This
protects against draining the battery if the headlamps or
parking lamps are accidentally left on. If you need to
leave the lamps on for more than 10 minutes, use the
exterior lamp control to turn the lamps back on after the
ignition is turned to LOCK/OFF and any door is opened.
Instrument Panel Brightness
D(Instrument Panel Brightness):This feature
controls the brightness of the instrument panel lights.
The knob for this control is located next to the exterior
lamps control.
Push the knob in and release when it pops out.
Turn the knob clockwise to increase the brightness
of the instrument panel lights and counter clockwise to
decrease the brightness. Turning the knob completely
clockwise to the detent will turn on the courtesy lamps.
3-17
Page 156 of 436
Courtesy Lamps
When any door is opened, several lamps turn on
making it easier for you to enter and exit the vehicle.
Turn the instrument panel brightness control completely
clockwise to manually turn on these lamps.
Entry Lighting
If it is dark enough outside when you press the unlock
button on the remote keyless entry transmitter, the
interior courtesy lamps will turn on and stay on for about
40 seconds. The lamps can be turned off immediately by
pressing the lock button on the remote keyless entry
transmitter, turning the ignition key to ON/RUN or
activating the power door locks.
Delayed Entry Lighting
The interior lamps will turn on if you open the door when
it is dark enough outside. When you close the door with
the ignition off, the interior lamps will stay on for up to
25 seconds or until the ignition is turned to an on position.
When the lamps turn off as a result of the 25 second timer
or the ignition switch being turned on, the lighting will
deactivate by way of the theater dimming effect. Locking
the doors will override the delayed entry lighting feature
and the lamps will turn off right away.
Theater Dimming
This feature allows for a three to �ve second fade out of
the courtesy lamps instead of immediate turn off.
Delayed Exit Lighting
If it is dark enough outside when you remove the key
from the ignition, the interior lamps will turn on and stay
on for about 25 seconds. This will give you time to �nd
the door pull handle or lock switches. Once the key is
inserted into the ignition, the exit lighting will be cancelled
and the lighting will fade out.
Perimeter Lighting
If it is dark enough outside when the unlock button on
the remote keyless entry transmitter is pressed, the
DRL, parking lamps and back-up lamps will come on.
This feature can be programmed on for various amounts
of time in seconds for each transmitter.
SeeDIC Vehicle Customization on page 3-66for
information on programming.
Front Reading Lamps
The front reading lamps are located on the headliner.
Press the button near each lamp to turn them on or off.
3-18
Page 160 of 436
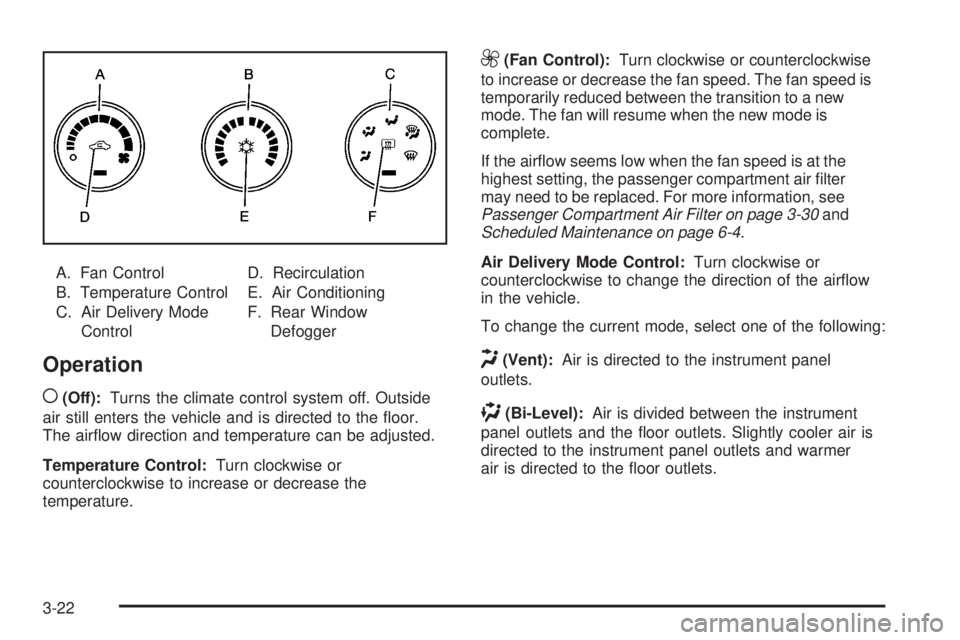
A. Fan Control
B. Temperature Control
C. Air Delivery Mode
ControlD. Recirculation
E. Air Conditioning
F. Rear Window
Defogger
Operation
(
(Off):Turns the climate control system off. Outside
air still enters the vehicle and is directed to the �oor.
The air�ow direction and temperature can be adjusted.
Temperature Control:Turn clockwise or
counterclockwise to increase or decrease the
temperature.
9(Fan Control):Turn clockwise or counterclockwise
to increase or decrease the fan speed. The fan speed is
temporarily reduced between the transition to a new
mode. The fan will resume when the new mode is
complete.
If the air�ow seems low when the fan speed is at the
highest setting, the passenger compartment air �lter
may need to be replaced. For more information, see
Passenger Compartment Air Filter on page 3-30and
Scheduled Maintenance on page 6-4.
Air Delivery Mode Control:Turn clockwise or
counterclockwise to change the direction of the air�ow
in the vehicle.
To change the current mode, select one of the following:
H(Vent):Air is directed to the instrument panel
outlets.
)(Bi-Level):Air is divided between the instrument
panel outlets and the �oor outlets. Slightly cooler air is
directed to the instrument panel outlets and warmer
air is directed to the �oor outlets.
3-22
Page 164 of 436
When the ENG/MET (English/metric) button on the
Driver Information Center (DIC) is pressed, the display
shows readings in Fahrenheit or Celsius. Use the
ENG/MET button to toggle between the readings.
AUTO (Automatic Air Conditioning):If AUTO
is selected on the fan or mode control, the system
automatically controls the air conditioning compressor.
The A/C compressor runs automatically even at cool
outside temperatures in order to dehumidify the air.
The A/C indicator light is lit when the system is operating
automatically. Press the A/C button on the fan control
to turn off the A/C. To clear windows better in defog or
defrost modes, the A/C compressor runs automatically
in damp cool conditions.
h(Auto Recirculation):If AUTO is selected on
either the fan or mode control, the system automatically
controls the supply of fresh outside air or recirculates the
interior air to cool the car faster. The indicator light on
the recirculation button will light whenever the system
switches to recirculation. You may force outside air by
pressing the outside air button. The next time AUTO fan
or mode is selected, it will reset back to AUTO operation.
Manual Operation
9(Off):Turns the climate control system off. Outside
air still enters the vehicle and is directed to the �oor.
The air�ow direction and temperature can be adjusted.
If the temperature is adjusted while the system is
off, the display will light to show the current settings.
wx(Driver Temperature Controls):Press
these buttons next to the fan control to increase
or decrease the temperature inside the vehicle.
wx(Passenger Temperature Controls):Press
these buttons next to the mode control to increase
or decrease the temperature for the front passenger.
If the passenger climate control system is off, pressing
one of these buttons turns it on.
9(Fan Control):Turn clockwise or counterclockwise
to increase or decrease the fan speed. Turning this
control completely counterclockwise turns on the
automatic fan operation.
If the air�ow seems low when the fan speed is at the
highest setting, the passenger compartment air �lter
may need to be replaced. For more information,
seePassenger Compartment Air Filter on page 3-30
andScheduled Maintenance on page 6-4.
3-26
Page 165 of 436

Air Delivery Mode Control:Turn clockwise or
counterclockwise to change the direction of the air�ow
in the vehicle.
To change the current mode, select one of the following:
F(Vent):Air is directed to the instrument panel
outlets.
*(Bi-Level):Air is divided between the instrument
panel outlets and the �oor outlets. In automatic operation,
cooler air is directed to the upper outlets and warmer air
to the �oor outlets.
7(Floor):Air is directed to the �oor outlets, with some
air directed to the windshield and side window outlets.
If recirculation is selected while in this mode, it stays on
for three minutes to reduce windshield fogging.
W(Floor/Defog):This mode clears the windows of
fog or moisture. Air is directed to the �oor outlets, with
some air directed to the windshield and side window
outlets. The system turns off recirculation and runs
the air-conditioning compressor unless the outside
temperature is at or below freezing. The recirculation
mode cannot be selected while in the �oor/defog mode.
0(Defrost):This mode removes fog or frost from the
windshield more quickly. Air is directed to the windshield
and the side window outlets. The system automatically
turns off recirculation and runs the air-conditioning
compressor, unless the outside temperature is at or
below freezing. Recirculation cannot be selected while
in the defrost mode.
#(Air Conditioning):Press to turn the air conditioning
system on or off and override the automatic system.
An indicator light below the button comes on to
show that this mode is on.
The air conditioning system removes moisture from the
air, so a small amount of water might drip under the
vehicle while idling or after turning off the engine.
This is normal.
:(Outside Air):Press to let outside air enter the
vehicle. An indicator light comes on to show this mode
is on. Pressing
?cancels this mode.
3-27
Page 214 of 436
Setting the Clock
Without Date Display
AM/FM Base Radio with a
Single CD Player
This radio has aHbutton for setting the time.
To set the time:
1. Press the
Hbutton until the hour begins �ashing
on display. Press
Ha second time and the
minutes begin �ashing on display.
2. To increase or decrease the time, do one of the
following while the hours or minutes are �ashing:
Turn thefknob.
Press¨SEEK or©SEEK.
Press\FWD orsREV.
3. Press the
Hbutton again until the clock display
stops �ashing to set the currently displayed time,
or wait �ve seconds until the �ashing stops and the
current time displayed is automatically set.To change the time default setting from 12 hour to
24 hour, press the
Hbutton and then the pushbutton
located under the forward arrow tab. Once the times
12H and 24H are displayed, press the pushbutton
located under the desired tab to select the default.
Press the
Hbutton again to apply the selected default,
or let the screen time out.
With Date Display
Single CD (MP3) Player
This radio has aHbutton for setting the time.
To set the time and date:
1. Turn the radio on.
2. Press the
Hbutton and the HR, MIN, MM, DD,
YYYY (hour, minute, month, day, and year) displays.
3. Press the pushbutton located under any one of the
tabs to be changed.
4. To increase the time or date, do one of the
following:
Press the pushbutton below the selected tab.
Turn thefknob clockwise.
Press¨SEEK.
Press\FWD.
3-76
Page 215 of 436
5. To decrease the time or date, do one of the
following:
Turn thefknob counter-clockwise.
Press©SEEK.
PresssREV.
The date does not automatically display. To see the
date press the
Hbutton while the radio is on. The date
with display times out after a few seconds and goes
back to the normal radio and time display.
Six-Disc CD (MP3) Player
This type of radio has a MENU button instead of the
clock button to set the time and date.
To set the time and date, follow these instructions:
1. Turn the radio on.
2. Press the MENU button.
3. Once the
Hoption displays, press the pushbutton
located under that tab. HR, MIN, MM, DD, YYYY
displays.
4. To increase the time or date, do one of the
following:
Press the pushbutton below the selected tab.
Turn thefknob clockwise.
Press¨SEEK.
Press\FWD.5. To decrease the time or date, do one of the
following:
Turn thefknob counter-clockwise.
Press©SEEK.
PresssREV.
The date does not automatically display. To see the
date press the MENU button and then the
Hbutton
while the radio is on. The date with display times
out after a few seconds and goes back to the normal
radio and time display.
To change the time default setting from 12 hour to
24 hour or to change the date default setting from
month/day/year to day/month/year:
1. Press the
Hbutton and then the pushbutton
located under the forward arrow tab. Once the time
12H and 24H, and the date MM/DD/YYYY (month,
day, and year) and DD/MM/YYYY (day, month,
and year) displays.
2. Press the pushbutton located under the desired
option.
3. Press the
Hor MENU button again to apply the
selected default, or let the screen time out.
3-77