climate control BUICK ENCLAVE 2010 Owner's Guide
[x] Cancel search | Manufacturer: BUICK, Model Year: 2010, Model line: ENCLAVE, Model: BUICK ENCLAVE 2010Pages: 438, PDF Size: 2.47 MB
Page 238 of 438

8-6 Climate Controls
Sensors
The solar sensor, located in the
defrost grille in the middle of the
instrument panel, monitors the solar
heat. Do not cover the solar sensor
or the system will not work properly.
The interior temperature sensor
located on the instrument panel to
the right of the steering column,
measures the temperature of the air
inside the vehicle.There is also an exterior
temperature sensor located behind
the front grille. This sensor reads
the outside air temperature and
helps maintain the temperature
inside the vehicle. Any cover on the
front of the vehicle could cause a
false reading in the displayed
temperature.
The climate control system uses the
information from these sensors to
maintain comfort settings by
adjusting the temperature, fan
speed, and the air delivery mode.
The system may also supply cooler
air to the side of the vehicle facing
the sun. The recirculation mode will
also be used as needed to maintain
cool outlet temperatures.
Page 239 of 438

Climate Controls 8-7
Rear Climate Control System
(Rear Climate Control Only)
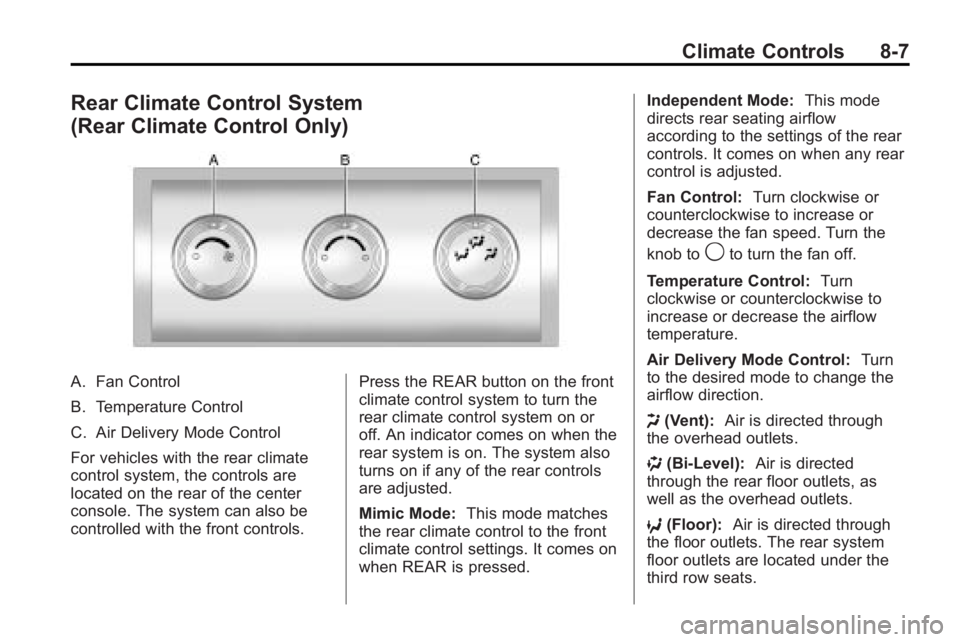
A. Fan Control
B. Temperature Control
C. Air Delivery Mode Control
For vehicles with the rear climate
control system, the controls are
located on the rear of the center
console. The system can also be
controlled with the front controls.Press the REAR button on the front
climate control system to turn the
rear climate control system on or
off. An indicator comes on when the
rear system is on. The system also
turns on if any of the rear controls
are adjusted.
Mimic Mode:
This mode matches
the rear climate control to the front
climate control settings. It comes on
when REAR is pressed. Independent Mode:
This mode
directs rear seating airflow
according to the settings of the rear
controls. It comes on when any rear
control is adjusted.
Fan Control: Turn clockwise or
counterclockwise to increase or
decrease the fan speed. Turn the
knob to
9to turn the fan off.
Temperature Control: Turn
clockwise or counterclockwise to
increase or decrease the airflow
temperature.
Air Delivery Mode Control: Turn
to the desired mode to change the
airflow direction.
H (Vent): Air is directed through
the overhead outlets.
) (Bi-Level): Air is directed
through the rear floor outlets, as
well as the overhead outlets.
6 (Floor): Air is directed through
the floor outlets. The rear system
floor outlets are located under the
third row seats.
Page 240 of 438

8-8 Climate Controls
Rear Climate Control System
(Rear Climate with Rear Seat Audio)
A. Fan Control
B. Air Delivery Mode Control
C. Temperature Control
For vehicles with the rear climate
control system, the controls are
located on the rear of the center
console.Press the REAR button on the front
climate control system to turn the
rear climate control system on or
off. The system also turns on if any
of the rear controls, except for the
C
are pressed. An indicator comes on
when the rear system is on.The system can also be turned off,
by pressing and holding the
C
button.
Mimic Mode:
This mode matches
the rear climate control to the front
climate control settings. It comes on
when REAR is pressed.
Independent Mode: This mode
directs rear seating airflow
according to the settings of the rear
controls. It comes on when any rear
control is adjusted.
D C(Fan Control): Press the fan
up or down buttons to increase or
decrease the fan speed.
Temperature Control: Press +
or −to increase or decrease the air
temperature. The temperature
settings will display in
0-12 increments, going from the
coolest (0) to the warmest (12)
setting.
Page 241 of 438

Climate Controls 8-9
N(Air Delivery Mode Control):
Press to manually change the
direction of the airflow. Repeatedly
press the button until the desired
mode appears on the display.
H(Vent): Air is directed through
the overhead outlets.
)(Bi-Level): Air is directed
through the rear floor outlets, as
well as the overhead outlets.
6(Floor): Air is directed through
the floor outlets. The rear system
floor outlets are located under the
third row seats.
Air Vents
Use the slider switch in the center of
the outlet, to change the direction of
the air flow. Use the thumbwheel
near the outlet to control the amount
of air flow or to shut off the airflow.
Keep all outlets open whenever
possible for best system
performance.
Operation Tips
.Clear away any ice, snow,
or leaves from the air inlets at
the base of the windshield that
can block the flow of air into the
vehicle.
.Use of non-GM approved hood
deflectors can adversely affect
the performance of the system.
.Keep the path under all seats
clear of objects to help circulate
the air inside the vehicle more
effectively.
.If fogging reoccurs while in vent
or bi-level modes with mild
temperature throughout the
vehicle, turn on the air
conditioner to reduce windshield
fogging.
Page 242 of 438

8-10 Climate Controls
2NOTES
Page 252 of 438

9-10 Driving and Operating
Blizzard Conditions
Being stuck in snow can be in a
serious situation. Stay with the
vehicle unless there is help nearby.
If possible, use theRoadside
Assistance Program
on page 13‑6.
To get help and keep everyone in
the vehicle safe:
.Turn on the hazard warning
flashers.
.Tie a red cloth to an outside
mirror.
{WARNING
Snow can trap engine exhaust
under the vehicle. This may
cause exhaust gases to get
inside. Engine exhaust contains
carbon monoxide (CO) which
cannot be seen or smelled. It can
cause unconsciousness and even
death.
(Continued)
WARNING (Continued)
If the vehicle is stuck in the snow:
.Clear away snow from around
the base of your vehicle,
especially any that is blocking
the exhaust pipe.
.Check again from time to
time to be sure snow does
not collect there.
.Open a window about 5 cm
(two inches) on the side of
the vehicle that is away from
the wind to bring in fresh air.
.Fully open the air outlets on
or under the instrument
panel.
.Adjust the Climate Control
system to a setting that
circulates the air inside the
vehicle and set the fan speed
to the highest setting. See
Climate Control System in the
Index.(Continued)
WARNING (Continued)
For more information about
carbon monoxide, see Engine
Exhaust on page 9‑22.
Snow can trap exhaust gases
under your vehicle. This can
cause deadly CO (carbon
monoxide) gas to get inside. CO
could overcome you and kill you.
You cannot see it or smell it, so
you might not know it is in your
vehicle. Clear away snow from
around the base of your vehicle,
especially any that is blocking the
exhaust.
Run the engine for short periods
only as needed to keep warm, but
be careful.
To save fuel, run the engine for only
short periods as needed to warm
the vehicle and then shut the
engine off and close the window
most of the way to save heat.
Page 267 of 438

Driving and Operating 9-25
Manual Mode
Electronic Range Select
(ERS) Mode
ERS mode allows you to choose the
top-gear limit of the transmission
and the vehicle's speed while
driving down hill or towing a trailer.
The vehicle has an electronic shift
position indicator within the
instrument panel cluster. When
using the ERS Mode a number will
display next to the L, indicating the
current gear that has been selected.
To use this feature:
1. Move the shift lever to L (Low).
2. Press the plus/minus buttonlocated on the shift lever, to
increase or decrease the gear
range available.
When you shift from D (Drive) to
L (Low), the transmission will shift to
a pre-determined lower gear range.
The highest gear available for this
pre-determined range is displayed next to the L in the DIC. See
Driver
Information Center (DIC)
on
page 5‑25for more information.
The number displayed in the DIC is
the highest gear that the
transmission will be allowed to
operate in. This means that all
gears below that number are
available. For example, when
4 (Fourth) is shown next to the L,
1 (First) through 4 (Fourth) gears are
automatically shifted by the vehicle.
The transmission will not shift into
5 (Fifth) until the + (Plus) button is
used or you shift back into D (Drive).
While in L (Low), the transmission
will prevent shifting to a lower gear
range if the engine speed is too
high. You have a brief period of time
to slow the vehicle. If vehicle speed
is not reduced within the time
allowed, the lower gear range shift
will not be completed. You must
further slow the vehicle, then press
the −(Minus) button to the desired
lower gear range. Automatic Engine Grade braking is
not available when the ERS is
active. It is available in D (Drive) for
both normal and Tow/Haul mode.
While using the ERS, cruise control
and the tow/haul mode can be used.
See Tow/Haul Mode following.
Tow/Haul Mode
_
(Tow/Haul):
The vehicle may
have a Tow/Haul mode.
The button is located on the
instrument panel under the climate
controls.
Push the button to activate the
system. Push it again to deactivate
the system. You can use this feature
to assist when towing or hauling a
heavy load.
When Tow/Haul is activated the
Tow/Haul symbol will come on the
instrument panel cluster. See
“Tow/Haul Mode” underDriving
Characteristics and Towing Tips
on
page 9‑45for more information.
Page 271 of 438

Driving and Operating 9-29
will be displayed on the Driver
Information Center (DIC):
TRACTION CONTROL OFF,
SERVICE TRACTION CONTROL,
SERVICE STABILITRAK. If these
conditions are observed, turn the
vehicle off, wait 15 seconds, and
then turn it back on again to reset
the system. If any of these
messages still appear on the Driver
Information Center (DIC), the
vehicle should be taken in for
service. For more information on the
DIC messages, seeDriver
Information Center (DIC)
on
page 5‑25.
The StabiliTrak light will flash on the
instrument panel cluster when the
system is both on and activated.
The system may be heard or felt
while it is working; this is normal.
The traction control disable button is
located on the instrument panel
below the climate controls.
The traction control part of
StabiliTrak can be turned off by
pressing and releasing the traction
control disable button.
Traction control can be turned on by
pressing and releasing the traction
control disable button if not
automatically shut off for any other
reason.
When the traction control system is
turned off, the StabiliTrak light and
the appropriate traction control off
message will be displayed on the
DIC to warn the driver. The vehicle
will still have brake-traction control
when traction control is off, but will
not be able to use the engine speed management system. See
“Traction
Control Operation” next for more
information.
When the traction control system
has been turned off, system noises
may be heard and felt as a result of
the brake-traction control working.
It is recommended to leave the
system on for normal driving
conditions, but it may be necessary
to turn the system off if the vehicle
is stuck in sand, mud, ice or snow,
and you want to “rock”the vehicle to
attempt to free it. It may also be
necessary to turn off the system
when driving in extreme off-road
conditions where high wheel spin is
required. See If the Vehicle is Stuck
on page 9‑11.
Traction Control Operation
The traction control system is part of
the StabiliTrak system. Traction
control limits wheel spin by
reducing engine power to the
wheels (engine speed management)
Page 297 of 438

Driving and Operating 9-55
They should be connected by your
dealer/retailer or a qualified service
center.
If the back-up lamp circuit is not
functional, contact your dealer/
retailer.
If a remote (non-vehicle) battery is
being charged, press the Tow/Haul
mode switch located on the center
console near the climate controls.
This will boost the vehicle system
voltage and properly charge the
battery. If the trailer is too light for
Tow/Haul mode, turn on the
headlamps (Non-HID only) as a
second way to boost the vehicle
system and charge the battery.Electric Trailer Brake Control
Wiring Provisions
These wiring provisions for an
electric trailer brake controller are
included with the vehicle as part of
the trailer wiring package. The
instrument panel contains blunt cut
wires behind the steering column for
the electric trailer brake controller.
The harness contains the following
wires:
.Red/Black: Power Supply
.White: Brake Switch Signal
.Gray: Illumination
.Dark Blue: Trailer Brake Signal
.Black: Ground
The electric trailer brake controller
should be installed by your dealer/
retailer or a qualified service center.
Conversions and
Add-Ons
Add-On Electrical
Equipment
Notice: Do not add anything
electrical to the vehicle unless
you check with your dealer/
retailer first. Some electrical
equipment can damage the
vehicle and the damage would
not be covered by the vehicle's
warranty. Some add-on electrical
equipment can keep other
components from working as
they should.
Add-on equipment can drain the
vehicle battery, even if the vehicle is
not operating.
The vehicle has an airbag system.
Before attempting to add anything
electrical to the vehicle, see
Servicing the Airbag-Equipped
Vehicle
on page 3‑41and Adding
Equipment to the Airbag-Equipped
Vehicle on page 3‑42.
Page 331 of 438

Vehicle Care 10-33
FusesUsage
A/C CLUTCH Air Conditioning
Clutch
ABS MTR Antilock Braking
System (ABS)
Motor
AFS Adaptive Forward
Lighting System
AIRBAG Airbag System
AUX POWER Auxiliary Power
AUX VACPUMP Auxiliary
Vacuum Pump
AWD All-Wheel-Drive
System
BATT 1 Battery 1
BATT 2 Battery 2
BATT 3 Battery 3
ECM Engine Control
Module
ECM 1 Engine Control
Module 1 Fuses
Usage
EMISSION 1 Emission 1
EMISSION 2 Emission 2
EVEN COILS Even Injector Coils FAN 1 Cooling Fan 1
FAN 2 Cooling Fan 2
FOG LAMP Fog Lamps
FSCM Fuel System
Control Module
HORN Horn
HTD MIR Heated Outside
Rearview Mirror
HVAC BLWR Heating,
Ventilation and
Air Conditioning
Blower
LT HI BEAM Left High-Beam
Headlamp
LT LO BEAM Left Low-Beam
Headlamp
LT PRK Left Parking Lamp Fuses
Usage
LT TRLR
STOP/TRN Trailer Left
Stoplamp and
Turn Signal
ODD COILS Odd Injector Coils
PCM IGN Powertrain Control
Module Ignition
PWR L/GATE Power Liftgate PWR
OUTLET Power Outlet
REAR
CAMERA Rear Camera
RR APO Rear Accessory
Power Outlet
RR DEFOG Rear Defogger
RR HVAC Rear Climate
Control System
RT HI BEAM Right High-Beam
Headlamp
RT LO BEAM Right Low-Beam
Headlamp