turn signal BUICK ENCLAVE 2010 Owner's Guide
[x] Cancel search | Manufacturer: BUICK, Model Year: 2010, Model line: ENCLAVE, Model: BUICK ENCLAVE 2010Pages: 438, PDF Size: 2.47 MB
Page 280 of 438
9-38 Driving and Operating
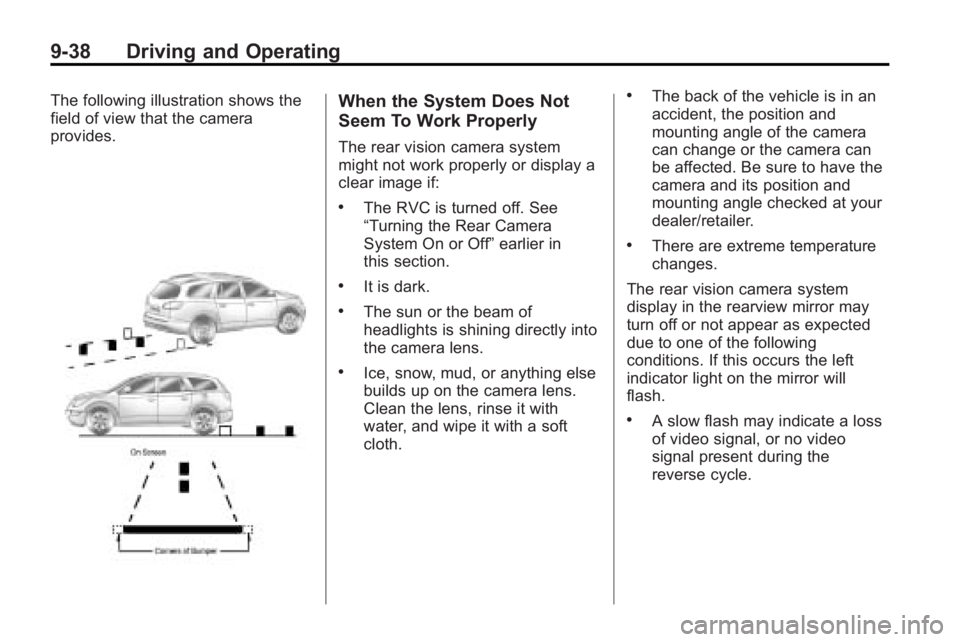
The following illustration shows the
field of view that the camera
provides.When the System Does Not
Seem To Work Properly
The rear vision camera system
might not work properly or display a
clear image if:
.The RVC is turned off. See
“Turning the Rear Camera
System On or Off”earlier in
this section.
.It is dark.
.The sun or the beam of
headlights is shining directly into
the camera lens.
.Ice, snow, mud, or anything else
builds up on the camera lens.
Clean the lens, rinse it with
water, and wipe it with a soft
cloth.
.The back of the vehicle is in an
accident, the position and
mounting angle of the camera
can change or the camera can
be affected. Be sure to have the
camera and its position and
mounting angle checked at your
dealer/retailer.
.There are extreme temperature
changes.
The rear vision camera system
display in the rearview mirror may
turn off or not appear as expected
due to one of the following
conditions. If this occurs the left
indicator light on the mirror will
flash.
.A slow flash may indicate a loss
of video signal, or no video
signal present during the
reverse cycle.
Page 290 of 438
9-48 Driving and Operating
Following Distance
Stay at least twice as far behind the
vehicle ahead as you would when
driving the vehicle without a trailer.
This can help to avoid situations
that require heavy braking and
sudden turns.
Passing
More passing distance is needed
when towing a trailer. Because the
rig is longer, it is necessary to go
farther beyond the passed vehicle
before returning to the lane.
Backing Up
Hold the bottom of the steering
wheel with one hand. To move the
trailer to the left, move that hand to
the left. To move the trailer to the
right, move your hand to the right.
Always back up slowly and,
if possible, have someone
guide you.
Making Turns
Notice:Making very sharp turns
while trailering could cause the
trailer to come in contact with the
vehicle. The vehicle could be
damaged. Avoid making very
sharp turns while trailering.
When turning with a trailer, make
wider turns than normal so the
trailer will not strike soft shoulders,
curbs, road signs, trees or other
objects. Use the turn signal well in
advance and avoid jerky or sudden
maneuvers.
Turn Signals When Towing a
Trailer
The turn signal indicators on the
instrument panel flash whenever
signaling a turn or lane change.
Properly hooked up, the trailer
lamps also flash, telling other
drivers the vehicle is turning,
changing lanes or stopping. When towing a trailer, the arrows on
the instrument panel flash for turns
even if the bulbs on the trailer are
burned out. Check occasionally to
be sure the trailer bulbs are still
working.
Driving On Grades
Reduce speed and shift to a
lower gear before starting down a
long or steep downgrade. If the
transmission is not shifted down, the
brakes might have to be used so
much that they would get hot and no
longer work well.
The vehicle can tow in D (Drive).
Use a lower gear if the transmission
shifts too often.
Page 296 of 438

9-54 Driving and Operating
Weight-Distributing Hitches and
Weight Carrying Hitches
A. Body-to-Ground Distance
B. Front of Vehicle
When using a weight-distributing
hitch, the hitch must be adjusted so
that the distance (A) remains the
same both before and after coupling
the trailer to the tow vehicle.
Safety Chains
Always attach chains between the
vehicle and the trailer. Cross the
safety chains under the tongue of
the trailer to help prevent the tongue
from contacting the road if it
becomes separated from the hitch.
Always leave just enough slack so
the rig can turn. Never allow safety
chains to drag on the ground.
Trailer Brakes
A loaded trailer that weighs more
than 450 kg (1,000 lbs) needs to
have its own brake system that is
adequate for the weight of the
trailer. Be sure to read and follow
the instructions for the trailer brakes
so they are installed, adjusted and
maintained properly.
Because the vehicle has antilock
brakes, do not try to tap into the
vehicle's hydraulic brake system.
If you do, both brake systems will
not work well, or at all.
Trailer Wiring Harness
Basic Trailer Wiring
The trailer wiring harness, with a
seven-pin connector, is located at
the rear of the vehicle and is tied to
the vehicle's frame. The harness
connector can be plugged into a
seven-pin universal heavy-duty
trailer connector available through
your dealer/retailer.
The seven-wire harness contains
the following trailer circuits:
.Yellow: Left Stop/Turn Signal
.Dark Green: Right Stop/Turn
Signal
.Brown: Taillamps
.Black: Ground
.Light Green: Back-up Lamps
.Red/Black: Battery Feed
.Dark Blue: Trailer Brake*
*The fuse for this circuit is installed
in the underhood electrical center,
but the wires are not connected.
Page 297 of 438

Driving and Operating 9-55
They should be connected by your
dealer/retailer or a qualified service
center.
If the back-up lamp circuit is not
functional, contact your dealer/
retailer.
If a remote (non-vehicle) battery is
being charged, press the Tow/Haul
mode switch located on the center
console near the climate controls.
This will boost the vehicle system
voltage and properly charge the
battery. If the trailer is too light for
Tow/Haul mode, turn on the
headlamps (Non-HID only) as a
second way to boost the vehicle
system and charge the battery.Electric Trailer Brake Control
Wiring Provisions
These wiring provisions for an
electric trailer brake controller are
included with the vehicle as part of
the trailer wiring package. The
instrument panel contains blunt cut
wires behind the steering column for
the electric trailer brake controller.
The harness contains the following
wires:
.Red/Black: Power Supply
.White: Brake Switch Signal
.Gray: Illumination
.Dark Blue: Trailer Brake Signal
.Black: Ground
The electric trailer brake controller
should be installed by your dealer/
retailer or a qualified service center.
Conversions and
Add-Ons
Add-On Electrical
Equipment
Notice: Do not add anything
electrical to the vehicle unless
you check with your dealer/
retailer first. Some electrical
equipment can damage the
vehicle and the damage would
not be covered by the vehicle's
warranty. Some add-on electrical
equipment can keep other
components from working as
they should.
Add-on equipment can drain the
vehicle battery, even if the vehicle is
not operating.
The vehicle has an airbag system.
Before attempting to add anything
electrical to the vehicle, see
Servicing the Airbag-Equipped
Vehicle
on page 3‑41and Adding
Equipment to the Airbag-Equipped
Vehicle on page 3‑42.
Page 299 of 438
Vehicle Care 10-1
Vehicle Care
General Information
General Information . . . . . . . . . . 10-2
California Proposition65 Warning . . . . . . . . . . . . . . . . . 10-3
California Perchlorate Materials Requirements . . . . 10-3
Accessories and Modifications . . . . . . . . . . . . . . . 10-3
Vehicle Checks
Doing Your OwnService Work . . . . . . . . . . . . . . . 10-4
Hood . . . . . . . . . . . . . . . . . . . . . . . . 10-4
Engine Compartment Overview . . . . . . . . . . . . . . . . . . . 10-6
Engine Cover . . . . . . . . . . . . . . . . 10-7
Engine Oil . . . . . . . . . . . . . . . . . . . 10-8
Engine Oil Life System . . . . . 10-10
Automatic Transmission Fluid . . . . . . . . . . . . . . . . . . . . . . 10-11
Engine Air Cleaner/Filter . . . . 10-12
Cooling System . . . . . . . . . . . . 10-14
Engine Coolant . . . . . . . . . . . . . 10-14
Engine Overheating . . . . . . . . 10-18 Overheated Engine
Protection
Operating Mode . . . . . . . . . . . 10-20
Power Steering Fluid . . . . . . . 10-20
Washer Fluid . . . . . . . . . . . . . . . 10-21
Brakes . . . . . . . . . . . . . . . . . . . . . 10-22
Brake Fluid . . . . . . . . . . . . . . . . . 10-23
Battery . . . . . . . . . . . . . . . . . . . . . 10-25
All-Wheel Drive . . . . . . . . . . . . . 10-25
Starter Switch Check . . . . . . . 10-25
Automatic Transmission Shift Lock Control System
Check . . . . . . . . . . . . . . . . . . . . . 10-26
Ignition Transmission Lock Check . . . . . . . . . . . . . . . . . . . . . 10-26
Park Brake and P (Park) Mechanism Check . . . . . . . . 10-26
Wiper Blade Replacement . . . . . . . . . . . . . . 10-27
Windshield Replacement . . . 10-28
Headlamp Aiming
Headlamp Aiming . . . . . . . . . . 10-28
Bulb Replacement
Bulb Replacement . . . . . . . . . . 10-28
Halogen Bulbs . . . . . . . . . . . . . . 10-28
High Intensity Discharge (HID) Lighting . . . . . . . . . . . . . 10-29 Taillamps, Turn Signal,
Sidemarker, and
Stoplamps . . . . . . . . . . . . . . . . 10-29
License Plate Lamp . . . . . . . . 10-30
Replacement Bulbs . . . . . . . . . 10-30
Electrical System
High Voltage Devices and Wiring . . . . . . . . . . . . . . . . . . . . . 10-30
Electrical System Overload . . . . . . . . . . . . . . . . . . 10-31
Fuses and Circuit Breakers . . . . . . . . . . . . . . . . . . 10-31
Engine Compartment Fuse Block . . . . . . . . . . . . . . . . . . . . . 10-31
Instrument Panel Fuse Block . . . . . . . . . . . . . . . . . . . . . 10-35
Wheels and Tires
Tires . . . . . . . . . . . . . . . . . . . . . . . . 10-37
Tire Sidewall Labeling . . . . . . 10-38
Tire Designations . . . . . . . . . . . 10-40
Tire Terminology and
Definitions . . . . . . . . . . . . . . . . 10-41
Tire Pressure . . . . . . . . . . . . . . . 10-44
Tire Pressure Monitor System . . . . . . . . . . . . . . . . . . . 10-45
Tire Pressure Monitor Operation . . . . . . . . . . . . . . . . . 10-46
Page 327 of 438
Vehicle Care 10-29
High Intensity Discharge
(HID) Lighting
{WARNING
The low beam high intensity
discharge lighting system
operates at a very high voltage.
If you try to service any of the
system components, you could be
seriously injured. Have your
dealer/retailer or a qualified
technician service them.
The up–level vehicle has HID
headlamps. The park lamp function
is also a function of the HID
headlamp. After an HID headlamp
bulb has been replaced, the beam
might be a slightly different shade
than it was originally. This is normal.
Taillamps, Turn Signal,
Sidemarker, and
Stoplamps
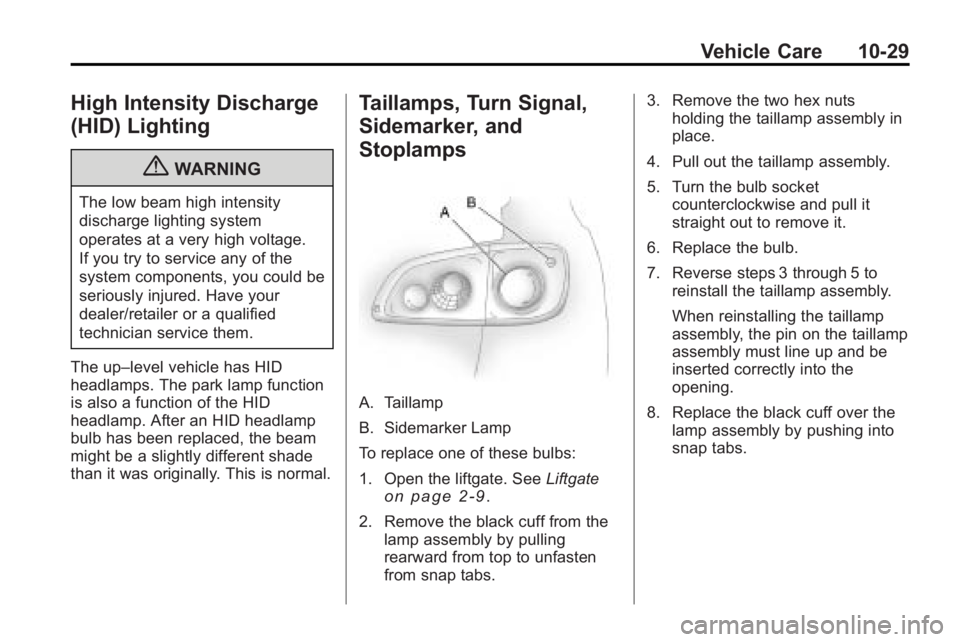
A. Taillamp
B. Sidemarker Lamp
To replace one of these bulbs:
1. Open the liftgate. See Liftgate
on page 2‑9.
2. Remove the black cuff from the lamp assembly by pulling
rearward from top to unfasten
from snap tabs. 3. Remove the two hex nuts
holding the taillamp assembly in
place.
4. Pull out the taillamp assembly.
5. Turn the bulb socket counterclockwise and pull it
straight out to remove it.
6. Replace the bulb.
7. Reverse steps 3 through 5 to reinstall the taillamp assembly.
When reinstalling the taillamp
assembly, the pin on the taillamp
assembly must line up and be
inserted correctly into the
opening.
8. Replace the black cuff over the lamp assembly by pushing into
snap tabs.
Page 328 of 438
10-30 Vehicle Care
License Plate Lamp
To replace one of these bulbs:
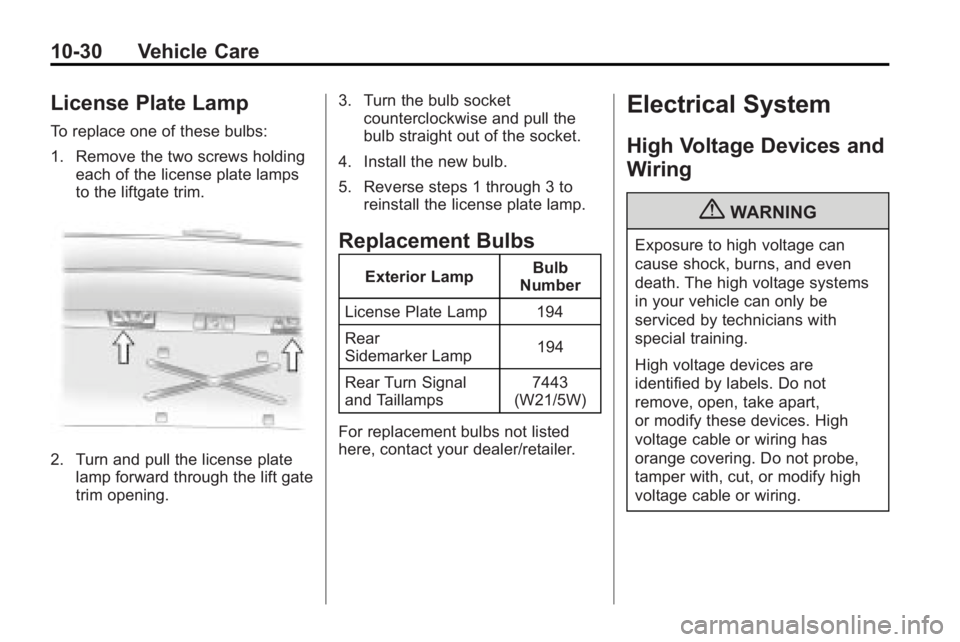
1. Remove the two screws holdingeach of the license plate lamps
to the liftgate trim.
2. Turn and pull the license plate
lamp forward through the lift gate
trim opening. 3. Turn the bulb socket
counterclockwise and pull the
bulb straight out of the socket.
4. Install the new bulb.
5. Reverse steps 1 through 3 to reinstall the license plate lamp.
Replacement Bulbs
Exterior Lamp Bulb
Number
License Plate Lamp 194
Rear
Sidemarker Lamp 194
Rear Turn Signal
and Taillamps 7443
(W21/5W)
For replacement bulbs not listed
here, contact your dealer/retailer.
Electrical System
High Voltage Devices and
Wiring
{WARNING
Exposure to high voltage can
cause shock, burns, and even
death. The high voltage systems
in your vehicle can only be
serviced by technicians with
special training.
High voltage devices are
identified by labels. Do not
remove, open, take apart,
or modify these devices. High
voltage cable or wiring has
orange covering. Do not probe,
tamper with, cut, or modify high
voltage cable or wiring.
Page 331 of 438
Vehicle Care 10-33
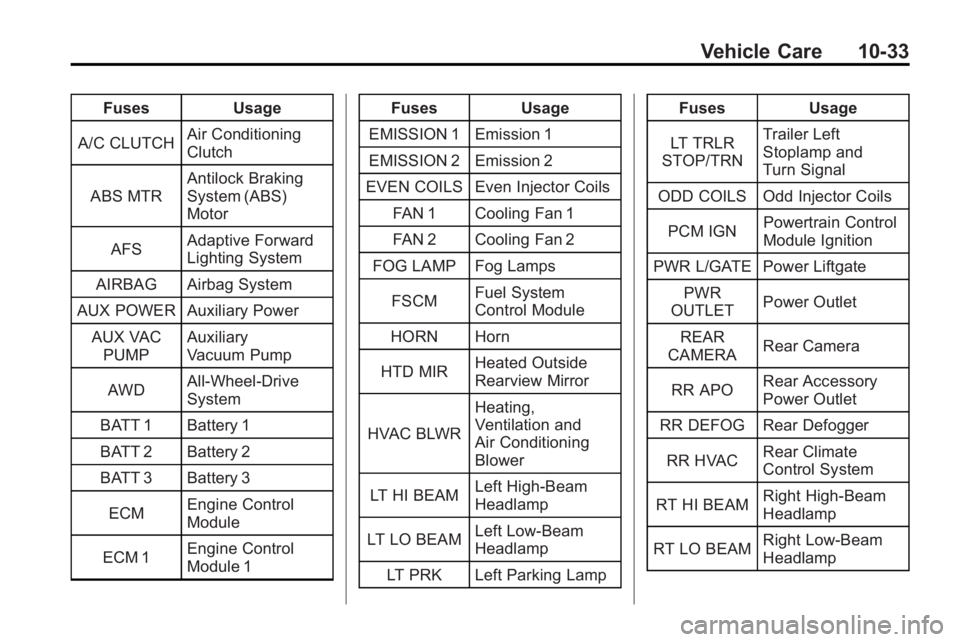
FusesUsage
A/C CLUTCH Air Conditioning
Clutch
ABS MTR Antilock Braking
System (ABS)
Motor
AFS Adaptive Forward
Lighting System
AIRBAG Airbag System
AUX POWER Auxiliary Power
AUX VACPUMP Auxiliary
Vacuum Pump
AWD All-Wheel-Drive
System
BATT 1 Battery 1
BATT 2 Battery 2
BATT 3 Battery 3
ECM Engine Control
Module
ECM 1 Engine Control
Module 1 Fuses
Usage
EMISSION 1 Emission 1
EMISSION 2 Emission 2
EVEN COILS Even Injector Coils FAN 1 Cooling Fan 1
FAN 2 Cooling Fan 2
FOG LAMP Fog Lamps
FSCM Fuel System
Control Module
HORN Horn
HTD MIR Heated Outside
Rearview Mirror
HVAC BLWR Heating,
Ventilation and
Air Conditioning
Blower
LT HI BEAM Left High-Beam
Headlamp
LT LO BEAM Left Low-Beam
Headlamp
LT PRK Left Parking Lamp Fuses
Usage
LT TRLR
STOP/TRN Trailer Left
Stoplamp and
Turn Signal
ODD COILS Odd Injector Coils
PCM IGN Powertrain Control
Module Ignition
PWR L/GATE Power Liftgate PWR
OUTLET Power Outlet
REAR
CAMERA Rear Camera
RR APO Rear Accessory
Power Outlet
RR DEFOG Rear Defogger
RR HVAC Rear Climate
Control System
RT HI BEAM Right High-Beam
Headlamp
RT LO BEAM Right Low-Beam
Headlamp
Page 332 of 438
10-34 Vehicle Care
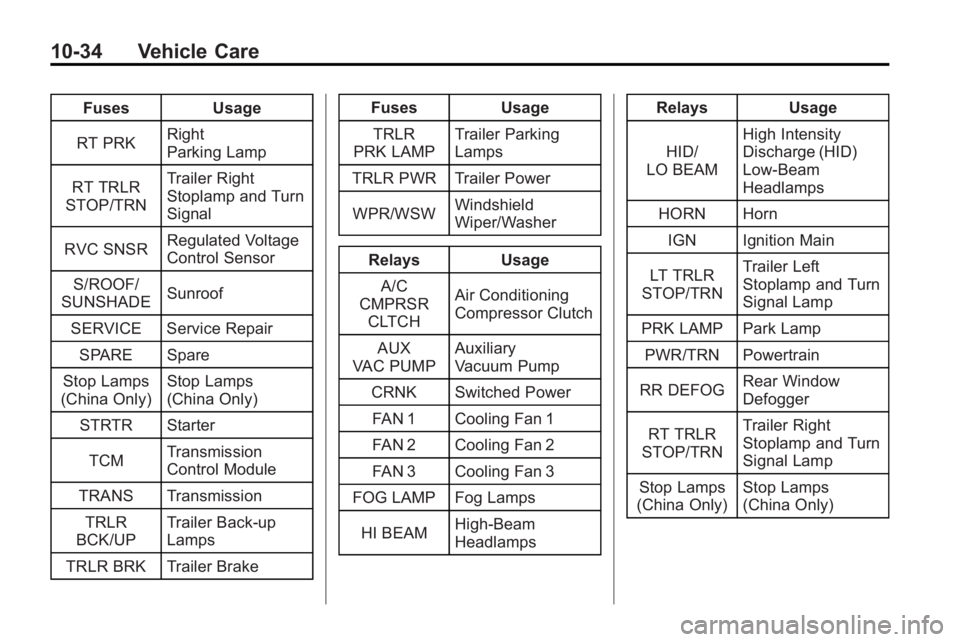
FusesUsage
RT PRK Right
Parking Lamp
RT TRLR
STOP/TRN Trailer Right
Stoplamp and Turn
Signal
RVC SNSR Regulated Voltage
Control Sensor
S/ROOF/
SUNSHADE Sunroof
SERVICE Service Repair SPARE Spare
Stop Lamps
(China Only) Stop Lamps
(China Only)
STRTR Starter
TCM Transmission
Control Module
TRANS Transmission TRLR
BCK/UP Trailer Back-up
Lamps
TRLR BRK Trailer Brake Fuses
Usage
TRLR
PRK LAMP Trailer Parking
Lamps
TRLR PWR Trailer Power
WPR/WSW Windshield
Wiper/Washer
Relays Usage
A/C
CMPRSR CLTCH Air Conditioning
Compressor Clutch
AUX
VAC PUMP Auxiliary
Vacuum Pump
CRNK Switched Power FAN 1 Cooling Fan 1
FAN 2 Cooling Fan 2
FAN 3 Cooling Fan 3
FOG LAMP Fog Lamps
HI BEAM High-Beam
Headlamps Relays
Usage
HID/
LO BEAM High Intensity
Discharge (HID)
Low-Beam
Headlamps
HORN Horn
IGN Ignition Main
LT TRLR
STOP/TRN Trailer Left
Stoplamp and Turn
Signal Lamp
PRK LAMP Park Lamp PWR/TRN Powertrain
RR DEFOG Rear Window
Defogger
RT TRLR
STOP/TRN Trailer Right
Stoplamp and Turn
Signal Lamp
Stop Lamps
(China Only) Stop Lamps
(China Only)
Page 334 of 438

10-36 Vehicle Care
FusesUsage
HVAC Heating,
Ventilation and
Air Conditioning
INADV/
PWR/LED Inadvertent
Power LED
INFOTMNT Infotainment
LT/TRN/SIG Driver Side Turn
Signal
MSM Memory Seat
Module
PDM Power Mirrors,
Liftgate Release
PWR MODE Power Mode
PWR/MIR Power Mirrors RDO Radio
REAR WPR Rear Wiper
RT/TRN/SIG Passenger Side
Turn Signal
SPARE Spare
STR/WHL/ ILLUM Steering Wheel
Illumination
Relay Side Relays Usage
LT/PWR/ SEAT Driver Side Power
Seat Relay
RT/PWR/ SEAT Passenger Side
Power Seat Relay
PWR/WNDW Power Windows
Relay
PWR/
COLUMN Power Steering
Column Relay
L/GATE Liftgate Relay
LCK Power Lock Relay
REAR/WSW Rear Window
Washer Relay
UNLCK Power Unlock
Relay