key BUICK ENCLAVE 2010 Manual Online
[x] Cancel search | Manufacturer: BUICK, Model Year: 2010, Model line: ENCLAVE, Model: BUICK ENCLAVE 2010Pages: 438, PDF Size: 2.47 MB
Page 279 of 438

Driving and Operating 9-37
Symbols
The navigation system may have a
feature that lets the driver view
symbols on the navigation screen
while using the rear vision camera.
The Ultrasonic Rear Park Assist
(URPA) system must not be
disabled to use the caution symbols.
If URPA has been disabled and the
symbols have been turned on, the
Rear Parking Assist Symbols
Unavailable error message may
display. SeeUltrasonic Parking
Assist on page 9‑33.
The symbols appear when an object
has been detected by the URPA
system. The symbol may cover the
object when viewing the navigation
screen.
To turn the symbols on or off:
1. Make sure that URPA has not been disabled.
2. Shift into P (Park). 3. Press the MENU hard key to
enter the configure menu
options, then press the MENU
hard key repeatedly until Display
is selected or touch the Display
screen button.
4. Select the Rear Camera Options screen button. The Rear Camera
Options screen will display.
5. Touch the Symbols screen button. The screen button will be
highlighted when on.
Rear Vision Camera Error
Messages
Service Rear Vision Camera
System: This message can display
when the system is not receiving
information it requires from other
vehicle systems.
If any other problem occurs or if a
problem persists, see your dealer/
retailer.Rear Vision Camera Location
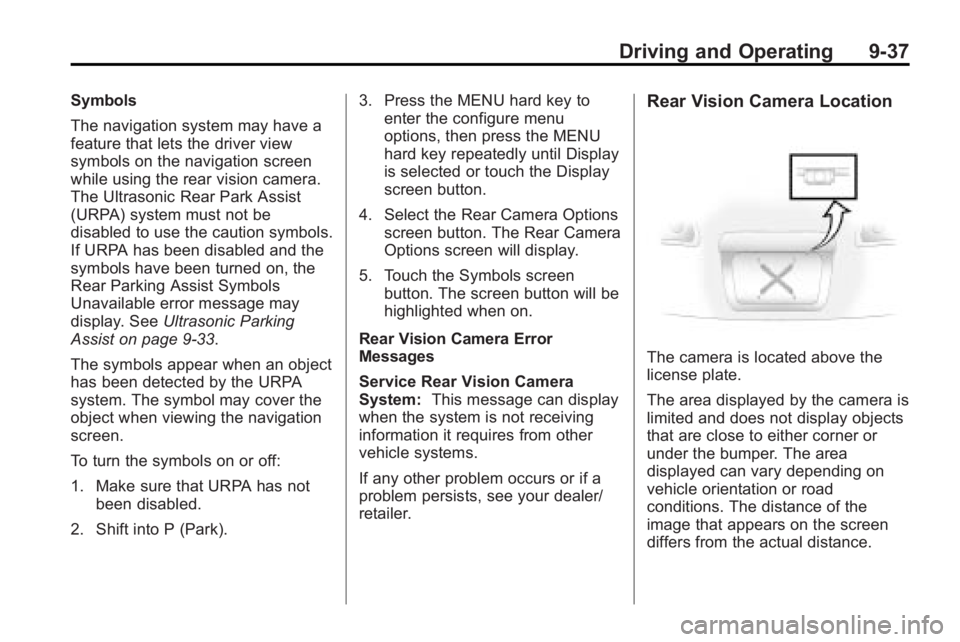
The camera is located above the
license plate.
The area displayed by the camera is
limited and does not display objects
that are close to either corner or
under the bumper. The area
displayed can vary depending on
vehicle orientation or road
conditions. The distance of the
image that appears on the screen
differs from the actual distance.
Page 301 of 438

Vehicle Care 10-3
California Proposition 65
Warning
Most motor vehicles, including this
one, contain and/or emit chemicals
known to the State of California to
cause cancer and birth defects or
other reproductive harm. Engine
exhaust, many parts and systems,
many fluids, and some component
wear by-products contain and/or
emit these chemicals.
California Perchlorate
Materials Requirements
Certain types of automotive
applications, such as airbag
initiators, seat belt pretensioners,
and lithium batteries contained in
remote keyless transmitters, may
contain perchlorate materials.
Special handling may be necessary.
For additional information, see
www.dtsc.ca.gov/hazardouswaste/
perchlorate.
Accessories and
Modifications
Adding non-dealer/non-retailer
accessories to the vehicle can affect
vehicle performance and safety,
including such things as airbags,
braking, stability, ride and handling,
emissions systems, aerodynamics,
durability, and electronic systems
like antilock brakes, traction control,
and stability control. Some of these
accessories could even cause
malfunction or damage not covered
by the vehicle warranty.
Damage to vehicle components
resulting from the installation or use
of non-GM certified parts, including
control module modifications, are
not covered under the terms of the
vehicle warranty and may affect
remaining warranty coverage for
affected parts.GM Accessories are designed to
complement and function with other
systems on the vehicle. Your GM
dealer/retailer can accessorize the
vehicle using genuine GM
Accessories. When you go to your
GM dealer/retailer and ask for GM
Accessories, you will know that
GM-trained and supported service
technicians will perform the work
using genuine GM Accessories.
Also, see
Adding Equipment to the
Airbag-Equipped Vehicle
on
page 3‑42.
Page 309 of 438

Vehicle Care 10-11
To reset the Engine Oil Life System:
1. Turn the ignition to ON/RUN,with the engine off.
2. Press the vehicle information button until OIL LIFE
REMAINING displays.
3. Press and hold the set/reset button until 100% is displayed.
Three chimes sound and the
CHANGE ENGINE OIL SOON
message goes off.
4. Turn the key to LOCK/OFF.
If the CHANGE ENGINE OIL SOON
message comes back on when the
vehicle is started, the engine oil life
system has not reset. Repeat the
procedure.What to Do with Used Oil
Used engine oil contains certain
elements that can be unhealthy for
your skin and could even cause
cancer. Do not let used oil stay on
your skin for very long. Clean your
skin and nails with soap and water,
or a good hand cleaner. Wash or
properly dispose of clothing or rags
containing used engine oil. See the
manufacturer's warnings about the
use and disposal of oil products.
Used oil can be a threat to the
environment. If you change your
own oil, be sure to drain all the oil
from the filter before disposal. Never
dispose of oil by putting it in the
trash, pouring it on the ground, into
sewers, or into streams or bodies of
water. Recycle it by taking it to a
place that collects used oil.
Automatic Transmission
Fluid
It is not necessary to check the
transmission fluid level.
A transmission fluid leak is the only
reason for fluid loss. If a leak
occurs, take the vehicle to the
dealer/retailer and have it repaired
as soon as possible.
Change the fluid at the intervals
listed in Scheduled Maintenance
on
page 11‑2, and be sure to use the
transmission fluid listed in
Recommended Fluids and
Lubricants on page 11‑7.
Page 319 of 438

Vehicle Care 10-21
When to Check Power Steering
Fluid
It is not necessary to regularly
check power steering fluid unless
you suspect there is a leak in the
system or you hear an unusual
noise. A fluid loss in this system
could indicate a problem. Have the
system inspected and repaired.
How to Check Power Steering
Fluid
To check the power steering fluid:
1. Turn the key off and let theengine compartment cool down.
2. Remove the engine cover. See Engine Cover on page 10‑7.
3. Wipe the cap and the top of the reservoir clean. 4. Unscrew the cap and wipe the
dipstick with a clean rag.
5. Replace the cap and completely tighten it.
6. Remove the cap again and look at the fluid level on the dipstick.
The fluid level should be
somewhere between MAX and
MIN line on the dipstick in room
temperature. If the fluid is on or
below MIN line, you should add fluid
close to MAX Line.
What to Use
To determine what kind of fluid to
use, see Recommended Fluids and
Lubricants
on page 11‑7. Always
use the proper fluid. Notice:
Use of the incorrect fluid
may damage the vehicle and the
damages may not be covered by
the vehicle's warranty. Always
use the correct fluid listed in
Recommended Fluids and
Lubricants on page 11‑7.
Washer Fluid
What to Use
When adding windshield washer
fluid, be sure to read the
manufacturer's instructions before
use. If the vehicle will be operating
in an area where the temperature
may fall below freezing, use a fluid
that has sufficient protection against
freezing.
Page 324 of 438

10-26 Vehicle Care
Automatic Transmission
Shift Lock Control
System Check
{WARNING
When you are doing this
inspection, the vehicle could
move suddenly. If the vehicle
moves, you or others could be
injured.
1. Before starting this check, be sure there is enough room
around the vehicle. It should be
parked on a level surface.
2. Firmly apply the parking brake. See Parking Brake
on
page 9‑27.
Be ready to apply the regular
brake immediately if the vehicle
begins to move. 3. With the engine off, turn the
ignition to ON/RUN, but do not
start the engine. Without
applying the regular brake, try to
move the shift lever out of
P (Park) with normal effort. If the
shift lever moves out of P (Park),
contact your dealer/retailer for
service.
Ignition Transmission
Lock Check
While parked, and with the parking
brake set, try to turn the ignition to
LOCK/OFF in each shift lever
position.
.The ignition should turn to
LOCK/OFF only when the shift
lever is in P (Park).
.The ignition key should come
out only in LOCK/OFF.
Contact your dealer/retailer if
service is required.
Park Brake and P (Park)
Mechanism Check
{WARNING
When you are doing this check,
the vehicle could begin to move.
You or others could be injured
and property could be damaged.
Make sure there is room in front
of the vehicle in case it begins to
roll. Be ready to apply the regular
brake at once should the vehicle
begin to move.
Page 347 of 438

Vehicle Care 10-49
The TPMS sensors can also be
matched to each tire/wheel position
by increasing or decreasing the
tire's air pressure. If increasing the
tire's air pressure, do not exceed
the maximum inflation pressure
indicated on the tire's sidewall.
To decrease air-pressure out of a
tire you can use the pointed end of
the valve cap, a pencil-style air
pressure gage, or a key.
You have two minutes to match the
first tire/wheel position, and
five minutes overall to match all
four tire/wheel positions. If it takes
longer than two minutes, to match
the first tire and wheel, or more than
five minutes to match all four tire
and wheel positions the matching
process stops and you need to
start over.
The TPMS sensor matching process
is outlined below:
1. Set the parking brake.
2. Turn the ignition switch to ON/RUN with the engine off. 3. Press the Remote Keyless Entry
(RKE) transmitter's LOCK and
UNLOCK buttons at the same
time for approximately
five seconds. The horn sounds
twice to signal the receiver is in
relearn mode and TIRE
LEARNING ACTIVE message
displays on the DIC screen.
4. Start with the driver side front tire.
5. Remove the valve cap from the valve cap stem. Activate the
TPMS sensor by increasing or
decreasing the tire's air pressure
for five seconds, or until a horn
chirp sounds. The horn chirp,
which may take up to
30 seconds to sound, confirms
that the sensor identification
code has been matched to this
tire and wheel position.
6. Proceed to the passenger side front tire, and repeat the
procedure in Step 5. 7. Proceed to the passenger side
rear tire, and repeat the
procedure in Step 5.
8. Proceed to the driver side rear tire, and repeat the procedure in
Step 5. The horn sounds two
times to indicate the sensor
identification code has been
matched to the driver side rear
tire, and the TPMS sensor
matching process is no longer
active. The TIRE LEARNING
ACTIVE message on the DIC
display screen goes off.
9. Turn the ignition switch to LOCK/OFF.
10. Set all four tires to the recommended air pressure
level as indicated on the Tire
and Loading Information label.
11. Put the valve caps back on the valve stems.
Page 369 of 438

Vehicle Care 10-71
Removing the Flat Tire and
Installing the Spare Tire
1. Do a safety check beforeproceeding. See If a Tire Goes
Flat
on page 10‑58for more
information.
2. If the vehicle has a wheel cover, loosen the plastic nut caps with
the wheel wrench. They will not
come off. Then, using the flat
end of the wheel wrench, pry
along the edge of the cover until
it comes off. Be careful; the
edges may be sharp. Do not try
to remove the cover with your
bare hands.
Store the wheel cover securely
in the rear of the vehicle until
you have the flat tire repaired or
replaced.
If the vehicle has aluminum
wheels, remove the wheel nut
caps using the wheel wrench.
3. Loosen the wheel nuts —but do
not remove them —using the
lug wrench. For wheels with a
wheel lock key, use the wheel
lock key between the lock nut
and lug wrench. The key is
supplied in the front passenger
door pocket. Notice:
If this vehicle has wheel
locks and an impact wrench is
used to remove the wheel nuts,
the lock nut or wheel lock key
could be damaged. Do not use an
impact wrench to remove the
wheel nuts if this vehicle has
wheel locks.
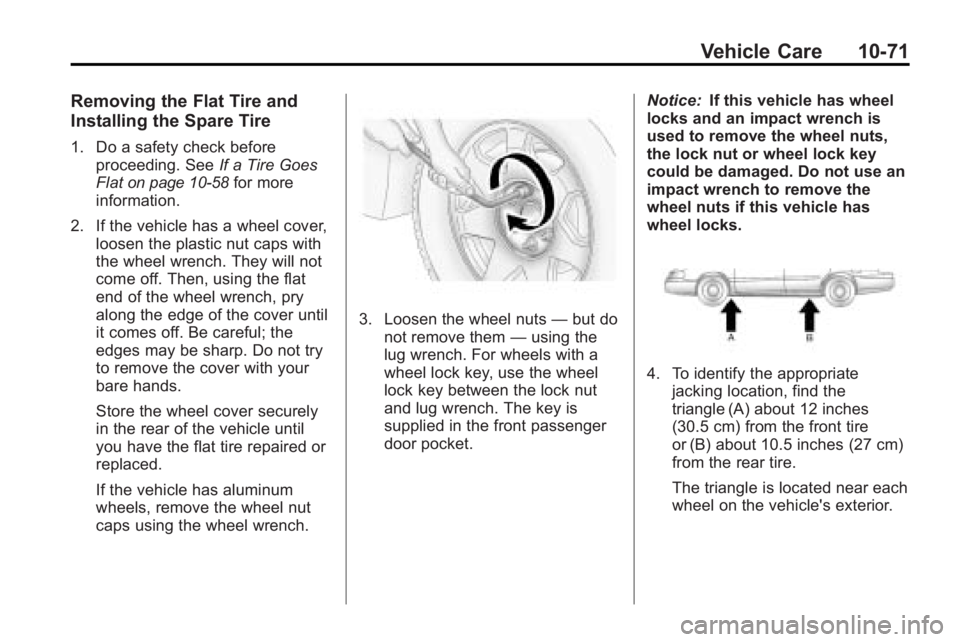
4. To identify the appropriate
jacking location, find the
triangle (A) about 12 inches
(30.5 cm) from the front tire
or (B) about 10.5 inches (27 cm)
from the rear tire.
The triangle is located near each
wheel on the vehicle's exterior.
Page 385 of 438

Vehicle Care 10-87
Once the destination is reached:
1. Set the parking brake.
2. Reinstall the 50 amp BATT1 fuseto the underhood fuse block.
3. Shift the transmission to P (Park), turn the ignition to
LOCK/OFF and remove the key
from the ignition.
4. Disconnect the vehicle from the towing vehicle.
Notice: Do not tow a vehicle with
the front drive wheels on the
ground if one of the front tires is
a compact spare tire. Towing with
two different tire sizes on the
front of the vehicle can cause
severe damage to the
transmission.Dolly Towing
(All-Wheel-Drive Vehicles)
All-wheel-drive vehicles must not be
towed with two wheels on the
ground. To properly tow these
vehicles, they should be placed on
a platform trailer with all four wheels
off of the ground or dinghy towed
from the front.
Dolly Towing
(Front-Wheel-Drive
Vehicles Only)
To tow a front-wheel-drive vehicle
from the front with two wheels on
the ground:
1. Put the front wheels on a dolly.
2. Move the shift lever to P (Park).
3. Set the parking brake.
Page 386 of 438

10-88 Vehicle Care
4. Clamp the steering wheel in astraight-ahead position with a
clamping device designed for
towing.
5. Remove the key from the ignition.
6. Secure the vehicle to the dolly.
7. Release the parking brake.
Towing the Vehicle From
the Rear
Notice: Towing the vehicle from
the rear could damage it. Also,
repairs would not be covered by
the vehicle warranty. Never have
the vehicle towed from the rear.
Do not tow the vehicle from the rear.
Appearance Care
Exterior Care
Cleaning Exterior Lamps/
Lenses
Use only lukewarm or cold water, a
soft cloth and a car washing soap to
clean exterior lamps and lenses.
Follow instructions under “Washing
the Vehicle” later in this section.
Finish Care
Occasional waxing or mild polishing
of the vehicle by hand may be
necessary to remove residue from
the paint finish. Approved cleaning
products can be obtained from your
dealer/retailer.
If the vehicle has a basecoat/
clearcoat paint finish, the clearcoat
gives more depth and gloss to the
colored basecoat. Always use
waxes and polishes that are
non-abrasive and made for a
basecoat/clearcoat paint finish.
Page 398 of 438

11-4 Service and Maintenance
.Body hinges and latches, key
lock cylinders, hood latch
assemblies, secondary latches,
pivots, spring anchor and
release pawl, hood and door
hinges, rear folding seats, and
liftgate hinges lubrication. See
Recommended Fluids and
Lubricants
on page 11‑7. More
frequent lubrication may be
required when vehicle is
exposed to a corrosive
environment. Applying silicone
grease on weatherstrips with a
clean cloth makes them last
longer, seal better, and not stick
or squeak.
.Restraint system component
check. See Safety System
Check on page 3‑28.
.Engine air cleaner filter
inspection. See Engine Air
Cleaner/Filter on page 10‑12.
Additional Required Services
At Each Fuel Stop
.Engine oil level check. See
Engine Oil on page 10‑8.
.Engine coolant level check. See
Engine Coolant on page 10‑14.
.Windshield washer fluid level
check. See Washer Fluidon
page 10‑21.
Once a Month
.Tire inflation check. See Tire
Pressure on page 10‑44.
.Tire wear inspection. See Tire
Inspection on page 10‑50.
Once a Year
.See Starter Switch Checkon
page 10‑25.
.See Automatic Transmission
Shift Lock Control System
Check on page 10‑26.
.See Ignition Transmission Lock
Check on page 10‑26.
.See Park Brake and P (Park)
Mechanism Checkon
page 10‑26.
.Engine cooling system and
pressure cap pressure check.
Radiator and air conditioning
condenser outside cleaning. See
Cooling System on page 10‑14.
.Exhaust system and nearby heat
shields inspection for loose or
damaged components.
.Accelerator pedal check for
damage, high effort, or binding.
Replace if needed.
.If the vehicle has a Tire Sealant
and Compressor Kit, check the
sealant expiration date printed
on the instruction label of the kit.
See Tire Sealant and
Compressor Kit on page 10‑60.
First Engine Oil Change After
Every 40 000 km/25,000 Miles
.Fuel system inspection for
damage or leaks.