Connect to phone BUICK ENCLAVE 2010 Owner's Manual
[x] Cancel search | Manufacturer: BUICK, Model Year: 2010, Model line: ENCLAVE, Model: BUICK ENCLAVE 2010Pages: 438, PDF Size: 2.47 MB
Page 21 of 438
In Brief 1-15
Setting the Clock
To set the time and date for the
radio with CD, DVD, and USB Port:
1. Turn the ignition key to ACC/ACCESSORY or ON/RUN, then
press
O, to turn the radio on.
2. Press
Gto display HR, MIN,
MM, DD, YYYY (hour, minute,
month, day, and year).
3. Press the pushbutton located under any one of the labels to be
changed.
4. To increase or decrease the time or date, turn
fclockwise or
counter-clockwise.
For detailed instructions on setting
the clock for the vehicles specific
audio system, see Clock
on
page 5‑8.
Satellite Radio
Vehicles with an XM™ Satellite
Radio tuner and a valid XM Satellite
Radio subscription can receive XM
programming.
XM Satellite Radio Service
XM is a satellite radio service that is
based in the 48 contiguous United
States and 10 Canadian provinces.
XM Satellite Radio has a wide
variety of programming and
commercial-free music,
coast-to-coast, and in digital-quality
sound. A fee is required to receive
the XM service. For more
information, contact XM at in the
U.S. and Canada.
For more information refer to:
.www.xmradio.com or call
1-800-929-2100 (U.S.).
.www.xmradio.ca or call
1-877-438-9677 (Canada).
See Satellite Radio on page 7‑7.
Portable Audio Devices
This vehicle may have an auxiliary
input located on the radio faceplate
and a USB port located in the center
console. External devices such as
iPod
®, laptop computers, MP3
players, CD changers, USB storage
device, etc. can be connected to the
auxiliary port using a 3.5 mm (1/8 in)
input jack or the USB port
depending on the audio system.
See Auxiliary Devices
on
page 7‑32.
Bluetooth®
The in-vehicle Bluetooth
system allows users with a
Bluetooth-enabled cell phone to
make and receive hands-free calls
using the vehicle’ s audio system,
microphone and controls.
Page 126 of 438
5-8 Instruments and Controls
If the DIC display does not show a
heading, for example, N for North,
or the heading does not change
after making turns, there may be a
strong magnetic field interfering with
the compass. Such interference
may be caused by a magnetic CB or
cell phone antenna mount, a
magnetic emergency light, magnetic
note pad holder, or any other
magnetic item. Turn off the vehicle,
move the magnetic item, then turn
on the vehicle and calibrate the
compass.
To calibrate the compass, use the
following procedure:
Compass Calibration Procedure
1. Before calibrating the compass,make sure the compass zone is
set to the variance zone in which
the vehicle is located. See
“Compass Variance (Zone)
Procedure” earlier in this
section. Do not operate any switches
such as window, sunroof,
climate controls, seats, etc.
during the calibration procedure.
2. Press the vehicle information button until PRESS
VTO
CALIBRATE COMPASS
displays.
3. Press the set/reset button to start the compass calibration.
4. The DIC will display CALIBRATING: DRIVE IN
CIRCLES. Drive the vehicle in
tight circles at less than 5 mph
(8 km/h) to complete the
calibration. The DIC will display
CALIBRATION COMPLETE
for a few seconds when the
calibration is complete. The DIC
display will then return to the
previous menu.
Clock
The vehicle has an analog clock
and a digital radio clock. The digital
radio clock can be enabled or
disabled.
Setting the Analog Clock
The analog clock is located on the
instrument panel above the radio.
The clock is not connected with any
other vehicle system and runs by
itself. To adjust the time:
1. Push and hold the button
located directly above the clock
to advance the clock hands.
Holding the button down causes
the clock to advance faster.
2. Push and release the button to increase the time by one minute
increments.
Page 210 of 438
7-32 Infotainment System
4. Turnfto scroll through the
folders or files in the
selected menu.
5. Press
fto select the file to be
played.
To skip through large lists, the five
softkeys can be used to navigate in
the following order:
.First softkey, first item in the list.
.Second softkey, 1% through the
list each time the softkey is
pressed.
.Third softkey, 5% through the list
each time the softkey is pressed.
.Fourth softkey, 10% through the
list each time the softkey is
pressed.
.Fifth softkey, end of the list.
Repeat Functionality
To use Repeat:
Press the softkey below
"or'
to select between Repeat All and
Repeat Track.
"(Repeat All): Press the softkey
below
"to repeat all tracks. The
tab appears lowered when Repeat
All is being used. This is the default
mode when a USB storage device
or iPod is first connected.
'(Repeat Track): Press the
softkey below
'to repeat one
track. The tab appears raised when
Repeat Track is being used.
Shuffle Functionality
To use Shuffle:
Press the softkey below
>,2,
Shuffle Songs, Shuffle Album,
or Shuffle Folder.
>(Shuffle Off): This is the
default mode when a USB storage
device or iPod is first connected.
2(Shuffle All Songs / Shuffle
Songs): Shuffles all songs on the
USB storage device or iPod.
<(Shuffle Album): Shuffles all
songs in the current album on
an iPod.
=(Shuffle Folder): Shuffles all
songs in the current folder on a USB
storage device.
Auxiliary Devices
The vehicle may have a 3.5 mm
(1/8 in) auxiliary input jack located
on the lower right side of the
faceplate and for vehicles with a
USB port, it is located in the center
console.
Using the 3.5 mm (1/8 in)
Auxiliary Input Jack
The auxiliary input jack is located on
the lower right side of the faceplate.
This is not an audio output; do not
plug a headphone set into the front
auxiliary input jack. Connect an
auxiliary input device such as an
iPod
®, laptop computer, MP3 player,
CD player, or cassette tape player,
Page 212 of 438
7-34 Infotainment System
page 7‑26for information about
how to connect and control a USB
storage device or an iPod.
USB Supported Devices
.USB Flash Drives
.Portable USB Hard Drives
.Fifth generation or later iPod
.iPod nanos
.iPod touch
.iPod classic
Not all iPods and USB Drives are
compatible with the USB port.
Make sure the iPod has the latest
firmware from Apple
®for proper
operation. iPod firmware can be
updated using the latest iTunes
®
application. See www.apple.com/
itunes.
For help with identifying your iPod,
go to www.apple.com/support.
Rear Seat
Infotainment
Rear Seat Entertainment
(RSE) System
The vehicle may have a DVD Rear
Seat Entertainment (RSE) system.
The RSE system works with the
vehicle's audio system. The DVD
player is part of the front radio. The
RSE system includes a radio with a
DVD player, a video display screen,
audio/video jacks, two wireless
headphones, and a remote control.
See Operation
on page 7‑2for
more information on the vehicle's
audio/DVD system.
Before Driving
The RSE is designed for rear seat
passengers only. The driver cannot
safely view the video screen while
driving and should not try to do so. In severe or extreme weather
conditions the RSE system might or
might not work until the temperature
is within the operating range. The
operating range for the RSE system
is above
−4°F (−20°C) or below
140°F (60°C). If the temperature of
the vehicle is outside of this range,
heat or cool the vehicle until the
temperature is within the operating
range of the RSE system.
Parental Control
The RSE system may have a
Parental Control feature, depending
on the radio. To enable Parental
Control, press and hold the radio
power button for more than
two seconds to stop all system
features such as: radio, video
screen, RSA, DVD and/or CD. While
Parental Control is on,
Qdisplays.
When the radio is turned back on,
Parental Control is unlocked.
Page 213 of 438
Infotainment System 7-35
Headphones
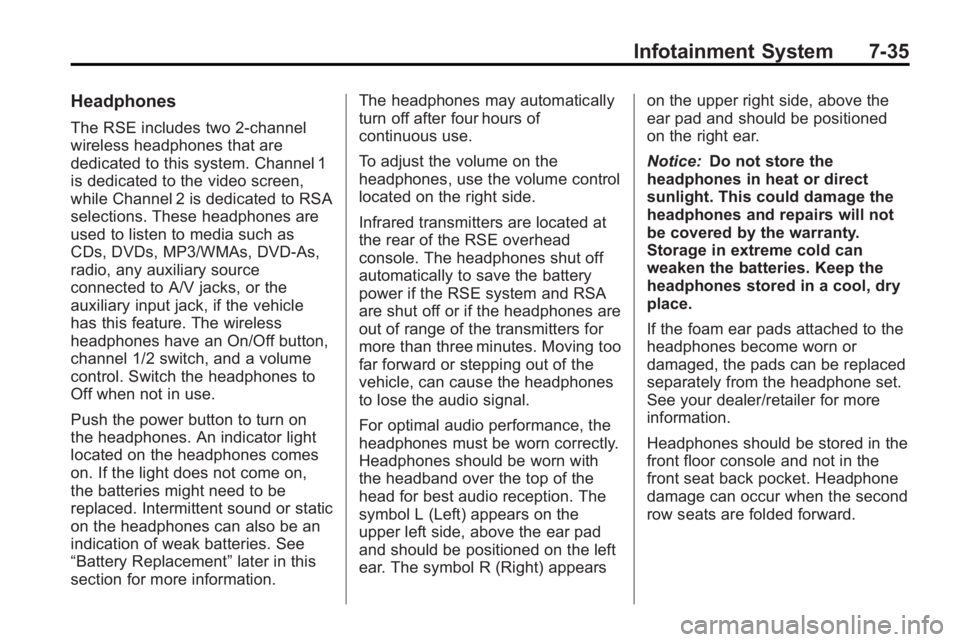
The RSE includes two 2-channel
wireless headphones that are
dedicated to this system. Channel 1
is dedicated to the video screen,
while Channel 2 is dedicated to RSA
selections. These headphones are
used to listen to media such as
CDs, DVDs, MP3/WMAs, DVD-As,
radio, any auxiliary source
connected to A/V jacks, or the
auxiliary input jack, if the vehicle
has this feature. The wireless
headphones have an On/Off button,
channel 1/2 switch, and a volume
control. Switch the headphones to
Off when not in use.
Push the power button to turn on
the headphones. An indicator light
located on the headphones comes
on. If the light does not come on,
the batteries might need to be
replaced. Intermittent sound or static
on the headphones can also be an
indication of weak batteries. See
“Battery Replacement”later in this
section for more information. The headphones may automatically
turn off after four hours of
continuous use.
To adjust the volume on the
headphones, use the volume control
located on the right side.
Infrared transmitters are located at
the rear of the RSE overhead
console. The headphones shut off
automatically to save the battery
power if the RSE system and RSA
are shut off or if the headphones are
out of range of the transmitters for
more than three minutes. Moving too
far forward or stepping out of the
vehicle, can cause the headphones
to lose the audio signal.
For optimal audio performance, the
headphones must be worn correctly.
Headphones should be worn with
the headband over the top of the
head for best audio reception. The
symbol L (Left) appears on the
upper left side, above the ear pad
and should be positioned on the left
ear. The symbol R (Right) appears
on the upper right side, above the
ear pad and should be positioned
on the right ear.
Notice:
Do not store the
headphones in heat or direct
sunlight. This could damage the
headphones and repairs will not
be covered by the warranty.
Storage in extreme cold can
weaken the batteries. Keep the
headphones stored in a cool, dry
place.
If the foam ear pads attached to the
headphones become worn or
damaged, the pads can be replaced
separately from the headphone set.
See your dealer/retailer for more
information.
Headphones should be stored in the
front floor console and not in the
front seat back pocket. Headphone
damage can occur when the second
row seats are folded forward.
Page 214 of 438
7-36 Infotainment System
Battery Replacement
To change the batteries on the
headphones:
1. Turn the screw to loosen thebattery door located on the left
side of the headphones. Slide
the battery door open.
2. Replace the two batteries in the compartment. Make sure that
they are installed correctly, using
the diagram on the inside of the
battery compartment.
3. Replace the battery door and tighten the door screw.
If the headphones are to be stored
for a long period of time, remove the
batteries and keep them in a cool,
dry place.Audio/Video (A/V) Jacks
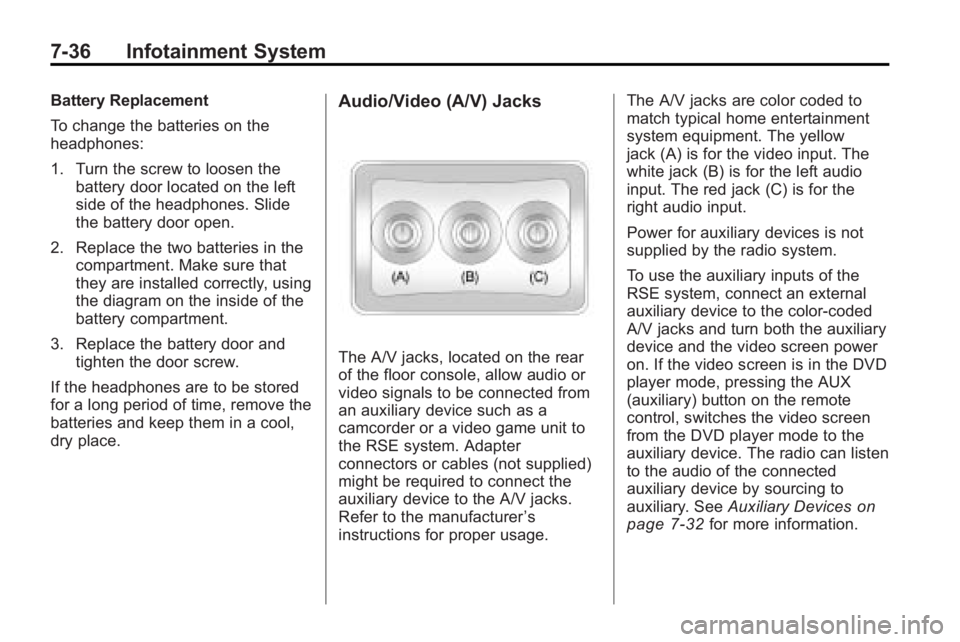
The A/V jacks, located on the rear
of the floor console, allow audio or
video signals to be connected from
an auxiliary device such as a
camcorder or a video game unit to
the RSE system. Adapter
connectors or cables (not supplied)
might be required to connect the
auxiliary device to the A/V jacks.
Refer to the manufacturer ’s
instructions for proper usage. The A/V jacks are color coded to
match typical home entertainment
system equipment. The yellow
jack (A) is for the video input. The
white jack (B) is for the left audio
input. The red jack (C) is for the
right audio input.
Power for auxiliary devices is not
supplied by the radio system.
To use the auxiliary inputs of the
RSE system, connect an external
auxiliary device to the color-coded
A/V jacks and turn both the auxiliary
device and the video screen power
on. If the video screen is in the DVD
player mode, pressing the AUX
(auxiliary) button on the remote
control, switches the video screen
from the DVD player mode to the
auxiliary device. The radio can listen
to the audio of the connected
auxiliary device by sourcing to
auxiliary. See
Auxiliary Devices
on
page 7‑32for more information.
Page 215 of 438
Infotainment System 7-37
How to Change the RSE Video
Screen Settings
The screen display mode (normal,
full, and zoom), screen brightness,
and setup menu language can be
changed from the on screen setup
menu by using the remote control.
To change a setting:
1. Press
z.
2. Use
n,q,p,oandrto
navigate and use the
setup menu.
3. Press
zagain to remove the
setup menu from the screen.
Audio Output
Audio from the DVD player or
auxiliary inputs can be heard
through the following sources:
.Wireless Headphones
.Vehicle Speakers
.Vehicle wired headphone jacks
on the rear seat audio system,
if the vehicle has this feature. The RSE system always transmits
the audio signal to the wireless
headphones, if there is audio
available. See
“Headphones” earlier
in this section for more information.
The DVD player is capable of
outputting audio to the wired
headphone jacks on the RSA
system, if the vehicle has this
feature. The DVD player can be
selected as an audio source on the
RSA system. See Rear Seat Audio
(RSA) System
on page 7‑42for
more information.
When a device is connected to the
A/V jacks, or the radio's auxiliary
input jack, if the vehicle has this
feature, the rear seat passengers
are able to hear audio from the
auxiliary device through the wireless
or wired headphones. The front seat
passengers are able to listen to
playback from this device through
the vehicle speakers by selecting
AUX as the source on the radio.
Video Screen
The video screen is located in the
overhead console. When the video
screen is not in use, push it up into
its locked position.
To use the video screen:
1. Push the release button located on the overhead console.
2. Move the screen to the desired position.
If a DVD is playing and the screen
is raised to its locked position, the
screen remains on; this is normal,
and the DVD continues to play
through the previous audio source.
Press
Pon the remote control or
eject the disc to turn off the screen.
Page 219 of 438
Infotainment System 7-41
Tips and Troubleshooting Chart (cont'd)
ProblemRecommended Action
After stopping the player, I push
Play but sometimes the DVD starts
where I left off and sometimes at the
beginning. If the stop button was pressed one
time, the DVD player resumes
playing where the DVD was
stopped. If the stop button was
pressed two times the DVD player
begins to play from the beginning of
the DVD.
The auxiliary source is running but
there is no picture or sound. Check that the RSE video screen is
in the auxiliary source mode.
Check the auxiliary input
connections at both devices.
Sometimes the wireless headphone
audio cuts out or buzzes. Check for obstructions, low
batteries, reception range, and
interference from cellular telephone
towers or by using a cellular
telephone in the vehicle.
Check that the headphones are on
correctly using the L (left) and
R (right) on the headphones.
I lost the remote and/or the
headphones. See your dealer/retailer for
assistance.
The DVD is playing, but there is no
picture or sound. Check that the RSE video screen is
sourced to the DVD player.
DVD Display Error Messages
The DVD display error message
depends on which radio the vehicle
has. The video screen might display
one of the following:
Disc Load/Eject Error:
This
message displays when there are
disc load or eject problems.
Disc Format Error: This message
displays if the disc is inserted with
the disc label wrong side up, or if
the disc is damaged.
Disc Region Error: This message
displays if the disc is not from a
correct region.
No Disc Inserted: This message
displays if no disc is present when
the
ZEJECT button is pressed on
the radio.
Page 223 of 438
Infotainment System 7-45
bg(Push To Talk) : Press to
answer incoming calls, to confirm
system information, and to start
speech recognition.
c x(Phone On Hook): Press to
end a call, reject a call, or to cancel
an operation.
Pairing
A Bluetooth enabled cell phone
must be paired to the in-vehicle
Bluetooth system first and then
connected to the vehicle before it
can be used. See the cell phone
manufacturers user guide for
Bluetooth functions before pairing
the cell phone. If a Bluetooth phone
is not connected, calls will be made
using OnStar
®Hands-Free Calling,
if available. Refer to the OnStar
owner's guide for more information.
Pairing Information:
.Up to five cell phones can be
paired to the in-vehicle Bluetooth
system.
.The pairing process is disabled
when the vehicle is moving.
.The in-vehicle Bluetooth system
automatically links with the first
available paired cell phone in the
order the phone was paired.
.Only one paired cell phone can
be connected to the in-vehicle
Bluetooth system at a time.
.Pairing should only need to be
completed once, unless changes
to the pairing information have
been made or the phone is
deleted.
To link to a different paired phone,
see Linking to a Different Phone
later in this section.
Pairing a Phone
1. Press and hold
b gfor
two seconds. The system
responds with “Ready”followed
by a tone.
2. Say “Bluetooth”. The system
responds with “Bluetooth ready”
followed by a tone. 3. Say
“Pair”. The system responds
with instructions and a four digit
PIN number. The PIN number
will be used in Step 4.
4. Start the Pairing process on the cell phone that will be paired to
the vehicle. Reference the cell
phone manufacturers user guide
for information on this process.
Locate the device named
“General Motors” in the list on
the cellular phone and follow the
instructions on the cell phone to
enter the four digit PIN number
that was provided in Step 3.
5. The system prompts for a name for the phone. Use a name that
best describes the phone. This
name will be used to indicate
which phone is connected. The
system then confirms the name
provided.
Page 224 of 438
7-46 Infotainment System
6. The system responds with“
successfully paired” after the
pairing process is complete.
7. Repeat Steps 1 through 7 for additional phones to be paired.
Listing All Paired and Connected
Phones
1. Press and hold
b gfor
two seconds. The system
responds with “Ready”followed
by a tone.
2. Say “Bluetooth”. The system
responds with “Bluetooth ready”
followed by a tone.
3. Say “List”. The system lists all
the paired Bluetooth devices. If a
phone is connected to the
vehicle, the system will say “Is
connected” after the connected
phone. Deleting a Paired Phone
1. Press and hold
b
gfor
two seconds. The system
responds with “Ready”followed
by a tone.
2. Say “Bluetooth”. The system
responds with “Bluetooth ready”
followed by a tone.
3. Say “Delete”. The system asks
which phone to delete followed
by a tone.
4. Say the name of the phone to be deleted. If the phone name is
unknown, use the “List”
command for a list of all paired
phones. The system responds
with “Would you like to delete
followed by a tone.
5. Say “Yes”to delete the phone.
The system responds with “OK,
deleting
1. Press and holdb
gfor
two seconds. The system
responds with “Ready”followed
by a tone.
2. Say “Bluetooth”. The system
responds with “Bluetooth ready”
followed by a tone.
3. Say “Change phone”. The
system responds with “Please
wait while I search for other
phones”.
.If another phone is found,
the response will be
“
connected”.
.If another phone is not
found, the original phone
remains connected.
Storing Name Tags
The system can store up to thirty
phone numbers as name tags that
are shared between the Bluetooth
and OnStar systems.