odometer BUICK ENCLAVE 2010 Owner's Manual
[x] Cancel search | Manufacturer: BUICK, Model Year: 2010, Model line: ENCLAVE, Model: BUICK ENCLAVE 2010Pages: 438, PDF Size: 2.47 MB
Page 119 of 438
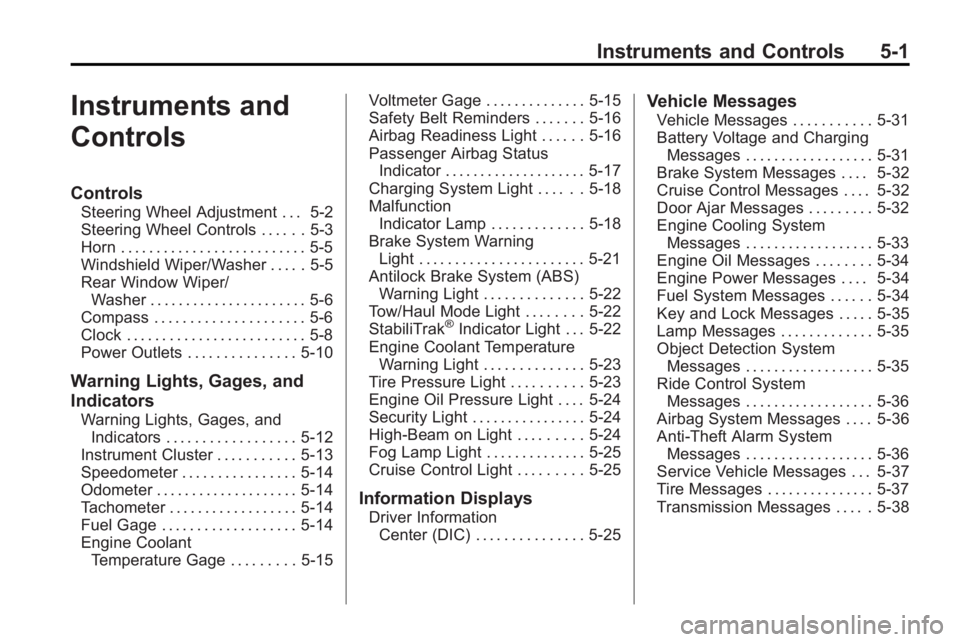
Instruments and Controls 5-1
Instruments and
Controls
Controls
Steering Wheel Adjustment . . . 5-2
Steering Wheel Controls . . . . . . 5-3
Horn . . . . . . . . . . . . . . . . . . . . . . . . . . 5-5
Windshield Wiper/Washer . . . . . 5-5
Rear Window Wiper/Washer . . . . . . . . . . . . . . . . . . . . . . 5-6
Compass . . . . . . . . . . . . . . . . . . . . . 5-6
Clock . . . . . . . . . . . . . . . . . . . . . . . . . 5-8
Power Outlets . . . . . . . . . . . . . . . 5-10
Warning Lights, Gages, and
Indicators
Warning Lights, Gages, and Indicators . . . . . . . . . . . . . . . . . . 5-12
Instrument Cluster . . . . . . . . . . . 5-13
Speedometer . . . . . . . . . . . . . . . . 5-14
Odometer . . . . . . . . . . . . . . . . . . . . 5-14
Tachometer . . . . . . . . . . . . . . . . . . 5-14
Fuel Gage . . . . . . . . . . . . . . . . . . . 5-14
Engine Coolant Temperature Gage . . . . . . . . . 5-15 Voltmeter Gage . . . . . . . . . . . . . . 5-15
Safety Belt Reminders . . . . . . . 5-16
Airbag Readiness Light . . . . . . 5-16
Passenger Airbag Status
Indicator . . . . . . . . . . . . . . . . . . . . 5-17
Charging System Light . . . . . . 5-18
Malfunction Indicator Lamp . . . . . . . . . . . . . 5-18
Brake System Warning Light . . . . . . . . . . . . . . . . . . . . . . . 5-21
Antilock Brake System (ABS) Warning Light . . . . . . . . . . . . . . 5-22
Tow/Haul Mode Light . . . . . . . . 5-22
StabiliTrak
®Indicator Light . . . 5-22
Engine Coolant Temperature Warning Light . . . . . . . . . . . . . . 5-23
Tire Pressure Light . . . . . . . . . . 5-23
Engine Oil Pressure Light . . . . 5-24
Security Light . . . . . . . . . . . . . . . . 5-24
High-Beam on Light . . . . . . . . . 5-24
Fog Lamp Light . . . . . . . . . . . . . . 5-25
Cruise Control Light . . . . . . . . . 5-25
Information Displays
Driver Information Center (DIC) . . . . . . . . . . . . . . . 5-25
Vehicle Messages
Vehicle Messages . . . . . . . . . . . 5-31
Battery Voltage and ChargingMessages . . . . . . . . . . . . . . . . . . 5-31
Brake System Messages . . . . 5-32
Cruise Control Messages . . . . 5-32
Door Ajar Messages . . . . . . . . . 5-32
Engine Cooling System Messages . . . . . . . . . . . . . . . . . . 5-33
Engine Oil Messages . . . . . . . . 5-34
Engine Power Messages . . . . 5-34
Fuel System Messages . . . . . . 5-34
Key and Lock Messages . . . . . 5-35
Lamp Messages . . . . . . . . . . . . . 5-35
Object Detection System Messages . . . . . . . . . . . . . . . . . . 5-35
Ride Control System Messages . . . . . . . . . . . . . . . . . . 5-36
Airbag System Messages . . . . 5-36
Anti-Theft Alarm System Messages . . . . . . . . . . . . . . . . . . 5-36
Service Vehicle Messages . . . 5-37
Tire Messages . . . . . . . . . . . . . . . 5-37
Transmission Messages . . . . . 5-38
Page 132 of 438
5-14 Instruments and Controls
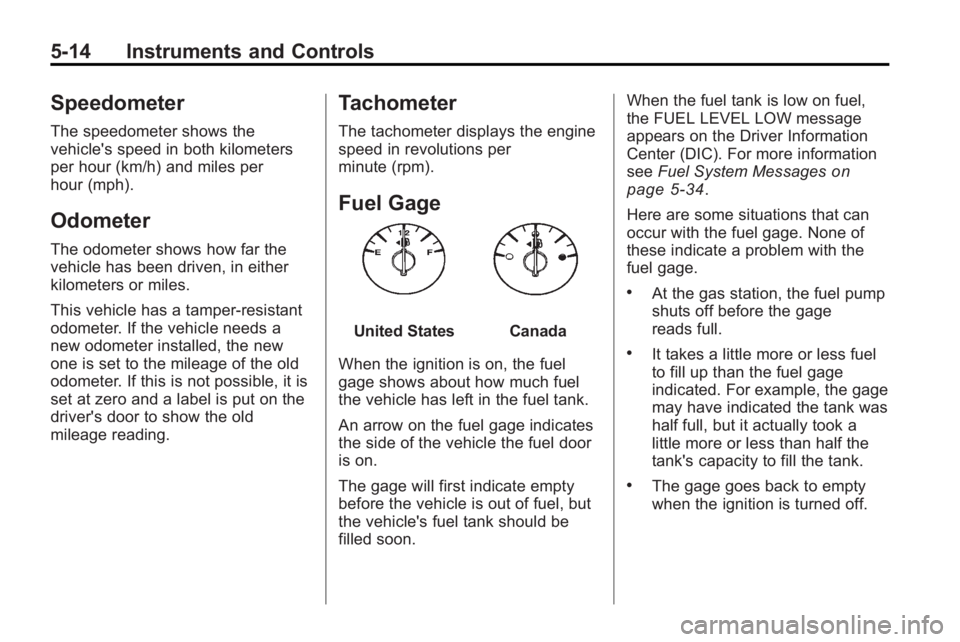
Speedometer
The speedometer shows the
vehicle's speed in both kilometers
per hour (km/h) and miles per
hour (mph).
Odometer
The odometer shows how far the
vehicle has been driven, in either
kilometers or miles.
This vehicle has a tamper-resistant
odometer. If the vehicle needs a
new odometer installed, the new
one is set to the mileage of the old
odometer. If this is not possible, it is
set at zero and a label is put on the
driver's door to show the old
mileage reading.
Tachometer
The tachometer displays the engine
speed in revolutions per
minute (rpm).
Fuel Gage
United StatesCanada
When the ignition is on, the fuel
gage shows about how much fuel
the vehicle has left in the fuel tank.
An arrow on the fuel gage indicates
the side of the vehicle the fuel door
is on.
The gage will first indicate empty
before the vehicle is out of fuel, but
the vehicle's fuel tank should be
filled soon. When the fuel tank is low on fuel,
the FUEL LEVEL LOW message
appears on the Driver Information
Center (DIC). For more information
see
Fuel System Messages
on
page 5‑34.
Here are some situations that can
occur with the fuel gage. None of
these indicate a problem with the
fuel gage.
.At the gas station, the fuel pump
shuts off before the gage
reads full.
.It takes a little more or less fuel
to fill up than the fuel gage
indicated. For example, the gage
may have indicated the tank was
half full, but it actually took a
little more or less than half the
tank's capacity to fill the tank.
.The gage goes back to empty
when the ignition is turned off.
Page 144 of 438
5-26 Instruments and Controls
The outside air temperature and
compass, if equipped, also display
on the DIC when viewing the trip
and fuel information. The outside air
temperature automatically appears
in the top right corner of the DIC
display. If there is a problem with
the system that controls the
temperature display, the numbers
will be replaced with dashes. If this
occurs, have the vehicle serviced.
The compass will be shown in the
bottom right corner of the DIC
display. SeeCompass
on
page 5‑6for more information.
The DIC has different displays
which can be accessed by pressing
the DIC buttons located on the
instrument panel.
The DIC displays trip, fuel, and
vehicle system information, and
warning messages if a system
problem is detected.
The DIC also allows some features
to be customized. See Vehicle
Personalization
on page 5‑40for
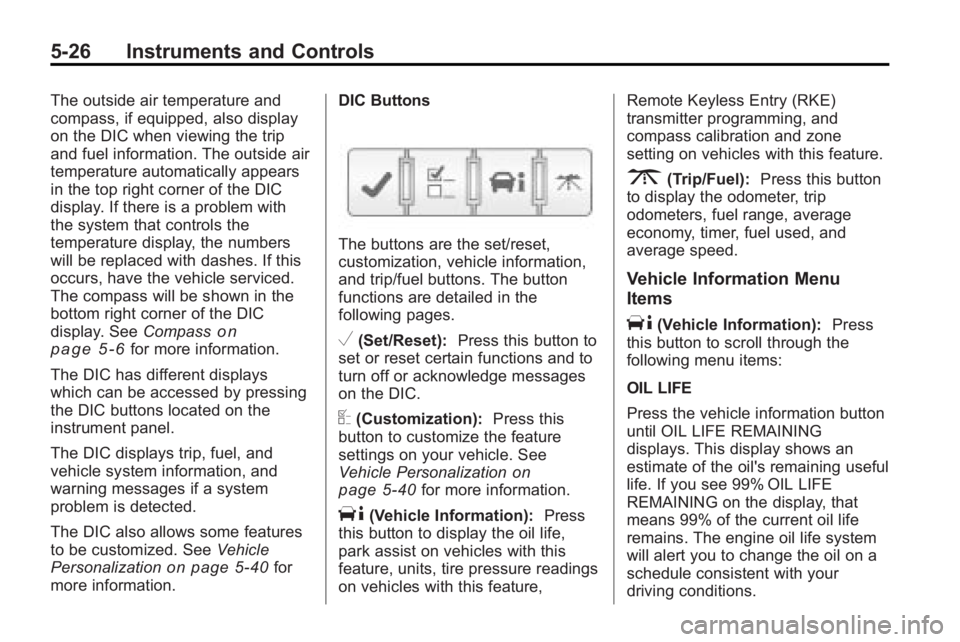
more information. DIC Buttons
The buttons are the set/reset,
customization, vehicle information,
and trip/fuel buttons. The button
functions are detailed in the
following pages.
V(Set/Reset):
Press this button to
set or reset certain functions and to
turn off or acknowledge messages
on the DIC.
U(Customization): Press this
button to customize the feature
settings on your vehicle. See
Vehicle Personalization
on
page 5‑40for more information.
T(Vehicle Information): Press
this button to display the oil life,
park assist on vehicles with this
feature, units, tire pressure readings
on vehicles with this feature, Remote Keyless Entry (RKE)
transmitter programming, and
compass calibration and zone
setting on vehicles with this feature.
3(Trip/Fuel):
Press this button
to display the odometer, trip
odometers, fuel range, average
economy, timer, fuel used, and
average speed.
Vehicle Information Menu
Items
T(Vehicle Information): Press
this button to scroll through the
following menu items:
OIL LIFE
Press the vehicle information button
until OIL LIFE REMAINING
displays. This display shows an
estimate of the oil's remaining useful
life. If you see 99% OIL LIFE
REMAINING on the display, that
means 99% of the current oil life
remains. The engine oil life system
will alert you to change the oil on a
schedule consistent with your
driving conditions.
Page 147 of 438

Instruments and Controls 5-29
Trip/Fuel Menu Items
3(Trip/Fuel):Press this button
to scroll through the following menu
items:
ODOMETER
Press the trip/fuel button until
ODOMETER displays. This display
shows the distance the vehicle has
been driven in either miles (mi) or
kilometers (km).
To switch between English and
metric measurements, see “UNITS”
earlier in this section.
TRIP A and TRIP B
Press the trip/fuel button until
TRIP A or TRIP B displays. This
display shows the current distance
traveled in either miles (mi) or
kilometers (km) since the last reset
for each trip odometer. Both trip
odometers can be used at the
same time. Each trip odometer can be reset to
zero separately by pressing the
set/reset button while the desired
trip odometer is displayed.
The trip odometer has a feature
called retroactive reset. This can be
used to set the trip odometer to the
number of miles (kilometers) driven
since the ignition was last turned on.
This can be used if the trip
odometer is not reset at the
beginning of the trip.
To use the retroactive reset feature,
press and hold the set/reset button
for at least four seconds. The trip
odometer will display the number of
miles (mi) or kilometers (km) driven
since the ignition was last turned on
and the vehicle was moving. Once
the vehicle begins moving, the trip
odometer will accumulate mileage.
For example, if the vehicle was
driven 5 miles (8 km) before it is
started again, and then the
retroactive reset feature is activated,
the display will show 5 miles (8 km).
As the vehicle begins moving, the
display will then increase to
5.1 miles (8.2 km), 5.2 miles
(8.4 km), etc.
If the retroactive reset feature is
activated after the vehicle is started,
but before it begins moving, the
display will show the number of
miles (mi) or kilometers (km) that
were driven during the last ignition
cycle.
RANGE
Press the trip/fuel button until
RANGE displays. This display
shows the approximate number
of remaining miles (mi) or
kilometers (km) the vehicle can be
driven without refueling. The display
will show LOW if the fuel level
is low.
Page 154 of 438
5-36 Instruments and Controls
Press the set/reset button or the
trip odometer reset stem to
acknowledge this message and
clear it from the DIC display. For
more information seeUltrasonic
Parking Assist on page 9‑33.
SERVICE PARK ASSIST
If your vehicle has the Ultrasonic
Rear Parking Assist (URPA) system,
this message displays if there is a
problem with the URPA system. Do
not use this system to help you
park. See Ultrasonic Parking Assist
on page 9‑33for more information.
See your dealer/retailer for service.
Ride Control System
Messages
SERVICE STABILITRAK
This message displays if there is a
problem with the StabiliTrak®
system. If this message appears, try
to reset the system. Stop; turn off
the engine for at least 15 seconds;
then start the engine again. If this message still comes on, it means
there is a problem. See your dealer/
retailer for service. The vehicle is
safe to drive, however, you do not
have the benefit of StabiliTrak, so
reduce your speed and drive
accordingly.
SERVICE TRACTION
CONTROL
This message displays when there
is a problem with the Traction
Control System (TCS). When this
message is displayed, the system
will not limit wheel spin. Adjust your
driving accordingly. See your dealer/
retailer for service. See
StabiliTrak
System
on page 9‑28for more
information.
TRACTION CONTROL OFF
This message displays when the
Traction Control System (TCS) is
turned off. Adjust your driving
accordingly. See StabiliTrak System
on page 9‑28for more information.
This message clears itself after
10 seconds.
Airbag System Messages
SERVICE AIR BAG
This message displays if there is a
problem with the airbag system.
Have your dealer/retailer inspect the
system for problems. See Airbag
Readiness Light
on page 5‑16and
Airbag Systemon page 3‑29for
more information.
Anti-Theft Alarm System
Messages
SERVICE THEFT DETERRENT
SYSTEM
This message displays when there
is a problem with the theft-deterrent
system. The vehicle may or may not
restart so you may want to take the
vehicle to your dealer/retailer before
turning off the engine. See
Immobilizer Operation
on
page 2‑13for more information.
Page 155 of 438

Instruments and Controls 5-37
THEFT ATTEMPTED
This message displays if the content
theft-deterrent system has detected
a break-in attempt while you were
away from your vehicle. See
Anti-Theft Alarm System
on
page 2‑12for more information.
Service Vehicle Messages
SERVICE A/C (Air
Conditioning) SYSTEM
This message displays when the
electronic sensors that control the
air conditioning and heating
systems are no longer working.
Have the climate control system
serviced by your dealer/retailer if
you notice a drop in heating and air
conditioning efficiency.
SERVICE POWER STEERING
This message displays when a
problem is detected with the power
steering system. When this
message is displayed, you may
notice that the effort required to
steer the vehicle increases or feels heavier, but you will still be able to
steer the vehicle. Have your vehicle
serviced by your dealer/retailer
immediately.
SERVICE VEHICLE SOON
This message displays when a
non-emissions related malfunction
occurs. Have the vehicle serviced
by your dealer/retailer as soon as
possible.
STARTING DISABLED
SERVICE THROTTLE
This message displays when your
vehicle's throttle system is not
functioning properly. Have your
vehicle serviced by your dealer/
retailer.
Tire Messages
TIRE LOW ADD AIR TO TIRE
On vehicles with the Tire Pressure
Monitor System (TPMS), this
message displays when the
pressure in one or more of the
vehicle's tires is low.
This message also displays LEFT
FRT (left front), RIGHT FRT
(right front), LEFT RR (left rear),
or RIGHT RR (right rear) to indicate
the location of the low tire.
The low tire pressure warning light
will also come on. See
Tire
Pressure Light on page 5‑23.
If a tire pressure message appears
on the DIC, stop as soon as you
can. Inflate the tires by adding air
until the tire pressure is equal to the
values shown on the Tire Loading
Information label. See Tires
on
page 10‑37, Vehicle Load Limitson
page 9‑12, and Tire Pressureon
page 10‑44.
You can receive more than one tire
pressure message at a time. To
read the other messages that may
have been sent at the same time,
press the set/reset button or the trip
odometer reset stem. The DIC also
shows the tire pressure values. See
Driver Information Center (DIC)
on
page 5‑25.
Page 355 of 438
Vehicle Care 10-57
{WARNING
Using the wrong replacement
wheels, wheel bolts, or wheel
nuts on your vehicle can be
dangerous. It could affect the
braking and handling of your
vehicle, make your tires lose air
and make you lose control. You
could have a collision in which
you or others could be injured.
Always use the correct wheel,
wheel bolts, and wheel nuts for
replacement.
Notice: The wrong wheel can
also cause problems with bearing
life, brake cooling, speedometer
or odometer calibration,
headlamp aim, bumper height,
vehicle ground clearance, and tire
or tire chain clearance to the
body and chassis.
See If a Tire Goes Flat
on
page 10‑58for more information.
Used Replacement Wheels
{WARNING
Putting a used wheel on the
vehicle is dangerous. You cannot
know how it has been used or
how far it has been driven.
It could fail suddenly and cause a
crash. If you have to replace a
wheel, use a new GM original
equipment wheel.
Tire Chains
{WARNING
Do not use tire chains. There is
not enough clearance. Tire chains
used on a vehicle without the
proper amount of clearance can
cause damage to the brakes,
suspension or other vehicle parts.
(Continued)
WARNING (Continued)
The area damaged by the tire
chains could cause you to lose
control of the vehicle and you or
others may be injured in a crash.
Use another type of traction
device only if its manufacturer
recommends it for use on the
vehicle and tire size combination
and road conditions. Follow that
manufacturer's instructions. To
help avoid damage to the vehicle,
drive slowly, readjust or remove
the device if it is contacting the
vehicle, and do not spin the
vehicle's wheels. If you do find
traction devices that will fit, install
them on the front tires.
Page 403 of 438

Service and Maintenance 11-9
Maintenance Records
After the scheduled services are performed, record the date, odometer reading, who performed the service, and the
type of services performed in the boxes provided. Retain all maintenance receipts.
Maintenance Record
DateOdometer
Reading Serviced By Services Performed
Page 404 of 438

11-10 Service and Maintenance
Maintenance Record (cont'd)
DateOdometer
Reading Serviced By Services Performed
Page 405 of 438

Service and Maintenance 11-11
Maintenance Record (cont'd)
DateOdometer
Reading Serviced By Services Performed