washer fluid BUICK ENCLAVE 2010 Owner's Manual
[x] Cancel search | Manufacturer: BUICK, Model Year: 2010, Model line: ENCLAVE, Model: BUICK ENCLAVE 2010Pages: 438, PDF Size: 2.47 MB
Page 5 of 438
Introduction v
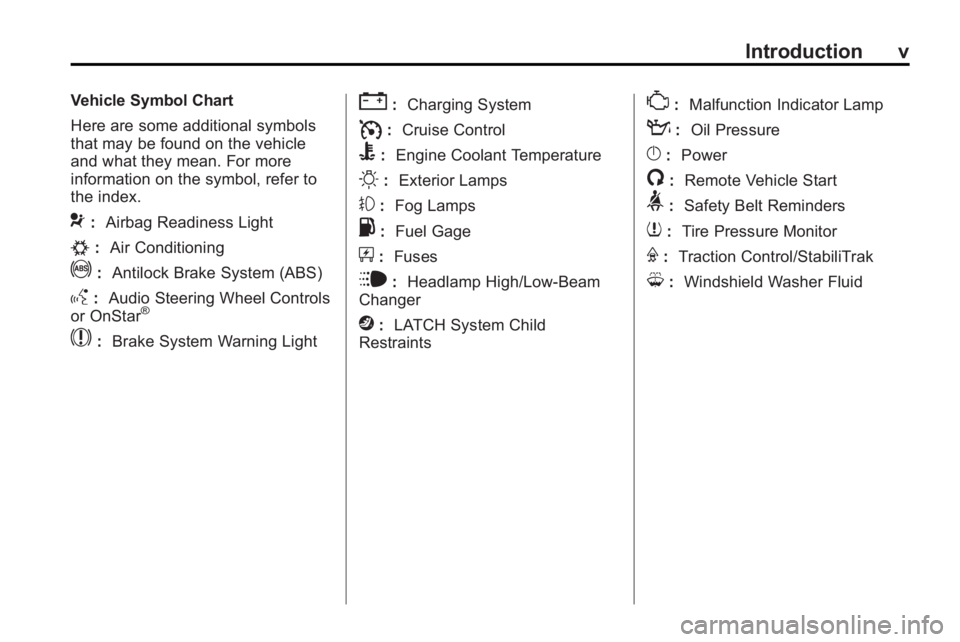
Vehicle Symbol Chart
Here are some additional symbols
that may be found on the vehicle
and what they mean. For more
information on the symbol, refer to
the index.
9:Airbag Readiness Light
#:Air Conditioning
!:Antilock Brake System (ABS)
g:Audio Steering Wheel Controls
or OnStar®
$: Brake System Warning Light
":Charging System
I:Cruise Control
B: Engine Coolant Temperature
O:Exterior Lamps
#:Fog Lamps
.: Fuel Gage
+:Fuses
i: Headlamp High/Low-Beam
Changer
j: LATCH System Child
Restraints
*: Malfunction Indicator Lamp
::Oil Pressure
}:Power
/:Remote Vehicle Start
>:Safety Belt Reminders
7:Tire Pressure Monitor
F:Traction Control/StabiliTrak
M:Windshield Washer Fluid
Page 18 of 438
1-12 In Brief
;:Manual operation of the parking
lamps and other exterior lamps,
except the headlamps.
2: Manual operation of the
headlamps and other exterior
lamps.
# (If Equipped): Push the fog lamp
button in to turn on the fog lamps.
For more information, see:
.Exterior Lamp Controlson
page 6‑1.
.Daytime Running Lamps (DRL)/
Automatic Headlamp Systemon
page 6‑3.
.Delayed Headlampson
page 6‑3.
.Fog Lamps on page 6‑5.
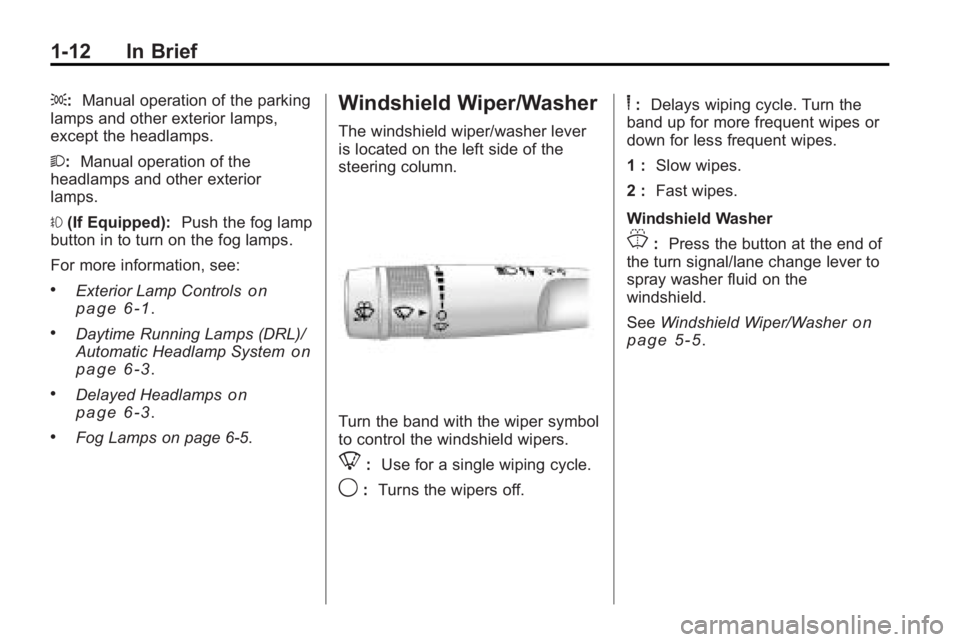
Windshield Wiper/Washer
The windshield wiper/washer lever
is located on the left side of the
steering column.
Turn the band with the wiper symbol
to control the windshield wipers.
8: Use for a single wiping cycle.
9:Turns the wipers off.
6:Delays wiping cycle. Turn the
band up for more frequent wipes or
down for less frequent wipes.
1 : Slow wipes.
2 : Fast wipes.
Windshield Washer
J: Press the button at the end of
the turn signal/lane change lever to
spray washer fluid on the
windshield.
See Windshield Wiper/Washer
on
page 5‑5.
Page 120 of 438
5-2 Instruments and Controls
Vehicle ReminderMessages . . . . . . . . . . . . . . . . . . 5-39
Vehicle Speed Messages . . . . 5-39
Washer Fluid Messages . . . . . 5-39
Vehicle Personalization
Vehicle Personalization . . . . . . 5-40
Universal Remote System
Universal Remote System . . . 5-47
Universal Remote System Programming . . . . . . . . . . . . . . . 5-47
Universal Remote System Operation . . . . . . . . . . . . . . . . . . 5-51
Controls
Steering Wheel
Adjustment
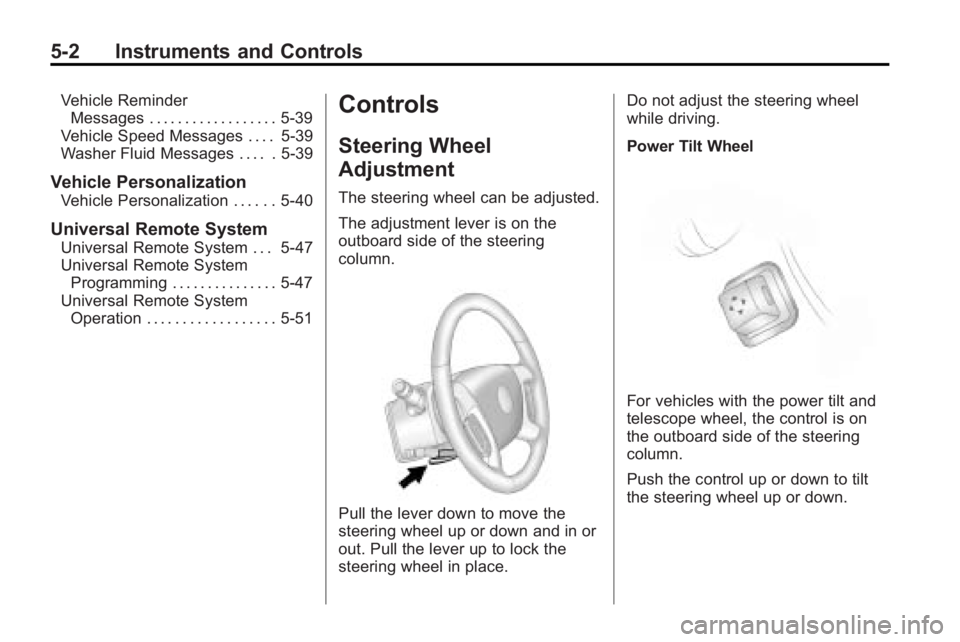
The steering wheel can be adjusted.
The adjustment lever is on the
outboard side of the steering
column.
Pull the lever down to move the
steering wheel up or down and in or
out. Pull the lever up to lock the
steering wheel in place. Do not adjust the steering wheel
while driving.
Power Tilt Wheel
For vehicles with the power tilt and
telescope wheel, the control is on
the outboard side of the steering
column.
Push the control up or down to tilt
the steering wheel up or down.
Page 123 of 438
Instruments and Controls 5-5
Press¨to select a track or a
folder when navigating folders on an
iPod or USB device.
For vehicles with a navigation
system:
1. Press and hold
¨until a beep
is heard, to place the radio into
SCAN mode, a station will play
for five seconds before moving
to the next station.
2. To stop the SCAN function, press
¨again.
3. In CD/DVD, iPod, or AUX USB, press and hold to quickly move
forward through the tracks.
Release to stop on the desired
track.
+
e−e(Volume): Press to
increase or to decrease the volume.
Horn
Press near or on the horn symbols
on the steering wheel pad to sound
the horn.
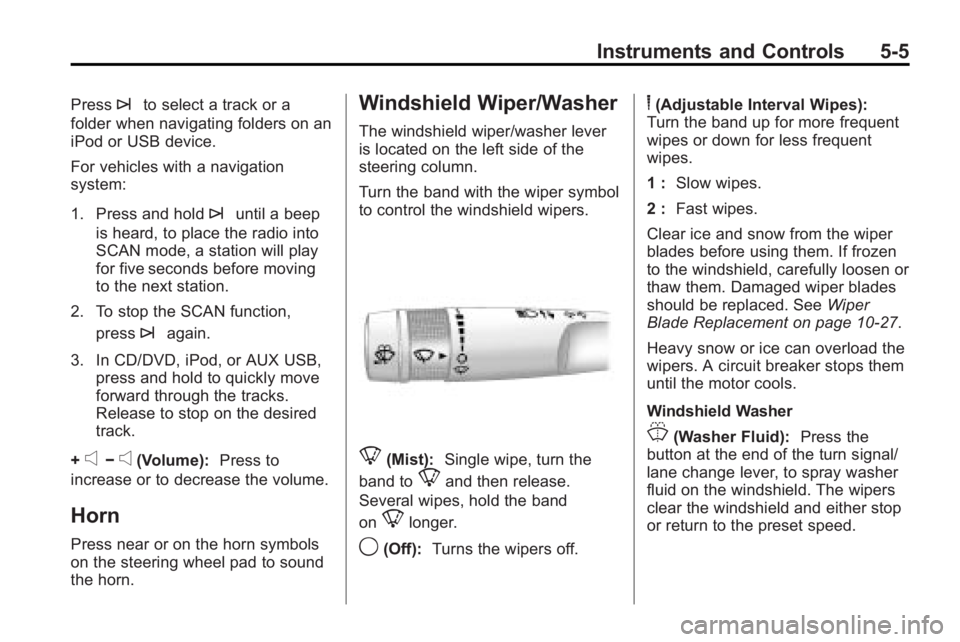
Windshield Wiper/Washer
The windshield wiper/washer lever
is located on the left side of the
steering column.
Turn the band with the wiper symbol
to control the windshield wipers.
8(Mist): Single wipe, turn the
band to
8and then release.
Several wipes, hold the band
on
8longer.
9(Off): Turns the wipers off.
6(Adjustable Interval Wipes):
Turn the band up for more frequent
wipes or down for less frequent
wipes.
1 : Slow wipes.
2 : Fast wipes.
Clear ice and snow from the wiper
blades before using them. If frozen
to the windshield, carefully loosen or
thaw them. Damaged wiper blades
should be replaced. See Wiper
Blade Replacement on page 10‑27.
Heavy snow or ice can overload the
wipers. A circuit breaker stops them
until the motor cools.
Windshield Washer
J(Washer Fluid): Press the
button at the end of the turn signal/
lane change lever, to spray washer
fluid on the windshield. The wipers
clear the windshield and either stop
or return to the preset speed.
Page 124 of 438
5-6 Instruments and Controls
The ignition key must be in
ACC/ACCESSORY or ON/RUN for
this to work. SeeWasher Fluid
on
page 10‑21Windshield Washer
Fluid.
{WARNING
In freezing weather, do not use
your washer until the windshield
is warmed. Otherwise the washer
fluid can form ice on the
windshield, blocking your vision.
WASHER FLUID LOW ADD FLUID
is displayed on the Driver
Information Center (DIC) when the
washer fluid is low. See Washer
Fluid Messages on page 5‑39.
Rear Window Wiper/
Washer
The rear wiper and rear wash button
is located on the instrument panel
below the climate control system.
Z (Rear Wiper): Press to turn the
rear wiper on and off. The wiper
speed cannot be changed.
Y (Wash): Press to spray washer
fluid on the rear window. The
window wiper will also come on.
Release the button when enough
fluid has been sprayed on the
window. The rear wiper will run a
few more cycles after it is released.
If the rear wiper function was
already on, prior to pressing the
wash button, it stays on until the
wiper button is pressed again.
The rear window washer uses the
same fluid that is in the windshield
washer reservoir. See Washer Fluid
on page 10‑21.
Compass
Your vehicle may have a compass
in the Driver Information Center
(DIC). SeeDriver Information
Center (DIC)
on page 5‑25for
more information about the DIC.
Compass Zone
The zone is set to zone eight upon
leaving the factory. Your dealer/
retailer will set the correct zone for
your location.
Under certain circumstances,
such as during a long distance
cross-country trip or moving to a
new state or province, it will be
necessary to compensate for
compass variance by resetting the
zone through the DIC if the zone is
not set correctly.
Page 157 of 438

Instruments and Controls 5-39
TRANSMISSION HOT IDLE
ENGINE
Notice:If you drive your vehicle
while the transmission fluid is
overheating and the transmission
temperature warning is displayed
on the instrument panel cluster
and/or DIC, you can damage the
transmission. This could lead to
costly repairs that would not be
covered by your warranty.
Do not drive your vehicle with
overheated transmission fluid
or while the transmission
temperature warning is displayed.
This message displays and a chime
sounds if the transmission fluid in
the vehicle gets hot. Driving with the
transmission fluid temperature high
can cause damage to the vehicle.
Stop the vehicle and let it idle to
allow the transmission to cool. This
message clears when the fluid
temperature reaches a safe level.
Vehicle Reminder
Messages
ICE POSSIBLE DRIVE
WITH CARE
This message displays when the
outside air temperature is cold
enough to create icy road
conditions. Adjust your driving
accordingly.
Vehicle Speed Messages
SPEED LIMITED TO
XXX MPH (KM/H)
This message displays when your
vehicle speed is limited to 80 mph
(128 km/h) because the vehicle
detects a problem in the speed
variable assist steering system.
Have your vehicle serviced by your
dealer/retailer.
Washer Fluid Messages
WASHER FLUID LOW ADD
FLUID
This message displays when the
windshield washer fluid is low.
Fill the windshield washer fluid
reservoir as soon as possible.
See Engine Compartment Overview
on page 10‑6for the location of the
windshield washer fluid reservoir.
Also, see Washer Fluid
on
page 10‑21for more information.
Page 249 of 438
Driving and Operating 9-7
WARNING (Continued)
Flowing or rushing water creates
strong forces. Driving through
flowing water could cause your
vehicle to be carried away. If this
happens, you and other vehicle
occupants could drown. Do not
ignore police warnings and be
very cautious about trying to drive
through flowing water.
Hydroplaning
Hydroplaning is dangerous. Water
can build up under your vehicle's
tires so they actually ride on the
water. This can happen if the road is
wet enough and you are going fast
enough. When your vehicle is
hydroplaning, it has little or no
contact with the road.
There is no hard and fast rule about
hydroplaning. The best advice is to
slow down when the road is wet.
Other Rainy Weather Tips
Besides slowing down, other wet
weather driving tips include:
.Allow extra following distance.
.Pass with caution.
.Keep windshield wiping
equipment in good shape.
.Keep the windshield washer fluid
reservoir filled.
.Have good tires with proper
tread depth. SeeTireson
page 10‑37.
.Turn off cruise control.
Highway Hypnosis
Always be alert and pay attention to
your surroundings while driving.
If you become tired or sleepy, find a
safe place to park your vehicle
and rest.
Other driving tips include:
.Keep the vehicle well ventilated.
.Keep interior temperature cool.
.Keep your eyes moving —scan
the road ahead and to the sides.
.Check the rearview mirror and
vehicle instruments often.
Page 261 of 438
Driving and Operating 9-19
Notice:The engine is designed to
work with the electronics in the
vehicle. If you add electrical parts
or accessories, you could change
the way the engine operates.
Before adding electrical
equipment, check with your
dealer/retailer. If you do not, the
engine might not perform
properly. Any resulting damage
would not be covered by the
vehicle warranty.
Engine Heater
The engine coolant heater can
provide easier starting and better
fuel economy during engine
warm-up in cold weather conditions
at or below 0°F (−18°C). Vehicles
with an engine coolant heater
should be plugged in at least four
hours before starting. Some models
may have an internal thermostat in
the cord which will prevent engine
coolant heater operation at
temperatures above 0°F (−18°C).
To Use the Engine Coolant
Heater
1. Turn off the engine.
2. Open the hood and unwrap the
electrical cord. The cord is
located on the driver side of the
engine compartment. It is routed
around the windshield washer
fluid reservoir.
3. Plug the cord into a normal, grounded 110-volt AC outlet.
{WARNING
Plugging the cord into an
ungrounded outlet could cause an
electrical shock. Also, the wrong
kind of extension cord could
overheat and cause a fire. You
could be seriously injured. Plug
the cord into a properly grounded
three-prong 110-volt AC outlet.
If the cord will not reach, use a
heavy-duty three-prong extension
cord rated for at least 15 amps. 4. Before starting the engine, be
sure to unplug and store the
cord as it was before to keep it
away from moving engine parts.
If you do not, it could be
damaged.
The length of time the heater should
remain plugged in depends on
several factors. Ask a dealer/retailer
in the area where you will be
parking the vehicle for the best
advice on this.
Page 299 of 438
Vehicle Care 10-1
Vehicle Care
General Information
General Information . . . . . . . . . . 10-2
California Proposition65 Warning . . . . . . . . . . . . . . . . . 10-3
California Perchlorate Materials Requirements . . . . 10-3
Accessories and Modifications . . . . . . . . . . . . . . . 10-3
Vehicle Checks
Doing Your OwnService Work . . . . . . . . . . . . . . . 10-4
Hood . . . . . . . . . . . . . . . . . . . . . . . . 10-4
Engine Compartment Overview . . . . . . . . . . . . . . . . . . . 10-6
Engine Cover . . . . . . . . . . . . . . . . 10-7
Engine Oil . . . . . . . . . . . . . . . . . . . 10-8
Engine Oil Life System . . . . . 10-10
Automatic Transmission Fluid . . . . . . . . . . . . . . . . . . . . . . 10-11
Engine Air Cleaner/Filter . . . . 10-12
Cooling System . . . . . . . . . . . . 10-14
Engine Coolant . . . . . . . . . . . . . 10-14
Engine Overheating . . . . . . . . 10-18 Overheated Engine
Protection
Operating Mode . . . . . . . . . . . 10-20
Power Steering Fluid . . . . . . . 10-20
Washer Fluid . . . . . . . . . . . . . . . 10-21
Brakes . . . . . . . . . . . . . . . . . . . . . 10-22
Brake Fluid . . . . . . . . . . . . . . . . . 10-23
Battery . . . . . . . . . . . . . . . . . . . . . 10-25
All-Wheel Drive . . . . . . . . . . . . . 10-25
Starter Switch Check . . . . . . . 10-25
Automatic Transmission Shift Lock Control System
Check . . . . . . . . . . . . . . . . . . . . . 10-26
Ignition Transmission Lock Check . . . . . . . . . . . . . . . . . . . . . 10-26
Park Brake and P (Park) Mechanism Check . . . . . . . . 10-26
Wiper Blade Replacement . . . . . . . . . . . . . . 10-27
Windshield Replacement . . . 10-28
Headlamp Aiming
Headlamp Aiming . . . . . . . . . . 10-28
Bulb Replacement
Bulb Replacement . . . . . . . . . . 10-28
Halogen Bulbs . . . . . . . . . . . . . . 10-28
High Intensity Discharge (HID) Lighting . . . . . . . . . . . . . 10-29 Taillamps, Turn Signal,
Sidemarker, and
Stoplamps . . . . . . . . . . . . . . . . 10-29
License Plate Lamp . . . . . . . . 10-30
Replacement Bulbs . . . . . . . . . 10-30
Electrical System
High Voltage Devices and Wiring . . . . . . . . . . . . . . . . . . . . . 10-30
Electrical System Overload . . . . . . . . . . . . . . . . . . 10-31
Fuses and Circuit Breakers . . . . . . . . . . . . . . . . . . 10-31
Engine Compartment Fuse Block . . . . . . . . . . . . . . . . . . . . . 10-31
Instrument Panel Fuse Block . . . . . . . . . . . . . . . . . . . . . 10-35
Wheels and Tires
Tires . . . . . . . . . . . . . . . . . . . . . . . . 10-37
Tire Sidewall Labeling . . . . . . 10-38
Tire Designations . . . . . . . . . . . 10-40
Tire Terminology and
Definitions . . . . . . . . . . . . . . . . 10-41
Tire Pressure . . . . . . . . . . . . . . . 10-44
Tire Pressure Monitor System . . . . . . . . . . . . . . . . . . . 10-45
Tire Pressure Monitor Operation . . . . . . . . . . . . . . . . . 10-46
Page 305 of 438
Vehicle Care 10-7
A. Radiator Pressure Cap. SeeCooling System on page 10‑14.
B. Engine Coolant Recovery Cap. See Cooling System
on
page 10‑14.
C. Remote Negative (−) Terminal. See Jump Starting
on
page 10‑81.
D. Engine Compartment Fuse
Block on page 10‑31.
E. Remote Positive (+) Terminal. See Jump Starting
on
page 10‑81.
F. Power Steering Reservoir and Cap (under engine cover). See
Power Steering Fluid
on
page 10‑20.
G. Engine Oil Fill Cap. See “When
to Add Engine Oil” underEngine
Oil on page 10‑8. H.
Engine Cover on page 10‑7.
I. Engine Oil Dipstick. See “Checking Engine Oil” under
Engine Oil on page 10‑8.
J. Automatic Transmission Fluid Dipstick. See “Checking the
Fluid Level” underAutomatic
Transmission Fluid
on
page 10‑11.
K. Brake Master Cylinder Reservoir. See “Brake Fluid”
under Brakes on page 10‑22.
L. Engine Air Cleaner/Filter
on
page 10‑12.
M. Windshield Washer Fluid Reservoir. See “Adding Washer
Fluid” under Washer Fluid
on
page 10‑21.
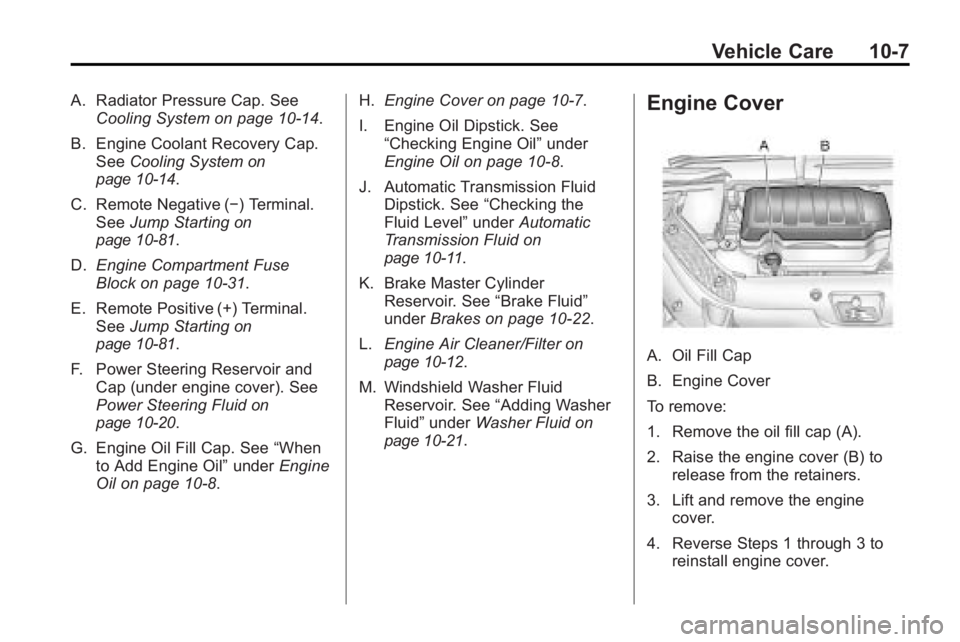
Engine Cover
A. Oil Fill Cap
B. Engine Cover
To remove:
1. Remove the oil fill cap (A).
2. Raise the engine cover (B) to release from the retainers.
3. Lift and remove the engine cover.
4. Reverse Steps 1 through 3 to reinstall engine cover.