window BUICK ENCLAVE 2012 Service Manual
[x] Cancel search | Manufacturer: BUICK, Model Year: 2012, Model line: ENCLAVE, Model: BUICK ENCLAVE 2012Pages: 382, PDF Size: 5.43 MB
Page 193 of 382

Black plate (9,1)Buick Verano Owner Manual - 2013 - crc - 10/17/12
Driving and Operating 9-9
WARNING (Continued)
to the highest setting. See
“Climate Control Systems”in
the Index.
For more information about
carbon monoxide, see Engine
Exhaust on page 9‑24.
To save fuel, run the engine for only
short periods as needed to warm
the vehicle and then shut the engine
off and close the window most of
the way to save heat. Repeat this
until help arrives but only when you
feel really uncomfortable from the
cold. Moving about to keep warm
also helps.
If it takes some time for help to
arrive, now and then when you run
the engine, push the accelerator
pedal slightly so the engine runs
faster than the idle speed. This
keeps the battery charged to restart
the vehicle and to signal for help
with the headlamps. Do this as little
as possible to save fuel.
If the Vehicle Is Stuck
Slowly and cautiously spin the
wheels to free the vehicle when
stuck in sand, mud, ice, or snow.
If stuck too severely for the traction
system to free the vehicle, turn the
traction system off and use the
rocking method. See Traction
Control System (TCS) on
page 9‑33.
{WARNING
If the vehicle's tires spin at high
speed, they can explode, and you
or others could be injured. The
vehicle can overheat, causing an
engine compartment fire or other
damage. Spin the wheels as little
as possible and avoid going
above 56 km/h (35 mph).
Rocking the Vehicle to Get
it Out
Turn the steering wheel left and
right to clear the area around the
front wheels. Turn off any traction
system. Shift back and forth
between R (Reverse) and a low
forward gear, spinning the wheels
as little as possible. To prevent
transmission wear, wait until the
wheels stop spinning before shifting
gears. Release the accelerator
pedal while shifting, and press
lightly on the accelerator pedal
when the transmission is in gear.
Slowly spinning the wheels in the
forward and reverse directions
causes a rocking motion that could
free the vehicle. If that does not get
the vehicle out after a few tries, it
might need to be towed out. If the
vehicle does need to be towed out,
see Towing the Vehicle on
page 10‑69.
Page 205 of 382
Black plate (21,1)Buick Verano Owner Manual - 2013 - crc - 10/17/12
Driving and Operating 9-21
2. Open the hood and unwrap theelectrical cord. For vehicles with
a 2.4L engine, the electrical cord
is located on the passenger side
of the engine compartment, near
the air cleaner. For vehicles with
a 2.0L turbo engine, the
electrical cord is located on the
front of the engine, on the driver
side of the vehicle.
3. Plug it into a normal, grounded 110-volt AC outlet.
{WARNING
Plugging the cord into an
ungrounded outlet could cause an
electrical shock. Also, the wrong
kind of extension cord could
overheat and cause a fire. You
could be seriously injured. Plug
the cord into a properly grounded
three-prong 110-volt AC outlet.
If the cord will not reach, use a
heavy-duty three-prong extension
cord rated for at least 15 amps. 4. Before starting the engine, be
sure to unplug and store the
cord as it was before to keep it
away from moving engine parts.
If you do not it could be
damaged.
The length of time the heater should
remain plugged in depends on
several factors. Ask a dealer in the
area where you will be parking the
vehicle for the best advice on this.
Retained Accessory
Power (RAP)
These vehicle accessories may be
used for up to 10 minutes after the
engine is turned off:
.Audio System
.Power Windows
.Sunroof
The power windows and sunroof will
continue to work for up to
10 minutes or until any door is opened. The radio will work when
the key is in ON/RUN or ACC/
ACCESSORY. Once the key is
turned from ON/RUN to LOCK/OFF,
the radio will continue to work for
10 minutes, or until the driver door is
opened or the key is removed from
the ignition.
Shifting Into Park
Use this procedure to shift into
P (Park):
1. Hold the brake pedal down and
set the parking brake.
See Parking Brake on page 9‑30
for more information.
2. Hold the button on the shift lever and push the lever toward the
front of the vehicle into P (Park).
3. Turn the ignition to LOCK/OFF.
4. Remove the key (if equipped).
Page 208 of 382

Black plate (24,1)Buick Verano Owner Manual - 2013 - crc - 10/17/12
9-24 Driving and Operating
Engine Exhaust
{WARNING
Engine exhaust contains carbon
monoxide (CO) which cannot be
seen or smelled. Exposure to CO
can cause unconsciousness and
even death.
Exhaust may enter the vehicle if:
.The vehicle idles in areas
with poor ventilation (parking
garages, tunnels, deep snow
that may block underbody
airflow or tail pipes).
.The exhaust smells or
sounds strange or different.
.The exhaust system leaks
due to corrosion or damage.
.The vehicle exhaust system
has been modified, damaged,
or improperly repaired.(Continued)
WARNING (Continued)
.There are holes or openings
in the vehicle body from
damage or aftermarket
modifications that are not
completely sealed.
If unusual fumes are detected or
if it is suspected that exhaust is
coming into the vehicle:
.Drive it only with the windows
completely down.
.Have the vehicle repaired
immediately.
Never park the vehicle with the
engine running in an enclosed
area such as a garage or a
building that has no fresh air
ventilation.
Running the Vehicle
While Parked
It is better not to park with the
engine running.
If the vehicle is left with the engine
running, follow the proper steps to
be sure the vehicle will not move.
See Shifting Into Park on page 9‑21
and Engine Exhaust on page 9‑24.
If the vehicle has a manual
transmission, see Parking on
page 9‑23.
If parking on a hill and pulling a
trailer, see Driving Characteristics
and Towing Tips on page 9‑51.
Page 217 of 382
Black plate (33,1)Buick Verano Owner Manual - 2013 - crc - 10/17/12
Driving and Operating 9-33
is designed to prevent the vehicle
from rolling, either forward or
rearward, during vehicle drive off.
After the driver completely stops
and holds the vehicle in a complete
standstill on a grade, HSA will be
automatically activated and the DIC
will display the HILL START ASSIST
ACTIVE message. During the
transition period between when the
driver releases the brake pedal and
starts to accelerate to drive off on a
grade, HSA holds the braking
pressure to ensure that there is no
rolling. The brakes will automatically
release after three seconds or when
the accelerator pedal is applied
within the three-second window.
A pop noise might be heard when
the brakes release. This is normal.
It will not activate if the vehicle is in
a drive gear and facing downhill or if
the vehicle is facing uphill and in
R (Reverse).Ride Control Systems
Traction Control
System (TCS)
The vehicle has a Traction Control
System (TCS) that limits wheel spin.
On a front-wheel-drive vehicle, the
system operates if it senses that
one or both of the front wheels are
spinning or beginning to lose
traction. When this happens, the
system brakes the spinning
wheel(s), and/or reduces engine
power to limit wheel spin.
The system may be heard or felt
while it is working, but this is
normal.
TCS is on whenever the vehicle is
started. To limit wheel spin,
especially in slippery road
conditions, the system should
always be left on. But, TCS can be
turned off if needed.TCS/StabiliTrak Light
dflashes to indicate that the
traction control system is active.
If there is a problem detected with
TCS, the appropriate message will
be displayed on the Driver
Information Center (DIC). See Ride
Control System Messages on
page 5‑28. When a message is
displayed and
dcomes on and
stays on, the vehicle is safe to drive
but the system is not operational.
Driving should be adjusted
accordingly.
If
dcomes on and stays on, reset
the system:
1. Stop the vehicle.
Page 271 of 382
Black plate (31,1)Buick Verano Owner Manual - 2013 - crc - 10/17/12
Vehicle Care 10-31
Mini
Fuses Amps Usage
2 10A Oxygen Sensor/Purge
Solenoid
3 15A Ignition Coils/ Injectors
4 15A Spare
5 –Empty
6a –Empty
6b 7.5A Mirror Defogger
7 5A Powertrain Cooling
8 7.5A Mass Air Flow Sensor/
Pre O2
Sensor
9 –Empty
10 5A Battery Potential
Signal
11 7.5A Spare Mini
Fuses Amps Usage
12 –Empty
13 25A Antilock Brake
System
Valves
14 –Empty
15 10A Engine Control
Module
17 10A Transmission Control
Module
22 –Empty
24 15A Right High-Beam
Headlamp
25 15A Left High-Beam
Headlamp
26 15A Front Fog Lamps Mini
Fuses Amps Usage
31 –Empty
32 5A Airbag
33 –Empty
34 7.5A Spare
35 7.5A Door Switch Supply/Left
Power
Window
36 10A Air Conditioning
Compressor
Clutch
37 10A Canister Vent
38 –Empty
39 20A Fuel System Control
Module
40 10A Front Windshield
Washer
Page 272 of 382

Black plate (32,1)Buick Verano Owner Manual - 2013 - crc - 10/17/12
10-32 Vehicle Care
Mini
Fuses Amps Usage
41 –Empty
46 –Empty
47 15A Horn
49 20A Fuel Pump
50 –Empty
51 5A Inside Rear View Mirror
52 –Empty
53 10A Ignition Engine
Control
Module/
Transmission
Control
Module Mini
Fuses Amps Usage
54 7.5A Instrument Cluster/Fuel
System
Control
Module/
Heater,
Ventilation,
and Air
Conditioning
Run/Crank
J-Case Fuses Amps Usage
16 30A Starter Control
18 30A Rear Window Defogger
19 30A Front Power Window
20 30A Rear Power Window J-Case
Fuses Amps Usage
21 40A Rear Electrical
Center
23 –Empty
27 50A Spare
28 –Empty
29 30A Electric Parking
Brake
30 60A Antilock Brake
System
Pump
42 40A Engine Cooling Fan
(RPO LEA)
43 30A Front Wipers
44 –Empty
Page 273 of 382
Black plate (33,1)Buick Verano Owner Manual - 2013 - crc - 10/17/12
Vehicle Care 10-33
J-CaseFuses Amps Usage
45 30A Engine Cooling Fan
(RPO LEA)
48 60A Engine Cooling Fan
Relays Usage 1 Empty
2 Starter
3 Engine Control Powertrain
4 Rear Window Defogger
5 Empty
6 Empty
7 Spare
8 Empty
9 Spare
10 EGR/Coolant Pump/ AIR Solenoid Valve Relays Usage
11 Engine Cooling Fan (RPO LEA)
12 Engine Cooling Fan (RPO LEA)
13 Engine Cooling Fan (RPO LEA)
14 Run/Crank
Instrument Panel Fuse
Block
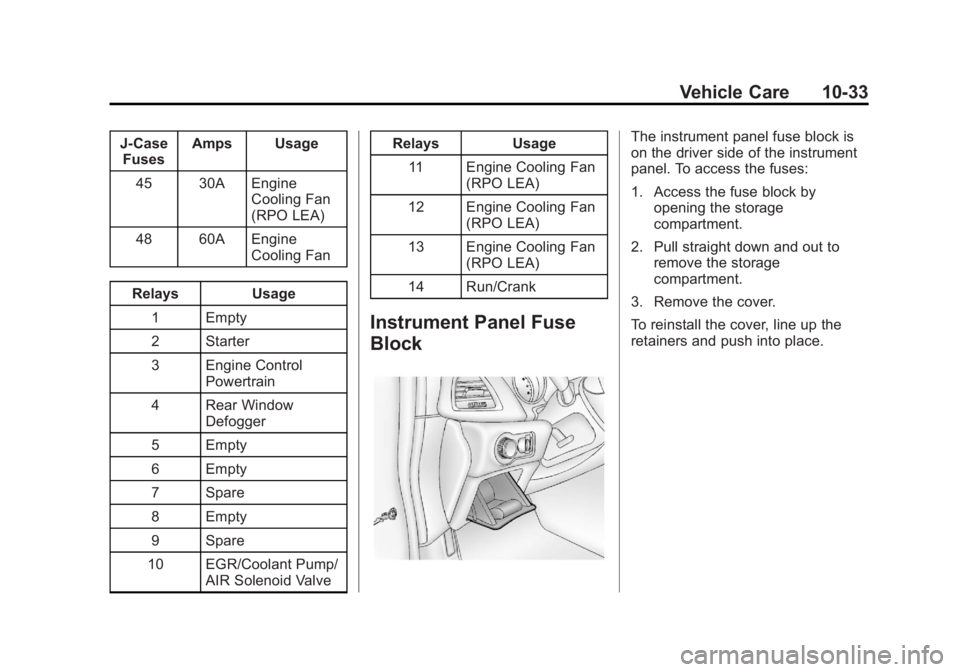
The instrument panel fuse block is
on the driver side of the instrument
panel. To access the fuses:
1. Access the fuse block by opening the storage
compartment.
2. Pull straight down and out to remove the storage
compartment.
3. Remove the cover.
To reinstall the cover, line up the
retainers and push into place.
Page 282 of 382
Black plate (42,1)Buick Verano Owner Manual - 2013 - crc - 10/17/12
10-42 Vehicle Care
Tire Designations
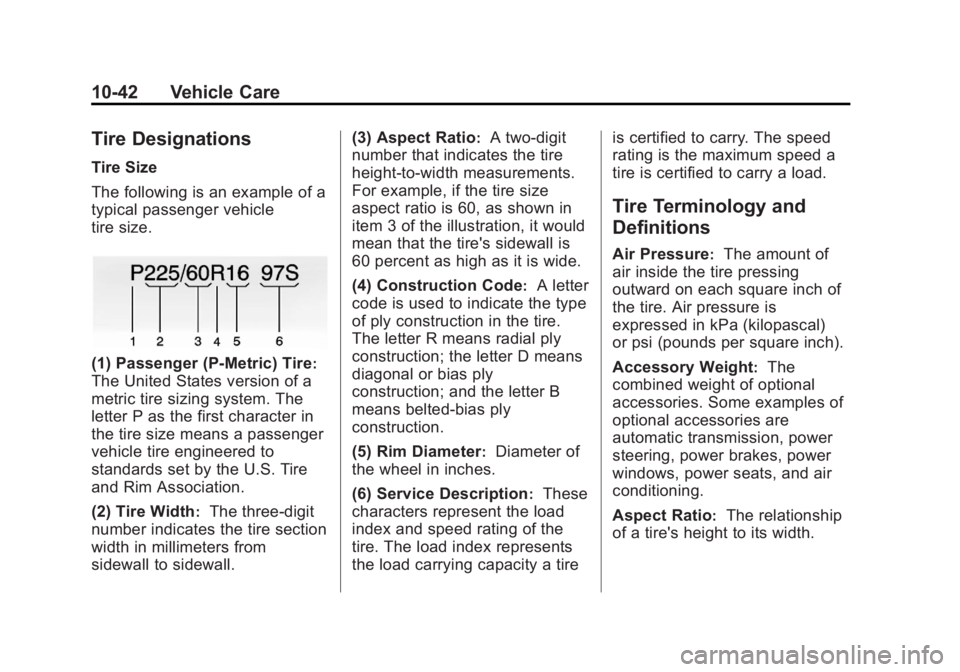
Tire Size
The following is an example of a
typical passenger vehicle
tire size.
(1) Passenger (P-Metric) Tire:
The United States version of a
metric tire sizing system. The
letter P as the first character in
the tire size means a passenger
vehicle tire engineered to
standards set by the U.S. Tire
and Rim Association.
(2) Tire Width
:The three-digit
number indicates the tire section
width in millimeters from
sidewall to sidewall. (3) Aspect Ratio
:A two-digit
number that indicates the tire
height-to-width measurements.
For example, if the tire size
aspect ratio is 60, as shown in
item 3 of the illustration, it would
mean that the tire's sidewall is
60 percent as high as it is wide.
(4) Construction Code
:A letter
code is used to indicate the type
of ply construction in the tire.
The letter R means radial ply
construction; the letter D means
diagonal or bias ply
construction; and the letter B
means belted-bias ply
construction.
(5) Rim Diameter
:Diameter of
the wheel in inches.
(6) Service Description
:These
characters represent the load
index and speed rating of the
tire. The load index represents
the load carrying capacity a tire is certified to carry. The speed
rating is the maximum speed a
tire is certified to carry a load.
Tire Terminology and
Definitions
Air Pressure:The amount of
air inside the tire pressing
outward on each square inch of
the tire. Air pressure is
expressed in kPa (kilopascal)
or psi (pounds per square inch).
Accessory Weight
:The
combined weight of optional
accessories. Some examples of
optional accessories are
automatic transmission, power
steering, power brakes, power
windows, power seats, and air
conditioning.
Aspect Ratio
:The relationship
of a tire's height to its width.
Page 315 of 382

Black plate (75,1)Buick Verano Owner Manual - 2013 - crc - 10/17/12
Vehicle Care 10-75
Underbody Maintenance
Use plain water to flush dirt and
debris from the vehicle's underbody.
Your dealer or an underbody car
washing system can do this. If not
removed, rust and corrosion can
develop.
Sheet Metal Damage
If the vehicle is damaged and
requires sheet metal repair or
replacement, make sure the body
repair shop applies anti-corrosion
material to parts repaired or
replaced to restore corrosion
protection.
Original manufacturer replacement
parts will provide the corrosion
protection while maintaining the
vehicle warranty.
Finish Damage
Quickly repair minor chips and
scratches with touch-up materials
available from your dealer to avoidcorrosion. Larger areas of finish
damage can be corrected in your
dealer's body and paint shop.
Chemical Paint Spotting
Airborne pollutants can fall upon
and attack painted vehicle surfaces
causing blotchy, ring-shaped
discolorations, and small, irregular
dark spots etched into the paint
surface.
Interior Care
To prevent dirt particle abrasions,
regularly clean the vehicle's interior.
Immediately remove any soils. Note
that newspapers or dark garments
that can transfer color to home
furnishings can also permanently
transfer color to the vehicle's
interior.
Use a soft bristle brush to remove
dust from knobs and crevices on the
instrument cluster. Using a mild
soap solution, immediately removehand lotions, sunscreen, and insect
repellent from all interior surfaces or
permanent damage may result.
Your dealer may have products for
cleaning the interior. Use cleaners
specifically designed for the
surfaces being cleaned to prevent
permanent damage. Apply all
cleaners directly to the cleaning
cloth. Do not spray cleaners directly
on any switches or controls.
Cleaners should be removed
quickly. Never allow cleaners to
remain on the surface being
cleaned for extended periods
of time.
Cleaners may contain solvents that
can become concentrated in the
interior. Before using cleaners, read
and adhere to all safety instructions
on the label. While cleaning the
interior, maintain adequate
ventilation by opening the doors and
windows.
Page 316 of 382

Black plate (76,1)Buick Verano Owner Manual - 2013 - crc - 10/17/12
10-76 Vehicle Care
To prevent damage, do not clean
the interior using the following
cleaners or techniques:
.Never use a razor or any other
sharp object to remove a soil
from any interior surface.
.Never use a brush with stiff
bristles.
.Never rub any surface
aggressively or with excessive
pressure.
.Do not use laundry detergents or
dishwashing soaps with
degreasers. For liquid cleaners,
use approximately 20 drops per
3.78 L (1 gal) of water.
A concentrated soap solution will
leave a residue that creates
streaks and attracts dirt. Do not
use solutions that contain strong
or caustic soap.
.Do not heavily saturate the
upholstery when cleaning.
.Do not use solvents or cleaners
containing solvents.
Interior Glass
To clean, use a terry cloth fabric
dampened with water. Wipe droplets
left behind with a clean dry cloth.
Commercial glass cleaners may be
used, if necessary, after cleaning
the interior glass with plain water.
Notice:To prevent scratching,
never use abrasive cleaners on
automotive glass. Abrasive
cleaners or aggressive cleaning
may damage the rear window
defogger.
Notice: Cleaning the windshield
with water during the first three to
six months of ownership will
reduce tendency to fog.
Speaker Covers
Vacuum around a speaker cover
gently, so that the speaker will not
be damaged. Clean spots with just
water and mild soap.
Coated Moldings
Coated moldings should be cleaned.
.When lightly soiled, wipe with a
sponge or soft lint-free cloth
dampened with water.
.When heavily soiled, use warm
soapy water.
Fabric/Carpet/Suede
Start by vacuuming the surface
using a soft brush attachment. If a
rotating brush attachment is being
used during vacuuming, only use it
on the floor carpet. Before cleaning,
gently remove as much of the soil
as possible using one of the
following techniques:
.Gently blot liquids with a paper
towel. Continue blotting until no
more soil can be removed.
.For solid soils, remove as much
as possible prior to vacuuming.