light BUICK ENCLAVE 2013 Manual PDF
[x] Cancel search | Manufacturer: BUICK, Model Year: 2013, Model line: ENCLAVE, Model: BUICK ENCLAVE 2013Pages: 392, PDF Size: 4.27 MB
Page 162 of 392
Black plate (8,1)Buick Verano Owner Manual (GMNA-Localizing-U.S./Canada/Mexico-
6042574) - 2014 - crc - 10/18/13
7-8 Infotainment System
Station Lists
1. Turn the TUNE/MENU knob.
2. Select AM or FM Station List. Allreceivable stations in the current
reception area are displayed. If a
station list has not been created,
an automatic station search
is done.
3. Select the station.
Category Lists
Most stations that broadcast an
RDS program type code specify the
type of programming transmitted.
Some stations change the program
type code depending on the
content. The system stores the RDS
stations sorted by program type in
the FM category list.
To search for a programming type
determined by station:
1. Turn the TUNE/MENU knob.
2. Select FM category list. A list of all programming types available
displays. 3. Select the programming type.
A list of stations that transmit
programming of the selected
type displays.
4. Select the station.
The category lists are updated when
the station lists are updated.
Updating Station & Category Lists
If stations stored in the station list
can no longer be received:
1. Turn the TUNE/MENU knob.
2. Select Update AM or FM Station List, if the stations stored in the
station list are no longer
received. A station search will be
completed and the first station in
the updated list will play.
To cancel the station search, press
the TUNE/MENU knob.
Radio Settings
To access the Radio Settings menu:
1. Press the CONFIG button. 2. Turn the TUNE/MENU knob until
Radio Settings displays. Press
the TUNE/MENU knob to display
other options within that feature.
Audio system settings or features
can be customized for:
.Auto Volume
.Maximum Start Up Volume
.Radio Favorites
.RDS Options
.XM Categories
Auto Volume: Turn the TUNE/
MENU knob to select volume Off,
Low, Medium, or High.
Maximum Start Up Volume: Turn
the TUNE/MENU knob to increase
or decrease the infotainment startup
volume.
Radio Favorites: Turn the TUNE/
MENU knob to highlight the number
of favorites. Press the TUNE/MENU
knob to select.
RDS Options: Press the TUNE/
MENU knob to turn RDS on or off.
Page 163 of 392
Black plate (9,1)Buick Verano Owner Manual (GMNA-Localizing-U.S./Canada/Mexico-
6042574) - 2014 - crc - 10/18/13
Infotainment System 7-9
XM Categories:If equipped, turn
the TUNE/MENU knob to highlight
the category. Press the TUNE/
MENU knob to select. Turn the
TUNE/MENU knob to Show all XM
Categories to display all categories.
Finding a Station
Select a band such as AM, FM,
or SIriusXM (if equipped).
Turn the TUNE/MENU knob to find
a radio station. To select a preset
station, press the corresponding
preset button.
Seeking a Station
Press
s ©or¨\to search for a
station.
Storing a Station as a Favorite
Up to 36 preset stations can be
stored. Each page can store
six preset stations. The presets
within a page can be from different
radio bands. To scroll through the pages, press
the FAV 1-2-3 (favorites) button. The
current page number displays above
the preset buttons. The stored
stations for each list display at the
bottom of the screen. The number of
preset FAV lists can be changed.
To store a radio station to a
favorites page:
1. Press the RADIO/BAND button
until the desired band is
selected.
2. Turn the TUNE/MENU knob to the station.
3. Press the FAV 1-2-3 button to scroll the list.
4. Press and hold one of the preset buttons for more than
two seconds. The station
frequency appears on the preset
button at the bottom of the
display.
5. Repeat the steps for each preset in each page. To recall a preset station from a
favorites page:
1. Press the FAV 1-2-3 button to
scroll to the page.
2. Press the preset button. The stored preset station is recalled.
Autostore Stations
AS 1-2 (Autostore): Autostore
searches and stores six FM and
six AM stations with the strongest
signal. To use autostore:
1. Press RADIO/BAND to select FM or AM.
2. Press AS 1-2 for at least two seconds until a beep
sounds. SEARCH displays on
the radio, followed by the
number of stations found.
3. The radio will automatically store the six strongest stations found
as autostore presets.
Press the AS 1-2 button to alternate
between the autostore stations and
favorites.
Page 165 of 392

Black plate (11,1)Buick Verano Owner Manual (GMNA-Localizing-U.S./Canada/Mexico-
6042574) - 2014 - crc - 10/18/13
Infotainment System 7-11
TUNE/MENU:Turn to select a
channel.
INFO: Press to display additional
information that may be available
about the current song.
w/j(Play/Pause): Press to
pause time shifted content,
if equipped.
Selecting the SiriusXM Band
Press the RADIO/BAND button to
choose between AM, FM, and XM.
The last channel played in that band
begins to play when that band is
selected.
SiriusXM Categories
SiriusXM channels are organized in
categories.
Removing or Adding Categories
Channels in a category that have
been removed can still be accessed
by using the
s ©or¨\buttons,
or the TUNE/MENU knob. To add or remove categories:
1. Press the CONFIG button.
2. Select Radio Settings.
3. Select XM Categories.
4. Turn the TUNE/MENU knob to
highlight the category.
5. Press the TUNE/MENU knob to remove or add the category.
Selecting an SiriusXM Channel
SiriusXM channels can be selected
by using
s©or¨\, the TUNE/
MENU knob, or the TUNE/MENU
system.
Selecting a Channel Using
s ©or
¨\
.Press and releases ©or¨\
to go to the previous or next
channel.
.Press and holds ©or¨\to
scroll through the previous or
next channel until the channel is
reached. Selecting a Channel Using the
TUNE/MENU Knob
To select a channel using the
TUNE/MENU knob:
1. Turn the TUNE/MENU knob and
select Channel List.
2. Select the desired channel.
Selecting a Channel Using the
TUNE/MENU System
1. Turn the TUNE/MENU knob.
2. Select XM Category List.
3. Select the category.
4. Select the channel.
Storing an SiriusXM Channel
as a Favorite
Channels from all bands can be
stored in any order in the favorite
pages.
Up to six channels can be stored in
each favorite page and the number
of available favorite pages can
be set.
Page 176 of 392
Black plate (22,1)Buick Verano Owner Manual (GMNA-Localizing-U.S./Canada/Mexico-
6042574) - 2014 - crc - 10/18/13
7-22 Infotainment System
Pairing a Phone
1. Press the CONFIG button.
2. Select Phone Settings orBluetooth Settings.
3. Select Bluetooth.
4. Select Pair Device (Phone). A four-digit Personal
Identification Number (PIN)
appears on the display. The PIN
is used in Step 6.
5. Start the pairing process on the cell phone to be paired to the
vehicle. See the cell phone
manufacturer's user guide for
information on this process.
6. Locate and select the device named after the vehicle make
and model in the list on the cell
phone. Follow the instructions
on the cell phone to enter the
PIN provided in Step 4, or to
confirm the six-digit code
matches. The system recognizes
the new connected phone after
the pairing process is complete. 7. Repeat Steps 1–6 to pair
additional phones.
Listing All Paired and Connected
Phones
1. Press the CONFIG button.
2. Select Phone Settings or Bluetooth Settings.
3. Select Bluetooth.
4. Select Device List.
Deleting a Paired Phone
1. Press the CONFIG button.
2. Select Phone Settings or Bluetooth Settings.
3. Select Bluetooth.
4. Select Device List.
5. Select the phone to delete and follow the on screen prompts.
Linking to a Different Phone
To link to a different phone, the new
phone must be in the vehicle and
available to be connected to the
Bluetooth system before the
process is started. 1. Press the CONFIG button.
2. Select Phone Settings or
Bluetooth Settings.
3. Select Bluetooth.
4. Select Device List.
5. Select the new phone to link to and follow the on screen
prompts.
If delete is selected, the
highlighted phone will be
deleted.
Making a Call Using
Phone Book
For cell phones that support the
phone book feature, the Bluetooth
system can use the contacts stored
on your cell phone to make calls.
See your cell phone manufacturer's
user guide or contact your wireless
provider to find out if this feature is
supported by your phone.
When a cell phone supports the
phone book feature, the Phone
Book and Call Lists menus are
automatically available.
Page 190 of 392
Black plate (2,1)Buick Verano Owner Manual (GMNA-Localizing-U.S./Canada/Mexico-
6042574) - 2014 - crc - 10/18/13
8-2 Climate Controls
Temperature Control:Turn the
knob clockwise or counterclockwise
to increase or decrease the
temperature setting.
Air Delivery Mode Control: Press
[,Y, orXto change the
direction of the airflow. Air delivery
mode settings can be combined. An
indicator light comes on in the
selected mode button.
[(Floor): Air is directed to the
floor outlets.
Y(Vent): Air is directed to the
instrument panel outlets.
X(Defog): Air is directed to the
windshield and side window vents.
0(Defrost): Press to clear the
windshield of fog or frost more
quickly. Air is directed to the
windshield.
For best results, clear all snow and
ice from the windshield before
defrosting.
Do not drive the vehicle until all the
windows are clear.
Air Conditioning
#(Air Conditioning): Press to
turn the air conditioning on or off. An
indicator light comes on. If the fan is
turned off or the outside
temperature falls below freezing, the
air conditioning compressor will
not work.
h(Recirculation): Press to turn
on the recirculation. An indicator
light comes on. Air is recirculated
inside the vehicle. It helps to quickly
cool the air inside the vehicle or
prevent outside air and odors from
entering. To improve fuel efficiency
and to cool the vehicle faster,
recirculation may be automatically
selected in warm weather when the
temperature is set to the coldest
setting. The recirculation light will
not come on. Press
hto select
recirculation; press it again to select
outside air.
Rear Window Defogger
1(Rear Defogger): Press to turn
the rear window defogger on or off.
The rear window defogger turns off
after about 10 minutes. It can also
be turned off by turning the ignition
to ACC/ACCESSORY or LOCK/
OFF. If turned on again it runs for
about five minutes before
turning off.
Do not drive the vehicle until all the
windows are clear.
{Caution
Do not use a razor blade or sharp
object to clear the inside rear
window. Do not adhere anything
to the defogger grid lines in the
rear glass. These actions may
damage the rear defogger.
Repairs would not be covered by
the vehicle warranty.
Page 191 of 392
Black plate (3,1)Buick Verano Owner Manual (GMNA-Localizing-U.S./Canada/Mexico-
6042574) - 2014 - crc - 10/18/13
Climate Controls 8-3
Dual Automatic Climate Control System
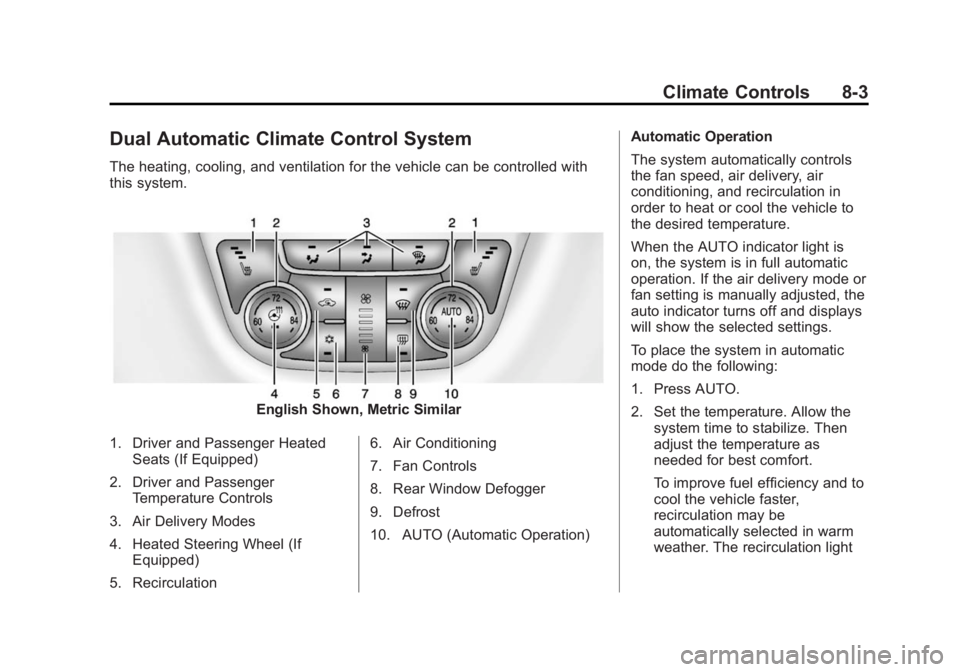
The heating, cooling, and ventilation for the vehicle can be controlled with
this system.
English Shown, Metric Similar
1. Driver and Passenger Heated Seats (If Equipped)
2. Driver and Passenger Temperature Controls
3. Air Delivery Modes
4. Heated Steering Wheel (If Equipped)
5. Recirculation 6. Air Conditioning
7. Fan Controls
8. Rear Window Defogger
9. Defrost
10. AUTO (Automatic Operation)Automatic Operation
The system automatically controls
the fan speed, air delivery, air
conditioning, and recirculation in
order to heat or cool the vehicle to
the desired temperature.
When the AUTO indicator light is
on, the system is in full automatic
operation. If the air delivery mode or
fan setting is manually adjusted, the
auto indicator turns off and displays
will show the selected settings.
To place the system in automatic
mode do the following:
1. Press AUTO.
2. Set the temperature. Allow the
system time to stabilize. Then
adjust the temperature as
needed for best comfort.
To improve fuel efficiency and to
cool the vehicle faster,
recirculation may be
automatically selected in warm
weather. The recirculation light
Page 192 of 392
Black plate (4,1)Buick Verano Owner Manual (GMNA-Localizing-U.S./Canada/Mexico-
6042574) - 2014 - crc - 10/18/13
8-4 Climate Controls
will not come on. Presshto
select recirculation; press it
again to select outside air.
English units can be changed to
metric units through the Driver
Information Center (DIC). See
Vehicle Personalization on
page 5-32.
Manual Operation
9(Fan Control): Press the lower9button to decrease the fan
speed. Pressing the lower button
longer turns the fan and cooling off.
Press the upper
9button to
increase the fan speed. The
selected fan speed is indicated by a
number on the display screen.
Press AUTO to return to automatic
operation.
Air Delivery Modes: Press
[,Y,
or
Xto change the direction of the
airflow. Air delivery mode settings
can be combined. An indicator light
comes on in the selected mode
button. Changing the mode cancels the
automatic operation and the system
goes into manual mode. Press
AUTO to return to automatic
operation.
[(Floor):
Air is directed to the
floor outlets.
Y(Vent): Air is directed to the
instrument panel outlets.
X(Defog): Air is directed to the
windshield and side window vents.
0(Defrost): Press to clear the
windshield of fog or frost more
quickly. Air is directed to the
windshield.
For best results, clear all snow and
ice from the windshield before
defrosting.
#(Air Conditioning): Press to
turn the automatic air conditioning
on or off. If the fan is turned off or
the outside temperature falls below
freezing, the air conditioning
compressor will not run. Press AUTO to return to automatic
operation and the air conditioner
runs as needed. When the indicator
light is on, the air conditioner runs
automatically to cool the air inside
the vehicle or to dry the air needed
to defog the windshield faster.
h(Recirculation):
Press to turn
on recirculation. An indicator light
comes on. Air is recirculated to
quickly cool the inside of the vehicle
or prevent outside air and odors
from entering.
Auto Defog: The climate control
system may have a sensor to
automatically detect high humidity
inside the vehicle. When high
humidity is detected, the climate
control system may adjust to
outside air supply and turn on the
air conditioner. If the climate control
system does not detect possible
window fogging, it returns to normal
operation. To turn Auto Defog off or
on, see "Climate and Air Quality"
under Vehicle Personalization on
page 5-32.
Page 193 of 392
Black plate (5,1)Buick Verano Owner Manual (GMNA-Localizing-U.S./Canada/Mexico-
6042574) - 2014 - crc - 10/18/13
Climate Controls 8-5
Rear Window Defogger
=(Rear Window Defogger):
Press to turn the rear window
defogger on or off.
The rear window defogger turns off
automatically after about
10 minutes. If turned on again it
runs for about five minutes before
turning off.
The rear window defogger can be
set to automatic operation; see
“Climate and Air Quality” under
Vehicle Personalization on
page 5-32. When auto rear defog is
selected, the rear window defogger
turns on automatically when the
interior temperature is cold and the
outside temperature is about 4°C
(40°F) and below. The auto rear
defogger turns off automatically
after about 10 minutes. At higher
speeds, the rear window defogger
may stay on continuously.
For vehicles with heated outside
rearview mirrors, they turn on when
the rear window defogger button is on and help to clear fog or frost from
the surface of the mirrors. See
Heated Mirrors on page 2-19.
{Caution
Do not try to clear frost or other
material from the inside of the
front windshield and rear window
with a razor blade or anything
else that is sharp. This may
damage the rear window
defogger grid and affect the
radio's ability to pick up stations
clearly. The repairs would not be
covered by the vehicle warranty.
MorL(Heated Seats, If
Equipped): Press to turn the
heated seats on or off. See Heated
Front Seats on page 3-6.
((Heated Steering Wheel, If
Equipped): Press to turn the
heated steering wheel on or off. See
Heated Steering Wheel on
page 5-3. Remote Start Climate Control
Operation:
For vehicles with the
remote vehicle start feature, the
climate control system may run
when the vehicle is started remotely.
The system uses the driver ’s
previous settings to heat or cool the
inside of the vehicle. The rear defog
may come on during remote start
based on cold ambient conditions.
The rear defog indicator light does
not come on during a remote start.
If the vehicle has front heated seats,
they may come on during a remote
start. The heated seat indicator
lights do not come on during a
remote start. See Remote Vehicle
Start on page 2-9 andHeated Front
Seats on page 3-6.
Sensors
The solar sensor, located on top of
the instrument panel near the
windshield, monitors the solar heat.
Page 200 of 392
Black plate (6,1)Buick Verano Owner Manual (GMNA-Localizing-U.S./Canada/Mexico-
6042574) - 2014 - crc - 10/18/13
9-6 Driving and Operating
{Warning
Wet brakes can cause crashes.
They might not work as well in a
quick stop and could cause
pulling to one side. You could
lose control of the vehicle.
After driving through a large
puddle of water or a car/vehicle
wash, lightly apply the brake
pedal until the brakes work
normally.
Flowing or rushing water creates
strong forces. Driving through
flowing water could cause the
vehicle to be carried away. If this
happens, you and other vehicle
occupants could drown. Do not
ignore police warnings and be
very cautious about trying to drive
through flowing water.
Hydroplaning
Hydroplaning is dangerous. Water
can build up under the vehicle's
tires so they actually ride on the
water. This can happen if the road is
wet enough and you are going fast
enough. When the vehicle is
hydroplaning, it has little or no
contact with the road.
There is no hard and fast rule about
hydroplaning. The best advice is to
slow down when the road is wet.
Other Rainy Weather Tips
Besides slowing down, other wet
weather driving tips include:
.Allow extra following distance.
.Pass with caution.
.Keep windshield wiping
equipment in good shape.
.Keep the windshield washer fluid
reservoir filled.
.Have good tires with proper
tread depth. SeeTires on
page 10-39.
.Turn off cruise control.
Highway Hypnosis
Always be alert and pay attention to
your surroundings while driving.
If you become tired or sleepy, find a
safe place to park the vehicle
and rest.
Other driving tips include:
.Keep the vehicle well ventilated.
.Keep the interior
temperature cool.
.Keep your eyes moving —scan
the road ahead and to the sides.
.Check the rearview mirror and
vehicle instruments often.
Hill and Mountain Roads
Driving on steep hills or through
mountains is different than driving
on flat or rolling terrain. Tips for
driving in these conditions include:
.Keep the vehicle serviced and in
good shape.
Page 203 of 392
Black plate (9,1)Buick Verano Owner Manual (GMNA-Localizing-U.S./Canada/Mexico-
6042574) - 2014 - crc - 10/18/13
Driving and Operating 9-9
If it takes some time for help to
arrive, now and then when you run
the engine, push the accelerator
pedal slightly so the engine runs
faster than the idle speed. This
keeps the battery charged to restart
the vehicle and to signal for help
with the headlamps. Do this as little
as possible to save fuel.
If the Vehicle Is Stuck
Slowly and cautiously spin the
wheels to free the vehicle when
stuck in sand, mud, ice, or snow.
If stuck too severely for the traction
system to free the vehicle, turn the
traction system off and use the
rocking method. SeeTraction
Control/Electronic Stability Control
on page 9-33.
{Warning
If the vehicle's tires spin at high
speed, they can explode, and you
or others could be injured. The
vehicle can overheat, causing an
engine compartment fire or other
damage. Spin the wheels as little
as possible and avoid going
above 56 km/h (35 mph).
Rocking the Vehicle to Get
it Out
Turn the steering wheel left and
right to clear the area around the
front wheels. Turn off any traction
system. Shift back and forth
between R (Reverse) and a low
forward gear, spinning the wheels
as little as possible. To prevent
transmission wear, wait until the
wheels stop spinning before shifting
gears. Release the accelerator
pedal while shifting, and press
lightly on the accelerator pedal
when the transmission is in gear. Slowly spinning the wheels in the
forward and reverse directions
causes a rocking motion that could
free the vehicle. If that does not get
the vehicle out after a few tries, it
might need to be towed out. If the
vehicle does need to be towed out,
see
Towing the Vehicle on
page 10-72.
Vehicle Load Limits
It is very important to know how
much weight the vehicle can
carry. This weight is called the
vehicle capacity weight and
includes the weight of all
occupants, cargo, and all
nonfactory-installed options.
Two labels on the vehicle show
how much weight it may
properly carry, the Tire and
Loading Information label and
the Certification label.