buttons BUICK ENCLAVE 2015 User Guide
[x] Cancel search | Manufacturer: BUICK, Model Year: 2015, Model line: ENCLAVE, Model: BUICK ENCLAVE 2015Pages: 395, PDF Size: 4.64 MB
Page 154 of 395
Black plate (45,1)Buick Enclave Owner Manual (GMNA-Localizing-U.S./Canada/Mexico-
7576029) - 2015 - CRC - 8/15/14
Instruments and Controls 5-45
Press the customization button until
FACTORY SETTINGS appears on
the DIC display. Press the set/reset
button once to access the settings
for this feature. Then press the
customization button to scroll
through the following settings:
RESTORE ALL (default):The
customization features will be set to
their factory default settings.
DO NOT RESTORE: The
customization features will not be
set to their factory default settings.
To select a setting, press the set/
reset button while the desired
setting is displayed on the DIC.
EXIT FEATURE SETTINGS
This feature allows you to exit the
feature settings menu.
Press the customization button until
FEATURE SETTINGS PRESS
V
TO EXIT appears in the DIC display.
Press the set/reset button once to
exit the menu. If you do not exit, pressing the
customization button again will
return you to the beginning of the
feature settings menu.
Exiting the Feature
Settings Menu
The feature settings menu will be
exited when any of the following
occurs:
.The vehicle is shifted out of
P (Park).
.The vehicle is no longer in
ON/RUN.
.The trip/fuel or vehicle
information DIC buttons are
pressed.
.The end of the feature settings
menu is reached and exited.
.A 40-second time period has
elapsed with no selection made.
Universal Remote
System
See
Radio Frequency Statement on
page 13-12.
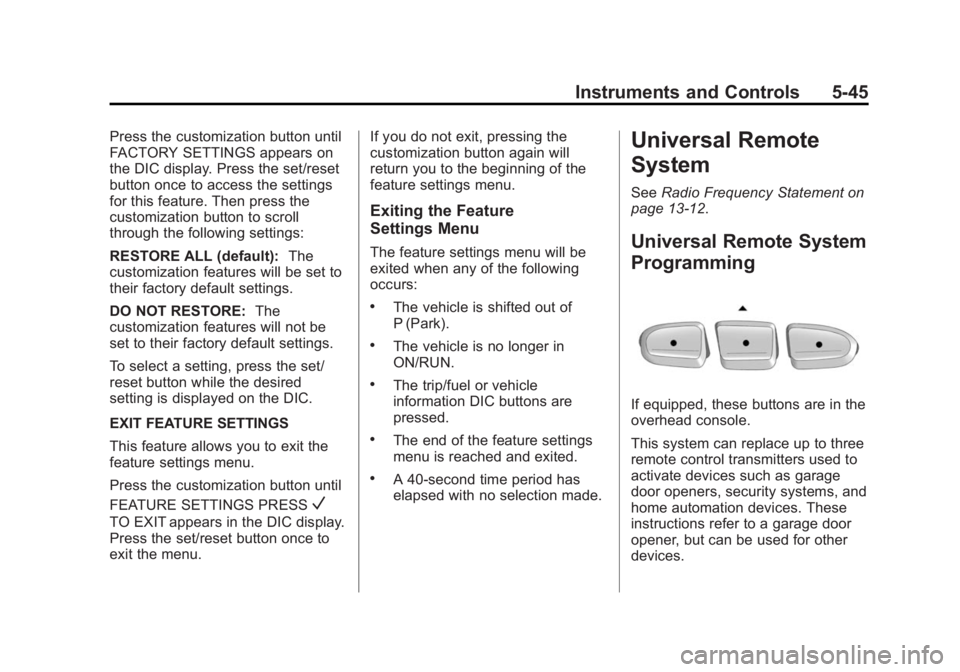
Universal Remote System
Programming
If equipped, these buttons are in the
overhead console.
This system can replace up to three
remote control transmitters used to
activate devices such as garage
door openers, security systems, and
home automation devices. These
instructions refer to a garage door
opener, but can be used for other
devices.
Page 155 of 395
Black plate (46,1)Buick Enclave Owner Manual (GMNA-Localizing-U.S./Canada/Mexico-
7576029) - 2015 - CRC - 8/15/14
5-46 Instruments and Controls
Do not use the Universal Remote
system with any garage door opener
that does not have the stop and
reverse feature. This includes any
garage door opener model
manufactured before April 1, 1982.
Read these instructions completely
before programming the Universal
Remote system. It may help to have
another person assist with the
programming process.
Keep the original hand-held
transmitter for use in other vehicles
as well as for future programming.
Erase the programming when
vehicle ownership is terminated.
See“Erasing Universal Remote
System Buttons” later in this
section.
To program a garage door opener,
park outside directly in line with and
facing the garage door opener
receiver. Clear all people and
objects near the garage door. Make sure the hand-held transmitter
has a new battery for quicker and
more accurate transmission of the
radio-frequency signal.
Programming the Universal
Remote System
For questions or help programming
the Universal Remote system, call
1-800-355-3515 or see
www.homelink.com.
Programming involves
time-sensitive actions, and may time
out causing the procedure to be
repeated.
To program up to three devices:
1. Hold the end of the hand-held
transmitter about 3 to 8 cm (1 to
3 in) away from the Universal
Remote system buttons with the
indicator light in view. The
hand-held transmitter was
supplied by the manufacturer of
the garage door opener receiver. 2. At the same time, press and
hold both the hand-held
transmitter button and one of the
three Universal Remote system
buttons to be used to operate
the garage door. Do not release
either button until the indicator
light changes from a slow to a
rapid flash. Then release both
buttons.
Some garage door openers may
require substitution of Step 2
with the procedure under “Radio
Signals for Canada and Some
Gate Operators” later in this
section.
3. Press and hold the newly programmed Universal Remote
system button for five seconds
while watching the indicator light
and garage door activation.
.If the indicator light stays on
continuously or the garage
door moves when the
button is pressed, then
Page 156 of 395
Black plate (47,1)Buick Enclave Owner Manual (GMNA-Localizing-U.S./Canada/Mexico-
7576029) - 2015 - CRC - 8/15/14
Instruments and Controls 5-47
programming is complete.
There is no need to
complete Steps 4–6.
.If the indicator light does
not come on or the garage
door does not move, a
second button press may
be required. For a second
time, press and hold the
newly programmed button
for five seconds. If the light
stays on or the garage door
moves, programming is
complete.
.If the indicator light blinks
rapidly for two seconds,
then changes to a solid light
and the garage door does
not move, continue with
programming Steps 4–6.
Learn or Smart Button
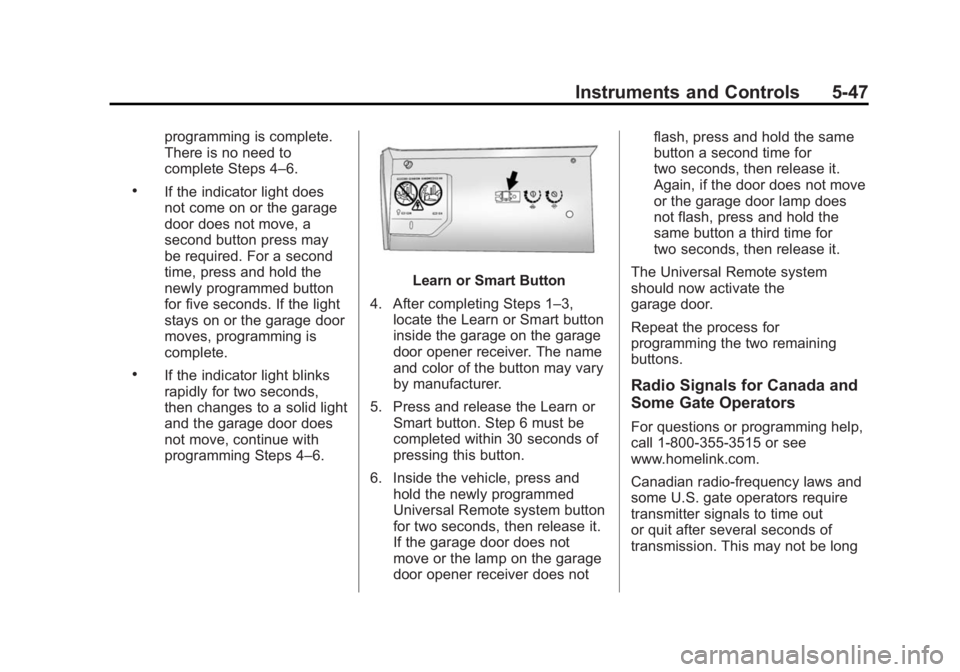
4. After completing Steps 1–3, locate the Learn or Smart button
inside the garage on the garage
door opener receiver. The name
and color of the button may vary
by manufacturer.
5. Press and release the Learn or Smart button. Step 6 must be
completed within 30 seconds of
pressing this button.
6. Inside the vehicle, press and hold the newly programmed
Universal Remote system button
for two seconds, then release it.
If the garage door does not
move or the lamp on the garage
door opener receiver does not flash, press and hold the same
button a second time for
two seconds, then release it.
Again, if the door does not move
or the garage door lamp does
not flash, press and hold the
same button a third time for
two seconds, then release it.
The Universal Remote system
should now activate the
garage door.
Repeat the process for
programming the two remaining
buttons.
Radio Signals for Canada and
Some Gate Operators
For questions or programming help,
call 1-800-355-3515 or see
www.homelink.com.
Canadian radio-frequency laws and
some U.S. gate operators require
transmitter signals to time out
or quit after several seconds of
transmission. This may not be long
Page 157 of 395
Black plate (48,1)Buick Enclave Owner Manual (GMNA-Localizing-U.S./Canada/Mexico-
7576029) - 2015 - CRC - 8/15/14
5-48 Instruments and Controls
enough for the Universal Remote
system to pick up the signal during
programming.
If the programming did not work,
replace Step 2 under“Programming
the Universal Remote System” with
the following:
Press and hold the Universal
Remote system button while
pressing and releasing the
hand-held transmitter button every
two seconds until the signal has
been successfully accepted by the
Universal Remote system. The
Universal Remote system indicator
light will flash slowly at first and then
rapidly. Proceed with Step 3 under
“Programming the Universal Remote
System” to complete.Universal Remote System
Operation
Using the Universal Remote
System
Press and hold the appropriate
Universal Remote system button for
at least one-half second. The
indicator light will come on while the
signal is being transmitted.
Erasing Universal Remote
System Buttons
Erase all programmed buttons when
vehicle ownership is terminated.
To erase:
1. Press and hold the two outside
buttons until the indicator light
begins to flash. This should take
about 10 seconds.
2. Release both buttons.
Reprogramming a Single
Universal Remote System
Button
To reprogram any of the system
buttons:
1. Press and hold any one of the buttons. Do not release the
button.
2. The indicator light will begin to flash after 20 seconds. Without
releasing the button, proceed
with Step 1 under “Programming
the Universal Remote System.”
Page 167 of 395
Black plate (2,1)Buick Enclave Owner Manual (GMNA-Localizing-U.S./Canada/Mexico-
7576029) - 2015 - CRC - 8/15/14
7-2 Infotainment System
The infotainment system has built-in
features intended to help avoid
distraction by disabling some
functions when driving. These
functions may gray out when they
are unavailable. Many infotainment
features are also available through
the instrument cluster and steering
wheel controls.Before driving:
.Become familiar with the
operation, faceplate buttons, and
screen buttons.
.Set up the audio by presetting
favorite stations, setting the
tone, and adjusting the
speakers.
.Set up phone numbers in
advance so they can be called
easily by pressing a single
button or by using a single voice
command if equipped with
Bluetooth phone capability.See
Defensive Driving on page 9-3.
To play the infotainment system with
the ignition off, see Retained
Accessory Power (RAP) on
page 9-19.
Theft-Deterrent Feature
TheftLock®is designed to
discourage theft of the vehicle's
radio by learning a portion of the
Vehicle Identification Number (VIN).
The radio does not operate if it is
stolen or moved to a different
vehicle.
Page 168 of 395
Black plate (3,1)Buick Enclave Owner Manual (GMNA-Localizing-U.S./Canada/Mexico-
7576029) - 2015 - CRC - 8/15/14
Infotainment System 7-3
Overview
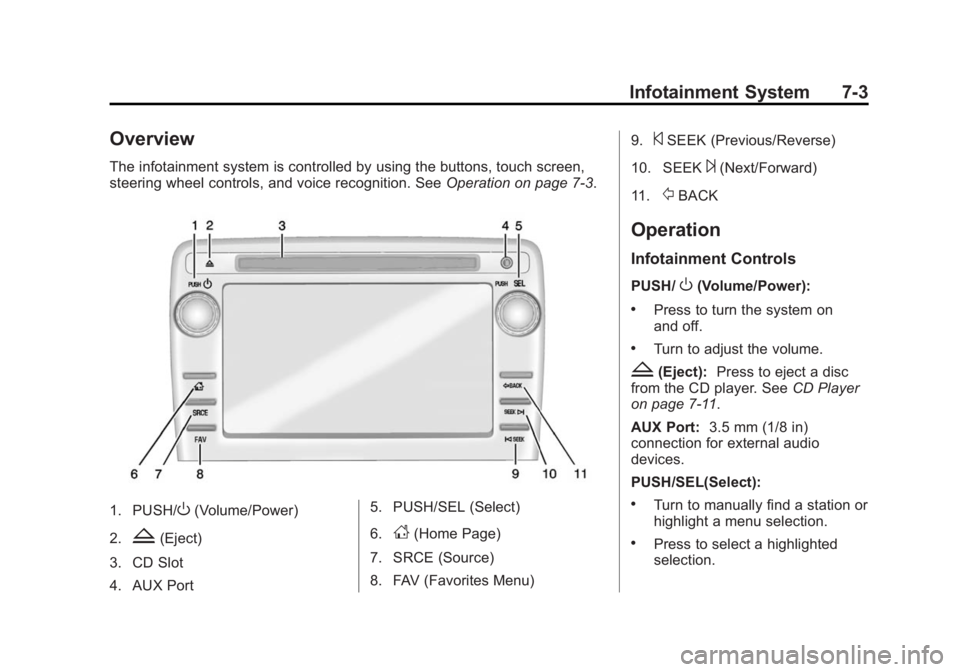
The infotainment system is controlled by using the buttons, touch screen,
steering wheel controls, and voice recognition. SeeOperation on page 7-3.
1. PUSH/O(Volume/Power)
2.
Z(Eject)
3. CD Slot
4. AUX Port 5. PUSH/SEL (Select)
6.D(Home Page)
7. SRCE (Source)
8. FAV (Favorites Menu) 9.
©SEEK (Previous/Reverse)
10. SEEK
¨(Next/Forward)
11.
/BACK
Operation
Infotainment Controls
PUSH/O(Volume/Power):
.Press to turn the system on
and off.
.Turn to adjust the volume.
Z(Eject): Press to eject a disc
from the CD player. See CD Player
on page 7-11.
AUX Port: 3.5 mm (1/8 in)
connection for external audio
devices.
PUSH/SEL(Select):
.Turn to manually find a station or
highlight a menu selection.
.Press to select a highlighted
selection.
Page 169 of 395
Black plate (4,1)Buick Enclave Owner Manual (GMNA-Localizing-U.S./Canada/Mexico-
7576029) - 2015 - CRC - 8/15/14
7-4 Infotainment System
D(Home Page):Press to go to
the Home Page. See “Home Page”
in this section.
SRCE (Source): Press to switch
between AM, FM, CD, and if
equipped, SiriusXM
®, front auxiliary,
rear auxiliary, and iPod/USB.
Press and hold to mute/pause the
system. Press and hold again to
unmute/resume the system.
FAV (Favorites Menu): In AM, FM,
or SiriusXM, press to change the
current favorite page number above
the preset buttons. Keep pressing to
scroll through the favorites pages.
The stored stations for each list
display on the bottom of the screen.
The number of preset Favorite
Pages can be changed by pressing
the Settings button on a Home
Page, then pressing Favorites
Pages, and then selecting the
number of Favorite Pages.
©SEEK (Previous/Reverse):
.AM, FM, SiriusXM (if equipped):
Press to seek to the previous
strong station. Press and hold
for Scan. Press
©again to stop
the scan.
.CD, USB: Press to seek to the
beginning of the current or
previous track.
.CD, USB: Press and hold to
quickly reverse through a track.
Release the button to return to
playing speed. See CD Player
on page 7-11 andAuxiliary
Devices on page 7-14.
SEEK
¨(Next/Forward):
.AM, FM, SiriusXM (if equipped):
Press to seek to the next strong
station. Press and hold for Scan.
Press
¨again to stop the scan.
.CD, USB: Press to seek or skip
the next track or program.
.CD, USB: Press and hold to fast
forward through a track. Release
the button to return to playing
speed. See CD Player on
page 7-11 andAuxiliary Devices
on page 7-14.
/BACK: Press to return to the
previous screen in a menu.
Touchscreen Buttons
Touchscreen buttons show visibly
on the screen when available. When
a function is unavailable, the button
may gray-out. When a function is
selected, the button may highlight,
or animate.
Page 174 of 395
Black plate (9,1)Buick Enclave Owner Manual (GMNA-Localizing-U.S./Canada/Mexico-
7576029) - 2015 - CRC - 8/15/14
Infotainment System 7-9
Storing Radio Station Presets
Up to 30 preset stations can be
stored. AM, FM, and SiriusXM (if
equipped) can be mixed.
1. From the AM, FM, or SiriusXMmain page, press and hold
any 1−5 buttons or one of the
preset screen buttons on the
banner until a beep is heard.
The new preset information
displays on that screen button.
2. Repeat for each preset.
Mixed-Band Presets
Each favorite page can store
five preset stations. The presets
within a page can be from different
radio bands.
To scroll through the pages, press
FAV or the FAV screen button on the
top bar. The current page number
displays above the preset buttons.
The stored stations for each favorite
page display on the preset buttons. To change the number of favorite
pages displayed:
1. Press Settings on the
Home Page.
2. Press Favorite Pages.
3. Select the number of pages to display.
Recalling a Preset Station
To recall a preset station from a
favorites page, do one the following:
.Press the FAV screen button at
the top bar to display the preset
pop-up. Press one of the preset
screen buttons to go to the
selected preset station.
.In the AM, FM, or SiriusXM (if
equipped) main page, press one
of the preset screen buttons to
go to the selected preset station.
Satellite Radio
If equipped, vehicles with a valid
SiriusXM®satellite radio
subscription can receive SiriusXM
programming. SiriusXM satellite radio has a wide
variety of programming and
commercial-free music, coast to
coast, and in digital-quality sound.
For more information, see
www.siriusxm.com or call
1-866-635-2349 (U.S.) and
www.xmradio.ca or call
1-877-209-0079 (Canada).
When SiriusXM is active, the station
name, number, category name,
song title, and artist display on the
screen. SiriusXM may update the
background picture at any time.
SiriusXM Categories
SiriusXM stations are organized in
categories.
Adding or Removing SiriusXM
Categories
Using the home page:
1. Press the Settings screen button
on the Home Page.
2. Select XM Categories.
Page 178 of 395
Black plate (13,1)Buick Enclave Owner Manual (GMNA-Localizing-U.S./Canada/Mexico-
7576029) - 2015 - CRC - 8/15/14
Infotainment System 7-13
.The Artist/Album/Song Titles/
Genre information requires a CD
to be fully scanned before the
music navigator works with
these menus.
MP3 Audio
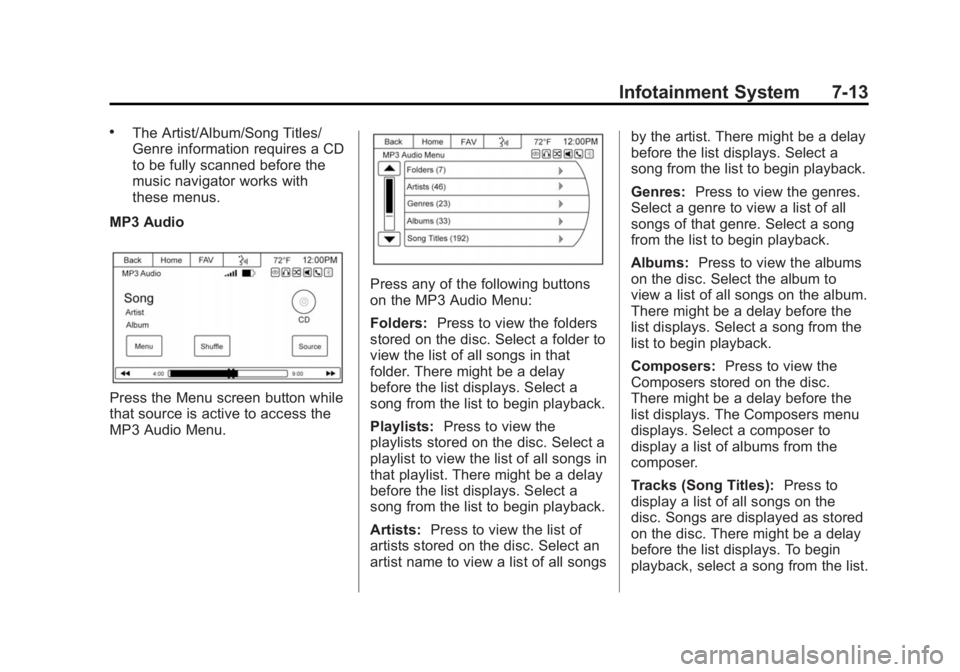
Press the Menu screen button while
that source is active to access the
MP3 Audio Menu.
Press any of the following buttons
on the MP3 Audio Menu:
Folders: Press to view the folders
stored on the disc. Select a folder to
view the list of all songs in that
folder. There might be a delay
before the list displays. Select a
song from the list to begin playback.
Playlists: Press to view the
playlists stored on the disc. Select a
playlist to view the list of all songs in
that playlist. There might be a delay
before the list displays. Select a
song from the list to begin playback.
Artists: Press to view the list of
artists stored on the disc. Select an
artist name to view a list of all songs by the artist. There might be a delay
before the list displays. Select a
song from the list to begin playback.
Genres:
Press to view the genres.
Select a genre to view a list of all
songs of that genre. Select a song
from the list to begin playback.
Albums: Press to view the albums
on the disc. Select the album to
view a list of all songs on the album.
There might be a delay before the
list displays. Select a song from the
list to begin playback.
Composers: Press to view the
Composers stored on the disc.
There might be a delay before the
list displays. The Composers menu
displays. Select a composer to
display a list of albums from the
composer.
Tracks (Song Titles): Press to
display a list of all songs on the
disc. Songs are displayed as stored
on the disc. There might be a delay
before the list displays. To begin
playback, select a song from the list.
Page 179 of 395
Black plate (14,1)Buick Enclave Owner Manual (GMNA-Localizing-U.S./Canada/Mexico-
7576029) - 2015 - CRC - 8/15/14
7-14 Infotainment System
Root Directory
The root directory is treated as a
folder. All files contained directly
under the root directory are
accessed prior to any root directory
folders.
Empty Folders
If a root directory or folder is empty
or contains only folders, the player
advances to the next folder in the
file structure that contains a
compressed audio file. The empty
folder(s) are not displayed or
numbered.
No Folder
When the CD only contains
compressed audio files without any
folders or playlists, all files are
under the root folder.
File System and Naming
The song titles, artists, albums, and
genres are taken from the file's ID3
tag and are only displayed if present
in the tag. If a song title is notpresent in the ID3 tag, the radio
displays the file name as the
track name.
Preprogrammed Playlists
The radio recognizes
preprogrammed playlists; however,
there is no editing capability. These
playlists are treated as special
folders containing compressed
audio song files.
Auxiliary Devices
The vehicle has a 3.5 mm (1/8 in)
auxiliary input jack on the faceplate
and a USB port in the center stack.
If equipped, there are two USB
ports on the rear of the center
console that can be used for
charging only. They can charge
devices that draw 2.1 amps or less.
See the device’
s owner manual for
the specification.
Using the 3.5 mm (1/8 in)
Auxiliary Input Jack
This is not an audio output; do not
plug a headphone set into the front
auxiliary input jack. Connect an
auxiliary input device such as an
iPod, laptop computer, MP3 player,
CD player, or cassette tape player
to the auxiliary input jack for use as
another source for audio listening.
Drivers are encouraged to set up
any auxiliary device while the
vehicle is in P (Park). See
Defensive Driving on page 9-3 for
more information on driver
distraction.
To use an auxiliary input device,
connect a 3.5 mm (1/8 in) cable to
the radio's front auxiliary input jack.
Press SRCE to select the device.
Using the USB Port
The USB port can control a USB
storage device or an iPod using the
radio buttons and knobs.