10-5 BUICK ENCLAVE 2015 Owner's Guide
[x] Cancel search | Manufacturer: BUICK, Model Year: 2015, Model line: ENCLAVE, Model: BUICK ENCLAVE 2015Pages: 395, PDF Size: 4.64 MB
Page 308 of 395

Black plate (53,1)Buick Enclave Owner Manual (GMNA-Localizing-U.S./Canada/Mexico-
7576029) - 2015 - CRC - 8/15/14
Vehicle Care 10-53
treadwear, traction, and
temperature performance. This
applies only to vehicles sold in
the United States. The grades
are molded on the sidewalls of
most passenger car tires. The
Uniform Tire Quality Grading
(UTQG) system does not apply
to deep tread, winter tires,
compact spare tires, tires with
nominal rim diameters of
10 to 12 inches (25 to 30 cm),
or to some limited-production
tires.
While the tires available on
General Motors passenger cars
and light trucks may vary with
respect to these grades, they
must also conform to federal
safety requirements and
additional General Motors Tire
Performance Criteria (TPC)
standards.Quality grades can be found
where applicable on the tire
sidewall between tread shoulder
and maximum section width. For
example:
Treadwear 200 Traction AA
Temperature A
All Passenger Car Tires Must
Conform to Federal Safety
Requirements In Addition To
These Grades.
Treadwear
The treadwear grade is a
comparative rating based on the
wear rate of the tire when tested
under controlled conditions on a
specified government test
course. For example, a tire
graded 150 would wear one and
one-half (1½) times as well on
the government course as a tire
graded 100. The relative
performance of tires depends
upon the actual conditions oftheir use, however, and may
depart significantly from the
norm due to variations in driving
habits, service practices and
differences in road
characteristics and climate.
Traction
The traction grades, from
highest to lowest, are AA, A, B,
and C. Those grades represent
the tire's ability to stop on wet
pavement as measured under
controlled conditions on
specified government test
surfaces of asphalt and
concrete. A tire marked C may
have poor traction performance.
Warning: The traction grade
assigned to this tire is based on
straight-ahead braking traction
tests, and does not include
acceleration, cornering,
hydroplaning, or peak traction
characteristics.
Page 309 of 395

Black plate (54,1)Buick Enclave Owner Manual (GMNA-Localizing-U.S./Canada/Mexico-
7576029) - 2015 - CRC - 8/15/14
10-54 Vehicle Care
Temperature
The temperature grades are A
(the highest), B, and C,
representing the tire's resistance
to the generation of heat and its
ability to dissipate heat when
tested under controlled
conditions on a specified indoor
laboratory test wheel. Sustained
high temperature can cause the
material of the tire to degenerate
and reduce tire life, and
excessive temperature can lead
to sudden tire failure. The grade
C corresponds to a level of
performance which all
passenger car tires must meet
under the Federal Motor Safety
Standard No. 109. Grades B and
A represent higher levels of
performance on the laboratory
test wheel than the minimum
required by law. Warning: The
temperature grade for this tire is
established for a tire that is
properly inflated and notoverloaded. Excessive speed,
underinflation, or excessive
loading, either separately or in
combination, can cause heat
buildup and possible tire failure.
Wheel Alignment and Tire
Balance
The tires and wheels were aligned
and balanced at the factory to
provide the longest tire life and best
overall performance. Adjustments to
wheel alignment and tire balancing
are not necessary on a regular
basis. Consider an alignment check
if there is unusual tire wear or the
vehicle is significantly pulling to one
side or the other. Some slight pull to
the left or right, depending on the
crown of the road and/or other road
surface variations such as troughs
or ruts, is normal. If the vehicle is
vibrating when driving on a smooth
road, the tires and wheels may need
to be rebalanced. See your dealer
for proper diagnosis.
Wheel Replacement
Replace any wheel that is bent,
cracked, or badly rusted or
corroded. If wheel nuts keep coming
loose, the wheel, wheel bolts, and
wheel nuts should be replaced.
If the wheel leaks air, replace it.
Some aluminum wheels can be
repaired. See your dealer if any of
these conditions exist.
Your dealer will know the kind of
wheel that is needed.
Each new wheel should have the
same load-carrying capacity,
diameter, width, offset, and be
mounted the same way as the one it
replaces.
Replace wheels, wheel bolts, wheel
nuts, or Tire Pressure Monitor
System (TPMS) sensors with new
GM original equipment parts.
Page 310 of 395

Black plate (55,1)Buick Enclave Owner Manual (GMNA-Localizing-U.S./Canada/Mexico-
7576029) - 2015 - CRC - 8/15/14
Vehicle Care 10-55
{Warning
Using the wrong replacement
wheels, wheel bolts, or wheel
nuts can be dangerous. It could
affect the braking and handling of
the vehicle. Tires can lose air,
and cause loss of control, causing
a crash. Always use the correct
wheel, wheel bolts, and wheel
nuts for replacement.
{Caution
The wrong wheel can also cause
problems with bearing life, brake
cooling, speedometer or
odometer calibration, headlamp
aim, bumper height, vehicle
ground clearance, and tire or tire
chain clearance to the body and
chassis.
Used Replacement Wheels
{Warning
Replacing a wheel with a used
one is dangerous. How it has
been used or how far it has been
driven may be unknown. It could
fail suddenly and cause a crash.
When replacing wheels, use a
new GM original equipment
wheel.
Tire Chains
{Warning
Do not use tire chains. There is
not enough clearance. Tire chains
used on a vehicle without the
proper amount of clearance can
cause damage to the brakes,
suspension, or other vehicle(Continued)
Warning (Continued)
parts. The area damaged by the
tire chains could cause loss of
control and a crash.
Use another type of traction
device only if its manufacturer
recommends it for the vehicle's
tire size combination and road
conditions. Follow that
manufacturer's instructions. To
avoid vehicle damage, drive slow
and readjust or remove the
traction device if it contacts the
vehicle. Do not spin the wheels.
If traction devices are used, install
them on the front tires.
Page 311 of 395

Black plate (56,1)Buick Enclave Owner Manual (GMNA-Localizing-U.S./Canada/Mexico-
7576029) - 2015 - CRC - 8/15/14
10-56 Vehicle Care
If a Tire Goes Flat
It is unusual for a tire to blow out
while driving, especially if the tires
are maintained properly. SeeTires
on page 10-35. If air goes out of a
tire, it is much more likely to leak
out slowly. But if there ever is a
blowout, here are a few tips about
what to expect and what to do:
If a front tire fails, the flat tire
creates a drag that pulls the vehicle
toward that side. Take your foot off
the accelerator pedal and grip the
steering wheel firmly. Steer to
maintain lane position, and then
gently brake to a stop, well off the
road, if possible. A rear blowout, particularly on a
curve, acts much like a skid and
may require the same correction as
used in a skid. Stop pressing the
accelerator pedal and steer to
straighten the vehicle. It may be
very bumpy and noisy. Gently brake
to a stop, well off the road,
if possible.
{Warning
Driving on a flat tire will cause
permanent damage to the tire.
Re-inflating a tire after it has been
driven on while severely
underinflated or flat may cause a
blowout and a serious crash.
Never attempt to re-inflate a tire
that has been driven on while
severely underinflated or flat.
Have your dealer or an authorized
tire service center repair or
replace the flat tire as soon as
possible.
{Warning
Lifting a vehicle and getting under
it to do maintenance or repairs is
dangerous without the
appropriate safety equipment and
training. If a jack is provided with
the vehicle, it is designed only for
changing a flat tire. If it is used for
anything else, you or others could
be badly injured or killed if the
vehicle slips off the jack. If a jack
is provided with the vehicle, only
use it for changing a flat tire.
If a tire goes flat, avoid further tire
and wheel damage by driving slowly
to a level place, well off the road,
if possible. Turn on the hazard
warning flashers. See Hazard
Warning Flashers on page 6-3.
Page 312 of 395
Black plate (57,1)Buick Enclave Owner Manual (GMNA-Localizing-U.S./Canada/Mexico-
7576029) - 2015 - CRC - 8/15/14
Vehicle Care 10-57
{Warning
Changing a tire can be
dangerous. The vehicle can slip
off the jack and roll over or fall
causing injury or death. Find a
level place to change the tire. To
help prevent the vehicle from
moving:1. Set the parking brake firmly.
2. Put an automatic transmission in P (Park) or a
manual transmission in
1 (First) or R (Reverse).
3. Turn off the engine and do not restart while the vehicle
is raised.
4. Do not allow passengers to remain in the vehicle.
5. Place wheel blocks, if equipped, on both sides of
the tire at the opposite
corner of the tire being
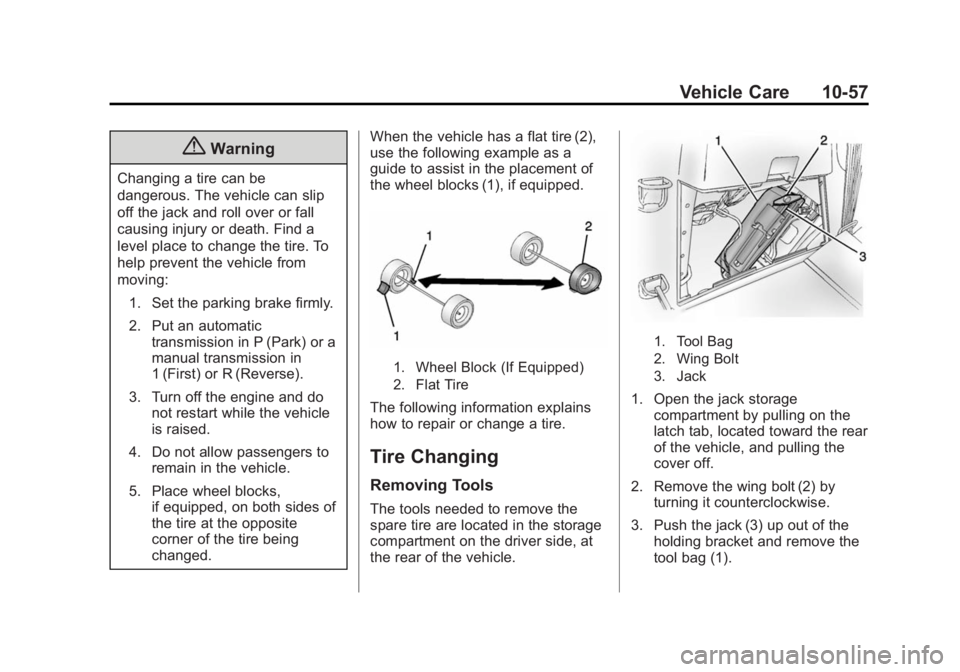
changed. When the vehicle has a flat tire (2),
use the following example as a
guide to assist in the placement of
the wheel blocks (1), if equipped.
1. Wheel Block (If Equipped)
2. Flat Tire
The following information explains
how to repair or change a tire.
Tire Changing
Removing Tools
The tools needed to remove the
spare tire are located in the storage
compartment on the driver side, at
the rear of the vehicle.
1. Tool Bag
2. Wing Bolt
3. Jack
1. Open the jack storage
compartment by pulling on the
latch tab, located toward the rear
of the vehicle, and pulling the
cover off.
2. Remove the wing bolt (2) by turning it counterclockwise.
3. Push the jack (3) up out of the holding bracket and remove the
tool bag (1).
Page 313 of 395
Black plate (58,1)Buick Enclave Owner Manual (GMNA-Localizing-U.S./Canada/Mexico-
7576029) - 2015 - CRC - 8/15/14
10-58 Vehicle Care
4. Turn the jack on its side, with thebottom facing toward you.
5. Pull the jack straight out, bottom first.
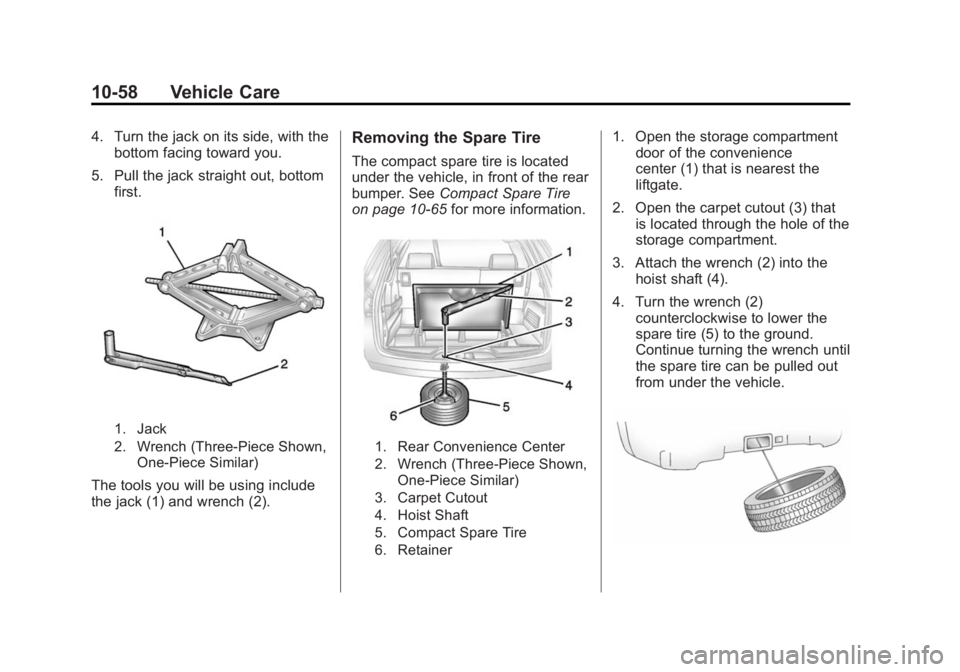
1. Jack
2. Wrench (Three-Piece Shown,
One-Piece Similar)
The tools you will be using include
the jack (1) and wrench (2).
Removing the Spare Tire
The compact spare tire is located
under the vehicle, in front of the rear
bumper. See Compact Spare Tire
on page 10-65 for more information.
1. Rear Convenience Center
2. Wrench (Three-Piece Shown,
One-Piece Similar)
3. Carpet Cutout
4. Hoist Shaft
5. Compact Spare Tire
6. Retainer
1. Open the storage compartment door of the convenience
center (1) that is nearest the
liftgate.
2. Open the carpet cutout (3) that is located through the hole of the
storage compartment.
3. Attach the wrench (2) into the hoist shaft (4).
4. Turn the wrench (2) counterclockwise to lower the
spare tire (5) to the ground.
Continue turning the wrench until
the spare tire can be pulled out
from under the vehicle.
Page 314 of 395

Black plate (59,1)Buick Enclave Owner Manual (GMNA-Localizing-U.S./Canada/Mexico-
7576029) - 2015 - CRC - 8/15/14
Vehicle Care 10-59
5. Tilt the retainer and slip itthrough the wheel opening to
remove the spare tire from the
cable.
6. Turn the wrench clockwise to raise the cable back up after
removing the spare tire.
Do not store a full-size or a flat
road tire under the vehicle. See
“Storing the Spare Tire” and
“Storing the Flat Tire” later in this
section.
Removing the Flat Tire and
Installing the Spare Tire
1. Do a safety check before proceeding. See If a Tire Goes
Flat on page 10-56 for more
information. 2. If the vehicle has a wheel cover,
loosen the plastic nut caps with
the wheel wrench. They will not
come off. Then, using the flat
end of the wheel wrench, pry
along the edge of the cover until
it comes off. Be careful; the
edges may be sharp. Do not try
to remove the cover with your
bare hands.
Store the wheel cover securely
in the rear of the vehicle until
you have the flat tire repaired or
replaced.
If the vehicle has aluminum
wheels, remove the wheel nut
caps using the wheel wrench.
3. Loosen the wheel nuts —but do
not remove them —using the
wrench. For wheels with a wheel
lock key, use the wheel lock key
between the lock nut and
wrench. The key is supplied in
the front passenger door pocket.
{Caution
If this vehicle has wheel locks and
an impact wrench is used to
remove the wheel nuts, the lock
nut or wheel lock key could be
(Continued)
Page 323 of 395
Black plate (68,1)Buick Enclave Owner Manual (GMNA-Localizing-U.S./Canada/Mexico-
7576029) - 2015 - CRC - 8/15/14
10-68 Vehicle Care
4. Open the hoods and locate thepositive (+) and negative (−)
terminal locations on the other
vehicle. Your vehicle has a
remote positive (+) and a remote
negative (−) jump starting
terminal. See Engine
Compartment Overview on
page 10-5 for the terminal
locations.
{Warning
Using a match near a battery can
cause battery gas to explode.
People have been hurt doing this,
and some have been blinded.
Use a flashlight if you need more
light.
Battery fluid contains acid that
can burn you. Do not get it on
you. If you accidentally get it in
your eyes or on your skin, flush
the place with water and get
medical help immediately.
{Warning
Fans or other moving engine
parts can injure you badly. Keep
your hands away from moving
parts once the engine is running.
5. Check that the jumper cables do not have loose or missing
insulation. If they do, you could
get a shock. The vehicles could
be damaged too.
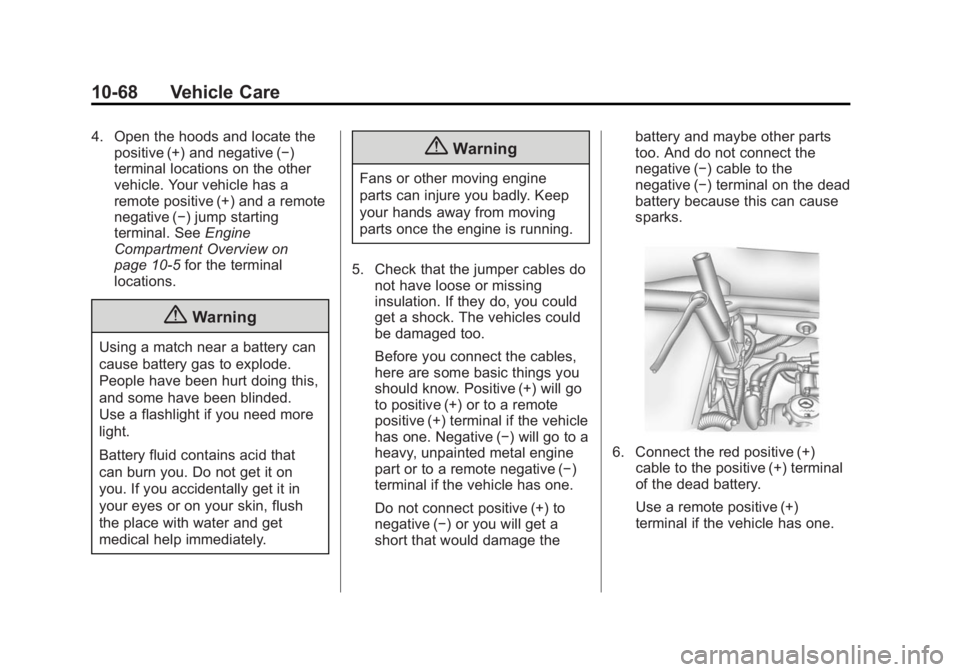
Before you connect the cables,
here are some basic things you
should know. Positive (+) will go
to positive (+) or to a remote
positive (+) terminal if the vehicle
has one. Negative (−) will go to a
heavy, unpainted metal engine
part or to a remote negative (−)
terminal if the vehicle has one.
Do not connect positive (+) to
negative (−) or you will get a
short that would damage the battery and maybe other parts
too. And do not connect the
negative (−) cable to the
negative (−) terminal on the dead
battery because this can cause
sparks.
6. Connect the red positive (+)
cable to the positive (+) terminal
of the dead battery.
Use a remote positive (+)
terminal if the vehicle has one.
Page 383 of 395

Black plate (2,1)Buick Enclave Owner Manual (GMNA-Localizing-U.S./Canada/Mexico-
7576029) - 2015 - CRC - 8/15/14
i-2 INDEX
B
Battery . . . . . . . . . . . . . . . . . . . . . . . 10-22Jump Starting . . . . . . . . . . . . . . . 10-66
Load Management . . . . . . . . . . . . . 6-7
Power Protection . . . . . . . . . . . . . . 6-8
Voltage and ChargingMessages . . . . . . . . . . . . . . . . . . . 5-29
Blade Replacement, Wiper . . . 10-24
Bluetooth Overview . . . . . . . . . . . . . . . . . . . . . 7-17
Brake
System Warning Light . . . . . . . . 5-18
Brakes . . . . . . . . . . . . . . . . . . . . . . . . 10-20 Antilock . . . . . . . . . . . . . . . . . . . . . . . 9-26
Assist . . . . . . . . . . . . . . . . . . . . . . . . . 9-28
Fluid . . . . . . . . . . . . . . . . . . . . . . . . 10-21
Parking . . . . . . . . . . . . . . . . . . . . . . . 9-27
System Messages . . . . . . . . . . . . 5-29
Braking . . . . . . . . . . . . . . . . . . . . . . . . . 9-3
Break-In, New Vehicle . . . . . . . . . 9-14
Bulb Replacement . . . . . . . . . . . . 10-27 Headlamp Aiming . . . . . . . . . . . 10-25
Headlamps . . . . . . . . . . . . . . . . . 10-26 Bulb Replacement (cont'd)
High Intensity Discharge
(HID) Lighting . . . . . . . . . . . . . 10-26
License Plate Lamps . . . . . . . 10-26
Taillamps, Turn Signal,
and Stoplamps . . . . . . . . . . . . 10-26
Buying New Tires . . . . . . . . . . . . . 10-50
C
Calibration . . . . . . . . . . . . . . . . . . . . . . 5-5
California Fuel Requirements . . . . . . . . . . . 9-43
Perchlorate MaterialsRequirements . . . . . . . . . . . . . . . 10-3
Warning . . . . . . . . . . . . . . . . . . . . . . 10-2
Camera
Rear Vision (RVC) . . . . . . . . . . . . 9-38
Canadian Vehicle Owners . . . . . . . . iii
Capacities and Specifications . . . . . . . . . . . . . . . . 12-2
Carbon Monoxide Engine Exhaust . . . . . . . . . . . . . . . 9-21
Liftgate . . . . . . . . . . . . . . . . . . . . . . . . 2-8
Winter Driving . . . . . . . . . . . . . . . . . 9-7 Cargo
Cover . . . . . . . . . . . . . . . . . . . . . . . . . . 4-3
Management System . . . . . . . . . . 4-3
Tie-Downs . . . . . . . . . . . . . . . . . . . . . 4-3
Cautions, Danger, and Warnings . . . . . . . . . . . . . . . . . . . . . . . . iv
CD Player . . . . . . . . . . . . . . . . . . . . . 7-11
Center Console Storage . . . . . . . . 4-2
Chains, Tire . . . . . . . . . . . . . . . . . . 10-55
Charging System Light . . . . . . . . 5-15
Check
Engine Light . . . . . . . . . . . . . . . . . . 5-15
IgnitionTransmission Lock . . . . . . . . 10-23
Child Restraints Infants and Young
Children . . . . . . . . . . . . . . . . . . . . . 3-37
Lower Anchors and Tethers for Children . . . . . . . . . 3-43
Older Children . . . . . . . . . . . . . . . . 3-35
Securing . . . . . . . . . . . . . . . . 3-50, 3-52
Systems . . . . . . . . . . . . . . . . . . . . . . 3-40
Circuit Breakers . . . . . . . . . . . . . . 10-28
Cleaning Exterior Care . . . . . . . . . . . . . . . 10-73
Interior Care . . . . . . . . . . . . . . . . 10-77
Page 385 of 395

Black plate (4,1)Buick Enclave Owner Manual (GMNA-Localizing-U.S./Canada/Mexico-
7576029) - 2015 - CRC - 8/15/14
i-4 INDEX
Driver InformationCenter (DIC) . . . . . . . . . . . . . . . . . 5-23
Driving Characteristics andTowing Tips . . . . . . . . . . . . . . . . . 9-46
Defensive . . . . . . . . . . . . . . . . . . . . . . 9-3
Drunk . . . . . . . . . . . . . . . . . . . . . . . . . . 9-3
For Better Fuel Economy . . . . . 1-22
Hill and Mountain Roads . . . . . . . 9-6
If the Vehicle is Stuck . . . . . . . . . . 9-9
Loss of Control . . . . . . . . . . . . . . . . 9-5
Off-Road Recovery . . . . . . . . . . . . 9-5
Vehicle Load Limits . . . . . . . . . . . . 9-9
Wet Roads . . . . . . . . . . . . . . . . . . . . 9-6
Winter . . . . . . . . . . . . . . . . . . . . . . . . . 9-7
Dual Automatic Climate
Control System . . . . . . . . . . . . . . . . 8-1
E
Electrical Equipment,Add-On . . . . . . . . . . . . . . . . . . . . . . 9-53
Electrical System Engine Compartment
Fuse Block . . . . . . . . . . . . . . . . 10-28 Electrical System (cont'd)
Fuses and Circuit
Breakers . . . . . . . . . . . . . . . . . . 10-28
Instrument Panel Fuse
Block . . . . . . . . . . . . . . . . . . . . . . 10-32
Overload . . . . . . . . . . . . . . . . . . . 10-28
Emergency OnStar
®. . . . . . . . . . . . . . . . . . . . . . 14-2
Engine
Air Cleaner/Filter . . . . . . . . . . . 10-10
Check and Service EngineSoon Light . . . . . . . . . . . . . . . . . . 5-15
Compartment Overview . . . . . . . 10-5
Coolant . . . . . . . . . . . . . . . . . . . . . 10-12
Coolant Temperature Gauge . . . . . . . . . . . . . . . . . . . . . . 5-12
Coolant Temperature Warning Light . . . . . . . . . . . . . . . 5-21
Cooling System . . . . . . . . . . . . . .10-11
Cooling System Messages . . . 5-31
Cover . . . . . . . . . . . . . . . . . . . . . . . . . 10-6
Drive Belt Routing . . . . . . . . . . . . 12-4
Exhaust . . . . . . . . . . . . . . . . . . . . . . 9-21
Heater . . . . . . . . . . . . . . . . . . . . . . . . 9-17
Oil Life System . . . . . . . . . . . . . . . 10-9
Oil Messages . . . . . . . . . . . . . . . . . 5-31 Engine (cont'd)
Overheated Protection
Operating Mode . . . . . . . . . . . 10-18
Overheating . . . . . . . . . . . . . . . . 10-16
Power Messages . . . . . . . . . . . . . 5-32
Pressure Light . . . . . . . . . . . . . . . . 5-22
Running While Parked . . . . . . . . 9-22
Starting . . . . . . . . . . . . . . . . . . . . . . . 9-16
Entry Lighting . . . . . . . . . . . . . . . . . . . 6-6
Equipment, Towing . . . . . . . . . . . . 9-51
Event Data Recorders . . . . . . . . 13-14
Extender, Safety Belt . . . . . . . . . . 3-20
Exterior Lamp Controls . . . . . . . . . 6-1
F
Features
Memory . . . . . . . . . . . . . . . . . . . . . . . . 1-7
Filter, Engine Air Cleaner . . . . . . . . . 10-10
Flash-to-Pass . . . . . . . . . . . . . . . . . . . 6-2
Flashers, Hazard Warning . . . . . . 6-3
Flat Tire . . . . . . . . . . . . . . . . . . . . . . 10-56
Changing . . . . . . . . . . . . . . . . . . . 10-57
Floor Mats . . . . . . . . . . . . . . . . . . . . 10-81