change time BUICK ENCLAVE 2015 Owner's Guide
[x] Cancel search | Manufacturer: BUICK, Model Year: 2015, Model line: ENCLAVE, Model: BUICK ENCLAVE 2015Pages: 395, PDF Size: 4.64 MB
Page 183 of 395

Black plate (18,1)Buick Enclave Owner Manual (GMNA-Localizing-U.S./Canada/Mexico-
7576029) - 2015 - CRC - 8/15/14
7-18 Infotainment System
When to Speak:A short tone
sounds after the system responds
indicating when it is waiting for a
voice command. Wait until the tone
and then speak.
How to Speak: Speak clearly in a
calm and natural voice.
Audio System
When using the in-vehicle Bluetooth
system, sound comes through the
vehicle's front audio system
speakers and overrides the audio
system. Use the audio system
volume knob, during a call, to
change the volume level. The
adjusted volume level remains in
memory for later calls. To prevent
missed calls, a minimum volume
level is used if the volume is turned
down too low.
Bluetooth Controls
Use the buttons located on the
steering wheel to operate the
in-vehicle Bluetooth system. See
Steering Wheel Controls on
page 5-3.
b/g(Press To Talk): Press to
answer incoming calls, confirm
system information, and start
speech recognition.
c/x(End): Press to end a call,
reject a call, or cancel an operation.
Pairing
A Bluetooth enabled cell phone
must be paired to the Bluetooth
system and then connected to the
vehicle before it can be used. See
the cell phone manufacturer's user
guide for Bluetooth functions before
pairing the cell phone. If a Bluetooth
phone is not connected, calls will be
made using OnStar Hands-Free
Calling, if equipped. See “OnStar”if
equipped.
Pairing Information
.A Bluetooth phone with MP3
capability cannot be paired to
the vehicle as a phone and an
MP3 player at the same time.
.Up to five cell phones can be
paired to the Bluetooth system.
.The pairing process is disabled
when the vehicle is moving.
.Pairing only needs to be
completed once, unless the
pairing information on the cell
phone changes or the cell phone
is deleted from the system.
.Only one paired cell phone can
be connected to the Bluetooth
system at a time.
.If multiple paired cell phones are
within range of the system, the
system connects to the first
available paired cell phone in the
order that they were first paired
to the system. To connect to a
different paired phone, see
“Connecting to a Different
Phone” later in this section.
Pairing a Phone
1. Press
b/g.
2. Say “Bluetooth.” This command
can be skipped.
Page 184 of 395

Black plate (19,1)Buick Enclave Owner Manual (GMNA-Localizing-U.S./Canada/Mexico-
7576029) - 2015 - CRC - 8/15/14
Infotainment System 7-19
3. Say“Pair.”The system responds
with instructions and a four-digit
Personal Identification Number
(PIN). The PIN is used in Step 5.
4. Start the pairing process on the cell phone that you want to pair.
For help with this process, see
the cell phone manufacturer's
user guide.
5. Locate the device named “Your
Vehicle” in the list on the cell
phone. Follow the instructions
on the cell phone to enter the
PIN provided in Step 3. After the
PIN is successfully entered, the
system prompts you to provide a
name for the paired cell phone.
This name will be used to
indicate which phones are
paired and connected to the
vehicle. The system responds
with “
successfully paired” after the
pairing process is complete.
6. Repeat Steps 1–5 to pair additional phones. Listing All Paired and Connected
Phones
The system can list all cell phones
paired to it. If a paired cell phone is
also connected to the vehicle, the
system responds with
“is connected”
after that phone name.
1. Press
b/g.
2. Say “Bluetooth.”
3. Say “List.”
Deleting a Paired Phone
If the phone name you want to
delete is unknown, see “Listing All
Paired and Connected Phones.”
1. Press
b/g.
2. Say “Bluetooth.”
3. Say “Delete.” The system asks
which phone to delete.
4. Say the name of the phone you want to delete. Connecting to a Different Phone
To connect to a different cell phone,
the Bluetooth system looks for the
next available cell phone in the
order in which all the available cell
phones were paired. Depending on
which cell phone you want to
connect to, you may have to use
this command several times.
1. Press
b/g.
2. Say “Bluetooth.”
3. Say “Change phone.”
.If another cell phone is
found, the response will be
“
connected.”
.If another cell phone is not
found, the original phone
remains connected.
Page 186 of 395
Black plate (21,1)Buick Enclave Owner Manual (GMNA-Localizing-U.S./Canada/Mexico-
7576029) - 2015 - CRC - 8/15/14
Infotainment System 7-21
Listing Stored Numbers
The list command will list all stored
numbers and name tags.
Using the“List”Command
1. Press
b/g.
2. Say “Directory.”
3. Say “Hands-Free Calling.”
4. Say “List.”
Making a Call
Calls can be made using the
following commands.
Dial or Call: The dial or call
command can be used
interchangeably to dial a phone
number or a stored name tag.
Digit Dial: This command allows a
phone number to be dialed by
entering the digits one at a time.
Re-dial: This command is used to
dial the last number used on the cell
phone. Using the
“Dial”or“Call”
Command
1. Press
b/g.
2. Say “Dial”or“Call.”
3. Say the entire number without pausing, or say the name tag.
Once connected, the person called
will be heard through the audio
speakers.
Calling 911 Emergency
1. Press
b/g.
2. Say “Dial”or“Call.”
3. Say “911.”
4. Say "Dial" or "Call.”
Using the “Digit Dial” Command
The digit dial command allows a
phone number to be dialed by
entering the digits one at a time.
After each digit is entered, the
system repeats back the digit it
heard followed by a tone. If an unwanted number is
recognized by the system, say
“Clear”
at any time to clear the last
number.
To hear all of the numbers
recognized by the system, say
“Verify” at any time.
1. Press
b/g.
2. Say “Digit Dial.”
3. Say each digit, one at a time, that you want to dial. After each
digit is entered, the system
repeats back the digit it heard
followed by a tone. After the last
digit has been entered,
say “Dial.”
Once connected, the person called
will be heard through the audio
speakers.
Using the “Re-dial”Command
1. Press
b/g.
2. After the tone, say “Re-dial.”
Page 189 of 395
Black plate (24,1)Buick Enclave Owner Manual (GMNA-Localizing-U.S./Canada/Mexico-
7576029) - 2015 - CRC - 8/15/14
7-24 Infotainment System
Other Information
The Bluetooth®word mark and
logos are owned by the Bluetooth®
SIG, Inc. and any use of such marks
by General Motors is under license.
Other trademarks and trade names
are those of their respective owners.
See Radio Frequency Statement on
page 13-12.
Settings
Press Settings on the Home Page
to adjust features and preferences,
such as Favorite Pages, Display,
Time, and Date, etc.
1. Press the Settings screen button on the Home Page.
2. Touch-tap the scroll bar until the desired option displays. Select
the desired settings to change.
A few of the setting options change
the way the navigation system
displays or reacts while in use.
Favorite Pages: Press to select
the number of favorite pages
displayed on the screen. The choice
is 1–6 pages.
Display: Press to adjust the screen
settings.
.Display Off: Select to turn the
screen off. Touch the screen to
turn the screen back on.
.Rear Camera: Select Symbols
and/or Guidelines to have them
display on the rear camera
screen.
.Brightness: Select to adjust the
screen brightness.
Speed Compensated Volume:
Select OFF, Low, Medium, or High
sensitivity to automatically adjust
the volume to minimize the effects
of unwanted background noise that
can result from changing road
surfaces, driving speeds, or open
windows. This feature works best at
lower volume settings where
background noise is typically louder
than the sound system volume.
Audible Touch Feedback: Select
to adjust the volume of the beep
that is played after touching a
screen button.
Notification Prompt Volume:
Select to adjust the volume of the
notification prompts.
Page 190 of 395
Black plate (25,1)Buick Enclave Owner Manual (GMNA-Localizing-U.S./Canada/Mexico-
7576029) - 2015 - CRC - 8/15/14
Infotainment System 7-25
Set Time:
.Press the up or down arrows to
change the Hours, Minutes, AM,
PM, or 24 hour setting on the
clock.
.Press and hold to quickly
increase or decrease the time
settings.
.Press OK to save the
adjustments.
.Press the Back or Cancel screen
button to cancel the
adjustments.
Set Date:
.Press the up or down arrows to
increase or decrease the Month,
Day, and Year settings.
.Press and hold to quickly
increase or decrease the date
settings.
.Press OK to save the
adjustments.
.Press the Back or Cancel screen
button to cancel the
adjustments.
XM Categories: Press to
customize which available XM
Categories are displayed and used
in the system.
Create “AS IS” Infotainment
File: This is used for dealer
troubleshooting.
Open Source Software: Select to
view software website information.
Rear Vision Camera (If
Equipped)
The rear vision camera can assist
the driver when backing up by
displaying a view of the area behind
the vehicle. To access the rear camera display
settings, press Display from the
Home screen, then press the Rear
Camera screen button. The
following options are available:
Symbols:
Press to enable or
disable the Rear Park Assist (RPA)
symbols presented over the rear
camera video.
Guidelines: Press to enable or
disable the RPA dynamic guidelines
presented over the rear camera
video.
See Rear Vision Camera (RVC) on
page 9-38.
Screen Brightness
To adjust the screen brightness,
touch the screen, then press + or −
on the brightness control.
Page 193 of 395
Black plate (2,1)Buick Enclave Owner Manual (GMNA-Localizing-U.S./Canada/Mexico-
7576029) - 2015 - CRC - 8/15/14
8-2 Climate Controls
Display Function
Each time the temperature, mode,
or fan controls are adjusted, the
climate control display shows that
function along with the inside
temperature setting. The outside
temperature is displayed on the
instrument cluster.
((On/Off):Turn clockwise or
counterclockwise to turn the climate
control system on or off.
The climate control system will also
turn on if the defrost, AUTO, or air
conditioning buttons are pressed.
Automatic Operation
AUTO (Automatic): The system
automatically controls the inside
temperature, the air delivery, and
the fan speed. To use automatic mode:
1. Press the AUTO button.
When AUTO is selected, the
current temperature(s) is
displayed and the AUTO
indicator light is on.
When AUTO is selected, the air
conditioning and air inlet are
automatically controlled. The air
conditioning runs when the
outside temperature is over 4°C
(40°F). The system is
automatically set to outside air,
unless it is hot outside and then
the air inlet changes to
recirculation mode to help
quickly cool the vehicle. The
recirculation indicator light will
come on. 2. Set the temperature for the
driver and passenger.
To find a comfortable setting,
start with a 22°C (73°F)
temperature setting and allow
about 20 minutes for the system
to regulate. Use the driver side
or passenger side temperature
control to adjust the temperature
setting as necessary. The
system will remain at the
selected setting. Choosing the
warmest or coolest temperatures
does not cause the vehicle to
heat or cool more quickly.
To avoid blowing cold air in cold
weather, the system delays
turning on the fan until warm air
is available. Turn the fan knob to
override this delay and select
the fan speed.
Page 217 of 395
Black plate (16,1)Buick Enclave Owner Manual (GMNA-Localizing-U.S./Canada/Mexico-
7576029) - 2015 - CRC - 8/15/14
9-16 Driving and Operating
If the vehicle cannot be pulled over,
and must be shut off while driving,
turn the ignition to ACC/
ACCESSORY.
ACC (ACC/ACCESSORY):This is
the position in which you can
operate the electrical accessories or
items plugged into the accessory
power outlets. This position unlocks
the ignition and steering wheel. Use
this position if the vehicle must be
pushed or towed.
R(ON/RUN): This position can be
used to operate the electrical
accessories and to display some
instrument panel warning and
indicator lights. This position can
also be used for service and
diagnostics, and to verify the proper
operation of the malfunction
indicator lamp as may be required
for emission inspection purposes.
The switch stays in this position
when the engine is running. The
transmission is also unlocked in this
position. If you leave the key in the
ACC/ACCESSORY or ON/RUN
position with the engine off, the battery could be drained. You may
not be able to start the vehicle if the
battery is allowed to drain for an
extended period of time.
/(START):
This is the position
that starts the engine. When the
engine starts, release the key. The
ignition switch will return to ON/RUN
for driving.
Key Lock Release
The vehicle has an electronic key
lock release system. This system is
to prevent ignition key removal
unless the shift lever is in P (Park).
The key lock release will not work if
the battery is charged less than
9-volts, or uncharged. Try charging
or jump starting the battery. See
Jump Starting on page 10-66
Starting the Engine
Move the shift lever to P (Park) or
N (Neutral). The engine will not start
in any other position. To restart the
engine when the vehicle is already
moving, use N (Neutral) only.
{Caution
Do not try to shift to P (Park) if the
vehicle is moving. If you do, you
could damage the transmission.
Shift to P (Park) only when the
vehicle is stopped.
{Caution
If you add electrical parts or
accessories, you could change
the way the engine operates. Any
resulting damage would not be
covered by the vehicle warranty.
See Add-On Electrical Equipment
on page 9-53.
Page 227 of 395
Black plate (26,1)Buick Enclave Owner Manual (GMNA-Localizing-U.S./Canada/Mexico-
7576029) - 2015 - CRC - 8/15/14
9-26 Driving and Operating
Drive Systems
All-Wheel Drive
Vehicles with this feature transfer
engine power, as required, to all
four wheels. It is fully automatic, and
adjusts itself as needed for road
conditions.
When using a compact spare tire on
an AWD vehicle, the system
automatically detects the compact
spare and reduces AWD
performance to protect the system.
To restore full AWD operation and
prevent excessive wear on the
system, replace the compact spare
with a full-size tire as soon as
possible. SeeCompact Spare Tire
on page 10-65.
Brakes
Antilock Brake
System (ABS)
This vehicle has ABS, an advanced
electronic braking system that helps
prevent a braking skid.
When the vehicle begins to drive
away, ABS checks itself.
A momentary motor or clicking noise
might be heard while this test is
going on, and it might even be
noticed that the brake pedal moves
a little. This is normal.
If there is a problem with ABS, this
warning light stays on. See Antilock
Brake System (ABS) Warning Light
on page 5-19. If driving safely on a wet road and it
becomes necessary to slam on the
brakes and continue braking to
avoid a sudden obstacle, a
computer senses the wheels are
slowing down. If one of the wheels
is about to stop rolling, the computer
will separately work the brakes at
each wheel.
ABS can change the brake pressure
to each wheel, as required, faster
than any driver could. This can help
you steer around the obstacle while
braking hard.
As the brakes are applied, the
computer keeps receiving updates
on wheel speed and controls
braking pressure accordingly.
Remember: ABS does not change
the time needed to get a foot up to
the brake pedal or always decrease
stopping distance. If you get too
close to the vehicle in front of you,
there will not be enough time to
apply the brakes if that vehicle
Page 241 of 395

Black plate (40,1)Buick Enclave Owner Manual (GMNA-Localizing-U.S./Canada/Mexico-
7576029) - 2015 - CRC - 8/15/14
9-40 Driving and Operating
1. View displayed by thecamera.
2. Corner of the rear bumper.
When the System Does Not
Seem To Work Properly
The RVC system might not work
properly or display a clear image if:
.It is dark.
.The sun or the beam of
headlamps is shining directly
into the camera lens.
.Ice, snow, mud, or anything else
builds up on the camera lens.
Clean the lens, rinse it with
water, and wipe it with a soft
cloth.
.The back of the vehicle is in an
accident. The position and
mounting angle of the camera
can change or the camera can
be affected. Be sure to have the
camera and its position and
mounting angle checked at your
dealer.
.There are extreme temperature
changes.
Lane Departure
Warning (LDW)
If equipped, LDW may help avoid
crashes due to unintentional lane
departures. It may provide an alert if
the vehicle is crossing a lane
without using a turn signal in that
direction. LDW uses a camera
sensor to detect the lane markings
at speeds of 56 km/h (35 mph) or
greater.
{Warning
The LDW system does not steer
the vehicle. The LDW system
may not:
.Provide enough time to avoid
a crash.
.Detect lane markings under
poor weather or visibility
conditions. This can occur if
the windshield or headlamps
are blocked by dirt, snow,
or ice; if they are not in
proper condition; or if the sun
shines directly into the
camera.
.Detect road edges.
.Detect lanes on winding or
hilly roads.
If LDW only detects lane
markings on one side of the road,
it will only warn you when
departing the lane on the side
where it has detected a lane (Continued)
Page 262 of 395
Black plate (7,1)Buick Enclave Owner Manual (GMNA-Localizing-U.S./Canada/Mexico-
7576029) - 2015 - CRC - 8/15/14
Vehicle Care 10-7
Engine Oil
To ensure proper engine
performance and long life, careful
attention must be paid to engine oil.
Following these simple, but
important steps will help protect
your investment:
.Always use engine oil approved
to the proper specification and of
the proper viscosity grade. See
“Selecting the Right Engine Oil”
in this section.
.Check the engine oil level
regularly and maintain the
proper oil level. See“Checking
Engine Oil” and“When to Add
Engine Oil” in this section.
.Change the engine oil at the
appropriate time. See Engine Oil
Life System on page 10-9.
.Always dispose of engine oil
properly. See “What to Do with
Used Oil” in this section.
Checking Engine Oil
It is a good idea to check the engine
oil level at each fuel fill. In order to
get an accurate reading, the vehicle
must be on level ground. The
engine oil dipstick handle is a loop.
SeeEngine Compartment Overview
on page 10-5 for the location of the
engine oil dipstick.
Obtaining an accurate oil level
reading is essential:
1. If the engine has been running recently, turn off the engine and
allow several minutes for the oil
to drain back into the oil pan.
Checking the oil level too soon
after engine shutoff will not
provide an accurate oil level
reading.
{Warning
The engine oil dipstick handle
may be hot; it could burn you.
Use a towel or glove to touch the
dipstick handle. 2. Pull out the dipstick and wipe it
with a clean paper towel or cloth,
then push it back in all the way.
Remove it again, keeping the tip
down, and check the level.
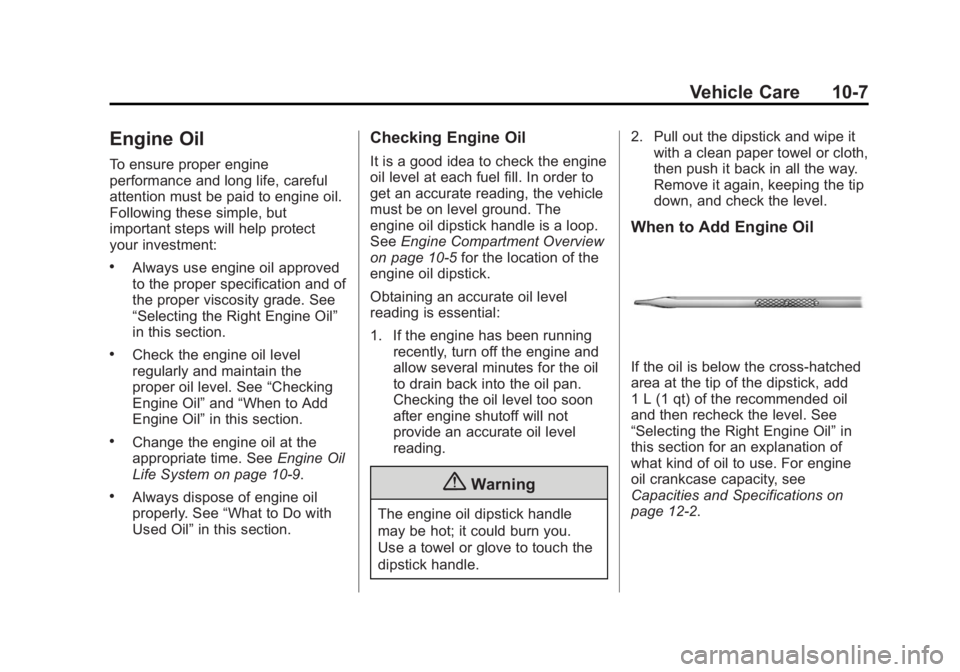
When to Add Engine Oil
If the oil is below the cross-hatched
area at the tip of the dipstick, add
1 L (1 qt) of the recommended oil
and then recheck the level. See
“Selecting the Right Engine Oil” in
this section for an explanation of
what kind of oil to use. For engine
oil crankcase capacity, see
Capacities and Specifications on
page 12-2.