climate settings BUICK ENCLAVE 2015 Owner's Manual
[x] Cancel search | Manufacturer: BUICK, Model Year: 2015, Model line: ENCLAVE, Model: BUICK ENCLAVE 2015Pages: 395, PDF Size: 4.64 MB
Page 2 of 395
Black plate (1,1)Buick Enclave Owner Manual (GMNA-Localizing-U.S./Canada/Mexico-
7576029) - 2015 - CRC - 8/15/14
2015 Buick Enclave Owner ManualM
In Brief. . . . . . . . . . . . . . . . . . . . . . . . 1-1
Instrument Panel . . . . . . . . . . . . . . 1-2
Initial Drive Information . . . . . . . . 1-4
Vehicle Features . . . . . . . . . . . . . 1-14
Performance and Maintenance . . . . . . . . . . . . . . . . 1-21
Keys, Doors, and Windows . . . . . . . . . . . . . . . . . . . . 2-1
Keys and Locks . . . . . . . . . . . . . . . 2-1
Doors . . . . . . . . . . . . . . . . . . . . . . . . . . 2-8
Vehicle Security . . . . . . . . . . . . . . 2-11
Exterior Mirrors . . . . . . . . . . . . . . . 2-14
Interior Mirrors . . . . . . . . . . . . . . . . 2-16
Windows . . . . . . . . . . . . . . . . . . . . . 2-16
Roof . . . . . . . . . . . . . . . . . . . . . . . . . . 2-19
Seats and Restraints . . . . . . . . . 3-1
Head Restraints . . . . . . . . . . . . . . . 3-2
Front Seats . . . . . . . . . . . . . . . . . . . . 3-3
Rear Seats . . . . . . . . . . . . . . . . . . . . 3-8
Safety Belts . . . . . . . . . . . . . . . . . . 3-13
Airbag System . . . . . . . . . . . . . . . . 3-21
Child Restraints . . . . . . . . . . . . . . 3-35 Storage
. . . . . . . . . . . . . . . . . . . . . . . 4-1
Storage Compartments . . . . . . . . 4-1
Additional Storage Features . . . 4-3
Roof Rack System . . . . . . . . . . . . . 4-5
Instruments and Controls . . . . 5-1
Controls . . . . . . . . . . . . . . . . . . . . . . . 5-2
Warning Lights, Gauges, and
Indicators . . . . . . . . . . . . . . . . . . . . 5-9
Information Displays . . . . . . . . . . 5-23
Vehicle Messages . . . . . . . . . . . . 5-29
Vehicle Personalization . . . . . . . 5-38
Universal Remote System . . . . 5-45
Lighting . . . . . . . . . . . . . . . . . . . . . . . 6-1
Exterior Lighting . . . . . . . . . . . . . . . 6-1
Interior Lighting . . . . . . . . . . . . . . . . 6-4
Lighting Features . . . . . . . . . . . . . . 6-6
Infotainment System . . . . . . . . . 7-1
Introduction . . . . . . . . . . . . . . . . . . . . 7-1
Radio . . . . . . . . . . . . . . . . . . . . . . . . . . 7-6
Audio Players . . . . . . . . . . . . . . . . 7-11
Rear Seat Infotainment . . . . . . . 7-15
Phone . . . . . . . . . . . . . . . . . . . . . . . . 7-17 Settings . . . . . . . . . . . . . . . . . . . . . . 7-24
Trademarks and License
Agreements . . . . . . . . . . . . . . . . . 7-26
Climate Controls . . . . . . . . . . . . . 8-1
Climate Control Systems . . . . . . 8-1
Air Vents . . . . . . . . . . . . . . . . . . . . . . . 8-8
Maintenance . . . . . . . . . . . . . . . . . . . 8-9
Driving and Operating . . . . . . . . 9-1
Driving Information . . . . . . . . . . . . . 9-2
Starting and Operating . . . . . . . 9-14
Engine Exhaust . . . . . . . . . . . . . . 9-21
Automatic Transmission . . . . . . 9-22
Drive Systems . . . . . . . . . . . . . . . . 9-26
Brakes . . . . . . . . . . . . . . . . . . . . . . . 9-26
Ride Control Systems . . . . . . . . 9-28
Cruise Control . . . . . . . . . . . . . . . . 9-30
Driver Assistance Systems . . . 9-33
Fuel . . . . . . . . . . . . . . . . . . . . . . . . . . 9-42
Trailer Towing . . . . . . . . . . . . . . . . 9-46
Conversions and Add-Ons . . . 9-53
Page 115 of 395
Black plate (6,1)Buick Enclave Owner Manual (GMNA-Localizing-U.S./Canada/Mexico-
7576029) - 2015 - CRC - 8/15/14
5-6 Instruments and Controls
5. If calibration is necessary,calibrate the compass. See
“Compass Calibration
Procedure” following.
Compass Calibration
The compass can be manually
calibrated. Only calibrate the
compass in a magnetically clean
and safe location, such as an open
parking lot, where driving the
vehicle in circles is not a danger.
It is suggested to calibrate away
from tall buildings, utility wires,
manhole covers, or other industrial
structures, if possible.
If CAL should ever appear in the
DIC display, the compass should be
calibrated.
If the DIC display does not show a
heading, for example, N for North,
or the heading does not change
after making turns, there may be a
strong magnetic field interfering with
the compass. Such interference
may be caused by a magnetic CB or
cell phone antenna mount, a
magnetic emergency light, magnetic note pad holder, or any other
magnetic item. Turn off the vehicle,
move the magnetic item, then turn
on the vehicle and calibrate the
compass.
To calibrate the compass, use the
following procedure:
Compass Calibration Procedure
1. Before calibrating the compass,
make sure the compass zone is
set to the variance zone in which
the vehicle is located. See
“Compass Variance (Zone)
Procedure” earlier in this
section.
Do not operate any switches
such as window, sunroof,
climate controls, seats, etc.
during the calibration procedure.
2. Press the vehicle information button until PRESS
VTO
CALIBRATE COMPASS
displays.
3. Press the set/reset button to start the compass calibration. 4. The DIC will display
CALIBRATING: DRIVE IN
CIRCLES. Drive the vehicle in
tight circles at less than 8 km/h
(5 mph) to complete the
calibration. The DIC will display
CALIBRATION COMPLETE for a
few seconds when the
calibration is complete. The DIC
display will then return to the
previous menu.
Clock
Setting the Digital Clock
Press Settings on the Home Page,
then press the Set Time or Set Date
settings screen button to display the
different options for setting the time
and date.
Set Time:
.Press the up or down arrows to
change the Hours, Minutes, AM,
PM, or the 24 hour setting on the
clock.
Page 116 of 395
Black plate (7,1)Buick Enclave Owner Manual (GMNA-Localizing-U.S./Canada/Mexico-
7576029) - 2015 - CRC - 8/15/14
Instruments and Controls 5-7
.Press and hold to quickly
increase or decrease the time
settings.
.Press OK to save the
adjustments.
.Press the Back or Cancel screen
button to cancel the
adjustments.
Set Date:
.Press the up or down arrows to
increase or decrease the Month,
Day, and Year settings.
.Press and hold to quickly
increase or decrease the date
settings.
.Press OK to save the
adjustments.
.Press the Back or Cancel screen
button to cancel the
adjustments.
Setting the Analog Clock
The clock on the center stack is not
connected to any other vehicle
system. To adjust the time:
1. Press and hold the button directly above the clock to
quickly advance the time.
2. Press and release the button to increase the time by one-minute
intervals.
Power Outlets
The vehicle has 12-volt outlets that
can be used to plug in electrical
equipment, such as a cell phone or
MP3 player.
The power outlets are located:
.On the center stack below the
climate controls.
.Inside the center console.
.At the rear of the center console.
.In the rear cargo area.
Lift the cover to access the outlet
and replace when not in use.
{Warning
Power is always supplied to the
outlets. Do not leave electrical
equipment plugged in when the
vehicle is not in use because the
vehicle could catch fire and cause
injury or death.
{Caution
Leaving electrical equipment
plugged in for an extended period
of time while the vehicle is off will
drain the battery. Always unplug
electrical equipment when not in
use and do not plug in equipment
that exceeds the maximum
20 amp rating.
Certain accessory plugs may not be
compatible with the accessory
power outlet and could overload
Page 196 of 395

Black plate (5,1)Buick Enclave Owner Manual (GMNA-Localizing-U.S./Canada/Mexico-
7576029) - 2015 - CRC - 8/15/14
Climate Controls 8-5
Rear Window Defogger
The rear window defogger uses a
warming grid to remove fog from the
rear window.
R
1(Rear Window Defogger):
Press to turn the rear window
defogger on or off. The rear window
defogger stays on for about
10 minutes, before turning off. The
defogger also turns off when the
engine is turned off. Do not drive the
vehicle until all the windows are
clear.
If equipped with heated outside
rearview mirrors, fog or frost is
cleared from the surface of the
mirror when the rear window defog
button is pressed.
{Caution
Using a razor blade or sharp
object on the inside rear window
can damage the antenna or
defogger. Repairs would not be
(Continued)
Caution (Continued)
covered by the vehicle warranty.
Do not stick anything to the rear
window.
Sensors
The solar sensor in the defrost grille
in the middle of the instrument
panel, monitors the solar heat. Do
not cover the solar sensor or the
system will not work properly.
The interior temperature sensor, on
the instrument panel to the right of
the steering column, measures the
temperature of the air inside the
vehicle.
There is also an exterior
temperature sensor behind the front
grille. This sensor reads the outside
air temperature and helps maintain
the temperature inside the vehicle.
Any cover on the front of the vehicle
could cause a false reading in the
displayed temperature.
The climate control system uses the
information from these sensors to
maintain comfort settings by
adjusting the temperature, fan
speed, and air delivery mode. The
system may also supply cooler air to
the side of the vehicle facing the
sun. The recirculation mode will also
be used as needed to maintain cool
outlet temperatures.
Page 197 of 395
Black plate (6,1)Buick Enclave Owner Manual (GMNA-Localizing-U.S./Canada/Mexico-
7576029) - 2015 - CRC - 8/15/14
8-6 Climate Controls
Rear Climate Control System
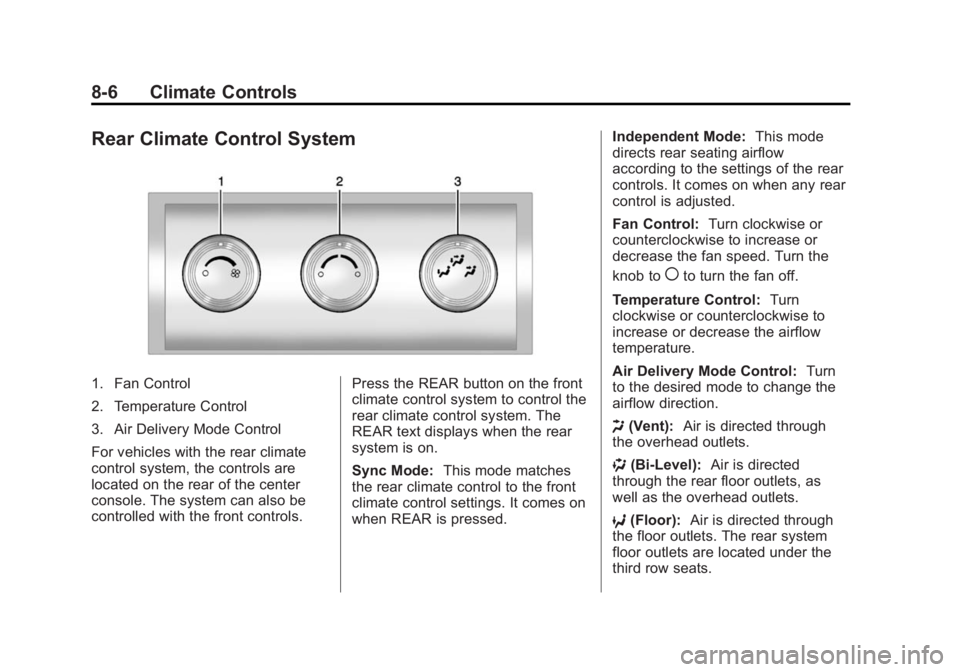
1. Fan Control
2. Temperature Control
3. Air Delivery Mode Control
For vehicles with the rear climate
control system, the controls are
located on the rear of the center
console. The system can also be
controlled with the front controls.Press the REAR button on the front
climate control system to control the
rear climate control system. The
REAR text displays when the rear
system is on.
Sync Mode:
This mode matches
the rear climate control to the front
climate control settings. It comes on
when REAR is pressed. Independent Mode:
This mode
directs rear seating airflow
according to the settings of the rear
controls. It comes on when any rear
control is adjusted.
Fan Control: Turn clockwise or
counterclockwise to increase or
decrease the fan speed. Turn the
knob to
(to turn the fan off.
Temperature Control: Turn
clockwise or counterclockwise to
increase or decrease the airflow
temperature.
Air Delivery Mode Control: Turn
to the desired mode to change the
airflow direction.
H (Vent): Air is directed through
the overhead outlets.
) (Bi-Level): Air is directed
through the rear floor outlets, as
well as the overhead outlets.
6 (Floor): Air is directed through
the floor outlets. The rear system
floor outlets are located under the
third row seats.
Page 198 of 395

Black plate (7,1)Buick Enclave Owner Manual (GMNA-Localizing-U.S./Canada/Mexico-
7576029) - 2015 - CRC - 8/15/14
Climate Controls 8-7
Rear Climate Control System (with Rear Seat Audio)
1. Fan Control
2. Air Delivery Mode Control
3. Temperature Control
If equipped with the rear climate
control system, the controls are on
the rear of the center console.
Press the REAR button on the front
climate control system to control the
rear climate control system. The
system also turns on if any of therear controls, exceptC, are
pressed. The display is activated
when the rear system is on.
The system can also be turned off
by pressing
Cuntil the fan goes off.
Sync Mode: This mode matches
the rear climate control to the front
climate control settings. It comes on
when REAR is pressed. Independent Mode:
This mode
directs rear seating airflow
according to the settings of the rear
controls. It comes on when any rear
control is adjusted.
DandC(Fan Control): Press the
fan up or down buttons to increase
or decrease the fan speed.
Temperature Control: Press + or
− to increase or decrease the air
temperature. The temperature
settings will display in
0-12 increments, going from the
coolest (0) to the warmest (12)
setting.
N(Air Delivery Mode Control):
Press to manually change the
direction of the airflow. Repeatedly
press the button until the desired
mode appears on the display.
H(Vent): Air is directed through
the overhead outlets.
Page 203 of 395
Black plate (2,1)Buick Enclave Owner Manual (GMNA-Localizing-U.S./Canada/Mexico-
7576029) - 2015 - CRC - 8/15/14
9-2 Driving and Operating
Trailer Towing
General TowingInformation . . . . . . . . . . . . . . . . . 9-46
Driving Characteristics and Towing Tips . . . . . . . . . . . . . . . . 9-46
Trailer Towing . . . . . . . . . . . . . . . . 9-49
Towing Equipment . . . . . . . . . . . 9-51
Conversions and Add-Ons
Add-On Electrical
Equipment . . . . . . . . . . . . . . . . . 9-53
Driving Information
Distracted Driving
Distraction comes in many forms
and can take your focus from the
task of driving. Exercise good
judgment and do not let other
activities divert your attention away
from the road. Many local
governments have enacted laws
regarding driver distraction. Become
familiar with the local laws in
your area.
To avoid distracted driving, always
keep your eyes on the road, hands
on the wheel, and mind on the drive.
.Do not use a phone in
demanding driving situations.
Use a hands-free method to
place or receive necessary
phone calls.
.Watch the road. Do not read,
take notes, or look up
information on phones or other
electronic devices.
.Designate a front seat
passenger to handle potential
distractions.
.Become familiar with vehicle
features before driving, such as
programming favorite radio
stations and adjusting climate
control and seat settings.
Program all trip information into
any navigation device prior to
driving.
.Wait until the vehicle is parked
to retrieve items that have fallen
to the floor.
.Stop or park the vehicle to tend
to children.
.Keep pets in an appropriate
carrier or restraint.
.Avoid stressful conversations
while driving, whether with a
passenger or on a cell phone.