clock BUICK ENCLAVE 2015 Owner's Manual
[x] Cancel search | Manufacturer: BUICK, Model Year: 2015, Model line: ENCLAVE, Model: BUICK ENCLAVE 2015Pages: 395, PDF Size: 4.64 MB
Page 10 of 395
Black plate (3,1)Buick Enclave Owner Manual (GMNA-Localizing-U.S./Canada/Mexico-
7576029) - 2015 - CRC - 8/15/14
In Brief 1-3
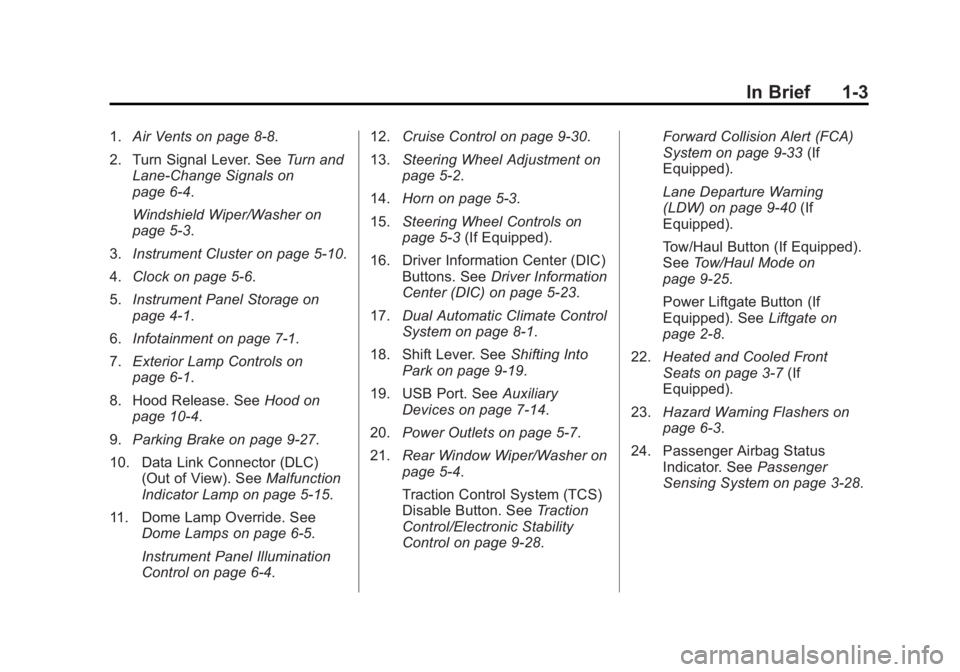
1.Air Vents on page 8-8.
2. Turn Signal Lever. See Turn and
Lane-Change Signals on
page 6-4.
Windshield Wiper/Washer on
page 5-3.
3. Instrument Cluster on page 5-10.
4. Clock on page 5-6.
5. Instrument Panel Storage on
page 4-1.
6. Infotainment on page 7-1.
7. Exterior Lamp Controls on
page 6-1.
8. Hood Release. See Hood on
page 10-4.
9. Parking Brake on page 9-27.
10. Data Link Connector (DLC) (Out of View). See Malfunction
Indicator Lamp on page 5-15.
11. Dome Lamp Override. See Dome Lamps on page 6-5.
Instrument Panel Illumination
Control on page 6-4. 12.
Cruise Control on page 9-30.
13. Steering Wheel Adjustment on
page 5-2.
14. Horn on page 5-3.
15. Steering Wheel Controls on
page 5-3 (If Equipped).
16. Driver Information Center (DIC) Buttons. See Driver Information
Center (DIC) on page 5-23.
17. Dual Automatic Climate Control
System on page 8-1.
18. Shift Lever. See Shifting Into
Park on page 9-19.
19. USB Port. See Auxiliary
Devices on page 7-14.
20. Power Outlets on page 5-7.
21. Rear Window Wiper/Washer on
page 5-4.
Traction Control System (TCS)
Disable Button. See Traction
Control/Electronic Stability
Control on page 9-28. Forward Collision Alert (FCA)
System on page 9-33
(If
Equipped).
Lane Departure Warning
(LDW) on page 9-40 (If
Equipped).
Tow/Haul Button (If Equipped).
See Tow/Haul Mode on
page 9-25.
Power Liftgate Button (If
Equipped). See Liftgate on
page 2-8.
22. Heated and Cooled Front
Seats on page 3-7 (If
Equipped).
23. Hazard Warning Flashers on
page 6-3.
24. Passenger Airbag Status Indicator. See Passenger
Sensing System on page 3-28.
Page 18 of 395
Black plate (11,1)Buick Enclave Owner Manual (GMNA-Localizing-U.S./Canada/Mexico-
7576029) - 2015 - CRC - 8/15/14
In Brief 1-11
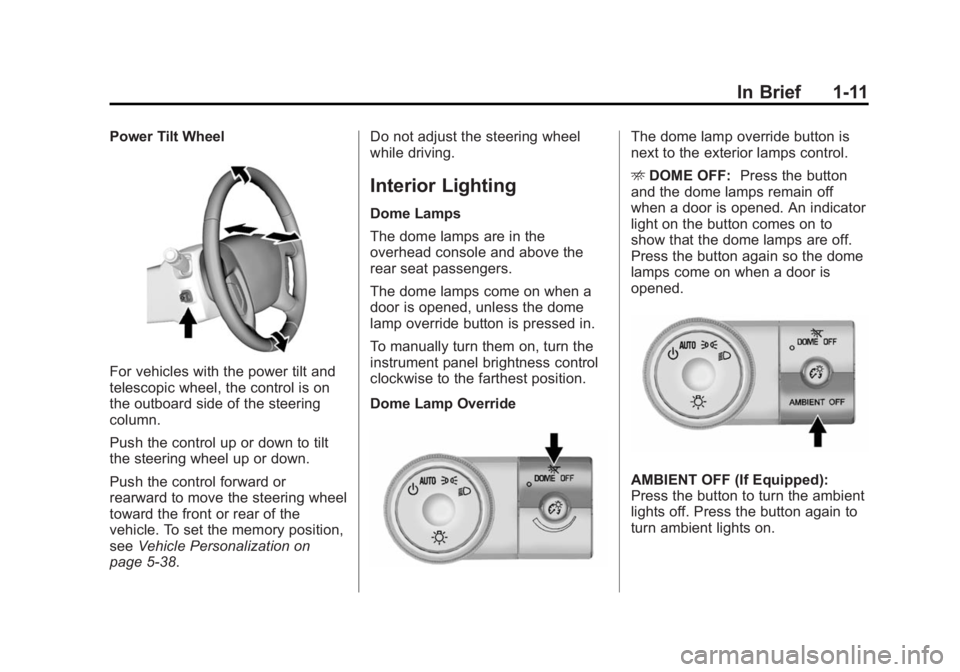
Power Tilt Wheel
For vehicles with the power tilt and
telescopic wheel, the control is on
the outboard side of the steering
column.
Push the control up or down to tilt
the steering wheel up or down.
Push the control forward or
rearward to move the steering wheel
toward the front or rear of the
vehicle. To set the memory position,
seeVehicle Personalization on
page 5-38. Do not adjust the steering wheel
while driving.
Interior Lighting
Dome Lamps
The dome lamps are in the
overhead console and above the
rear seat passengers.
The dome lamps come on when a
door is opened, unless the dome
lamp override button is pressed in.
To manually turn them on, turn the
instrument panel brightness control
clockwise to the farthest position.
Dome Lamp Override
The dome lamp override button is
next to the exterior lamps control.
E
DOME OFF: Press the button
and the dome lamps remain off
when a door is opened. An indicator
light on the button comes on to
show that the dome lamps are off.
Press the button again so the dome
lamps come on when a door is
opened.
AMBIENT OFF (If Equipped):
Press the button to turn the ambient
lights off. Press the button again to
turn ambient lights on.
Page 23 of 395
Black plate (16,1)Buick Enclave Owner Manual (GMNA-Localizing-U.S./Canada/Mexico-
7576029) - 2015 - CRC - 8/15/14
1-16 In Brief
bottom of the screen. After a few
seconds, a beep is heard and
the new preset information
displays on that screen button.
2. Repeat for each preset.
See AM-FM Radio on page 7-6.
Setting the Clock
Press Settings on the Home Page,
then press the Set Time or Set Date
settings screen button to display the
different options for setting the time
and date.
Set Time:
.Press the up or down arrows to
change the Hours, Minutes, AM,
PM, or the 24 hour setting on the
clock.
.Press and hold to quickly
increase or decrease the time
settings.
.Press OK to save the
adjustments.
.Press the Back or Cancel screen
button to cancel the
adjustments.
Set Date:
.Press the up or down arrows to
increase or decrease the Month,
Day, and Year settings.
.Press and hold to quickly
increase or decrease the date
settings.
.Press OK to save the
adjustments.
.Press the Back or Cancel screen
button to cancel the
adjustments.
Setting the Analog Clock
The analog clock is on the
instrument panel above the radio.
The clock is not connected with any
other vehicle system and runs by
itself. To adjust the time:
1. Press and hold the button directly above the clock to
advance the clock hands.
Holding the button down causes
the clock to advance faster.
2. Press and release the button to increase the time by one minute
increments.
Satellite Radio
If equipped, vehicles with a
SiriusXM®satellite radio tuner and a
valid SiriusXM satellite radio
subscription can receive SiriusXM
programming.
Page 110 of 395
Black plate (1,1)Buick Enclave Owner Manual (GMNA-Localizing-U.S./Canada/Mexico-
7576029) - 2015 - CRC - 8/15/14
Instruments and Controls 5-1
Instruments and
Controls
Controls
Steering Wheel Adjustment . . . 5-2
Steering Wheel Controls . . . . . . 5-3
Horn . . . . . . . . . . . . . . . . . . . . . . . . . . 5-3
Windshield Wiper/Washer . . . . . 5-3
Rear Window Wiper/Washer . . . . . . . . . . . . . . . . . . . . . . 5-4
Compass . . . . . . . . . . . . . . . . . . . . . 5-5
Clock . . . . . . . . . . . . . . . . . . . . . . . . . 5-6
Power Outlets . . . . . . . . . . . . . . . . . 5-7
Warning Lights, Gauges, and
Indicators
Warning Lights, Gauges, and Indicators . . . . . . . . . . . . . . . . . . . . 5-9
Instrument Cluster . . . . . . . . . . . 5-10
Speedometer . . . . . . . . . . . . . . . . 5-11
Odometer . . . . . . . . . . . . . . . . . . . . 5-11
Tachometer . . . . . . . . . . . . . . . . . . 5-11
Fuel Gauge . . . . . . . . . . . . . . . . . . 5-11
Engine Coolant Temperature Gauge . . . . . . . . . . . . . . . . . . . . . . 5-12
Voltmeter Gauge . . . . . . . . . . . . . 5-12
Safety Belt Reminders . . . . . . . 5-13 Airbag Readiness Light . . . . . . 5-14
Passenger Airbag Status
Indicator . . . . . . . . . . . . . . . . . . . . 5-14
Charging System Light . . . . . . 5-15
Malfunction Indicator Lamp . . . . . . . . . . . . . 5-15
Brake System Warning Light . . . . . . . . . . . . . . . . . . . . . . . 5-18
Antilock Brake System (ABS) Warning Light . . . . . . . . . . . . . . 5-19
Tow/Haul Mode Light . . . . . . . . 5-19
Lane Departure Warning (LDW) Light . . . . . . . . . . . . . . . . 5-20
Vehicle Ahead Indicator . . . . . . 5-20
StabiliTrak
®Indicator Light . . . 5-20
Engine Coolant Temperature Warning Light . . . . . . . . . . . . . . 5-21
Tire Pressure Light . . . . . . . . . . 5-21
Engine Oil Pressure Light . . . . 5-22
Security Light . . . . . . . . . . . . . . . . 5-22
High-Beam On Light . . . . . . . . . 5-23
Cruise Control Light . . . . . . . . . 5-23
Information Displays
Driver Information Center (DIC) . . . . . . . . . . . . . . . 5-23
Vehicle Messages
Vehicle Messages . . . . . . . . . . . 5-29
Battery Voltage and ChargingMessages . . . . . . . . . . . . . . . . . . 5-29
Brake System Messages . . . . 5-29
Cruise Control Messages . . . . 5-30
Door Ajar Messages . . . . . . . . . 5-30
Engine Cooling System Messages . . . . . . . . . . . . . . . . . . 5-31
Engine Oil Messages . . . . . . . . 5-31
Engine Power Messages . . . . 5-32
Fuel System Messages . . . . . . 5-32
Key and Lock Messages . . . . . 5-32
Lamp Messages . . . . . . . . . . . . . 5-33
Object Detection System Messages . . . . . . . . . . . . . . . . . . 5-33
Ride Control System Messages . . . . . . . . . . . . . . . . . . 5-35
Airbag System Messages . . . . 5-35
Security Messages . . . . . . . . . . 5-35
Service Vehicle Messages . . . 5-35
Tire Messages . . . . . . . . . . . . . . . 5-36
Transmission Messages . . . . . 5-37
Vehicle Reminder Messages . . . . . . . . . . . . . . . . . . 5-38
Vehicle Speed Messages . . . . 5-38
Washer Fluid Messages . . . . . 5-38
Page 115 of 395
Black plate (6,1)Buick Enclave Owner Manual (GMNA-Localizing-U.S./Canada/Mexico-
7576029) - 2015 - CRC - 8/15/14
5-6 Instruments and Controls
5. If calibration is necessary,calibrate the compass. See
“Compass Calibration
Procedure” following.
Compass Calibration
The compass can be manually
calibrated. Only calibrate the
compass in a magnetically clean
and safe location, such as an open
parking lot, where driving the
vehicle in circles is not a danger.
It is suggested to calibrate away
from tall buildings, utility wires,
manhole covers, or other industrial
structures, if possible.
If CAL should ever appear in the
DIC display, the compass should be
calibrated.
If the DIC display does not show a
heading, for example, N for North,
or the heading does not change
after making turns, there may be a
strong magnetic field interfering with
the compass. Such interference
may be caused by a magnetic CB or
cell phone antenna mount, a
magnetic emergency light, magnetic note pad holder, or any other
magnetic item. Turn off the vehicle,
move the magnetic item, then turn
on the vehicle and calibrate the
compass.
To calibrate the compass, use the
following procedure:
Compass Calibration Procedure
1. Before calibrating the compass,
make sure the compass zone is
set to the variance zone in which
the vehicle is located. See
“Compass Variance (Zone)
Procedure” earlier in this
section.
Do not operate any switches
such as window, sunroof,
climate controls, seats, etc.
during the calibration procedure.
2. Press the vehicle information button until PRESS
VTO
CALIBRATE COMPASS
displays.
3. Press the set/reset button to start the compass calibration. 4. The DIC will display
CALIBRATING: DRIVE IN
CIRCLES. Drive the vehicle in
tight circles at less than 8 km/h
(5 mph) to complete the
calibration. The DIC will display
CALIBRATION COMPLETE for a
few seconds when the
calibration is complete. The DIC
display will then return to the
previous menu.
Clock
Setting the Digital Clock
Press Settings on the Home Page,
then press the Set Time or Set Date
settings screen button to display the
different options for setting the time
and date.
Set Time:
.Press the up or down arrows to
change the Hours, Minutes, AM,
PM, or the 24 hour setting on the
clock.
Page 116 of 395
Black plate (7,1)Buick Enclave Owner Manual (GMNA-Localizing-U.S./Canada/Mexico-
7576029) - 2015 - CRC - 8/15/14
Instruments and Controls 5-7
.Press and hold to quickly
increase or decrease the time
settings.
.Press OK to save the
adjustments.
.Press the Back or Cancel screen
button to cancel the
adjustments.
Set Date:
.Press the up or down arrows to
increase or decrease the Month,
Day, and Year settings.
.Press and hold to quickly
increase or decrease the date
settings.
.Press OK to save the
adjustments.
.Press the Back or Cancel screen
button to cancel the
adjustments.
Setting the Analog Clock
The clock on the center stack is not
connected to any other vehicle
system. To adjust the time:
1. Press and hold the button directly above the clock to
quickly advance the time.
2. Press and release the button to increase the time by one-minute
intervals.
Power Outlets
The vehicle has 12-volt outlets that
can be used to plug in electrical
equipment, such as a cell phone or
MP3 player.
The power outlets are located:
.On the center stack below the
climate controls.
.Inside the center console.
.At the rear of the center console.
.In the rear cargo area.
Lift the cover to access the outlet
and replace when not in use.
{Warning
Power is always supplied to the
outlets. Do not leave electrical
equipment plugged in when the
vehicle is not in use because the
vehicle could catch fire and cause
injury or death.
{Caution
Leaving electrical equipment
plugged in for an extended period
of time while the vehicle is off will
drain the battery. Always unplug
electrical equipment when not in
use and do not plug in equipment
that exceeds the maximum
20 amp rating.
Certain accessory plugs may not be
compatible with the accessory
power outlet and could overload
Page 161 of 395

Black plate (4,1)Buick Enclave Owner Manual (GMNA-Localizing-U.S./Canada/Mexico-
7576029) - 2015 - CRC - 8/15/14
6-4 Lighting
The turn signals do not work while
the hazard warning flashers are on.
Turn and Lane-Change
Signals
Move the turn signal lever all the
way up or down to signal a turn.
An arrow on the instrument cluster
flashes in the direction of the turn or
lane change.Raise or lower the lever until the
arrow starts to flash to signal a lane
change. Hold it there until the lane
change is completed. If the lever is
briefly pressed and released, the
turn signal flashes three times.
The lever returns to its starting
position whenever it is released.
If after signaling a turn or lane
change the arrow flashes rapidly or
does not come on, a signal bulb
may be burned out.
Have any burned out bulbs
replaced. If a bulb is not burned out,
check the fuse. See
Fuses and
Circuit Breakers on page 10-28.
Turn Signal On Chime
If either one of the turn signals is left
on and the vehicle has been driven
more than 1.2 km (0.75 mi), a chime
will sound.
Interior Lighting
Instrument Panel
Illumination Control
The instrument panel brightness
knob is located on the instrument
panel to the left of the steering
column.
D(Instrument Panel
Brightness): Push the knob in all
the way until it extends out and then
turn the knob clockwise or
counterclockwise to brighten or dim
the lights. Push the knob back in
when finished.
Page 162 of 395

Black plate (5,1)Buick Enclave Owner Manual (GMNA-Localizing-U.S./Canada/Mexico-
7576029) - 2015 - CRC - 8/15/14
Lighting 6-5
Courtesy Lamps
The courtesy lamps automatically
come on when a door is opened.
The lamps can also be turned on
manually by fully turning the
instrument panel brightness control
clockwise.
The reading lamps, located on the
headliner above the rearview mirror,
can be turned on or off
independently of the automatic
courtesy lamps, when the doors are
closed.
Dome Lamps
The dome lamps are in the
overhead console and above the
rear seat passengers.
The dome lamps come on when a
door is opened, unless the dome
lamp override button is pressed in.
The lamps can also be turned on
and off by turning the instrument
panel brightness control clockwise
to the farthest position.Dome Lamp Override
The dome lamp override button is
next to the exterior lamps control.
E
DOME OFF (Dome Lamp
Override): Press the button and
the dome lamps remain off when a
door is opened. An indicator light on
the button comes on to show that
the dome lamps are off. Press the
button again so the dome lamps
come on when a door is opened.
AMBIENT OFF (If Equipped):
Press the button to turn the ambient
lights off. Press the button again to
turn ambient lights on.
Reading Lamps
Press the button near each lamp to
turn them on or off.
Page 190 of 395
Black plate (25,1)Buick Enclave Owner Manual (GMNA-Localizing-U.S./Canada/Mexico-
7576029) - 2015 - CRC - 8/15/14
Infotainment System 7-25
Set Time:
.Press the up or down arrows to
change the Hours, Minutes, AM,
PM, or 24 hour setting on the
clock.
.Press and hold to quickly
increase or decrease the time
settings.
.Press OK to save the
adjustments.
.Press the Back or Cancel screen
button to cancel the
adjustments.
Set Date:
.Press the up or down arrows to
increase or decrease the Month,
Day, and Year settings.
.Press and hold to quickly
increase or decrease the date
settings.
.Press OK to save the
adjustments.
.Press the Back or Cancel screen
button to cancel the
adjustments.
XM Categories: Press to
customize which available XM
Categories are displayed and used
in the system.
Create “AS IS” Infotainment
File: This is used for dealer
troubleshooting.
Open Source Software: Select to
view software website information.
Rear Vision Camera (If
Equipped)
The rear vision camera can assist
the driver when backing up by
displaying a view of the area behind
the vehicle. To access the rear camera display
settings, press Display from the
Home screen, then press the Rear
Camera screen button. The
following options are available:
Symbols:
Press to enable or
disable the Rear Park Assist (RPA)
symbols presented over the rear
camera video.
Guidelines: Press to enable or
disable the RPA dynamic guidelines
presented over the rear camera
video.
See Rear Vision Camera (RVC) on
page 9-38.
Screen Brightness
To adjust the screen brightness,
touch the screen, then press + or −
on the brightness control.
Page 193 of 395
Black plate (2,1)Buick Enclave Owner Manual (GMNA-Localizing-U.S./Canada/Mexico-
7576029) - 2015 - CRC - 8/15/14
8-2 Climate Controls
Display Function
Each time the temperature, mode,
or fan controls are adjusted, the
climate control display shows that
function along with the inside
temperature setting. The outside
temperature is displayed on the
instrument cluster.
((On/Off):Turn clockwise or
counterclockwise to turn the climate
control system on or off.
The climate control system will also
turn on if the defrost, AUTO, or air
conditioning buttons are pressed.
Automatic Operation
AUTO (Automatic): The system
automatically controls the inside
temperature, the air delivery, and
the fan speed. To use automatic mode:
1. Press the AUTO button.
When AUTO is selected, the
current temperature(s) is
displayed and the AUTO
indicator light is on.
When AUTO is selected, the air
conditioning and air inlet are
automatically controlled. The air
conditioning runs when the
outside temperature is over 4°C
(40°F). The system is
automatically set to outside air,
unless it is hot outside and then
the air inlet changes to
recirculation mode to help
quickly cool the vehicle. The
recirculation indicator light will
come on. 2. Set the temperature for the
driver and passenger.
To find a comfortable setting,
start with a 22°C (73°F)
temperature setting and allow
about 20 minutes for the system
to regulate. Use the driver side
or passenger side temperature
control to adjust the temperature
setting as necessary. The
system will remain at the
selected setting. Choosing the
warmest or coolest temperatures
does not cause the vehicle to
heat or cool more quickly.
To avoid blowing cold air in cold
weather, the system delays
turning on the fan until warm air
is available. Turn the fan knob to
override this delay and select
the fan speed.