LATCH BUICK ENCLAVE 2016 Owner's Guide
[x] Cancel search | Manufacturer: BUICK, Model Year: 2016, Model line: ENCLAVE, Model: BUICK ENCLAVE 2016Pages: 360, PDF Size: 5.04 MB
Page 90 of 360

Buick Enclave Owner Manual (GMNA-Localizing-U.S./Canada/Mexico-
9159225) - 2016 - crc - 7/31/15
Seats and Restraints 89
route the tether around
the headrest or head
restraint.
If the position you are
using has a fixed headrest
or head restraint and you
are using a single tether,
route the tether over the
headrest or head restraint.
3. Before placing a child in the child restraint, make sure it is
securely held in place. To
check, grasp the child restraint
at the LATCH path and attempt
to move it side to side and
back and forth. There should
be no more than 2.5 cm (1 in) of
movement, for proper
installation.
Replacing LATCH System
Parts After a Crash
{Warning
A crash can damage the LATCH
system in the vehicle. A damaged
LATCH system may not properly
secure the child restraint,
resulting in serious injury or even
death in a crash. To help make
sure the LATCH system is
working properly after a crash,
see your dealer to have the
system inspected and any
necessary replacements made as
soon as possible.
If the vehicle has the LATCH system
and it was being used during a
crash, new LATCH system parts
may be needed.
New parts and repairs may be
necessary even if the LATCH
system was not being used at the
time of the crash.
Securing Child Restraints
(Rear Seat)
The vehicle is equipped with a front
center airbag in the inboard side of
the driver seat. Even with a front
center airbag, a child restraint can
be installed in any second row
seating position. If you install a child
restraint in a second row center
seat, move the second row seat to
the rearward position, whenever
possible, to minimize contact with
the front center airbag.
When securing a child restraint in a
rear seating position, study the
instructions that came with the child
restraint to make sure it is
compatible with this vehicle.
If the child restraint has the LATCH
system, see Lower Anchors and
Tethers for Children (LATCH
System) 083 for how and where to
install the child restraint using
LATCH. If a child restraint is
secured in the vehicle using a
safety belt and it uses a top tether,
see Lower Anchors and Tethers for
Children (LATCH System) 083 for
top tether anchor locations.
Page 91 of 360
Buick Enclave Owner Manual (GMNA-Localizing-U.S./Canada/Mexico-
9159225) - 2016 - crc - 7/31/15
90 Seats and Restraints
Do not secure a child seat in a
position without a top tether anchor
if a national or local law requires
that the top tether be anchored, or if
the instructions that come with the
child restraint say that the top strap
must be anchored.
In Canada, the law requires that
forward-facing child restraints have
a top tether, and that the tether be
attached.
If the child restraint or vehicle seat
position does not have the LATCH
system, you will be using the safety
belt to secure the child restraint in
this position. Be sure to follow the
instructions that came with the child
restraint. Secure the child in the
child restraint when and as the
instructions say.
If more than one child restraint
needs to be installed in the rear
seat, be sure to readWhere to Put
the Restraint 081.
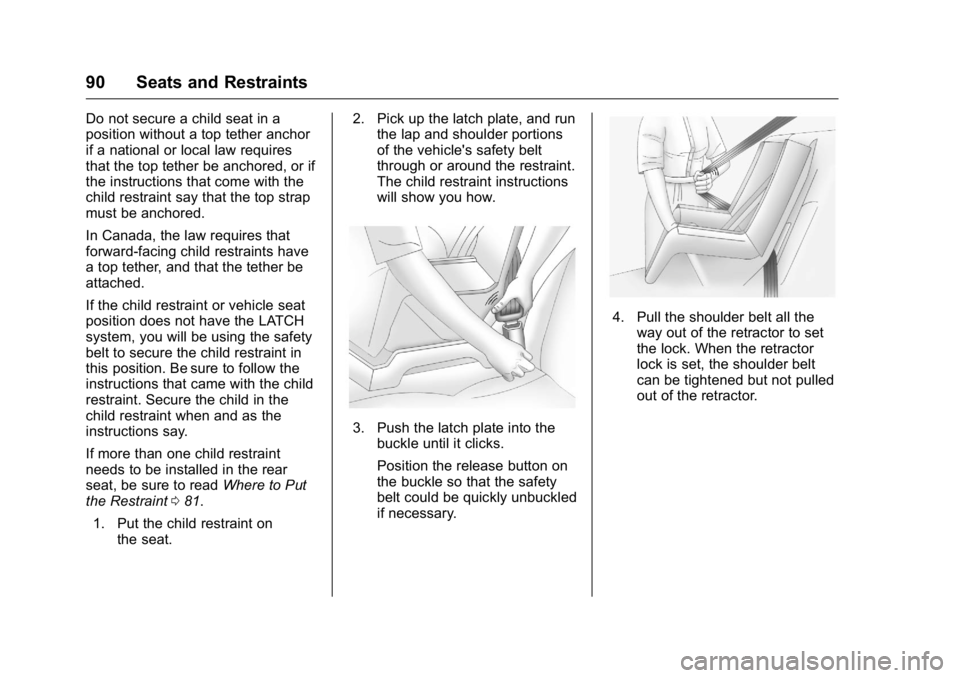
1. Put the child restraint on the seat. 2. Pick up the latch plate, and run
the lap and shoulder portions
of the vehicle's safety belt
through or around the restraint.
The child restraint instructions
will show you how.
3. Push the latch plate into thebuckle until it clicks.
Position the release button on
the buckle so that the safety
belt could be quickly unbuckled
if necessary.
4. Pull the shoulder belt all the
way out of the retractor to set
the lock. When the retractor
lock is set, the shoulder belt
can be tightened but not pulled
out of the retractor.
Page 92 of 360
Buick Enclave Owner Manual (GMNA-Localizing-U.S./Canada/Mexico-
9159225) - 2016 - crc - 7/31/15
Seats and Restraints 91
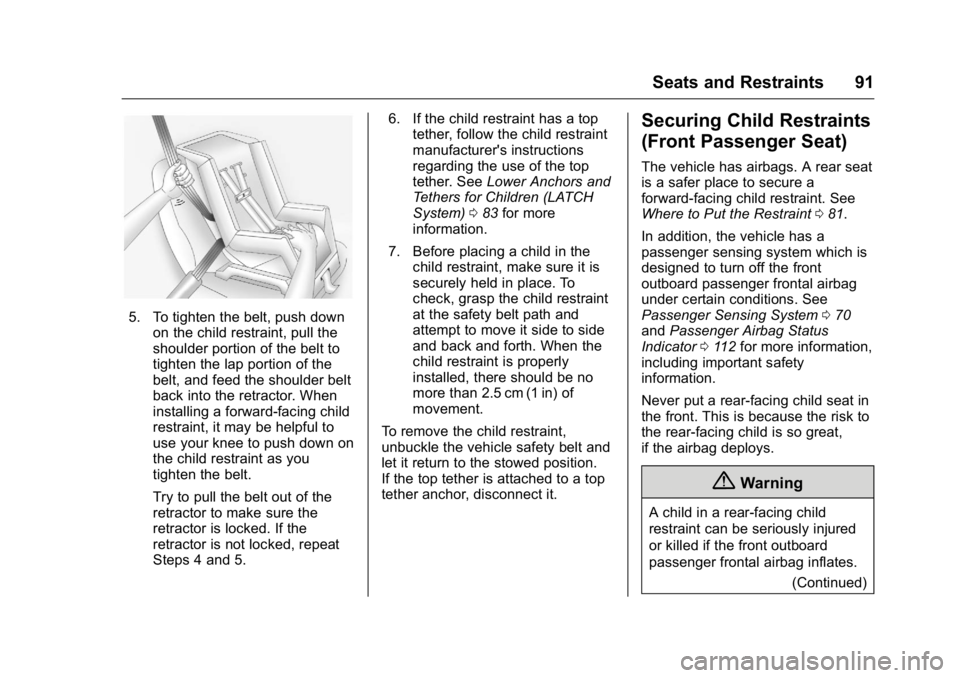
5. To tighten the belt, push downon the child restraint, pull the
shoulder portion of the belt to
tighten the lap portion of the
belt, and feed the shoulder belt
back into the retractor. When
installing a forward-facing child
restraint, it may be helpful to
use your knee to push down on
the child restraint as you
tighten the belt.
Try to pull the belt out of the
retractor to make sure the
retractor is locked. If the
retractor is not locked, repeat
Steps 4 and 5. 6. If the child restraint has a top
tether, follow the child restraint
manufacturer's instructions
regarding the use of the top
tether. See Lower Anchors and
Tethers for Children (LATCH
System) 083 for more
information.
7. Before placing a child in the child restraint, make sure it is
securely held in place. To
check, grasp the child restraint
at the safety belt path and
attempt to move it side to side
and back and forth. When the
child restraint is properly
installed, there should be no
more than 2.5 cm (1 in) of
movement.
To remove the child restraint,
unbuckle the vehicle safety belt and
let it return to the stowed position.
If the top tether is attached to a top
tether anchor, disconnect it.
Securing Child Restraints
(Front Passenger Seat)
The vehicle has airbags. A rear seat
is a safer place to secure a
forward-facing child restraint. See
Where to Put the Restraint 081.
In addition, the vehicle has a
passenger sensing system which is
designed to turn off the front
outboard passenger frontal airbag
under certain conditions. See
Passenger Sensing System 070
and Passenger Airbag Status
Indicator 0112 for more information,
including important safety
information.
Never put a rear-facing child seat in
the front. This is because the risk to
the rear-facing child is so great,
if the airbag deploys.
{Warning
A child in a rear-facing child
restraint can be seriously injured
or killed if the front outboard
passenger frontal airbag inflates.
(Continued)
Page 93 of 360

Buick Enclave Owner Manual (GMNA-Localizing-U.S./Canada/Mexico-
9159225) - 2016 - crc - 7/31/15
92 Seats and Restraints
Warning (Continued)
This is because the back of the
rear-facing child restraint would
be very close to the inflating
airbag. A child in a forward-facing
child restraint can be seriously
injured or killed if the front
outboard passenger frontal airbag
inflates and the passenger seat is
in a forward position.
Even if the passenger sensing
system has turned off the front
outboard passenger frontal
airbag, no system is fail-safe. No
one can guarantee that an airbag
will not deploy under some
unusual circumstance, even
though it is turned off.
Secure rear-facing child restraints
in a rear seat, even if the airbag
is off. If you secure a
forward-facing child restraint in
the front seat, always move the(Continued)
Warning (Continued)
front passenger seat as far back
as it will go. It is better to secure
the child restraint in a rear seat.
SeePassenger Sensing System
0 70 for additional information.
If the child restraint uses a top
tether, see Lower Anchors and
Tethers for Children (LATCH
System) 083 for top tether anchor
locations.
Do not secure a child seat in a
position without a top tether anchor
if a national or local law requires
that the top tether be anchored, or if
the instructions that come with the
child restraint say that the top strap
must be anchored.
In Canada, the law requires that
forward-facing child restraints have
a top tether, and that the tether be
attached. When using the lap-shoulder belt to
secure the child restraint in this
position, follow the instructions that
came with the child restraint and the
following instructions:
1. Move the seat as far back as it will go before securing the
forward-facing child restraint.
When the passenger sensing
system has turned off the front
outboard passenger frontal
airbag, the off indicator on the
passenger airbag status
indicator should light and stay
lit when the vehicle is started.
See Passenger Airbag Status
Indicator 0112.
2. Put the child restraint on the seat.
3. Pick up the latch plate, and run the lap and shoulder portions
of the vehicle's safety belt
through or around the restraint.
The child restraint instructions
will show you how.
Page 94 of 360
Buick Enclave Owner Manual (GMNA-Localizing-U.S./Canada/Mexico-
9159225) - 2016 - crc - 7/31/15
Seats and Restraints 93
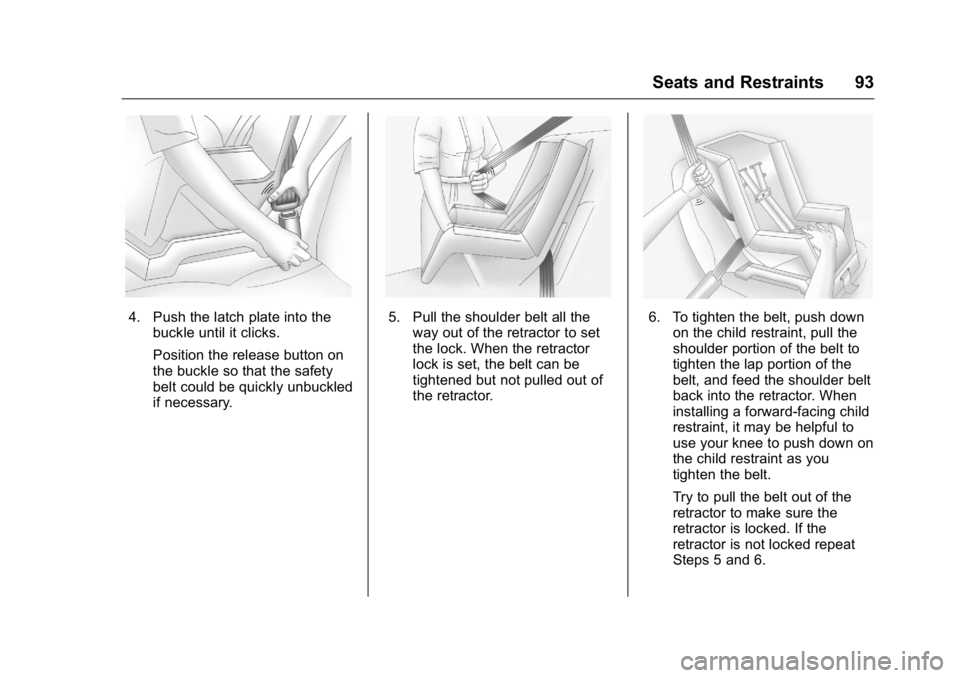
4. Push the latch plate into thebuckle until it clicks.
Position the release button on
the buckle so that the safety
belt could be quickly unbuckled
if necessary.5. Pull the shoulder belt all theway out of the retractor to set
the lock. When the retractor
lock is set, the belt can be
tightened but not pulled out of
the retractor.6. To tighten the belt, push downon the child restraint, pull the
shoulder portion of the belt to
tighten the lap portion of the
belt, and feed the shoulder belt
back into the retractor. When
installing a forward-facing child
restraint, it may be helpful to
use your knee to push down on
the child restraint as you
tighten the belt.
Try to pull the belt out of the
retractor to make sure the
retractor is locked. If the
retractor is not locked repeat
Steps 5 and 6.
Page 98 of 360

Buick Enclave Owner Manual (GMNA-Localizing-U.S./Canada/Mexico-
9159225) - 2016 - crc - 7/31/15
Storage 97
Additional Storage
Features
Cargo Cover
For vehicles with a cargo cover, it
can be used to cover items in the
rear of the vehicle. To install the
cover, place the loops on each
corner of the cover on the four
hooks in the rear of the vehicle. The
cover should be stored securely
when not in use.
Cargo Tie-Downs
Four cargo tie‐downs are located in
the rear compartment of the vehicle.
The tie-downs can be used to
secure small loads.
Cargo Management
System
This vehicle has a cargo
management system located in
the rear.
To remove the cargo management
cover:1. Open the cover. It remains open when lifted.
2. Pull the cover up making sure to unhook the hinges at the
rear of the cover.
3. Store the cover outside the vehicle or reattach before
driving.
{Warning
An improperly latched and closed
cargo cover, or cargo cover left in
the open position, could be
thrown about the vehicle during a
crash or sudden maneuver.
Someone could be injured. Be
sure to return the cover to the
closed position and latch before
driving. If the cover is removed,
always store it outside of the
vehicle. When it is replaced,
always be sure that it is securely
reattached.
Page 237 of 360
Buick Enclave Owner Manual (GMNA-Localizing-U.S./Canada/Mexico-
9159225) - 2016 - crc - 7/31/15
236 Vehicle Care
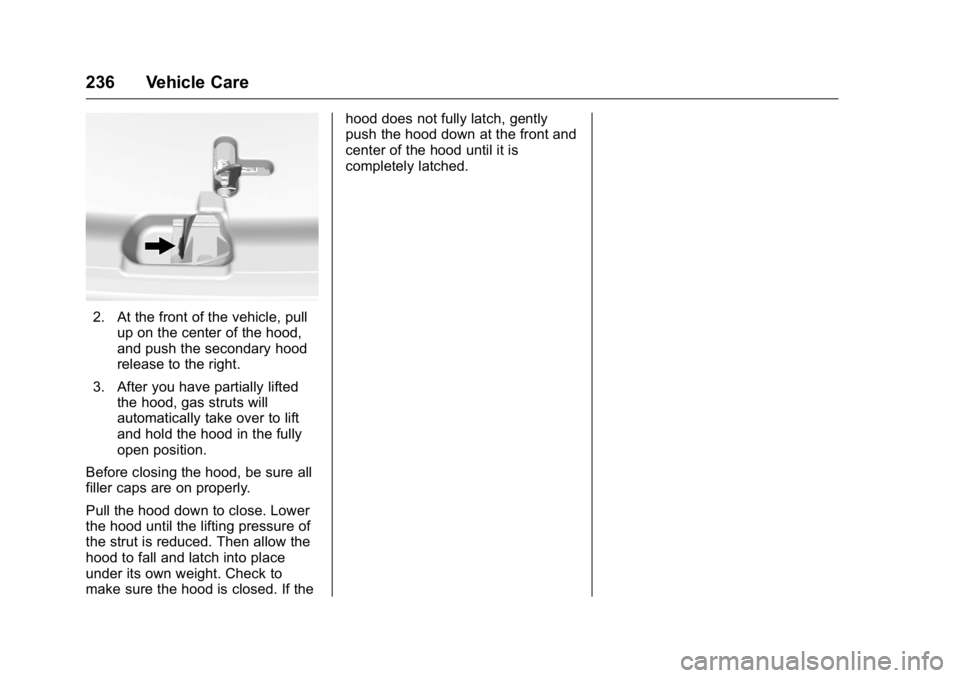
2. At the front of the vehicle, pullup on the center of the hood,
and push the secondary hood
release to the right.
3. After you have partially lifted the hood, gas struts will
automatically take over to lift
and hold the hood in the fully
open position.
Before closing the hood, be sure all
filler caps are on properly.
Pull the hood down to close. Lower
the hood until the lifting pressure of
the strut is reduced. Then allow the
hood to fall and latch into place
under its own weight. Check to
make sure the hood is closed. If the hood does not fully latch, gently
push the hood down at the front and
center of the hood until it is
completely latched.
Page 286 of 360

Buick Enclave Owner Manual (GMNA-Localizing-U.S./Canada/Mexico-
9159225) - 2016 - crc - 7/31/15
Vehicle Care 285
1. Tool Bag
2. Wing Bolt
3. Jack
1. Open the jack storagecompartment by pulling on the
latch tab, located toward the
rear of the vehicle, and pulling
the cover off.
2. Remove the wing bolt (2) by turning it counterclockwise.
3. Push the jack (3) up out of the holding bracket and remove
the tool bag (1).
4. Turn the jack on its side, with the bottom facing toward you. 5. Pull the jack straight out,
bottom first.1. Jack
2. Wrench (Three-Piece
Shown, One-Piece Similar)
The tools you will be using include
the jack (1) and wrench (2).
Removing the Spare Tire
The compact spare tire is located
under the vehicle, in front of the rear
bumper. See Compact Spare Tire
0 291 for more information.
1. Rear Convenience Center
2. Wrench (Three-Piece
Shown, One-Piece Similar)
3. Carpet Cutout
4. Hoist Shaft
5. Compact Spare Tire
6. Retainer
1. Open the storage compartment door of the convenience
center (1) that is nearest the
liftgate.
2. Open the carpet cutout (3) that is located through the hole of
the storage compartment.
3. Attach the wrench (2) into the hoist shaft (4).
Page 289 of 360
Buick Enclave Owner Manual (GMNA-Localizing-U.S./Canada/Mexico-
9159225) - 2016 - crc - 7/31/15
288 Vehicle Care
7. Raise the vehicle by turning thewrench clockwise in the jack.
Raise the vehicle far enough
off the ground so that there is
enough room for the spare tire
to fit under the wheel well.
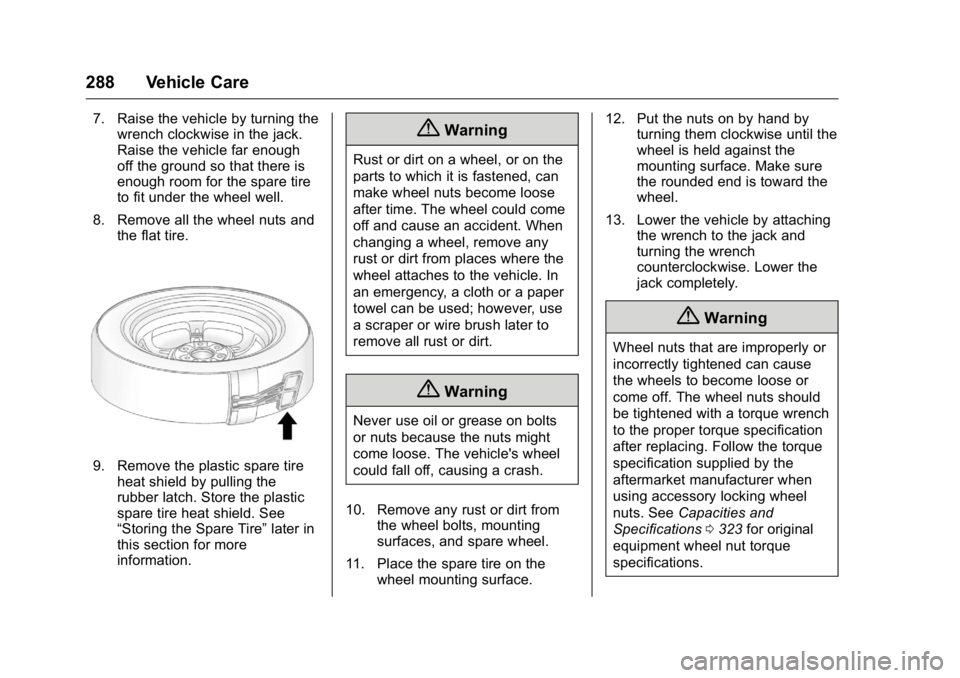
8. Remove all the wheel nuts and the flat tire.
9. Remove the plastic spare tireheat shield by pulling the
rubber latch. Store the plastic
spare tire heat shield. See
“Storing the Spare Tire” later in
this section for more
information.
{Warning
Rust or dirt on a wheel, or on the
parts to which it is fastened, can
make wheel nuts become loose
after time. The wheel could come
off and cause an accident. When
changing a wheel, remove any
rust or dirt from places where the
wheel attaches to the vehicle. In
an emergency, a cloth or a paper
towel can be used; however, use
a scraper or wire brush later to
remove all rust or dirt.
{Warning
Never use oil or grease on bolts
or nuts because the nuts might
come loose. The vehicle's wheel
could fall off, causing a crash.
10. Remove any rust or dirt from the wheel bolts, mounting
surfaces, and spare wheel.
11. Place the spare tire on the wheel mounting surface. 12. Put the nuts on by hand by
turning them clockwise until the
wheel is held against the
mounting surface. Make sure
the rounded end is toward the
wheel.
13. Lower the vehicle by attaching the wrench to the jack and
turning the wrench
counterclockwise. Lower the
jack completely.
{Warning
Wheel nuts that are improperly or
incorrectly tightened can cause
the wheels to become loose or
come off. The wheel nuts should
be tightened with a torque wrench
to the proper torque specification
after replacing. Follow the torque
specification supplied by the
aftermarket manufacturer when
using accessory locking wheel
nuts. See Capacities and
Specifications 0323 for original
equipment wheel nut torque
specifications.
Page 290 of 360

Buick Enclave Owner Manual (GMNA-Localizing-U.S./Canada/Mexico-
9159225) - 2016 - crc - 7/31/15
Vehicle Care 289
Caution
Improperly tightened wheel nuts
can lead to brake pulsation and
rotor damage. To avoid expensive
brake repairs, evenly tighten the
wheel nuts in the proper
sequence and to the proper
torque specification. See
Capacities and Specifications
0323 for the wheel nut torque
specification.
14. Tighten the wheel nuts firmly in a crisscross sequence, as
shown.
Caution
Wheel covers will not fit on the
vehicle's compact spare. If you try
to put a wheel cover on the
compact spare, the cover or the
spare could be damaged.
Storing the Spare Tire
{Warning
The underbody-mounted spare
tire needs to be stored with the
valve stem pointing down. If the
spare tire is stored with the valve
stem pointing upwards, the
secondary latch will not work
properly and the spare tire could
loosen and suddenly fall from the
vehicle. If this happened when
the vehicle was being driven, the
tire might contact a person or
another vehicle, causing injury
and damage to itself. Be sure the
underbody-mounted spare tire is
stored with the valve stem
pointing down.
{Warning
Storing a jack, a tire, or other
equipment in the passenger
compartment of the vehicle could
cause injury. In a sudden stop or
collision, loose equipment could
strike someone. Store all these in
the proper place.
To store the spare tire: 1. Lay the compact spare tire near the rear of the vehicle with
the valve stem down.
2. Reinstall the plastic spare tire heat shield on the compact
spare tire.
3. Slide the cable retainer through the center of the wheel and
start to raise the compact
spare tire.
Make sure the retainer is fully
seated across the underside of
the wheel.