buttons BUICK ENCLAVE 2016 Owner's Guide
[x] Cancel search | Manufacturer: BUICK, Model Year: 2016, Model line: ENCLAVE, Model: BUICK ENCLAVE 2016Pages: 360, PDF Size: 5.04 MB
Page 167 of 360

Buick Enclave Owner Manual (GMNA-Localizing-U.S./Canada/Mexico-
9159225) - 2016 - crc - 7/31/15
166 Infotainment System
The RSA functions operate even
when the main radio is off. The front
audio system displays
Xwhen the
RSA is on, and disappears from the
display when it is off.
Audio can be heard through wired
headphones (not included) plugged
into the jacks on the RSA. If the
vehicle has this feature, audio can
also be heard on Channel 2 of the
wireless headphones.
The audio system mutes the rear
speakers when the RSA audio is
active through the headphones.
To listen to an iPod or portable
audio device through the RSA,
attach the iPod or portable audio
device to the front auxiliary input (if
available), located on the front audio
system. Turn the iPod on, then
choose the front auxiliary input with
the RSA SRCE button.
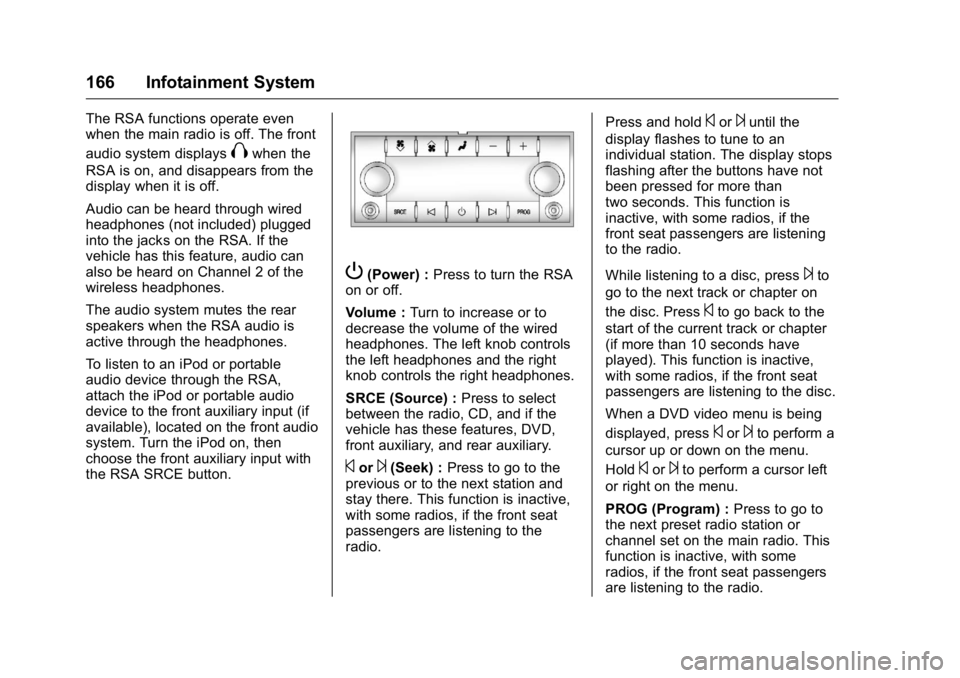
P(Power) : Press to turn the RSA
on or off.
Volume : Turn to increase or to
decrease the volume of the wired
headphones. The left knob controls
the left headphones and the right
knob controls the right headphones.
SRCE (Source) : Press to select
between the radio, CD, and if the
vehicle has these features, DVD,
front auxiliary, and rear auxiliary.
©or¨(Seek) : Press to go to the
previous or to the next station and
stay there. This function is inactive,
with some radios, if the front seat
passengers are listening to the
radio. Press and hold
©or¨until the
display flashes to tune to an
individual station. The display stops
flashing after the buttons have not
been pressed for more than
two seconds. This function is
inactive, with some radios, if the
front seat passengers are listening
to the radio.
While listening to a disc, press
¨to
go to the next track or chapter on
the disc. Press
©to go back to the
start of the current track or chapter
(if more than 10 seconds have
played). This function is inactive,
with some radios, if the front seat
passengers are listening to the disc.
When a DVD video menu is being
displayed, press
©or¨to perform a
cursor up or down on the menu.
Hold
©or¨to perform a cursor left
or right on the menu.
PROG (Program) : Press to go to
the next preset radio station or
channel set on the main radio. This
function is inactive, with some
radios, if the front seat passengers
are listening to the radio.
Page 169 of 360

Buick Enclave Owner Manual (GMNA-Localizing-U.S./Canada/Mexico-
9159225) - 2016 - crc - 7/31/15
168 Infotainment System
ON/RUN or ACC/ACCESSORY
position. The range of the Bluetooth
system can be up to 9.1 m (30 ft).
Not all phones support all functions,
and not all phones work with the
in-vehicle Bluetooth system. See
www.gm.com/bluetooth for more
information on compatible phones.
Voice Recognition
The Bluetooth system uses voice
recognition to interpret voice
commands to dial phone numbers
and name tags.
For additional information, say
“Help”while you are in a voice
recognition menu.
Noise : Keep interior noise levels to
a minimum. The system may not
recognize voice commands if there
is too much background noise.
When to Speak : A short tone
sounds after the system responds
indicating when it is waiting for a
voice command. Wait until the tone
and then speak.
How to Speak : Speak clearly in a
calm and natural voice.
Audio System
When using the in-vehicle Bluetooth
system, sound comes through the
vehicle's front audio system
speakers and overrides the audio
system. Use the audio system
volume knob, during a call, to
change the volume level. The
adjusted volume level remains in
memory for later calls. To prevent
missed calls, a minimum volume
level is used if the volume is turned
down too low.
Bluetooth Controls
Use the buttons located on the
steering wheel to operate the
in-vehicle Bluetooth system. See
Steering Wheel Controls 0102.
b/g(Press To Talk) : Press to
answer incoming calls, confirm
system information, and start
speech recognition.
c/x(End) : Press to end a call,
reject a call, or cancel an operation.
Pairing
A Bluetooth enabled cell phone
must be paired to the Bluetooth
system and then connected to the
vehicle before it can be used. See
the cell phone manufacturer's user
guide for Bluetooth functions before
pairing the cell phone. If a Bluetooth
phone is not connected, calls will be
made using OnStar Hands-Free
Calling, if equipped. See “OnStar”if
equipped.
Pairing Information
. A Bluetooth phone with MP3
capability cannot be paired to
the vehicle as a phone and an
MP3 player at the same time.
. Up to five cell phones can be
paired to the Bluetooth system.
. The pairing process is disabled
when the vehicle is moving.
. Pairing only needs to be
completed once, unless the
pairing information on the cell
phone changes or the cell phone
is deleted from the system.
Page 178 of 360

Buick Enclave Owner Manual (GMNA-Localizing-U.S./Canada/Mexico-
9159225) - 2016 - crc - 7/31/15
Climate Controls 177
function along with the inside
temperature setting. The outside
temperature is displayed on the
instrument cluster.
((On/Off) :Turn clockwise or
counterclockwise to turn the climate
control system on or off.
The climate control system will also
turn on if the defrost, AUTO, or air
conditioning buttons are pressed.
Automatic Operation
AUTO (Automatic) : The system
automatically controls the inside
temperature, the air delivery, and
the fan speed.
To use automatic mode:
1. Press the AUTO button. When AUTO is selected, the
current temperature(s) is
displayed and the AUTO
indicator light is on.
When AUTO is selected, the
air conditioning and air inlet are
automatically controlled. The
air conditioning runs when the
outside temperature is over 4 °
C (40 °F). The system is automatically set to outside air,
unless it is hot outside and
then the air inlet changes to
recirculation mode to help
quickly cool the vehicle. The
recirculation indicator light will
come on.
2. Set the temperature for the driver and passenger.
To find a comfortable setting,
start with a 22 °C (73 °F)
temperature setting and allow
about 20 minutes for the
system to regulate. Use the
driver side or passenger side
temperature control to adjust
the temperature setting as
necessary. The system will
remain at the selected setting.
Choosing the warmest or
coolest temperatures does not
cause the vehicle to heat or
cool more quickly.
To avoid blowing cold air in
cold weather, the system
delays turning on the fan until
warm air is available. Turn the
fan knob to override this delay
and select the fan speed. Temperature Control
The driver and passenger side
temperature controls are used to
adjust the temperature of the air
coming through the system. The
temperature can be adjusted even if
the system is turned off since
outside air still enters the vehicle,
unless the recirculation mode is
selected. See
“Recirculation” later in
this section.
Driver Side Temperature
Control : Turn clockwise or
counterclockwise to increase or
decrease the driver side
temperature. The driver side
temperature display will show the
temperature setting.
Passenger Side Temperature
Control : Turn clockwise or
counterclockwise to increase or
decrease the passenger side
temperature. The passenger side
display will show the temperature
setting.
SYNC (Synchronized
Temperature) : Press to set the
passenger temperature to match the
driver temperature setting.
Page 183 of 360

Buick Enclave Owner Manual (GMNA-Localizing-U.S./Canada/Mexico-
9159225) - 2016 - crc - 7/31/15
182 Climate Controls
Rear Climate Control System (with Rear Seat Audio)
1. Fan Control
2. Air Delivery Mode Control
3. Temperature Control
If equipped with the rear climate
control system, the controls are on
the rear of the center console.
Press the REAR button on the front
climate control system to control the
rear climate control system. The
system also turns on if any of the
rear controls, except
C, are
pressed. The display is activated
when the rear system is on. The system can also be turned off
by pressing
Cuntil the fan goes off.
Sync Mode : This mode matches
the rear climate control to the front
climate control settings. It comes on
when REAR is pressed.
Independent Mode : This mode
directs rear seating airflow
according to the settings of the rear
controls. It comes on when any rear
control is adjusted.
DandC(Fan Control) : Press the
fan up or down buttons to increase
or decrease the fan speed. Temperature Control :
Press + or
− to increase or decrease the air
temperature. The temperature
settings will display in
0-12 increments, going from the
coolest (0) to the warmest (12)
setting.
N(Air Delivery Mode Control) :
Press to manually change the
direction of the airflow. Repeatedly
press the button until the desired
mode appears on the display.
H(Vent) : Air is directed through
the overhead outlets.
)(Bi-Level) : Air is directed
through the rear floor outlets, as
well as the overhead outlets.
6(Floor) : Air is directed through
the floor outlets. The rear system
floor outlets are under the third row
seats.
Page 277 of 360

Buick Enclave Owner Manual (GMNA-Localizing-U.S./Canada/Mexico-
9159225) - 2016 - crc - 7/31/15
276 Vehicle Care
The TPMS sensor matching process
is outlined below:1. Set the parking brake.
2. Turn the ignition to ON/RUN with the engine off.
3. Press the Remote Keyless Entry (RKE) transmitter's
Q
andKbuttons at the same
time for approximately
five seconds. The horn sounds
twice to signal the receiver is in
relearn mode and TIRE
LEARNING ACTIVE message
displays on the DIC screen.
4. Start with the driver side front tire.
5. Place the relearn tool against the tire sidewall, near the valve
stem. Then press the button to
activate the TPMS sensor.
A horn chirp confirms that the
sensor identification code has
been matched to this tire and
wheel position.
6. Proceed to the passenger side front tire, and repeat the
procedure in Step 5. 7. Proceed to the passenger side
rear tire, and repeat the
procedure in Step 5.
8. Proceed to the driver side rear tire, and repeat the procedure
in Step 5. The horn sounds two
times to indicate the sensor
identification code has been
matched to the driver side rear
tire, and the TPMS sensor
matching process is no longer
active. The TIRE LEARNING
ACTIVE message on the DIC
display screen goes off.
9. Turn the ignition to LOCK/OFF.
10. Set all four tires to the recommended air pressure
level as indicated on the Tire
and Loading Information label.
11. Put the valve caps back on the valve stems.
Tire Inspection
We recommend that the tires,
including the spare tire, if the
vehicle has one, be inspected
for signs of wear or damage at
least once a month. Replace the tire if:
.The indicators at three or
more places around the tire
can be seen.
.There is cord or fabric
showing through the tire's
rubber.
.The tread or sidewall is
cracked, cut, or snagged
deep enough to show cord or
fabric.
.The tire has a bump, bulge,
or split.
.The tire has a puncture, cut,
or other damage that cannot
be repaired well because of
the size or location of the
damage.
Tire Rotation
Tires should be rotated every
12 000 km (7,500 mi). See
Maintenance Schedule
0310.
Page 340 of 360

Buick Enclave Owner Manual (GMNA-Localizing-U.S./Canada/Mexico-
9159225) - 2016 - crc - 7/31/15
OnStar 339
OnStar
OnStar Overview
OnStar Overview . . . . . . . . . . . . . 339
OnStar Services
Emergency . . . . . . . . . . . . . . . . . . . 340
Security . . . . . . . . . . . . . . . . . . . . . . 340
Navigation . . . . . . . . . . . . . . . . . . . . 340
Connections . . . . . . . . . . . . . . . . . . 341
Diagnostics . . . . . . . . . . . . . . . . . . . 343
OnStar Additional Information
OnStar AdditionalInformation . . . . . . . . . . . . . . . . . . 343
OnStar Overview
=Voice Command Button
QBlue OnStar Button
>Red Emergency Button
This vehicle may be equipped with a
comprehensive, in-vehicle system
that can connect to an OnStar
Advisor for Emergency, Security,
Navigation, Connections, and
Diagnostics Services. OnStar
services may require a paid
subscription and data plan. OnStar
requires the vehicle battery and
electrical system, cellular service,
and GPS satellite signals to be
available and operating. OnStar acts
as a link to existing emergency
service providers. OnStar may
collect information about you and
your vehicle, including location
information. See OnStar ’s Terms &Conditions and Privacy Statement
for more details including system
limitations at www.onstar.com (U.S.)
or www.onstar.ca (Canada).
The OnStar system status light is
next to the OnStar buttons. If the
status light is:
.
Solid Green: System is ready.
. Flashing Green: On a call.
. Red: Indicates a problem.
. Off: System is off. PressQ
twice to speak with an OnStar
Advisor.
Press
Qor call 1-888-4ONSTAR
(1-888-466-7827) to speak to an
Advisor.
Press
=to:
. Make a call, end a call,
or answer an incoming call.
. Give OnStar Hands-Free Calling
voice commands.
. Give OnStar Turn-by-Turn
Navigation voice commands.