remote control BUICK ENCLAVE 2017 User Guide
[x] Cancel search | Manufacturer: BUICK, Model Year: 2017, Model line: ENCLAVE, Model: BUICK ENCLAVE 2017Pages: 366, PDF Size: 5 MB
Page 139 of 366

Buick Enclave Owner Manual (GMNA-Localizing-U.S./Canada/Mexico-
9955666) - 2017 - crc - 8/4/16
138 Instruments and Controls
for this feature. Then press the
customization button to scroll
through the following settings:
OFF :There will be no feedback
when you press the lock button on
the RKE transmitter.
LIGHTS ONLY : The exterior lamps
will flash when you press the lock
button on the RKE transmitter.
HORN ONLY : The horn will sound
on the second press of the lock
button on the RKE transmitter.
HORN & LIGHTS (default) : The
exterior lamps will flash when you
press the lock button on the RKE
transmitter, and the horn will sound
when the lock button is pressed
again within five seconds of the
previous command.
NO CHANGE : No change will be
made to this feature. The current
setting will remain.
To select a setting, press the set/
reset button while the desired
setting is displayed on the DIC. REMOTE DOOR UNLOCK
This feature allows you to select the
type of feedback you will receive
when unlocking the vehicle with the
Remote Keyless Entry (RKE)
transmitter. You will not receive
feedback when unlocking the
vehicle with the RKE transmitter if
the doors are open. See
Remote
Keyless Entry (RKE) System
Operation 029.
Press the customization button until
REMOTE DOOR UNLOCK appears
on the DIC display. Press the set/
reset button once to access the
settings for this feature. Then press
the customization button to scroll
through the following settings:
LIGHTS OFF : The exterior lamps
will not flash when you press the
unlock button on the RKE
transmitter.
LIGHTS ON (default) : The exterior
lamps will flash when you press the
unlock button on the RKE
transmitter. NO CHANGE :
No change will be
made to this feature. The current
setting will remain.
To select a setting, press the set/
reset button while the desired
setting is displayed on the DIC.
DELAY DOOR LOCK
This feature allows you to select
whether or not the locking of the
vehicle's doors and liftgate will be
delayed. When locking the doors
and liftgate with the power door lock
switch and a door or the liftgate is
open, this feature will delay locking
the doors and liftgate until
five seconds after the last door is
closed. You will hear three chimes
to signal that the delayed locking
feature is in use. The key must be
out of the ignition for this feature to
work. You can temporarily override
delayed locking by pressing the
power door lock switch twice or the
lock button on the RKE transmitter
twice. See Delayed Locking 033.
Page 140 of 366

Buick Enclave Owner Manual (GMNA-Localizing-U.S./Canada/Mexico-
9955666) - 2017 - crc - 8/4/16
Instruments and Controls 139
Press the customization button until
DELAY DOOR LOCK appears on
the DIC display. Press the set/reset
button once to access the settings
for this feature. Then press the
customization button to scroll
through the following settings:
OFF :There will be no delayed
locking of the vehicle's doors.
ON (default) : The doors will not
lock until five seconds after the last
door or the liftgate is closed.
NO CHANGE : No change will be
made to this feature. The current
setting will remain.
To select a setting, press the set/
reset button while the desired
setting is displayed on the DIC.
EXIT LIGHTING
This feature allows you to select the
amount of time you want the
exterior lamps to remain on when it
is dark enough outside. This
happens after the key is turned from
ON/RUN to LOCK/OFF. Press the customization button until
EXIT LIGHTING appears on the DIC
display. Press the set/reset button
once to access the settings for this
feature. Then press the
customization button to scroll
through the following settings:
OFF :
The exterior lamps will not
turn on.
30 SECONDS (default) : The
exterior lamps will stay on for
30 seconds.
1 MINUTE : The exterior lamps will
stay on for one minute.
2 MINUTES : The exterior lamps will
stay on for two minutes.
NO CHANGE : No change will be
made to this feature. The current
setting will remain.
To select a setting, press the set/
reset button while the desired
setting is displayed on the DIC.
APPROACH LIGHTING
This feature allows you to select
whether or not to have the exterior
lights turn on briefly during low light periods after unlocking the vehicle
using the Remote Keyless Entry
(RKE) transmitter.
Press the customization button until
APPROACH LIGHTING appears on
the DIC display. Press the set/reset
button once to access the settings
for this feature. Then press the
customization button to scroll
through the following settings:
OFF :
The exterior lights will not
turn on when you unlock the vehicle
with the RKE transmitter.
ON (default) : If it is dark enough
outside, the exterior lights will turn
on briefly when you unlock the
vehicle with the RKE transmitter.
The lights will remain on for
20 seconds or until the lock button
on the RKE transmitter is pressed,
or the vehicle is no longer off. See
Remote Keyless Entry (RKE)
System Operation 029.
NO CHANGE : No change will be
made to this feature. The current
setting will remain.
Page 142 of 366
Buick Enclave Owner Manual (GMNA-Localizing-U.S./Canada/Mexico-
9955666) - 2017 - crc - 8/4/16
Instruments and Controls 141
also move up and forward on
vehicles with the power tilt and
telescopic steering wheel feature.
SeeSteering Wheel
Adjustment 0103.
The automatic easy exit seat
movement will only occur one time
after the key is removed from the
ignition. If the automatic movement
has already occurred, and you put
the key back in the ignition and
remove it again, the seat and
steering column will stay in the
original exit position, unless a
memory recall took place prior to
removing the key again.
NO CHANGE : No change will be
made to this feature. The current
setting will remain.
To select a setting, press the set/
reset button while the desired
setting is displayed on the DIC.
MEMORY SEAT RECALL
If your vehicle has this feature, it
allows you to select your preference
for the remote memory seat recall
feature. See Memory Seats 050. Press the customization button until
MEMORY SEAT RECALL appears
on the DIC display. Press the set/
reset button once to access the
settings for this feature. Then press
the customization button to scroll
through the following settings:
OFF (default) :
No remote memory
seat recall will occur.
ON : The driver seat and outside
mirrors will automatically move to
the stored driving position when the
unlock button on the Remote
Keyless Entry (RKE) transmitter is
pressed. The steering column will
also move on vehicles with the
power tilt and telescopic steering
wheel feature. See Steering Wheel
Adjustment 0103. See “Memory
Remote Recall” underMemory
Seats 050 for information on
matching transmitters to driver
positions.
NO CHANGE : No change will be
made to this feature. The current
setting will remain.
To select a setting, press the set/
reset button while the desired
setting is displayed on the DIC. REMOTE START
If your vehicle has this feature, it
allows you to turn the remote start
off or on. The remote start feature
allows you to start the engine from
outside of the vehicle using the
Remote Keyless Entry (RKE)
transmitter. See
Remote Vehicle
Start 031.
Press the customization button until
REMOTE START appears on the
DIC display. Press the set/reset
button once to access the settings
for this feature. Then press the
customization button to scroll
through the following settings:
OFF : The remote start feature will
be disabled.
ON (default) : The remote start
feature will be enabled.
NO CHANGE : No change will be
made to this feature. The current
setting will remain.
To select a setting, press the set/
reset button while the desired
setting is displayed on the DIC.
Page 143 of 366
Buick Enclave Owner Manual (GMNA-Localizing-U.S./Canada/Mexico-
9955666) - 2017 - crc - 8/4/16
142 Instruments and Controls
FACTORY SETTINGS
This feature allows you to set all of
the customization features back to
their factory default settings.
Press the customization button until
FACTORY SETTINGS appears on
the DIC display. Press the set/reset
button once to access the settings
for this feature. Then press the
customization button to scroll
through the following settings:
RESTORE ALL (default) :The
customization features will be set to
their factory default settings.
DO NOT RESTORE : The
customization features will not be
set to their factory default settings.
To select a setting, press the set/
reset button while the desired
setting is displayed on the DIC.
EXIT FEATURE SETTINGS
This feature allows you to exit the
feature settings menu. Press the customization button until
FEATURE SETTINGS PRESS
V
TO EXIT appears in the DIC display.
Press the set/reset button once to
exit the menu.
If you do not exit, pressing the
customization button again will
return you to the beginning of the
feature settings menu.
Exiting the Feature
Settings Menu
The feature settings menu will be
exited when any of the following
occurs:
.
The vehicle is shifted out of
P (Park).
. The vehicle is no longer in
ON/RUN.
. The trip/fuel or vehicle
information DIC buttons are
pressed.
. The end of the feature settings
menu is reached and exited.
. A 40-second time period has
elapsed with no selection made.
Universal Remote
System
See Radio Frequency
Statement 0340.
Universal Remote System
Programming
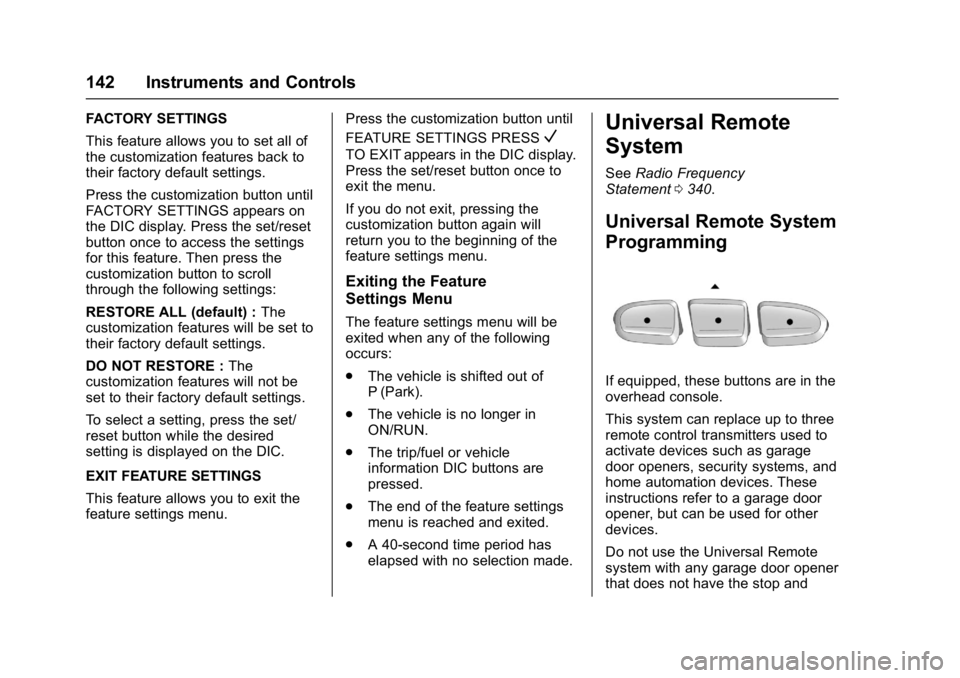
If equipped, these buttons are in the
overhead console.
This system can replace up to three
remote control transmitters used to
activate devices such as garage
door openers, security systems, and
home automation devices. These
instructions refer to a garage door
opener, but can be used for other
devices.
Do not use the Universal Remote
system with any garage door opener
that does not have the stop and
Page 144 of 366
Buick Enclave Owner Manual (GMNA-Localizing-U.S./Canada/Mexico-
9955666) - 2017 - crc - 8/4/16
Instruments and Controls 143
reverse feature. This includes any
garage door opener model
manufactured before April 1, 1982.
Read these instructions completely
before programming the Universal
Remote system. It may help to have
another person assist with the
programming process.
Keep the original hand-held
transmitter for use in other vehicles
as well as for future programming.
Erase the programming when
vehicle ownership is terminated.
See“Erasing Universal Remote
System Buttons” later in this
section.
To program a garage door opener,
park outside directly in line with and
facing the garage door opener
receiver. Clear all people and
objects near the garage door.
Make sure the hand-held transmitter
has a new battery for quicker and
more accurate transmission of the
radio-frequency signal.Programming the Universal
Remote System
For questions or help programming
the Universal Remote system, call
1-800-355-3515 or see
www.homelink.com.
Programming involves
time-sensitive actions, and may time
out causing the procedure to be
repeated.
To program up to three devices:
1. Hold the end of the hand-held transmitter about 3 to 8 cm (1
to 3 in) away from the
Universal Remote system
buttons with the indicator light
in view. The hand-held
transmitter was supplied by the
manufacturer of the garage
door opener receiver.
2. At the same time, press and hold both the hand-held
transmitter button and one of
the three Universal Remote
system buttons to be used to
operate the garage door. Do
not release either button until the indicator light changes from
a slow to a rapid flash. Then
release both buttons.
Some garage door openers
may require substitution of
Step 2 with the procedure
under
“Radio Signals for
Canada and Some Gate
Operators” later in this section.
3. Press and hold the newly programmed Universal Remote
system button for five seconds
while watching the indicator
light and garage door
activation.
.If the indicator light stays on
continuously or the garage
door moves when the
button is pressed, then
programming is complete.
There is no need to
complete Steps 4–6.
. If the indicator light does
not come on or the garage
door does not move, a
second button press may
be required. For a second
time, press and hold the
newly programmed button
Page 145 of 366
Buick Enclave Owner Manual (GMNA-Localizing-U.S./Canada/Mexico-
9955666) - 2017 - crc - 8/4/16
144 Instruments and Controls
for five seconds. If the light
stays on or the garage door
moves, programming is
complete.
. If the indicator light blinks
rapidly for two seconds,
then changes to a solid light
and the garage door does
not move, continue with
programming Steps 4–6.
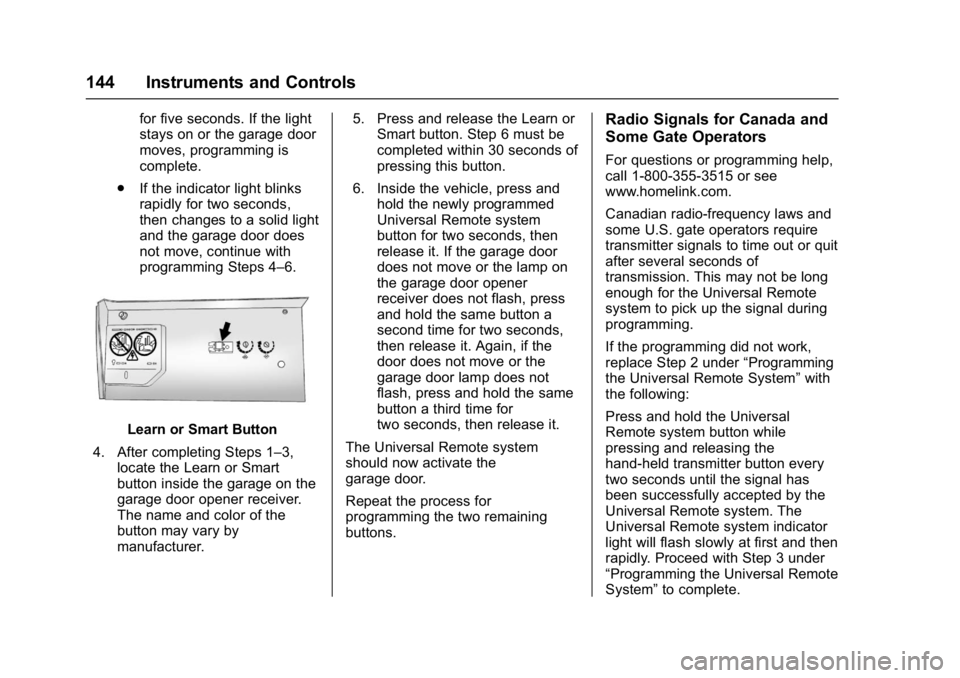
Learn or Smart Button
4. After completing Steps 1–3, locate the Learn or Smart
button inside the garage on the
garage door opener receiver.
The name and color of the
button may vary by
manufacturer. 5. Press and release the Learn or
Smart button. Step 6 must be
completed within 30 seconds of
pressing this button.
6. Inside the vehicle, press and hold the newly programmed
Universal Remote system
button for two seconds, then
release it. If the garage door
does not move or the lamp on
the garage door opener
receiver does not flash, press
and hold the same button a
second time for two seconds,
then release it. Again, if the
door does not move or the
garage door lamp does not
flash, press and hold the same
button a third time for
two seconds, then release it.
The Universal Remote system
should now activate the
garage door.
Repeat the process for
programming the two remaining
buttons.
Radio Signals for Canada and
Some Gate Operators
For questions or programming help,
call 1-800-355-3515 or see
www.homelink.com.
Canadian radio-frequency laws and
some U.S. gate operators require
transmitter signals to time out or quit
after several seconds of
transmission. This may not be long
enough for the Universal Remote
system to pick up the signal during
programming.
If the programming did not work,
replace Step 2 under “Programming
the Universal Remote System” with
the following:
Press and hold the Universal
Remote system button while
pressing and releasing the
hand-held transmitter button every
two seconds until the signal has
been successfully accepted by the
Universal Remote system. The
Universal Remote system indicator
light will flash slowly at first and then
rapidly. Proceed with Step 3 under
“Programming the Universal Remote
System” to complete.
Page 146 of 366
Buick Enclave Owner Manual (GMNA-Localizing-U.S./Canada/Mexico-
9955666) - 2017 - crc - 8/4/16
Instruments and Controls 145
Universal Remote System
Operation
Using the Universal Remote
System
Press and hold the appropriate
Universal Remote system button for
at least one-half second. The
indicator light will come on while the
signal is being transmitted.
Erasing Universal Remote
System Buttons
Erase all programmed buttons when
vehicle ownership is terminated.
To erase:1. Press and hold the two outside buttons until the indicator light
begins to flash. This should
take about 10 seconds.
2. Release both buttons.
Reprogramming a Single
Universal Remote System
Button
To reprogram any of the system
buttons: 1. Press and hold any one of the buttons. Do not release the
button.
2. The indicator light will begin to flash after 20 seconds. Without
releasing the button, proceed
with Step 1 under
“Programming the Universal
Remote System.”
Page 235 of 366
Buick Enclave Owner Manual (GMNA-Localizing-U.S./Canada/Mexico-
9955666) - 2017 - crc - 8/4/16
234 Driving and Operating
When using a weight-distributing
hitch, the hitch must be adjusted so
that the distance (2) remains the
same both before and after coupling
the trailer to the tow vehicle.
Safety Chains
Always attach chains between the
vehicle and the trailer. Cross the
safety chains under the tongue of
the trailer to help prevent the tongue
from contacting the road if it
becomes separated from the hitch.
Always leave just enough slack so
the rig can turn. Never allow safety
chains to drag on the ground.
Trailer Brakes
A loaded trailer that weighs more
than 450 kg (1,000 lb) needs to have
its own brake system that is
adequate for the weight of the
trailer. Be sure to read and follow
the instructions for the trailer brakes
so they are installed, adjusted, and
maintained properly.Because the vehicle has antilock
brakes, do not try to tap into the
vehicle's hydraulic brake system.
If you do, both brake systems will
not work well, or at all.
Trailer Wiring Harness
Basic Trailer Wiring
The trailer wiring harness, with a
seven-pin connector, is located at
the rear of the vehicle and is tied to
the vehicle's frame. The harness
connector can be plugged into a
seven-pin universal heavy-duty
trailer connector available through
your dealer.
Use only a round, seven-wire
connector with flat blade terminals
meeting SAE J2863 specifications
for proper electrical connectivity.
The seven-wire harness contains
the following trailer circuits:
.
Yellow: Left Stop/Turn Signal
. Dark Green: Right Stop/Turn
Signal
. Brown: Taillamps
. Black: Ground .
Light Green: Back-up Lamps
. Red/Black: Battery Feed
. Dark Blue: Trailer Brake*
*The fuse for this circuit is installed
in the underhood electrical center,
but the wires are not connected.
They should be connected by your
dealer or a qualified service center.
If the back-up lamp circuit is not
functional, contact your dealer.
To help charge a remote
(non-vehicle) battery, press the Tow/
Haul Mode button at the end of the
shift lever. If the trailer is too light for
Tow/Haul Mode, turn on the
headlamps to help charge the
battery.
Electric Trailer Brake Control
Wiring Provisions
These wiring provisions for an
electric trailer brake controller are
included with the vehicle as part of
the trailer wiring package. The
instrument panel contains blunt cut
wires above the parking brake
Page 348 of 366
Buick Enclave Owner Manual (GMNA-Localizing-U.S./Canada/Mexico-
9955666) - 2017 - crc - 8/4/16
OnStar 347
from each other and use a
combination of letters, numbers,
and symbols to increase the
security.
. Change the default name of the
SSID (Service Set Identifier).
This is your network’s name that
is visible to other wireless
devices. Choose a unique name
and avoid family names or
vehicle descriptions.
OnStar Wi-Fi
®Hotspot (If
Equipped)
The vehicle may have a built-in
Wi-Fi hotspot that provides access
to the Internet and web content at
4G LTE speed. Up to seven mobile
devices can be connected. A data
plan is required. Use the in-vehicle
controls only when it is safe to
do so.
1. To retrieve Wi-Fi hotspot information, press
=, wait for
the prompt, then say “Wi-Fi
settings.” On some vehicles,
touch Wi-Fi Settings on the
screen. 2. The Wi-Fi settings will display
the Wi-Fi hotspot name (SSID),
password, and on some
vehicles, the connection type
(no Internet connection, 3G,
4G, 4G LTE), and signal quality
(poor, good, excellent).
3. To change the SSID or password, press
Qor call
1-888-4ONSTAR to connect
with an Advisor.
After initial set-up, your vehicle’s
Wi-Fi hotspot will connect
automatically to your mobile
devices. Manage data usage by
turning Wi-Fi on or off on your
mobile device, using the
RemoteLink mobile app, or by
contacting an OnStar Advisor.
OnStar RemoteLink
®Mobile App
(If Equipped)
Download the OnStar RemoteLink
mobile app to select Apple
®iOS,
Android™, BlackBerry®,
or Windows®mobile devices.
OnStar Subscribers can access the
following services from a mobile
device: .
Remotely start/stop the vehicle,
if factory-equipped.
. Lock/unlock doors, if equipped
with automatic locks.
. Activate the horn and lamps.
. Check the vehicle’s fuel level, oil
life, or tire pressure,
if factory-equipped with the Tire
Pressure Monitor System.
. Send directions to the vehicle.
. Locate the vehicle on a map
(U.S. market only).
. Turn the vehicle's Wi-Fi hotspot
on/off, manage settings, and
monitor data consumption,
if equipped.
For OnStar RemoteLink information
and compatibility, see
www.onstar.com (U.S.) or
www.onstar.ca (Canada).
Remote Services
Contact an OnStar Advisor to
unlock the doors or sound the horn
and flash the lamps.
Page 350 of 366

Buick Enclave Owner Manual (GMNA-Localizing-U.S./Canada/Mexico-
9955666) - 2017 - crc - 8/4/16
OnStar 349
OnStar Additional
Information
In-Vehicle Audio Messages
Audio messages may play important
information at the following times:
.Prior to vehicle purchase.
Press
Qto set up an account.
. With the OnStar Basic Plan,
every 60 days.
. After change in ownership and
at 90 days.
Transferring Service
PressQto request account transfer
eligibility information. The Advisor
can cancel or change account
information.
Selling/Transferring the
Vehicle
Call 1-888-4ONSTAR
(1-888-466-7827) immediately to
terminate your OnStar services if
the vehicle is disposed of, sold,
transferred, or if the lease ends.
Reactivation for Subsequent
Owners
PressQand follow the prompts to
speak to an Advisor as soon as
possible. The Advisor will update
vehicle records and explain OnStar
service options.
How OnStar Service Works
Automatic Crash Response,
Emergency Services, Crisis Assist,
Stolen Vehicle Assistance,
Advanced Vehicle Diagnostics,
Remote Services, Roadside
Assistance, Turn-by-Turn
Navigation, and Hands-Free Calling
are available on most vehicles. Not
all OnStar services are available
everywhere or on all vehicles. For
more information, a full description
of OnStar services, system
limitations, and OnStar User Terms,
Privacy Statement, and Software
Terms:
. Call 1-888-4ONSTAR
(1-888-466-7827).
. See www.onstar.com (U.S.).
. See www.onstar.ca (Canada). .
Call TTY 1-877-248-2080.
. Press
Qto speak with an
Advisor.
OnStar services cannot work unless
the vehicle is in a place where
OnStar has an agreement with a
wireless service provider for service
in that area. The wireless service
provider must also have coverage,
network capacity, reception, and
technology compatible with OnStar
services. Service involving location
information about the vehicle cannot
work unless GPS signals are
available, unobstructed, and
compatible with the OnStar
hardware. OnStar services may not
work if the OnStar equipment is not
properly installed or it has not been
properly maintained. If equipment or
software is added, connected,
or modified, OnStar services may
not work. Other problems beyond
the control of OnStar —such as
hills, tall buildings, tunnels, weather,
electrical system design and
architecture of the vehicle, damage