Check BUICK ENCLAVE 2018 Owner's Guide
[x] Cancel search | Manufacturer: BUICK, Model Year: 2018, Model line: ENCLAVE, Model: BUICK ENCLAVE 2018Pages: 393, PDF Size: 5.68 MB
Page 110 of 393

Buick Enclave Owner Manual (GMNA-Localizing-U.S./Canada/Mexico-
10999311) - 2018 - crc - 11/20/17
Seats and Restraints 109
If the position you are
using has an adjustable
head restraint and you
are using a single tether,
raise the head restraint
and route the tether
under the head restraint
and in between the head
restraint posts.
If the position you are
using has an adjustable
head restraint and you
are using a dual tether,
raise head restraint and
route the tether around
the head restraint posts.
If the position you are
using has a fixed head
restraint and you are
using a single tether,
route the tether under the
head restraint and in
between the head
restraint posts or around
the outboard side of the
head restraint.
If the position you are
using has a fixed head
restraint and you are
using a dual tether, route
the tether around the
head restraint.
4. Before placing a child in the child restraint, make sure it is
securely held in place. To
check, grasp the child restraint
at the LATCH path and attempt
to move it side to side and
back and forth. There should
be no more than 2.5 cm (1 in) of
movement, for proper
installation.
Page 114 of 393

Buick Enclave Owner Manual (GMNA-Localizing-U.S./Canada/Mexico-
10999311) - 2018 - crc - 11/20/17
Seats and Restraints 113
6. If the child restraint has a toptether, follow the child restraint
manufacturer's instructions
regarding the use of the top
tether. See Lower Anchors and
Tethers for Children (LATCH
System) 0103.
7. Before placing a child in the child restraint, make sure it is
securely held in place. To
check, grasp the child restraint
at the seat belt path and
attempt to move it side to side
and back and forth. When the
child restraint is properly
installed, there should be no
more than 2.5 cm (1 in) of
movement.
To remove the child restraint,
unbuckle the vehicle seat belt and
let it return to the stowed position.
If the top tether is attached to a top
tether anchor, disconnect it.
If the head restraint was removed,
reinstall it before the seating
position is used. See "Head
Restraint Removal and Reinstallation" under
Lower Anchors
and Tethers for Children (LATCH
System) 0103 for additional
information on installing the head
restraint properly.
Securing Child Restraints
(With the Seat Belt in the
Front Seat)
This vehicle has airbags. A rear
seat is a safer place to secure a
forward-facing child restraint. See
Where to Put the Restraint 0101.
In addition, the vehicle has a
passenger sensing system which is
designed to turn off the front
outboard passenger frontal airbag
under certain conditions.
See Passenger Sensing System
0 90 and Passenger Airbag Status
Indicator 0139 for more information,
including important safety
information.
Never put a rear-facing child seat in
the front. This is because the risk to
the rear-facing child is so great,
if the airbag deploys.
{Warning
A child in a rear-facing child
restraint can be seriously injured
or killed if the front outboard
passenger frontal airbag inflates.
This is because the back of the
rear-facing child restraint would
be very close to the inflating
airbag. A child in a forward-facing
child restraint can be seriously
injured or killed if the front
outboard passenger frontal airbag
inflates and the passenger seat is
in a forward position.
Even if the passenger sensing
system has turned off the front
outboard passenger frontal
airbag, no system is fail-safe. No
one can guarantee that an airbag
will not deploy under some
unusual circumstance, even
though it is turned off.
Secure rear-facing child restraints
in a rear seat, even if the airbag
is off. If you secure a
(Continued)
Page 117 of 393

Buick Enclave Owner Manual (GMNA-Localizing-U.S./Canada/Mexico-
10999311) - 2018 - crc - 11/20/17
116 Seats and Restraints
7. Before placing a child in thechild restraint, make sure it is
securely held in place. To
check, grasp the child restraint
at the seat belt path and
attempt to move it side to side
and back and forth. When the
child restraint is properly
installed, there should be no
more than 2.5 cm (1 in) of
movement.
If the airbag is off, the off indicator in
the passenger airbag status
indicator will come on and stay on
when the vehicle is started.
If a child restraint has been installed
and the on indicator is lit, see “If the
On Indicator Is Lit for a Child
Restraint” underPassenger Sensing
System 090.
To remove the child restraint,
unbuckle the vehicle seat belt and
let it return to the stowed position.
Page 122 of 393

Buick Enclave Owner Manual (GMNA-Localizing-U.S./Canada/Mexico-
10999311) - 2018 - crc - 11/20/17
Storage 121
Caution
Loading cargo on the roof rack
that weighs more than 100 kg
(220 lb) or hangs over the rear or
sides of the vehicle may damage
the vehicle. Load cargo so that it
rests evenly between the
crossrails, making sure to fasten
cargo securely.
To prevent damage or loss of cargo
when driving, check to make sure
crossrails and cargo are securely
fastened. Loading cargo on the roofrack will make the vehicle’
s center
of gravity higher. Avoid high speeds,
sudden starts, sharp turns, sudden
braking, or abrupt maneuvers;
otherwise it may result in loss of
control. If driving for a long distance,
on rough roads, or at high speeds,
occasionally stop the vehicle to
make sure the cargo remains in its
place. Do not exceed the maximum
vehicle capacity when loading the
vehicle. For more information on
vehicle capacity and loading, see
Vehicle Load Limits 0196.
Page 123 of 393
Buick Enclave Owner Manual (GMNA-Localizing-U.S./Canada/Mexico-
10999311) - 2018 - crc - 11/20/17
122 Instruments and Controls
Instruments and
Controls
Controls
Steering Wheel Adjustment . . . 123
Steering Wheel Controls . . . . . . 123
Heated Steering Wheel . . . . . . . 123
Horn . . . . . . . . . . . . . . . . . . . . . . . . . . 124
Windshield Wiper/Washer . . . . 124
Rear Window Wiper/Washer . . . . . . . . . . . . . . . . . . . . . 125
Compass . . . . . . . . . . . . . . . . . . . . . 126
Clock . . . . . . . . . . . . . . . . . . . . . . . . . 126
Power Outlets . . . . . . . . . . . . . . . . 127
Wireless Charging . . . . . . . . . . . . 129
Warning Lights, Gauges, and
Indicators
Warning Lights, Gauges, and Indicators . . . . . . . . . . . . . . . . . . . 131
Instrument Cluster . . . . . . . . . . . . 132
Speedometer . . . . . . . . . . . . . . . . . 135
Odometer . . . . . . . . . . . . . . . . . . . . . 135
Trip Odometer . . . . . . . . . . . . . . . . 135
Tachometer . . . . . . . . . . . . . . . . . . . 135
Fuel Gauge . . . . . . . . . . . . . . . . . . . 136
Engine Coolant Temperature
Gauge . . . . . . . . . . . . . . . . . . . . . . 137 Seat Belt Reminders . . . . . . . . . 137
Airbag Readiness Light . . . . . . . 138
Passenger Airbag Status
Indicator . . . . . . . . . . . . . . . . . . . . 139
Charging System Light . . . . . . . 139
Malfunction Indicator Lamp
(Check Engine Light) . . . . . . . . 140
Brake System Warning Light . . . . . . . . . . . . . . . . . . . . . . . . 142
Electric Parking Brake Light . . . . . . . . . . . . . . . . . . . . . . . . 142
Service Electric Parking Brake Light . . . . . . . . . . . . . . . . . . . . . . . . 142
Antilock Brake System (ABS) Warning Light . . . . . . . . . . . . . . . 143
Lane Keep Assist (LKA) Light . . . . . . . . . . . . . . . . . . . . . . . . 143
Vehicle Ahead Indicator . . . . . . 144
Pedestrian Ahead Indicator . . . 144
Traction Off Light . . . . . . . . . . . . . 144
StabiliTrak OFF Light . . . . . . . . . 144
Traction Control System (TCS)/ StabiliTrak Light . . . . . . . . . . . . . 145
Tire Pressure Light . . . . . . . . . . . 145
Engine Oil Pressure Light . . . . 145
Low Fuel Warning Light . . . . . . 146
Security Light . . . . . . . . . . . . . . . . . 146
High-Beam On Light . . . . . . . . . . 146
Lamps On Reminder . . . . . . . . . 147
Cruise Control Light . . . . . . . . . . 147 Door Ajar Light . . . . . . . . . . . . . . . 147
Information Displays
Driver Information Center (DIC)
(Base Level) . . . . . . . . . . . . . . . . 148
Driver Information Center (DIC) (Uplevel) . . . . . . . . . . . . . . . . . . . . 150
Vehicle Messages
Vehicle Messages . . . . . . . . . . . . 153
Engine Power Messages . . . . . 154
Vehicle Speed Messages . . . . . 154
Vehicle Personalization
Vehicle Personalization . . . . . . . 154
Universal Remote System
Universal Remote System . . . . 162
Universal Remote SystemProgramming . . . . . . . . . . . . . . . 162
Universal Remote System Operation . . . . . . . . . . . . . . . . . . . 165
Page 126 of 393
Buick Enclave Owner Manual (GMNA-Localizing-U.S./Canada/Mexico-
10999311) - 2018 - crc - 11/20/17
Instruments and Controls 125
If the windshield wiper lever is then
moved to OFF before the driver
door is opened or within 10 minutes,
the wipers will restart and move to
the base of the windshield.
If the ignition is turned off while the
wipers are performing wipes due to
windshield washing, the wipers
continue to run until they reach the
base of the windshield.
Rear Window Wiper/
Washer
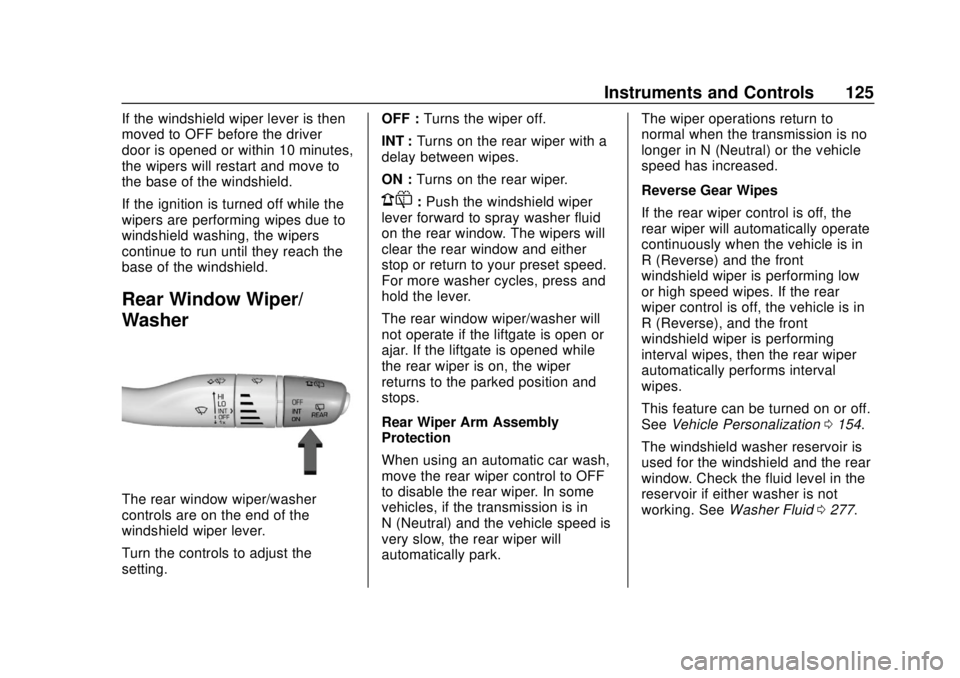
The rear window wiper/washer
controls are on the end of the
windshield wiper lever.
Turn the controls to adjust the
setting.OFF :
Turns the wiper off.
INT : Turns on the rear wiper with a
delay between wipes.
ON : Turns on the rear wiper.
1:Push the windshield wiper
lever forward to spray washer fluid
on the rear window. The wipers will
clear the rear window and either
stop or return to your preset speed.
For more washer cycles, press and
hold the lever.
The rear window wiper/washer will
not operate if the liftgate is open or
ajar. If the liftgate is opened while
the rear wiper is on, the wiper
returns to the parked position and
stops.
Rear Wiper Arm Assembly
Protection
When using an automatic car wash,
move the rear wiper control to OFF
to disable the rear wiper. In some
vehicles, if the transmission is in
N (Neutral) and the vehicle speed is
very slow, the rear wiper will
automatically park. The wiper operations return to
normal when the transmission is no
longer in N (Neutral) or the vehicle
speed has increased.
Reverse Gear Wipes
If the rear wiper control is off, the
rear wiper will automatically operate
continuously when the vehicle is in
R (Reverse) and the front
windshield wiper is performing low
or high speed wipes. If the rear
wiper control is off, the vehicle is in
R (Reverse), and the front
windshield wiper is performing
interval wipes, then the rear wiper
automatically performs interval
wipes.
This feature can be turned on or off.
See
Vehicle Personalization 0154.
The windshield washer reservoir is
used for the windshield and the rear
window. Check the fluid level in the
reservoir if either washer is not
working. See Washer Fluid 0277.
Page 130 of 393
Buick Enclave Owner Manual (GMNA-Localizing-U.S./Canada/Mexico-
10999311) - 2018 - crc - 11/20/17
Instruments and Controls 129
Wireless Charging
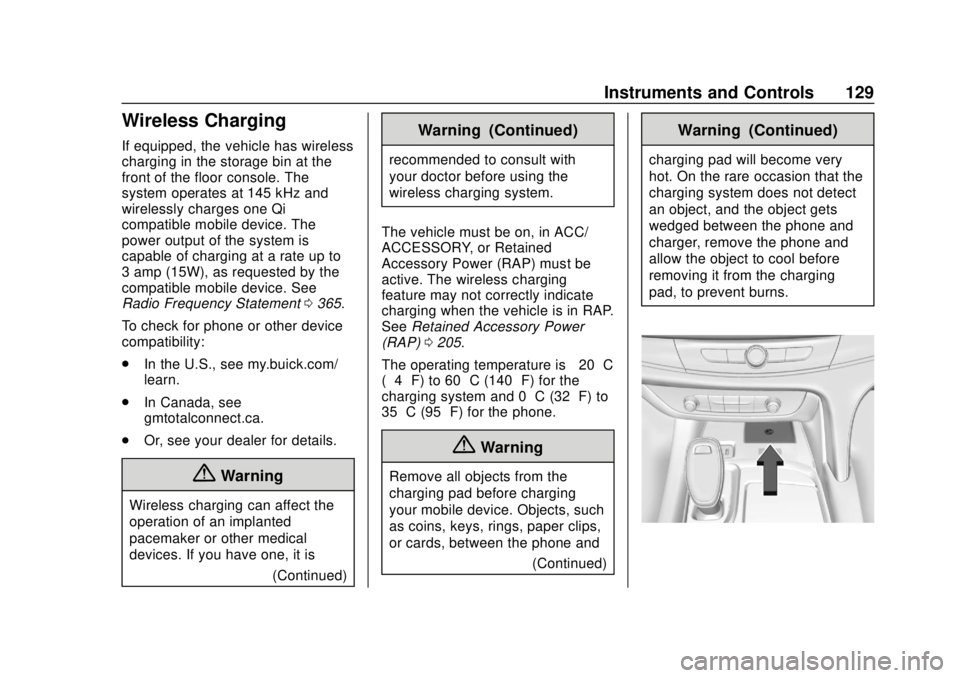
If equipped, the vehicle has wireless
charging in the storage bin at the
front of the floor console. The
system operates at 145 kHz and
wirelessly charges one Qi
compatible mobile device. The
power output of the system is
capable of charging at a rate up to
3 amp (15W), as requested by the
compatible mobile device. See
Radio Frequency Statement0365.
To check for phone or other device
compatibility:
. In the U.S., see my.buick.com/
learn.
. In Canada, see
gmtotalconnect.ca.
. Or, see your dealer for details.
{Warning
Wireless charging can affect the
operation of an implanted
pacemaker or other medical
devices. If you have one, it is
(Continued)
Warning (Continued)
recommended to consult with
your doctor before using the
wireless charging system.
The vehicle must be on, in ACC/
ACCESSORY, or Retained
Accessory Power (RAP) must be
active. The wireless charging
feature may not correctly indicate
charging when the vehicle is in RAP.
See Retained Accessory Power
(RAP) 0205.
The operating temperature is −20 °C
(−4 °F) to 60 °C (140 °F) for the
charging system and 0 °C (32 °F) to
35 °C (95 °F) for the phone.
{Warning
Remove all objects from the
charging pad before charging
your mobile device. Objects, such
as coins, keys, rings, paper clips,
or cards, between the phone and
(Continued)
Warning (Continued)
charging pad will become very
hot. On the rare occasion that the
charging system does not detect
an object, and the object gets
wedged between the phone and
charger, remove the phone and
allow the object to cool before
removing it from the charging
pad, to prevent burns.
Page 132 of 393
Buick Enclave Owner Manual (GMNA-Localizing-U.S./Canada/Mexico-
10999311) - 2018 - crc - 11/20/17
Instruments and Controls 131
SHALL THE COPYRIGHT HOLDER
OR CONTRIBUTORS BE LIABLE
FOR ANY DIRECT, INDIRECT,
INCIDENTAL, SPECIAL,
EXEMPLARY, OR
CONSEQUENTIAL DAMAGES
(INCLUDING, BUT NOT LIMITED
TO, PROCUREMENT OF
SUBSTITUTE GOODS OR
SERVICES; LOSS OF USE, DATA,
OR PROFITS; OR BUSINESS
INTERRUPTION) HOWEVER
CAUSED AND ON ANY THEORY
OF LIABILITY, WHETHER IN
CONTRACT, STRICT LIABILITY,
OR TORT (INCLUDING
NEGLIGENCE OR OTHERWISE)
ARISING IN ANY WAY OUT OF
THE USE OF THIS SOFTWARE,
EVEN IF ADVISED OF THE
POSSIBILITY OF SUCH DAMAGE.Warning Lights,
Gauges, and
Indicators
Warning lights and gauges can
signal that something is wrong
before it becomes serious enough
to cause an expensive repair or
replacement. Paying attention to the
warning lights and gauges could
prevent injury.
Some warning lights come on briefly
when the engine is started to
indicate they are working. When
one of the warning lights comes on
and stays on while driving, or when
one of the gauges shows there may
be a problem, check the section that
explains what to do. Waiting to do
repairs can be costly and even
dangerous.
Page 136 of 393
Buick Enclave Owner Manual (GMNA-Localizing-U.S./Canada/Mexico-
10999311) - 2018 - crc - 11/20/17
Instruments and Controls 135
desired item is highlighted.
A checkmark will be displayed next
to the selected item.
Display Themes (Uplevel) :There
are two instrument cluster display
configurations to choose from: Sport
and Touring.
Info Pages : Press
pwhile Info
Pages is displayed to enter the Info
Pages menu and select the items to
be displayed in the Info app.
See Driver Information Center (DIC)
(Base Level) 0148 orDriver
Information Center (DIC) (Uplevel)
0 150.
Speed Warning : The Speed
Warning display allows the driver to
set a speed that they do not want to
exceed. To set the Speed Warning
press
pwhen Speed Warning is
displayed.
For the Base Level Cluster, press
worxto adjust the value. PressVto set the speed. For the Uplevel Cluster, scroll to set
speed and press
p. Pressworx
to adjust the value. PressVto set
the speed.
Once the speed is set, this feature
can be turned off by pressing
V
while viewing this page. If the
selected speed limit is exceeded, a
pop-up warning is displayed with a
chime.
Software Information : Displays
open source software information.
Speedometer
The speedometer shows the
vehicle's speed in either kilometers
per hour (km/h) or miles per
hour (mph).
Odometer
The odometer shows how far the
vehicle has been driven, in either
kilometers or miles.
Trip Odometer
The trip odometer shows how far
the vehicle has been driven since
the trip odometer was last reset.
The trip odometer is accessed and
reset through the Driver Information
Center (DIC).
See Driver Information Center (DIC)
(Base Level) 0148 orDriver
Information Center (DIC) (Uplevel)
0 150.
Tachometer
The tachometer displays the engine
speed in revolutions per
minute (rpm).
For vehicles with the Stop/Start
system, when the ignition is on, the
tachometer indicates the vehicle
status. When pointing to AUTO
STOP, the engine is off but the
vehicle is on and can move. The
engine could auto start at any time.
When the indicator points to OFF,
the vehicle is off.
Page 139 of 393

Buick Enclave Owner Manual (GMNA-Localizing-U.S./Canada/Mexico-
10999311) - 2018 - crc - 11/20/17
138 Instruments and Controls
This cycle may continue several
times if the driver remains or
becomes unbuckled while the
vehicle is moving.
If the driver seat belt is buckled,
neither the light nor the chime
comes on.
Passenger Seat Belt Reminder
Light
There is a passenger seat belt
reminder light near the passenger
airbag status indicator. See
Passenger Sensing System090.
When the vehicle is started, this
light flashes and a chime may come
on to remind passengers to fasten
their seat belt. Then the light stays
on solid until the belt is buckled.
This cycle continues several times if the passenger remains or becomes
unbuckled while the vehicle is
moving.
If the passenger seat belt is
buckled, neither the chime nor the
light comes on.
The front passenger seat belt
reminder light and chime may turn
on if an object is put on the seat
such as a briefcase, handbag,
grocery bag, laptop, or other
electronic device. To turn off the
reminder light and/or chime, remove
the object from the seat or buckle
the seat belt.
Airbag Readiness Light
This light shows if there is an
electrical problem with the airbag
system. The system check includes
the airbag sensor(s), the passenger
sensing system, the pretensioners,
the airbag modules, the wiring, and
the crash sensing and diagnostic
module. For more information on the
airbag system, see
Airbag System
0 83.
The airbag readiness light comes on
for several seconds when the
vehicle is started. If the light does
not come on then, have it fixed
immediately.
{Warning
If the airbag readiness light stays
on after the vehicle is started or
comes on while driving, it means
the airbag system might not be
working properly. The airbags in
the vehicle might not inflate in a
crash, or they could even inflate
without a crash. To help avoid
injury, have the vehicle serviced
right away.
If there is a problem with the airbag
system, a Driver Information Center
(DIC) message may also come on.