driver mode control BUICK ENCLAVE 2019 User Guide
[x] Cancel search | Manufacturer: BUICK, Model Year: 2019, Model line: ENCLAVE, Model: BUICK ENCLAVE 2019Pages: 398, PDF Size: 5.91 MB
Page 180 of 398

Buick Enclave Owner Manual (GMNA-Localizing-U.S./Canada/Mexico-
12146155) - 2019 - crc - 9/10/18
Climate Controls 179
8. Rear Window Defogger andHeated Outside Mirrors (If
Equipped)
9. ON/OFF (Power)
10. AUTO (Automatic Operation)
Climate Control Display
1. Outside Temperature Display
2. Driver and Passenger Temperature Controls
3. Fan Control
4. Sync (Synchronized Temperature)
5. A/C (Air Conditioning) 6. Climate Control Selection
(Application Tray Button)
7. Air Delivery Mode Control
The fan, air delivery mode, air
conditioning, driver and passenger
temperatures, and Sync settings
can be controlled by touching
CLIMATE on the infotainment
display Home Page or the climate
button in the application tray display.
A selection can then be made on
the front climate control page
displayed. See the infotainment
manual.
Climate Control Status Display
The climate control status display
appears briefly when the climate
controls on the center stack are
adjusted. The air delivery mode can
be adjusted on the climate control
display.
Automatic Operation
The system automatically controls
the fan speed, air delivery, air
conditioning, and recirculation in
order to heat or cool the vehicle to
the desired temperature.
When AUTO is lit, all four functions
operate automatically. Each function
can also be manually set and the
selected setting is displayed.
Functions not manually set will
continue to be automatically
controlled, even if the AUTO
indicator is not lit.
For automatic operation: 1. Press AUTO.
2. Set the temperature. Allow the system time to stabilize. Adjust
the temperature as needed for
best comfort.
Page 181 of 398

Buick Enclave Owner Manual (GMNA-Localizing-U.S./Canada/Mexico-
12146155) - 2019 - crc - 9/10/18
180 Climate Controls
To improve fuel efficiency and to
cool the vehicle faster with A/C on,
recirculation may be automatically
selected in warm weather. Press
@to select recirculation; press it
again to select outside air.
Driver and Passenger
Temperature Controls : The
temperature can be adjusted
separately for the driver and the
passenger. Turn the knob clockwise
or counterclockwise to increase or
decrease the driver or passenger
temperature setting.
The driver and passenger
temperatures can also be adjusted
by touching the controls on the
climate control display.
Sync : Touch Sync on the display to
link all passenger settings to the
driver settings. Adjust the driver side
temperature control to change the
linked temperature. When the
passenger settings are adjusted, the
Sync button is displayed and the
temperatures are unlinked.
Manual Operation
CLIMATE : Press CLIMATE to show
the climate control display.
ON/OFF : Press to turn the fan on
or off. When off, no air will flow into
the vehicle. Turning the fan on,
pressing any other button, or turning
a knob will turn the system back on
using the current setting.
hi: Press or touch the fan controls
on the center stack or the display to
increase or decrease the fan speed.
The fan speed setting displays.
Pressing either button cancels
automatic fan control and the fan is
controlled manually. Press AUTO to
return to automatic operation.
Air Delivery Mode Control : When
the climate information is displayed,
touch
6,Y, orXon the display to
change the direction of airflow. Any
combination of the three modes can
be selected. The selected air
delivery mode is lit. Pressing any
mode control cancels automatic air
delivery control and the direction of the airflow is controlled manually.
Press AUTO to return to automatic
operation.
To change the current mode, select
one or more of the following:
6:
Air is directed to the floor
outlets, with some air to the
windshield and side windows.
Y: Air is directed to the instrument
panel outlets.
X: Clears the windows of fog or
moisture. Air is directed to the
windshield.
1MAX : Air is directed to the
windshield, the fan runs at a higher
speed, and the temperature of the
air is increased if not already at
maximum. This mode overrides the
previous mode selected and clears
fog or frost from the windshield
more quickly. When
1MAX is
pressed again, the system returns
to the previous mode setting and
fan speed.
For best results, clear all snow and
ice from the windshield before
defrosting.
Page 183 of 398
Buick Enclave Owner Manual (GMNA-Localizing-U.S./Canada/Mexico-
12146155) - 2019 - crc - 9/10/18
182 Climate Controls
Caution
Do not try to clear frost or other
material from the inside of the
front windshield and rear window
with a razor blade or anything
else that is sharp. This may
damage the rear window
defogger grid and affect the
radio's ability to pick up stations
clearly. The repairs would not be
covered by the vehicle warranty.
Heated and Ventilated Seats
MorL:If equipped, pressMorLto heat the driver or passenger seat.
Cor{:If equipped, pressCor{to ventilate the driver or
passenger seat. See Heated and
Ventilated Seats 012.
Remote Start Climate Control
Operation : The climate control
system may run when the vehicle is
started remotely. If the vehicle has
heated or ventilated seats, they may come on during a remote start.
See
Remote Vehicle Start 036 and
Heated and Ventilated Seats 012.
Sensors
The solar sensor, on top of the
instrument panel near the
windshield, monitors the solar heat.
The climate control system uses the
sensor information to adjust the
temperature, fan speed,
recirculation, and air delivery mode
for best comfort.
Do not cover the sensor; otherwise
the automatic climate control system
may not work properly.
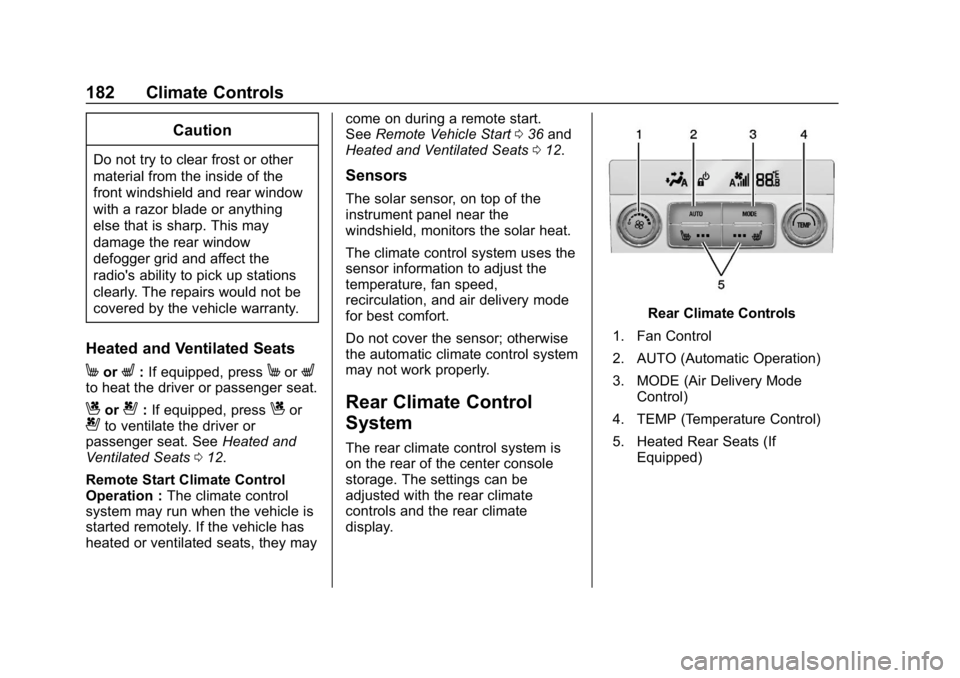
Rear Climate Control
System
The rear climate control system is
on the rear of the center console
storage. The settings can be
adjusted with the rear climate
controls and the rear climate
display.
Rear Climate Controls
1. Fan Control
2. AUTO (Automatic Operation)
3. MODE (Air Delivery Mode Control)
4. TEMP (Temperature Control)
5. Heated Rear Seats (If Equipped)
Page 184 of 398

Buick Enclave Owner Manual (GMNA-Localizing-U.S./Canada/Mexico-
12146155) - 2019 - crc - 9/10/18
Climate Controls 183
Rear Climate Display
1. Outside Temperature Display
2. Sync (Synchronized Temperatures)
3. Front Climate Control Display
4. REAR
O(On/Off)
5. Rear Auto (Automatic Operation)
6. Rear Control Lockout
7. Fan Control
8. Air Delivery Mode Control
9. Rear Climate Temperature Control REAR
O:
Touch REAROto turn
the rear climate control on or off.
Sync : Touch Sync on the rear
climate display to match the rear
climate control temperature to the
front climate control driver
temperature. The Sync button will
be lit. Adjust the rear climate control
temperature to change the linked
temperature. The Sync button
turns off.
Rear Control Lockout : Touch
Rear Control Lockout on the rear
climate display to lock or unlock
control of the rear climate control
system from the front seat. When
locked,
Qwill show on the rear
climate display. The rear climate
control system cannot be adjusted
from the second row seats.
Automatic Operation
AUTO : Touch AUTO or touch Rear
AUTO on the rear climate display to
automatically control air delivery
and fan speed. A is indicated in the
display on the rear of the center
console storage when automatic operation is active. If any of the
climate control settings are manually
adjusted, this cancels full automatic
operation.
The display on the rear of the center
console storage only indicates
climate control functions when the
system is in rear independent mode.
When Sync is active the display is
not shown.
Manual Operation
9:
Turn the knob clockwise or
counterclockwise or press and hold
SorTon the rear climate display
to increase or decrease the fan
speed.
TEMP : Turn the knob clockwise or
counterclockwise or press and hold
the rear climate display temperature
controls to adjust the rear
passenger temperature. If Sync is
lit, the rear climate temperature is
linked to the driver temperature
setting.
Page 187 of 398
Buick Enclave Owner Manual (GMNA-Localizing-U.S./Canada/Mexico-
12146155) - 2019 - crc - 9/10/18
186 Driving and Operating
Driving and
Operating
Driving Information
Distracted Driving . . . . . . . . . . . . 187
Defensive Driving . . . . . . . . . . . . . 188
Drunk Driving . . . . . . . . . . . . . . . . . 188
Control of a Vehicle . . . . . . . . . . . 188
Braking . . . . . . . . . . . . . . . . . . . . . . . 188
Steering . . . . . . . . . . . . . . . . . . . . . . 189
Off-Road Recovery . . . . . . . . . . . 189
Loss of Control . . . . . . . . . . . . . . . 190
Off-Road Driving . . . . . . . . . . . . . 190
Driving on Wet Roads . . . . . . . . 195
Hill and Mountain Roads . . . . . 196
Winter Driving . . . . . . . . . . . . . . . . 196
If the Vehicle Is Stuck . . . . . . . . 198
Vehicle Load Limits . . . . . . . . . . . 198
Starting and Operating
New Vehicle Break-In . . . . . . . . . 202
Ignition Positions . . . . . . . . . . . . . 202
Starting the Engine . . . . . . . . . . . 204
Stop/Start System . . . . . . . . . . . . 205
Engine Heater . . . . . . . . . . . . . . . . 206
Retained AccessoryPower (RAP) . . . . . . . . . . . . . . . . 207
Shifting Into Park . . . . . . . . . . . . . 207 Shifting out of Park . . . . . . . . . . . 208
Parking over Things
That Burn . . . . . . . . . . . . . . . . . . . 210
Extended Parking . . . . . . . . . . . . 210
Engine Exhaust
Engine Exhaust . . . . . . . . . . . . . . . 211
Running the Vehicle While Parked . . . . . . . . . . . . . . . . . . . . . . 212
Automatic Transmission
Automatic Transmission . . . . . . 212
Manual Mode . . . . . . . . . . . . . . . . . 217
Tow/Haul Mode . . . . . . . . . . . . . . . 217
Drive Systems
All-Wheel Drive . . . . . . . . . . . . . . . 218
Brakes
Antilock BrakeSystem (ABS) . . . . . . . . . . . . . . . 218
Electric Parking Brake . . . . . . . . 219
Brake Assist . . . . . . . . . . . . . . . . . . 220
Hill Start Assist (HSA) . . . . . . . . 221
Ride Control Systems
Traction Control/Electronic Stability Control . . . . . . . . . . . . . 222
Driver Mode Control . . . . . . . . . . 223
Cruise Control
Cruise Control . . . . . . . . . . . . . . . . 225 Adaptive Cruise Control . . . . . . 227
Driver Assistance Systems
Driver Assistance Systems . . . 235
Assistance Systems for
Parking or Backing . . . . . . . . . . 237
Assistance Systems for Driving . . . . . . . . . . . . . . . . . . . . . . 240
Forward Collision Alert (FCA) System . . . . . . . . . . . . . . . . . . . . . . 240
Forward Automatic Braking (FAB) . . . . . . . . . . . . . . . 243
Front Pedestrian Braking (FPB) System . . . . . . . . . . . . . . . 244
Side Blind Zone Alert (SBZA) . . . . . . . . . . . . . . . . 246
Lane Change Alert (LCA) . . . . . 247
Lane Departure
Warning (LDW) . . . . . . . . . . . . . 249
Lane Keep Assist (LKA) . . . . . . 249
Fuel
Top Tier Fuel . . . . . . . . . . . . . . . . . 251
Recommended Fuel . . . . . . . . . . 251
Prohibited Fuels . . . . . . . . . . . . . . 251
Fuels in Foreign Countries . . . 252
Fuel Additives . . . . . . . . . . . . . . . . 252
Filling the Tank . . . . . . . . . . . . . . . 252
Filling a Portable Fuel Container . . . . . . . . . . . . . . . . . . . 253
Page 196 of 398
Buick Enclave Owner Manual (GMNA-Localizing-U.S./Canada/Mexico-
12146155) - 2019 - crc - 9/10/18
Driving and Operating 195
After operation in mud or sand,
have the brake linings cleaned and
checked. These substances can
cause glazing and uneven braking.
Check the body structure, steering,
suspension, wheels, tires, and
exhaust system for damage and
check the fuel lines and cooling
system for any leakage.
More frequent maintenance service
is required. SeeMaintenance
Schedule 0346.
Driving on Wet Roads
Rain and wet roads can reduce
vehicle traction and affect your
ability to stop and accelerate.
Always drive slower in these types
of driving conditions and avoid
driving through large puddles and
deep-standing or flowing water.
{Warning
Wet brakes can cause crashes.
They might not work as well in a
quick stop and could cause
pulling to one side. You could
lose control of the vehicle.
After driving through a large
puddle of water or a car/vehicle
wash, lightly apply the brake
pedal until the brakes work
normally.
Flowing or rushing water creates
strong forces. Driving through
flowing water could cause the
vehicle to be carried away. If this
happens, you and other vehicle
occupants could drown. Do not
ignore police warnings and be
very cautious about trying to drive
through flowing water.
Hydroplaning
Hydroplaning is dangerous. Water
can build up under the vehicle's
tires so they actually ride on the
water. This can happen if the road is wet enough and you are going fast
enough. When the vehicle is
hydroplaning, it has little or no
contact with the road.
There is no hard and fast rule about
hydroplaning. The best advice is to
slow down when the road is wet.
Other Rainy Weather Tips
Besides slowing down, other wet
weather driving tips include:
.
Allow extra following distance.
. Pass with caution.
. Keep windshield wiping
equipment in good shape.
. Keep the windshield washer fluid
reservoir filled.
. Have good tires with proper
tread depth. See Tires0299.
. Turn off cruise control.
. Activate All-Wheel Drive (AWD)
mode. See Driver Mode Control
0 223.
Page 197 of 398
Buick Enclave Owner Manual (GMNA-Localizing-U.S./Canada/Mexico-
12146155) - 2019 - crc - 9/10/18
196 Driving and Operating
Hill and Mountain Roads
Driving on steep hills or through
mountains is different than driving
on flat or rolling terrain. Tips include:
.Keep the vehicle serviced and in
good shape.
. Check all fluid levels and brakes,
tires, cooling system, and
transmission.
. Shift to a lower gear when going
down steep or long hills.
{Warning
Using the brakes to slow the
vehicle on a long downhill slope
can cause brake overheating, can
reduce brake performance, and
could result in a loss of braking.
Shift the transmission to a lower
gear to let the engine assist the
brakes on a steep downhill slope.
{Warning
Coasting downhill in N (Neutral)
or with the ignition off is
dangerous. This can cause
overheating of the brakes and
loss of steering assist. Always
have the engine running and the
vehicle in gear.
. Drive at speeds that keep the
vehicle in its own lane. Do not
swing wide or cross the
center line.
. Be alert on top of hills;
something could be in your lane
(e.g., stalled car, crash).
. Pay attention to special road
signs (e.g., falling rocks area,
winding roads, long grades,
passing or no-passing zones)
and take appropriate action.
. Select All-Wheel Drive (AWD)
Mode.
See Driver Mode Control 0223
and All-Wheel Drive 0218.
Winter Driving
Driving on Snow or Ice
Snow or ice between the tires and
the road creates less traction or
grip, so drive carefully. Wet ice can
occur at about 0 °C (32 °F) when
freezing rain begins to fall. Avoid
driving on wet ice or in freezing rain
until roads can be treated.
For Slippery Road Driving:
.
Accelerate gently. Accelerating
too quickly causes the wheels to
spin and makes the surface
under the tires slick.
. Turn on Traction Control. See
Traction Control/Electronic
Stability Control 0222.
. The Antilock Brake System
(ABS) improves vehicle stability
during hard stops, but the
brakes should be applied sooner
than when on dry pavement.
See Antilock Brake System
(ABS) 0218.
Page 198 of 398

Buick Enclave Owner Manual (GMNA-Localizing-U.S./Canada/Mexico-
12146155) - 2019 - crc - 9/10/18
Driving and Operating 197
.Allow greater following distance
and watch for slippery spots. Icy
patches can occur on otherwise
clear roads in shaded areas.
The surface of a curve or an
overpass can remain icy when
the surrounding roads are clear.
Avoid sudden steering
maneuvers and braking while
on ice.
. Turn off cruise control.
. Select All-Wheel Drive (AWD)
Mode for vehicles equipped with
AWD. Select Snow/Ice Mode for
FWD only vehicles.
See Driver Mode Control 0223
and All-Wheel Drive 0218.
Blizzard Conditions
Stop the vehicle in a safe place and
signal for help. Stay with the vehicle
unless there is help nearby.
If possible, use Roadside
Assistance. See Roadside
Assistance Program 0364. To get
help and keep everyone in the
vehicle safe:
. Turn on the hazard warning
flashers. .
Tie a red cloth to an outside
mirror.
{Warning
Snow can trap engine exhaust
under the vehicle. This may
cause exhaust gases to get
inside. Engine exhaust contains
carbon monoxide (CO), which
cannot be seen or smelled. It can
cause unconsciousness and even
death.
If the vehicle is stuck in snow:
. Clear snow from the base of
the vehicle, especially any
blocking the exhaust pipe.
. Open a window about 5 cm
(2 in) on the vehicle side
that is away from the wind,
to bring in fresh air.
. Fully open the air outlets on
or under the instrument
panel.
(Continued)
Warning (Continued)
.Adjust the climate control
system to circulate the air
inside the vehicle and set
the fan speed to the highest
setting. See “Climate
Control Systems.”
For more information about CO,
see Engine Exhaust 0211.
To save fuel, run the engine for
short periods to warm the vehicle
and then shut the engine off and
partially close the window. Moving
about to keep warm also helps.
If it takes time for help to arrive,
when running the engine, push the
accelerator pedal slightly so the
engine runs faster than the idle
speed. This keeps the battery
charged to restart the vehicle and to
signal for help with the headlamps.
Do this as little as possible, to
save fuel.
Page 199 of 398

Buick Enclave Owner Manual (GMNA-Localizing-U.S./Canada/Mexico-
12146155) - 2019 - crc - 9/10/18
198 Driving and Operating
If the Vehicle Is Stuck
Slowly and cautiously spin the
wheels to free the vehicle when
stuck in sand, mud, ice, or snow.
If stuck too severely for the traction
system to free the vehicle, turn the
traction system off and use the
rocking method. SeeTraction
Control/Electronic Stability Control
0 222.
{Warning
If the vehicle's tires spin at high
speed, they can explode, and you
or others could be injured. The
vehicle can overheat, causing an
engine compartment fire or other
damage. Spin the wheels as little
as possible and avoid going
above 56 km/h (35 mph).
Select All-Wheel Drive (AWD)
Mode.
See Driver Mode Control 0223 and
All-Wheel Drive 0218.
Rocking the Vehicle to Get
it Out
Turn the steering wheel left and
right to clear the area around the
front wheels. Turn off any traction
system. Shift back and forth
between R (Reverse) and a low
forward gear, spinning the wheels
as little as possible. To prevent
transmission wear, wait until the
wheels stop spinning before shifting
gears. Release the accelerator
pedal while shifting, and press
lightly on the accelerator pedal
when the transmission is in gear.
Slowly spinning the wheels in the
forward and reverse directions
causes a rocking motion that could
free the vehicle. If that does not get
the vehicle out after a few tries, it
might need to be towed out. If the
vehicle does need to be towed out,
see Towing the Vehicle 0331.
Vehicle Load Limits
It is very important to know how
much weight the vehicle can
carry. This weight is called the vehicle capacity weight and
includes the weight of all
occupants, cargo, and all
nonfactory-installed options.
Two labels on the vehicle may
show how much weight it may
properly carry, the Tire and
Loading Information label and
the Certification/Tire label.
{Warning
Do not load the vehicle any
heavier than the Gross
Vehicle Weight Rating
(GVWR), or either the
maximum front or rear Gross
Axle Weight Rating (GAWR).
This can cause systems to
break and change the way the
vehicle handles. This could
cause loss of control and a
crash. Overloading can also
reduce stopping distance,
damage the tires, and shorten
the life of the vehicle.
Page 217 of 398
Buick Enclave Owner Manual (GMNA-Localizing-U.S./Canada/Mexico-
12146155) - 2019 - crc - 9/10/18
216 Driving and Operating
Car Wash Mode (Engine On–
Driver out of Vehicle)
To place the vehicle in N (Neutral)
with the engine on and the vehicle
unoccupied:
1. Drive to the entrance of the car wash.
2. Apply the brake pedal.
3. Open the door.
4. Shift to N (Neutral), then release the brake pedal.
5. The indicator should continue to show N. If it does not, repeat
Steps 2–4.
6. Exit the vehicle and close the door. The vehicle is now ready
for the car wash.
7. The vehicle may automatically shift to P (Park) upon re-entry.
D : This position is for normal
driving. If more power is needed for
passing, press the accelerator
pedal down. To shift into D (Drive):
1. Bring the vehicle to a complete stop.
2. From the center position, move the shift lever back. If the
vehicle is in P (Park) press and
hold the shift lock release
button, continue holding it, and
move the shift lever back. D
will illuminate in red.
3. After releasing the shift lever, it will return to the center
position.
To shift out of D (Drive): 1. Bring the vehicle to a complete stop.
2. Shift to the desired gear.
3. After releasing the shift lever, it will return to the center
position.
Downshifting the transmission in
slippery road conditions could result
in skidding. See “Skidding”under
Loss of Control 0190.Caution
A transmission hot message may
display if the automatic
transmission fluid is too hot.
Driving under this condition can
damage the vehicle. Stop and idle
the engine to cool the automatic
transmission fluid. This message
clears when the transmission fluid
has cooled sufficiently.
Caution
Spinning the tires or holding the
vehicle in one place on a hill
using only the accelerator pedal
may damage the transmission.
The repair will not be covered by
the vehicle warranty. If the vehicle
is stuck, do not spin the tires.
When stopping on a hill, use the
brakes to hold the vehicle in
place.