display BUICK ENCLAVE 2019 Workshop Manual
[x] Cancel search | Manufacturer: BUICK, Model Year: 2019, Model line: ENCLAVE, Model: BUICK ENCLAVE 2019Pages: 398, PDF Size: 5.91 MB
Page 180 of 398

Buick Enclave Owner Manual (GMNA-Localizing-U.S./Canada/Mexico-
12146155) - 2019 - crc - 9/10/18
Climate Controls 179
8. Rear Window Defogger andHeated Outside Mirrors (If
Equipped)
9. ON/OFF (Power)
10. AUTO (Automatic Operation)
Climate Control Display
1. Outside Temperature Display
2. Driver and Passenger Temperature Controls
3. Fan Control
4. Sync (Synchronized Temperature)
5. A/C (Air Conditioning) 6. Climate Control Selection
(Application Tray Button)
7. Air Delivery Mode Control
The fan, air delivery mode, air
conditioning, driver and passenger
temperatures, and Sync settings
can be controlled by touching
CLIMATE on the infotainment
display Home Page or the climate
button in the application tray display.
A selection can then be made on
the front climate control page
displayed. See the infotainment
manual.
Climate Control Status Display
The climate control status display
appears briefly when the climate
controls on the center stack are
adjusted. The air delivery mode can
be adjusted on the climate control
display.
Automatic Operation
The system automatically controls
the fan speed, air delivery, air
conditioning, and recirculation in
order to heat or cool the vehicle to
the desired temperature.
When AUTO is lit, all four functions
operate automatically. Each function
can also be manually set and the
selected setting is displayed.
Functions not manually set will
continue to be automatically
controlled, even if the AUTO
indicator is not lit.
For automatic operation: 1. Press AUTO.
2. Set the temperature. Allow the system time to stabilize. Adjust
the temperature as needed for
best comfort.
Page 181 of 398

Buick Enclave Owner Manual (GMNA-Localizing-U.S./Canada/Mexico-
12146155) - 2019 - crc - 9/10/18
180 Climate Controls
To improve fuel efficiency and to
cool the vehicle faster with A/C on,
recirculation may be automatically
selected in warm weather. Press
@to select recirculation; press it
again to select outside air.
Driver and Passenger
Temperature Controls : The
temperature can be adjusted
separately for the driver and the
passenger. Turn the knob clockwise
or counterclockwise to increase or
decrease the driver or passenger
temperature setting.
The driver and passenger
temperatures can also be adjusted
by touching the controls on the
climate control display.
Sync : Touch Sync on the display to
link all passenger settings to the
driver settings. Adjust the driver side
temperature control to change the
linked temperature. When the
passenger settings are adjusted, the
Sync button is displayed and the
temperatures are unlinked.
Manual Operation
CLIMATE : Press CLIMATE to show
the climate control display.
ON/OFF : Press to turn the fan on
or off. When off, no air will flow into
the vehicle. Turning the fan on,
pressing any other button, or turning
a knob will turn the system back on
using the current setting.
hi: Press or touch the fan controls
on the center stack or the display to
increase or decrease the fan speed.
The fan speed setting displays.
Pressing either button cancels
automatic fan control and the fan is
controlled manually. Press AUTO to
return to automatic operation.
Air Delivery Mode Control : When
the climate information is displayed,
touch
6,Y, orXon the display to
change the direction of airflow. Any
combination of the three modes can
be selected. The selected air
delivery mode is lit. Pressing any
mode control cancels automatic air
delivery control and the direction of the airflow is controlled manually.
Press AUTO to return to automatic
operation.
To change the current mode, select
one or more of the following:
6:
Air is directed to the floor
outlets, with some air to the
windshield and side windows.
Y: Air is directed to the instrument
panel outlets.
X: Clears the windows of fog or
moisture. Air is directed to the
windshield.
1MAX : Air is directed to the
windshield, the fan runs at a higher
speed, and the temperature of the
air is increased if not already at
maximum. This mode overrides the
previous mode selected and clears
fog or frost from the windshield
more quickly. When
1MAX is
pressed again, the system returns
to the previous mode setting and
fan speed.
For best results, clear all snow and
ice from the windshield before
defrosting.
Page 182 of 398
Buick Enclave Owner Manual (GMNA-Localizing-U.S./Canada/Mexico-
12146155) - 2019 - crc - 9/10/18
Climate Controls 181
A/C :Touch A/C on the display to
turn the air conditioning on or off.
If the fan is turned off, the air
conditioner will not run and A/C OFF
will show on the climate control
display.
Touch AUTO to return to automatic
operation and the air conditioner
runs automatically as needed.
@: Press to turn on recirculation.
An indicator light comes on. Air is
recirculated to quickly cool the
inside of the vehicle or to reduce the
entry of outside air and odors.
If selected during cool or cold
weather, the windshield and
windows may fog. Turn off
recirculation to help clear the
windshield and windows.
Auto Defog : The climate control
system has a sensor to
automatically detect high humidity
inside the vehicle. When high
humidity is detected, the climate
control system may adjust to
outside air supply and turn on the
air conditioner. The fan speed may
slightly increase to help prevent fogging. If the climate control
system does not detect possible
window fogging, it returns to normal
operation.
To turn Auto Defog off or on, see
“Climate and Air Quality”
under
Vehicle Personalization 0156.
Ionizer : If equipped with an ionizer,
this feature helps to clean the air
inside the vehicle and remove
contaminants such as pollen, odors,
and dust. If the climate control
system is on and the ionizer is
enabled, Ionizer On will be
displayed. To turn the ionizer on or
off, see “Climate and Air Quality”
under Vehicle Personalization
0 156.
Rear Window Defogger
K:Press to turn the rear window
defogger on or off. An indicator light
on the button comes on to show that
the rear window defogger is on. The
rear window defogger only works
when the engine is running. It turns
off when the ignition is turned off or
in ACC/ACCESSORY. The rear window defogger can be
set to automatic operation. See
“Climate and Air Quality”
under
Vehicle Personalization 0156.
When Auto Rear Defog is selected,
the rear window defogger turns on
automatically when the interior
temperature is cold and the outside
temperature is about 4 °C (40 °F)
and below. The auto rear defogger
turns off automatically after about
10 minutes, or after five minutes if
the outside temperature is not
as cold.
The upper gridlines on the rear
window are antenna lines and are
not intended to heat when the
defogger is activated.
The heated outside mirrors turn on
when the rear window defogger
button is on and help to clear fog or
frost from the surface of the mirror.
See Heated Mirrors 053.
Page 183 of 398
Buick Enclave Owner Manual (GMNA-Localizing-U.S./Canada/Mexico-
12146155) - 2019 - crc - 9/10/18
182 Climate Controls
Caution
Do not try to clear frost or other
material from the inside of the
front windshield and rear window
with a razor blade or anything
else that is sharp. This may
damage the rear window
defogger grid and affect the
radio's ability to pick up stations
clearly. The repairs would not be
covered by the vehicle warranty.
Heated and Ventilated Seats
MorL:If equipped, pressMorLto heat the driver or passenger seat.
Cor{:If equipped, pressCor{to ventilate the driver or
passenger seat. See Heated and
Ventilated Seats 012.
Remote Start Climate Control
Operation : The climate control
system may run when the vehicle is
started remotely. If the vehicle has
heated or ventilated seats, they may come on during a remote start.
See
Remote Vehicle Start 036 and
Heated and Ventilated Seats 012.
Sensors
The solar sensor, on top of the
instrument panel near the
windshield, monitors the solar heat.
The climate control system uses the
sensor information to adjust the
temperature, fan speed,
recirculation, and air delivery mode
for best comfort.
Do not cover the sensor; otherwise
the automatic climate control system
may not work properly.
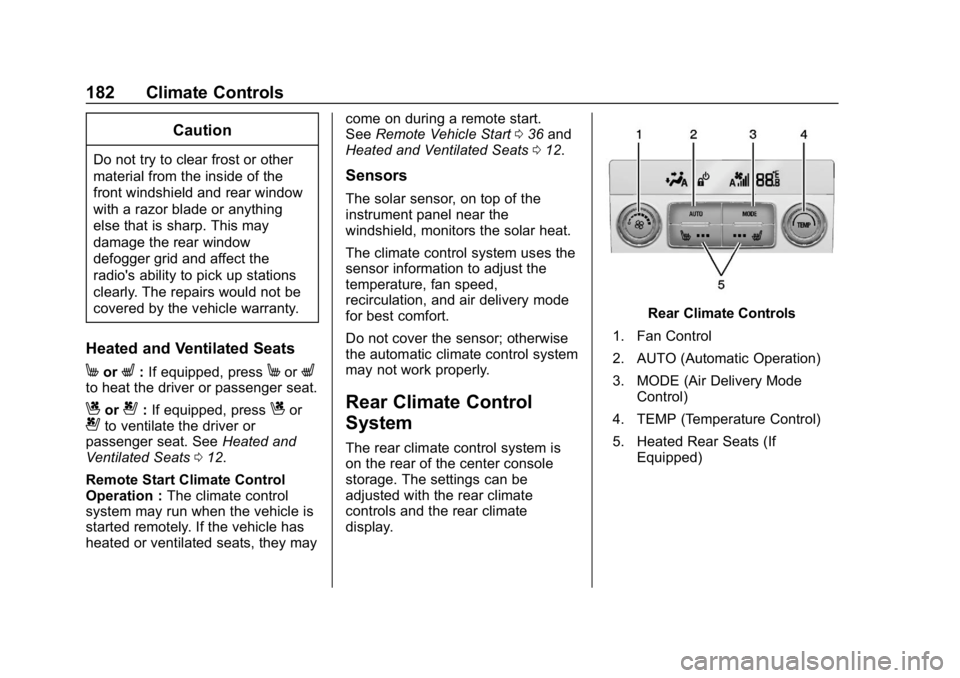
Rear Climate Control
System
The rear climate control system is
on the rear of the center console
storage. The settings can be
adjusted with the rear climate
controls and the rear climate
display.
Rear Climate Controls
1. Fan Control
2. AUTO (Automatic Operation)
3. MODE (Air Delivery Mode Control)
4. TEMP (Temperature Control)
5. Heated Rear Seats (If Equipped)
Page 184 of 398

Buick Enclave Owner Manual (GMNA-Localizing-U.S./Canada/Mexico-
12146155) - 2019 - crc - 9/10/18
Climate Controls 183
Rear Climate Display
1. Outside Temperature Display
2. Sync (Synchronized Temperatures)
3. Front Climate Control Display
4. REAR
O(On/Off)
5. Rear Auto (Automatic Operation)
6. Rear Control Lockout
7. Fan Control
8. Air Delivery Mode Control
9. Rear Climate Temperature Control REAR
O:
Touch REAROto turn
the rear climate control on or off.
Sync : Touch Sync on the rear
climate display to match the rear
climate control temperature to the
front climate control driver
temperature. The Sync button will
be lit. Adjust the rear climate control
temperature to change the linked
temperature. The Sync button
turns off.
Rear Control Lockout : Touch
Rear Control Lockout on the rear
climate display to lock or unlock
control of the rear climate control
system from the front seat. When
locked,
Qwill show on the rear
climate display. The rear climate
control system cannot be adjusted
from the second row seats.
Automatic Operation
AUTO : Touch AUTO or touch Rear
AUTO on the rear climate display to
automatically control air delivery
and fan speed. A is indicated in the
display on the rear of the center
console storage when automatic operation is active. If any of the
climate control settings are manually
adjusted, this cancels full automatic
operation.
The display on the rear of the center
console storage only indicates
climate control functions when the
system is in rear independent mode.
When Sync is active the display is
not shown.
Manual Operation
9:
Turn the knob clockwise or
counterclockwise or press and hold
SorTon the rear climate display
to increase or decrease the fan
speed.
TEMP : Turn the knob clockwise or
counterclockwise or press and hold
the rear climate display temperature
controls to adjust the rear
passenger temperature. If Sync is
lit, the rear climate temperature is
linked to the driver temperature
setting.
Page 185 of 398
Buick Enclave Owner Manual (GMNA-Localizing-U.S./Canada/Mexico-
12146155) - 2019 - crc - 9/10/18
184 Climate Controls
Y/6or MODE :Touch one or both
modes on the rear climate display or
press MODE on the rear climate
controls to change the direction of
the airflow in the rear seating area.
Press MODE again to deselect.
Active modes will be highlighted.
MorL: If equipped, pressMorLto heat the left or right outboard
seat. See Heated Rear Seats 073.
Air Vents
Use the slider switch on the air
outlets to change the direction of the
airflow, or to open and close off the
airflow.
There are also outlets overhead in
the rear passenger area; adjust as
needed.
Keep all outlets open whenever
possible for best system
performance.
Operation Tips
.
Clear away any ice, snow,
or leaves from the air inlets at
the base of the windshield that
can block the flow of air into the
vehicle.
. Clear snow off the hood to
improve visibility and help
decrease moisture drawn into
the vehicle. .
Use of non-GM approved hood
deflectors can adversely affect
the performance of the system.
. Keep the path under all seats
clear of objects to help circulate
the air inside the vehicle more
effectively.
. If fogging reoccurs while in vent
or bi-level modes with mild
temperature throughout the
vehicle, turn on the air
conditioner to reduce windshield
fogging.
Page 204 of 398
Buick Enclave Owner Manual (GMNA-Localizing-U.S./Canada/Mexico-
12146155) - 2019 - crc - 9/10/18
Driving and Operating 203
The Remote Keyless Entry (RKE)
transmitter must be in the vehicle for
the system to operate. If the
pushbutton start is not working, the
vehicle may be near a strong radio
antenna signal causing interference
to the Keyless Access system. See
Remote Keyless Entry (RKE)
System Operation029.
To shift out of P (Park), the engine
must be running, and the brake
pedal must be applied.
Stopping the Engine/OFF (No
Indicator Lights) : When the
vehicle is stopped, press ENGINE
START/STOP once to turn the
engine off.
If the vehicle is in P (Park), the
ignition will turn off, and Retained
Accessory Power (RAP) will remain
active. See Retained Accessory
Power (RAP) 0207.
If the vehicle is in R (Reverse), D
(Drive) or L (Low), the vehicle will
shift to P (Park), the ignition will turn
off, and Retained Accessory Power
(RAP) will remain active. If the vehicle is in N (Neutral), the
ignition will return to ACC/
ACCESSORY and display the
message SHIFT TO PARK in the
Driver Information Center (DIC).
When the vehicle is shifted into
P (Park), the ignition will turn off.
Do not turn the engine off when the
vehicle is moving. This will cause a
loss of power assist in the brake
and steering systems and disable
the airbags.
If the vehicle must be shut off in an
emergency:
1. Brake using a firm and steady pressure. Do not pump the
brakes repeatedly. This may
deplete power assist, requiring
increased brake pedal force.
2. Shift the vehicle to N (Neutral). This can be done while the
vehicle is moving. After shifting
to N (Neutral), firmly apply the
brakes and steer the vehicle to
a safe location.
3. Come to a complete stop and shift to P (Park). 4. Set the parking brake. See
Electric Parking Brake 0219.
5. Press ENGINE START/STOP to turn the vehicle off.
{Warning
Turning off the vehicle while
moving may cause loss of power
assist in the brake and steering
systems and disable the airbags.
While driving, only shut the
vehicle off in an emergency.
If the vehicle cannot be pulled over,
and must be shut off while driving,
press and hold ENGINE START/
STOP for longer than two seconds,
or press twice in five seconds.
ACC/ACCESSORY (Amber
Indicator Light) : This mode allows
some electrical accessories to be
used when the engine is off.
With the ignition off, pressing the
button one time without the brake
pedal applied will place the ignition
system in ACC/ACCESSORY.
Page 205 of 398

Buick Enclave Owner Manual (GMNA-Localizing-U.S./Canada/Mexico-
12146155) - 2019 - crc - 9/10/18
204 Driving and Operating
The ignition will switch from ACC/
ACCESSORY to OFF after
five minutes to prevent battery
rundown.
ON/RUN/START (Green Indicator
Light) :This mode is for driving and
starting. With the ignition off, and
the brake pedal applied, pressing
the button once will place the
ignition system in ON/RUN/START.
Once engine cranking begins,
release the button. Engine cranking
will continue until the engine starts.
See Starting the Engine 0204. The
ignition will then remain on.
Service Mode
This power mode is available for
service and diagnostics, and to
verify the proper operation of the
malfunction indicator lamp as may
be required for emission inspection
purposes. With the vehicle off, and
the brake pedal not applied,
pressing and holding the button for
more than five seconds will place
the vehicle in Service Mode. The
instruments and audio systems will
operate as they do in ON/RUN, but
the vehicle will not be able to be driven. The engine will not start in
Service Mode. Press the button
again to turn the vehicle off.
Starting the Engine
Press the P (Park) button on the
shift lever or shift the vehicle to
N (Neutral). The engine will not start
in any other position. To restart the
engine when the vehicle is already
moving, use N (Neutral) only.
Caution
Do not try to shift to P (Park) if the
vehicle is moving. If you do, you
could damage the transmission.
Shift to P (Park) only when the
vehicle is stopped.
Caution
If you add electrical parts or
accessories, you could change
the way the engine operates. Any
resulting damage would not be
(Continued)
Caution (Continued)
covered by the vehicle warranty.
SeeAdd-On Electrical Equipment
0 266.
Starting Procedure
1. With the Keyless Access
system, the RKE transmitter
must be in the vehicle. Press
ENGINE START/STOP with the
brake pedal applied. When the
engine begins cranking, let go
of the button.
The idle speed will go down as
the engine gets warm. Do not
race the engine immediately
after starting it.
If the RKE transmitter is not in
the vehicle, if there is
interference, or if the RKE
battery is low, the Driver
Information Center (DIC) will
display a message.
Page 206 of 398

Buick Enclave Owner Manual (GMNA-Localizing-U.S./Canada/Mexico-
12146155) - 2019 - crc - 9/10/18
Driving and Operating 205
Caution
Cranking the engine for long
periods of time, by returning the
ignition to the START position
immediately after cranking has
ended, can overheat and damage
the cranking motor, and drain the
battery. Wait at least 15 seconds
between each try, to let the
cranking motor cool down.
2. If the engine does not start after five to 10 seconds,
especially in very cold weather
(below −18 °C or 0 °F), it could
be flooded with too much
gasoline. Try pushing the
accelerator pedal all the way to
the floor and holding it there as
you press ENGINE START/
STOP, for up to a maximum of
15 seconds. Wait at least
15 seconds between each try,
to allow the cranking motor to
cool down. When the engine
starts, let go of the button and
the accelerator. If the vehicle starts briefly but then stops
again, do the same thing. This
clears the extra gasoline from
the engine. Do not race the
engine immediately after
starting it. Operate the engine
and transmission gently until
the oil warms up and lubricates
all moving parts.
Stop/Start System
The Stop/Start system will shut off
the engine to help conserve fuel.
It has components designed for the
increased number of starts.
{Warning
The automatic engine Stop/Start
feature causes the engine to shut
off while the vehicle is still on. Do
not exit the vehicle before shifting
to P (Park). The vehicle may
restart and move unexpectedly.
Always shift to P (Park), and then
turn the ignition off before exiting
the vehicle.
Auto Engine Stop/Start
When the brakes are applied and
the vehicle is at a complete stop,
the engine may turn off. When
stopped, the tachometer displays
AUTO STOP. See
Tachometer
0 135. When the brake pedal is
released or the accelerator pedal is
pressed, the engine will restart.
To maintain vehicle performance,
other conditions may cause the
engine to automatically restart
before the brake pedal is released.
Auto Stops may not occur and/or
auto restarts may occur because:
. The climate control settings
require the engine to be running
to cool or heat the vehicle
interior.
. The vehicle battery charge
is low.
. The vehicle battery has recently
been disconnected.
. Minimum vehicle speed has not
been reached since the last
Auto Stop.
Page 210 of 398
Buick Enclave Owner Manual (GMNA-Localizing-U.S./Canada/Mexico-
12146155) - 2019 - crc - 9/10/18
Driving and Operating 209
If the vehicle cannot shift from
P (Park), a Driver Information
Center (DIC) message will be
displayed. See your dealer for
service.
Manual Park Release
{Warning
The transmission will be placed in
N (Neutral) when the manual park
release is pulled. The vehicle can
roll and you or others could be
injured. Ensure the vehicle is on
level ground.
Caution
The manual park release is not
intended to be used for towing.
Damage may result from using
the manual park release in this
way. The repairs would not be
covered by the vehicle warranty.This vehicle includes a manual park
release that can be used to shift the
vehicle into N (Neutral) when the
engine is not running.
Pulling the manual park release
while the vehicle is on or turning the
ignition on while the manual park
release is pulled, will result in a
Service Transmission message
being displayed.
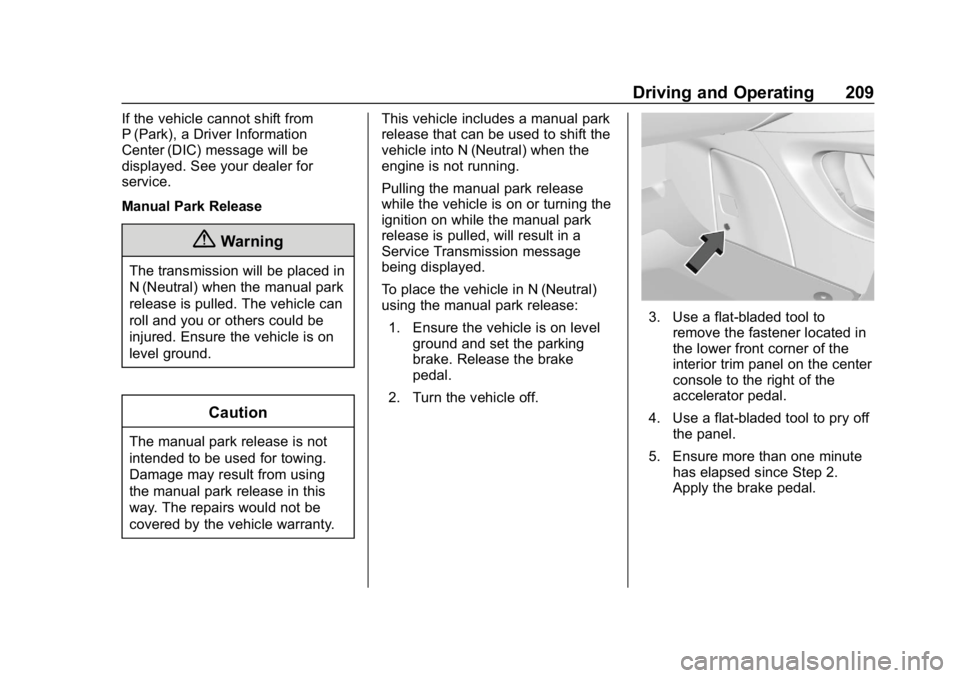
To place the vehicle in N (Neutral)
using the manual park release:
1. Ensure the vehicle is on level ground and set the parking
brake. Release the brake
pedal.
2. Turn the vehicle off.
3. Use a flat-bladed tool to remove the fastener located in
the lower front corner of the
interior trim panel on the center
console to the right of the
accelerator pedal.
4. Use a flat-bladed tool to pry off the panel.
5. Ensure more than one minute has elapsed since Step 2.
Apply the brake pedal.