remove seats BUICK ENCLAVE 2020 User Guide
[x] Cancel search | Manufacturer: BUICK, Model Year: 2020, Model line: ENCLAVE, Model: BUICK ENCLAVE 2020Pages: 381, PDF Size: 7.08 MB
Page 90 of 381

Buick Enclave Owner Manual (GMNA-Localizing-U.S./Canada/Mexico-
13527524) - 2020 - CRC - 4/10/19
Seats and Restraints 89
If the position you are
using has a fixed head
restraint and you are
using a single tether,
route the tether under the
head restraint and in
between the head
restraint posts or around
the outboard side of the
head restraint. If the position you are
using has a fixed head
restraint and you are
using a dual tether, route
the tether around the
head restraint.
4. Before placing a child in the
child restraint, make sure it is
securely held in place. To
check, grasp the child restraint
at the LATCH path and attempt
to move it side to side and
back and forth. There should
be no more than 2.5 cm (1 in) of
movement, for proper
installation. Head Restraint Removal and
Reinstallation The second row outboard head
restraints can be removed if they
interfere with the proper installation
of the child restraint.
The third row head restraints cannot
be removed.
To remove the head restraint:
1. Partially fold the seatback
forward. See Rear Seats 0 48
for additional information.
Page 91 of 381

Buick Enclave Owner Manual (GMNA-Localizing-U.S./Canada/Mexico-
13527524) - 2020 - CRC - 4/10/19
90 Seats and Restraints 2. Press both buttons on the head
restraint posts at the same
time, and pull up on the head
restraint.
3. Store the head restraint in the
cargo area of the vehicle.
4. When the child restraint is
removed, reinstall the head
restraint before the seating
position is used.
{ WarningWith head restraints that are not
installed and adjusted properly,
there is a greater chance that
occupants will suffer a neck/
spinal injury in a crash. Do not
drive until the head restraints for
all occupants are installed and
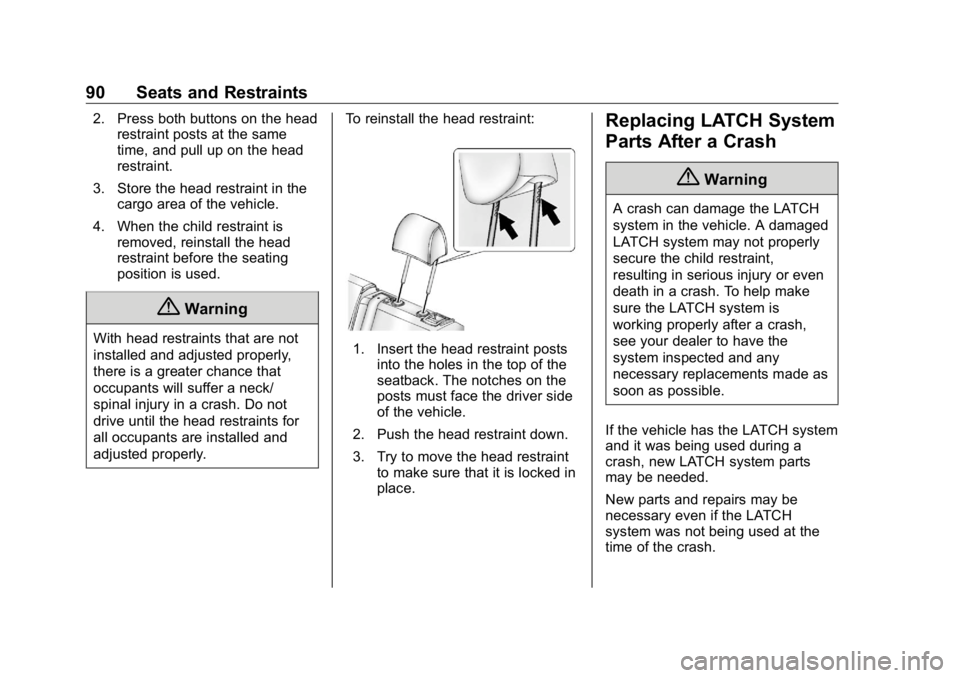
adjusted properly. To reinstall the head restraint:
1. Insert the head restraint posts
into the holes in the top of the
seatback. The notches on the
posts must face the driver side
of the vehicle.
2. Push the head restraint down.
3. Try to move the head restraint
to make sure that it is locked in
place. Replacing LATCH System
Parts After a Crash
{ WarningA crash can damage the LATCH
system in the vehicle. A damaged
LATCH system may not properly
secure the child restraint,
resulting in serious injury or even
death in a crash. To help make
sure the LATCH system is
working properly after a crash,
see your dealer to have the
system inspected and any
necessary replacements made as
soon as possible.
If the vehicle has the LATCH system
and it was being used during a
crash, new LATCH system parts
may be needed.
New parts and repairs may be
necessary even if the LATCH
system was not being used at the
time of the crash.
Page 92 of 381

Buick Enclave Owner Manual (GMNA-Localizing-U.S./Canada/Mexico-
13527524) - 2020 - CRC - 4/10/19
Seats and Restraints 91
Securing Child Restraints
(With the Seat Belt in the
Rear Seat) The vehicle is equipped with a front
center airbag in the inboard side of
the driver seat. Even with a front
center airbag, a child restraint can
be installed in any second row
seating position. If you install a child
restraint in a second row center
seat, move the second row seat to
the rearward position, whenever
possible, to minimize contact with
the front center airbag.
When securing a child restraint with
the seat belts in a rear seat position,
study the instructions that came with
the child restraint to make sure it is
compatible with this vehicle.
If the child restraint has the LATCH
system, see Lower Anchors and
Tethers for Children (LATCH
System) 0 81 for how and where to
install the child restraint using
LATCH. If a child restraint is
secured in the vehicle using a seat belt and it uses a top tether, see
Lower Anchors and Tethers for
Children (LATCH System) 0 81 for
top tether anchor locations.
Do not secure a child seat in a
position without a top tether anchor
if a national or local law requires
that the top tether be anchored, or if
the instructions that come with the
child restraint say that the top tether
must be anchored.
In Canada, the law requires that
forward-facing child restraints have
a top tether, and that the tether be
attached.
If the child restraint or vehicle seat
position does not have the LATCH
system, you will be using the seat
belt to secure the child restraint.
Be sure to follow the instructions
that came with the child restraint.
If more than one child restraint
needs to be installed in the rear
seat, be sure to read Where to Put
the Restraint 0 80 .
1. Put the child restraint on
the seat. If the head restraint interferes
with the proper installation of
the child restraint, the head
restraint may be removed. See
"Head Restraint Removal and
Reinstallation" under Lower
Anchors and Tethers for
Children (LATCH System).
2. Pick up the latch plate, and run
the lap and shoulder portions
of the vehicle seat belt through
or around the child restraint.
The child restraint instructions
will show you how.
3. Push the latch plate into the
buckle until it clicks.
Page 93 of 381

Buick Enclave Owner Manual (GMNA-Localizing-U.S./Canada/Mexico-
13527524) - 2020 - CRC - 4/10/19
92 Seats and Restraints Position the release button on
the buckle, away from the child
restraint, so that the seat belt
could be quickly unbuckled if
necessary.
4. Pull the shoulder belt all the
way out of the retractor to set
the lock. When the retractor
lock is set, the belt can be
tightened but not pulled out of
the retractor. 5. To tighten the belt, push down
on the child restraint, pull the
shoulder portion of the belt to
tighten the lap portion of the
belt, and feed the shoulder belt
back into the retractor. When
installing a forward-facing child
restraint, it may be helpful to
use your knee to push down on
the child restraint as you
tighten the belt.
Try to pull the belt out of the
retractor to make sure the
retractor is locked. If the
retractor is not locked, repeat
Steps 4 and 5. 6. If the child restraint has a top
tether, follow the child restraint
manufacturer's instructions
regarding the use of the top
tether. See Lower Anchors and
Tethers for Children (LATCH
System) 0 81 .
7. Before placing a child in the
child restraint, make sure it is
securely held in place. To
check, grasp the child restraint
at the seat belt path and
attempt to move it side to side
and back and forth. When the
child restraint is properly
installed, there should be no
more than 2.5 cm (1 in) of
movement.
To remove the child restraint,
unbuckle the vehicle seat belt and
let it return to the stowed position.
If the top tether is attached to a top
tether anchor, disconnect it.
If the head restraint was removed,
reinstall it before the seating
position is used. See "Head
Restraint Removal and
Page 96 of 381

Buick Enclave Owner Manual (GMNA-Localizing-U.S./Canada/Mexico-
13527524) - 2020 - CRC - 4/10/19
Seats and Restraints 95
5. Pull the shoulder belt all the
way out of the retractor to set
the lock. When the retractor
lock is set, the belt can be
tightened but not pulled out of
the retractor. 6. To tighten the belt, push down
on the child restraint, pull the
shoulder portion of the belt to
tighten the lap portion of the
belt, and feed the shoulder belt
back into the retractor. When
installing a forward-facing child
restraint, it may be helpful to
use your knee to push down on
the child restraint as you
tighten the belt.
Try to pull the belt out of the
retractor to make sure the
retractor is locked. If the
retractor is not locked, repeat
Steps 5 and 6. 7. Before placing a child in the
child restraint, make sure it is
securely held in place. To
check, grasp the child restraint
at the seat belt path and
attempt to move it side to side
and back and forth. When the
child restraint is properly
installed, there should be no
more than 2.5 cm (1 in) of
movement.
If the airbag is off, the OFF indicator
in the passenger airbag status
indicator will come on and stay on
when the vehicle is started.
If a child restraint has been installed
and the ON indicator is lit, see “ If
the On Indicator Is Lit for a Child
Restraint ” under Passenger Sensing
System 0 68 .
To remove the child restraint,
unbuckle the vehicle seat belt and
let it return to the stowed position.
Page 139 of 381

Buick Enclave Owner Manual (GMNA-Localizing-U.S./Canada/Mexico-
13527524) - 2020 - CRC - 4/10/19
138 Instruments and Controls Auto Cooled Seats
This setting automatically turns on
and regulates the ventilated seats
when the cabin temperature is
warm. See Heated and Ventilated
Front Seats 0 46 .
Touch Off or On.
Auto Heated Seats
This setting automatically turns on
and regulates the heated seats
when the cabin temperature is cool.
The auto heated seats can be
turned off by using the heated seat
buttons on the center stack. See
Heated and Ventilated Front Seats
0 46 .
If equipped with Auto Heated
Steering Wheel, this feature will turn
on when the Auto Heated Seats
turn on.
Touch Off or On.
Auto Defog
This setting automatically turns the
front defogger on when the engine
is started.
Touch Off or On. Auto Rear Defog
This setting automatically turns the
rear defogger on when the engine is
started.
Touch Off or On.
Ionizer
If equipped and on, this feature
helps to clean the air inside the
vehicle and remove contaminants
such as pollen, odors, and dust.
See Dual Automatic Climate Control
System 0 156 .
Touch Off or On.
Collision / Detection Systems Touch and the following may
display:
.
Alert Type
.
Forward Collision System
.
Front Pedestrian Detection
.
Rear Cross Traffic Alert
.
Adaptive Cruise Go Notifier
.
Lane Change Alert Alert Type
This setting specifies the type of
vehicle feedback provided, either a
beep or seat vibration, when you
are in danger of colliding with an
object.
Touch Beeps or Safety Alert Seat.
Forward Collision System
This setting controls the vehicle
response when detecting a vehicle
ahead of you. The Off setting
disables all FCA and AEB functions.
With the Alert and Brake setting,
both FCA and AEB are available.
The Alert setting disables AEB. See
Automatic Emergency Braking
(AEB) 0 223 .
Touch Off, Alert, or Alert and Brake.
Front Pedestrian Detection
This feature may help avoid or
reduce the harm caused by
front-end crashes with nearby
pedestrians.
See Front Pedestrian Braking (FPB)
System 0 224 .
Select Off, Alert, or Alert and Brake.
Page 280 of 381

Buick Enclave Owner Manual (GMNA-Localizing-U.S./Canada/Mexico-
13527524) - 2020 - CRC - 4/10/19
Vehicle Care 279The trim panel is removed by prying
along the top edge of the trim panel
at two notched locations. Remove
the trim panel to access the fuse
block.
To remove a fuse, use the fuse
puller in the engine compartment
fuse block.
The fuse block label is on the back
of the access door in the driver side
rear trim panel.
Fuses Usage
F1 –
F2 Trailer Fuses Usage
F3 Folding seats
F4 Rear blower