Rear end BUICK ENCORE 2018 Owner's Guide
[x] Cancel search | Manufacturer: BUICK, Model Year: 2018, Model line: ENCORE, Model: BUICK ENCORE 2018Pages: 330, PDF Size: 4.99 MB
Page 185 of 330
Buick Encore Owner Manual (GMNA-Localizing-U.S./Canada/Mexico-
11354409) - 2018 - crc - 11/8/17
184 Driving and Operating
The speedometer reading can be
displayed in either English or metric
units.
SeeDriver Information Center (DIC)
(Uplevel) 0125 orDriver Information
Center (DIC) (Base Level) 0123.
The increment value used depends
on the units displayed.
Passing Another Vehicle While
Using Cruise Control
Use the accelerator pedal to
increase the vehicle speed. When
you take your foot off the pedal, the
vehicle slows down to the previous
set cruise control speed. While
pressing the accelerator pedal or
shortly following the release to
override cruise control, briefly
moving the thumbwheel toward
SET/− will result in cruise set to the
current vehicle speed.
Using Cruise Control on Hills
How well cruise control works on
hills depends on the vehicle speed,
load, and the steepness of the hills.
When going up steep hills, you
might have to step on the
accelerator pedal to maintain the vehicle speed. When going
downhill, you might have to brake or
shift to a lower gear to keep your
speed down. If the brake pedal is
applied, cruise control will
disengage.
Ending Cruise Control
There are four ways to end cruise
control:
.
To disengage cruise control,
step lightly on the brake pedal.
. Press
n.
. Shift the transmission to
N (Neutral).
. To turn off cruise control,
press
o.
Erasing Speed Memory
The cruise control set speed is
erased from memory if
ois
pressed or if the vehicle is
turned off.
Driver Assistance
Systems
Rear Vision
Camera (RVC)
The RVC can assist the driver when
backing up by displaying a view of
the area behind the vehicle.
{Warning
The camera(s) do not display
children, pedestrians, bicyclists,
crossing traffic, animals, or any
other object outside of the
cameras’ field of view, below the
bumper, or under the vehicle.
Shown distances may be different
from actual distances. Do not
drive or park the vehicle using
only these camera(s). Always
check behind and around the
vehicle before driving. Failure to
use proper care may result in
injury, death, or vehicle damage.
Page 186 of 330
Buick Encore Owner Manual (GMNA-Localizing-U.S./Canada/Mexico-
11354409) - 2018 - crc - 11/8/17
Driving and Operating 185
An image appears on the
infotainment display when the
vehicle is shifted into R (Reverse).
The previous screen displays when
the vehicle is shifted out of
R (Reverse) after a short delay. To
return to the previous screen
sooner, press any button on the
infotainment display, shift into
P (Park), or reach a vehicle speed
of approximately 12 km/h (8 mph).
Symbols and Guidelines
The RVC may have a guideline
overlay that can help the driver align
the vehicle when backing into a
parking spot. Select the guidance
lines button on the camera screen
to enable or disable the guidance
lines, or seeVehicle Personalization
0 128.
The RVC system may have a
feature that lets the driver view
parking assist symbols on the
infotainment screen while using the
RVC. The Rear Parking Assist
(RPA) system must not be disabled
to use the caution symbols. The
error message Rear Parking Assist
Symbols Unavailable may display if RPA has been disabled and the
symbols have been turned on. See
Parking Assist
0186.
Rear Cross Traffic Alert (RCTA)
On vehicles with the RCTA, a
warning triangle with a left or right
pointing arrow may appear on the
infotainment display to warn of
traffic coming from the left or the
right. Three beeps will sound from
the speaker on that side. This
system detects objects coming from
up to 20 m (65 ft) from the left or
right side behind the vehicle. The
RCTA system will not work properly
if ice, snow, mud, or anything else
builds up on the rear bumper
sensors.Rear Vision Camera Location
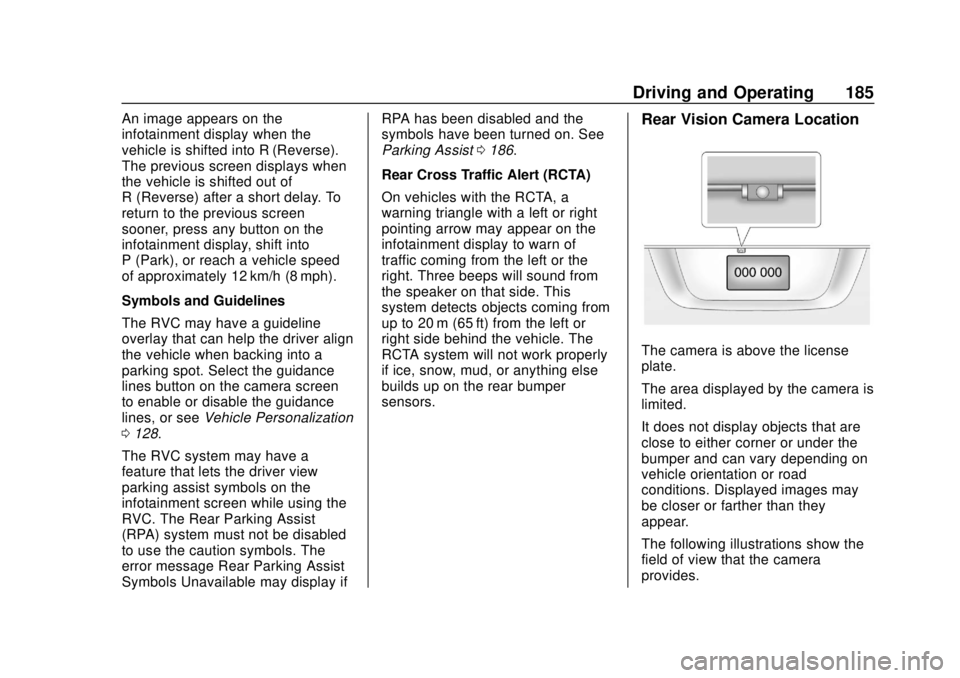
The camera is above the license
plate.
The area displayed by the camera is
limited.
It does not display objects that are
close to either corner or under the
bumper and can vary depending on
vehicle orientation or road
conditions. Displayed images may
be closer or farther than they
appear.
The following illustrations show the
field of view that the camera
provides.
Page 192 of 330

Buick Encore Owner Manual (GMNA-Localizing-U.S./Canada/Mexico-
11354409) - 2018 - crc - 11/8/17
Driving and Operating 191
unsafe to change lanes. Before
making a lane change, check the
SBZA display, check mirrors, glance
over your shoulder, and use the turn
signals.
Left Side MirrorDisplayRight Side Mirror Display
When the vehicle is started, both
outside mirror SBZA displays will
briefly come on to indicate the
system is operating. When the
vehicle is in a forward gear, the left-
or right-side mirror display will light
up if a moving vehicle is detected in
that blind zone. If the turn signal is
activated in the same direction of a
detected vehicle, this display will
flash as an extra warning not to
change lanes.
SBZA can be disabled through
vehicle personalization. See
“Collision/Detection Systems” under
Vehicle Personalization 0128. If SBZA is disabled by the driver,
the SBZA mirror displays will not
light up.
When the System Does Not
Seem to Work Properly
SBZA displays may not come on
when passing a vehicle quickly or
for a stopped vehicle. SBZA may
alert to objects attached to the
vehicle, such as a bicycle, or object
extending out to either side of the
vehicle. This is normal system
operation; the vehicle does not need
service.
SBZA may not always alert the
driver to vehicles in the side blind
zone, especially in wet conditions.
The system does not need to be
serviced. The system may light up
due to guardrails, signs, trees,
shrubs, and other non-moving
objects. This is normal system
operation; the vehicle does not need
service.
SBZA may not operate when the
SBZA sensors in the left or right
corners of the rear bumper are
covered with mud, dirt, snow, ice,
or slush, or in heavy rainstorms. For
cleaning instructions, see "Washing
the Vehicle" under
Exterior Care
0 267. If the DIC still displays the
system unavailable message after
cleaning both sides of the vehicle
toward the rear corners of the
vehicle, see your dealer.
If the SBZA displays do not light up
when vehicles are in the blind zone
and the system is clean, the system
may need service. Take the vehicle
to your dealer.
When SBZA is disabled for any
reason other than the driver turning
it off, the Side Blind Zone Alert On
option will not be available on the
personalization menu.
Radio Frequency Information
See Radio Frequency Statement
0 302.
Page 193 of 330

Buick Encore Owner Manual (GMNA-Localizing-U.S./Canada/Mexico-
11354409) - 2018 - crc - 11/8/17
192 Driving and Operating
Lane Departure
Warning (LDW)
If equipped, LDW may help avoid
crashes due to unintentional lane
departures. It may provide an alert if
the vehicle is crossing a lane
without using a turn signal in that
direction. LDW uses a camera
sensor to detect the lane markings
at speeds of 56 km/h (35 mph) or
greater.
{Warning
The LDW system does not steer
the vehicle. The LDW system
may not:. Provide enough time to
avoid a crash.
. Detect lane markings under
poor weather or visibility
conditions. This can occur if
the windshield or
headlamps are blocked by
dirt, snow, or ice; if they are
(Continued)
Warning (Continued)
not in proper condition; or if
the sun shines directly into
the camera.
. Detect road edges.
. Detect lanes on winding or
hilly roads.
If LDW only detects lane
markings on one side of the road,
it will only warn you when
departing the lane on the side
where it has detected a lane
marking. Always keep your
attention on the road and
maintain proper vehicle position
within the lane, or vehicle
damage, injury, or death could
occur. Always keep the
windshield, headlamps, and
camera sensors clean and in
good repair. Do not use LDW in
bad weather conditions.
How the System Works
The LDW camera sensor is on the
windshield ahead of the rearview
mirror.
To turn LDW on and off, press
@on
the center stack, forward of the shift
lever. The control indicator will light
when LDW is on.
When LDW is on,@is green if
LDW is available to warn of a lane
departure. If the vehicle crosses a
detected lane marking without using
the turn signal in that direction,
@
changes to amber and flashes.
Additionally, there will be three
beeps on the right or left, depending
on the lane departure direction.
Page 196 of 330

Buick Encore Owner Manual (GMNA-Localizing-U.S./Canada/Mexico-
11354409) - 2018 - crc - 11/8/17
Driving and Operating 195
Warning (Continued)
.Do not leave the fuel pump
unattended.
. Do not use a cell phone
while refueling.
. Do not reenter the vehicle
while pumping fuel.
. Keep children away from
the fuel pump and never let
children pump fuel.
. Fuel can spray out if the
refueling nozzle is inserted
too quickly. This spray can
happen if the tank is nearly
full, and is more likely in hot
weather. Insert the refueling
nozzle slowly and wait for
any hiss noise to stop prior
to beginning to flow fuel.
The fuel door is on the passenger
rear side of the vehicle. If equipped,
the fuel door is locked when the
vehicle doors are locked. Press
K
on the RKE transmitter to unlock.
To open the fuel door, push and
release the rearward center edge of
the door.
The vehicle has a capless refueling
system and does not have a fuel
cap. The filling nozzle must be fully
inserted and latched prior to starting
fuel flow.
{Warning
Overfilling the fuel tank by more
than three clicks of a standard fill
nozzle may cause:
. Vehicle performance issues,
including engine stalling and
damage to the fuel system.
. Fuel spills.
. Potential fuel fires.
Be careful not to spill fuel. Wait a
few seconds after you have finished
pumping before removing the
nozzle. Clean fuel from painted
surfaces as soon as possible. See
Exterior Care 0267.
{Warning
If a fire starts while you are
refueling, do not remove the
nozzle. Shut off the flow of fuel by
shutting off the pump or by
notifying the station attendant.
Leave the area immediately.
Page 242 of 330
Buick Encore Owner Manual (GMNA-Localizing-U.S./Canada/Mexico-
11354409) - 2018 - crc - 11/8/17
Vehicle Care 241
Number (TIN), an alphanumeric
designator which can also
identify the tire manufacturer,
production plant, brand, and
date of production.
GVWR
:Gross Vehicle Weight
Rating. See Vehicle Load Limits
0 162.
GAWR FRT
:Gross Axle Weight
Rating for the front axle. See
Vehicle Load Limits 0162.
GAWR RR
:Gross Axle Weight
Rating for the rear axle. See
Vehicle Load Limits 0162.
Intended Outboard Sidewall
:
The side of an asymmetrical tire
that must always face outward
when mounted on a vehicle.
Kilopascal (kPa)
:The metric
unit for air pressure.
Light Truck (LT-Metric) Tire
:A
tire used on light duty trucks and
some multipurpose passenger
vehicles. Load Index
:An assigned
number ranging from 1 to 279
that corresponds to the load
carrying capacity of a tire.
Maximum Inflation Pressure
:
The maximum air pressure to
which a cold tire can be inflated.
The maximum air pressure is
molded onto the sidewall.
Maximum Load Rating
:The
load rating for a tire at the
maximum permissible inflation
pressure for that tire.
Maximum Loaded Vehicle
Weight
:The sum of curb
weight, accessory weight,
vehicle capacity weight, and
production options weight.
Normal Occupant Weight
:The
number of occupants a vehicle
is designed to seat multiplied by
68 kg (150 lb). See Vehicle Load
Limits 0162.
Occupant Distribution
:
Designated seating positions. Outward Facing Sidewall
:The
side of an asymmetrical tire that
has a particular side that faces
outward when mounted on a
vehicle. The side of the tire that
contains a whitewall, bears
white lettering, or bears
manufacturer, brand, and/or
model name molding that is
higher or deeper than the same
moldings on the other sidewall
of the tire.
Passenger (P-Metric) Tire
:A
tire used on passenger cars and
some light duty trucks and
multipurpose vehicles.
Recommended Inflation
Pressure
:Vehicle
manufacturer's recommended
tire inflation pressure as shown
on the tire placard.
See Tire Pressure 0242 and
Vehicle Load Limits 0162.
Page 248 of 330
Buick Encore Owner Manual (GMNA-Localizing-U.S./Canada/Mexico-
11354409) - 2018 - crc - 11/8/17
Vehicle Care 247
relearn tool, in the following order:
driver side front tire, passenger side
front tire, passenger side rear tire,
and driver side rear. See your
dealer for service or to purchase a
relearn tool. A TPMS relearn tool
can also be purchased. See Tire
Pressure Monitor Sensor Activation
Tool at
www.gmtoolsandequipment.com or
call 1-800-GM TOOLS
(1-800-468-6657).
There are two minutes to match the
first tire/wheel position, and
five minutes overall to match all four
tire/wheel positions. If it takes
longer, the matching process stops
and must be restarted.
The TPMS sensor matching
process is:1. Set the parking brake.
2. Place the vehicle in Service Mode. See Ignition Positions
0 166.
3. Use the MENU button to select the Vehicle Information Menu
(Menu 2) in the Driver
Information Center (DIC). 4. Use the thumbwheel (or up and
down arrows) to scroll to the
Tire Pressure Menu Item
screen.
5. Press and hold the SET/CLR button to begin the sensor
matching process.
A message requesting
acceptance of the process may
display.
6. If requested, press the SET/ CLR button again to confirm
the selection.
The horn sounds twice to
signal the receiver is in relearn
mode and the TIRE LEARN or
TIRE LEARNING ACTIVE
message displays on the DIC
screen.
7. Start with the driver side front tire.
8. Place the relearn tool against the tire sidewall, near the valve
stem. Then press the button to
activate the TPMS sensor.
A horn chirp confirms that the sensor identification code has
been matched to this tire and
wheel position.
9. Proceed to the passenger side front tire, and repeat the
procedure in Step 8.
10. Proceed to the passenger side rear tire, and repeat the
procedure in Step 8.
11. Proceed to the driver side rear tire, and repeat the procedure
in Step 8. The horn sounds two
times to indicate the sensor
identification code has been
matched to the driver side rear
tire, and the TPMS sensor
matching process is no longer
active. The TIRE LEARN or
TIRE LEARNING ACTIVE
message on the DIC display
screen goes off.
12. Turn the vehicle off.
13. Set all four tires to the recommended air pressure
level as indicated on the Tire
and Loading Information label.
Page 249 of 330
Buick Encore Owner Manual (GMNA-Localizing-U.S./Canada/Mexico-
11354409) - 2018 - crc - 11/8/17
248 Vehicle Care
Tire Inspection
We recommend that the tires,
including the spare tire, if the
vehicle has one, be inspected
for signs of wear or damage at
least once a month.
Replace the tire if:
.The indicators at three or
more places around the tire
can be seen.
.There is cord or fabric
showing through the tire's
rubber.
.The tread or sidewall is
cracked, cut, or snagged
deep enough to show cord or
fabric.
.The tire has a bump, bulge,
or split.
.The tire has a puncture, cut,
or other damage that cannot
be repaired well because of
the size or location of the
damage.
Tire Rotation
Tires should be rotated every
12 000 km (7,500 mi). See
Maintenance Schedule0278.
Tires are rotated to achieve a
more uniform wear for all tires.
The first rotation is the most
important.
Anytime unusual wear is
noticed, rotate the tires as soon
as possible, check for proper tire
inflation pressure, and check for
damaged tires or wheels. If the
unusual wear continues after the
rotation, check the wheel
alignment.
See When It Is Time for New
Tires 0249 andWheel
Replacement 0253.
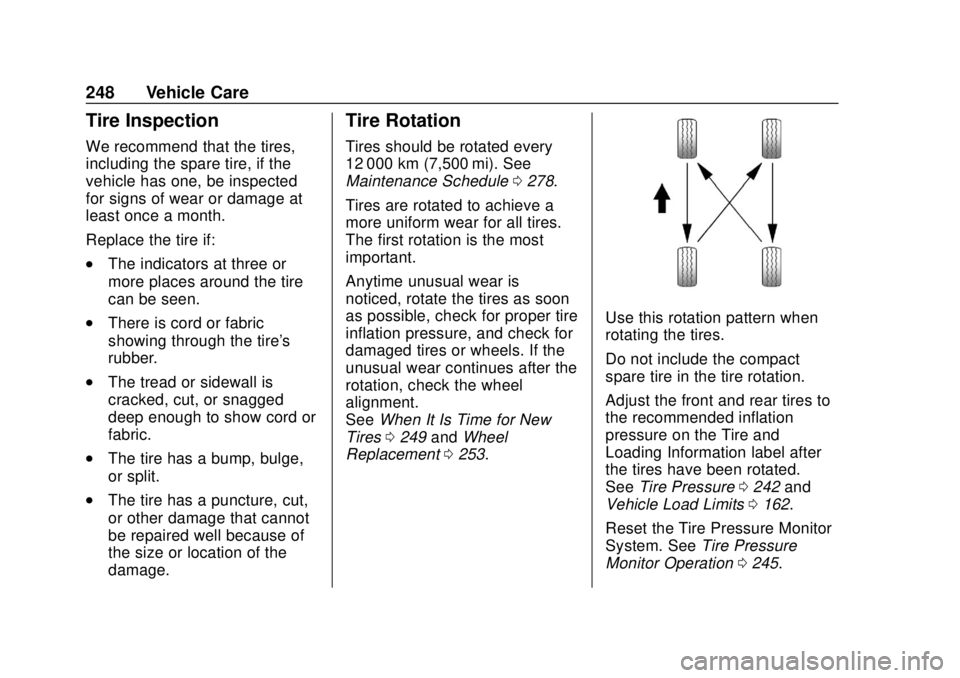
Use this rotation pattern when
rotating the tires.
Do not include the compact
spare tire in the tire rotation.
Adjust the front and rear tires to
the recommended inflation
pressure on the Tire and
Loading Information label after
the tires have been rotated.
See Tire Pressure 0242 and
Vehicle Load Limits 0162.
Reset the Tire Pressure Monitor
System. See Tire Pressure
Monitor Operation 0245.
Page 251 of 330

Buick Encore Owner Manual (GMNA-Localizing-U.S./Canada/Mexico-
11354409) - 2018 - crc - 11/8/17
250 Vehicle Care
of grease, gasoline, or other
substances that can deteriorate
rubber.
Parking for an extended period can
cause flat spots on the tires that
may result in vibrations while
driving. When storing a vehicle for
at least a month, remove the tires or
raise the vehicle to reduce the
weight from the tires.
Buying New Tires
GM has developed and matched
specific tires for the vehicle. The
original equipment tires installed
were designed to meet General
Motors Tire Performance Criteria
Specification (TPC Spec)
system rating. When
replacement tires are needed,
GM strongly recommends
buying tires with the same TPC
Spec rating.
GM's exclusive TPC Spec
system considers over a dozen
critical specifications that impact
the overall performance of thevehicle, including brake system
performance, ride and handling,
traction control, and tire
pressure monitoring
performance. GM's TPC Spec
number is molded onto the tire's
sidewall near the tire size. If the
tires have an all-season tread
design, the TPC Spec number
will be followed by MS for mud
and snow. See
Tire Sidewall
Labeling 0237.
GM recommends replacing worn
tires in complete sets of four.
Uniform tread depth on all tires
will help to maintain the
performance of the vehicle.
Braking and handling
performance may be adversely
affected if all the tires are not
replaced at the same time.
If proper rotation and
maintenance have been done,
all four tires should wear out at
about the same time. See Tire
Rotation 0248. However, if it is necessary to replace only one
axle set of worn tires, place the
new tires on the rear axle.
Winter tires with the same speed
rating as the original equipment
tires may not be available for H,
V, W, Y and ZR speed rated
tires. Never exceed the winter
tires’
maximum speed capability
when using winter tires with a
lower speed rating.{Warning
Tires could explode during
improper service. Attempting
to mount or dismount a tire
could cause injury or death.
Only your dealer or authorized
tire service center should
mount or dismount the tires.
Page 260 of 330

Buick Encore Owner Manual (GMNA-Localizing-U.S./Canada/Mexico-
11354409) - 2018 - crc - 11/8/17
Vehicle Care 259
Caution
Improperly tightened wheel nuts
can lead to brake pulsation and
rotor damage. To avoid expensive
brake repairs, evenly tighten the
wheel nuts in the proper
sequence and to the proper
torque specification. See
Capacities and Specifications
0290 for the wheel nut torque
specification.
13. Tighten the wheel nuts firmly with the wheel wrench in a
crisscross sequence, as
shown.
Caution
Wheel covers will not fit on the
vehicle's compact spare. If you try
to put a wheel cover on the
compact spare, the cover or the
spare could be damaged.
Storing a Flat or Spare Tire
and Tools
{Warning
Storing a jack, a tire, or other
equipment in the passenger
compartment of the vehicle could
cause injury. In a sudden stop or
collision, loose equipment could
strike someone. Store all these in
the proper place. Storing the Flat Tire and Tools
1. Return the jack and tools to their original storage location.
2. Replace the trim cover.
3. Place the flat tire, lying flat, in the rear storage compartment.
4. Attach one end of the strap to a cargo tie-down in the rear of
the vehicle.
5. Route the strap through the
wheel, as shown.
6. Attach the other end of the strap to the other cargo
tie-down in the rear of the
vehicle.
7. Tighten the strap.