ignition BUICK ENCORE GX 2020 Workshop Manual
[x] Cancel search | Manufacturer: BUICK, Model Year: 2020, Model line: ENCORE GX, Model: BUICK ENCORE GX 2020Pages: 442, PDF Size: 11.64 MB
Page 321 of 442
Buick Encore GX Owner Manual (GMNA-Localizing-U.S./Canada/Mexico-
14018934) - 2020 - CRC - 2/27/20
320 Vehicle Care
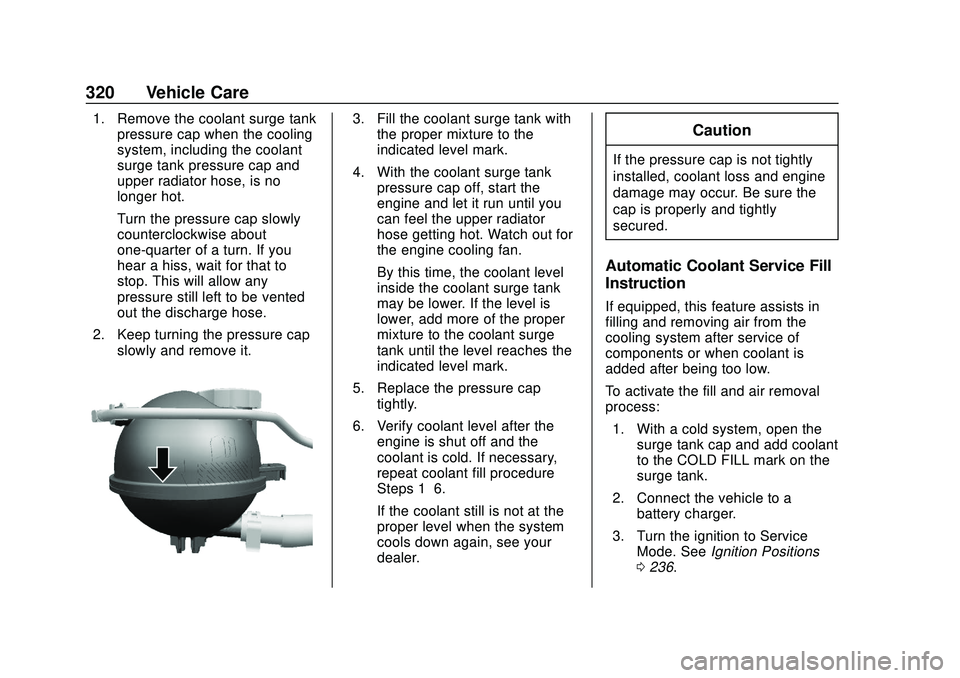
1. Remove the coolant surge tankpressure cap when the cooling
system, including the coolant
surge tank pressure cap and
upper radiator hose, is no
longer hot.
Turn the pressure cap slowly
counterclockwise about
one-quarter of a turn. If you
hear a hiss, wait for that to
stop. This will allow any
pressure still left to be vented
out the discharge hose.
2. Keep turning the pressure cap slowly and remove it.3. Fill the coolant surge tank withthe proper mixture to the
indicated level mark.
4. With the coolant surge tank pressure cap off, start the
engine and let it run until you
can feel the upper radiator
hose getting hot. Watch out for
the engine cooling fan.
By this time, the coolant level
inside the coolant surge tank
may be lower. If the level is
lower, add more of the proper
mixture to the coolant surge
tank until the level reaches the
indicated level mark.
5. Replace the pressure cap tightly.
6. Verify coolant level after the engine is shut off and the
coolant is cold. If necessary,
repeat coolant fill procedure
Steps 1–6.
If the coolant still is not at the
proper level when the system
cools down again, see your
dealer.Caution
If the pressure cap is not tightly
installed, coolant loss and engine
damage may occur. Be sure the
cap is properly and tightly
secured.
Automatic Coolant Service Fill
Instruction
If equipped, this feature assists in
filling and removing air from the
cooling system after service of
components or when coolant is
added after being too low.
To activate the fill and air removal
process:
1. With a cold system, open the surge tank cap and add coolant
to the COLD FILL mark on the
surge tank.
2. Connect the vehicle to a battery charger.
3. Turn the ignition to Service Mode. See Ignition Positions
0 236.
Page 322 of 442
Buick Encore GX Owner Manual (GMNA-Localizing-U.S./Canada/Mexico-
14018934) - 2020 - CRC - 2/27/20
Vehicle Care 321
4. Turn off the air conditioning.
5. Set the parking brake.
6. At the same time, press theaccelerator and the brake for
two seconds, then release.
At the end of the cycle, check the
coolant level in the surge tank and
add coolant if it is low. Turn off the
vehicle, allow the Engine Control
Module (ECM) to go to sleep, about
two minutes, and repeat Steps 3-7.
Listen for pump activation and
movement of the control valves
while watching the level of the
coolant in the surge tank. If the tank
empties, turn the ignition off,
carefully remove the surge tank cap,
refill to the COLD FILL mark, and
repeat Steps 4-7. The fill and air
removal process will run for
approximately 10 minutes.
Engine Overheating
The vehicle has an engine coolant
temperature gauge to warn of the
engine overheating. See Engine
Coolant Temperature Gauge 0112. If the decision is made not to lift the
hood when this warning appears,
get service help right away. See
Roadside Assistance Program
0
410.
If the decision is made to lift the
hood, make sure the vehicle is
parked on a level surface.
Then check to see if the engine
cooling fan is running. If the engine
is overheating, the fan should be
running. If it is not, do not continue
to run the engine. Have the vehicle
serviced.
Caution
Do not run the engine if there is a
leak in the engine cooling system.
This can cause a loss of all
coolant and can damage the
system and vehicle. Have any
leaks fixed right away.
If Steam Is Coming from the
Engine Compartment
{Warning
Steam and scalding liquids from a
hot cooling system are under
pressure. Turning the pressure
cap, even a little, can cause them
to come out at high speed and
you could be burned. Never turn
the cap when the cooling system,
including the pressure cap, is hot.
Wait for the cooling system and
pressure cap to cool.
If No Steam Is Coming from
the Engine Compartment
If an engine overheat warning is
displayed but no steam can be seen
or heard, the problem may not be
too serious. Sometimes the engine
can get a little too hot when the
vehicle:
. Climbs a long hill on a hot day
. Stops after high-speed driving
Page 325 of 442

Buick Encore GX Owner Manual (GMNA-Localizing-U.S./Canada/Mexico-
14018934) - 2020 - CRC - 2/27/20
324 Vehicle Care
Brake Pad Life System
When to Change Brake Pads
If equipped, this system estimates
the remaining life of the front and
rear brake pads. Brake pad life is
displayed in the Driver Information
Center (DIC), along with
a percentage for each axle. The
system must be reset every time the
brake pads are changed.
When the system has determined
that the brake pads need to be
replaced, a message will display.
Brake pads should always be
replaced as complete axle sets.
How to Reset the Brake Pad
Life System
When the ignition is turned on after
new pads and wear sensors are
installed, a message will display.
Follow the prompts to reset the
system.The brake pad life system can also
be manually reset:
1. Display Brake Pad Life on the DIC. See Driver Information
Center (DIC) (Base Level)
0 123 or
Driver Information Center (DIC)
(Uplevel) 0127.
2. Press and hold
lor the
thumbwheel. Select front or
rear pads as appropriate.
3. Select YES on the confirmation message. Repeat for pads on
the other axle if they were also
replaced.
How to Disable the Brake Pad
Life System
The brake pad life system can be
turned off. This may be necessary if
aftermarket brake pads without wear
sensors are installed. When the
system is turned off, the front and
rear brake pad life percentages will
not display. However, the built-in
wear indicators that make a
high-pitched warning sound when the brake pads are worn can still
determine when the pads should be
replaced. See
Brakes0323.
To turn off the brake pad life system: 1. Display Brake Pad Life on the DIC. See Driver Information
Center (DIC) (Base Level)
0 123 or
Driver Information Center (DIC)
(Uplevel) 0127.
2. Select DISABLE
To turn the brake pad life system
back on, follow the above steps but
select ENABLE in Step 2.
Brake Fluid
The brake master cylinder reservoir
is filled with GM approved DOT 4
brake fluid as indicated on the
Page 327 of 442
Buick Encore GX Owner Manual (GMNA-Localizing-U.S./Canada/Mexico-
14018934) - 2020 - CRC - 2/27/20
326 Vehicle Care
Battery - North America
The original equipment battery is
maintenance free. Do not remove
the cap and do not add fluid.
Refer to the replacement number
shown on the original battery label
when a new battery is needed. For
replacement of the battery, see your
dealer.
Stop/Start System
The vehicle has a Stop/Start system
to shut off the engine to help
conserve fuel. SeeStop/Start
System 0239. It has an Absorbed
Glass Mat (AGM) 12–volt battery.
Installation of a standard 12–volt
battery will result in reduced 12–volt
battery life.
When using a 12–volt battery
charger on the 12–volt AGM battery,
some chargers have an ACM
battery setting on the charger.
If available, use the AGM setting on
the charger, to limit charge voltage
to 14.8 volts.
{Warning
WARNING: Battery posts,
terminals, and related
accessories contain lead and lead
compounds, chemicals known to
the State of California to cause
cancer and birth defects or other
reproductive harm. Batteries also
contain other chemicals known to
the State of California to cause
cancer. WASH HANDS AFTER
HANDLING. For more information
go to www.P65Warnings.ca.gov/
passenger-vehicle.
See California Proposition
65 Warning 0304 and the back
cover.
Vehicle Storage
{Warning
Batteries have acid that can burn
you and gas that can explode.
You can be badly hurt if you are
(Continued)
Warning (Continued)
not careful. SeeJump Starting -
North America 0372 for tips on
working around a battery without
getting hurt.
Infrequent Usage: Remove the
black, negative (−) cable from the
battery to keep the battery from
running down.
Extended Storage: Remove the
black, negative (−) cable from the
battery or use a battery trickle
charger.
Negative Battery Cable
Disconnection
{Warning
Before disconnecting the negative
battery cable, turn off all features,
turn the ignition off, and remove
the key, if equipped, from the
vehicle. If this is not done, you or
others could be injured, and the
vehicle could be damaged.
Page 328 of 442

Buick Encore GX Owner Manual (GMNA-Localizing-U.S./Canada/Mexico-
14018934) - 2020 - CRC - 2/27/20
Vehicle Care 327
Caution
If the battery is disconnected with
the ignition on or the vehicle in
Retained Accessory Power
(RAP), the OnStar back-up
battery will be permanently
discharged and will need to be
replaced.
1. Make sure the lamps, features, and accessories are turned off.
2. Turn the ignition off and remove the key, if equipped.
3. Loosen the negative batterycable nut (1).
4. Remove the negative battery cable (2) from the battery.
Negative Battery Cable
Reconnection
Caution
When reconnecting the battery:. Use the original nut from the
vehicle to secure the
negative battery cable. Do
not use a different nut.
If you need a replacement
nut, see your dealer.
. Tighten the nut with a hand
tool. Do not use an impact
wrench or power tools to
tighten the nut.
The vehicle could be damaged if
these guidelines are not followed.
Caution
Do not use paints, lubricants,
or corrosion inhibitors on the nut
that secures the negative battery
cable to the vehicle. This could
damage the vehicle.
1. Install the negative battery cable (2) to the battery.
2. Install the negative battery cable nut (1) and tighten.
3. Turn the ignition on.
All-Wheel Drive
Transfer Case
Under normal driving conditions,
transfer case fluid does not require
maintenance unless there is a fluid
leak or unusual noise. If required,
have the transfer case serviced by
your dealer.
Page 329 of 442

Buick Encore GX Owner Manual (GMNA-Localizing-U.S./Canada/Mexico-
14018934) - 2020 - CRC - 2/27/20
328 Vehicle Care
Automatic Transmission
Shift Lock Control
Function Check
{Warning
When you are doing this
inspection, the vehicle could
move suddenly. If the vehicle
moves, you or others could be
injured.
1. Before starting this check, be sure there is enough room
around the vehicle. It should be
parked on a level surface.
2. Apply the parking brake. Be ready to apply the regular
brake immediately if the vehicle
begins to move.
3. With the engine off, turn the ignition on, but do not start the
engine. Without applying the
regular brake, try to move the
shift lever out of P (Park) with
normal effort. If the shift lever
moves out of P (Park), contact
your dealer for service.
Park Brake and P (Park)
Mechanism Check
{Warning
When you are doing this check,
the vehicle could begin to move.
You or others could be injured
and property could be damaged.
Make sure there is room in front
of the vehicle in case it begins to
roll. Be ready to apply the regular
brake at once should the vehicle
begin to move.
Park on a fairly steep hill, with the
vehicle facing downhill. Keeping
your foot on the regular brake, set
the parking brake.
. To check the parking brake's
holding ability: With the engine
running and the transmission in
N (Neutral), slowly remove foot
pressure from the regular brake
pedal. Do this until the vehicle is
held by the parking brake only. .
To check the P (Park)
mechanism's holding ability:
With the engine running, shift to
P (Park). Then release the
parking brake followed by the
regular brake.
Contact your dealer if service is
required.
Wiper Blade Replacement
Windshield wiper blades should be
replaced periodically. See
Maintenance Schedule 0390.
Replacement blades come in
different types and are removed in
different ways. For proper type and
length, see Maintenance
Replacement Parts 0400.
Caution
Allowing the wiper arm to touch
the windshield when no wiper
blade is installed could damage
the windshield. Any damage that
occurs would not be covered by
(Continued)
Page 355 of 442

Buick Encore GX Owner Manual (GMNA-Localizing-U.S./Canada/Mexico-
14018934) - 2020 - CRC - 2/27/20
354 Vehicle Care
When a low tire pressure condition
is detected, the TPMS illuminates
the low tire pressure warning light
located on the instrument cluster.
If the warning light comes on, stop
as soon as possible and inflate the
tires to the recommended pressure
shown on the Tire and Loading
Information label. SeeVehicle Load
Limits 0232.
A message to check the pressure in
a specific tire may display in the
Driver Information Center (DIC). The
low tire pressure warning light and
the DIC warning message,
if equipped, come on at each
ignition cycle until the tires are
inflated to the correct inflation
pressure. Using the DIC, it may be
possible to view the tire pressure
levels. For additional information
and details about the DIC operation and displays, see
Driver Information
Center (DIC) (Base Level) 0123 or
Driver Information Center (DIC)
(Uplevel) 0127.
The low tire pressure warning light
may come on in cool weather when
the vehicle is first started, and then
turn off as the vehicle is driven. This
could be an early indicator that the
air pressure is getting low and
needs to be inflated to the proper
pressure.
A Tire and Loading Information label
shows the size of the original
equipment tires and the correct
inflation pressure for the tires when
they are cold. See Vehicle Load
Limits 0232, for an example of the
Tire and Loading Information label
and its location. Also see Tire
Pressure 0351.
The TPMS can warn about a low
tire pressure condition, but it does
not replace normal tire
maintenance. See Tire Inspection
0 357, Tire Rotation 0358, and
Tires 0344.
Caution
Tire sealant materials are not all
the same. A non-approved tire
sealant could damage the TPMS
sensors. TPMS sensor damage
caused by using an incorrect tire
sealant is not covered by the
vehicle warranty. Always use only
the GM approved tire sealant
available through your dealer or
included in the vehicle.
TPMS Malfunction Light and
Message
The TPMS will not function properly
if one or more of the TPMS sensors
are missing or inoperable. When the
system detects a malfunction, the
low tire pressure warning light,
defined above, flashes for about
one minute and then stays on for
the remainder of the ignition cycle.
A DIC warning message may also
display. The malfunction light and
DIC warning message, if equipped,
come on at each ignition cycle until
Page 357 of 442

Buick Encore GX Owner Manual (GMNA-Localizing-U.S./Canada/Mexico-
14018934) - 2020 - CRC - 2/27/20
356 Vehicle Care
{Warning
Overinflating a tire could cause
the tire to rupture and you or
others could be injured. Do not
exceed the maximum pressure
listed on the tire sidewall.
SeeTire Sidewall Labeling 0346
and Vehicle Load Limits 0232.
If the tire is overinflated by more
than 35 kPa (5 psi), the horn will
sound multiple times and the turn
signal lamp will continue to flash for
several seconds after filling stops.
To release and correct the pressure,
while the turn signal lamp is still
flashing, briefly press the center of
the valve stem. When the
recommended pressure is reached,
the horn sounds once.
If the turn signal lamp does not flash
within 15 seconds after starting to
inflate the tire, the tire fill alert has
not been activated or is not working. If the hazard warning flashers are
on, the tire fill alert visual feedback
will not work properly.
The TPMS will not activate the tire
fill alert properly under the following
conditions:
.
There is interference from an
external device or transmitter.
. The air pressure from the
inflation device is not sufficient
to inflate the tire.
. There is a malfunction in
the TPMS.
. There is a malfunction in the
horn or turn signal lamps.
. The identification code of the
TPMS sensor is not registered to
the system.
. The battery of the TPMS sensor
is low.
If the tire fill alert does not operate
due to TPMS interference, move the
vehicle about 1 m (3 ft) back or
forward and try again. If the tire fill
alert feature is not working, use a
tire pressure gauge.
TPMS Sensor Matching
Process
Each TPMS sensor has a unique
identification code. The identification
code needs to be matched to a new
tire/wheel position after rotating the
vehicle’s tires or replacing one or
more of the TPMS sensors. Also,
the TPMS sensor matching process
should be performed after replacing
a spare tire with a road tire
containing the TPMS sensor. The
malfunction light and the DIC
message, if equipped, should go off
at the next ignition cycle. The
sensors are matched to the tire/
wheel positions, using a TPMS
relearn tool, in the following order:
driver side front tire, passenger side
front tire, passenger side rear tire,
and driver side rear. See your
dealer for service or to purchase a
relearn tool. A TPMS relearn tool
can also be purchased. See
Tire Pressure Monitor Sensor
Activation Tool at
www.gmtoolsandequipment.com or
call 1-800-GM TOOLS
(1-800-468-6657).
Page 358 of 442
Buick Encore GX Owner Manual (GMNA-Localizing-U.S./Canada/Mexico-
14018934) - 2020 - CRC - 2/27/20
Vehicle Care 357
There are two minutes to match the
first tire/wheel position, and
five minutes overall to match all four
tire/wheel positions. If it takes
longer, the matching process stops
and must be restarted.
The TPMS sensor matching
process is:1. Set the parking brake.
2. Turn the ignition on without starting the vehicle or place the
vehicle in Service Mode. See
Ignition Positions 0236.
3. Use SELECT or
o/pto select
the Vehicle in the Base Level
Driver Information Center
(DIC). Or Use SELECT
or
o/pto select the Info page
in the Uplevel Driver
Information Center (DIC).
4. Use the thumbwheel to scroll to the Tire Pressure Learn Menu
Item (Base DIC) or the Tire
Pressure Menu Item screen
(Uplevel DIC). 5. Press and hold
lor the
thumbwheel to begin the
sensor matching process.
A message requesting
acceptance of the process may
display.
6. If requested, press
lor the
thumbwheel again to confirm
the selection. The horn sounds
twice to signal the receiver is in
relearn mode and the TIRE
LEARN or TIRE LEARNING
ACTIVE message displays on
the DIC screen.
7. Start with the driver side front tire.
8. Place the relearn tool against the tire sidewall, near the valve
stem. Then press the button to
activate the TPMS sensor.
A horn chirp confirms that the
sensor identification code has
been matched to this tire and
wheel position.
9. Proceed to the passenger side front tire, and repeat the
procedure in Step 8. 10. Proceed to the passenger side
rear tire, and repeat the
procedure in Step 8.
11. Proceed to the driver side rear tire, and repeat the procedure
in Step 8. The horn sounds two
times to indicate the sensor
identification code has been
matched to the driver side rear
tire, and the TPMS sensor
matching process is no longer
active. The TIRE LEARN or
TIRE LEARNING ACTIVE
message on the DIC display
screen goes off.
12. Turn the vehicle off.
13. Set all four tires to the recommended air pressure
level as indicated on the Tire
and Loading Information label.
Tire Inspection
We recommend that the tires,
including the spare tire, if the
vehicle has one, be inspected
for signs of wear or damage at
least once a month.
Page 374 of 442
Buick Encore GX Owner Manual (GMNA-Localizing-U.S./Canada/Mexico-
14018934) - 2020 - CRC - 2/27/20
Vehicle Care 373
3. Good Battery Negative (-)Terminal
4. Good Battery Positive (+) Terminal
The jump start negative grounding
point (1) for the discharged battery
is the engine block or an engine
mounting bolt. Connect to a spot as
far away from the discharged
battery as possible.
The jump start positive terminal (2)
on the discharged battery is in the
engine compartment on the driver
side of the vehicle.
The jump start negative terminal (3)
and positive terminal (4) are on the
battery of the vehicle providing the
jump start.
The positive jump start connection
for the discharged battery is under a
trim cover. Open the cover to
expose the terminal.
1. Check the other vehicle. It must have a 12-volt battery
with a negative ground system.
Caution
If the other vehicle does not have
a 12-volt system with a negative
ground, both vehicles can be
damaged. Only use a vehicle that
has a 12-volt system with a
negative ground for jump starting.
2. Position the two vehicles so that they are not touching.
3. Set the parking brake firmly and put the shift lever in
P (Park) with an automatic
transmission, or Neutral with a
manual transmission.
Caution
If any accessories are left on or
plugged in during the jump
starting procedure, they could be
damaged. The repairs would not
be covered by the vehicle
warranty. Whenever possible, turn
off or unplug all accessories on
either vehicle when jump starting. 4. Turn the ignition off. Turn off all
lights and accessories in both
vehicles, except the hazard
warning flashers if needed.
{Warning
An electric fan can start up even
when the engine is not running
and can injure you. Keep hands,
clothing, and tools away from any
underhood electric fan.
{Warning
Using a match near a battery can
cause battery gas to explode.
People have been hurt doing this,
and some have been blinded.
Use a flashlight if you need more
light.
Battery fluid contains acid that
can burn you. Do not get it on
you. If you accidentally get it in
your eyes or on your skin, flush
the place with water and get
medical help immediately.