FLUID BUICK ENCORE GX 2022 User Guide
[x] Cancel search | Manufacturer: BUICK, Model Year: 2022, Model line: ENCORE GX, Model: BUICK ENCORE GX 2022Pages: 376, PDF Size: 17.43 MB
Page 261 of 376
Buick Encore GX Owner Manual (GMNA-Localizing-U.S./Canada/Mexico-
15481080) - 2022 - CRC - 6/1/21
260 Vehicle Care
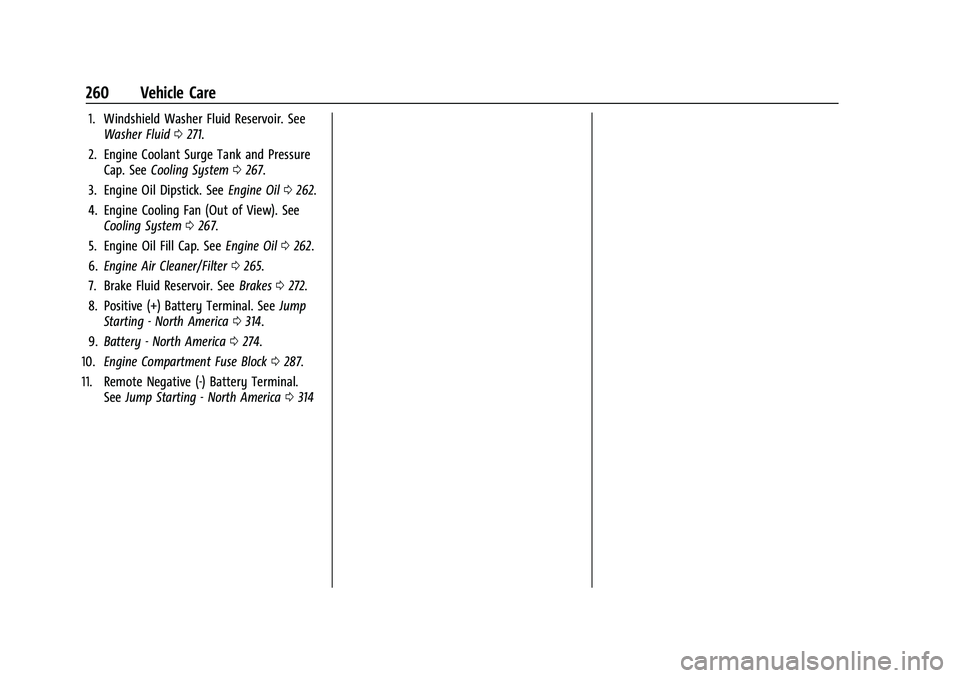
1. Windshield Washer Fluid Reservoir. SeeWasher Fluid 0271.
2. Engine Coolant Surge Tank and Pressure Cap. See Cooling System 0267.
3. Engine Oil Dipstick. See Engine Oil0262.
4. Engine Cooling Fan (Out of View). See Cooling System 0267.
5. Engine Oil Fill Cap. See Engine Oil0262.
6. Engine Air Cleaner/Filter 0265.
7. Brake Fluid Reservoir. See Brakes0272.
8. Positive (+) Battery Terminal. See Jump
Starting - North America 0314.
9. Battery - North America 0274.
10. Engine Compartment Fuse Block 0287.
11. Remote Negative (-) Battery Terminal. SeeJump Starting - North America 0314
Page 263 of 376
Buick Encore GX Owner Manual (GMNA-Localizing-U.S./Canada/Mexico-
15481080) - 2022 - CRC - 6/1/21
262 Vehicle Care
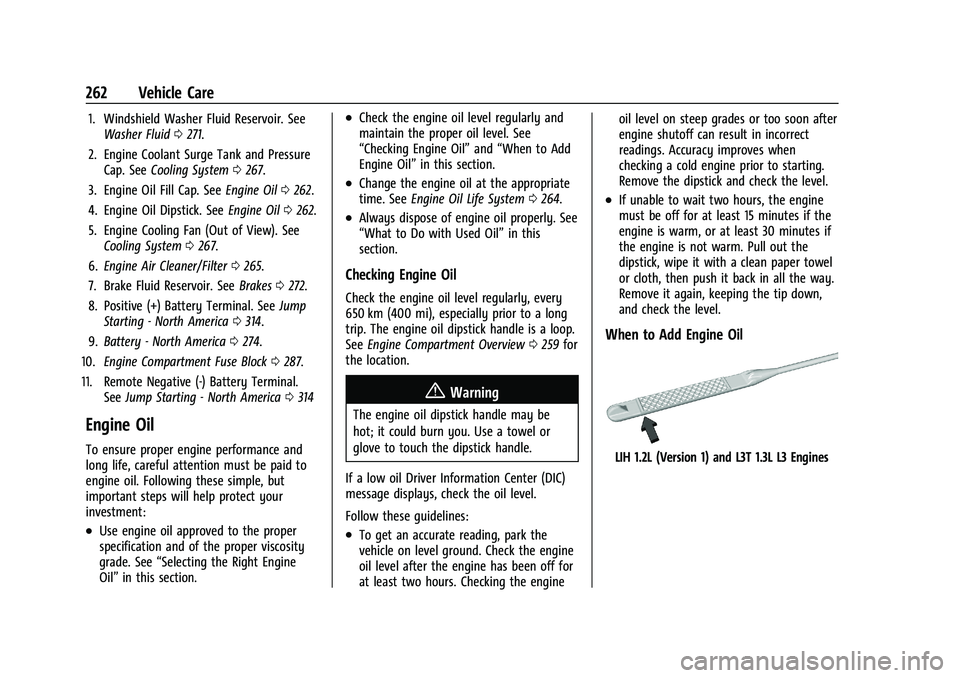
1. Windshield Washer Fluid Reservoir. SeeWasher Fluid 0271.
2. Engine Coolant Surge Tank and Pressure Cap. See Cooling System 0267.
3. Engine Oil Fill Cap. See Engine Oil0262.
4. Engine Oil Dipstick. See Engine Oil0262.
5. Engine Cooling Fan (Out of View). See Cooling System 0267.
6. Engine Air Cleaner/Filter 0265.
7. Brake Fluid Reservoir. See Brakes0272.
8. Positive (+) Battery Terminal. See Jump
Starting - North America 0314.
9. Battery - North America 0274.
10. Engine Compartment Fuse Block 0287.
11. Remote Negative (-) Battery Terminal. SeeJump Starting - North America 0314
Engine Oil
To ensure proper engine performance and
long life, careful attention must be paid to
engine oil. Following these simple, but
important steps will help protect your
investment:
.Use engine oil approved to the proper
specification and of the proper viscosity
grade. See “Selecting the Right Engine
Oil” in this section.
.Check the engine oil level regularly and
maintain the proper oil level. See
“Checking Engine Oil” and“When to Add
Engine Oil” in this section.
.Change the engine oil at the appropriate
time. SeeEngine Oil Life System 0264.
.Always dispose of engine oil properly. See
“What to Do with Used Oil” in this
section.
Checking Engine Oil
Check the engine oil level regularly, every
650 km (400 mi), especially prior to a long
trip. The engine oil dipstick handle is a loop.
See Engine Compartment Overview 0259 for
the location.
{Warning
The engine oil dipstick handle may be
hot; it could burn you. Use a towel or
glove to touch the dipstick handle.
If a low oil Driver Information Center (DIC)
message displays, check the oil level.
Follow these guidelines:
.To get an accurate reading, park the
vehicle on level ground. Check the engine
oil level after the engine has been off for
at least two hours. Checking the engine oil level on steep grades or too soon after
engine shutoff can result in incorrect
readings. Accuracy improves when
checking a cold engine prior to starting.
Remove the dipstick and check the level.
.If unable to wait two hours, the engine
must be off for at least 15 minutes if the
engine is warm, or at least 30 minutes if
the engine is not warm. Pull out the
dipstick, wipe it with a clean paper towel
or cloth, then push it back in all the way.
Remove it again, keeping the tip down,
and check the level.
When to Add Engine Oil
LIH 1.2L (Version 1) and L3T 1.3L L3 Engines
Page 264 of 376
Buick Encore GX Owner Manual (GMNA-Localizing-U.S./Canada/Mexico-
15481080) - 2022 - CRC - 6/1/21
Vehicle Care 263
LIH 1.2L (Version 2) L3 Engine
If the oil is below the cross-hatched area at
the tip of the dipstick and the engine has
been off for at least 15 minutes, add 1 L
(1 qt) of the recommended oil and then
recheck the level. See “Selecting the Right
Engine Oil” later in this section for an
explanation of what kind of oil to use. For
engine oil crankcase capacity, see Capacities
and Specifications 0342.
Caution
Do not add too much oil. Oil levels above
or below the acceptable operating range
shown on the dipstick are harmful to the
engine. If you find that you have an oil
level above the operating range, i.e., the
engine has so much oil that the oil level
gets above the MAX mark, the engine
could be damaged. You should drain out
(Continued)
Caution (Continued)
the excess oil or limit driving of the
vehicle and seek a service professional to
remove the excess amount of oil.
See Engine Compartment Overview 0259 for
the location of the engine oil fill cap.
Add enough oil to put the level somewhere
in the proper operating range between the
MIN and MAX marks. Push the dipstick all
the way back in when through.
Selecting the Right Engine Oil
Selecting the right engine oil depends on
both the proper oil specification and
viscosity grade. See Recommended Fluids
and Lubricants 0337.
Specification
Use full synthetic engine oils that meet the
dexos1 specification.
Engine oils that have been approved by GM
as meeting the dexos1 specification are
marked with the dexos1 approved logo. See
www.gmdexos.com.
Caution
Failure to use the recommended engine
oil or equivalent can result in engine
damage not covered by the vehicle
warranty.
Viscosity Grade
Use SAE 0W-20 viscosity grade engine oil for
1.3L L3 engine.
Use SAE 5W-30 viscosity grade engine oil for
1.2L L3 engine. Cold Temperature Operation:
In an area of extreme cold, where the
temperature falls below −29 °C (−20 °F), an
SAE 0W-30 oil may be used for the 1.2L L3
engine. An oil of this viscosity grade will
provide easier cold starting for the engine at
extremely low temperatures.
When selecting an oil of the appropriate
viscosity grade, it is recommended to select
an oil of the correct specification. See
“Specification” earlier in this section.
Page 266 of 376
Buick Encore GX Owner Manual (GMNA-Localizing-U.S./Canada/Mexico-
15481080) - 2022 - CRC - 6/1/21
Vehicle Care 265
Automatic Transmission Fluid
How to Check Automatic Transmission
Fluid
It is not necessary to check the transmission
fluid level. A transmission fluid leak is the
only reason for fluid loss. If a leak occurs,
take the vehicle to your dealer and have it
repaired as soon as possible.
There is a special procedure for checking and
changing the transmission fluid. Because this
procedure is difficult, you should have this
done at your dealer.
Change the fluid at the intervals listed in
Maintenance Schedule0329, and be sure to
use the fluid listed in Recommended Fluids
and Lubricants 0337.
Engine Air Filter Life System
If equipped, this feature provides the engine
air filter’s remaining life and best timing for
a change. The timing to change an engine
air filter depends on driving and
environmental conditions.
When to Change the Engine Air Filter
When the Driver Information Center (DIC)
displays a message to replace the engine air
filter at the next oil change, follow this
timing.
When the DIC displays a message to replace
the engine air filter soon, replace the engine
air filter at the earliest convenience.
The system must be reset after the engine
air filter is changed.
If the DIC displays a message to check the
engine air filter system, see your dealer.
How to Reset the Engine Air Filter Life
System
To reset:
1. Place the vehicle in P (Park).
2. Select Engine Air Filter Life on the DIC menu. See Driver Information Center
(DIC) (Base Level) 0107 or
Driver Information Center (DIC) (Uplevel)
0 109.
3. Press
lor the thumbwheel to move to
the Reset/Disable display area. Select
Reset then press
lor press the
thumbwheel. Then press Yes to confirm
the reset. 4. 100% AIR FILTER LIFE will be displayed
when the Engine Air Filter Life System is
successfully reset.
Engine Air Cleaner/Filter
The engine air cleaner/filter is in the engine
compartment on the passenger side of the
vehicle. See Engine Compartment Overview
0 259.
When to Inspect the Engine Air Cleaner/
Filter
If the vehicle is not equipped with the
engine air filter life system, see
Maintenance Schedule 0329 for intervals on
inspecting and replacing the engine air
cleaner/filter.
How to Inspect the Engine Air Cleaner/
Filter
Do not start the engine or have the engine
running with the engine air cleaner/filter
housing open. Before removing the engine
air cleaner/filter, make sure that the engine
air cleaner/filter housing and nearby
components are free of dirt and debris. Do
not clean the engine air cleaner/filter with
water or compressed air.
Page 272 of 376

Buick Encore GX Owner Manual (GMNA-Localizing-U.S./Canada/Mexico-
15481080) - 2022 - CRC - 6/1/21
Vehicle Care 271
If the decision is made to lift the hood,
make sure the vehicle is parked on a level
surface.
Then check to see if the engine cooling fan
is running. If the engine is overheating, the
fan should be running. If it is not, do not
continue to run the engine. Have the vehicle
serviced.
Caution
Do not run the engine if there is a leak
in the engine cooling system. This can
cause a loss of all coolant and can
damage the system and vehicle. Have
any leaks fixed right away.
If Steam Is Coming from the Engine
Compartment
{Warning
Steam and scalding liquids from a hot
cooling system are under pressure.
Turning the pressure cap, even a little,
can cause them to come out at high
speed and you could be burned. Never
turn the cap when the cooling system,(Continued)
Warning (Continued)
including the pressure cap, is hot. Wait
for the cooling system and pressure cap
to cool.
If No Steam Is Coming from the Engine
Compartment
If an engine overheat warning is displayed
but no steam can be seen or heard, the
problem may not be too serious. Sometimes
the engine can get a little too hot when the
vehicle:
.Climbs a long hill on a hot day
.Stops after high-speed driving
If the overheat warning is displayed with no
sign of steam: 1. Turn the air conditioning off.
2. Turn the heater on to the highest temperature and to the highest fan
speed. Open the windows as necessary.
3. When it is safe to do so, pull off the road, shift to P (Park) or N (Neutral), and
let the engine idle.
If the engine coolant temperature gauge is
no longer in the overheat zone, the vehicle
can be driven. Continue to drive the vehicle slowly for about 10 minutes. Keep a safe
vehicle distance from the vehicle in front.
If the warning does not come back on,
continue to drive normally and have the
cooling system checked for proper fill and
function.
If the warning continues, pull over, stop, and
park the vehicle right away.
If there is no sign of steam, idle the engine
for three minutes while parked. If the
warning is still displayed, turn off the
engine until it cools down.
Washer Fluid
What to Use
When the vehicle needs windshield washer
fluid, be sure to read the manufacturer's
instructions before use. If operating the
vehicle in an area where the temperature
may fall below freezing, use a fluid that has
sufficient protection against freezing.
Page 273 of 376
Buick Encore GX Owner Manual (GMNA-Localizing-U.S./Canada/Mexico-
15481080) - 2022 - CRC - 6/1/21
272 Vehicle Care
Adding Washer Fluid
Open the cap with the washer symbol on it.
Add washer fluid until the tank is full. See
Engine Compartment Overview0259 for
reservoir location.
Caution
.Do not use washer fluid that contains
any type of water repellent coating.
This can cause the wiper blades to
chatter or skip, and may also clog the
washer nozzle.
.Do not use engine coolant (antifreeze)
in the windshield washer. It can
damage the windshield washer system
and paint.
.Do not mix water with ready-to-use
washer fluid. Water can cause the
solution to freeze and damage the
washer fluid tank and other parts of
the washer system.
(Continued)
Caution (Continued)
.When using concentrated washer fluid,
follow the manufacturer instructions
for adding water.
.Fill the washer fluid tank only
three-quarters full when it is very cold.
This allows for fluid expansion if
freezing occurs, which could damage
the tank if it is completely full.
Brakes
Disc brake linings have built-in wear
indicators that make a high-pitched warning
sound when the brake linings are worn and
new linings are needed. The sound can come
and go or can be heard all the time when
the vehicle is moving, except when applying
the brake pedal firmly.
{Warning
The brake wear warning sound means
that soon the brakes will not work well.
That could lead to a crash. When the
brake wear warning sound is heard, have
the vehicle serviced.
Caution
Continuing to drive with worn-out brake
linings could result in costly brake
repairs.
Some driving conditions or climates can
cause a brake squeal when the brakes are
first applied, clearing up following several
applications. This does not mean something
is wrong with the brakes.
Properly torqued wheel nuts are necessary
to help prevent brake pulsation. When tires
are rotated, inspect brake linings for wear
and evenly tighten wheel nuts in the proper
sequence to torque specifications. See
Capacities and Specifications 0342.
Brake pads should be replaced as complete
axle sets.
Brake Pedal Travel
See your dealer if the brake pedal does not
return to normal height, or if there is a
rapid increase in pedal travel. This could be
a sign that brake service may be required.
Page 274 of 376
Buick Encore GX Owner Manual (GMNA-Localizing-U.S./Canada/Mexico-
15481080) - 2022 - CRC - 6/1/21
Vehicle Care 273
Replacing Brake System Parts
Always replace brake system parts with
new, approved replacement parts. If this is
not done, the brakes may not work
properly. The braking performance can
change in many ways if the wrong brake
parts are installed or if parts are improperly
installed.
Brake Pad Life System
When to Change Brake Pads
If equipped, this system estimates the
remaining life of the front and rear brake
pads. Brake pad life is displayed in the
Driver Information Center (DIC), along with
a percentage for each axle. The system must
be reset every time the brake pads are
changed.
When the system has determined that the
brake pads need to be replaced, a message
will display.
Brake pads should always be replaced as
complete axle sets.
How to Reset the Brake Pad Life System
When the ignition is turned on after new
pads and wear sensors are installed, a
message will display. Follow the prompts to
reset the system.
The brake pad life system can also be
manually reset:1. Display Brake Pad Life on the DIC. See Driver Information Center (DIC) (Base
Level) 0107 or
Driver Information Center (DIC) (Uplevel)
0 109.
2. Press and hold
lor the thumbwheel.
Select front or rear pads as appropriate.
3. Select YES on the confirmation message. Repeat for pads on the other axle if they
were also replaced.
How to Disable the Brake Pad Life
System
The brake pad life system can be turned off.
This may be necessary if aftermarket brake
pads without wear sensors are installed.
When the system is turned off, the front
and rear brake pad life percentages will not
display. However, the built-in wear
indicators that make a high-pitched warning sound when the brake pads are worn can
still determine when the pads should be
replaced. See
Brakes0272.
To turn off the brake pad life system: 1. Display Brake Pad Life on the DIC. See Driver Information Center (DIC) (Base
Level) 0107 or
Driver Information Center (DIC) (Uplevel)
0 109.
2. Select DISABLE
To turn the brake pad life system back on,
follow the above steps but select ENABLE in
Step 2.
Brake Fluid
The brake master cylinder reservoir is filled
with GM approved DOT 4 brake fluid as
indicated on the reservoir cap. See Engine
Compartment Overview 0259 for the
location of the reservoir.
Page 275 of 376

Buick Encore GX Owner Manual (GMNA-Localizing-U.S./Canada/Mexico-
15481080) - 2022 - CRC - 6/1/21
274 Vehicle Care
Checking Brake Fluid
With the vehicle in P (Park) on a level
surface, the brake fluid level should be
between the minimum and maximum marks
on the brake fluid reservoir.
There are only two reasons why the brake
fluid level in the reservoir may go down:
.Normal brake lining wear. When new
linings are installed, the fluid level goes
back up.
.A fluid leak in the brake hydraulic system.
Have the brake hydraulic system fixed.
With a leak, the brakes will not
work well.
Always clean the brake fluid reservoir cap
and the area around the cap before
removing it.
Do not top off the brake fluid. Adding fluid
does not correct a leak. If fluid is added
when the linings are worn, there will be too
much fluid when new brake linings are
installed. Add or remove fluid, as necessary,
only when work is done on the brake
hydraulic system.
{Warning
If too much brake fluid is added, it can
spill on the engine and burn, if the
engine is hot enough. You or others could
be burned, and the vehicle could be
damaged. Add brake fluid only when
work is done on the brake hydraulic
system.
When the brake fluid falls to a low level,
the brake warning light comes on. See Brake
System Warning Light 0101.
Brake fluid absorbs water over time which
degrades the effectiveness of the brake fluid.
Replace brake fluid at the specified intervals
to prevent increased stopping distance. See
Maintenance Schedule 0329.
What to Add
Use only GM approved DOT 4 brake fluid
from a clean, sealed container. See
Recommended Fluids and Lubricants 0337.
{Warning
The wrong or contaminated brake fluid
could result in damage to the brake
system. This could result in the loss of
(Continued)
Warning (Continued)
braking leading to a possible injury.
Always use the proper GM approved
brake fluid.
Caution
If brake fluid is spilled on the vehicle's
painted surfaces, the paint finish can be
damaged. Immediately wash off any
painted surface.
Battery - North America
The original equipment battery is
maintenance free. Do not remove the cap
and do not add fluid.
Refer to the replacement number shown on
the original battery label when a new
battery is needed. For replacement of the
battery, see your dealer.
Stop/Start System
The vehicle has a Stop/Start system to shut
off the engine to help conserve fuel. See
Stop/Start System0202. It has an Absorbed
Page 277 of 376

Buick Encore GX Owner Manual (GMNA-Localizing-U.S./Canada/Mexico-
15481080) - 2022 - CRC - 6/1/21
276 Vehicle Care
Negative Battery Cable ReconnectionCaution
When reconnecting the battery:
.Use the original nut from the vehicle
to secure the negative battery cable.
Do not use a different nut. If you
need a replacement nut, see your
dealer.
.Tighten the nut with a hand tool. Do
not use an impact wrench or power
tools to tighten the nut.
The vehicle could be damaged if these
guidelines are not followed.
Caution
Do not use paints, lubricants, or corrosion
inhibitors on the nut that secures the
negative battery cable to the vehicle. This
could damage the vehicle.
1. Install the negative battery cable (2) to the battery.
2. Install the negative battery cable nut (1) and tighten.
3. Turn the ignition on.
All-Wheel Drive
Transfer Case
Under normal driving conditions, transfer
case fluid does not require maintenance
unless there is a fluid leak or unusual noise.
If required, have the transfer case serviced
by your dealer.
Automatic Transmission Shift Lock
Control Function Check
{Warning
When you are doing this inspection, the
vehicle could move suddenly. If the
vehicle moves, you or others could be
injured.
1. Before starting this check, be sure there is enough room around the vehicle.
It should be parked on a level surface.
2. Apply the parking brake. Be ready to apply the regular brake immediately if
the vehicle begins to move.
3. With the engine off, turn the ignition on, but do not start the engine. Without
applying the regular brake, try to move
the shift lever out of P (Park) with normal effort. If the shift lever moves
out of P (Park), contact your dealer for
service.
Park Brake and P (Park)
Mechanism Check
{Warning
When you are doing this check, the
vehicle could begin to move. You or
others could be injured and property
could be damaged. Make sure there is
room in front of the vehicle in case it
begins to roll. Be ready to apply the
regular brake at once should the vehicle
begin to move.
Park on a fairly steep hill, with the vehicle
facing downhill. Keeping your foot on the
regular brake, set the parking brake.
.To check the parking brake's holding
ability: With the engine running and the
transmission in N (Neutral), slowly remove
foot pressure from the regular brake
pedal. Do this until the vehicle is held by
the parking brake only.
Page 316 of 376

Buick Encore GX Owner Manual (GMNA-Localizing-U.S./Canada/Mexico-
15481080) - 2022 - CRC - 6/1/21
Vehicle Care 315
The good battery negative (–) terminal and
good battery positive (+) terminal are on
the battery of the vehicle providing the
jump start.
The discharged battery positive (+) terminal
is under a trim cover. Open the cover to
expose the terminal.1. Check the other vehicle. It must have a 12-volt battery with a negative ground
system.
Caution
If the other vehicle does not have a
12-volt system with a negative ground,
both vehicles can be damaged. Only use
a vehicle that has a 12-volt system with a
negative ground for jump starting.
2. Position the two vehicles so that they are not touching.
3. Set the parking brake firmly and put the shift lever in P (Park) with an automatic
transmission, or Neutral with a manual
transmission.
Caution
If any accessories are left on or plugged
in during the jump starting procedure,
they could be damaged. The repairs
would not be covered by the vehicle
warranty. Whenever possible, turn off or
unplug all accessories on either vehicle
when jump starting.
4. Turn the ignition off. Turn off all lights and accessories in both vehicles, except
the hazard warning flashers if needed.
{Warning
An electric fan can start up even when
the engine is not running and can injure
you. Keep hands, clothing, and tools
away from any underhood electric fan.
{Warning
Using a match near a battery can cause
battery gas to explode. People have been
hurt doing this, and some have been
blinded. Use a flashlight if you need
more light.
(Continued)
Warning (Continued)
Battery fluid contains acid that can burn
you. Do not get it on you. If you
accidentally get it in your eyes or on
your skin, flush the place with water and
get medical help immediately.
{Warning
Fans or other moving engine parts can
injure you badly. Keep your hands away
from moving parts once the engine is
running.
5. Connect one end of the red positive (+) cable to the discharged battery
positive (+) terminal.
6. Connect the other end of the red positive (+) cable to the good battery
positive (+) terminal.
7. Connect one end of the black negative (–) cable to the good battery negative
(–) terminal.
8. Connect the other end of the black negative (–) cable to the discharged
battery negative (–) grounding point.